
 |
|
|
#226 |
|
Junior Member
Join Date: Jun 2006
Location: Frisco Tx
Posts: 311
|
Re: progress pics
What are the specs on the heads? I was looking at getting the summits. Looks killer!
|
|
|

|
|
|
#228 |
|
OG
Join Date: Sep 2007
Location: Orlando Florida
Posts: 146
|
Re: progress pics
Very Nice Engine! Hey I PMed you about a weeks ago you never returned the PM whatsup?
|
|
|

|
|
|
#229 | |
|
Senior Member
Join Date: May 2004
Location: johnstown, NY
Posts: 2,393
|
Re: progress pics
Quote:
sorry man. the bars are 32" center to center and the link brackets you were asking about I designed. I've been thinking about having some of those made. If your interested, let me know. |
|
|
|

|
|
|
#230 |
|
OG
Join Date: Sep 2007
Location: Orlando Florida
Posts: 146
|
Re: progress pics
Im very interested in those link brackets, let me know how much you would charge me to make some. I still need to measure my 4 link but that will be next week. Let me know!
|
|
|

|
|
|
#231 |
|
Senior Member
Join Date: May 2004
Location: johnstown, NY
Posts: 2,393
|
Re: progress pics
A little update...got a new cab(the last one, I promise) and a little something to go with it:
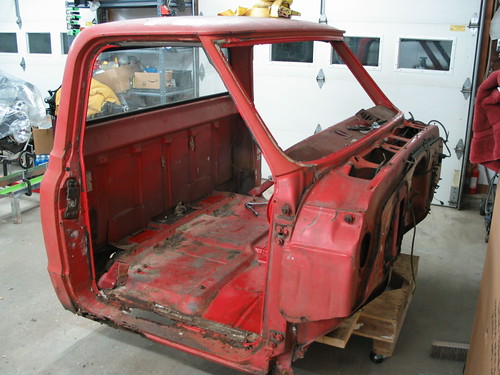 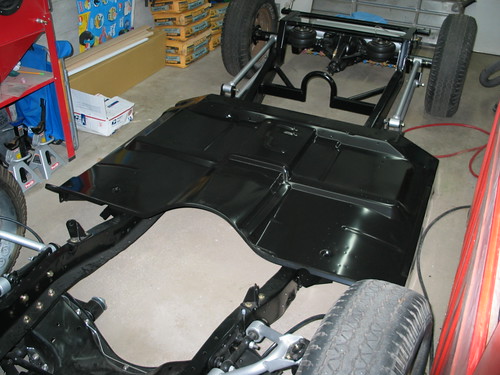 Its a 68 cab. I picked up the whole truck cheap. The real reason I wanted it was for the 67/68 style front clip! Always loved that style. The cab was an added bonus. Its not perfect, but it is better than the other two cabs I had. I started a separate thread on the floor install here. Last edited by jlaird; 10-19-2008 at 09:58 PM. |
|
|

|
|
|
#232 |
|
Registered User
Join Date: Jun 2007
Location: Saskatoon, Saskatchewan,:
Posts: 2,901
|
Re: progress pics
Lookin good, i have been debating on one of those floors.
__________________
James 1968 GMC "HAVOC" 1986 GMC "Frank" J.J.R.H. Design & Consulting My 68`Rebuild "HAVOC": http://67-72chevytrucks.com/vboard/s...d.php?t=316300 A 58' chev build thread: http://www.67-72chevytrucks.com/vboa...d.php?t=311238 1969 Camaro Pro Touring http://67-72chevytrucks.com/vboard/s...61#post3513361 Swiss Cheese: http://67-72chevytrucks.com/vboard/s...d.php?t=384390 Adjustable Trailing Arm How-To: http://67-72chevytrucks.com/vboard/s...d.php?t=321100 1968 Ford Farm Truck: http://67-72chevytrucks.com/vboard/s...=1#post6555587 |
|
|

|
|
|
#233 |
|
OG
Join Date: Sep 2007
Location: Orlando Florida
Posts: 146
|
Re: progress pics
Nice! Hey hit me up sometime was wondering if you where still down to making those 4 link brackets that you used on your truck give me a price.
As you can see my build slowed down I changed my approach a little bit and I think this time around the BAG on bar setup will be perfect. 
|
|
|

|
|
|
#234 |
|
OG
Join Date: Sep 2007
Location: Orlando Florida
Posts: 146
|
Re: progress pics
Any work yet on wether or not you can do those brackets for me and send me a price. THanks!
Sorry to be a bother...! |
|
|

|
|
|
#235 |
|
Senior Member
Join Date: May 2004
Location: johnstown, NY
Posts: 2,393
|
Re: progress pics
no problem, I will send you a PM.
|
|
|

|
|
|
#236 |
|
Registered User
Join Date: Jul 2006
Location: Central PA
Posts: 12,201
|
Re: progress pics
Cool, I just found your thread...
Nice looking cab for NY... That floor is pretty nice in the end, and easy to put in... I think if a guy is replacing mors than 3 or 4 pieces of his floor he is ahead to just do the onepiece... Does it also need other parts (kick panels, pillars etc?) I never put mine on the frame until I was done, fit perfectly...
__________________
The Garage: 1968 K-10 SWB - "Project Money Pit" 1996 Z-71 - "huntin rig" 1969 C-10 LWB (SOLD) "Project flip that truck or else" 1993 Passport, F@rd 1-ton (SOLD)"Project Cousin Eddie" My Garage Build "The 1,000 footer" |
|
|

|
|
|
#237 |
|
Registered User
Join Date: Jul 2007
Location: Fresno, Ca
Posts: 89
|
Re: progress pics
Updates??? Id be interested in a set of those 4 Link brackets as well, shoot me a PM.
|
|
|

|
|
|
#238 |
|
Registered User
Join Date: Aug 2008
Location: travis afb
Posts: 304
|
Re: progress pics
Sweet build. Keep up the good work and way to get low.
__________________
67 gmc 1/2 ton, 5.0 v6, 4 speed SOLD!! 70 Chevy C-10, 355, th400, 3.73's 2/4 drop |
|
|

|
|
|
#239 |
|
Registered User
Join Date: Nov 2001
Location: Concord, NC
Posts: 2,489
|
Re: progress pics
pic
|
|
|

|
|
|
#240 |
|
Registered User
Join Date: Sep 2007
Location: Tampa,Fl
Posts: 82
|
Re: progress pics
Really top notch work bro.Any hints on the finished paint scheme?
|
|
|

|
|
|
#241 |
|
Senior Member
Join Date: May 2004
Location: johnstown, NY
Posts: 2,393
|
Re: progress pics
|
|
|

|
|
|
#242 |
|
Registered User
Join Date: Aug 2006
Location: Dallas
Posts: 61
|
Re: progress pics
Nice work and I'm diggin that engine. BTW where did you get the blk filler neck?
__________________
04 Chevy X Cab 67 Chevy SWB (LuLu) 15 GMC Sierra Crew |
|
|

|
|
|
#243 |
|
Senior Member
Join Date: May 2004
Location: johnstown, NY
Posts: 2,393
|
Re: progress pics
|
|
|

|
|
|
#244 |
|
Argon User
Join Date: Oct 2008
Location: Qc, AZ
Posts: 353
|
Re: progress pics
Lookin good ... Like the motor looks clean
|
|
|

|
|
|
#245 |
|
Senior Member
Join Date: May 2004
Location: johnstown, NY
Posts: 2,393
|
Re: progress pics
got a chance today to get the truck out of the garage and snap some pics of where its at as of now.
OK, first, here is my dyno sheet: 371lbft of torque, 332 hp. 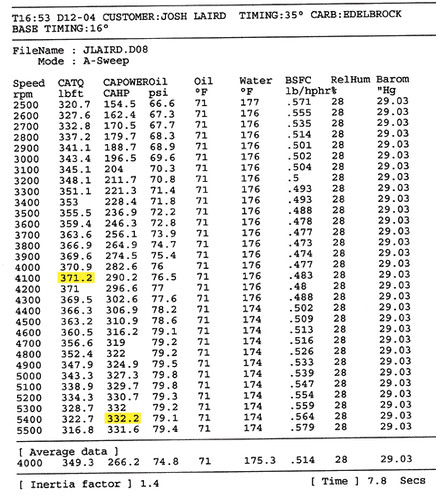 Engine and trans in. 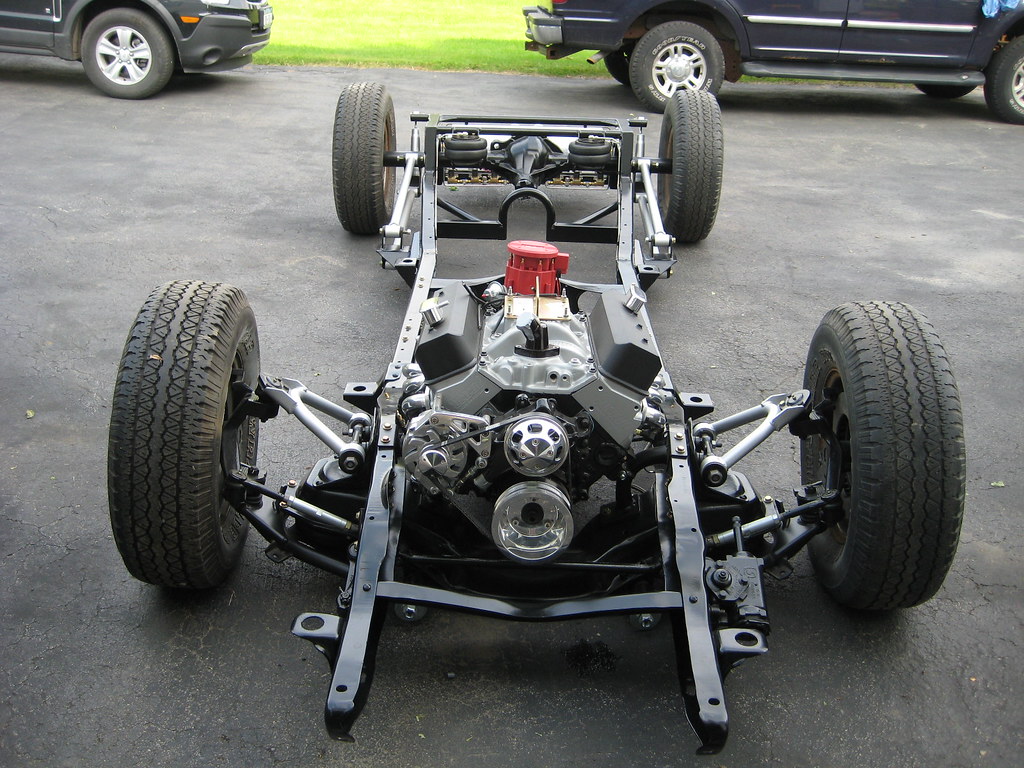  Close up of serpentine setup  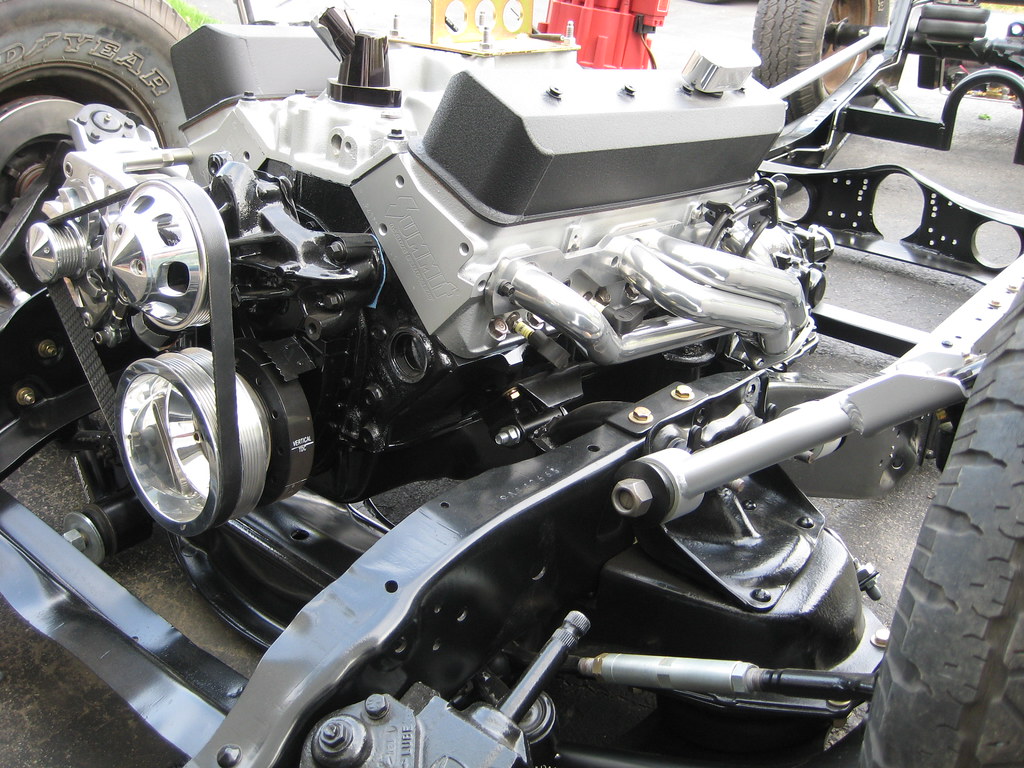 Headers are Sanderson. 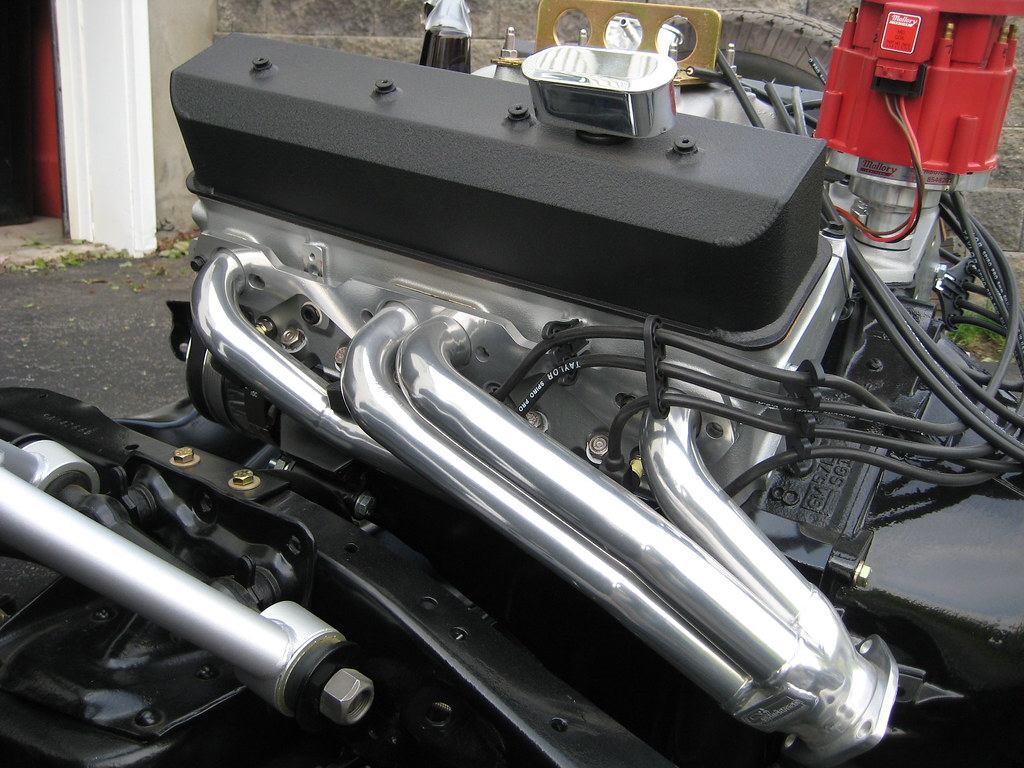 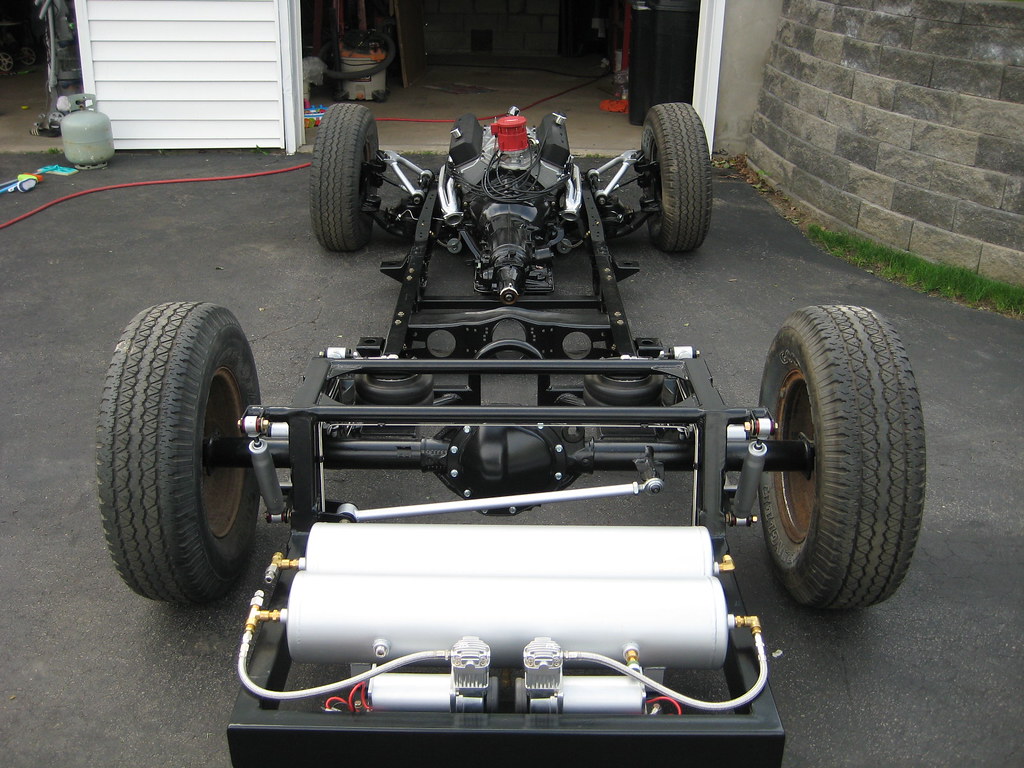
|
|
|

|
|
|
#246 |
|
Senior Member
Join Date: May 2004
Location: johnstown, NY
Posts: 2,393
|
Re: progress pics
The next set of pics are the stainless air and brake lines. The airlines are complete except that I have to connect two lines from the takes to the valve manifolds.
This pic shows the lines going out to the bags. All lines are 1/4 inch.  Here is where the two airlines go around the notch. This is the same on both sides. One line is for the rear bag, and the other line is for the front bag. In this pic, you will also see the brake lines. Notice the line on the top round bar. I STOLE this idea from Scotts Hot rods. No more lines on the axle. Nice and clean. Thanks Scotts! Oh, I am using AN fittings here. A braided stainless line will connect to this fitting to the caliper.  This is the other side. Sorry for the blurry pic. The clips are freakin awesome. They are from made4u. 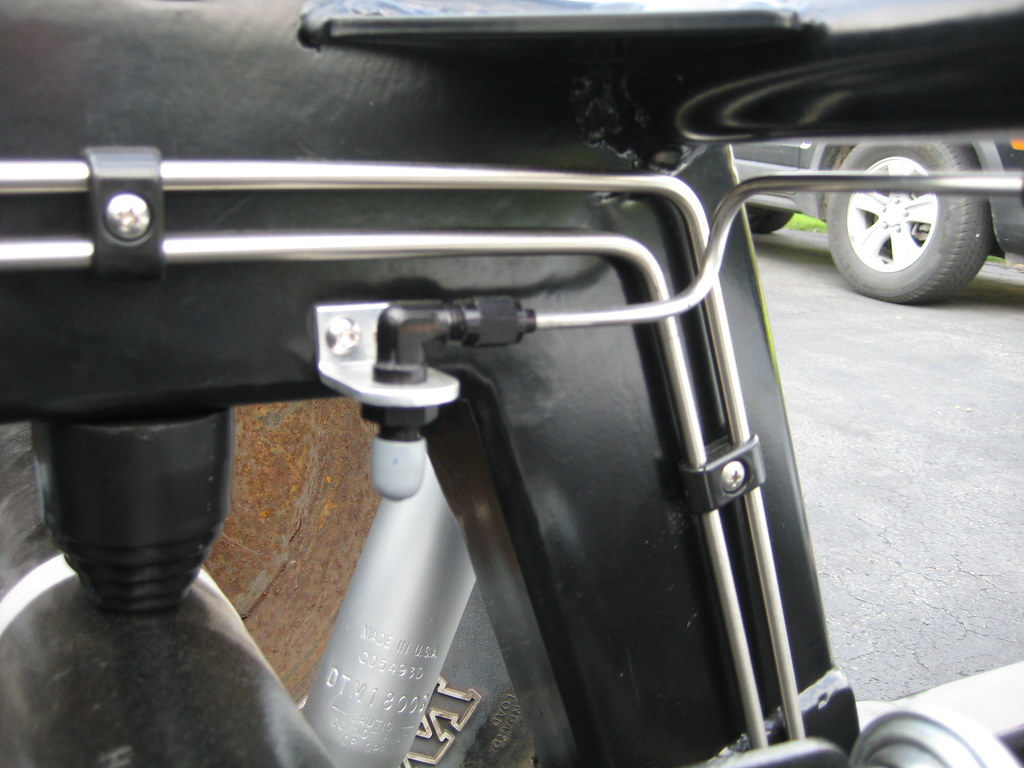 This is one of the rear bags.  
|
|
|

|
|
|
#247 |
|
Senior Member
Join Date: May 2004
Location: johnstown, NY
Posts: 2,393
|
Re: progress pics
Here you can see the brake line crossing from the driver side to pass. side
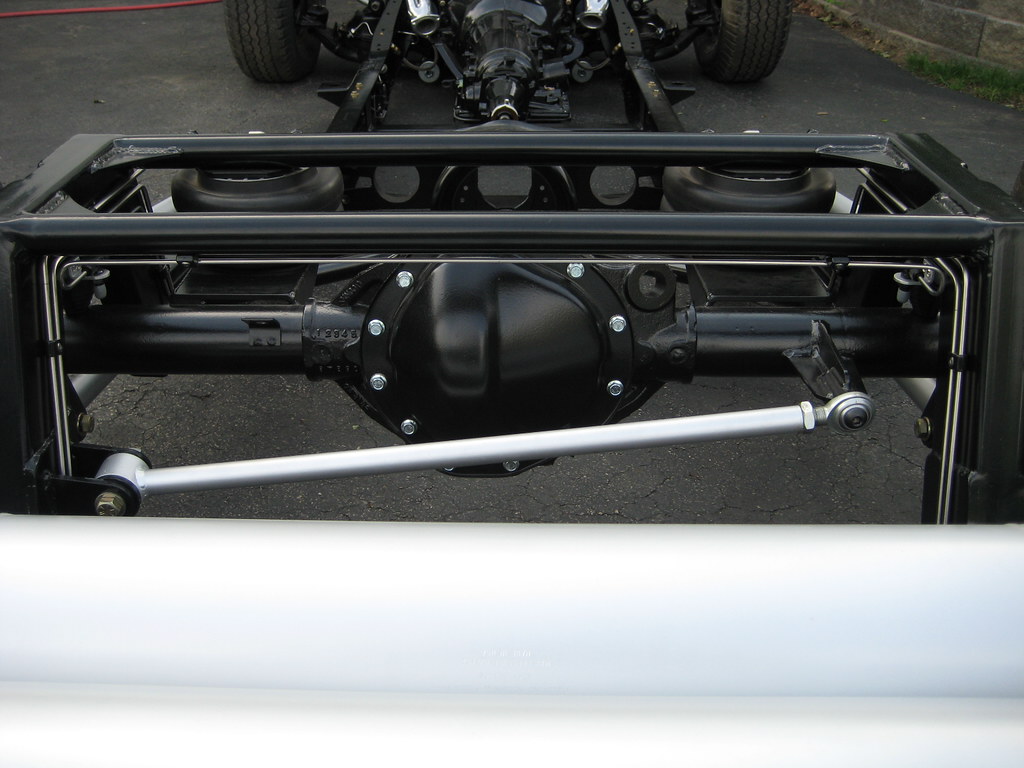 air line on top, brake line on bottom... 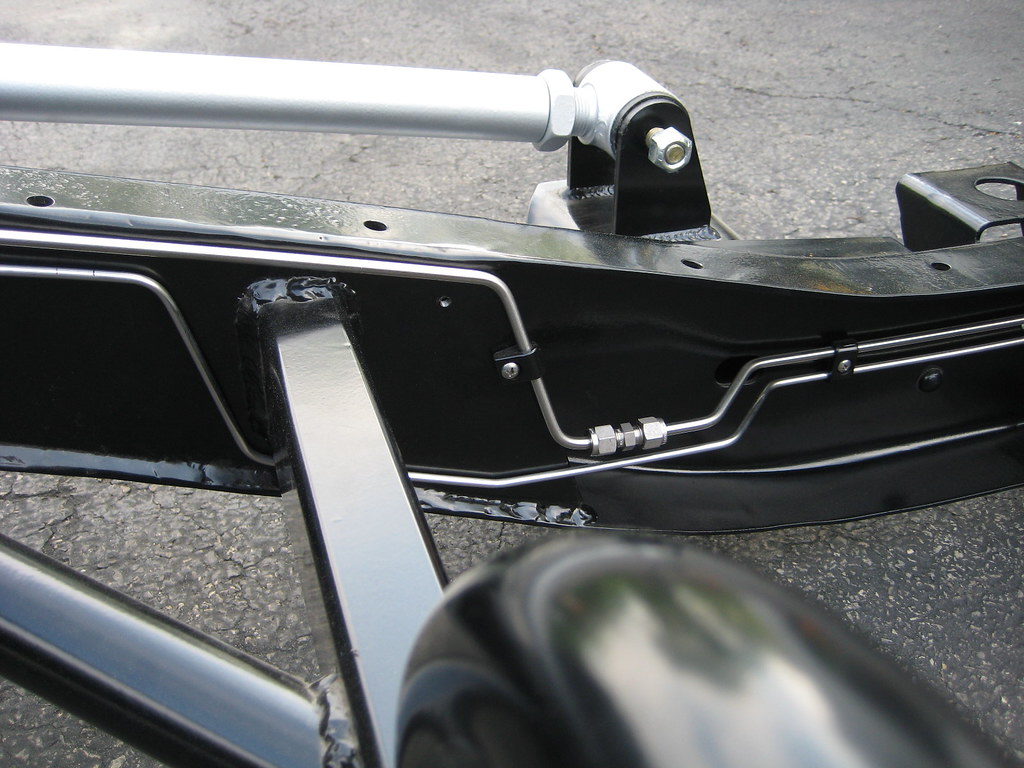 This pic shows the Summit adjustable prop valve which is also a distribution block AND has a brake light switch. Nice little piece. You can also see the end of the air line. A braided stainless line from the front bag will connect here. 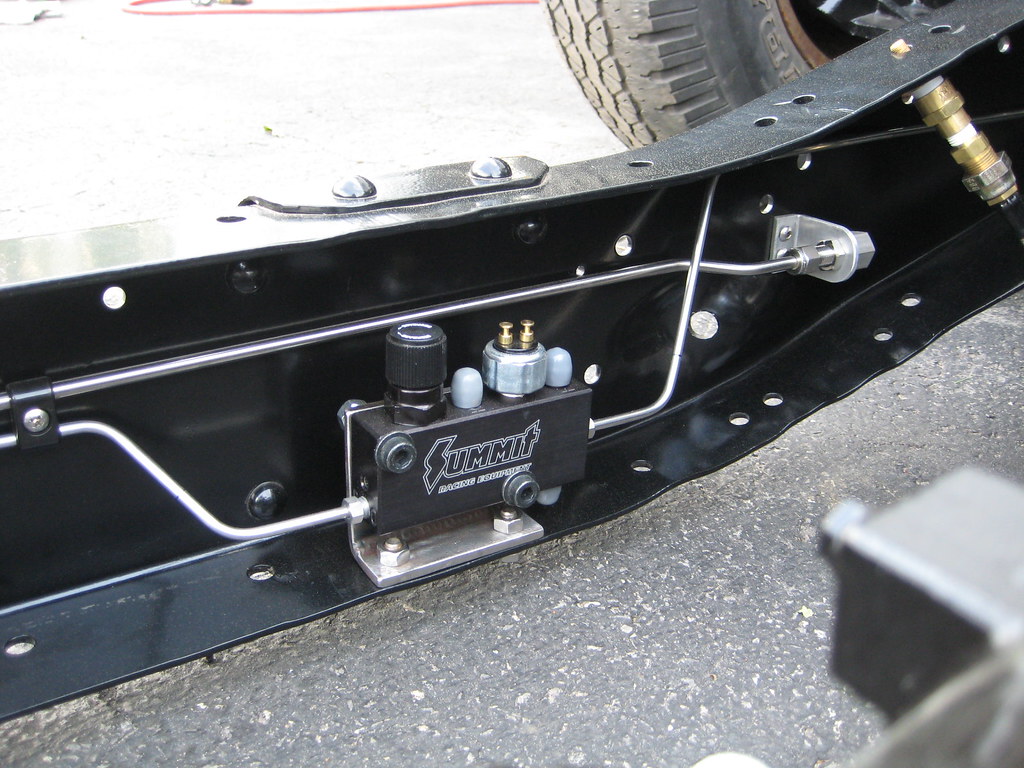 Here is my temporary setup for getting air in the front bags. 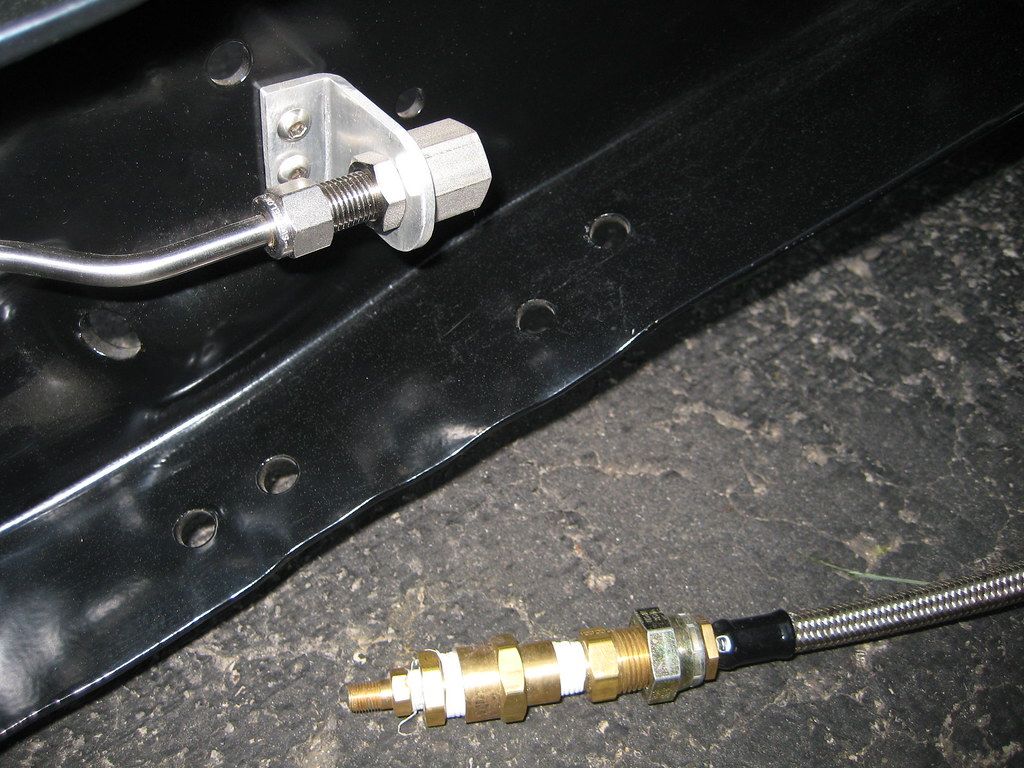 Here is the soft line coming out of the crossmember. A little dusty in there!  Here is where the front lines tee 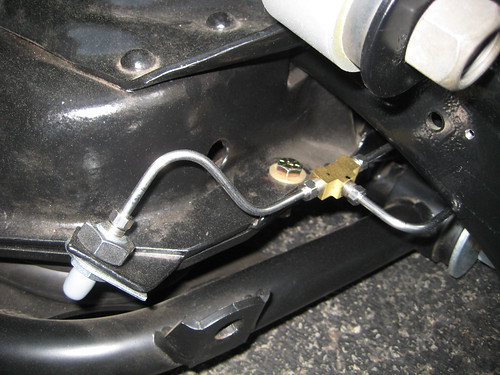 top view of rear 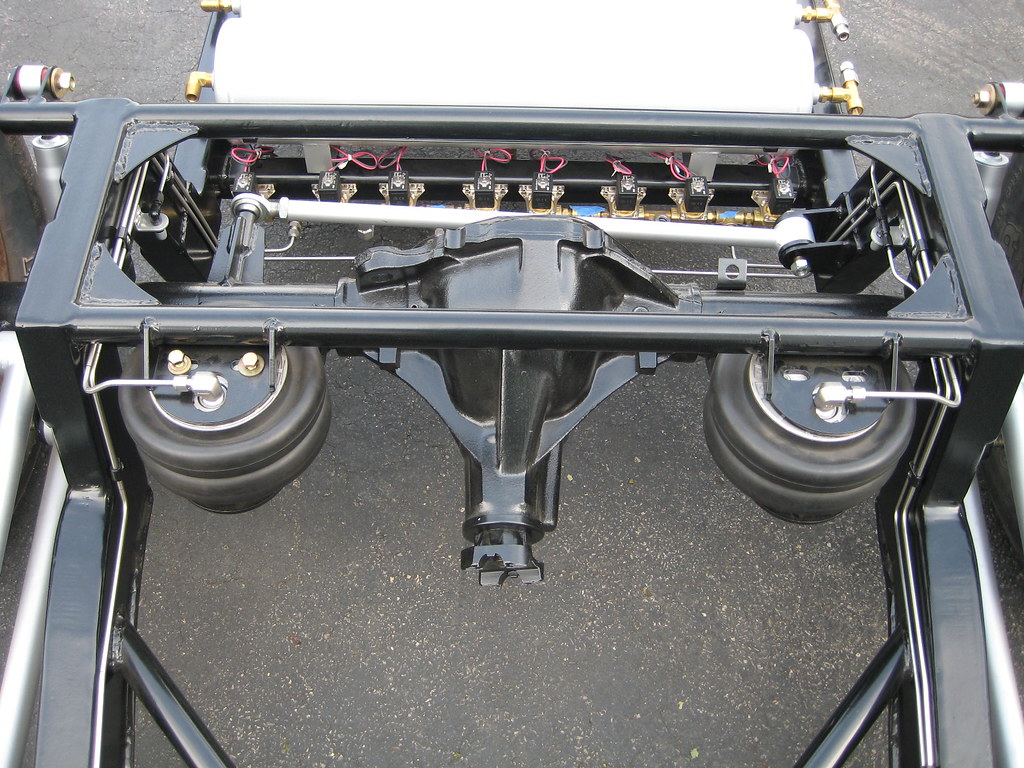 Well, thats it boys. Let me know what you think. |
|
|

|
|
|
#248 |
|
Senior Member
Join Date: May 2004
Location: johnstown, NY
Posts: 2,393
|
Re: progress pics
wanted to get these two in this thread. A little before and after!
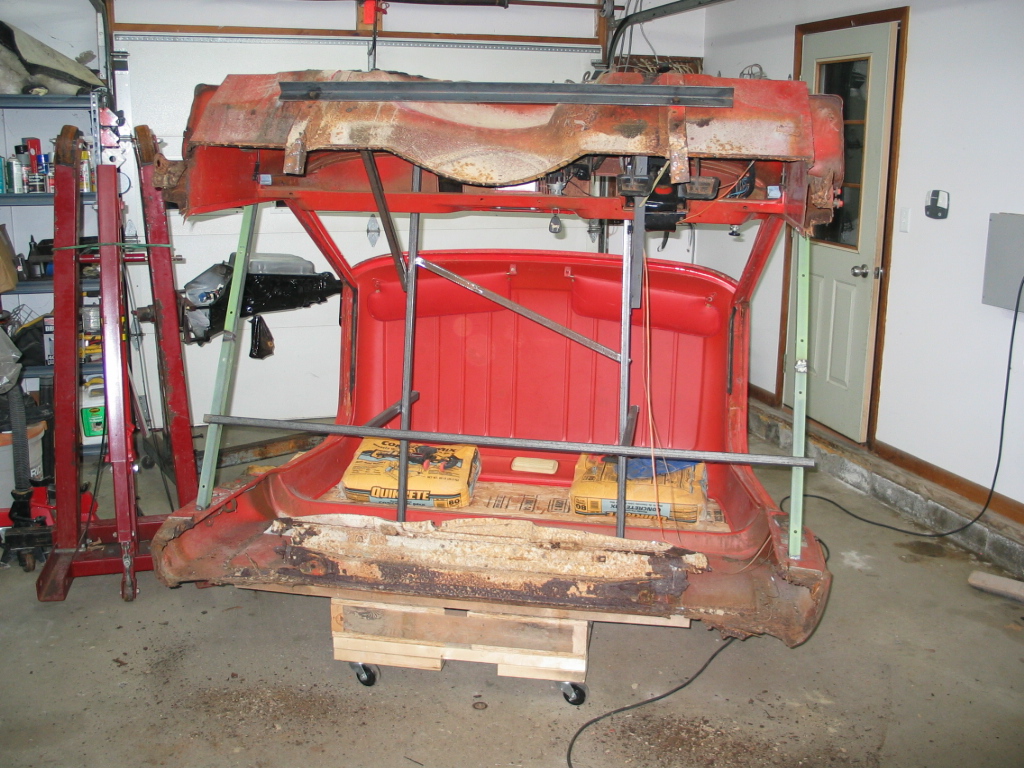 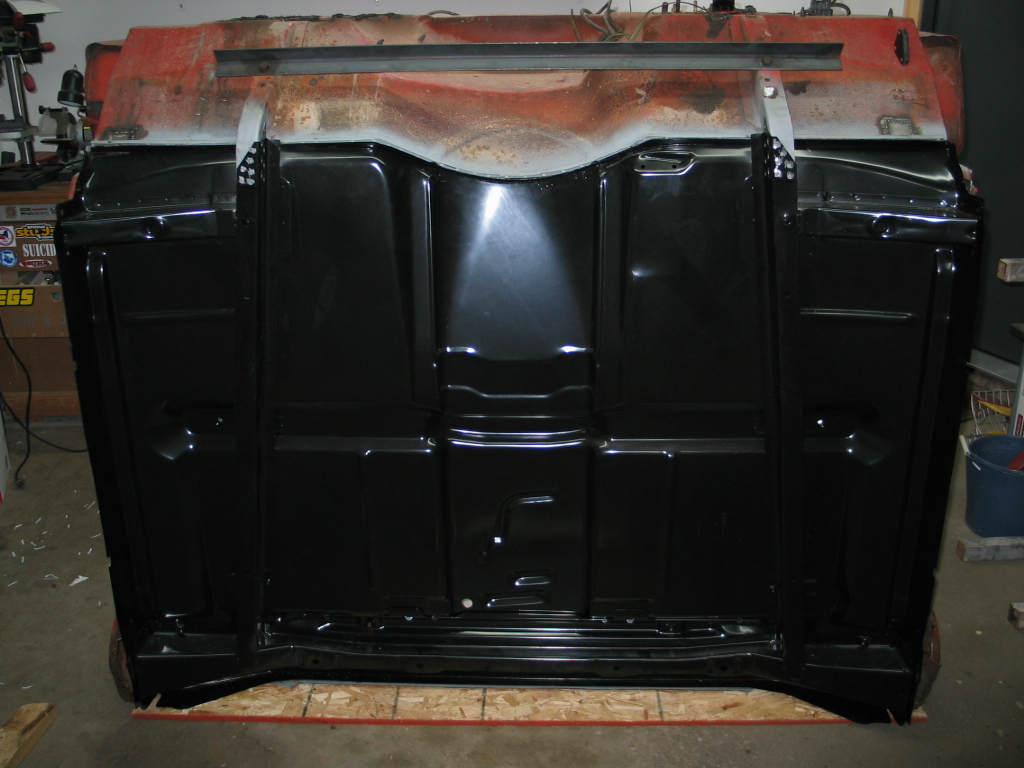
|
|
|

|
|
|
#249 |
|
Registered User
 Join Date: Mar 2007
Location: Denver, CO
Posts: 247
|
Re: progress pics
Wow, that's incredible looking. I really want to do hard on my truck. I bought some 3/8" line and fought with it until it looked horrible and then gave up. Your's turned out amazing have you done this much before?
__________________
Ryan 84  SWB, C4 IFS Crossmember, C4 IRS, RE7 bags, WCC 3pc 22"s SWB, C4 IFS Crossmember, C4 IRS, RE7 bags, WCC 3pc 22"sMy reBuild: http://67-72chevytrucks.com/vboard/s...d.php?t=346328 |
|
|

|
|
|
#250 |
|
Senior Member
Join Date: May 2004
Location: johnstown, NY
Posts: 2,393
|
Re: progress pics
nope, first time. I just take my time. Every one of those hard lines you see I did a first time with cheapo steel line as a template and after I had it perfect, just copied it in stainless. It took longer but I didnt screw up one piece of stainless.
|
|
|

|
 |
| Bookmarks |
|
|