
|
|
|
 09-29-2019, 10:47 AM
|
#1 |
|
Registered User
Join Date: Aug 2019
Location: Würzburg Germany
Posts: 46
|
Re: Wife's 48
Nice progress! The idea using the front bumper for the rear is grate and the same I have. Being equal from the shape in the front and the back the whole truck looks smoother in my opinion. Ok my second reason is that I do not find a rear bumper here in Germany.
|

|

|
|
09-29-2019, 05:39 PM
|
#2 |
|
Senior Member
 Join Date: Sep 2017
Location: Bryan, Texas
Posts: 2,300
|
Re: Wife's 48
Got a couple more things done today.
I had a steering column collar/bracket left over from my Jeep, so I thought why not. I had to bend it some and cut it down a little, but it fits pretty well.  IMG_0273 by Robert Moorman, on Flickr IMG_0273 by Robert Moorman, on FlickrThen I welded the gas pedal support to the floor.  IMG_0274 by Robert Moorman, on Flickr IMG_0274 by Robert Moorman, on FlickrAnd while I was messing around inside the cab, I decided it was time to fix the 4 pieces I cut out of the firewall at the tranny when I thought I had the motor set right, only to find out I didn't need to cut into the tunnel! I finished welding them in and ground the welds down after this picture.
__________________
8man-aka Robert 1948 on a S10 Frame, small block with a carb 1954 Cab, 53 Front and Bed, 50 Doors, S10 Frame, Power TBD Build thread: "]http://67-72chevytrucks.com/vboard/showthread.php?t=746899&highlight=wife%27s+48[/URL] [/URL]http://67-72chevytrucks.com/vboard/showthread.php?t=840204 |
|
|
|
|
09-29-2019, 10:05 PM
|
#3 |
|
Account Suspended
Join Date: Aug 2016
Location: Florida, USA
Posts: 290
|
Re: Wife's 48
I'm concerned about that brake pedal welded straight across - only about 1" of weld holding such a high-stress piece together. I'd cut and weld it diagonally. That way you'll get 2-3" of weld. Or fish plate it.
|
|
|
|
|
09-30-2019, 09:35 PM
|
#4 |
|
Registered User
Join Date: Dec 2018
Location: Winnipeg mb canada
Posts: 18
|
Re: Wife's 48
Keep up the good work, its very inspirational!!
|
|
|
|
|
09-30-2019, 10:02 PM
|
#5 |
|
Registered User
Join Date: Jul 2017
Location: Joshua, Texas.
Posts: 1,303
|
Re: Wife's 48
It's looking good! Feels to good to get a lot done doesn't it.
__________________
1950 Build |
|
|
|
|
10-05-2019, 01:29 PM
|
#6 |
|
Senior Member
Join Date: Sep 2017
Location: Bryan, Texas
Posts: 2,300
|
Re: Wife's 48
I stripped all the body parts from the frame. I liked looking at it all together, but I had to weld the cab mounts and check some other welds on the frame.
 IMG_0284 by Robert Moorman, on Flickr IMG_0284 by Robert Moorman, on FlickrSo now the frame is welded and ready for disassembly and paint. Small steps, but today they were all forward!
__________________
8man-aka Robert 1948 on a S10 Frame, small block with a carb 1954 Cab, 53 Front and Bed, 50 Doors, S10 Frame, Power TBD Build thread: "]http://67-72chevytrucks.com/vboard/showthread.php?t=746899&highlight=wife%27s+48[/URL] [/URL]http://67-72chevytrucks.com/vboard/showthread.php?t=840204 |
|
|
|
|
10-27-2019, 06:24 PM
|
#7 |
|
Senior Member
Join Date: Sep 2017
Location: Bryan, Texas
Posts: 2,300
|
Re: Wife's 48
Well I slicked up the firewall because I like the look. Then I got the Vintage Air sure fit kit.
 IMG_2104 by Robert Moorman, on Flickr IMG_2104 by Robert Moorman, on FlickrSo I had to re-drill the holes for the factory heater. So I marked where the hoses would go through the firewall, it looked like this. Those 4 X's are where I drilled the holes for the VA mock up unit I have. So I'll be welding those holes up now.  IMG_0309 by Robert Moorman, on Flickr IMG_0309 by Robert Moorman, on FlickrSo I drilled holes and cleaned up the big one with a Dremel, big hole saws just don't work for me. 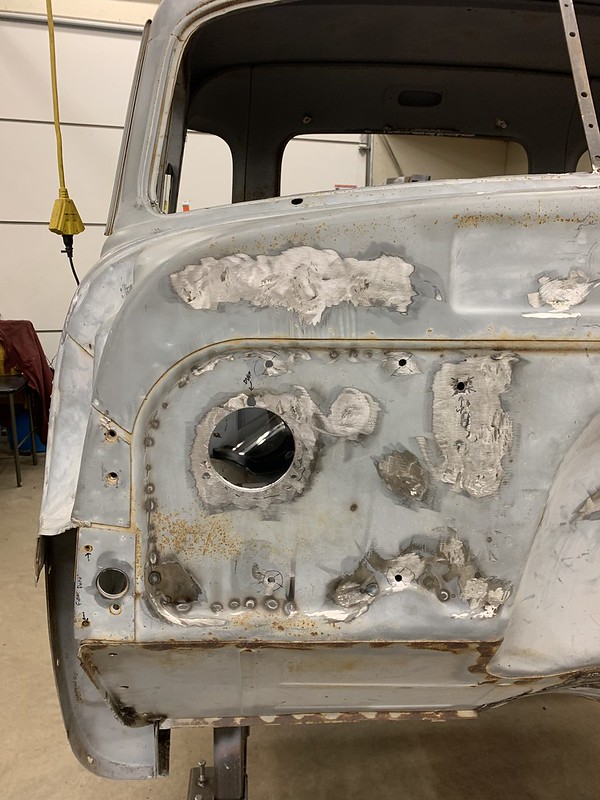 IMG_0311 by Robert Moorman, on Flickr IMG_0311 by Robert Moorman, on FlickrAnd my lucky day, the sure fit kit fits.  IMG_0312 by Robert Moorman, on Flickr IMG_0312 by Robert Moorman, on FlickrI got pretty lucky on the template I made and it was close enough that the Dremel made it all fit. Now that kills my plans for the battery box, so I'm looking for some ideas on battery placement. I put the other cab on the frame I've been working on for the 48 to see if there was a place on the frame under the cab where I could put the battery, but it doesn't look like it. I know Joe put one in an inner fender, but any other ideas? I don't want to put it in the bed if I can help it, but that may be the last resort. Made two more decisions on the truck, 1) I'm replacing the lower left outer cowl as the old vent has me concerned about leakage (both air and water), and 2) I'm going to weld up the gills on the right cowl. Looked at a truck this past weekend that had done that and it looked good.
__________________
8man-aka Robert 1948 on a S10 Frame, small block with a carb 1954 Cab, 53 Front and Bed, 50 Doors, S10 Frame, Power TBD Build thread: "]http://67-72chevytrucks.com/vboard/showthread.php?t=746899&highlight=wife%27s+48[/URL] [/URL]http://67-72chevytrucks.com/vboard/showthread.php?t=840204 |
|
|
|
|
10-30-2019, 02:53 PM
|
#8 | |
|
Registered User
 Join Date: Mar 2007
Location: Scotts, Michigan
Posts: 3,766
|
Re: Wife's 48
Quote:
__________________
...........__________ .................. ((__|__||___\____ ..;.;;.:;:;.,;..;((_(O))____ (_(O)) 1948 Chevy Truck - Finished SOLD!! 1953 Chevy Suburban "Family Truckster" Completed: Spring of 2021 http://67-72chevytrucks.com/vboard/s...d.php?t=605484 1994 4x4 Blazer - "Field Find" https://67-72chevytrucks.com/vboard/...ferrerid=30857 |
|
|
|
|
|
10-30-2019, 03:57 PM
|
#9 |
|
Senior Member
Join Date: Sep 2017
Location: Bryan, Texas
Posts: 2,300
|
Re: Wife's 48
Thanks, I hadn't thought of that location. I've been looking at places to put a drop down box, but with the sheet metal off again, I haven't really come to any conclusions. I'll take a look when I get it back on the frame again.
__________________
8man-aka Robert 1948 on a S10 Frame, small block with a carb 1954 Cab, 53 Front and Bed, 50 Doors, S10 Frame, Power TBD Build thread: "]http://67-72chevytrucks.com/vboard/showthread.php?t=746899&highlight=wife%27s+48[/URL] [/URL]http://67-72chevytrucks.com/vboard/showthread.php?t=840204 |
|
|
|
|
12-02-2019, 11:55 PM
|
#10 | |
|
Senior Member
 Join Date: May 2007
Location: Doodah Kansas
Posts: 7,770
|
Re: Wife's 48
man you are really doing some great work here!
Quote:
I quit a job over a dull 6" hole saw and an old two handed drill. turned me all around and twisted my wrist.
__________________
the mass of men live lives of quiet desperation if there is a problem, I can have it. new project WAYNE http://67-72chevytrucks.com/vboard/s...d.php?t=844393 |
|
|
|
|
|
12-03-2019, 09:39 AM
|
#11 |
|
Senior Member
Join Date: Sep 2017
Location: Bryan, Texas
Posts: 2,300
|
Re: Wife's 48
Thanks Joe, but that is a reach as this is my "learning experience" and I've seen good work, and I'm not there yet.
__________________
8man-aka Robert 1948 on a S10 Frame, small block with a carb 1954 Cab, 53 Front and Bed, 50 Doors, S10 Frame, Power TBD Build thread: "]http://67-72chevytrucks.com/vboard/showthread.php?t=746899&highlight=wife%27s+48[/URL] [/URL]http://67-72chevytrucks.com/vboard/showthread.php?t=840204 |
|
|
|
|
10-27-2019, 08:00 PM
|
#12 |
|
Registered User
Join Date: Nov 2014
Location: Yuba City, CA.
Posts: 678
|
Re: Wife's 48
Looks like you’ve been busy in the metal work dept, nice work there.I struggled with weather or not to weld up the fins on my truck also, I hope I don’t regret keeping them.
__________________
Jan's 53 |
|
|
|
|
11-01-2019, 01:12 PM
|
#13 |
|
Post Whore
 Join Date: May 2015
Location: Alabama
Posts: 14,624
|
Re: Wife's 48
Looks good Robert....those lights behind the weld work well...
__________________
Mongo...aka Greg RIP Dad RIP Jesse 1981 C30 LQ9 NV4500..http://67-72chevytrucks.com/vboard/s...d.php?t=753598 Mongos AD- LS3 TR6060...http://67-72chevytrucks.com/vboard/s...34#post8522334 Columbus..the 1957 IH 4x4...http://67-72chevytrucks.com/vboard/s...63#post8082563 2023 Chevy Z71..daily driver |
|
|
|
|
11-01-2019, 01:16 PM
|
#14 |
|
Senior Member
Join Date: Sep 2017
Location: Bryan, Texas
Posts: 2,300
|
Re: Wife's 48
Thanks Greg.
__________________
8man-aka Robert 1948 on a S10 Frame, small block with a carb 1954 Cab, 53 Front and Bed, 50 Doors, S10 Frame, Power TBD Build thread: "]http://67-72chevytrucks.com/vboard/showthread.php?t=746899&highlight=wife%27s+48[/URL] [/URL]http://67-72chevytrucks.com/vboard/showthread.php?t=840204 |
|
|
|
|
11-02-2019, 02:12 PM
|
#16 |
|
Senior Member
Join Date: Sep 2017
Location: Bryan, Texas
Posts: 2,300
|
Re: Wife's 48
Thanks Jan.
So yesterday I got the left lower cowl removed, and slipped the new panel in place for a look.  IMG_0318 by Robert Moorman, on Flickr IMG_0318 by Robert Moorman, on FlickrThen I painted the inside.  IMG_0320 by Robert Moorman, on Flickr IMG_0320 by Robert Moorman, on FlickrThat rusty color is the reflection of my shirt. Then as I was test fitting, punching holes, wire brushing down to clean steel, I test fit one more time. 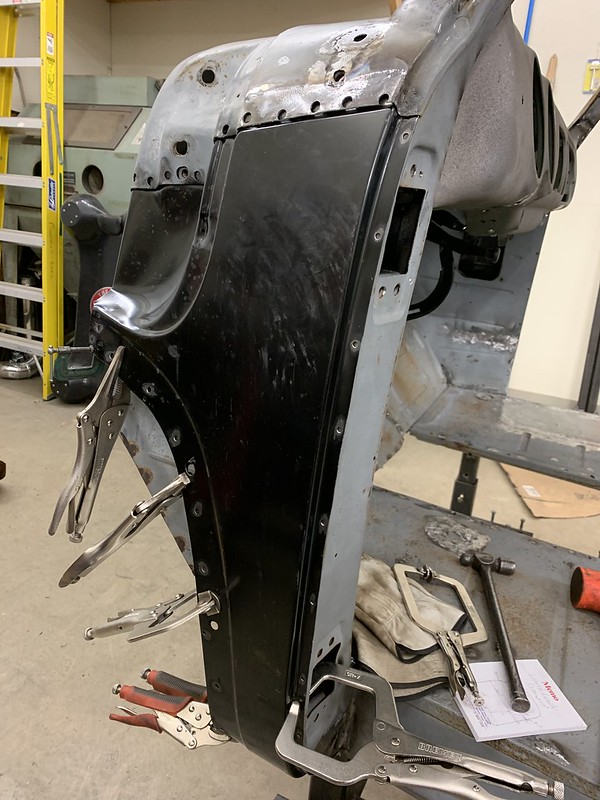 IMG_0321 by Robert Moorman, on Flickr IMG_0321 by Robert Moorman, on FlickrAnd today I've spot welded and ground them down and it's done.  IMG_0322 by Robert Moorman, on Flickr IMG_0322 by Robert Moorman, on FlickrOk, maybe it's not done, but the welding and grinding on that cowl is done. Oh, and did I mention spot welding that panel in is a LOT easier than butt welding that gill closed!
__________________
8man-aka Robert 1948 on a S10 Frame, small block with a carb 1954 Cab, 53 Front and Bed, 50 Doors, S10 Frame, Power TBD Build thread: "]http://67-72chevytrucks.com/vboard/showthread.php?t=746899&highlight=wife%27s+48[/URL] [/URL]http://67-72chevytrucks.com/vboard/showthread.php?t=840204 |
|
|
|
|
11-02-2019, 03:55 PM
|
#17 |
|
Registered User
Join Date: Jul 2017
Location: Joshua, Texas.
Posts: 1,303
|
Re: Wife's 48
I love checking in. Looks good man. I feel like it took me forever to get the confidence to start stuff like that.
__________________
1950 Build |
|
|
|
|
11-02-2019, 06:31 PM
|
#18 |
|
Senior Member
Join Date: Sep 2017
Location: Bryan, Texas
Posts: 2,300
|
Re: Wife's 48
Thanks Matt. No kidding on the confidence part.
So at lunch Laura and I talked and since we live in a college town, we really do want all the brake light we can get to try and take their attention off of the phone. So with my new found confidence, I installed the 3rd brake light. First was to locate it. I've thought about it a lot and finally went with this spot. 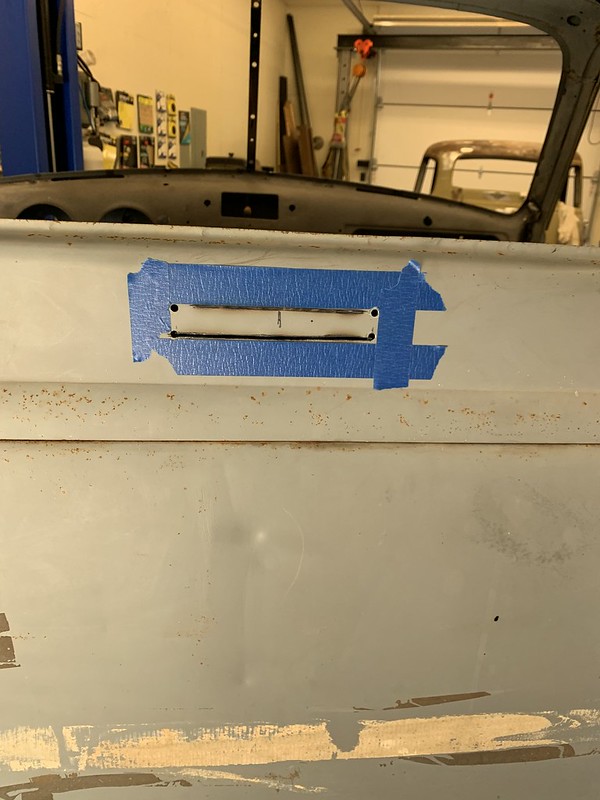 IMG_0323 by Robert Moorman, on Flickr IMG_0323 by Robert Moorman, on FlickrThen I finished cutting it out, and test fit it. I had to do some finish work on the hole to get the Ron Francis light in the spot, but I finally got it in there.  IMG_0324 - Copy by Robert Moorman, on Flickr IMG_0324 - Copy by Robert Moorman, on FlickrI found out on this site that I could weld the stainless without incident, so I did. Darned if it didn't weld up pretty easy.  IMG_0325 - Copy by Robert Moorman, on Flickr IMG_0325 - Copy by Robert Moorman, on FlickrSlicked it off, at least the cab skin, the Ron Francis design had a lip that sat inside and the cab was thicker than the new metal I guess, because the flat part of the light is recessed a little. A little filler will be needed to bring it up flush, but it's in!  IMG_0326 - Copy by Robert Moorman, on Flickr IMG_0326 - Copy by Robert Moorman, on FlickrOf course there was the hole inside to work through, so I made a cover and luckily had four metal screws that are similar.  IMG_0327 - Copy by Robert Moorman, on Flickr IMG_0327 - Copy by Robert Moorman, on FlickrThen I drilled the holes for the wire to the light. I tried to get it up as high to the belt as possible. Now I'm finished for the day.
__________________
8man-aka Robert 1948 on a S10 Frame, small block with a carb 1954 Cab, 53 Front and Bed, 50 Doors, S10 Frame, Power TBD Build thread: "]http://67-72chevytrucks.com/vboard/showthread.php?t=746899&highlight=wife%27s+48[/URL] [/URL]http://67-72chevytrucks.com/vboard/showthread.php?t=840204 |
|
|
|
|
11-04-2019, 09:09 AM
|
#19 |
|
Registered User
Join Date: Jul 2017
Location: Joshua, Texas.
Posts: 1,303
|
Re: Wife's 48
Cover plate looks factory! Can't wait to see your lights.
__________________
1950 Build |
|
|
|
|
11-04-2019, 09:22 AM
|
#20 |
|
Senior Member
Join Date: Sep 2017
Location: Bryan, Texas
Posts: 2,300
|
Re: Wife's 48
Thanks Matt. Electrical seems so far away right now, but it felt good to get that cab work done!
__________________
8man-aka Robert 1948 on a S10 Frame, small block with a carb 1954 Cab, 53 Front and Bed, 50 Doors, S10 Frame, Power TBD Build thread: "]http://67-72chevytrucks.com/vboard/showthread.php?t=746899&highlight=wife%27s+48[/URL] [/URL]http://67-72chevytrucks.com/vboard/showthread.php?t=840204 |
|
|
|
|
11-04-2019, 01:44 PM
|
#21 |
|
Registered User
Join Date: Mar 2015
Location: Castle Rock, CO
Posts: 534
|
Re: Wife's 48
Nice work all around! Those cowls are too bad but the replacements seem just a little off and take some tweaking. The 3rd brake light is probably a good idea but I keep looking around for one that's kind of old and rusty!
__________________
Scott ______________ my '51 build: http://67-72chevytrucks.com/vboard/s...d.php?t=677979 |
|
|
|
|
11-04-2019, 01:57 PM
|
#22 |
|
Senior Member
Join Date: Sep 2017
Location: Bryan, Texas
Posts: 2,300
|
Re: Wife's 48
Thanks Scott. I tried another light first, but wound up with that one. If you do come up with something else, let me know.
__________________
8man-aka Robert 1948 on a S10 Frame, small block with a carb 1954 Cab, 53 Front and Bed, 50 Doors, S10 Frame, Power TBD Build thread: "]http://67-72chevytrucks.com/vboard/showthread.php?t=746899&highlight=wife%27s+48[/URL] [/URL]http://67-72chevytrucks.com/vboard/showthread.php?t=840204 |
|
|
|
|
11-07-2019, 05:25 PM
|
#23 |
|
Registered User
Join Date: Sep 2019
Location: Maynooth, Ontario, Canada
Posts: 174
|
Re: Wife's 48
Nice job Robert. Nothing wrong with your fab skills. I just jealous of the rust free trucks you get to work with. I have practiced on rusted metal since I was 14. Never learned to give up......
 I think I used those same cowl patch panels.
__________________
http://67-72chevytrucks.com/vboard/s...82#post8619382 |
|
|
|
|
11-07-2019, 05:38 PM
|
#24 |
|
Senior Member
Join Date: Sep 2017
Location: Bryan, Texas
Posts: 2,300
|
Re: Wife's 48
Olcarguy, thanks for that.
This is my first experience working with this old metal. I've learned a lot, including welding, and I am still learning every time I go out there. You are right that the 48 was in pretty good shape. The 54 is more of a challenge. When I get the 48 done we'll see how much I've learned when get back on the 54.
__________________
8man-aka Robert 1948 on a S10 Frame, small block with a carb 1954 Cab, 53 Front and Bed, 50 Doors, S10 Frame, Power TBD Build thread: "]http://67-72chevytrucks.com/vboard/showthread.php?t=746899&highlight=wife%27s+48[/URL] [/URL]http://67-72chevytrucks.com/vboard/showthread.php?t=840204 |
|
|
|
|
12-01-2019, 01:46 PM
|
#25 |
|
Senior Member
Join Date: Sep 2017
Location: Bryan, Texas
Posts: 2,300
|
Re: Wife's 48
We had the 6 & 4 year old grandkids for 10 days before Thanksgiving, and then the whole family for Thanksgiving, so nothing went on for 2 weeks, BUT after they left yesterday I tried out mounting the windlace retainer to the cab, with 3M 07333 Impact Resistant Structural Adhesive.
Thank you Martinsr! The stuff was easy to use and it really seems solid. First I ground down the back of the retainer and the cab where it would mount with a roloc disc. Then I got the windlace retainer and some metal screws for each end and mounted it to the cab, with just the 2 screws on each end of the retainer holding it in place to see how it fit. Then I got all the parts together.  IMG_0347 by Robert Moorman, on Flickr IMG_0347 by Robert Moorman, on FlickrThen using almost every clamp I had I applied the adhesive, screwed each end of the retainer to the cab, and used the clamps to make sure the rest of the retainer was firmly against the cab on the rider's side.  IMG_0349 by Robert Moorman, on Flickr IMG_0349 by Robert Moorman, on FlickrThe magnets are helping hold the heavier clamps so they wouldn't pull off as I didn't want to apply so much pressure as to crush the retainer. 24 hours later I took the clamps off and did the driver's side. I had used too much of the adhesive in some places on the rider's side, so I had some spots where it had "squished" out from between the retainer and the cab, so I started sanding on that after I glued and clamped up the drivers side, being a little more careful with the adhesive.
__________________
8man-aka Robert 1948 on a S10 Frame, small block with a carb 1954 Cab, 53 Front and Bed, 50 Doors, S10 Frame, Power TBD Build thread: "]http://67-72chevytrucks.com/vboard/showthread.php?t=746899&highlight=wife%27s+48[/URL] [/URL]http://67-72chevytrucks.com/vboard/showthread.php?t=840204 |
|
|
|
 |
| Bookmarks |
|
|


 Hybrid Mode
