
 |
|
|
#251 |
|
Senior Enthusiast
Join Date: Feb 2007
Location: Spokane Valley, WA
Posts: 8,356
|
Re: Markeb01 Build Thread
This morning I started working on the new wide windshield trim. 3 Ĺ hours later, all the dents were removed, including the worst one in the set (first photo). Having the right punches and a better working set up this time made the job much easier. Iím now ready to move on to the sanding phase. So far Iím amazed and thankful how nice itís turning out.
Just to see if the repairs looked as good as they appeared, I sanded the worst dent with 320 & 400 then stepped over to the buffer and hit it with green cutting compound and grey medium compound. Other than needing a lot more sanding (600, 800, 1200 & 1500) before finish buffing, the repair is undetectable: Hereís the before shot: 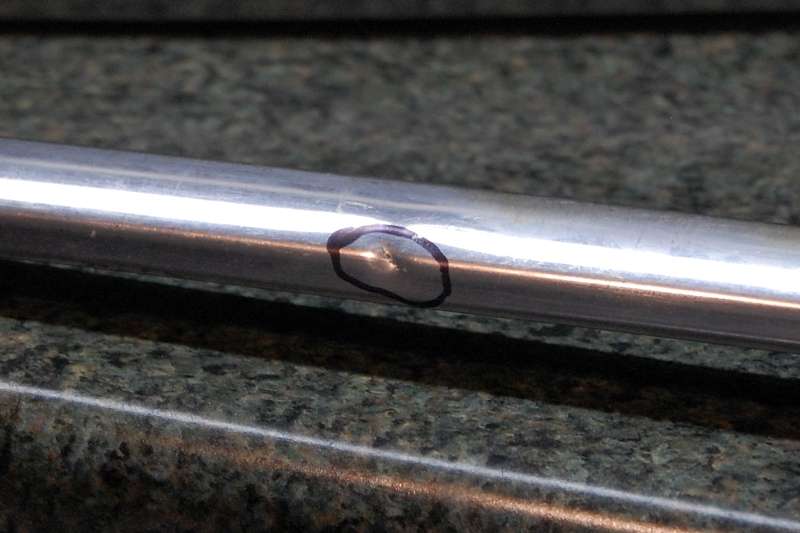 The area between the ink marks is the same section of trim shown above. This photo was taken with flash: 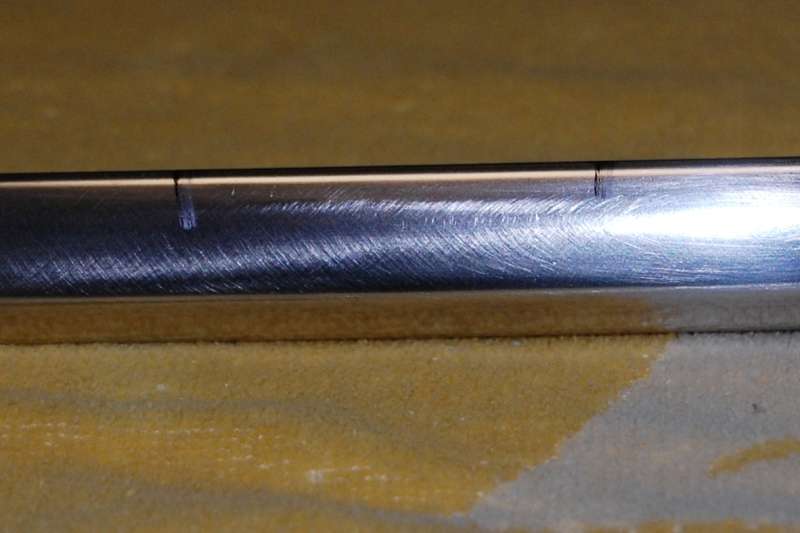 And this is the same section without flash. The dark area has been buffed. The dull areas remain a sanded finish: 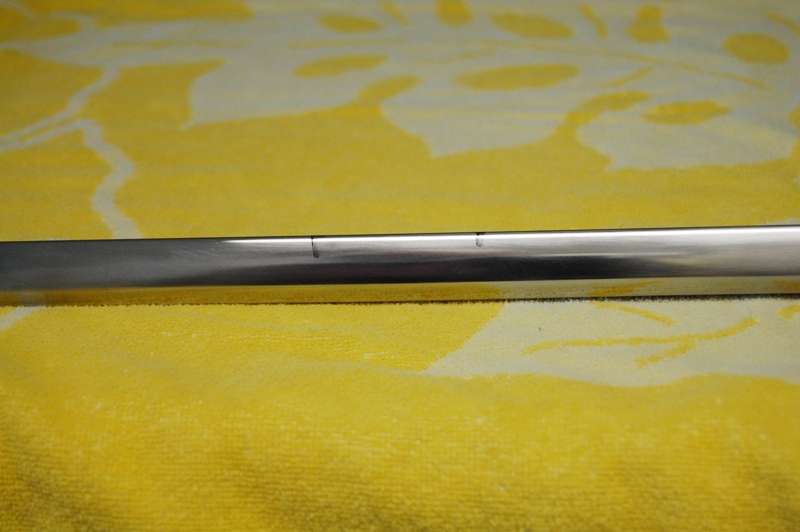 As a side note - it turns out when you whittle brass punches down to a 1/16Ē tip, itís not a good idea to drop them on the floor!
__________________
My Build Thread: http://67-72chevytrucks.com/vboard/s...d.php?t=444502 |
|
|

|
|
|
#252 |
|
Registered User
Join Date: Apr 2012
Location: Cambridge, Ontario, Canada
Posts: 1,771
|
Re: Markeb01 Build Thread
Man I wish I had your combination of patience and skill, nice work Mark! Looking forward to seeing the finished product!
__________________
Craigerrr My build thread, CRGRS 66 Winter Build: http://67-72chevytrucks.com/vboard/s...09#post5638709 |
|
|

|
|
|
#253 |
|
Registered User
 Join Date: May 2009
Location: Rathdrum, Idaho
Posts: 1,135
|
Re: Markeb01 Build Thread
Hey hi Mark I thought I had some pic's of the hood ornament and looked in my files couldn't find a decent one so I took a new one and some progress masking Ole Frank for paint enjoy...Vernski

|
|
|

|
|
|
#254 |
|
Senior Enthusiast
Join Date: Feb 2007
Location: Spokane Valley, WA
Posts: 8,356
|
Re: Markeb01 Build Thread
Hi Vernski thanks for sharing. Back in the 60's I had one off a 1940 Packard in my possession for a few weeks. It looked exactly like this one but the plastic or glass wings were long gone:
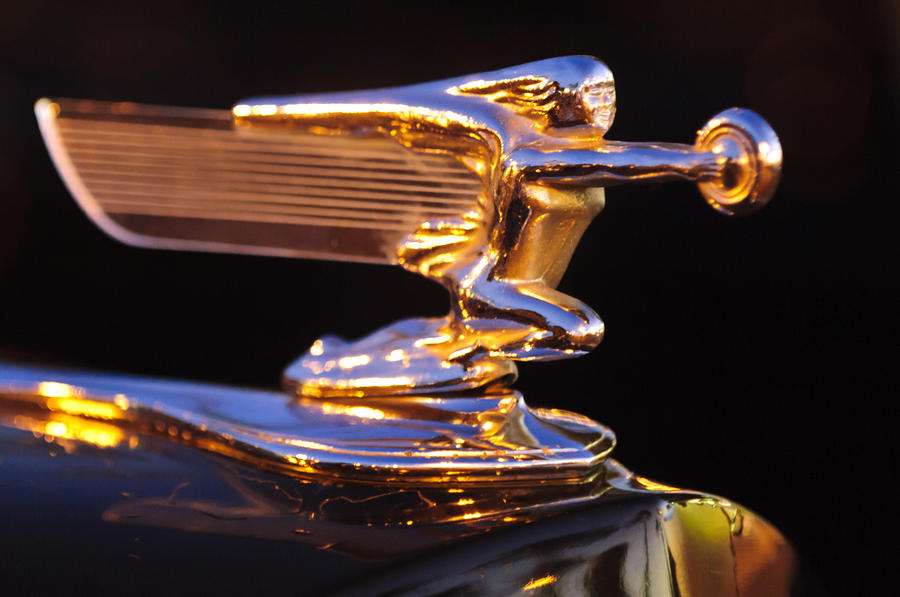 I originally discovered the car under a grove of trees, but my dad wouldnít let me buy it. So a rich friend got his dad to buy it so heíd have something to tinker with and learn on. He gave me the hood ornament and proceeded to bust out the cracked windows with a hammer, got it running and terrorized the neighborhood with it. It was a lot of fun, but I really wanted to restore the body, paint it black, and drop a Chevy & 4 speed in it. After a while he wanted the ornament back so I handed it over. I found out when I returned from Vietnam he had scrapped the car which really bummed me out. His dad bought him a new car as a replacement. They really did have money. Their house was probably 10,000 square feet with angora carpet in the living room with a grand piano, ballroom, maids quarters, 3 car garage and a machine shop. So what color are you painting the truck? Iím not sure if whatís showing in the picture is the final color or just the primer. Any chance youíll be taking it to Goodguys this August? Hope you're having a great week.
__________________
My Build Thread: http://67-72chevytrucks.com/vboard/s...d.php?t=444502 |
|
|

|
|
|
#255 |
|
Registered User
 Join Date: May 2009
Location: Rathdrum, Idaho
Posts: 1,135
|
Re: Markeb01 Build Thread
Mark it seems my Dad was incorrect on the ornament the closest one to it is a swan with wings so it's not OE, also it has no parts#. But it still looks good and it found a home, I found a web site that has them listed year by year. The color of the paint is chartreuse witch is lighter than lime green and almost yellow. I sure don't think I'll have it done for Goodguys I keep finding bodywork that needs attention every time I walk around it, so I keep plugging away at it I'm not to fast these days oh and it's a two tone the white part is kind of a light cream or antique color this will take extra time also. I hope to come to Goodguys but can't say for sure at this point, pat that purty black stepside for me....Vernski

|
|
|

|
|
|
#256 | |
|
Registered User
Join Date: Sep 2011
Location: Tacoma, WA
Posts: 2,425
|
Re: Markeb01 Build Thread
Quote:
I will have the '66 Tempest Convertible there this year. Would be nice to meet as many of us Inland Empire guys as possible that weekend !!!
__________________
Michael McMurphy My 66 Stepside My 64 Tow Truck My 66 Tempest Table Of Contents Added to Page1 |
|
|
|

|
|
|
#257 |
|
But Found Her 25yrs Later!
Join Date: Oct 2010
Location: Oregon City, Oregon
Posts: 10,527
|
Re: Markeb01 Build Thread
Mark,
I have to say how much I appreciate the detail in explaining how and why you did what. And then you often even put together a separate thread laying all the steps out. You add so much value to this forum. Thank You, Very Much! - Robert Posted via Mobile Device
__________________
I lost my 65 - Found it 25 years later: http://67-72chevytrucks.com/vboard/s...d.php?t=426650 66 C20 Service Truck: http://67-72chevytrucks.com/vboard/s...d.php?t=428035 |
|
|

|
|
|
#258 |
|
Senior Enthusiast
Join Date: Feb 2007
Location: Spokane Valley, WA
Posts: 8,356
|
Re: Markeb01 Build Thread
Thanks Robert. Your comments are much appreciated. I remember when I started building street rods back in the 60’s about the only sources of information available were repair manuals and old hot rod magazines. Once in a while an old guy with experience would also contribute valuable input. But trial and error was the primary path to knowledge, which can be both expensive and sometimes dangerous.
Now that I’m one of those old guys with some measure of experience, it keeps me engaged in the hobby if I can share some things that work, or help others avoid some of the pitfalls I’ve been through. And being a tech writer and help desk coordinator taught me the importance of clear detailed communications. Again thanks for your comments. Learning from other members and feedback like yours is what inspires me to stick around.
__________________
My Build Thread: http://67-72chevytrucks.com/vboard/s...d.php?t=444502 Last edited by markeb01; 07-09-2012 at 11:45 PM. |
|
|

|
|
|
#259 |
|
Registered User
Join Date: Sep 2011
Location: Tacoma, WA
Posts: 2,425
|
Re: Markeb01 Build Thread
I know I would not be nearly as far along in my build, or doing as deep a resto as I am if it were not for you and all the other members on this board that show their work, share their insights, and answer the same noob questions season after season.
It is such an inspiration to see some of the work done here, and empowering too I might add!! It is far easier to be brave when you are stepping where others have already walked ......
__________________
Michael McMurphy My 66 Stepside My 64 Tow Truck My 66 Tempest Table Of Contents Added to Page1 |
|
|

|
|
|
#260 |
|
Senior Enthusiast
Join Date: Feb 2007
Location: Spokane Valley, WA
Posts: 8,356
|
Re: Markeb01 Build Thread
One of the things I enjoy most about this forum is the open sharing of ideas which might inspire others. I’ve been so inspired, in this case by Leadfoot Lambert and his 55 Buick grille bar. It has an almost factory appearance in fit and proportion:
 I’ve never really been content with the GMC letters on my truck, mainly over maintenance issues and also because the G and C are hidden by the fog lamps. The letters are a pita to wash, especially when they are covered in bugs. I tried eliminating them before, but the shape of the Plymouth grille bar I used didn’t blend in well enough. I also considered a custom effort similar to a conventional tube grille, but it would have been made out of cast acrylic rod and illuminated from each end. Ultimately I thought it would be too much and not a good fit with the rest of the truck layout. I really like the fit and shape of the Buick bar. Painted white to match the front end, I think it will offer somewhat of an Oldsmobile-like appearance. Here’s my pathetic photoshop attempt at mounting a 55 Buick grille bar in my truck: 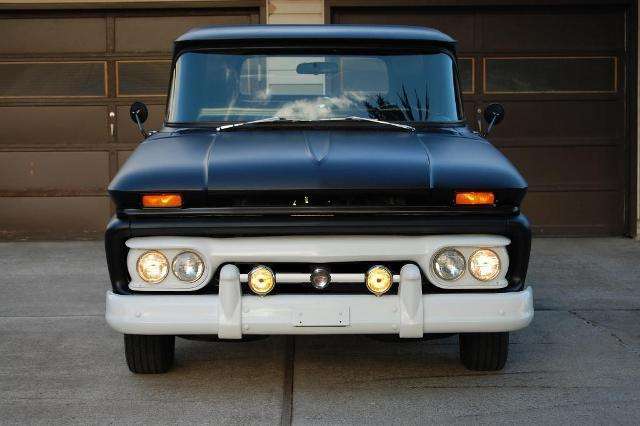 I’ve reduced the photo size which seems to make it look a bit more realistic. The entire bar and center housing will be Rustoleum white like the grille and bumper, but I can’t replicate the white center housing with my limited photo editing skills. I have several ideas for the emblem, including the original Buick center. But again my attempts at switching emblems digitally look terrible, so I’ll just have to wait for the grille bar to arrive so I can start experimenting for real. Here’s what an original Buick emblem looks like, which I like. Of course the one I bought doesn’t look anywhere near this nice: 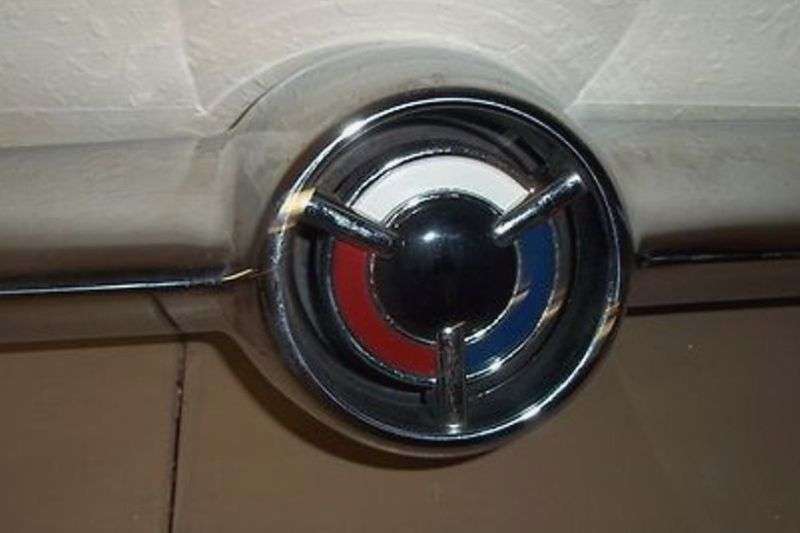 The Buick grill bar should arrive early next week. Painting and mounting should be easy, but figuring out the final center emblem may take some time.
__________________
My Build Thread: http://67-72chevytrucks.com/vboard/s...d.php?t=444502 Last edited by markeb01; 07-21-2012 at 03:00 AM. |
|
|

|
|
|
#261 |
|
Rollin' Old Skool
Join Date: Jun 2007
Location: Hattiesburg, MS
Posts: 5,371
|
Re: Markeb01 Build Thread
i saw his grille pic for the first time the other day as well, & i thought it was very unique and looked "right"....can't wait to see how yours turns out!
__________________
_____________________________________________ Phillip My Build threads: 1966 Chevy C-10 "Black Betty" shortbed, fleetside, BBW, 327 V8/ Powerglide (under construction) http://67-72chevytrucks.com/vboard/s...ighlight=betty 1997 Chevy Tahoe, 2dr/2wd, mild custom (Daily driver) http://67-72chevytrucks.com/vboard/s...d.php?t=601142 Pics: '66 C-10 https://flic.kr/s/aHsjHWD4h9 '97 Tahoe https://flic.kr/s/aHsjGZ7wKP '93 C-1500 https://flic.kr/s/aHskxdpdnQ '88 S-10 Blazer https://flic.kr/s/aHsjYGx4Md Previous Rides: 1993 Chevy S-10 ext. cab, 4.3L, 4/5 drop (Sold) 1993 Chevy C-1500 short/step Retro-Rod (Sold) 1988 S-10 Blazer 2dr/2wd mild custom (Sold) |
|
|

|
|
|
#262 |
|
Senior Enthusiast
Join Date: Feb 2007
Location: Spokane Valley, WA
Posts: 8,356
|
Re: Markeb01 Build Thread
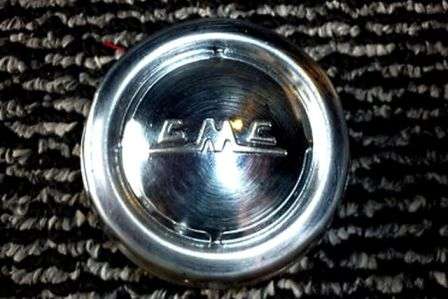
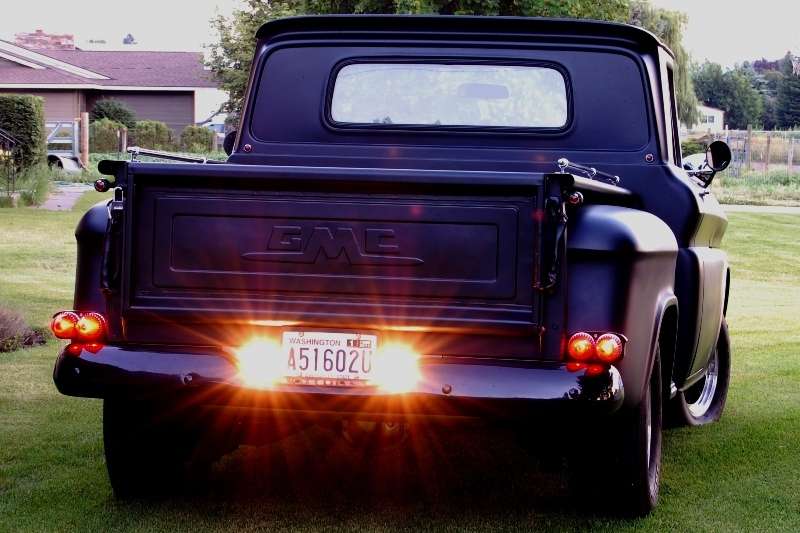
Picked up this 57-59 GMC Ebay horn button today as a possible candidate for the Buick grille bar center emblem. I like the fact itís rather plain, and the lettering is a close match to the style on the tailgate.
__________________
My Build Thread: http://67-72chevytrucks.com/vboard/s...d.php?t=444502 |
|
|

|
|
|
#263 |
|
Rollin' Old Skool
Join Date: Jun 2007
Location: Hattiesburg, MS
Posts: 5,371
|
Re: Markeb01 Build Thread
i like that...wonder how it would look with the center, recessed circle area behind the letters painted black but leaving the outer ring & letters shiny metal? or vice versa with the outer ring painted black, center circle shiny, and letters painted black? either way i think would offer nice, subtle detail
__________________
_____________________________________________ Phillip My Build threads: 1966 Chevy C-10 "Black Betty" shortbed, fleetside, BBW, 327 V8/ Powerglide (under construction) http://67-72chevytrucks.com/vboard/s...ighlight=betty 1997 Chevy Tahoe, 2dr/2wd, mild custom (Daily driver) http://67-72chevytrucks.com/vboard/s...d.php?t=601142 Pics: '66 C-10 https://flic.kr/s/aHsjHWD4h9 '97 Tahoe https://flic.kr/s/aHsjGZ7wKP '93 C-1500 https://flic.kr/s/aHskxdpdnQ '88 S-10 Blazer https://flic.kr/s/aHsjYGx4Md Previous Rides: 1993 Chevy S-10 ext. cab, 4.3L, 4/5 drop (Sold) 1993 Chevy C-1500 short/step Retro-Rod (Sold) 1988 S-10 Blazer 2dr/2wd mild custom (Sold) |
|
|

|
|
|
#264 |
|
Senior Enthusiast
Join Date: Feb 2007
Location: Spokane Valley, WA
Posts: 8,356
|
Re: Markeb01 Build Thread
Iím thinking along the same lines. If the horn button turns out to be stainless steel as stated by the seller, Iíll polish the whole thing to a mirror finish and then decide what to paint. Iíve even thought about painting the area around the letters metalflake orange to tie it in with the fog lights.
If it turns out to be old/tired chrome plating, Iíll sandblast the whole thing and paint it white. Then I can either paint the area around the letters black (or some other color), or do just the reverse with the letters and border ending up black. If the center is mounted from the back side of the grille bar (which I believe it is) it should provide more of a recessed factory look which might look best. Iím looking forward to playing around with it.
__________________
My Build Thread: http://67-72chevytrucks.com/vboard/s...d.php?t=444502 |
|
|

|
|
|
#265 |
|
Senior Enthusiast
Join Date: Feb 2007
Location: Spokane Valley, WA
Posts: 8,356
|
Re: Markeb01 Build Thread
The Ebay grille bar showed up today. Great news there were no cracks or stripped threads in the mounting bosses. As expected the chrome was blistering everywhere, and especially on the lower surfaces:
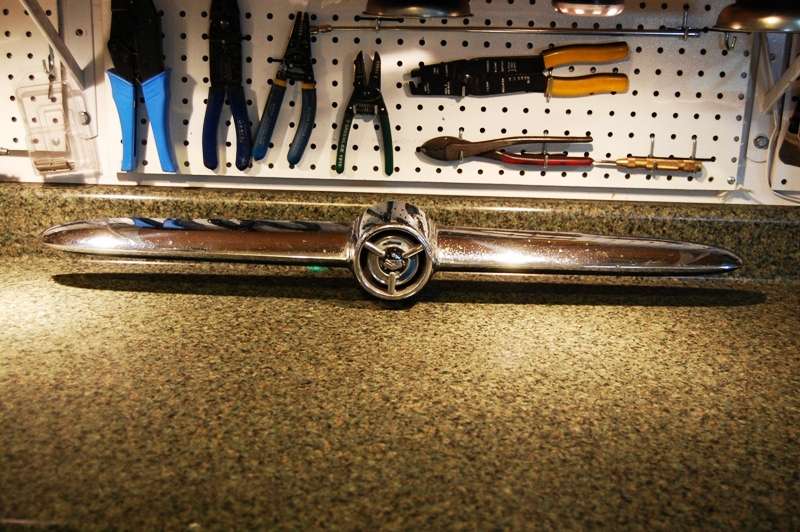 Hereís a better shot of the blisters on top: 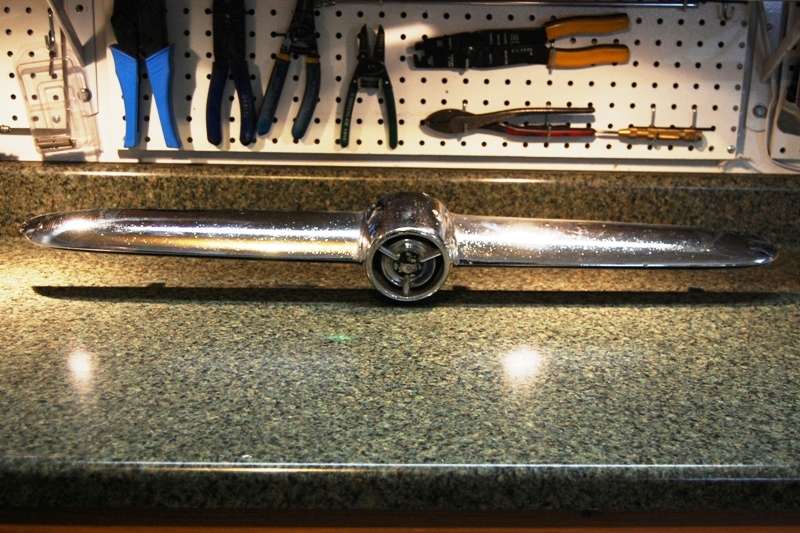 The bottom was much worse: 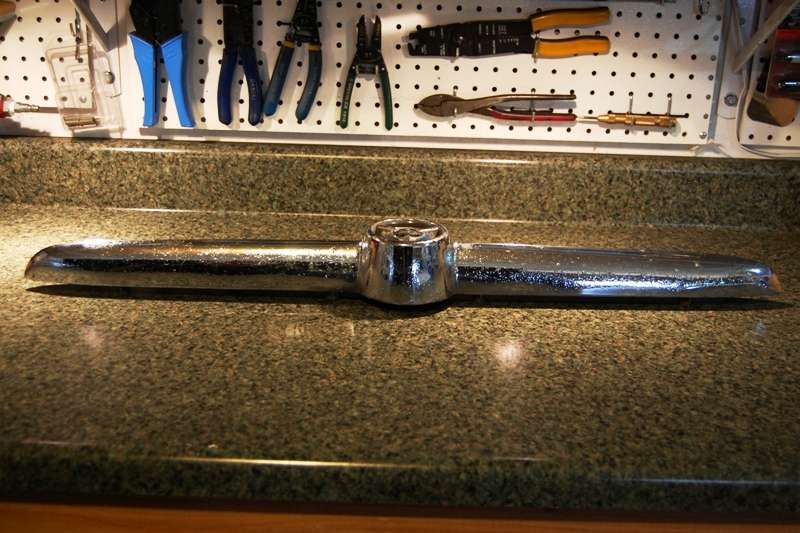 And this was the worst of it: 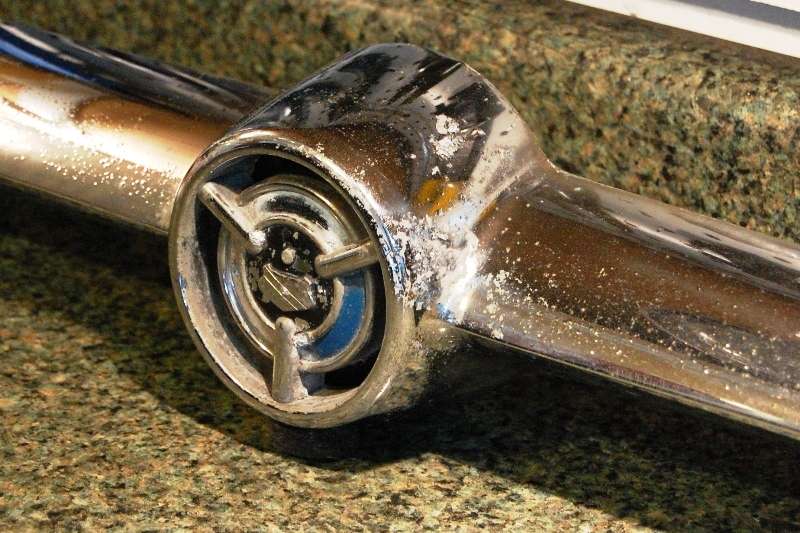 This is the back of the center attachment. The main backing plate is centered by the blade and slot at the top. Removing the center bolt releases the die cast emblem. I was very fortunate when all three ľ-20 bolts came right out with very little effort. They could have just as easily been frozen solid and broken off: 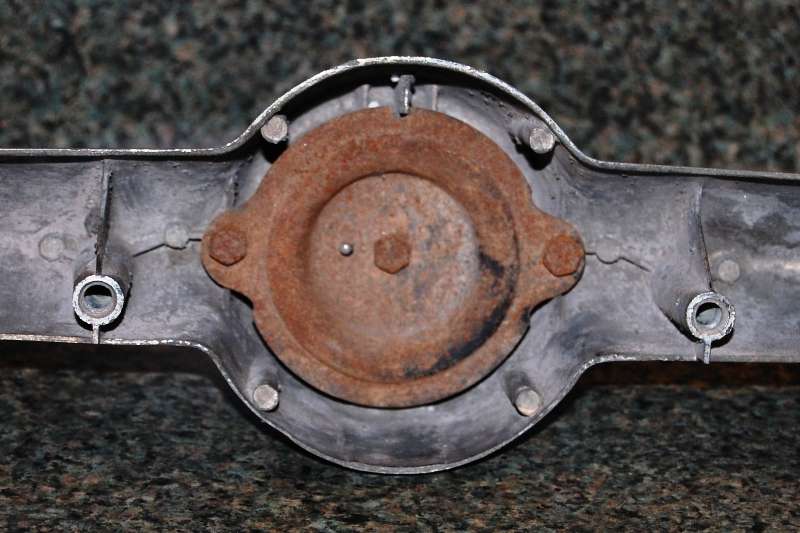 Hereís the center emblem unbolted from the mounting plate. Alignment is assured by the locating pin in the emblem and alignment hole in the plate:  The inner bezel recess is about ĺĒ deep and fortunately there are no attachment holes for the center emblem, making it easy to do just about any custom installation that can be dreamed up with very little effort. The shot shows the back side of the backing plate and center emblem resting against the face of the bar: 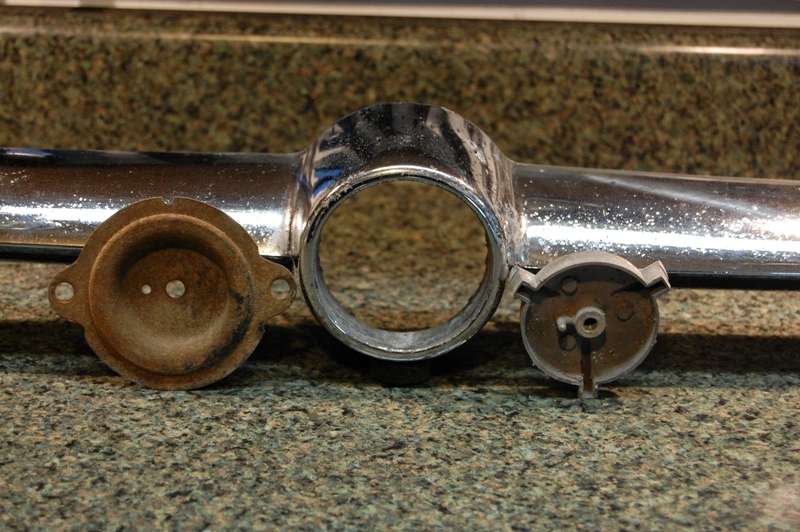 And hereís the main bar after about an hour and a half with some 320 grit on a D/A sander. The only ding in the whole thing is this small rock hit on the driver side. A dab of JB Weld or body filler will correct the problem: 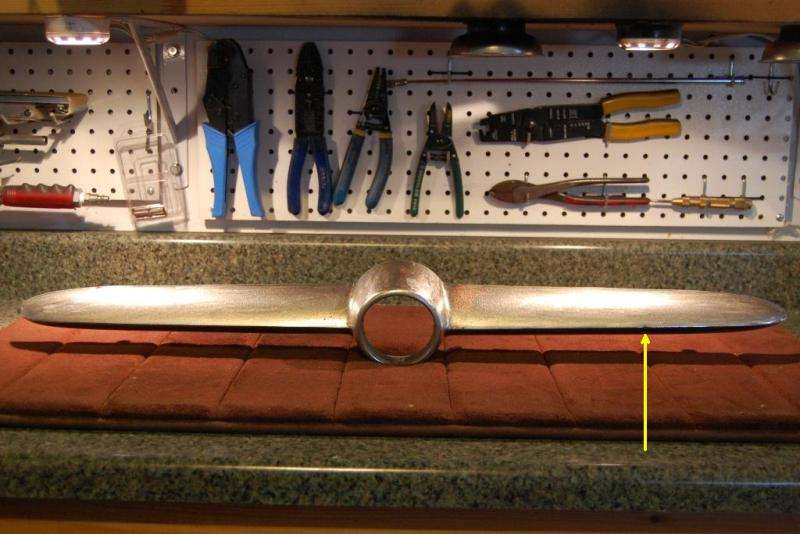 Next step is having all the parts blasting with glass beads for a uniform texture after which the main bar and retaining plate will be coated with epoxy primer. UPOL 2K hi fill primer will follow along with block sanding. The final finish will be the same Rustoleum gloss white covering the grille, bumper, and guards.
__________________
My Build Thread: http://67-72chevytrucks.com/vboard/s...d.php?t=444502 |
|
|

|
|
|
#266 |
|
"Where were you in '62?"
 Join Date: Jul 2004
Location: Cleveland County, North Cackalacky
Posts: 5,013
|
She's gonna look good on there Mark.
I've been lurking around gathering ideas myself from other guys on here as well. I've been looking around ebay and other sites for hard to find and rare parts. Here lately I have been looking at Studebaker tail lights and backup lights. Then I start looking at other lights and even spot lights. http://www.ebay.com/sch/Lighting-Lam..._ipg=200&rt=nc Then I see pictures like this truck and it's rear bumper and I start getting ideas for my front bumper. http://image.lowridermagazine.com/f/...+rear_view.jpg And this: http://i151.photobucket.com/albums/s...-19_123248.jpg Then I think how would rear bumper guards look on my year truck. http://image.lowridermagazine.com/f/...+rear_view.jpg I do like how you are doing this. I like the grille bar or grill guard with the fog lights and bumper guards. I want old school fog lights kinda like this. Not sure about the visors. http://www.ebay.com/itm/NEW-30-S-40-...r#ht_500wt_949 http://i655.photobucket.com/albums/u...0418001004.jpg http://67-72chevytrucks.com/vboard/a...1&d=1326421912 I want old nostalgia stuff that blends in well and doesn't stand out. Anyhoot.... still looking for me some back up lights like you have.. What do you think about these? http://www.ebay.com/itm/1955-Chevy-L...#ht_1749wt_698 More 1955 Buick Grille like you have. http://www.ebay.com/sch/i.html?_nkw=1955+buick+grille
__________________
PROJECT: "FULL METAL YELLOW JACKET" 1962 Chevy C-10 Stepside Shortbed Nostalgia Pro/Street Pickup Truck PROJECT: "FULL METAL YELLOW JACKET Build Thread What Are You Workin' On? - 1Bad62ChevyPickup PROJECT: "TYRANNORAMBLER REX" 1969 AMC Rambler American Nostalgia Pro/Street Youtube Channel: Father Son Projects Youtube Channel: 2TIMOTHY2FITHTEEN        "North and South Carolina Folks Click Here!" (((( ~ I have Parts For Sale & Miscellaneous Stuff ~ )))) "Well being as there's no other place around the place, I reckon this must be the place, I reckon...Nyuk Nyuk Nyuk" -Curly Howard Ph.D. Last edited by 1Bad62Pro/Street; 07-26-2012 at 08:25 AM. Reason: http://www.ebay.com/sch/i.html?_nkw=1955+buick+grille |
|
|

|
|
|
#267 |
|
Senior Enthusiast
Join Date: Feb 2007
Location: Spokane Valley, WA
Posts: 8,356
|
Re: Markeb01 Build Thread
I share a similar approach to things. I want things to look vintage, but also want them to look like they belong together. I combine this with the stuff I either loved in my youth, or always wanted but could never afford.
Iíd probably have guards on my back bumper now, but have never found a good way to install any that wouldnít put the tailgate at risk if it got dropped. And although I like the rear bumper because itís attractive and goes with the 1955 rear fenders, Iíve often thought about trying to modify a front bumper for use on the back, so it might look like it was designed for the truck. The lenses on the 55 Chevy back up lights look great, but I canít really determine what the mounting bezels would look like. Iíve seen a couple more Unity lamps like mine on Ebay recently, but some were shot with bad chrome and a couple others were way overpriced for just single lamps (not a pair). I hope you can find some you like.
__________________
My Build Thread: http://67-72chevytrucks.com/vboard/s...d.php?t=444502 |
|
|

|
|
|
#268 |
|
Senior Enthusiast
Join Date: Feb 2007
Location: Spokane Valley, WA
Posts: 8,356
|
Re: Markeb01 Build Thread
Did a few test fits with the Buick grille bar today, using the original GMC letter hanger to attach it to the truck. Ironically the inboard mounting bosses on the Buick grille were within ľĒ of aligning with the GMC ďMĒ holes.
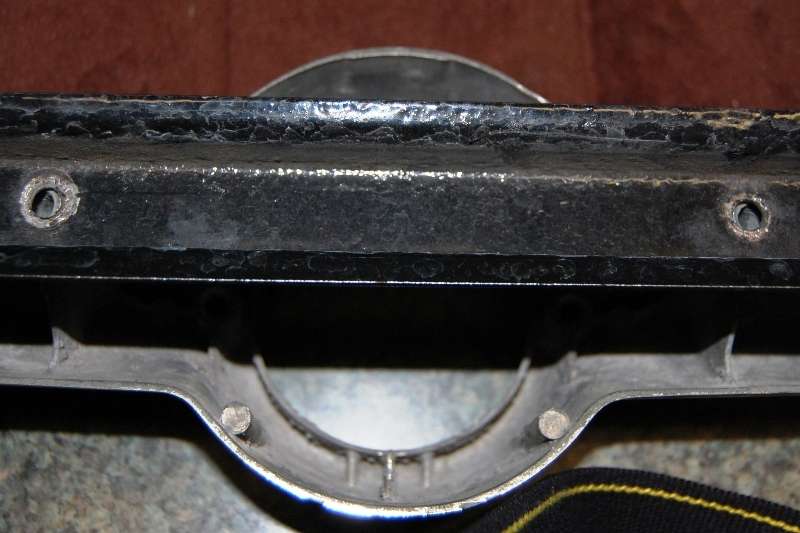 A few file strokes and the grille bar bolted right on. Years ago when I installed the Plymouth grille bar, I removed the letter hanger from the main grille. When I went back to the GMC letters, I retained the heavy steel mounting plates bolted to the radiator support, and reattached the letter rack via a pair of aluminum angles pop riveted to the ends. This earlier modification made it very easy to mount the Buick bar. On first installation, the bar was too high and the center hub almost contacted the main grille. Inverting the letter rack lowered the Buick bar to where it is now centered between the bottom of the main grille and the top of the license plate. Once that was dialed in, 90 degree brackets were fitted to the ends of the letter rack to give the outboard grille bosses somewhere to attach. It seemed sensible to attach the Buick bar at all four bosses to eliminate potential vibration cracks: 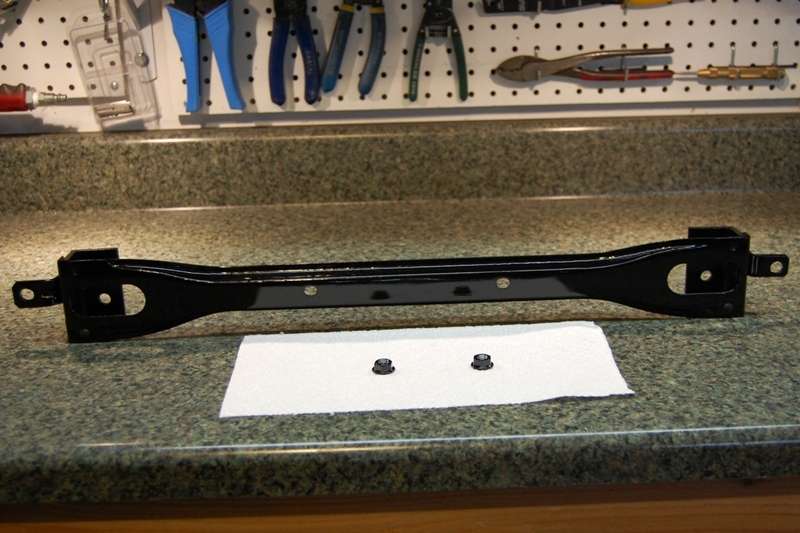 The GMC letter support was given a good sanding and fresh paint. Itís ready for final installation once the center hub for the grille arrives. While I was at it I went ahead and painted the mounting nuts as well so they wonít show after itís all put together. Hereís the last photo taken of the truck with the GMC letters: 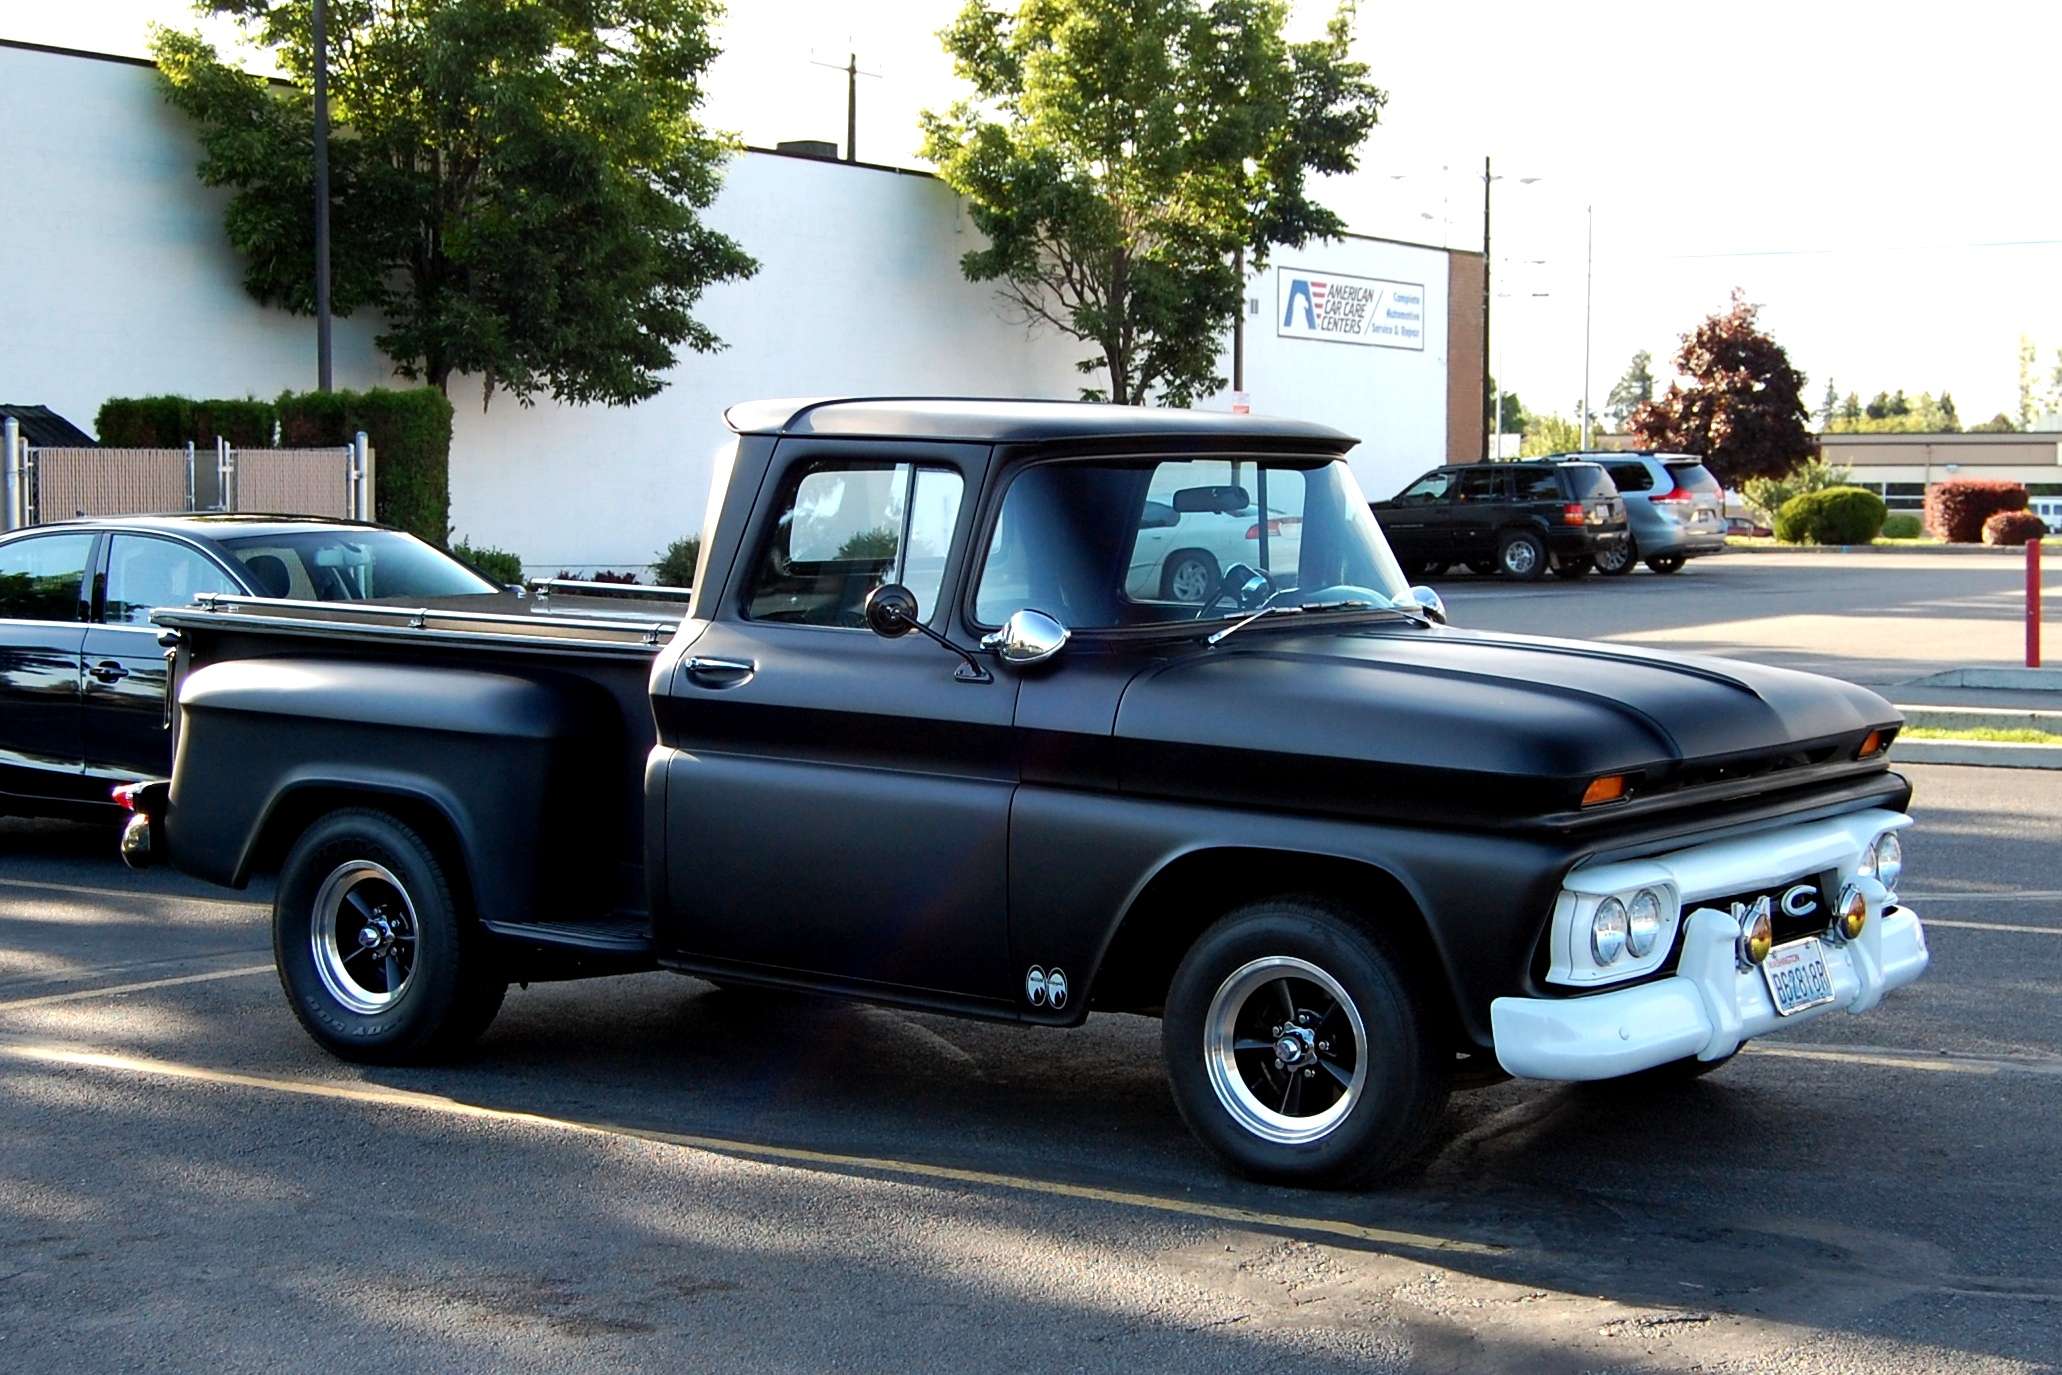 And hereís a photo with the Buick bar from a similar angle. I really love how it fills the cavity, and appears to ďbelongĒ much better than the letters did:  The fog lights look crooked because I pulled them off to have clearance to fit the grille. They are somewhat loose in the photos. When completed Iím going to raise them back up a tad so they look more centered at the same level of the new floating grille. Hereís the same shot with the Buick emblem stuffed in the hole just to have some type of emblem showing: 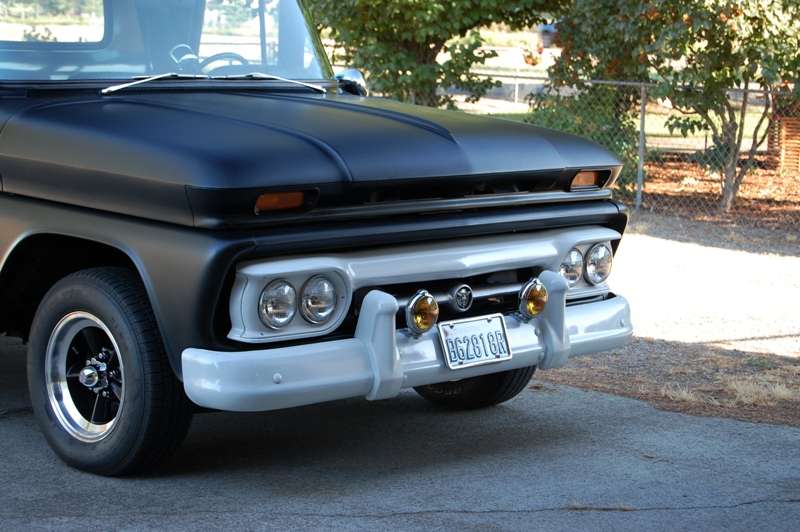 Inspected up close I thought the Buick emblem could have been made to look nice, but standing back and looking at the truck I donít like it at all. It seems reminiscent of a 52 Ford which I never found all that appealing. Here are a few more shots showing how well the new bar fits, along with how close it is to everything:  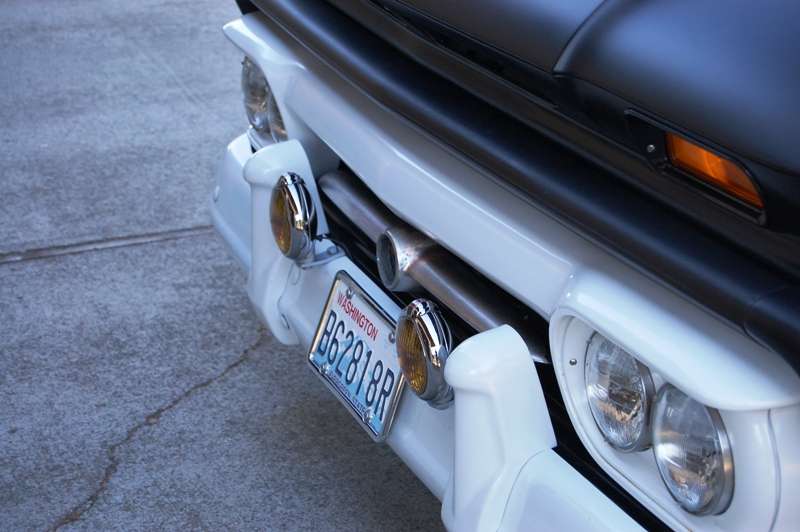 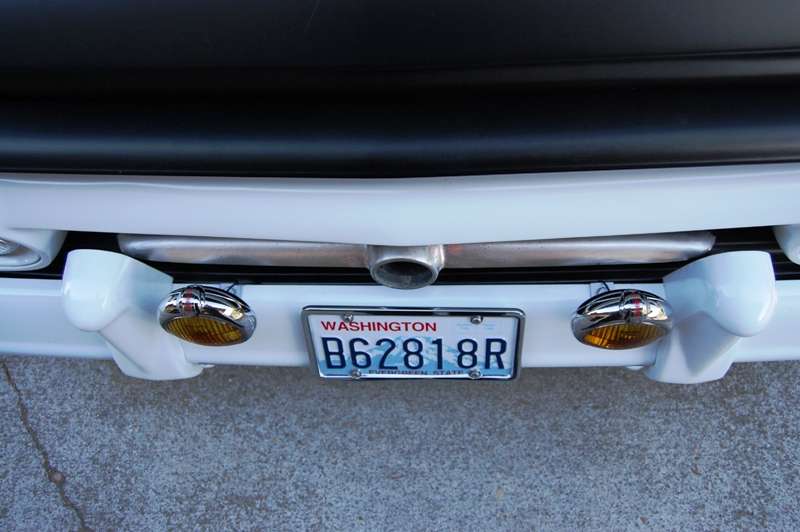 If all goes well Iíll have it in primer tomorrow and final paint by the weekend. If the horn button/hub shows up right away, it may get completed and installed sooner, especially if it fits, works, and looks good. If it looks stupid Iíll have to consider other options for the center cavity. Here are a couple of head on shots. Even unpainted it looks a lot better than my crappy photoshop mock up. At this point all I really see is how crooked the fog lights look! 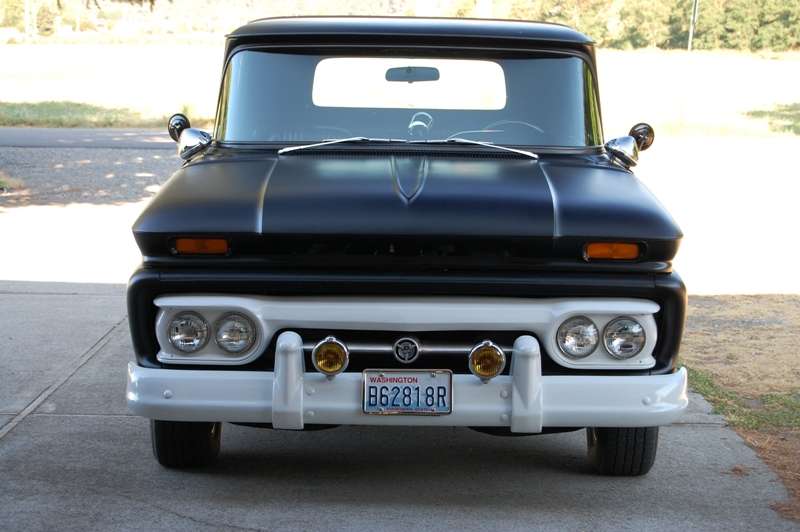  This has been such a simple project with such dramatic results Iím really looking forward to getting it done.
__________________
My Build Thread: http://67-72chevytrucks.com/vboard/s...d.php?t=444502 |
|
|

|
|
|
#269 |
|
Registered User
Join Date: Jan 2011
Location: Saco, Maine
Posts: 377
|
Re: Markeb01 Build Thread
If anyone else wants to do this conversion I have another 55 Buick grille bar in about the same condition as the one mark used, pm me if you want it.
__________________
65 Chevy short fleet 350 5 speed, soon to be LSX powered 65 F100 short fleet 91 Heritage softail 94 Fatboy 11 Softail Deluxe [wife's bike] 13 Streetglide http://www.youtube.com/watch?v=yMFMw...eature=mh_lolz |
|
|

|
|
|
#270 |
|
Senior Enthusiast
Join Date: Feb 2007
Location: Spokane Valley, WA
Posts: 8,356
|
Re: Markeb01 Build Thread
Found an ultra rare JC Whitney 55 Buick chrome bullnose grille emblem and mounted it up to see how it looked.
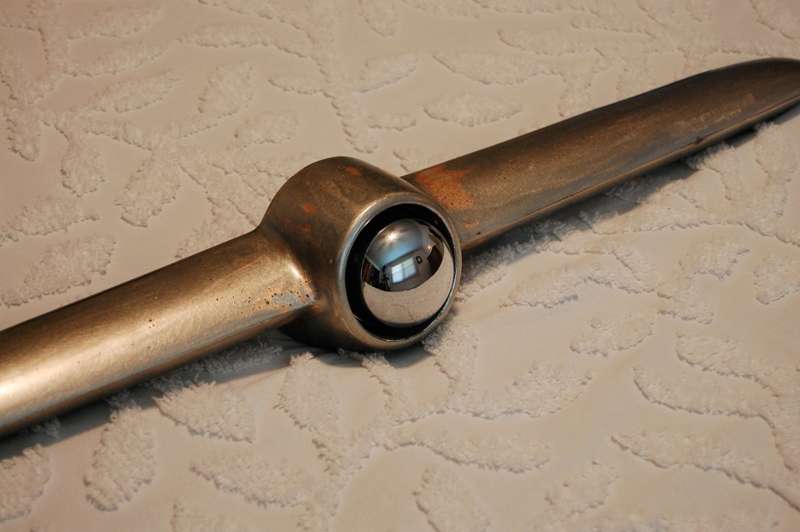 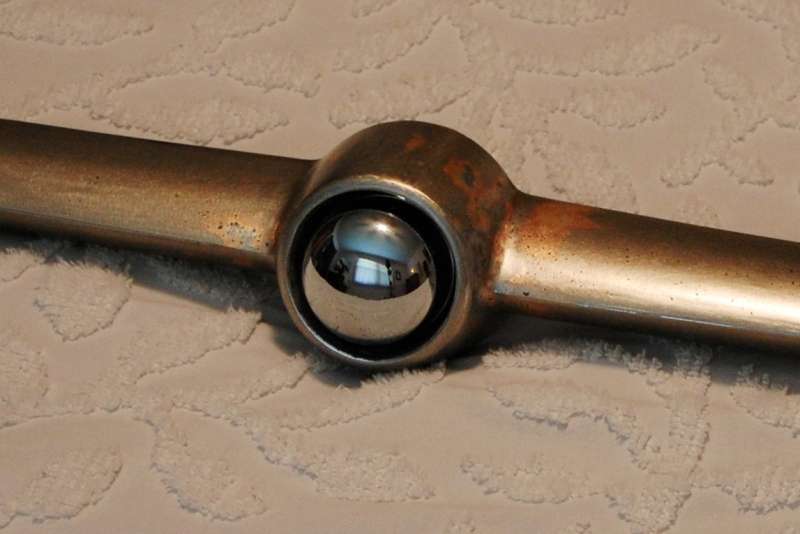 Overall it looks pretty decent, but I wonít be using it. The GMC emblem looks much more truck like and fits the area nicer. After that I spent 4 hours in the garage fitting the 59 GMC horn button, fabricating brackets, prepping for paint, etc. The GMC horn button/center emblem turned out to be chrome plated rather than stainless steel, so after scuffing with a Scotchbrite pad it was shot with UPOL Acid #8 etch primer followed by 3 coats of Rustoleum gloss white enamel. Itís finished. The grille bar was shot with etch primer and coated with UPOL high fill 2K primer. Tomorrow it will be block sanded and painted. No pictures yet. If all goes well the whole thing will be completed and installed this weekend. And by the way, the ultra rare chrome center shown above Ė is nothing more than a spare chrome dome oil fill cap! 
__________________
My Build Thread: http://67-72chevytrucks.com/vboard/s...d.php?t=444502 |
|
|

|
|
|
#271 |
|
Senior Enthusiast
Join Date: Feb 2007
Location: Spokane Valley, WA
Posts: 8,356
|
Re: Markeb01 Build Thread
After the morning bike ride the next two hours were consumed block sanding the brushed on 2K primer. Brushing it on is sure easy on clean up, but itís fairly miserable for block sanding. Sprayed on primer would have taken very little effort to block out by comparison.
Once sanded smooth it was wiped down twice with wax and grease remover. Then I started thinking about a way to hang the darn thing so I could apply the paint. A simple solution presented itself when I remembered keeping a heavy cast iron base weight out of an architectsí lamp. It weighs at least twice as much as the grille piece. A mount was created using a length of all thread and a few nuts and washers. The grille bar has a heavy steel strap where the original tin emblem backer bolted on. It was rested on the all thread and clamped tight with a second nut. Since the cast iron was dirty, it was covered with aluminum foil, along with the turn table underneath. Hereís how it looked after about 6 heavy flow coats sprayed on directly under the heat lamps in an 84 degree garage: 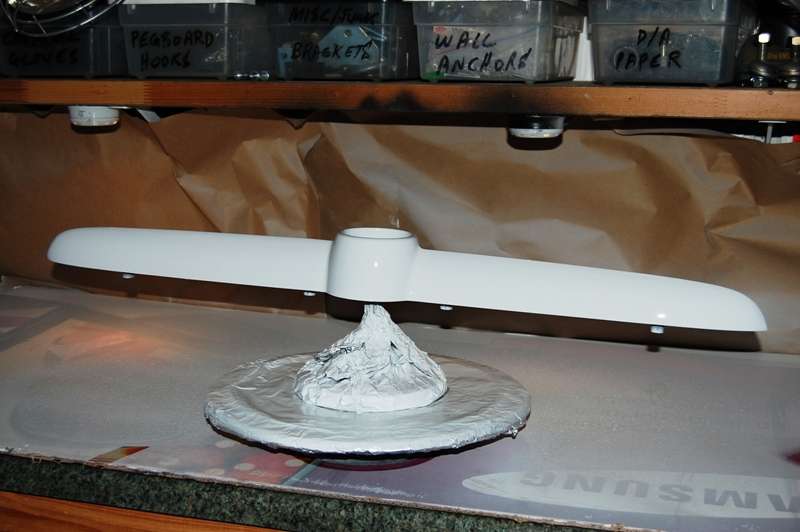 A tiny dust spec settled in the first mist coat, which I picked out with tweezers. Amazingly no additional debris landed in the paint. The picture doesnít do it justice, it really came out nice and shiny smooth. Hereís the emblem retaining strap holding the bar up. The color looks off because I forgot to turn off the heat lamps before taking the picture:  The center emblem was finished yesterday: 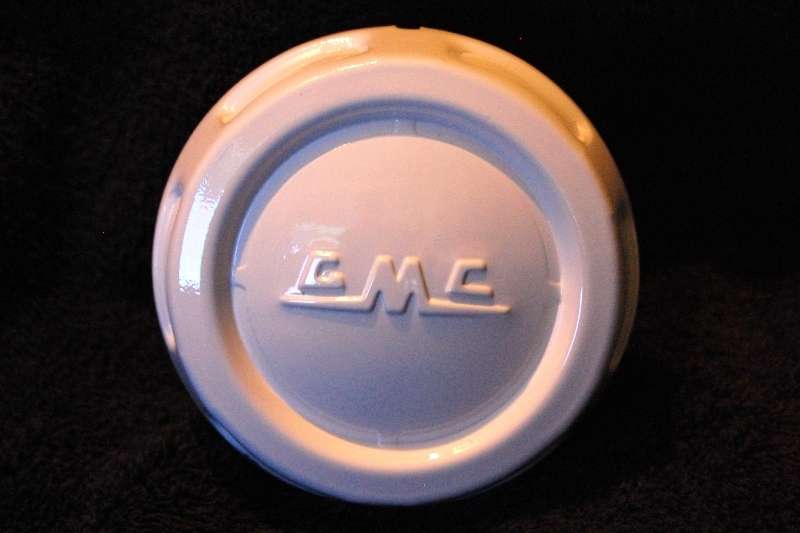 Originally I was going to paint the background black and leave the letters white. Then I thought about painting the letters (only) black. For now Iím going to leave the whole thing white. Iím thinking leaving it white will minimize the emblem and give it more of a factory appearance. I guess the proof will be in how it looks after installation. And hereís the back of the emblem/former horn button. The sides were trimmed down so the mounting tabs would be lower than the factory threaded bosses in the grille bar. 90 degree brackets where pop riveted to the sides and mounting bolts attached. Six pieces of .080 plastic styrene were Krazy glued to the perimeter. This forces the cap to be centered in the grille opening. The holes in the grille strap were drilled to fit the bolts in the cap, so pushing it into place both centers the cap and aligns the letters dead level. 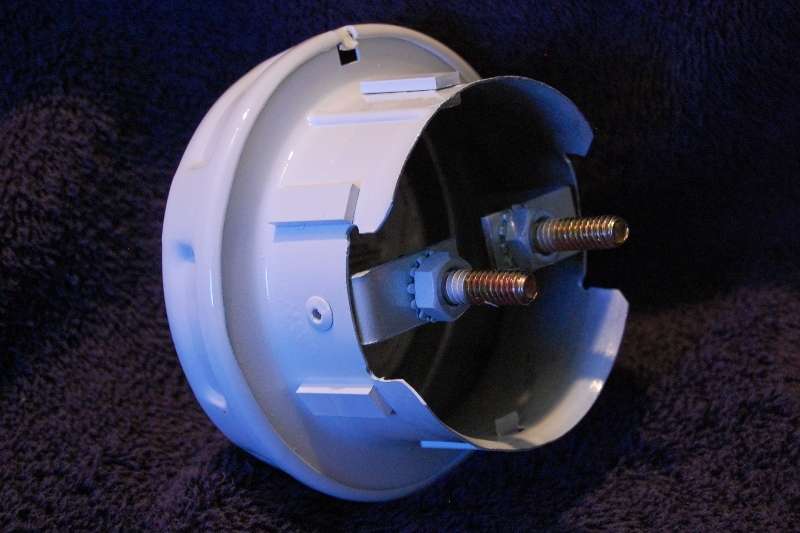 Thereís so much paint on the bar, itís going to take until tomorrow to cure sufficiently to allow handling. The only thing left to do is assemble the parts and stick it on the truck, after which Iíll correct the up and down fit of the fog lights. Iím getting anxious to see how it looks when completed.
__________________
My Build Thread: http://67-72chevytrucks.com/vboard/s...d.php?t=444502 |
|
|

|
|
|
#272 |
|
Registered User
Join Date: Feb 2011
Location: muskogee, ok
Posts: 1,091
|
Re: Markeb01 Build Thread
i dig that grill bar!! that looks sweet
it looks like it was made for that truck
__________________
 bagged 66 longbed build http://67-72chevytrucks.com/vboard/s...d.php?t=449548 my favorite colors.. black, rust, and shiny!!!! instagram: @coulter918 |
|
|

|
|
|
#273 |
|
The 60-66 GMC/Pontiac guy....
Join Date: Oct 2010
Location: Apache Junction, Arizona
Posts: 1,306
|
Re: Markeb01 Build Thread
background black, letters white, sides of the cap white...
thats my 2 pennies
__________________
 Building Genuine Pontiac Firepowered cars and trucks for several decades.  Why Pontiac?? That's just me daring to be different.  Projects.. 63 C10 Short Wheel Base fleetside (The Pro-Street) currently under reconstruction. 440CID 2X4 Pontiac 
|
|
|

|
|
|
#274 |
|
Registered User
Join Date: Feb 2011
Location: muskogee, ok
Posts: 1,091
|
Re: Markeb01 Build Thread
ya im with him on that ^
__________________
 bagged 66 longbed build http://67-72chevytrucks.com/vboard/s...d.php?t=449548 my favorite colors.. black, rust, and shiny!!!! instagram: @coulter918 |
|
|

|
|
|
#275 |
|
Registered User
Join Date: Sep 2011
Location: Tacoma, WA
Posts: 2,425
|
Re: Markeb01 Build Thread
Some quick work with paint program, but you get the idea. If this were mine to do...
It would be hard to do, but you strike me as a detail minded sort of fellow anyways  First one I did was without the outer most edge done. I almost liked that better.
__________________
Michael McMurphy My 66 Stepside My 64 Tow Truck My 66 Tempest Table Of Contents Added to Page1 Last edited by McMurphy; 07-29-2012 at 03:03 AM. |
|
|

|
 |
| Bookmarks |
|
|