
|
|
|
 03-12-2016, 08:17 PM
|
#1 |
|
Post Whore
 Join Date: Aug 2014
Location: Sacramento, CA
Posts: 10,819
|
Re: Restoring Rusty
decided to remove the rockers, didn't realiaze there was that spacer washer thingie under the nut
|

|

|
|
03-12-2016, 09:27 PM
|
#2 | |
|
Registered User
Join Date: Oct 2008
Location: Livermore ca
Posts: 699
|
Re: Restoring Rusty
Quote:
|
|
|
|
|
|
03-12-2016, 03:31 PM
|
#3 |
|
Post Whore
Join Date: Aug 2014
Location: Sacramento, CA
Posts: 10,819
|
Re: Restoring Rusty
I cleaned the Timing Cover next, then I realized it has some sort of built in rubber seal, well obviously but can only that seal be replaced or did I just waste my time making this cover shinny and now I have to get a new one
|
|
|
|
|
03-12-2016, 03:36 PM
|
#4 | |
|
Registered User
Join Date: Oct 2008
Location: Livermore ca
Posts: 699
|
Re: Restoring Rusty
Quote:
|
|
|
|
|
|
03-12-2016, 05:45 PM
|
#5 | |
|
Moderator
 Join Date: Oct 2008
Location: Wentworth, NH
Posts: 4,929
|
Re: Restoring Rusty
Quote:
If you're re-using the harmonic balancer you can get a "lip relocator" type seal so the lip isn't riding in the 42 year old groove in on the balancer snout. The other option is a Speedi Sleeve to cover the groove on the balancer snout.
__________________
1959 M35A2 LDT465-1D SOLD 1967 Dodge W200 B383, NP420/NP201 SOLD 1969 Dodge Polara 500 B383, A833 SOLD 1972 Ford F250 FE390, NP435/NP205 SOLD 1976 Chevy K20, 6.5L, NV4500/NP208 SOLD 1986 M1008 CUCV SOLD 2000 GMC C2500, TD6.5L, NV4500 2005 Chevy Silverado LS 2500HD 6.0L 4L80E/NP263 2009 Impala SS LS4 V8 RTFM... GM Parts Books, GM Schematics, GM service manuals, and GM training materials...
And please let us know if and how your repairs were successful. |
|
|
|
|
|
03-20-2016, 08:43 PM
|
#6 | |
|
Post Whore
Join Date: Aug 2014
Location: Sacramento, CA
Posts: 10,819
|
Re: Restoring Rusty
Quote:
I pretty much tried everything to no avail |
|
|
|
|
|
03-20-2016, 08:58 PM
|
#7 | |
|
Registered User
Join Date: Nov 2013
Location: Calgary, AB
Posts: 31
|
Re: Restoring Rusty
Quote:
Before you put a torch and a lot of heat to it (and risk warping the timing cover) would you take your dremel and a little cut-off wheel and carefully cut a slot in the collar/ rim of the seal? If you can weaken it there you can probably collapse the seal, prying it away from the inside radius of the timing cover with the tip of a flat head screwdriver? No warranty with my advice.
__________________
1985 GMC K2500 Sierra Classic / 350cid / TH400 Auto |
|
|
|
|
|
03-20-2016, 09:05 PM
|
#8 | |
|
Post Whore
Join Date: Aug 2014
Location: Sacramento, CA
Posts: 10,819
|
Re: Restoring Rusty
Quote:
but I took some pliers and went around and bent the lip out, so it became a pipe instead of bent in, that also made the metal crack sorta like cutting it like you suggested, then using what is quickly becoming my favorite tool THE VISE GRIPS I ripped her right out, I guess the secret was going out there late at night in my pijamas, and not being skierd! |
|
|
|
|
|
03-12-2016, 03:32 PM
|
#9 |
|
Post Whore
Join Date: Aug 2014
Location: Sacramento, CA
Posts: 10,819
|
Re: Restoring Rusty
decided to straighten out a few dents with some precision tools
|
|
|
|
|
03-12-2016, 05:17 PM
|
#10 |
|
Registered User
Join Date: Jan 2009
Location: Calgary, AB
Posts: 1,181
|
Re: Restoring Rusty
the timing cover seal is easy to replace but make sure you support it properly to not warp it
|
|
|
|
|
03-12-2016, 10:42 PM
|
#11 |
|
Registered User
Join Date: Jan 2009
Location: Calgary, AB
Posts: 1,181
|
Re: Restoring Rusty
You are planning on putting new rocker arms in right? LOL. I wouldn't resuse any of those especially if they have that deep of groves.
|
|
|
|
|
03-13-2016, 12:42 AM
|
#12 |
|
Registered User
Join Date: Jan 2016
Location: Ontario
Posts: 123
|
Re: Restoring Rusty
Make sure you check the Valve guides for play while you have the heads off and everything off them. It would have been a good idea to keep each valve in the same space it came off of. not sure if you did that or not..
|
|
|
|
|
03-13-2016, 01:30 AM
|
#13 | |
|
Post Whore
Join Date: Aug 2014
Location: Sacramento, CA
Posts: 10,819
|
Re: Restoring Rusty
Quote:
|
|
|
|
|
|
03-13-2016, 01:41 AM
|
#14 |
|
Post Whore
Join Date: Aug 2014
Location: Sacramento, CA
Posts: 10,819
|
Re: Restoring Rusty
lets take a closer look at each of the valve guide pairs and studs
|
|
|
|
|
03-13-2016, 01:45 AM
|
#15 |
|
Post Whore
Join Date: Aug 2014
Location: Sacramento, CA
Posts: 10,819
|
Re: Restoring Rusty
and now lets take a look at the chambers and study the valve seats
that looks great to me |
|
|
|
|
03-13-2016, 01:51 AM
|
#16 |
|
Post Whore
Join Date: Aug 2014
Location: Sacramento, CA
Posts: 10,819
|
Re: Restoring Rusty
I started cleaning the valves next, and the face on the # 2 Exhaust Valve one looks pitted, its the first one I cleaned
now since this is a Budget DIY Adventure, I am entertaining the following two options, just lap them and see how much better they get, or buy new exhaust valves and lap them in also going to disassemble my old heads and see how bad those exhaust valves were/are, after all that engine ran, so question is how bad can the exhaust valves be and still move the truck, and plus I learn by comparison so it will be a fun stare and compare exercise Wow replacement GM Exhaust Valves part number 12550909 are $17 bucks a pop, EXPENSIVE! some before after cleaning pics Last edited by Gregski; 03-13-2016 at 02:09 AM. |
|
|
|
|
03-13-2016, 01:59 AM
|
#17 |
|
Post Whore
Join Date: Aug 2014
Location: Sacramento, CA
Posts: 10,819
|
Re: Restoring Rusty
then it was time to clean the # 2 Intake Valve and check it out, it looks better than the exhaust one
heck speaking of comparing valves, it wouldn't hurt to buy new ones and compare these to new ones, what a novel idea, ha ha Wow replacement GM Intake Valves part number 10241743 are $16 bucks a pop, EXPENSIVE! couple before and after cleaning pics Last edited by Gregski; 03-13-2016 at 02:06 AM. |
|
|
|
|
03-13-2016, 01:07 PM
|
#18 | |
|
Senior Member
Join Date: Jul 2000
Location: North Texas
Posts: 3,463
|
Re: Restoring Rusty
Quote:
Be sure to "lap in" the valves to the seats using valve grinding compound and a tool like this: http://www.summitracing.com/parts/oe...2c4aAoYY8P8HAQ 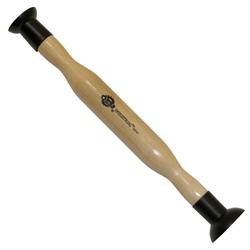
__________________
Mike 1969 C10 LWB -- owned for 35 years. 350/TH350, 3.08 posi, 1st Gen Vintage Air, AAW wiring harness, 5-lug conversion, 1985 spindles and brakes. 1982 C10 SWB -- sold 1981 C10 Silverado LWB -- sold, but wish I still had it! 1969 C10 (not the current one) that I bought in the early 1980s. Paid $1200; sold for $1500 a few years later. Just a hint at the appreciation that was coming. Retired as a factory automation products salesman. Worked part-time over the years for an engine builder and a classic car repair shop. Member here for 24 years! This is the very first car/truck Internet forum I joined. I still used a dial-up modem back then! |
|
|
|
|
|
03-13-2016, 02:02 AM
|
#19 |
|
Post Whore
Join Date: Aug 2014
Location: Sacramento, CA
Posts: 10,819
|
Re: Restoring Rusty
so 2 valves cleaned, 14 to go, I hope to knock them out tomorrow if for no other reason to be able to inspect them closer
|
|
|
|
|
03-13-2016, 11:00 AM
|
#20 |
|
Registered User
Join Date: Jan 2009
Location: Calgary, AB
Posts: 1,181
|
Re: Restoring Rusty
pitting is fine it's the valve seat you need to be concerned about.
|
|
|
|
|
03-13-2016, 11:41 AM
|
#21 | |
|
Post Whore
Join Date: Aug 2014
Location: Sacramento, CA
Posts: 10,819
|
Re: Restoring Rusty
Quote:
|
|
|
|
|
|
03-13-2016, 11:37 AM
|
#22 |
|
Registered User
Join Date: Feb 2012
Location: Beautiful BC, Canada, eh?!
Posts: 2,213
|
Re: Restoring Rusty
Now is a good time to modify the heads for more lift, and run 1.6 rockers.
__________________
1961 Apache: "Grabber Orange" Shortboxed, pancake, step-notch, air-ride, boosted-LS 1977 Silverado: Shortboxed & dropped, potato-potato V8 Pontiac Firefly (Chevy Sprint): The ultimate engine swap: 5.7L in a 1.0L bag Lotus Super 7 Replica: Scratch-built street-legal rollerskate |
|
|
|
|
03-13-2016, 11:43 AM
|
#23 | |
|
Post Whore
Join Date: Aug 2014
Location: Sacramento, CA
Posts: 10,819
|
Re: Restoring Rusty
Quote:
|
|
|
|
|
|
03-13-2016, 01:24 PM
|
#24 |
|
Registered User
Join Date: Oct 2008
Location: Livermore ca
Posts: 699
|
Re: Restoring Rusty
So a couple of things while looking at your heads just thru the pictures. The valve seat width is WAY to big to be able to lap the seats in. You want the width to be about .060. This is what a proper valve job comes into play to be able to fix this issue. a 30* top angle, 45* sealing and a 60* bottom. The pitting on the valve will need to be addressed and the valve refaced to the proper angle. The valves in your old heads are a little different then the Vortec valves. They have an O-ring groove below the keeper groove. While this will not hurt anything, they are not the same. The price for GM parts is crazy to aftermarket, valves should run you about 5-6 dollars a piece.
|
|
|
|
|
03-13-2016, 02:07 PM
|
#25 | |
|
Post Whore
Join Date: Aug 2014
Location: Sacramento, CA
Posts: 10,819
|
Re: Restoring Rusty
Quote:
however I believe those specs are for a performance valve job not stock Super Chevy article Angling For Power says: "Using a dial caliper, we measured a seat width of 0.060 inch, which is a generally accepted street-engine spec." it goes on to say "Narrower seats generally improve flow but are also less durable." Last edited by Gregski; 03-13-2016 at 02:12 PM. |
|
|
|
|
 |
| Bookmarks |
|
|


 Hybrid Mode
