
|
 10-09-2012, 05:02 PM
|
#276 | |
|
Registered User
Join Date: May 2012
Location: zaandam netherlands
Posts: 240
|
Re: Dutch 1955 build
Quote:
   also fitted the gas pedal in place  and checked if the wiper motor would not interfere with the brake booster 
|
|

|

|
|
10-09-2012, 05:20 PM
|
#277 |
|
56 - autocross
Join Date: Apr 2010
Location: Camarillo, Ca
Posts: 1,121
|
Re: Dutch 1955 build
I have always wanted to know how you fill and maintain a master cylinder like that? Can you enlighten me please?
By the way, what pedal set up did you use? |
|
|
|
|
10-09-2012, 05:59 PM
|
#278 | |
|
Registered User
Join Date: May 2012
Location: zaandam netherlands
Posts: 240
|
Re: Dutch 1955 build
Quote:
 the same procedure i use on my 55 panel with underfloor pw brake setup where the master cilinder is located right under the seat without an access hole from above the pedal setup i use is a modified underfloor setup the rubber brake pad is from a corvette, the gas pedal is from lokar. |
|
|
|
|
|
10-09-2012, 06:17 PM
|
#279 | |
|
56 - autocross
Join Date: Apr 2010
Location: Camarillo, Ca
Posts: 1,121
|
Re: Dutch 1955 build
Quote:
|
|
|
|
|
|
10-09-2012, 06:27 PM
|
#280 | |
|
Registered User
Join Date: May 2012
Location: zaandam netherlands
Posts: 240
|
Re: Dutch 1955 build
Quote:

|
|
|
|
|
|
10-09-2012, 06:33 PM
|
#281 |
|
Registered User
Join Date: Aug 2007
Location: Corona, California
Posts: 7,998
|
Re: Dutch 1955 build
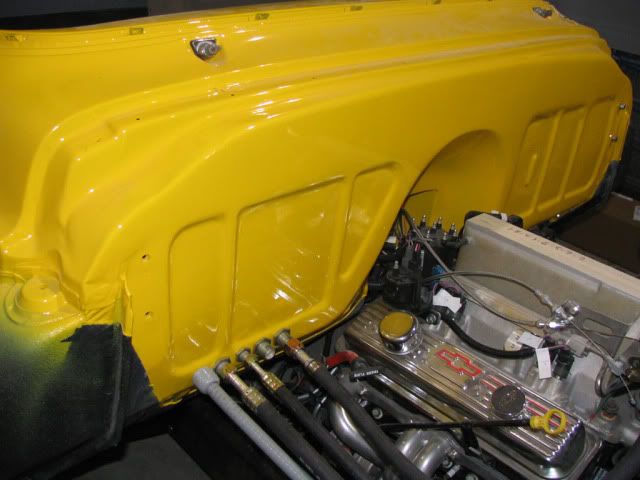
The fire wall looks good. I may be a bit prejudiced though.
Kim |
|
|
|
|
10-09-2012, 11:37 PM
|
#282 |
|
Senior Member
 Join Date: Mar 2011
Location: West Plains, Missouri
Posts: 7,555
|
Re: Dutch 1955 build
I agree that the firewall looks much better with the lip removed....Jim
__________________
my build thread: http://67-72chevytrucks.com/vboard/s...d.php?t=459839 Jimbo's long bed step build:http://67-72chevytrucks.com/vboard/s...t=464626<br /> |
|
|
|
|
10-13-2012, 08:10 PM
|
#283 | |
|
Senior Member
  Join Date: Nov 2008
Location: Glendora, CA
Posts: 6,336
|
Re: Dutch 1955 build
Quote:
I have been looking for bed roll end treatments and Russell turned me on to your threat. After looking this photo over I really like what you've done but I have a question: Doesn't this create a place for water to collect at the bottom of this smooth transition you added? I don't see a weep hole and you didn't mention putting any kind of rust preventative on the back side of the steel you added. Also, I haven't looked ENTIRELY through your thread but I didn't see any closing off of the bed tube. I knew someone once who added a 3-4" wide, long strip of sheet steel closing the tube underneath because he wanted to use an old style vinyl tonneau cover but not drill snaps into the bed tube, so he put industrial strength Velcro under the tube on that strip he added. Something like that would close off this dead end your tube treatment creates. |
|
|
|
|
|
10-14-2012, 12:28 AM
|
#284 |
|
Registered User
Join Date: Jun 2006
Location: Idaho
Posts: 8,800
|
Re: Dutch 1955 build
I did my firewall like yours, but left the horizontal projecting seam. I will be driving the truck in weather and it diverts the rain and snow melt to the side and off the electrical stuff on the back of the engine and firewall.
__________________
1959 Chevy Short Fleetside w/ 74 4WD drive train (current project) OrrieG Build Thread 1964 Chevelle Malibu w/ 355-350TH (daily driver) Helpful AD and TF Manual Site Old Car Manual Project |
|
|
|
|
10-14-2012, 01:01 PM
|
#285 | |
|
Registered User
Join Date: May 2012
Location: zaandam netherlands
Posts: 240
|
Re: Dutch 1955 build
Quote:
i will put in some wax in these kind of places there is also a weep hole on the inside 
|
|
|
|
|
|
10-14-2012, 01:10 PM
|
#286 | |
|
Registered User
Join Date: May 2012
Location: zaandam netherlands
Posts: 240
|
Re: Dutch 1955 build
Quote:

|
|
|
|
|
|
10-14-2012, 03:32 PM
|
#287 |
|
Registered User
Join Date: May 2012
Location: zaandam netherlands
Posts: 240
|
Re: Dutch 1955 build
last week done some small things that take a lot of time
and dont show much progress, cleaned up some holes on the dash and holes for the sunvisors we wont use, and fit all things that need to go under the dash like defroster hose, blower fan and gauge cluster to see nothing will interfere with the brake booster setup.  made a bracket for the fuse box  the fab work is as good as done on the cab so it can be made ready for primer and paint. now i will get working on the bed agian i was thinking for a while in what direction to go on the taillights i going to integrate these corvette taillights in the rear fenders 2 on each side , well at least thats the plan....  made some pipes that wil need to be cut in a 30 degree angle  and cut one hole into the fender 
|
|
|
|
|
10-14-2012, 05:49 PM
|
#288 | |
|
Registered User
Join Date: Jun 2006
Location: Idaho
Posts: 8,800
|
Quote:
__________________
1959 Chevy Short Fleetside w/ 74 4WD drive train (current project) OrrieG Build Thread 1964 Chevelle Malibu w/ 355-350TH (daily driver) Helpful AD and TF Manual Site Old Car Manual Project |
|
|
|
|
|
10-15-2012, 05:25 PM
|
#289 |
|
Registered User
Join Date: May 2012
Location: zaandam netherlands
Posts: 240
|
Re: Dutch 1955 build
well thanks OrrieG
 tonight i have made some cups for the the tail lights yesterday i had made some tubes and tried to cut them in a 30 degree angle with a belt saw on my work. but could not get a nice clean cut and wrinkled the tubes  so i took the best of both sizes and cut them open and spread them out, and then traced over on new sheet metal  rolled the inner tubes  and here the outher tubes   and closed them up, next will be to cut a hole in the outher tubes to weld the inner tubes in 
|
|
|
|
|
10-15-2012, 06:15 PM
|
#290 |
|
Registered User
Join Date: Aug 2007
Location: Corona, California
Posts: 7,998
|
Re: Dutch 1955 build
Looks like you came up with a good solution to your problem.
Kim |
|
|
|
|
10-15-2012, 09:48 PM
|
#291 |
|
Registered User
Join Date: Aug 2010
Location: Lafayette In.
Posts: 252
|
Re: Dutch 1955 build
So simple, yet, trick on the little cups. You make them out of cardboard first?
|
|
|
|
|
10-15-2012, 11:18 PM
|
#292 |
|
Senior Member
Join Date: Mar 2011
Location: West Plains, Missouri
Posts: 7,555
|
Re: Dutch 1955 build
Slick....Jim
__________________
my build thread: http://67-72chevytrucks.com/vboard/s...d.php?t=459839 Jimbo's long bed step build:http://67-72chevytrucks.com/vboard/s...t=464626<br /> |
|
|
|
|
10-16-2012, 05:58 PM
|
#293 | |
|
Registered User
Join Date: May 2012
Location: zaandam netherlands
Posts: 240
|
Re: Dutch 1955 build
Quote:
|
|
|
|
|
|
10-16-2012, 06:06 PM
|
#294 |
|
Registered User
Join Date: May 2012
Location: zaandam netherlands
Posts: 240
|
Re: Dutch 1955 build
have finished up the taillight cups
cut open the outher pieces  and welded in the inner pieces  and a lot of grind work later.......  tomorrow night i will determine the final location and fit them in the fenders |
|
|
|
|
10-16-2012, 06:11 PM
|
#295 |
|
Registered User
Join Date: Aug 2007
Location: Corona, California
Posts: 7,998
|
Re: Dutch 1955 build
Those came out real nice.
They should look good in the fenders. Kim |
|
|
|
|
10-16-2012, 11:22 PM
|
#296 |
|
Senior Member
Join Date: Mar 2011
Location: West Plains, Missouri
Posts: 7,555
|
Re: Dutch 1955 build
Very nice...Jim
__________________
my build thread: http://67-72chevytrucks.com/vboard/s...d.php?t=459839 Jimbo's long bed step build:http://67-72chevytrucks.com/vboard/s...t=464626<br /> |
|
|
|
|
10-17-2012, 04:37 PM
|
#297 |
|
Registered User
Join Date: May 2012
Location: zaandam netherlands
Posts: 240
|
Re: Dutch 1955 build
got them in the fender on one side
   
|
|
|
|
|
10-17-2012, 06:13 PM
|
#298 |
|
56 - autocross
Join Date: Apr 2010
Location: Camarillo, Ca
Posts: 1,121
|
Re: Dutch 1955 build
I like those taillights. Ever consider making the housings and selling them? I would be interested.
|
|
|
|
|
10-17-2012, 09:44 PM
|
#299 |
|
Registered User
Join Date: Nov 2011
Location: Langley, BC
Posts: 702
|
Re: Dutch 1955 build
Lights look real good. I like the way you fab'd them.
__________________
56 Chevy PU http://67-72chevytrucks.com/vboard/s...d.php?t=531955 Question: Know how to sell your truck for $50,000? Answer: Spend $100,000 building it. |
|
|
|
|
10-17-2012, 09:54 PM
|
#300 |
|
Registered User
Join Date: Aug 2007
Location: Corona, California
Posts: 7,998
|
Re: Dutch 1955 build
Those look sweet.
Kim |
|
|
|
 |
| Bookmarks |
|
|


 Linear Mode

