
|
|
|
 07-06-2013, 10:05 AM
|
#1 |
|
Registered User
 Join Date: Mar 2005
Location: apple valley, ca
Posts: 2,670
|
Re: Project '64 Cheapskate
Thanks!
I looked at the pictures again this morning, and the outside of the case where the clutch housing is looks like the paint crinkled, but it's the rough casting of the outer case. I even walked out into the shop and looked at it again to be sure. Late yesterday, I decided to do a quick voltage check to see if I could hear the lock-up solenoid clicking, so I put 12v to the electrical plug and got nothing. I called my buddy who owned the trans before me and was the one who had it rebuilt said that he ran a non-lockup converter and had that function disabled. Bummer. I'm a big believer in the lock-up function, and I will ensure that it's operational before I put the trans into the truck. So, I'll be draining the trans and getting the lock-up parts and making it all work. Something about tranny fluid just makes me want to send it off and let somebody else do it. It's messy, and no matter how well you prepare for spillage, you're going to make a huge mess.
__________________
Check out my latest endeavor: https://roundsixpod.com My build threads: '55 Chevy: http://67-72chevytrucks.com/vboard/s...d.php?t=247512 '64 C-20: http://67-72chevytrucks.com/vboard/s...d.php?t=446527 |

|

|
|
07-07-2013, 10:50 AM
|
#2 |
|
Registered User
Join Date: Mar 2005
Location: apple valley, ca
Posts: 2,670
|
Re: Project '64 Cheapskate
Had a very productive day yesterday.
I am a real stickler about ergonomics whenever I build a car. It has to "feel" right, from the pedal placement, the column position, and especially the seat. I've sat in a lot of the '60-'66 Chevy trucks, and I've never been a fan of the "feel". You sit too high, the stock seat is overstuffed, the steering wheel is too big, and the pedals are too high off the floor. Because my '64 is essentially a clean-sheet build, I have the perfect opportunity to get the ergonomics tailored to my liking. I was able to mount the column and the steering wheel, and the shape and size of the old wood wheel is going to be perfect, and it'll give me the '60s vibe I'm looking for. On to the seat. I had two original '60-'66 stock seats that I played with, even using a pair of cut down stock seat brackets to get the seat lower, but I didn't like it. So, I wound up finding a bench seat out of the rear of an early '90s Chevy Crew Cab dually at the local Pick-A-Part that was in perfect condition for $70. It even has the flip down armrest that tucks into the seat. I put the seat into position, and it was a HUGE improvement over the stock seat, but it still needed improvement. So, with the assistance of Mr. Brad, we fired up the cut-off wheels and make sparks fly: After careful consideration, it was determined that if the seat brackets had 2" chopped out of them, it would help get the seat down where it needed to be: 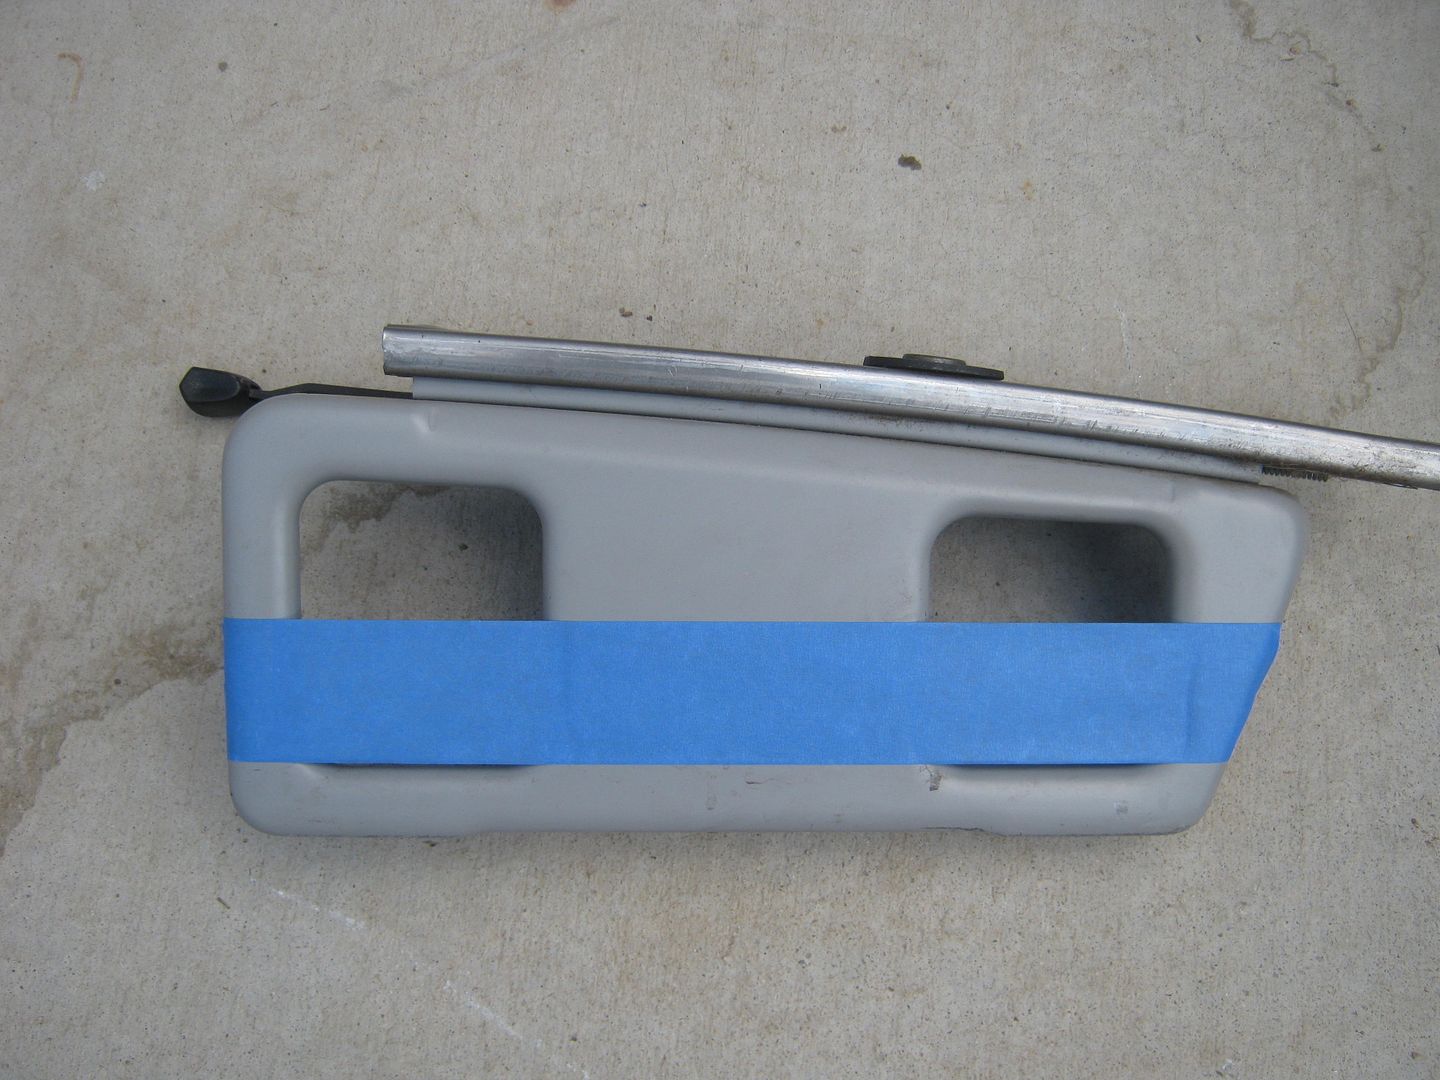 The shape of the seat brackets don't allow the pieces to come back together perfectly without a slight gap at the bottom, but that's not a problem. I will build a plate to cover the seat bracket and probably carpet it when the time comes. 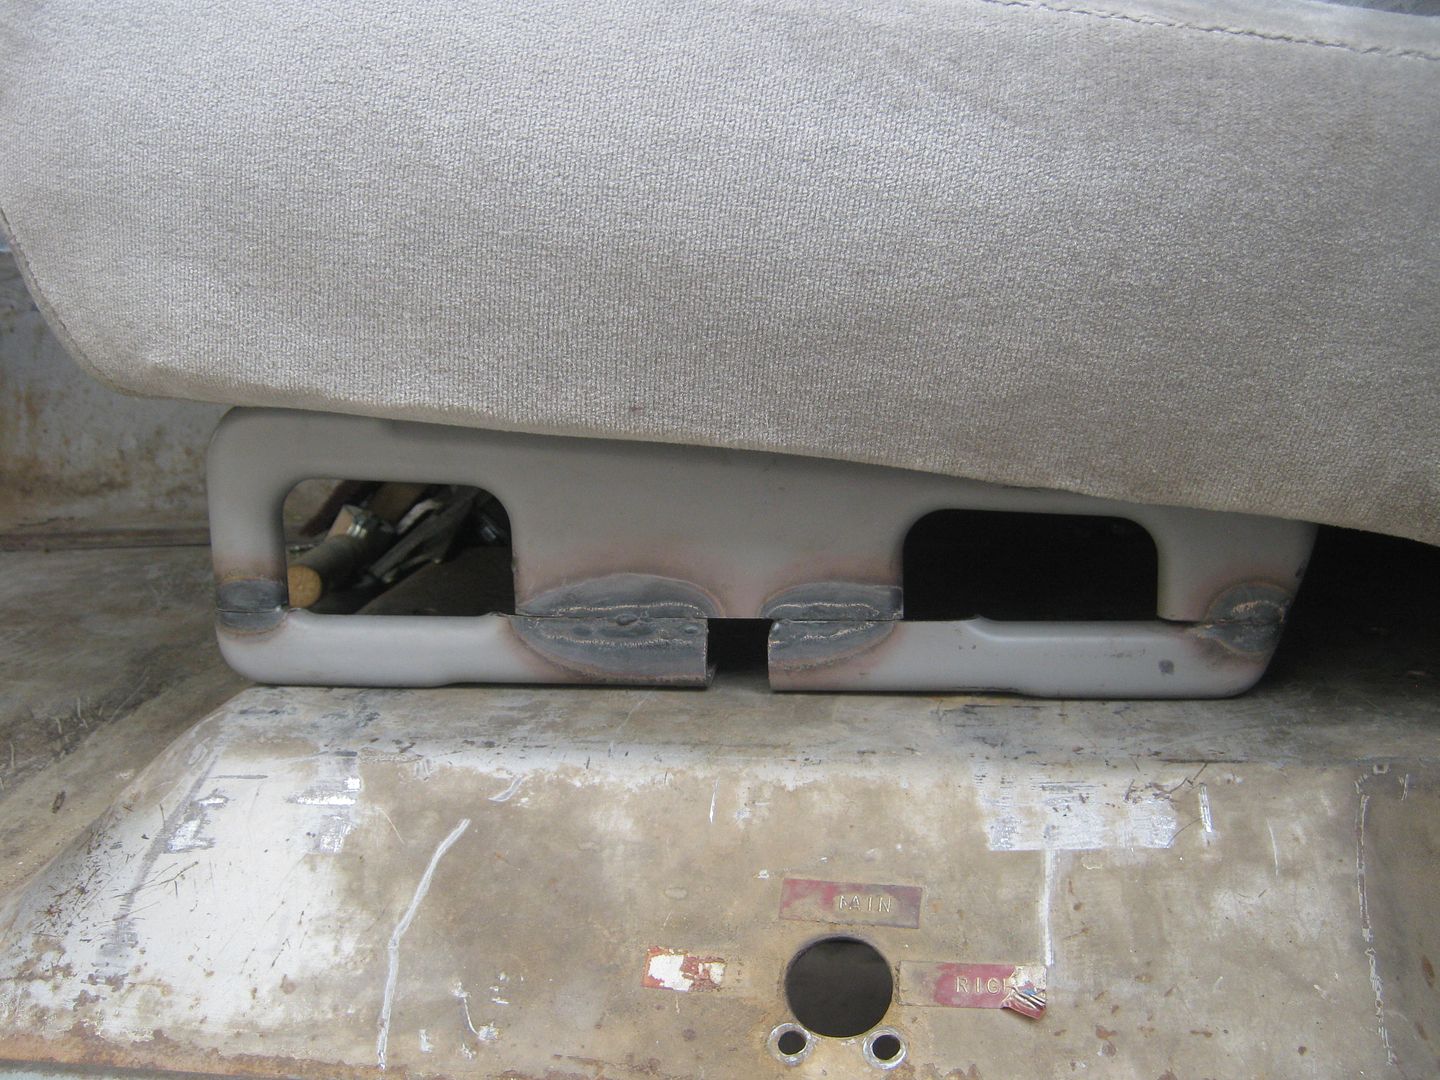 This picture shows the new seating position. The seat is now lower by 2", and now that the gas tank has been removed from the cab, the seat is back all the way to the rear. You're not scrunched up anymore, like the stock configuration 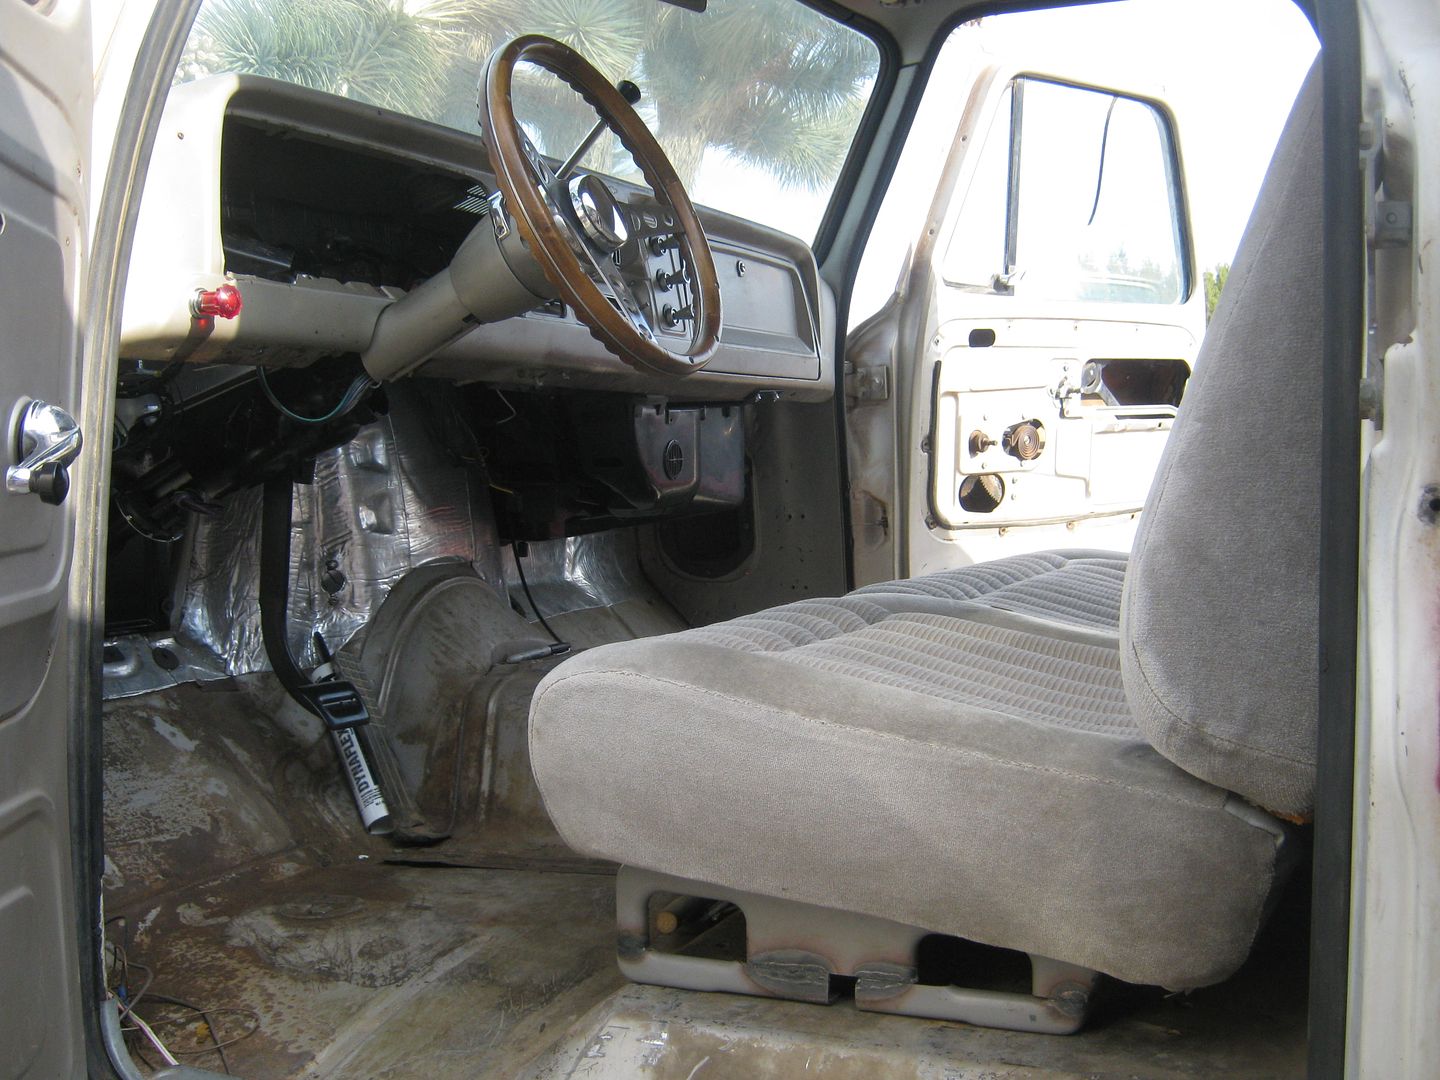 The gear selector and the turn signal lever are going to have to be chucked up in the lathe and shortened. Right now, they're much too long. 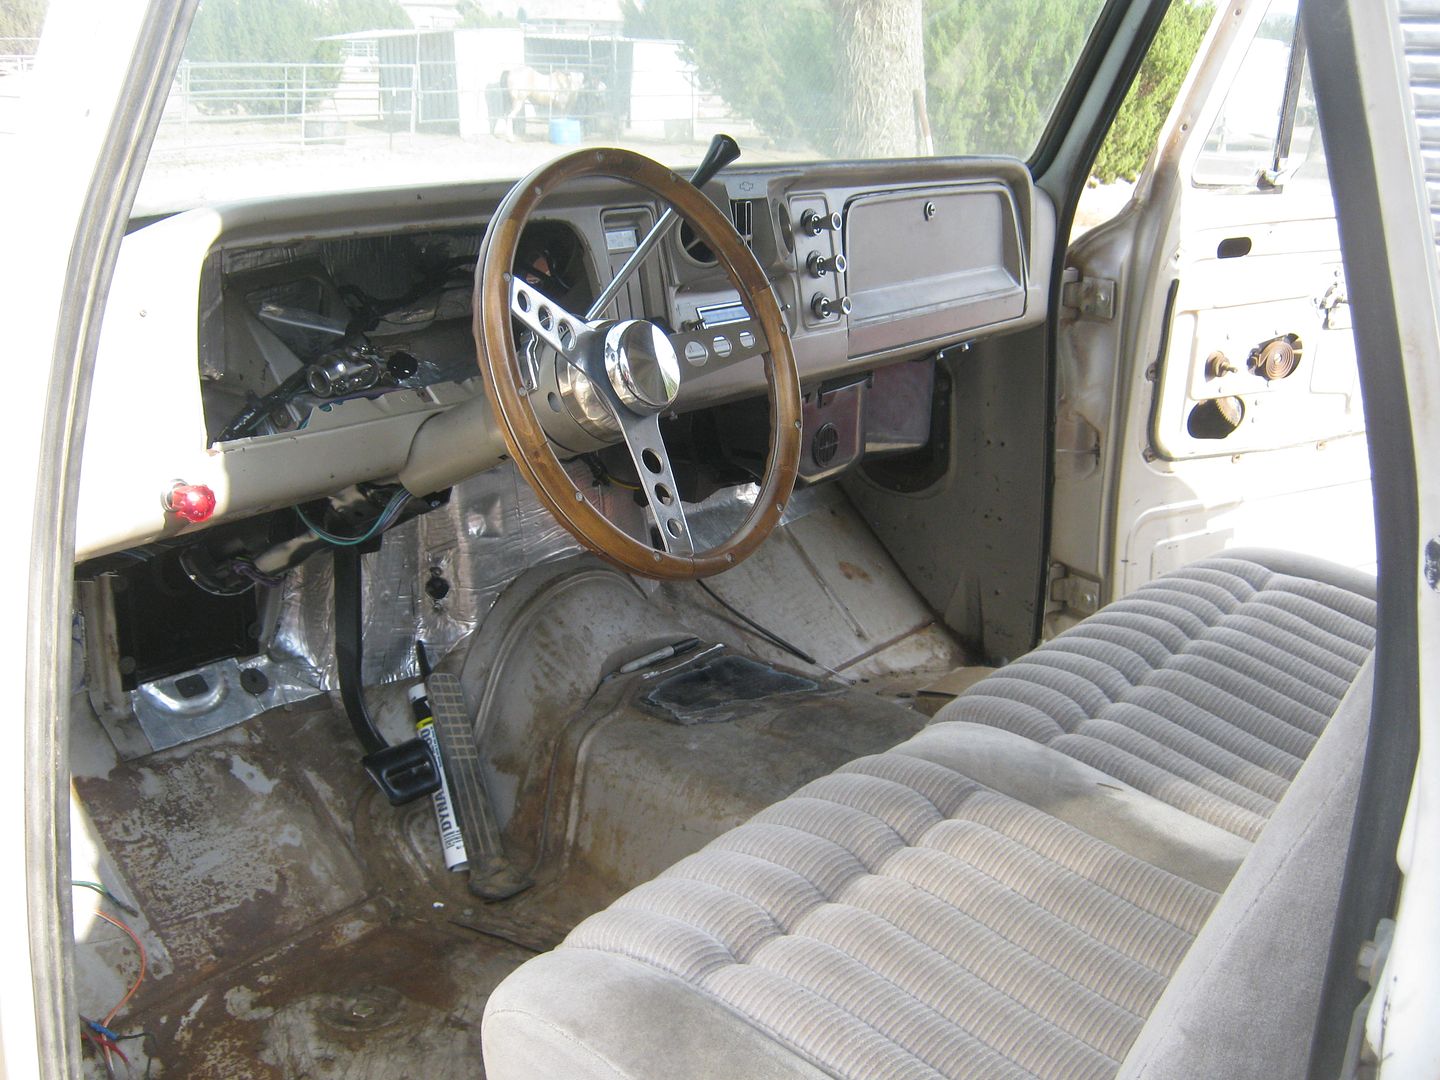 One of the best things about using this seat in a '60-'66 is that you only have to drill 2 holes for the rear bolts. The fronts line up perfectly with the original nutplates in the floor. Again, thank you Chevrolet! Next on the agenda: Finalize the column position and "lock it down" Gas tank(s) mod.
__________________
Check out my latest endeavor: https://roundsixpod.com My build threads: '55 Chevy: http://67-72chevytrucks.com/vboard/s...d.php?t=247512 '64 C-20: http://67-72chevytrucks.com/vboard/s...d.php?t=446527 |
|
|
|
|
07-07-2013, 11:57 AM
|
#3 |
|
Registered User
Join Date: Apr 2011
Location: .
Posts: 3,104
|
Re: Project '64 Cheapskate
From the original stock height of the '60-'66 seat to the '90 seat being modified(lowered), how many inches did you achieve?
The stock seat has me craning my neck at stop lights. Even with the cab stretch I've mocked up stop light conditions and end up having to bend down to look up to see a light.  Looks great, You took all the guess work out, got me sold on the idea 
|
|
|
|
|
07-07-2013, 11:56 AM
|
#4 |
|
Slots go on anything!
Join Date: May 2003
Location: Richardson, TX
Posts: 5,957
|
Re: Project '64 Cheapskate
With the seat lower, do you have enough legroom? I like the gas pedal spacer, too.
On your TCC, if you can put the trans on your engine stand and roll it over, it will make everything 100% easier. Good excuse to add a drain plug to the pan, too.
__________________
1974 Jimmy- 5.3/4L80e/NP241 Last edited by Jonboy; 07-07-2013 at 12:04 PM. |
|
|
|
|
07-07-2013, 06:32 PM
|
#5 |
|
Registered User
Join Date: Apr 2003
Location: Indep, MO
Posts: 5,893
|
Re: Project '64 Cheapskate
Like the looks of it! I did my trams on the stand, highly recommended. Are you gonna use the BTO kit? I liked that it solved all the geometry probs in one whack. Are you gonna use a vacuum cutoff as well? Glad you're back on the job, as it were.
Posted via Mobile Device
__________________
Boppa's Old Yeller Truck Build, Old Yeller's New Heart! Project Buzz Bomb Flyin' Low! |
|
|
|
|
07-07-2013, 09:55 PM
|
#6 | ||||
|
Registered User
Join Date: Mar 2005
Location: apple valley, ca
Posts: 2,670
|
Re: Project '64 Cheapskate
Quote:
Quote:
Quote:
Quote:
Brad did his TV cable using a factory bracket with a slight mod and it works great on his Holley. I might use the same set-up. Bow Tie Overdrives is actually in the next town over. I've used their stuff before, and it worked good. You'd be shocked at how their place looks. They do a ton of business, but their shop is a dive. 99% of what they do is mail order, so it doesn't matter how nice the place looks. Those boys crank out some transmissions.
__________________
Check out my latest endeavor: https://roundsixpod.com My build threads: '55 Chevy: http://67-72chevytrucks.com/vboard/s...d.php?t=247512 '64 C-20: http://67-72chevytrucks.com/vboard/s...d.php?t=446527 |
||||
|
|
|
|
07-08-2013, 08:51 AM
|
#7 |
|
Registered User
Join Date: Apr 2003
Location: Indep, MO
Posts: 5,893
|
Re: Project '64 Cheapskate
Oh hey, if you're gonna have to do a converter, the 4.3 Blazer ones apparently have a tad more stall built in to get it movin'. Hope it helps!
Posted via Mobile Device
__________________
Boppa's Old Yeller Truck Build, Old Yeller's New Heart! Project Buzz Bomb Flyin' Low! |
|
|
|
|
07-09-2013, 12:15 AM
|
#8 |
|
Registered User
Join Date: Sep 2011
Location: Tacoma, WA
Posts: 2,425
|
Re: Project '64 Cheapskate
Here are a couple of quick and dirty shots of the stock bench seat measurements I promised.
I hope this gives you guys a ballpark estimate of what you were discussing. Rock on man !!
__________________
Michael McMurphy My 66 Stepside My 64 Tow Truck My 66 Tempest Table Of Contents Added to Page1 |
|
|
|
|
07-09-2013, 09:21 PM
|
#9 |
|
Registered User
Join Date: Apr 2011
Location: .
Posts: 3,104
|
Re: Project '64 Cheapskate
Thanks for the pics McMurphy.
From the way chevyrestoguy describes the room and comfort Im keeping my eyes open for a seat to try out. Thanks Fellas |
|
|
|
|
07-10-2013, 10:16 AM
|
#10 | |
|
Registered User
Join Date: Mar 2005
Location: apple valley, ca
Posts: 2,670
|
Re: Project '64 Cheapskate
Quote:
McMurphy- Thanks for the measurements. Is there any way you could get a vertical measurement from the floor to the top of the upholstery at the front edge of the seat? This measurement will tell us the height difference between my modified seat and a stock seat. My measurement was 14.25" from the floor to the top of the front of the seat. Thanks!
__________________
Check out my latest endeavor: https://roundsixpod.com My build threads: '55 Chevy: http://67-72chevytrucks.com/vboard/s...d.php?t=247512 '64 C-20: http://67-72chevytrucks.com/vboard/s...d.php?t=446527 |
|
|
|
|
|
07-10-2013, 03:57 PM
|
#11 | |
|
Old and crusty
Join Date: Jan 2009
Location: Surprise, AZ
Posts: 462
|
Re: Project '64 Cheapskate
Quote:
What year crew cab seats are you using?
__________________
65 Chevy long wide daily driver - SOLD! 64 Chevy Short Step LS |
|
|
|
|
|
07-10-2013, 09:58 PM
|
#12 | |
|
Registered User
Join Date: Sep 2011
Location: Tacoma, WA
Posts: 2,425
|
Re: Project '64 Cheapskate
Quote:
__________________
Michael McMurphy My 66 Stepside My 64 Tow Truck My 66 Tempest Table Of Contents Added to Page1 |
|
|
|
|
|
07-11-2013, 12:05 AM
|
#13 |
|
Rollin' Old Skool
Join Date: Jun 2007
Location: Hattiesburg, MS
Posts: 5,371
|
Re: Project '64 Cheapskate
looks like your photos on page 14 got messed up...you're correct on the interiors changing in '95....I had blue cloth buckets in a similar pattern in my old '93 fullsize reg. cab....from reading, it seems as though crew cabs began in '88 for the '88-98 body style, but it was a 3500 series. Not sure when that particular seat pattern began though (if it matters), but I think '90-94 should be what to look for.
__________________
_____________________________________________ Phillip My Build threads: 1966 Chevy C-10 "Black Betty" shortbed, fleetside, BBW, 327 V8/ Powerglide (under construction) http://67-72chevytrucks.com/vboard/s...ighlight=betty 1997 Chevy Tahoe, 2dr/2wd, mild custom (Daily driver) http://67-72chevytrucks.com/vboard/s...d.php?t=601142 Pics: '66 C-10 https://flic.kr/s/aHsjHWD4h9 '97 Tahoe https://flic.kr/s/aHsjGZ7wKP '93 C-1500 https://flic.kr/s/aHskxdpdnQ '88 S-10 Blazer https://flic.kr/s/aHsjYGx4Md Previous Rides: 1993 Chevy S-10 ext. cab, 4.3L, 4/5 drop (Sold) 1993 Chevy C-1500 short/step Retro-Rod (Sold) 1988 S-10 Blazer 2dr/2wd mild custom (Sold) |
|
|
|
|
07-11-2013, 11:48 PM
|
#14 | |
|
Registered User
Join Date: Mar 2005
Location: apple valley, ca
Posts: 2,670
|
Re: Project '64 Cheapskate
Quote:
likaroc13- Thanks for the info. I remember that they carried over the old (pre '88) crew cab 4 drs. until 1991, and the '88-'98 body style crew cabs showed up in 1992. I'm talking crew cab, not extended cab. I remember that everybody with a pre '88 wanted the '88-'91 crew cab front ends because they were cool looking and only the rich guys could afford the swap.
__________________
Check out my latest endeavor: https://roundsixpod.com My build threads: '55 Chevy: http://67-72chevytrucks.com/vboard/s...d.php?t=247512 '64 C-20: http://67-72chevytrucks.com/vboard/s...d.php?t=446527 |
|
|
|
|
|
07-12-2013, 12:31 AM
|
#15 | |
|
Rollin' Old Skool
Join Date: Jun 2007
Location: Hattiesburg, MS
Posts: 5,371
|
Re: Project '64 Cheapskate
Quote:
 So yeah, I'd say '92-94 for the crew cabs, & '90-94 for regular OBS C/K trucks. So yeah, I'd say '92-94 for the crew cabs, & '90-94 for regular OBS C/K trucks.btw, nice job on your brake pedal modification...& I dig the steering wheel, which fits in nicely 
__________________
_____________________________________________ Phillip My Build threads: 1966 Chevy C-10 "Black Betty" shortbed, fleetside, BBW, 327 V8/ Powerglide (under construction) http://67-72chevytrucks.com/vboard/s...ighlight=betty 1997 Chevy Tahoe, 2dr/2wd, mild custom (Daily driver) http://67-72chevytrucks.com/vboard/s...d.php?t=601142 Pics: '66 C-10 https://flic.kr/s/aHsjHWD4h9 '97 Tahoe https://flic.kr/s/aHsjGZ7wKP '93 C-1500 https://flic.kr/s/aHskxdpdnQ '88 S-10 Blazer https://flic.kr/s/aHsjYGx4Md Previous Rides: 1993 Chevy S-10 ext. cab, 4.3L, 4/5 drop (Sold) 1993 Chevy C-1500 short/step Retro-Rod (Sold) 1988 S-10 Blazer 2dr/2wd mild custom (Sold) |
|
|
|
|
|
07-12-2013, 10:24 AM
|
#16 | |
|
Registered User
Join Date: Mar 2005
Location: apple valley, ca
Posts: 2,670
|
Re: Project '64 Cheapskate
Quote:
I really stewed over using that wheel. I'm old enough (I'm 49) to remember when those wheels were really popular, and also remember a few years later when they were EXTREMELY uncool. I remember yanking them out of a few cars and tossing them right into the trash. A pristine original Superior or Grant wood wheel brings big bucks nowadays. I've seen them going for $300 on ebay. Who would have known? My wheel is a little different because it hardly has any "dish" at all to it, which works out just right for interior space. I can only assume that my wheel came out of an old van from back in the day, because it's a small diameter and nearly flat. I'm going for a late '60s theme, so finding a suitable wheel was harder than I thought. It was absolutely trashed when I bought it, and some cleaning with acetone and a coat of satin clear made it look better, but the chrome is terrible. The patina will match the rest of the truck, I guess.
__________________
Check out my latest endeavor: https://roundsixpod.com My build threads: '55 Chevy: http://67-72chevytrucks.com/vboard/s...d.php?t=247512 '64 C-20: http://67-72chevytrucks.com/vboard/s...d.php?t=446527 |
|
|
|
|
|
07-12-2013, 01:13 PM
|
#17 |
|
Registered User
Join Date: Apr 2003
Location: Indep, MO
Posts: 5,893
|
Re: Project '64 Cheapskate
I was gonna say, I'm surprised at how flat it was!
__________________
Boppa's Old Yeller Truck Build, Old Yeller's New Heart! Project Buzz Bomb Flyin' Low! |
|
|
|
|
07-12-2013, 10:02 PM
|
#18 |
|
Registered User
Join Date: Mar 2005
Location: apple valley, ca
Posts: 2,670
|
Re: Project '64 Cheapskate
I have been working on mounting the A/C condenser for the past couple of days, so I figured that I should post up the progress. I have an original condenser that came out of a parts truck, but it's so fragile that it feels like it's going to crumble when you pick it up. Plus, I am converting the system to R134, and I need an efficient condenser designed for the current refrigerant.
I was able to find a guy on Craigslist selling a condenser out of a 1999 Z06 Corvette, and after he rattled off the dimensions, I knew it was going to work perfect. Here's a picture of it sitting on top of the core support. The width and height is perfect, but the inlet and outlet fittings were going to be a problem. 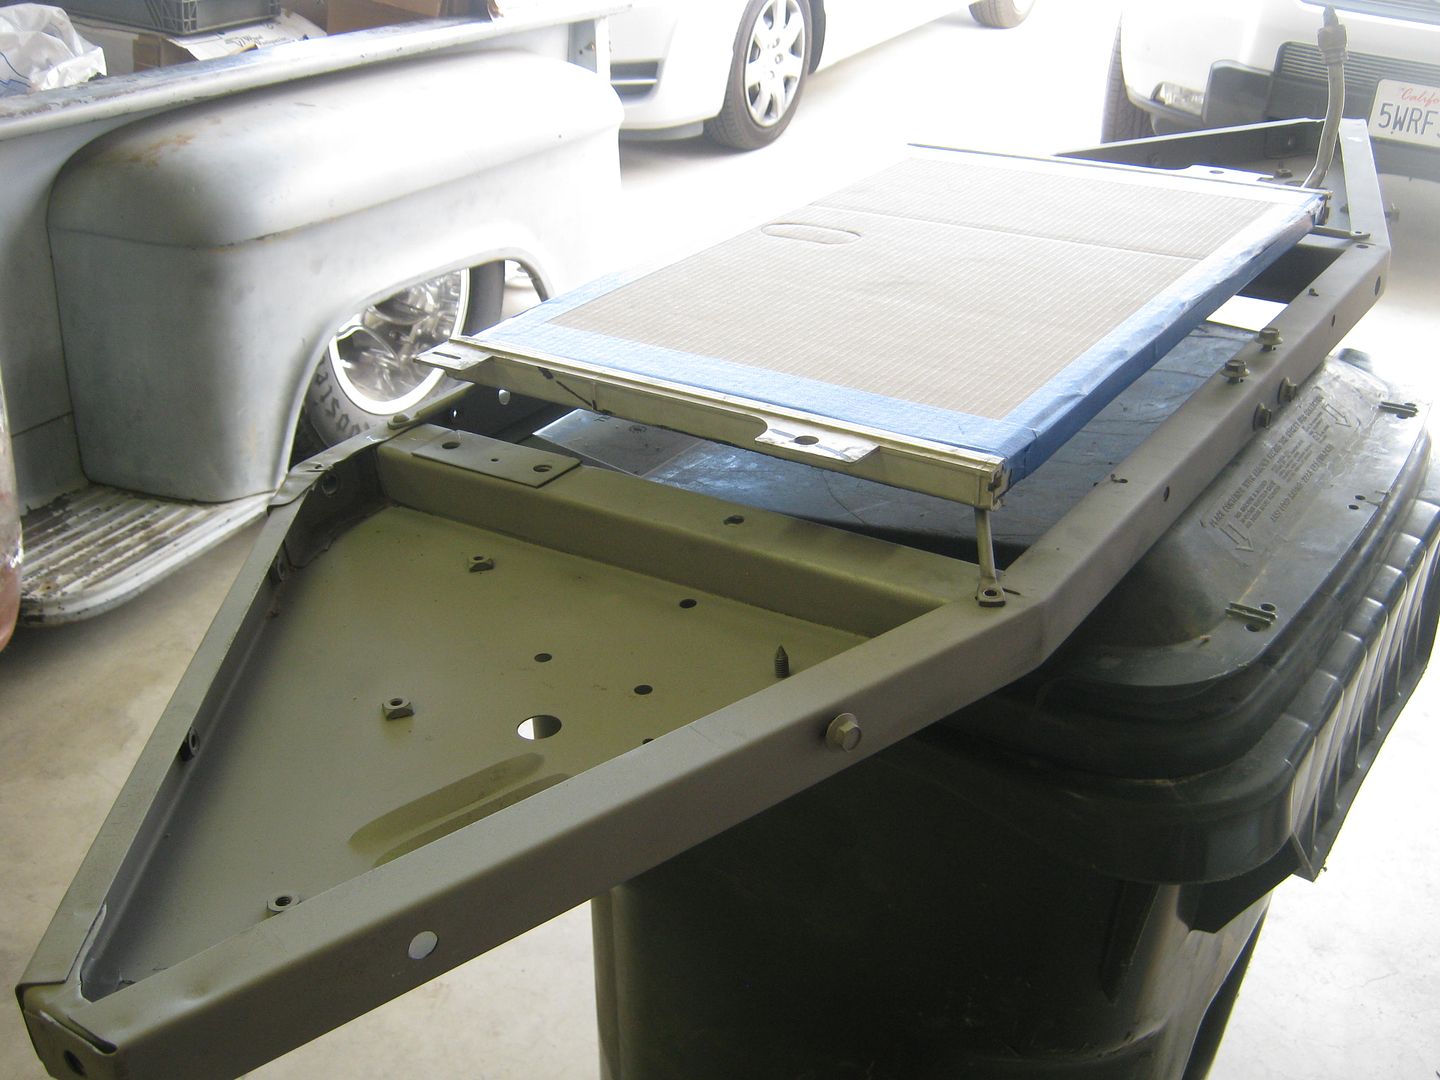 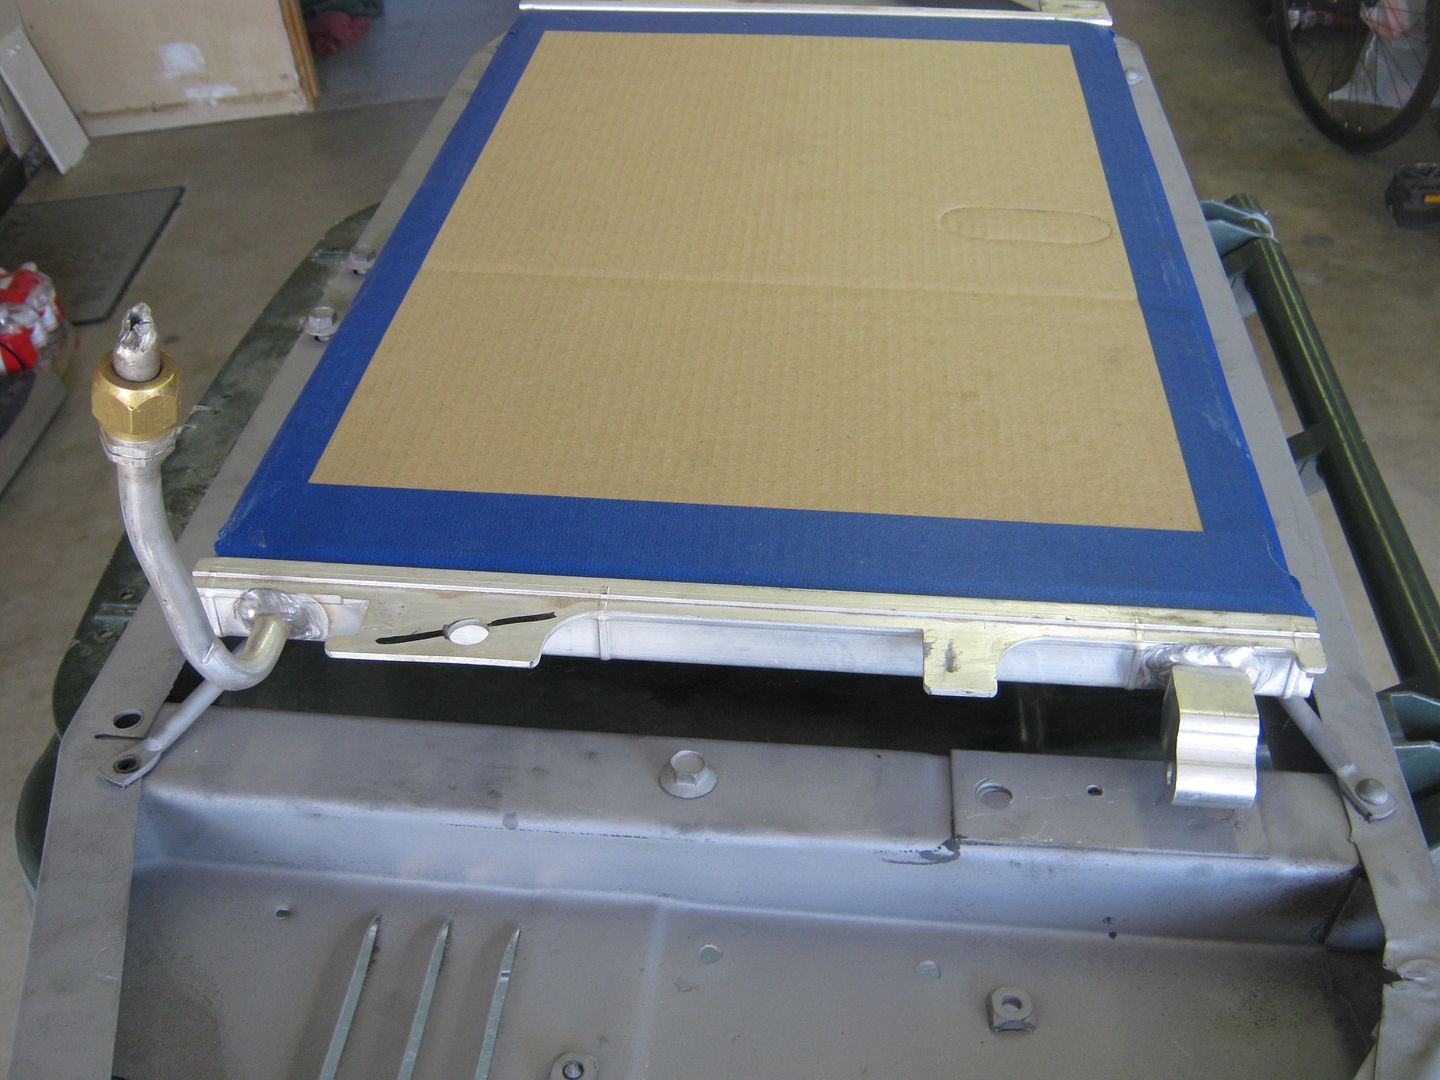 So, I got out the cut-off wheel and commenced to cuttin' 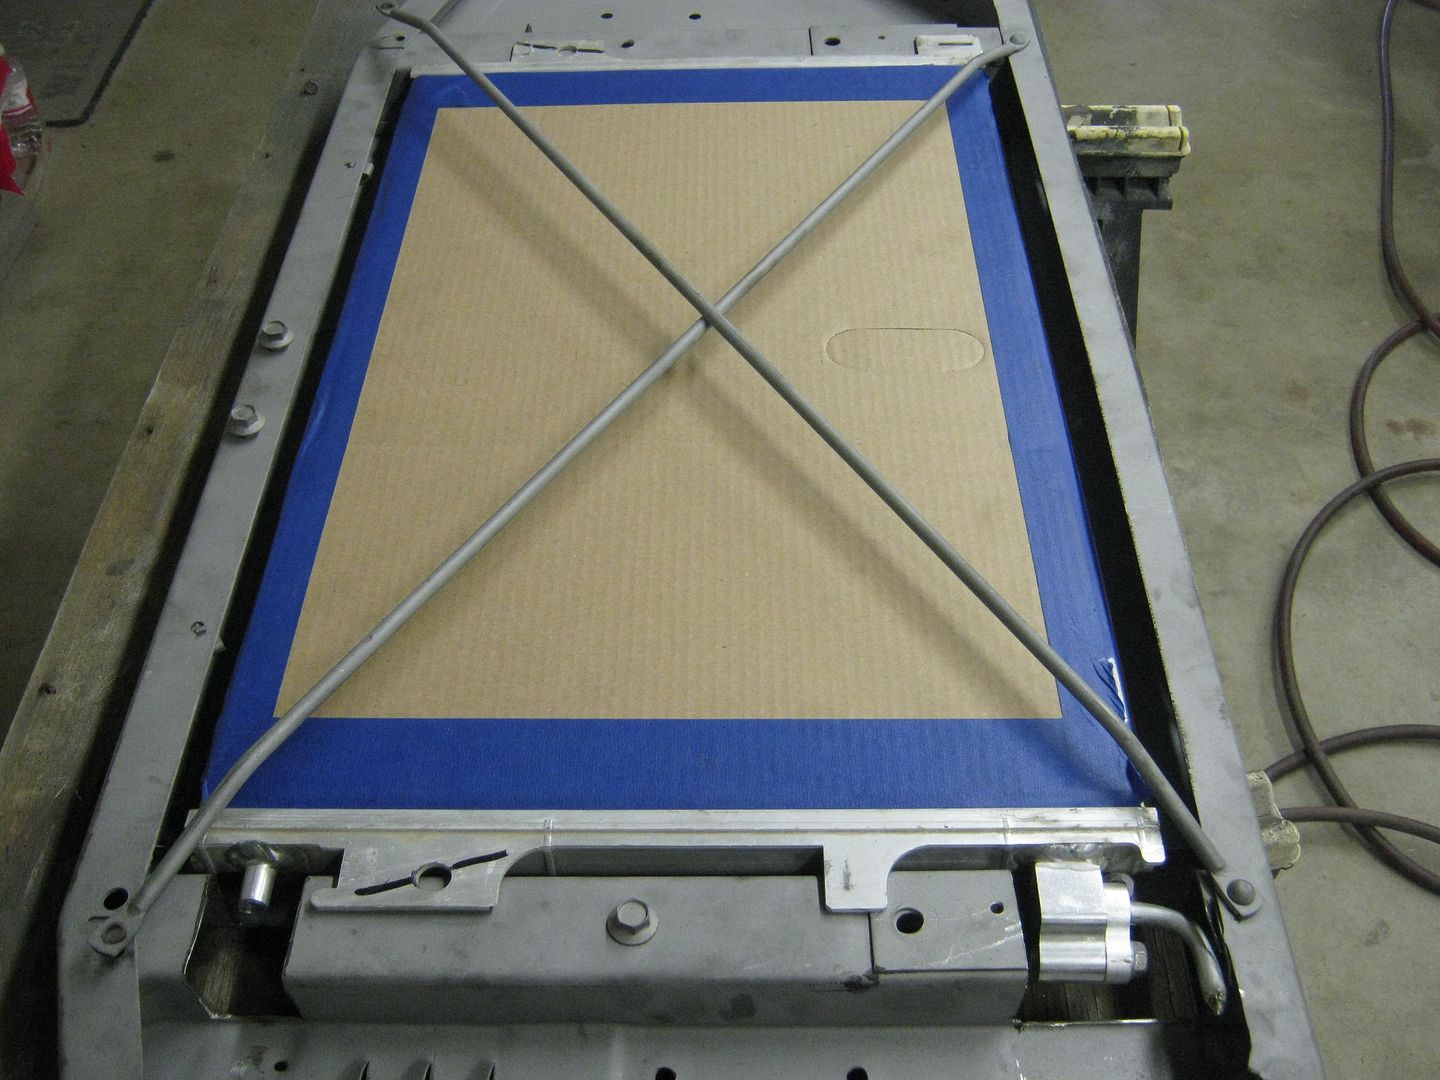 I had some square tubing in my scrap pile and made some pieces to cover the removed areas and tacked them in. I also chopped off the original outlet line because it wasn't going to work for my application. 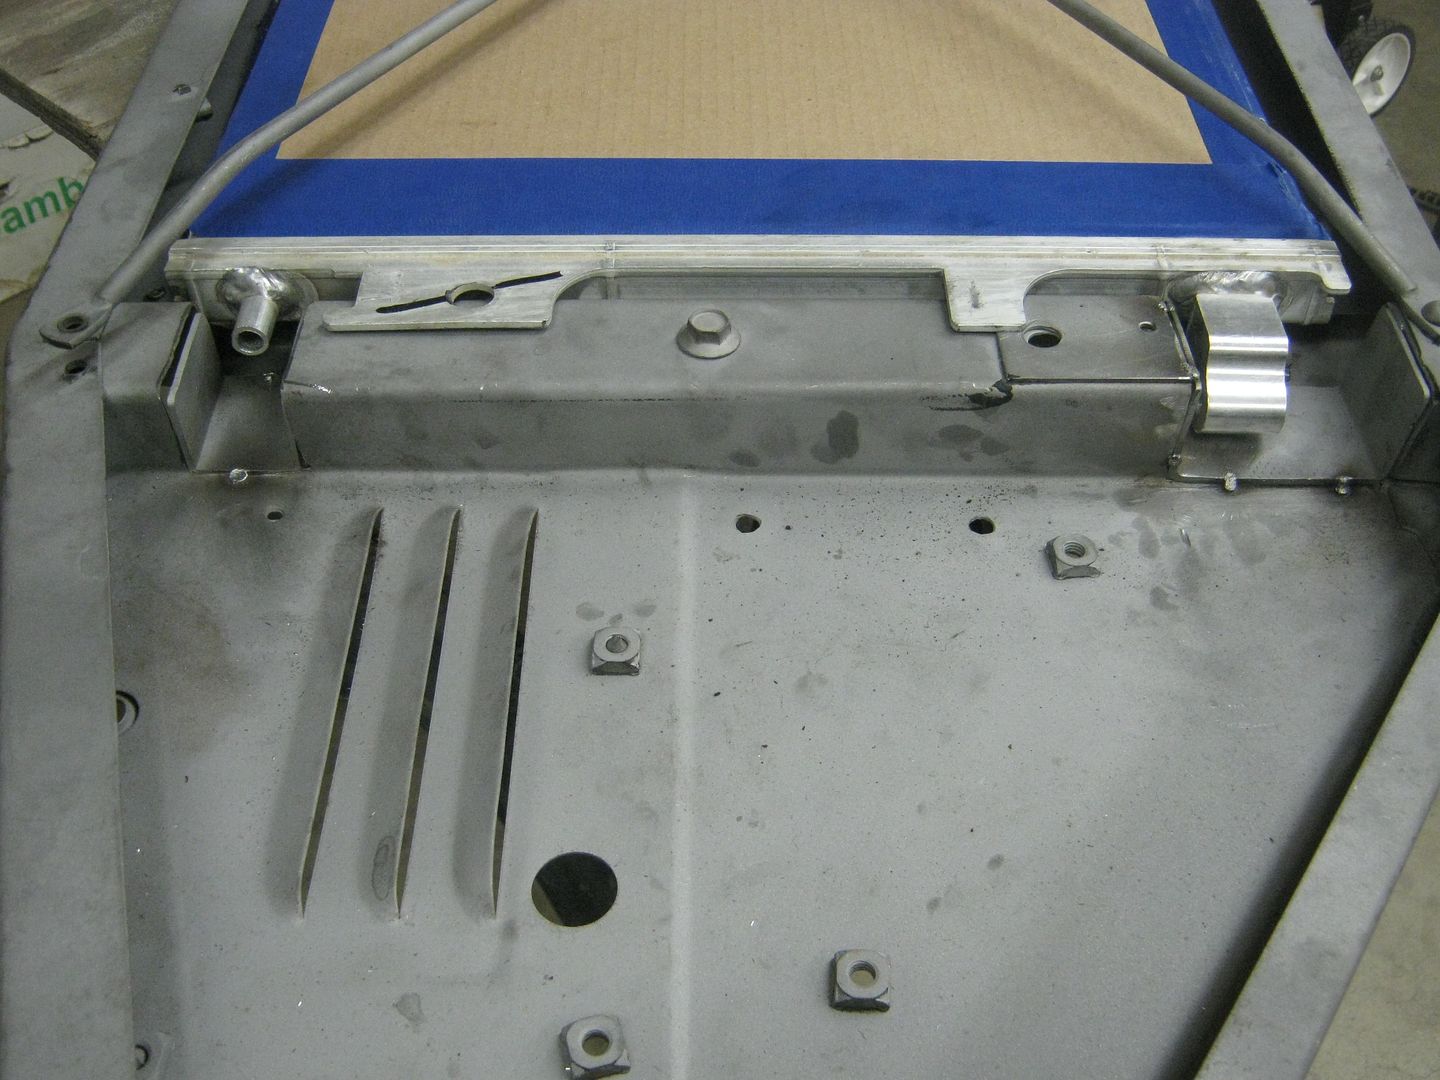 The stock Corvette mounting tabs were not consistent from side to side, so they got whacked. 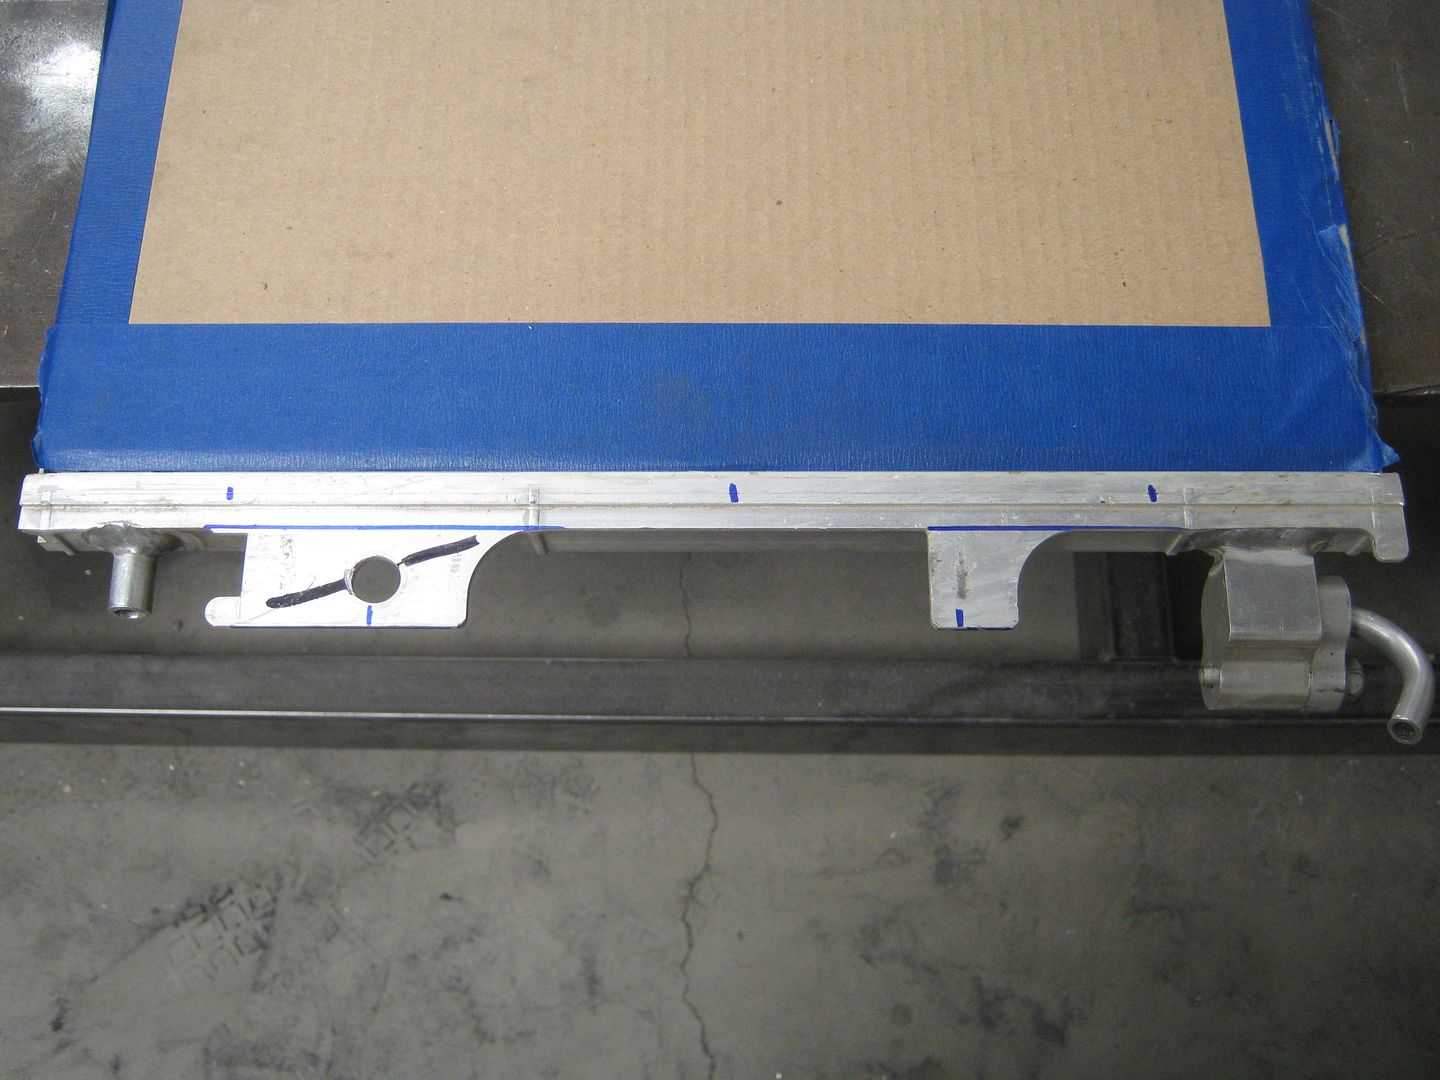 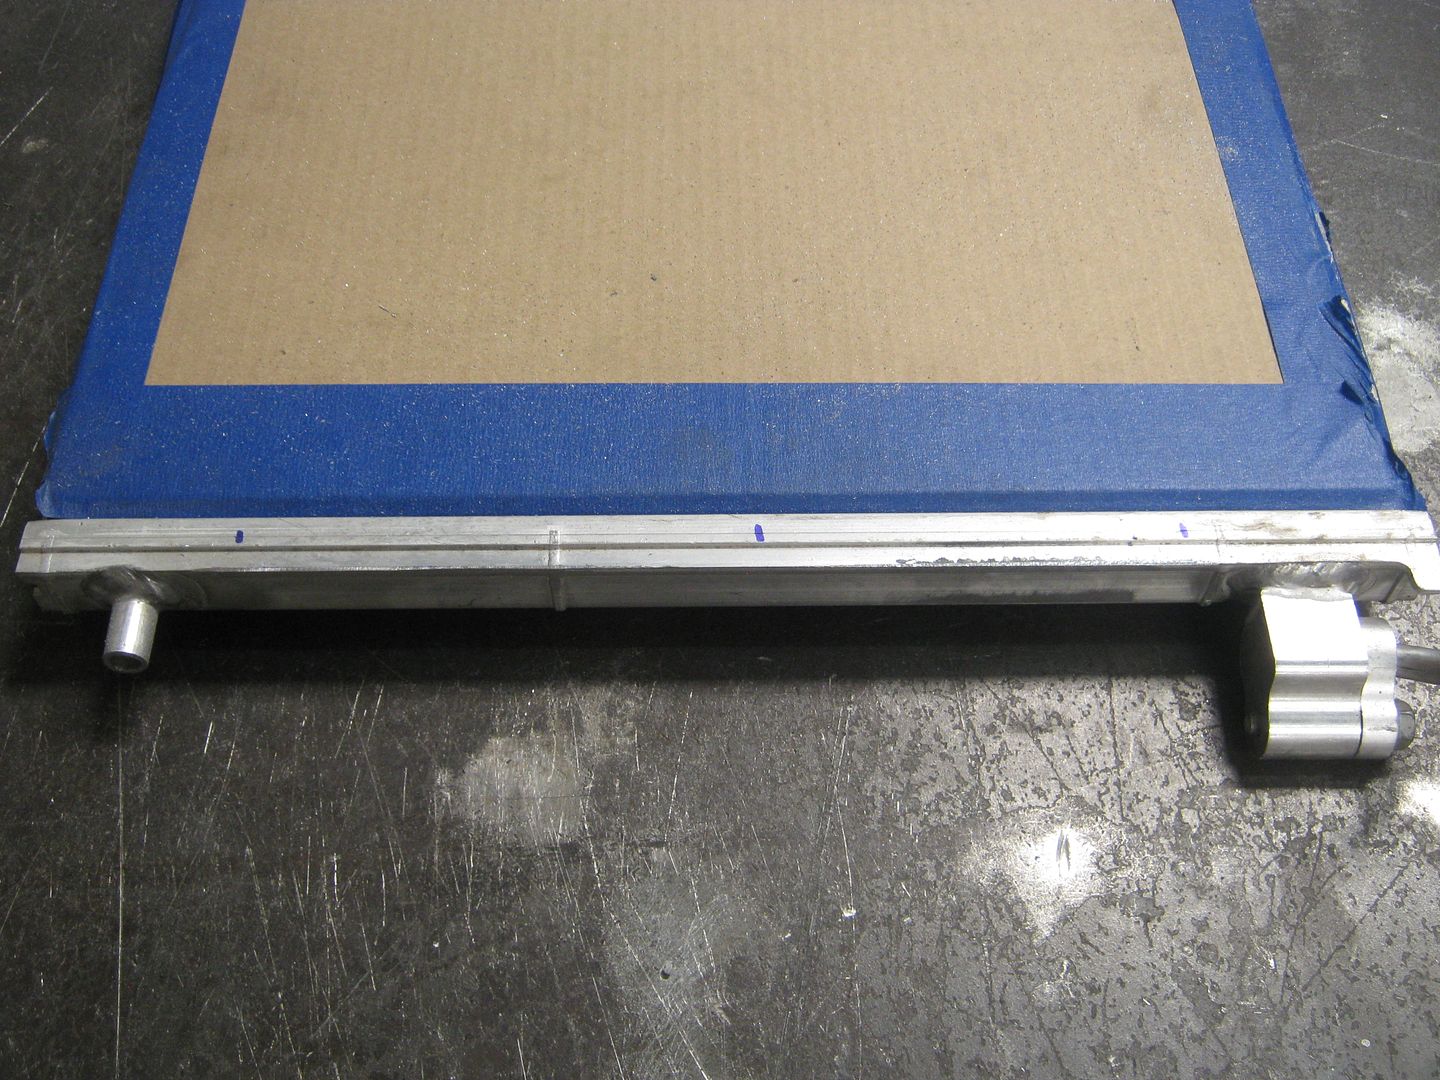 Grabbed some aluminum from the scrap pile and made new mount tabs and make my buddy Mike Jones TIG them in place. 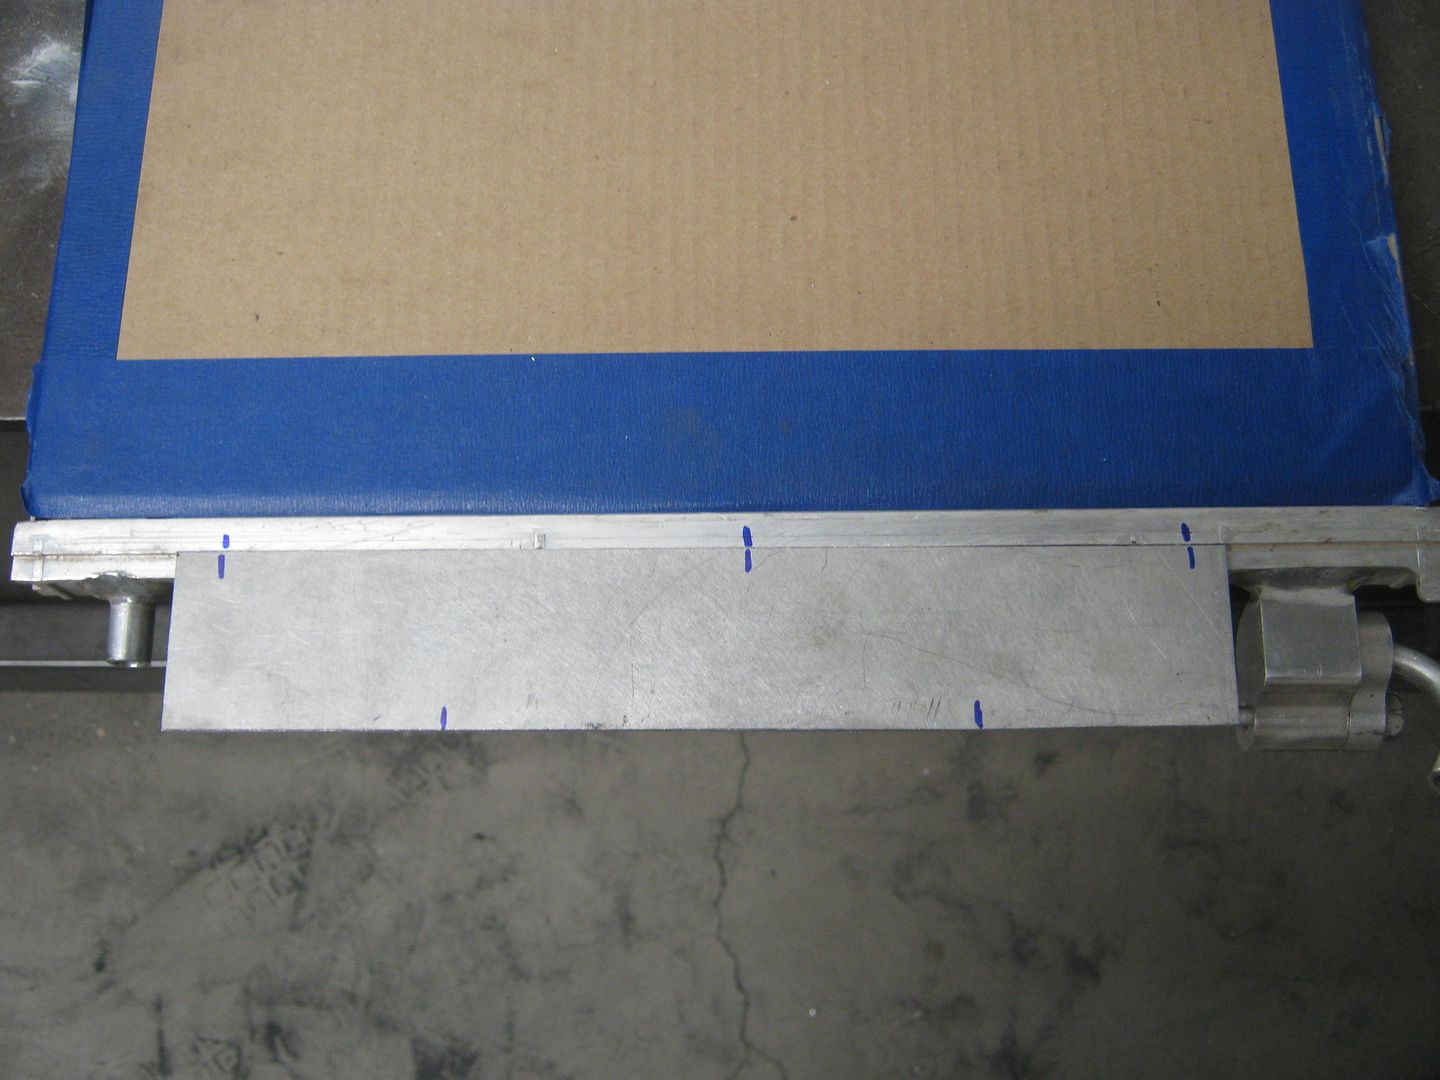 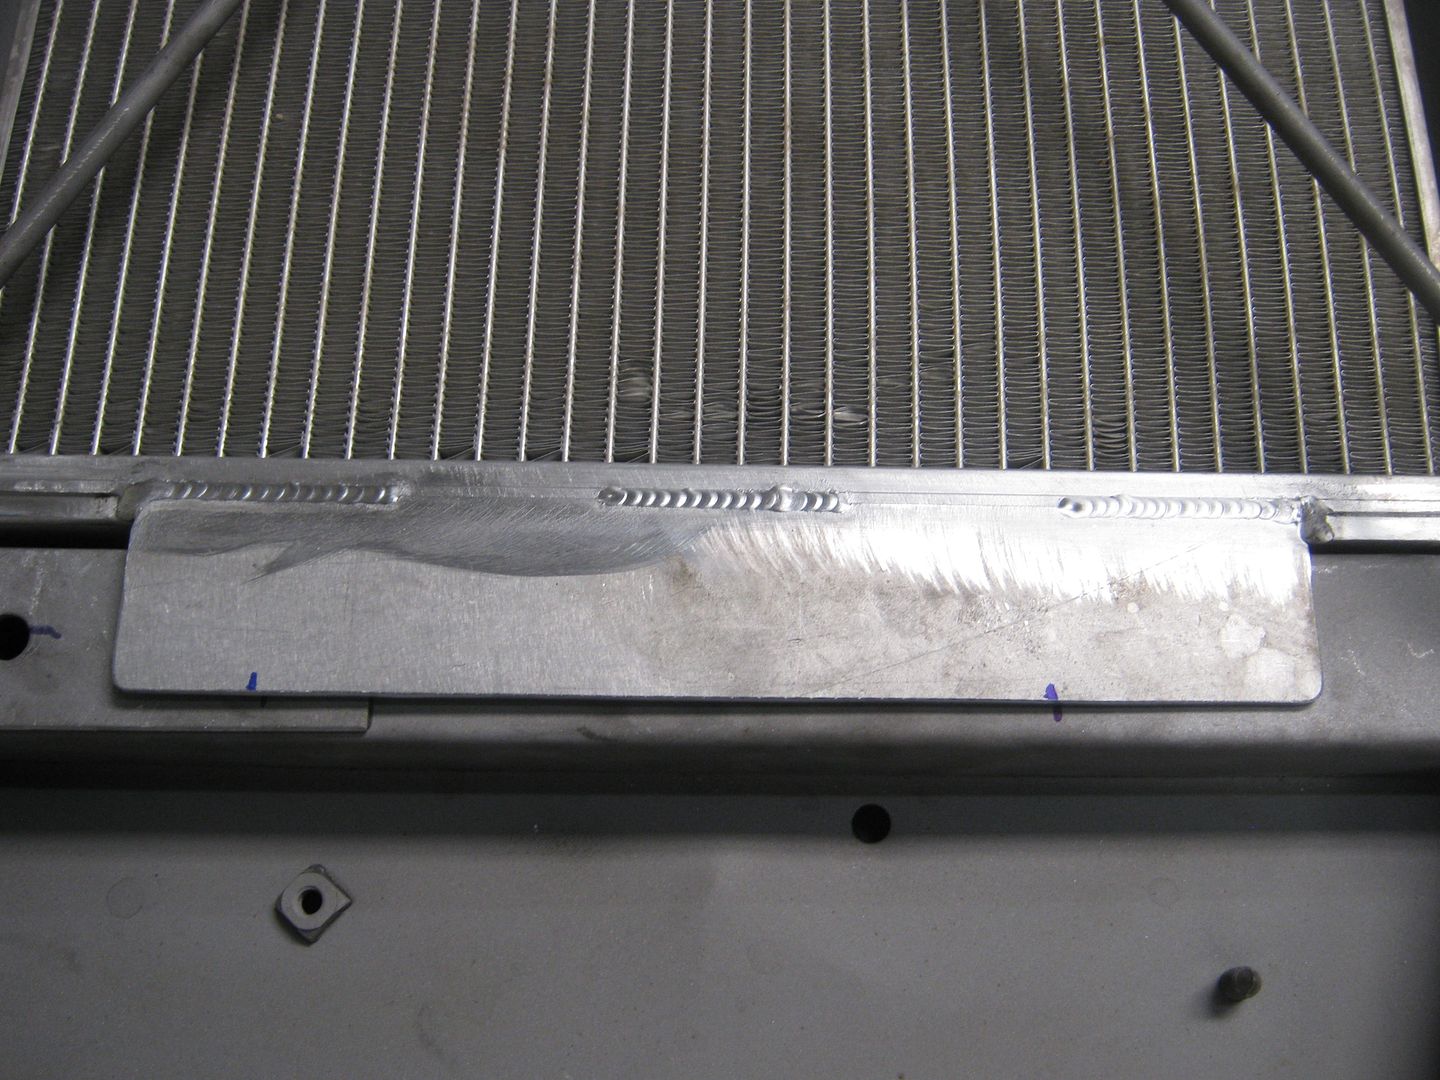 Fast forward a little, and I drilled the core support for the AC bulkhead fittings, and shortened and reshaped the dryer clamps. I chopped up some new fittings to accept hoses at the inlet and outlet lines and had Mike TIG them on. I installed the old mock-up dryer and started mocking up the lines and have a couple of the hoses ready to crimp. I still need to get a #10 female straight fitting for the inlet line at the top and cut the hose to length. The mounting tabs will need to be drilled for mounting bolts and rubber isolators. Once this gets done, I'll blow it all back apart and send it back to the sandblaster to get it touched up due to all the grease and oils from working on the condenser. After that, I'll do a little body work, and it'll be ready for primer and paint (chassis black). Speaking of black, everything you see on this core support will be painted black because I do not want to see anything behind the grill of the truck. I always think that it looks wrong when I see shiny stuff behind the grille or body-colored core supports. You have to hide that stuff! 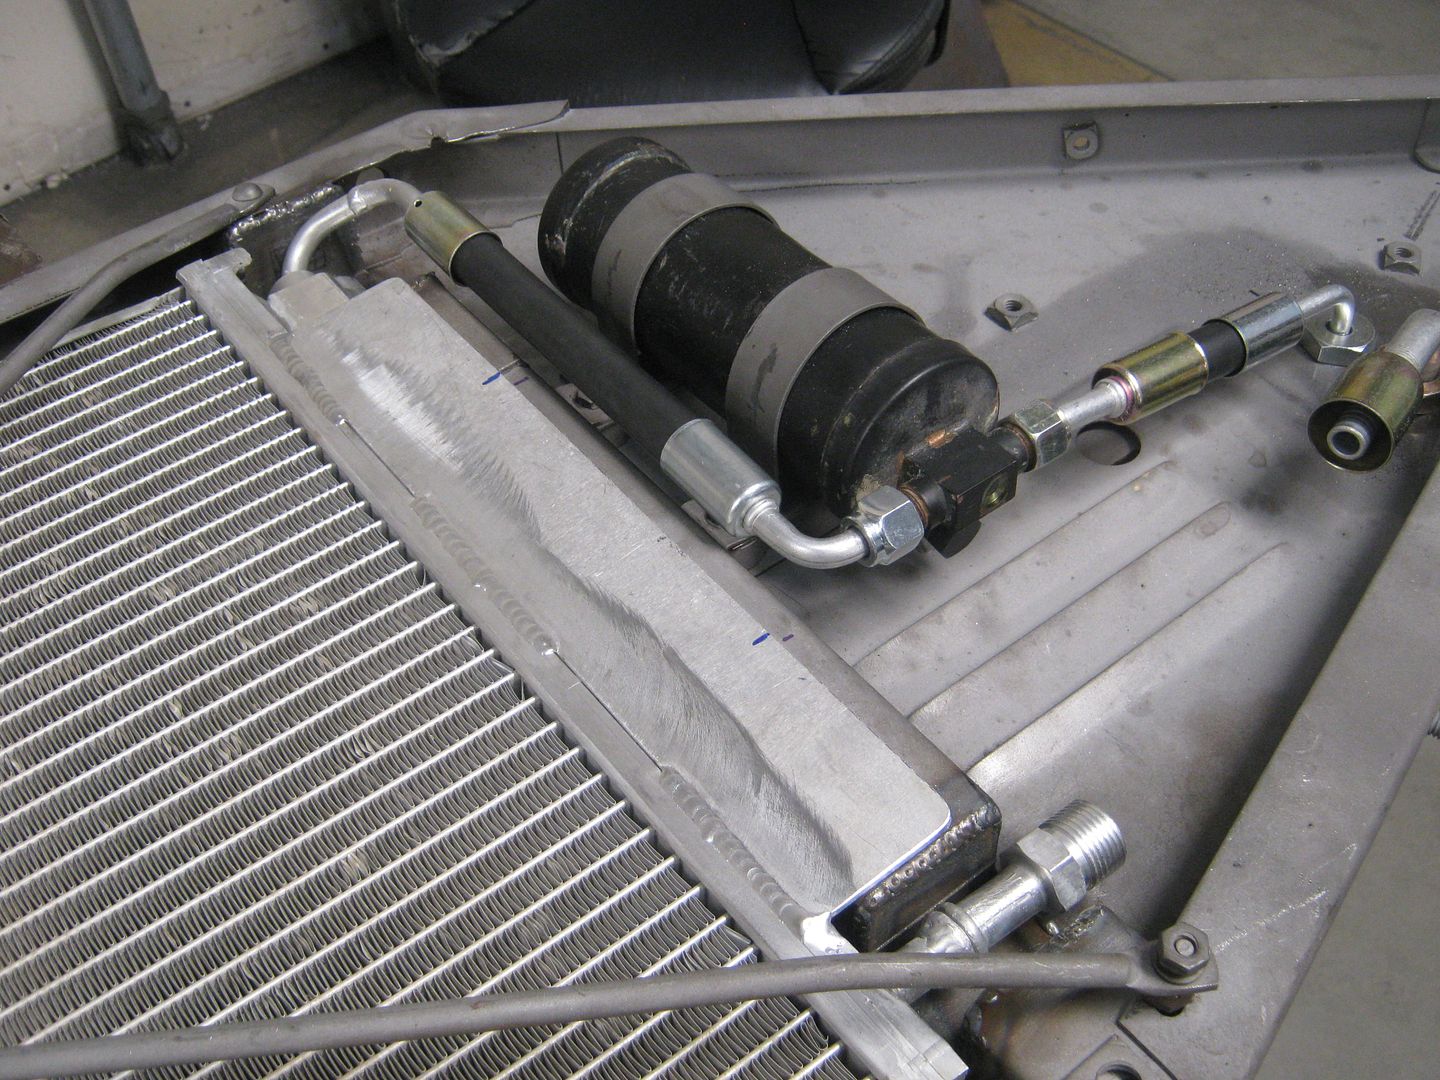 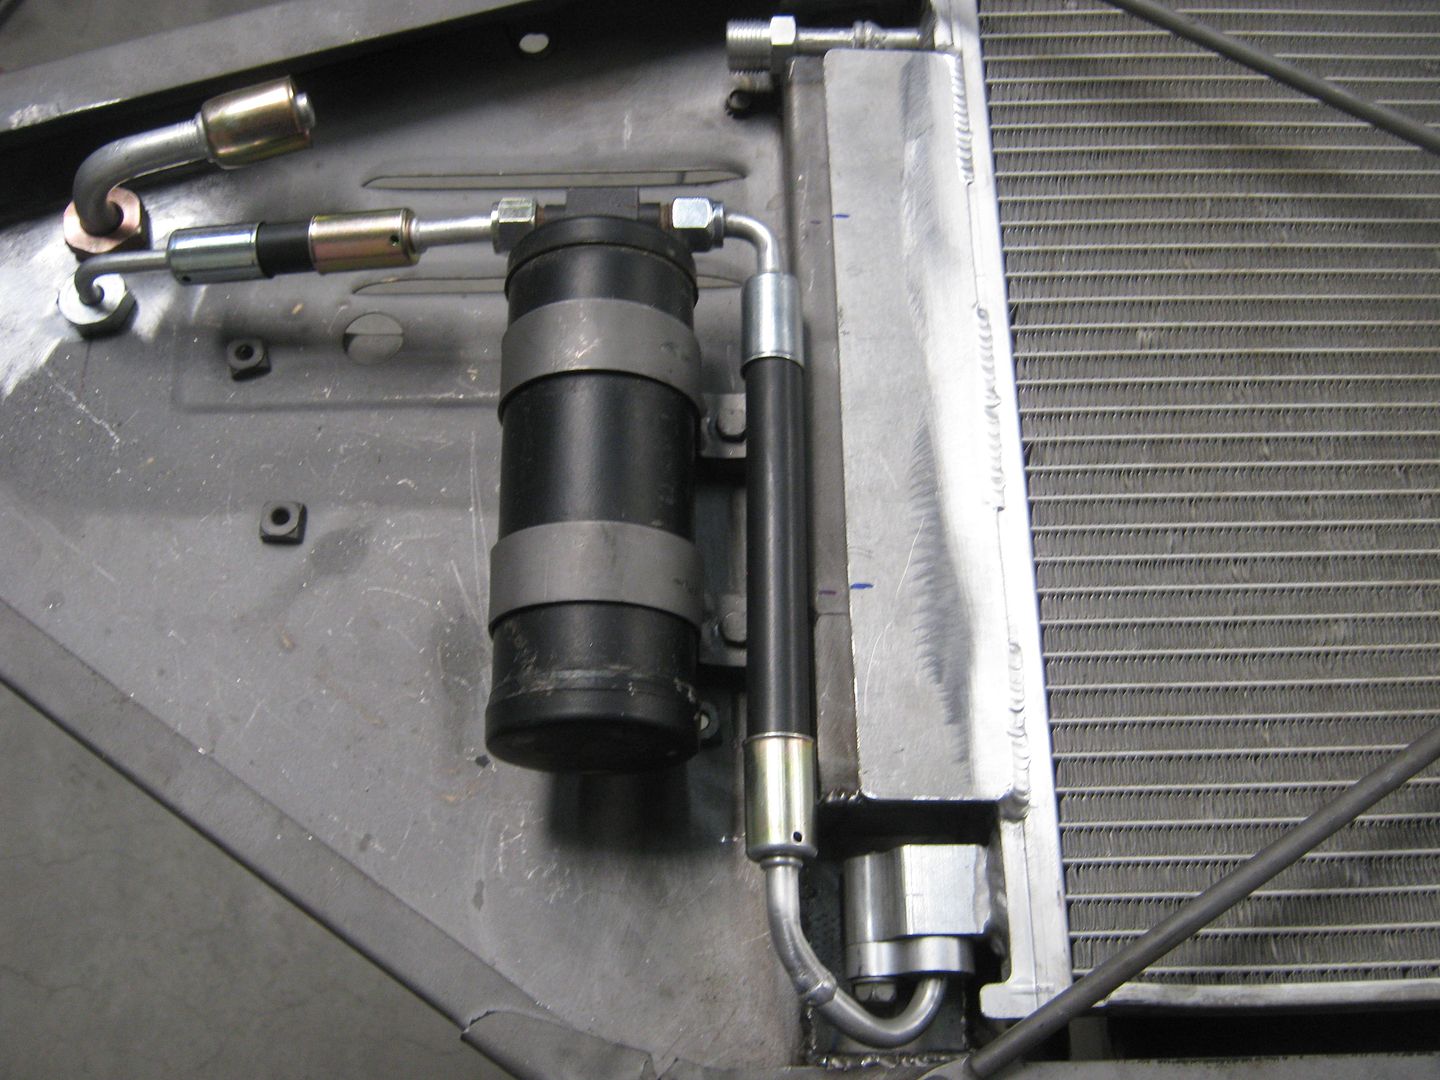
__________________
Check out my latest endeavor: https://roundsixpod.com My build threads: '55 Chevy: http://67-72chevytrucks.com/vboard/s...d.php?t=247512 '64 C-20: http://67-72chevytrucks.com/vboard/s...d.php?t=446527 |
|
|
|
|
07-12-2013, 10:55 PM
|
#19 |
|
Registered User
Join Date: Apr 2011
Location: .
Posts: 3,104
|
Re: Project '64 Cheapskate
Man you always blow me away.
Wish I had some of the talent you have. So much great info here ALWAYS
|
|
|
|
|
07-13-2013, 01:05 AM
|
#20 |
|
Registered User
Join Date: Apr 2003
Location: Indep, MO
Posts: 5,893
|
Re: Project '64 Cheapskate
Mad skills! AC scares me. Beautiful work.
Posted via Mobile Device
__________________
Boppa's Old Yeller Truck Build, Old Yeller's New Heart! Project Buzz Bomb Flyin' Low! |
|
|
|
|
07-13-2013, 01:15 AM
|
#21 |
|
60-66 Nut
 Join Date: Mar 2007
Location: Coeur d'Alene, Idaho
Posts: 23,246
|
Re: Project '64 Cheapskate
Good score on the condenser. Very sanitary job on this installation

__________________
Power Steering Box Adapter Plates For Sale HERE Power Brake Booster Adapter Brackets For Sale '63-'66 HERE and '67-'72 HERE and '60-'62 HERE and "60-'62 with clutch HERE Rear Disc Brake Brackets For Sale. Impala SS calipers HERE Camaro Calipers HERE D52 Calipers HERE 6 Lug HERE Hydroboost Mounting Plates HERE |
|
|
|
|
07-13-2013, 07:01 AM
|
#22 |
|
Registered User
Join Date: Sep 2012
Location: Midway, NC
Posts: 3,275
|
Re: Project '64 Cheapskate
Looks awesome.
__________________
http://67-72chevytrucks.com/vboard/s...d.php?t=581873 The low buck build threads. Check'em out! http://67-72chevytrucks.com/vboard/s...d.php?t=666022 My build thread Crossmembers CC |
|
|
|
|
07-13-2013, 03:25 PM
|
#23 |
|
Registered User
Join Date: Sep 2011
Location: Tacoma, WA
Posts: 2,425
|
Re: Project '64 Cheapskate
This looks like my kind of adaption !!
Great work here, and your buddy Mike seems to really know what he is doing, those welds look real purty
__________________
Michael McMurphy My 66 Stepside My 64 Tow Truck My 66 Tempest Table Of Contents Added to Page1 |
|
|
|
|
07-13-2013, 03:42 PM
|
#24 | |
|
Registered User
Join Date: Mar 2005
Location: apple valley, ca
Posts: 2,670
|
Re: Project '64 Cheapskate
Quote:
__________________
Check out my latest endeavor: https://roundsixpod.com My build threads: '55 Chevy: http://67-72chevytrucks.com/vboard/s...d.php?t=247512 '64 C-20: http://67-72chevytrucks.com/vboard/s...d.php?t=446527 |
|
|
|
|
|
07-13-2013, 06:05 PM
|
#25 |
|
Senior Member
Join Date: Sep 2011
Location: Hanford, CA
Posts: 1,027
|
Re: Project '64 Cheapskate
Thoroughly impressed at your vision on this one. Great work!
__________________
Poor and content is Rich...and Rich enough! - William Shakespeare 1966 C10 Custom Cab "Luigi" Big Window - SWB Fleetside 350 V-8 - Powerglide My not so much a build thread as a "Slow Progression Thread":http://67-72chevytrucks.com/vboard/s...d.php?t=486894 |
|
|
|
 |
| Bookmarks |
|
|


 Hybrid Mode
