
 |
|
|
#351 |
|
Registered User
Join Date: Sep 2011
Location: Tacoma, WA
Posts: 2,425
|
Re: Project '64 Cheapskate
Here are a couple of quick and dirty shots of the stock bench seat measurements I promised.
I hope this gives you guys a ballpark estimate of what you were discussing. Rock on man !!
__________________
Michael McMurphy My 66 Stepside My 64 Tow Truck My 66 Tempest Table Of Contents Added to Page1 |
|
|

|
|
|
#352 |
|
Registered User
Join Date: Apr 2011
Location: .
Posts: 3,104
|
Re: Project '64 Cheapskate
Thanks for the pics McMurphy.
From the way chevyrestoguy describes the room and comfort Im keeping my eyes open for a seat to try out. Thanks Fellas |
|
|

|
|
|
#353 | |
|
Registered User
 Join Date: Mar 2005
Location: apple valley, ca
Posts: 2,670
|
Re: Project '64 Cheapskate
Quote:
McMurphy- Thanks for the measurements. Is there any way you could get a vertical measurement from the floor to the top of the upholstery at the front edge of the seat? This measurement will tell us the height difference between my modified seat and a stock seat. My measurement was 14.25" from the floor to the top of the front of the seat. Thanks!
__________________
Check out my latest endeavor: https://roundsixpod.com My build threads: '55 Chevy: http://67-72chevytrucks.com/vboard/s...d.php?t=247512 '64 C-20: http://67-72chevytrucks.com/vboard/s...d.php?t=446527 |
|
|
|

|
|
|
#354 | |
|
Old and crusty
 Join Date: Jan 2009
Location: Surprise, AZ
Posts: 462
|
Re: Project '64 Cheapskate
Quote:
What year crew cab seats are you using?
__________________
65 Chevy long wide daily driver - SOLD! 64 Chevy Short Step LS |
|
|
|

|
|
|
#355 | |
|
Registered User
Join Date: Sep 2011
Location: Tacoma, WA
Posts: 2,425
|
Re: Project '64 Cheapskate
Quote:
__________________
Michael McMurphy My 66 Stepside My 64 Tow Truck My 66 Tempest Table Of Contents Added to Page1 |
|
|
|

|
|
|
#356 |
|
Registered User
 Join Date: Mar 2005
Location: apple valley, ca
Posts: 2,670
|
Re: Project '64 Cheapskate
Because it was in a wrecking yard, I wasn't exactly sure of the year. In 1992, GM finally started building crew cabs in the body style that came out in 1988. If memory serves me correctly, 1995 was a year where they made a lot of interior changes, seats included. If I were to guess what year crew cabs had the "good" seats, I would have to guess 1992-1994. I'm not too versed on that generation of truck, so it's just a guess.
Because this seat isn't a 60/40, it also came in the standard cab trucks. Extended cabs had the 60/40 for access to the rear seats. The base models were usually vinyl upholstery, whereas the upscale models like the Silverado, had cloth upholstery and usually, the armrest. This might be a good question to post up in the '88-'98 forum. Those guys could give us the exact years to look for.
__________________
Check out my latest endeavor: https://roundsixpod.com My build threads: '55 Chevy: http://67-72chevytrucks.com/vboard/s...d.php?t=247512 '64 C-20: http://67-72chevytrucks.com/vboard/s...d.php?t=446527 |
|
|

|
|
|
#357 |
|
Rollin' Old Skool
Join Date: Jun 2007
Location: Hattiesburg, MS
Posts: 5,371
|
Re: Project '64 Cheapskate
looks like your photos on page 14 got messed up...you're correct on the interiors changing in '95....I had blue cloth buckets in a similar pattern in my old '93 fullsize reg. cab....from reading, it seems as though crew cabs began in '88 for the '88-98 body style, but it was a 3500 series. Not sure when that particular seat pattern began though (if it matters), but I think '90-94 should be what to look for.
__________________
_____________________________________________ Phillip My Build threads: 1966 Chevy C-10 "Black Betty" shortbed, fleetside, BBW, 327 V8/ Powerglide (under construction) http://67-72chevytrucks.com/vboard/s...ighlight=betty 1997 Chevy Tahoe, 2dr/2wd, mild custom (Daily driver) http://67-72chevytrucks.com/vboard/s...d.php?t=601142 Pics: '66 C-10 https://flic.kr/s/aHsjHWD4h9 '97 Tahoe https://flic.kr/s/aHsjGZ7wKP '93 C-1500 https://flic.kr/s/aHskxdpdnQ '88 S-10 Blazer https://flic.kr/s/aHsjYGx4Md Previous Rides: 1993 Chevy S-10 ext. cab, 4.3L, 4/5 drop (Sold) 1993 Chevy C-1500 short/step Retro-Rod (Sold) 1988 S-10 Blazer 2dr/2wd mild custom (Sold) |
|
|

|
|
|
#358 | |
|
Registered User
 Join Date: Mar 2005
Location: apple valley, ca
Posts: 2,670
|
Re: Project '64 Cheapskate
Quote:
likaroc13- Thanks for the info. I remember that they carried over the old (pre '88) crew cab 4 drs. until 1991, and the '88-'98 body style crew cabs showed up in 1992. I'm talking crew cab, not extended cab. I remember that everybody with a pre '88 wanted the '88-'91 crew cab front ends because they were cool looking and only the rich guys could afford the swap.
__________________
Check out my latest endeavor: https://roundsixpod.com My build threads: '55 Chevy: http://67-72chevytrucks.com/vboard/s...d.php?t=247512 '64 C-20: http://67-72chevytrucks.com/vboard/s...d.php?t=446527 |
|
|
|

|
|
|
#359 | |
|
Rollin' Old Skool
Join Date: Jun 2007
Location: Hattiesburg, MS
Posts: 5,371
|
Re: Project '64 Cheapskate
Quote:
 So yeah, I'd say '92-94 for the crew cabs, & '90-94 for regular OBS C/K trucks. So yeah, I'd say '92-94 for the crew cabs, & '90-94 for regular OBS C/K trucks.btw, nice job on your brake pedal modification...& I dig the steering wheel, which fits in nicely 
__________________
_____________________________________________ Phillip My Build threads: 1966 Chevy C-10 "Black Betty" shortbed, fleetside, BBW, 327 V8/ Powerglide (under construction) http://67-72chevytrucks.com/vboard/s...ighlight=betty 1997 Chevy Tahoe, 2dr/2wd, mild custom (Daily driver) http://67-72chevytrucks.com/vboard/s...d.php?t=601142 Pics: '66 C-10 https://flic.kr/s/aHsjHWD4h9 '97 Tahoe https://flic.kr/s/aHsjGZ7wKP '93 C-1500 https://flic.kr/s/aHskxdpdnQ '88 S-10 Blazer https://flic.kr/s/aHsjYGx4Md Previous Rides: 1993 Chevy S-10 ext. cab, 4.3L, 4/5 drop (Sold) 1993 Chevy C-1500 short/step Retro-Rod (Sold) 1988 S-10 Blazer 2dr/2wd mild custom (Sold) |
|
|
|

|
|
|
#360 | |
|
Registered User
 Join Date: Mar 2005
Location: apple valley, ca
Posts: 2,670
|
Re: Project '64 Cheapskate
Quote:
I really stewed over using that wheel. I'm old enough (I'm 49) to remember when those wheels were really popular, and also remember a few years later when they were EXTREMELY uncool. I remember yanking them out of a few cars and tossing them right into the trash. A pristine original Superior or Grant wood wheel brings big bucks nowadays. I've seen them going for $300 on ebay. Who would have known? My wheel is a little different because it hardly has any "dish" at all to it, which works out just right for interior space. I can only assume that my wheel came out of an old van from back in the day, because it's a small diameter and nearly flat. I'm going for a late '60s theme, so finding a suitable wheel was harder than I thought. It was absolutely trashed when I bought it, and some cleaning with acetone and a coat of satin clear made it look better, but the chrome is terrible. The patina will match the rest of the truck, I guess.
__________________
Check out my latest endeavor: https://roundsixpod.com My build threads: '55 Chevy: http://67-72chevytrucks.com/vboard/s...d.php?t=247512 '64 C-20: http://67-72chevytrucks.com/vboard/s...d.php?t=446527 |
|
|
|

|
|
|
#361 |
|
Registered User
Join Date: Apr 2003
Location: Indep, MO
Posts: 5,893
|
Re: Project '64 Cheapskate
I was gonna say, I'm surprised at how flat it was!
__________________
Boppa's Old Yeller Truck Build, Old Yeller's New Heart! Project Buzz Bomb Flyin' Low! |
|
|

|
|
|
#362 |
|
Registered User
 Join Date: Mar 2005
Location: apple valley, ca
Posts: 2,670
|
Re: Project '64 Cheapskate
I have been working on mounting the A/C condenser for the past couple of days, so I figured that I should post up the progress. I have an original condenser that came out of a parts truck, but it's so fragile that it feels like it's going to crumble when you pick it up. Plus, I am converting the system to R134, and I need an efficient condenser designed for the current refrigerant.
I was able to find a guy on Craigslist selling a condenser out of a 1999 Z06 Corvette, and after he rattled off the dimensions, I knew it was going to work perfect. Here's a picture of it sitting on top of the core support. The width and height is perfect, but the inlet and outlet fittings were going to be a problem. 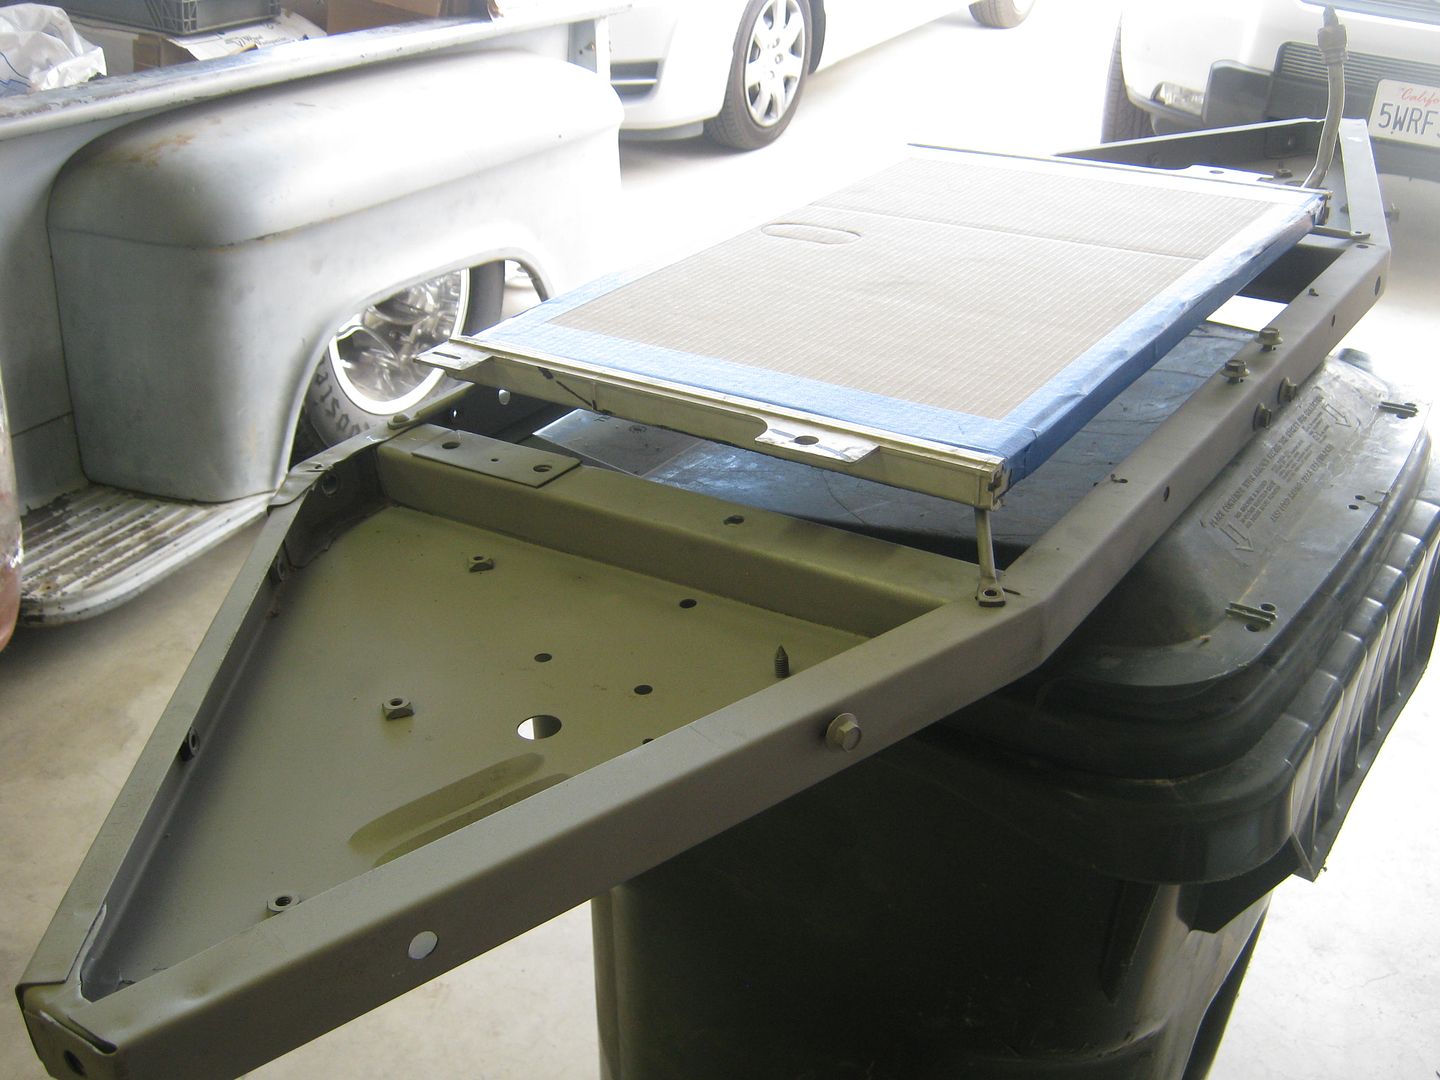 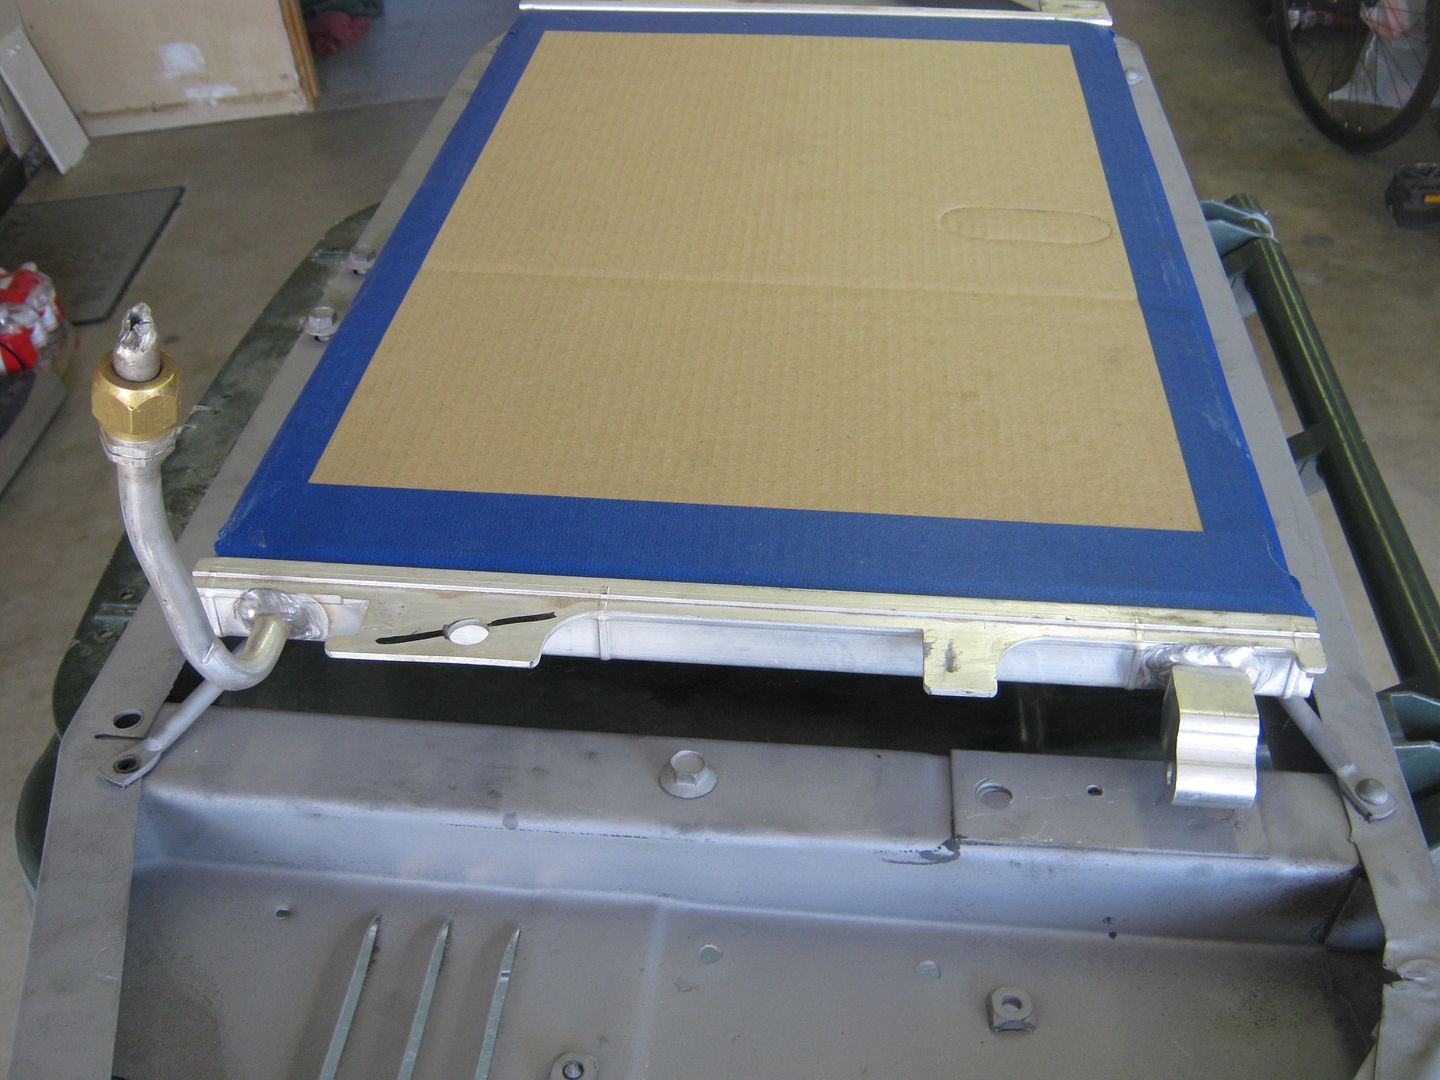 So, I got out the cut-off wheel and commenced to cuttin' 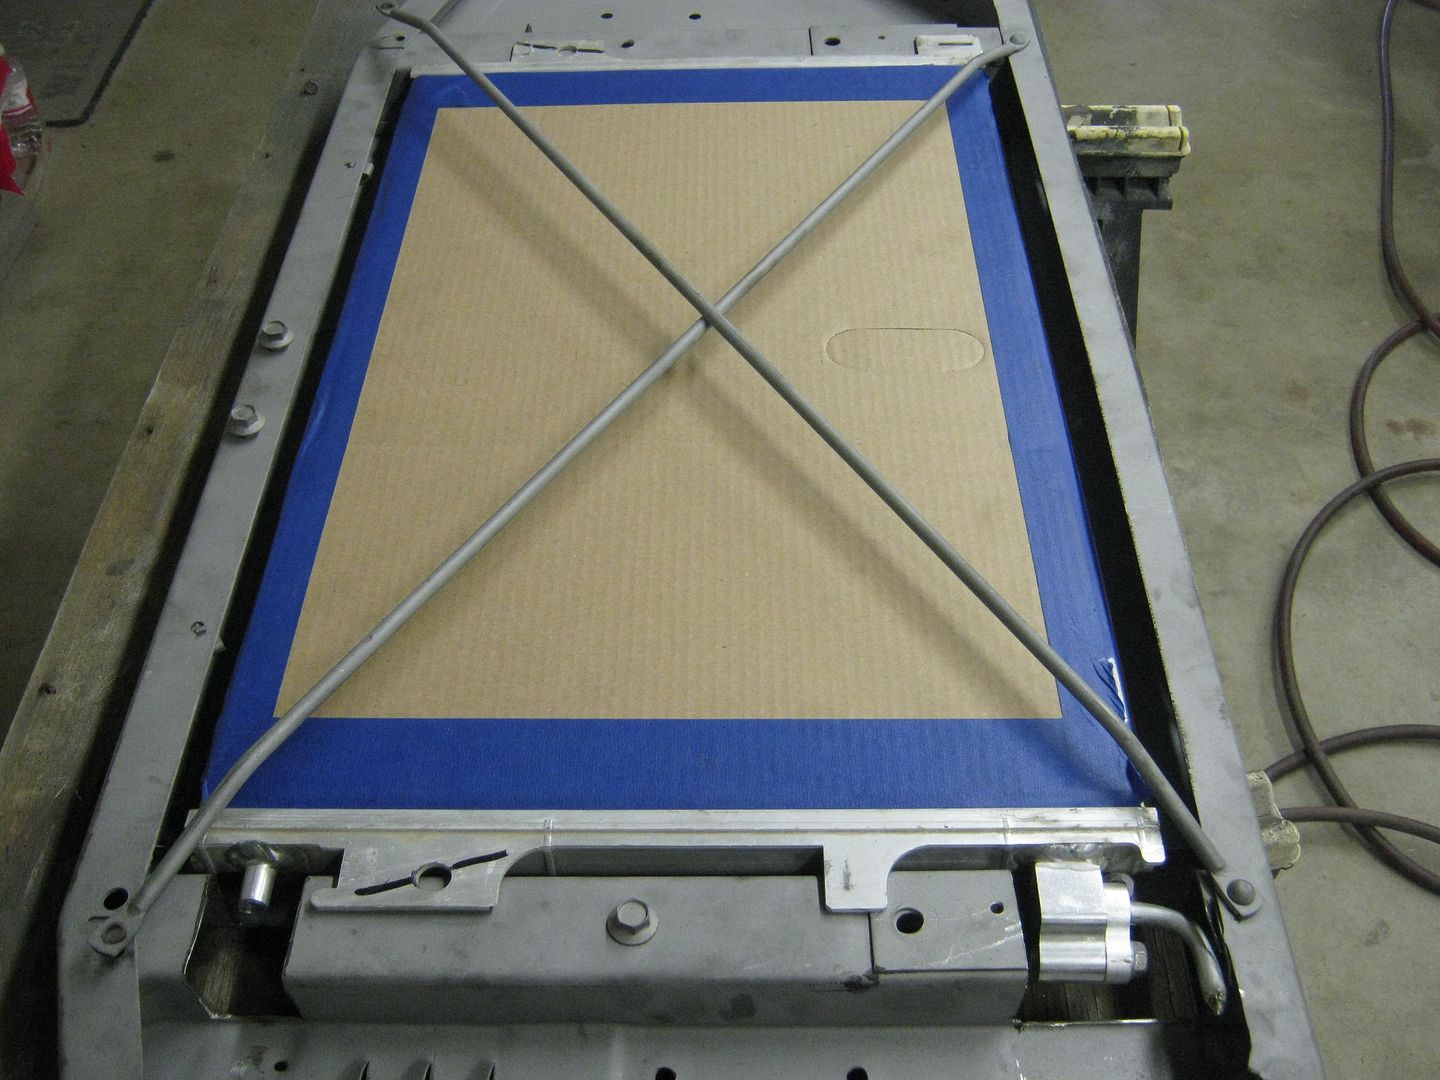 I had some square tubing in my scrap pile and made some pieces to cover the removed areas and tacked them in. I also chopped off the original outlet line because it wasn't going to work for my application. 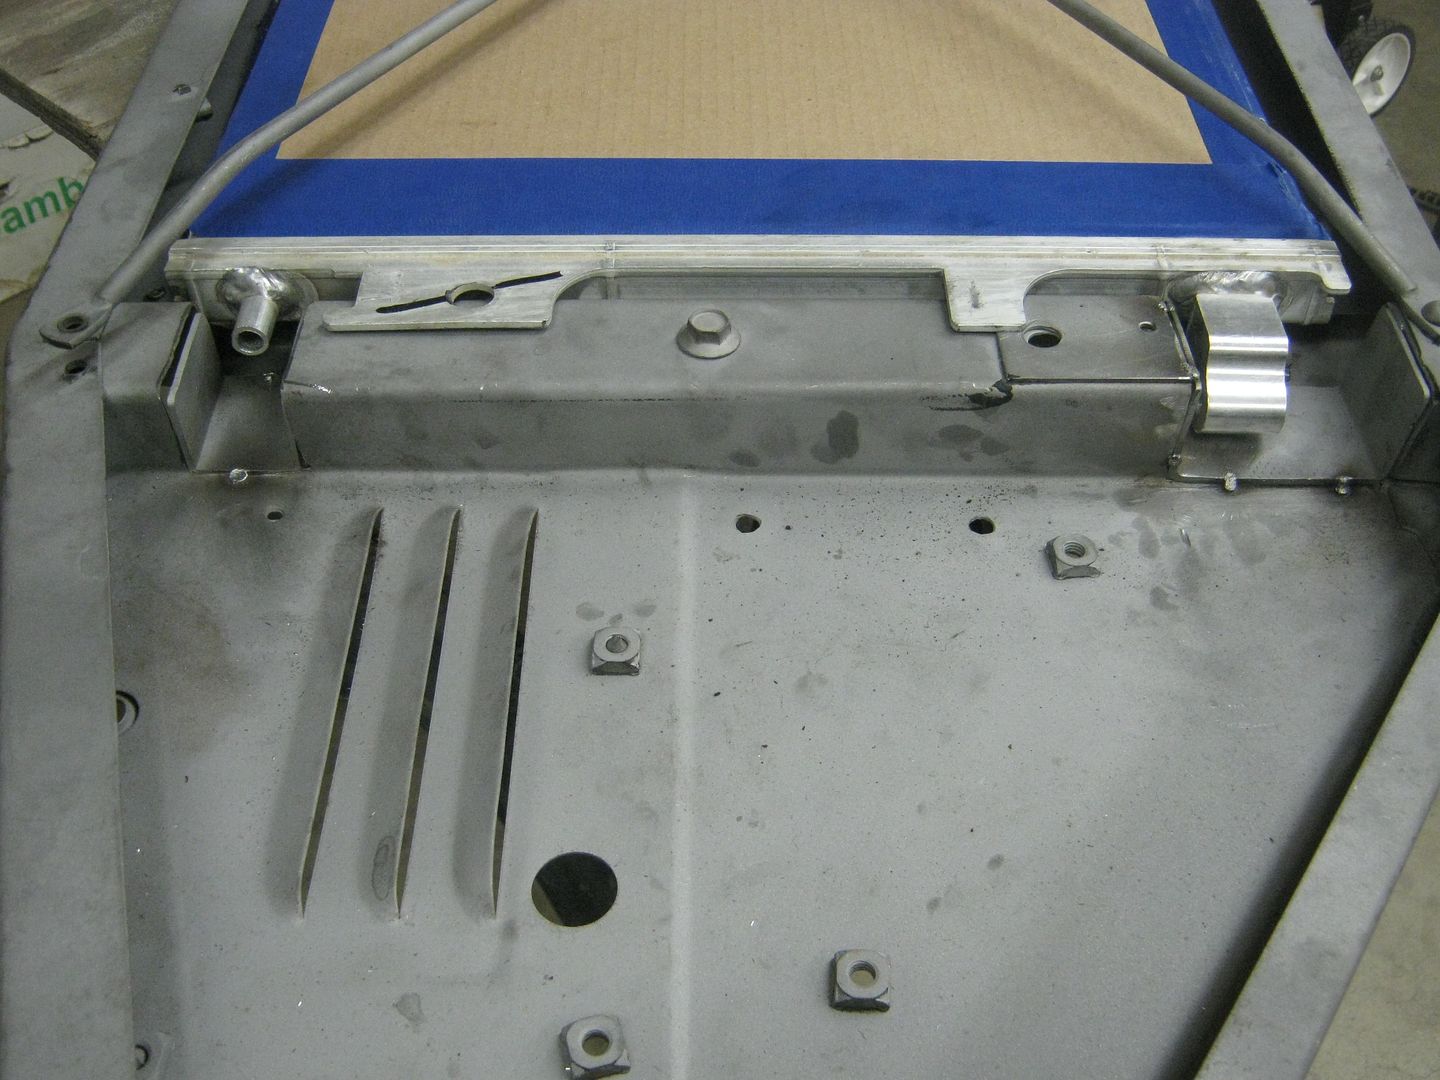 The stock Corvette mounting tabs were not consistent from side to side, so they got whacked. 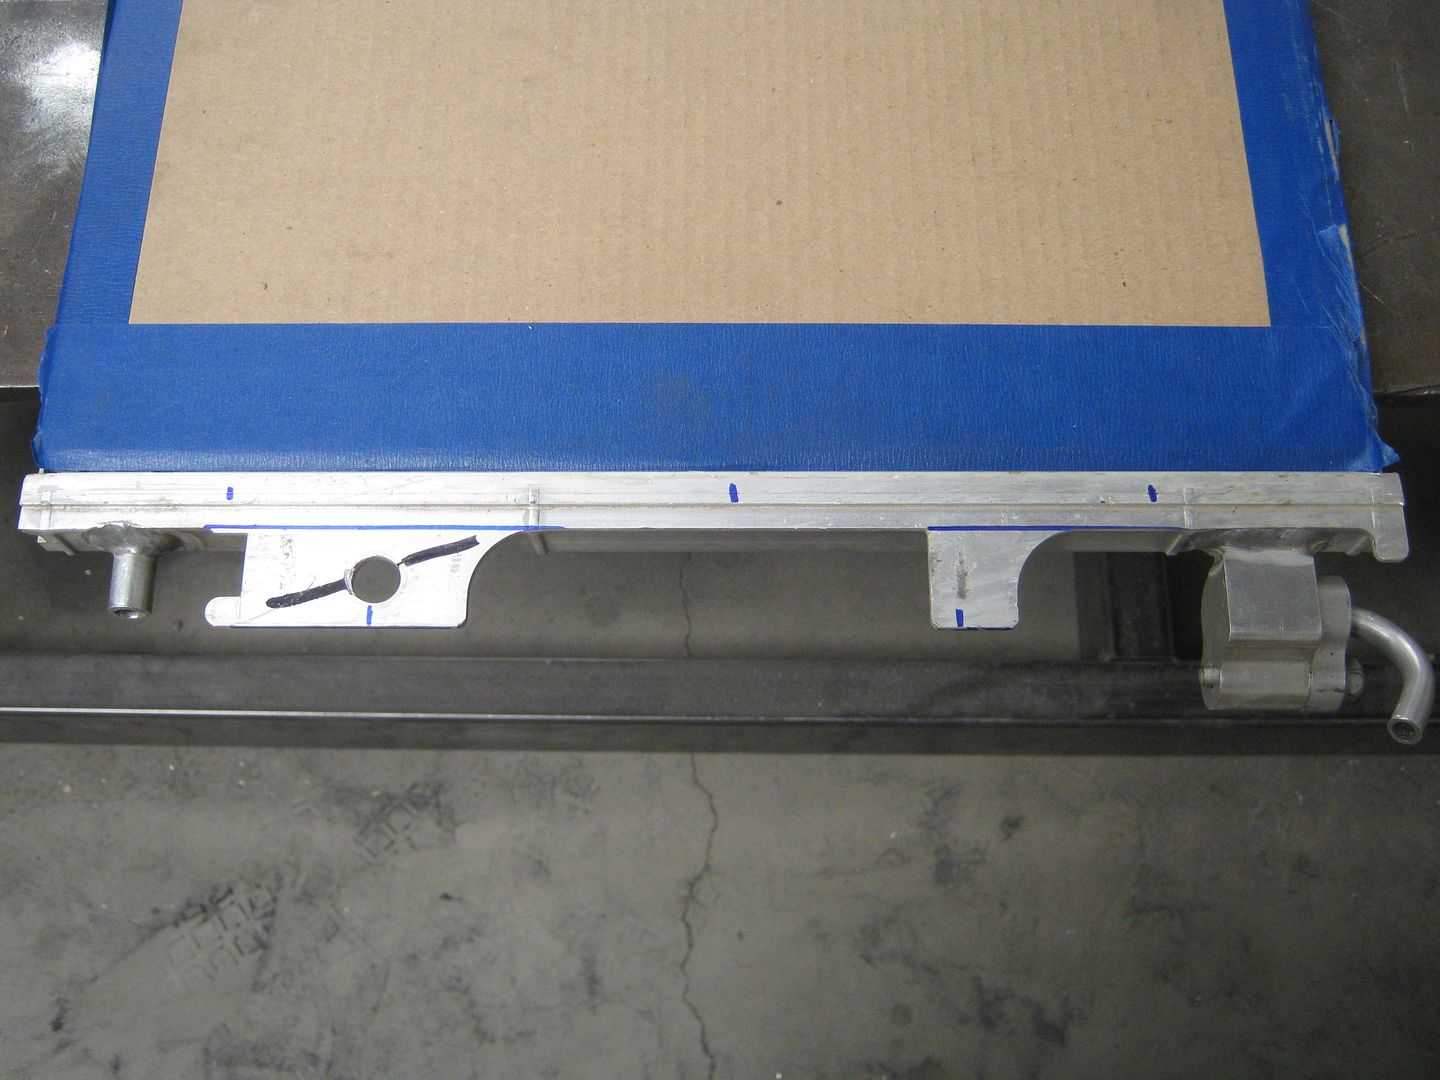 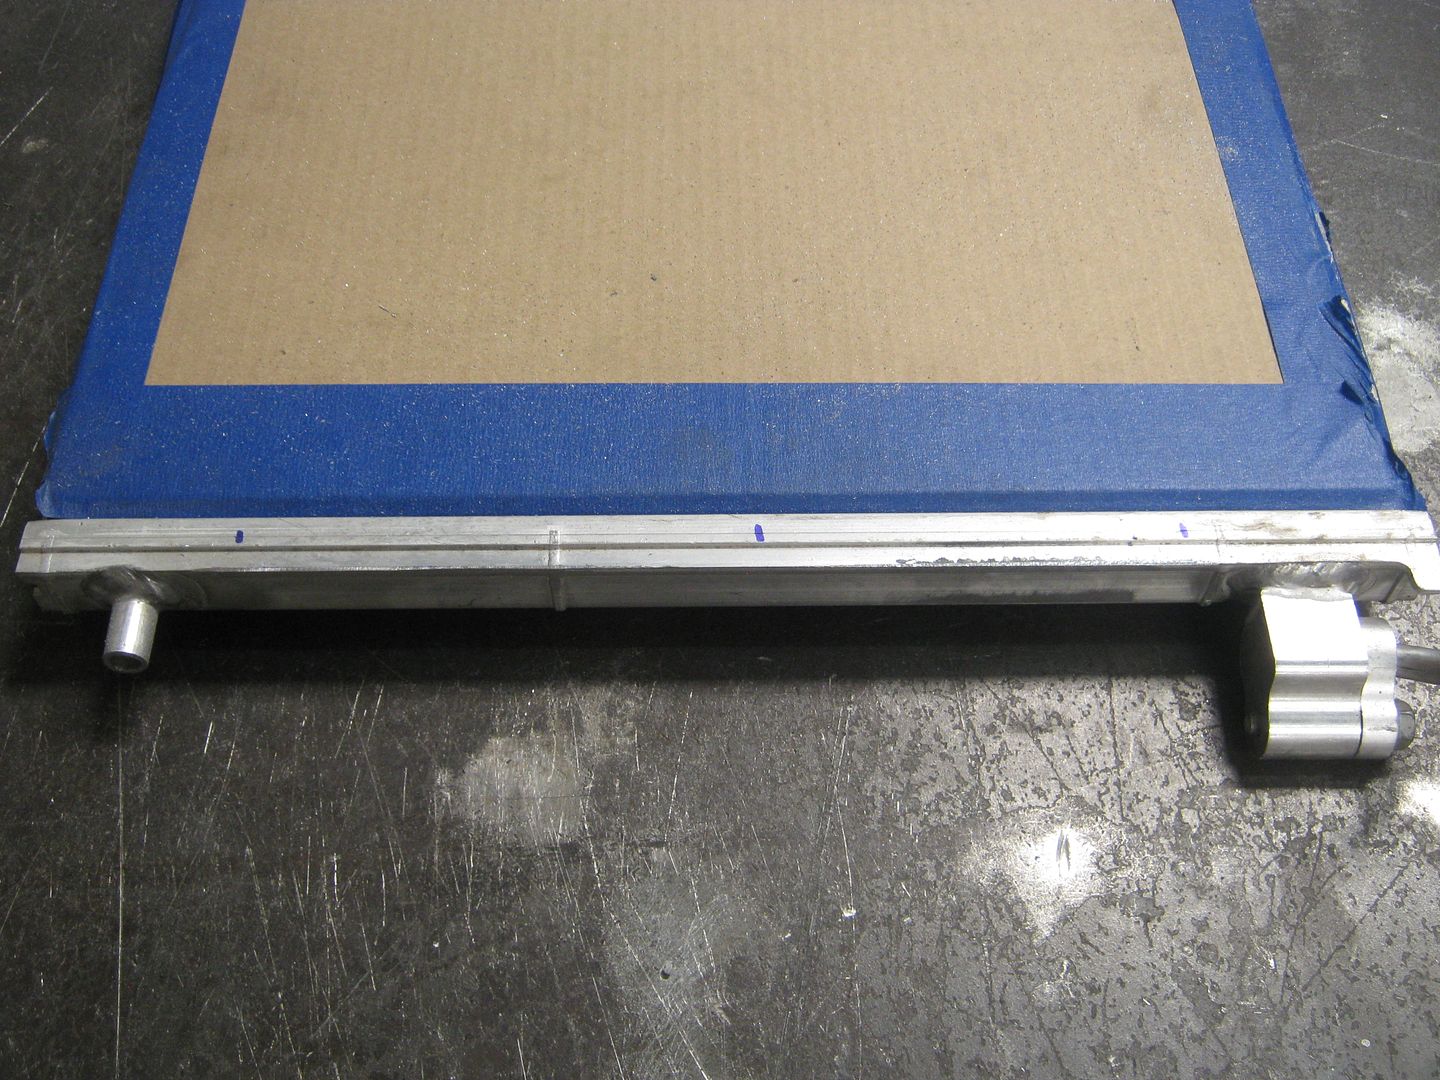 Grabbed some aluminum from the scrap pile and made new mount tabs and make my buddy Mike Jones TIG them in place. 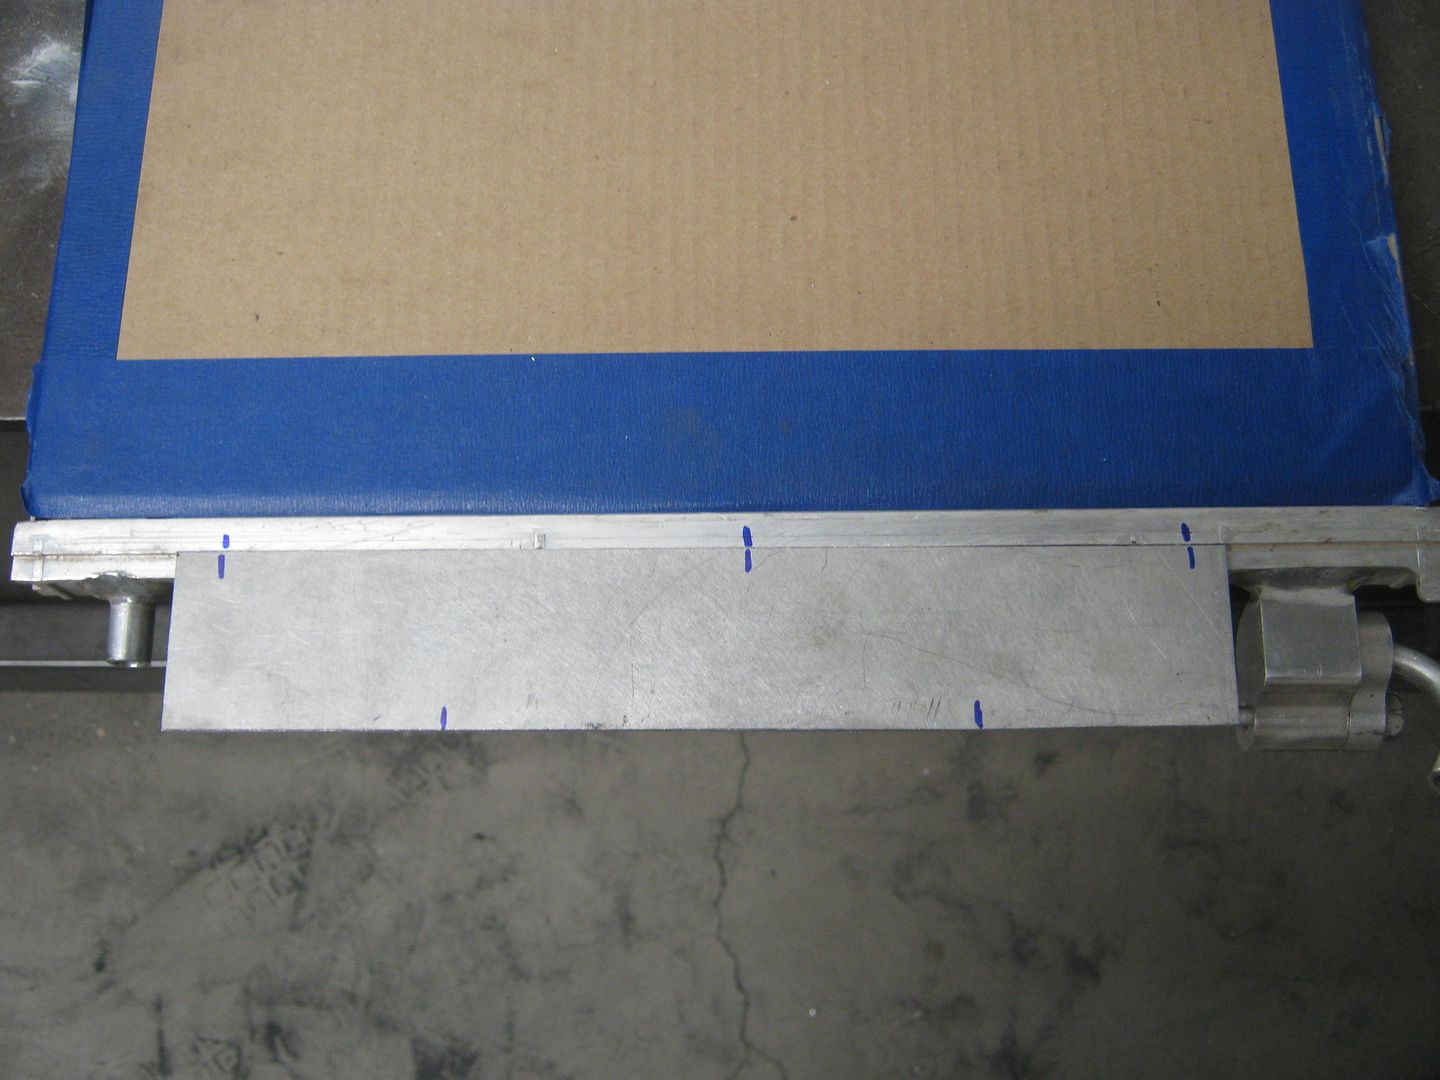 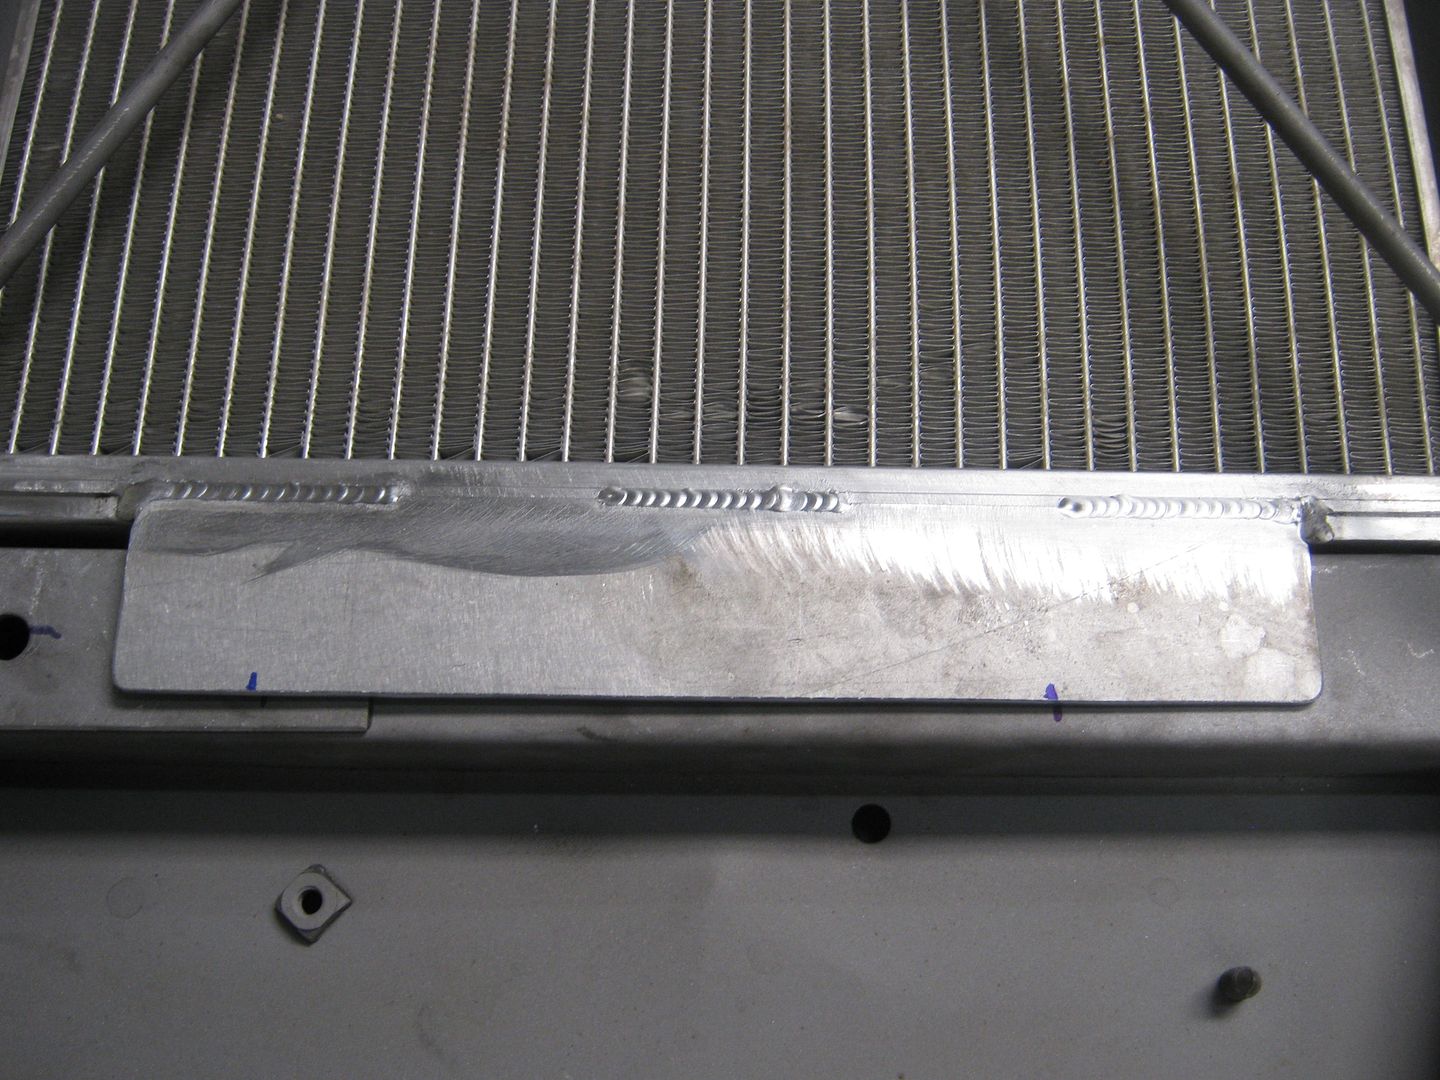 Fast forward a little, and I drilled the core support for the AC bulkhead fittings, and shortened and reshaped the dryer clamps. I chopped up some new fittings to accept hoses at the inlet and outlet lines and had Mike TIG them on. I installed the old mock-up dryer and started mocking up the lines and have a couple of the hoses ready to crimp. I still need to get a #10 female straight fitting for the inlet line at the top and cut the hose to length. The mounting tabs will need to be drilled for mounting bolts and rubber isolators. Once this gets done, I'll blow it all back apart and send it back to the sandblaster to get it touched up due to all the grease and oils from working on the condenser. After that, I'll do a little body work, and it'll be ready for primer and paint (chassis black). Speaking of black, everything you see on this core support will be painted black because I do not want to see anything behind the grill of the truck. I always think that it looks wrong when I see shiny stuff behind the grille or body-colored core supports. You have to hide that stuff! 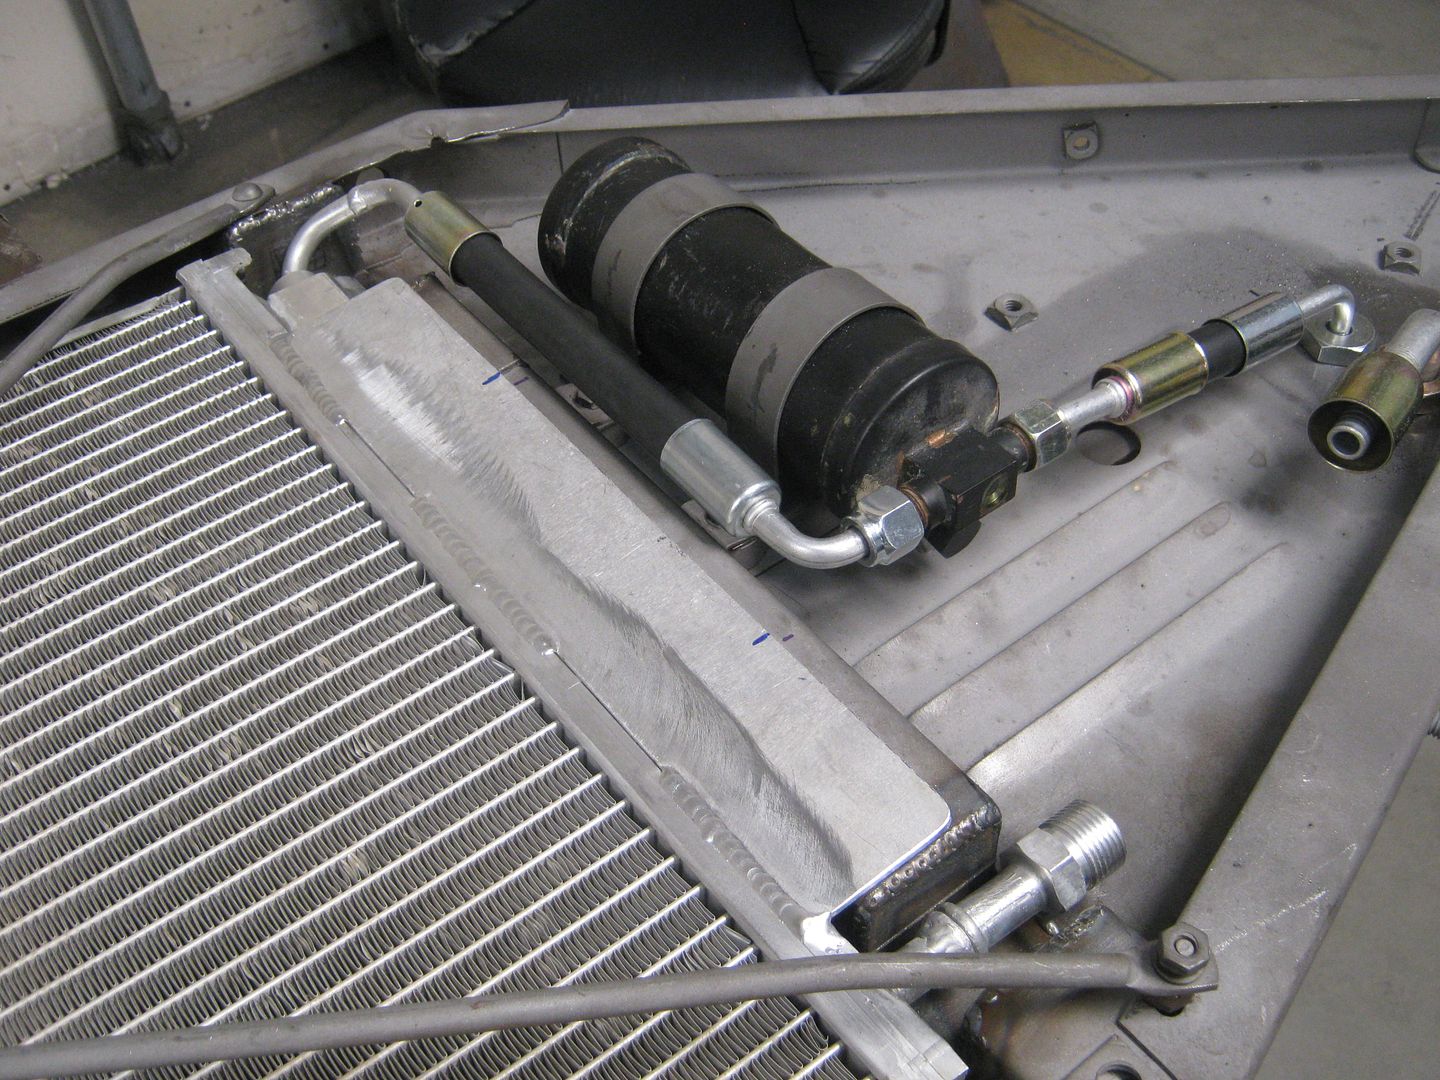 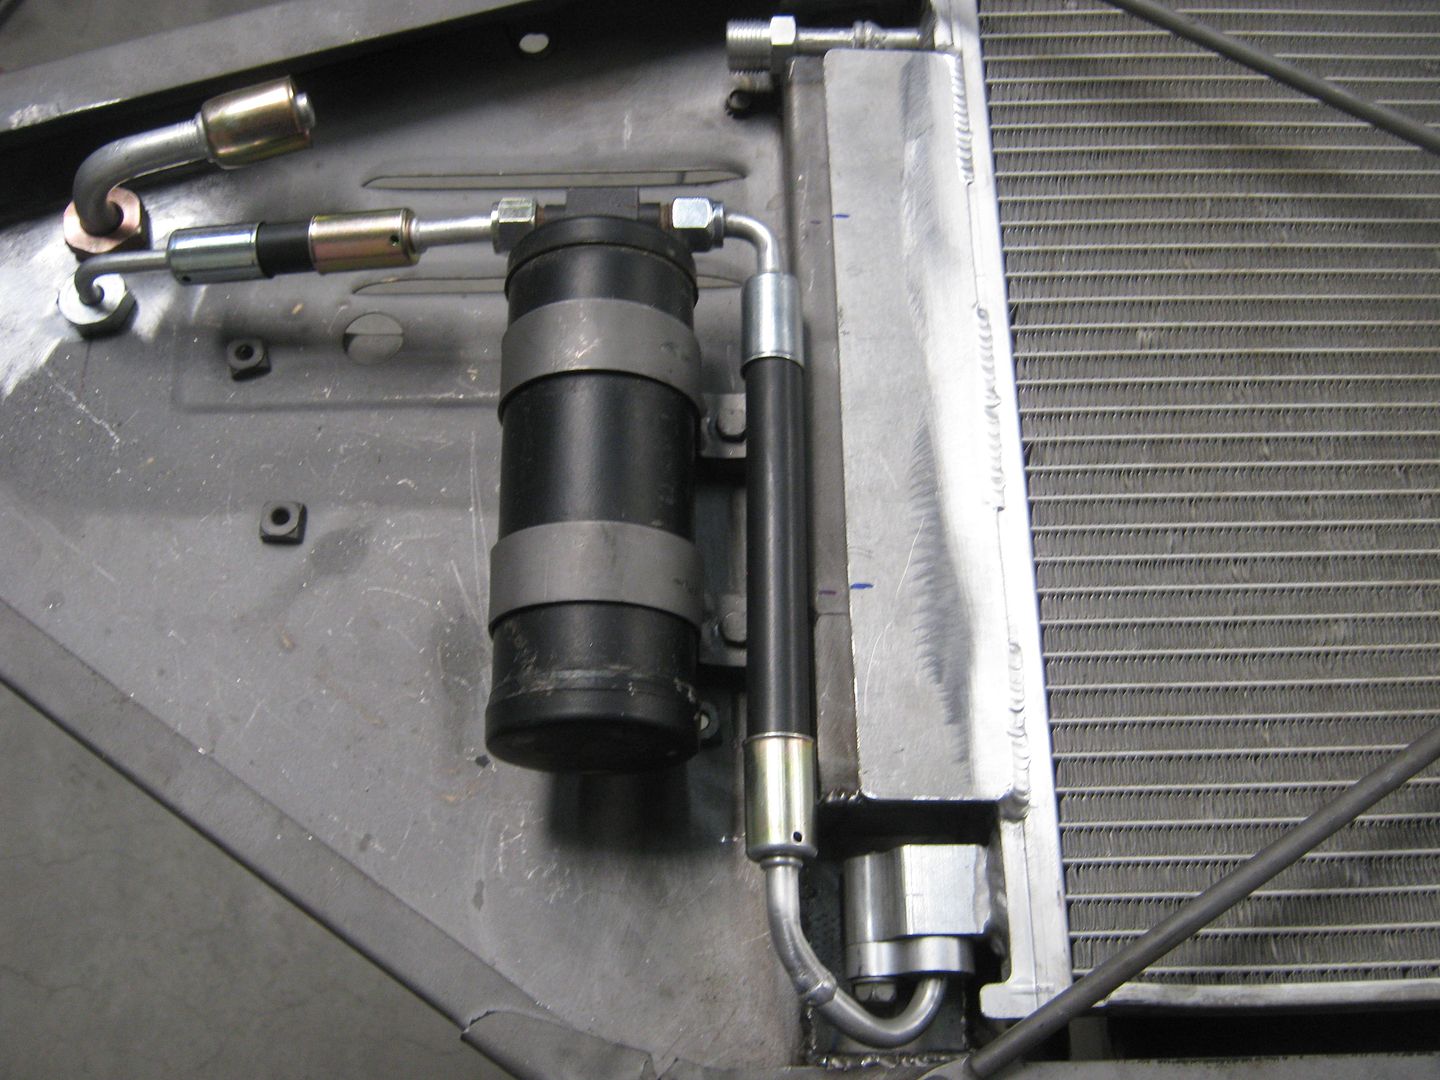
__________________
Check out my latest endeavor: https://roundsixpod.com My build threads: '55 Chevy: http://67-72chevytrucks.com/vboard/s...d.php?t=247512 '64 C-20: http://67-72chevytrucks.com/vboard/s...d.php?t=446527 |
|
|

|
|
|
#363 |
|
Registered User
Join Date: Apr 2011
Location: .
Posts: 3,104
|
Re: Project '64 Cheapskate
Man you always blow me away.
Wish I had some of the talent you have. So much great info here ALWAYS 
|
|
|

|
|
|
#364 |
|
Registered User
Join Date: Apr 2003
Location: Indep, MO
Posts: 5,893
|
Re: Project '64 Cheapskate
Mad skills! AC scares me. Beautiful work.
Posted via Mobile Device
__________________
Boppa's Old Yeller Truck Build, Old Yeller's New Heart! Project Buzz Bomb Flyin' Low! |
|
|

|
|
|
#365 |
|
60-66 Nut
  Join Date: Mar 2007
Location: Coeur d'Alene, Idaho
Posts: 23,250
|
Re: Project '64 Cheapskate
Good score on the condenser. Very sanitary job on this installation

__________________
Power Steering Box Adapter Plates For Sale HERE Power Brake Booster Adapter Brackets For Sale '63-'66 HERE and '67-'72 HERE and '60-'62 HERE and "60-'62 with clutch HERE Rear Disc Brake Brackets For Sale. Impala SS calipers HERE Camaro Calipers HERE D52 Calipers HERE 6 Lug HERE Hydroboost Mounting Plates HERE |
|
|

|
|
|
#366 |
|
Registered User
Join Date: Sep 2012
Location: Midway, NC
Posts: 3,275
|
Re: Project '64 Cheapskate
Looks awesome.
__________________
http://67-72chevytrucks.com/vboard/s...d.php?t=581873 The low buck build threads. Check'em out! http://67-72chevytrucks.com/vboard/s...d.php?t=666022 My build thread Crossmembers CC |
|
|

|
|
|
#367 |
|
Registered User
Join Date: Sep 2011
Location: Tacoma, WA
Posts: 2,425
|
Re: Project '64 Cheapskate
This looks like my kind of adaption !!
Great work here, and your buddy Mike seems to really know what he is doing, those welds look real purty 
__________________
Michael McMurphy My 66 Stepside My 64 Tow Truck My 66 Tempest Table Of Contents Added to Page1 |
|
|

|
|
|
#368 |
|
Registered User
 Join Date: Mar 2005
Location: apple valley, ca
Posts: 2,670
|
Re: Project '64 Cheapskate
Mike is an amazing fabricator. He builds some of the most over-the-top off-road race vehicles I have ever seen. If you want to see some amazing welds, check out the rear air ride set-up on my '55 build thread. His work is in the last part of the thread. He welds like a robot.
__________________
Check out my latest endeavor: https://roundsixpod.com My build threads: '55 Chevy: http://67-72chevytrucks.com/vboard/s...d.php?t=247512 '64 C-20: http://67-72chevytrucks.com/vboard/s...d.php?t=446527 |
|
|

|
|
|
#369 |
|
Senior Member
 Join Date: Sep 2011
Location: Hanford, CA
Posts: 1,027
|
Re: Project '64 Cheapskate
Thoroughly impressed at your vision on this one. Great work!
__________________
Poor and content is Rich...and Rich enough! - William Shakespeare 1966 C10 Custom Cab "Luigi" Big Window - SWB Fleetside 350 V-8 - Powerglide My not so much a build thread as a "Slow Progression Thread":http://67-72chevytrucks.com/vboard/s...d.php?t=486894 |
|
|

|
|
|
#370 |
|
Registered User
Join Date: Jul 2006
Location: Willis, Texas
Posts: 754
|
Re: Project '64 Cheapskate
Will it cool faster since it came off of a Z06? :-) Cool stuff as usual!!!!
Posted via Mobile Device
__________________
65Gregg Blue long bed White TBSS 61 Impala “The two most important days in your life are the day you are born and the day you find out why.” Mark Twain |
|
|

|
|
|
#371 |
|
Registered User
 Join Date: Mar 2005
Location: apple valley, ca
Posts: 2,670
|
Re: Project '64 Cheapskate
I did something tonight that I have never done before. I rebuilt my steering box rag joint. I had been shopping around for a new rag joint, but them little suckers are spendy and I couldn't bring myself to pay $75 for a piece of rubber. So, I started shopping around and found that Borgeson sells a rebuilt kit for $16. It comes with the metal reinforced rubber disc and all the hardware. It was easy. I even wire-wheeled the parts and painted them, and I was done in less than an hour. I'm going to do these rebuilds from now on! Definitely a money saver.
The original grungy rag joint from my '79 Suburban donor. Pretty messed up. 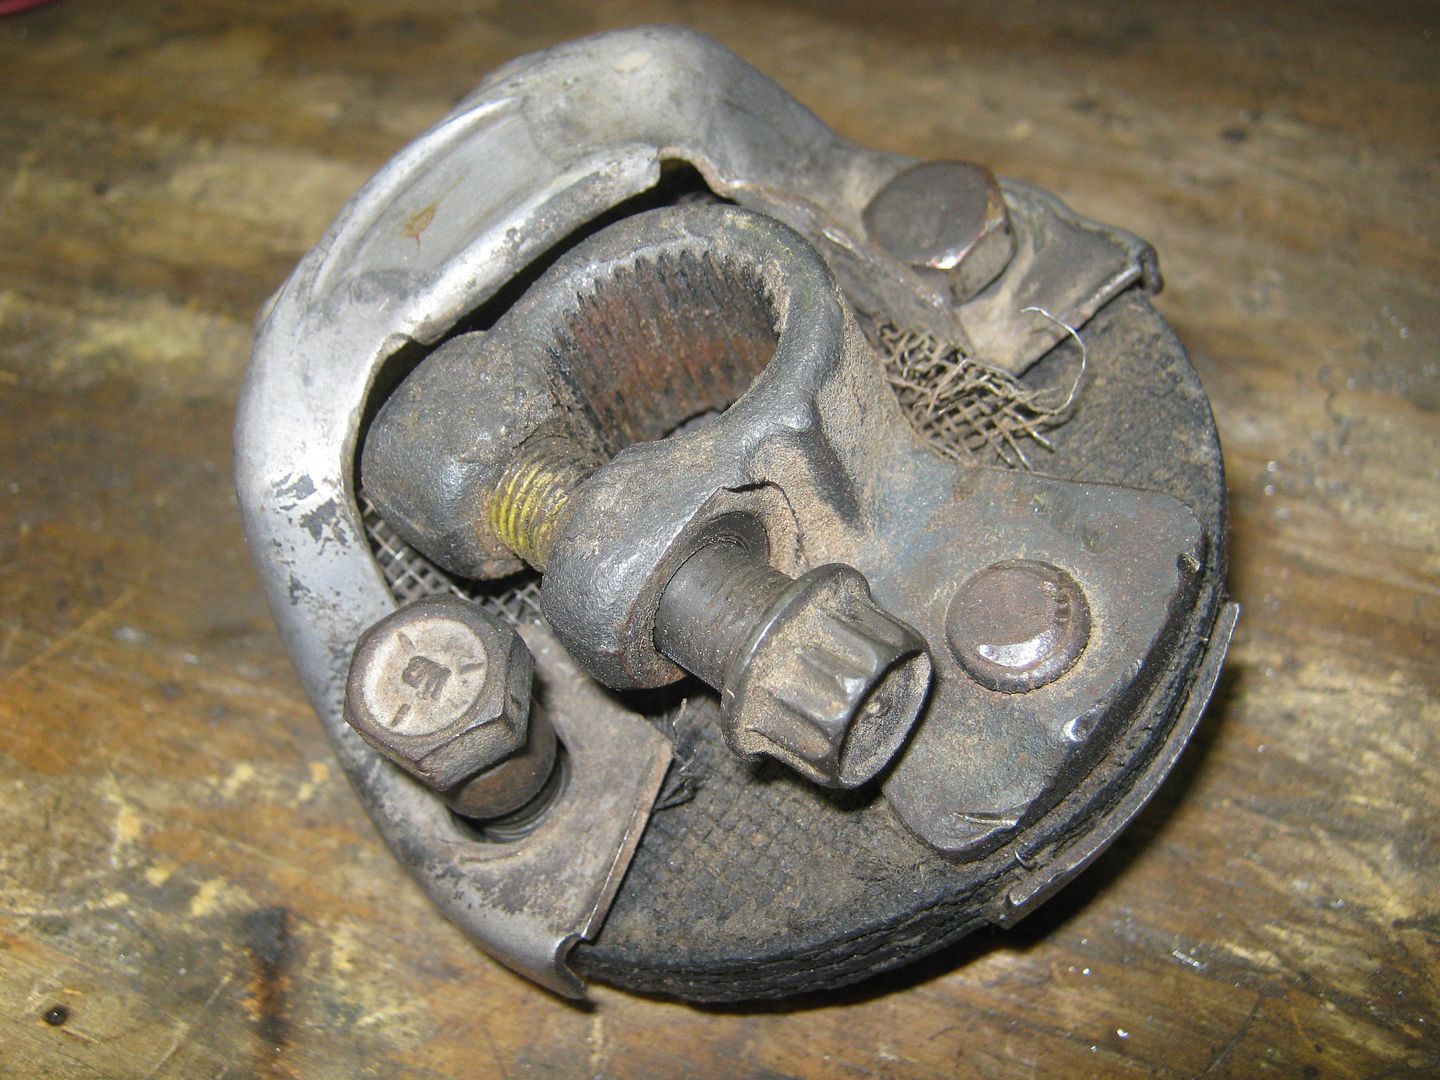 Here's all the parts laid out, cleaned up and painted, with the Borgeson kit (rubber disc and the hardware). 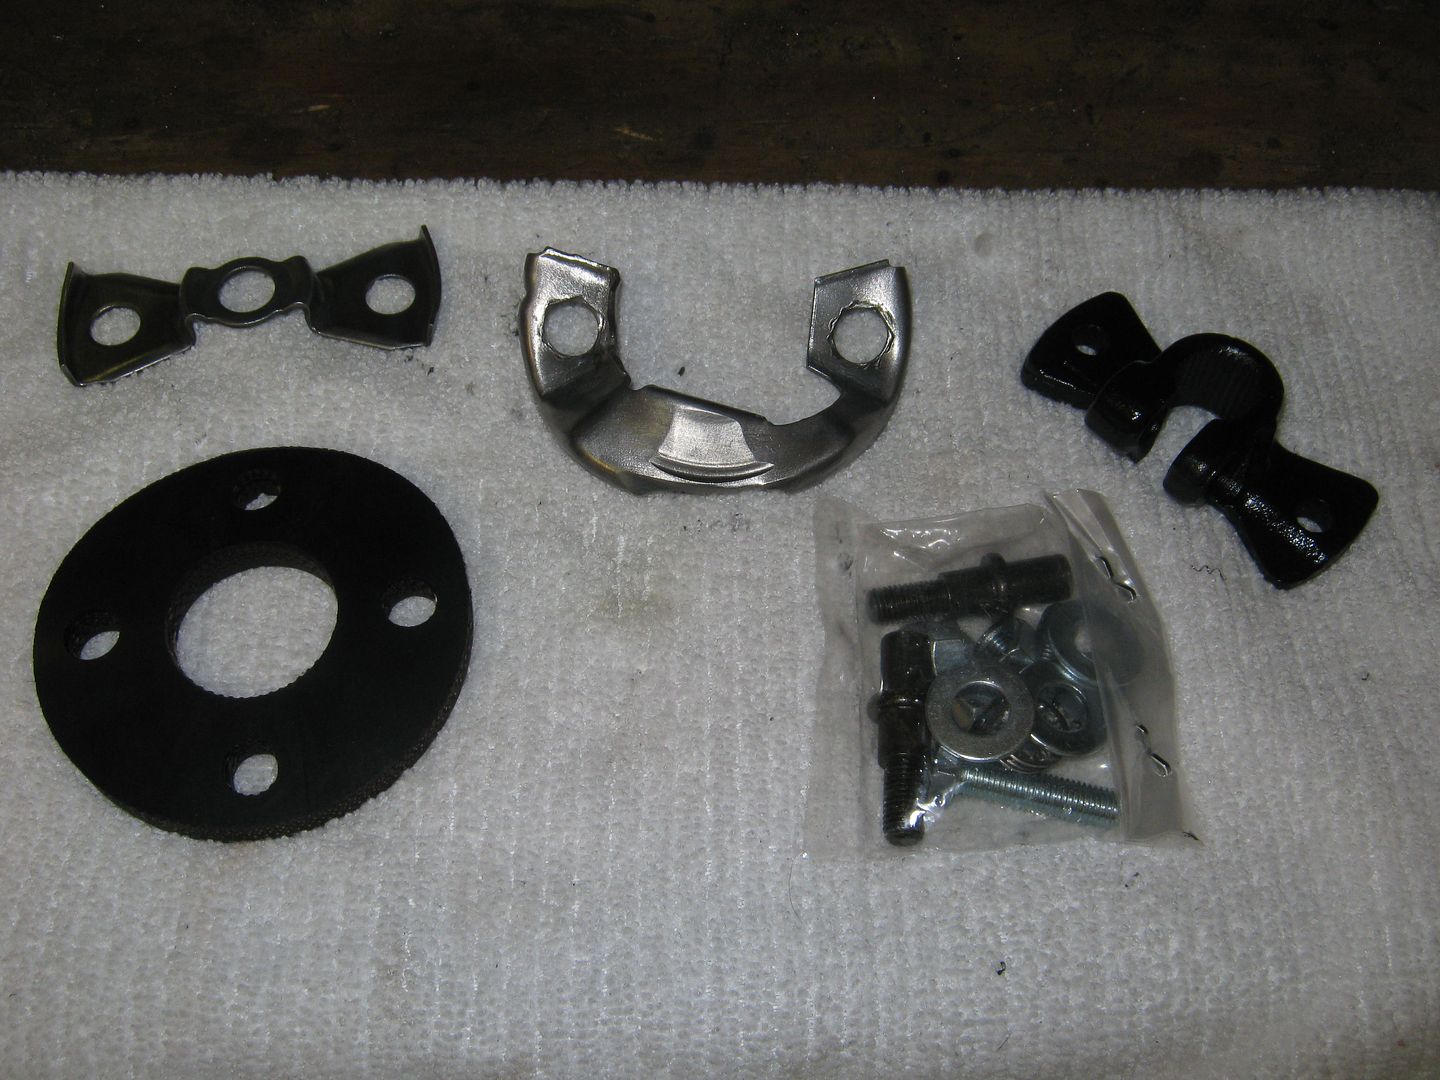 Finished product. The bolts holding the reinforcement bracket on look mismatched, but Chevy used two different sized bolts to attach the rag joint to the column. The steering shaft was two different sized holes to match the different bolts. 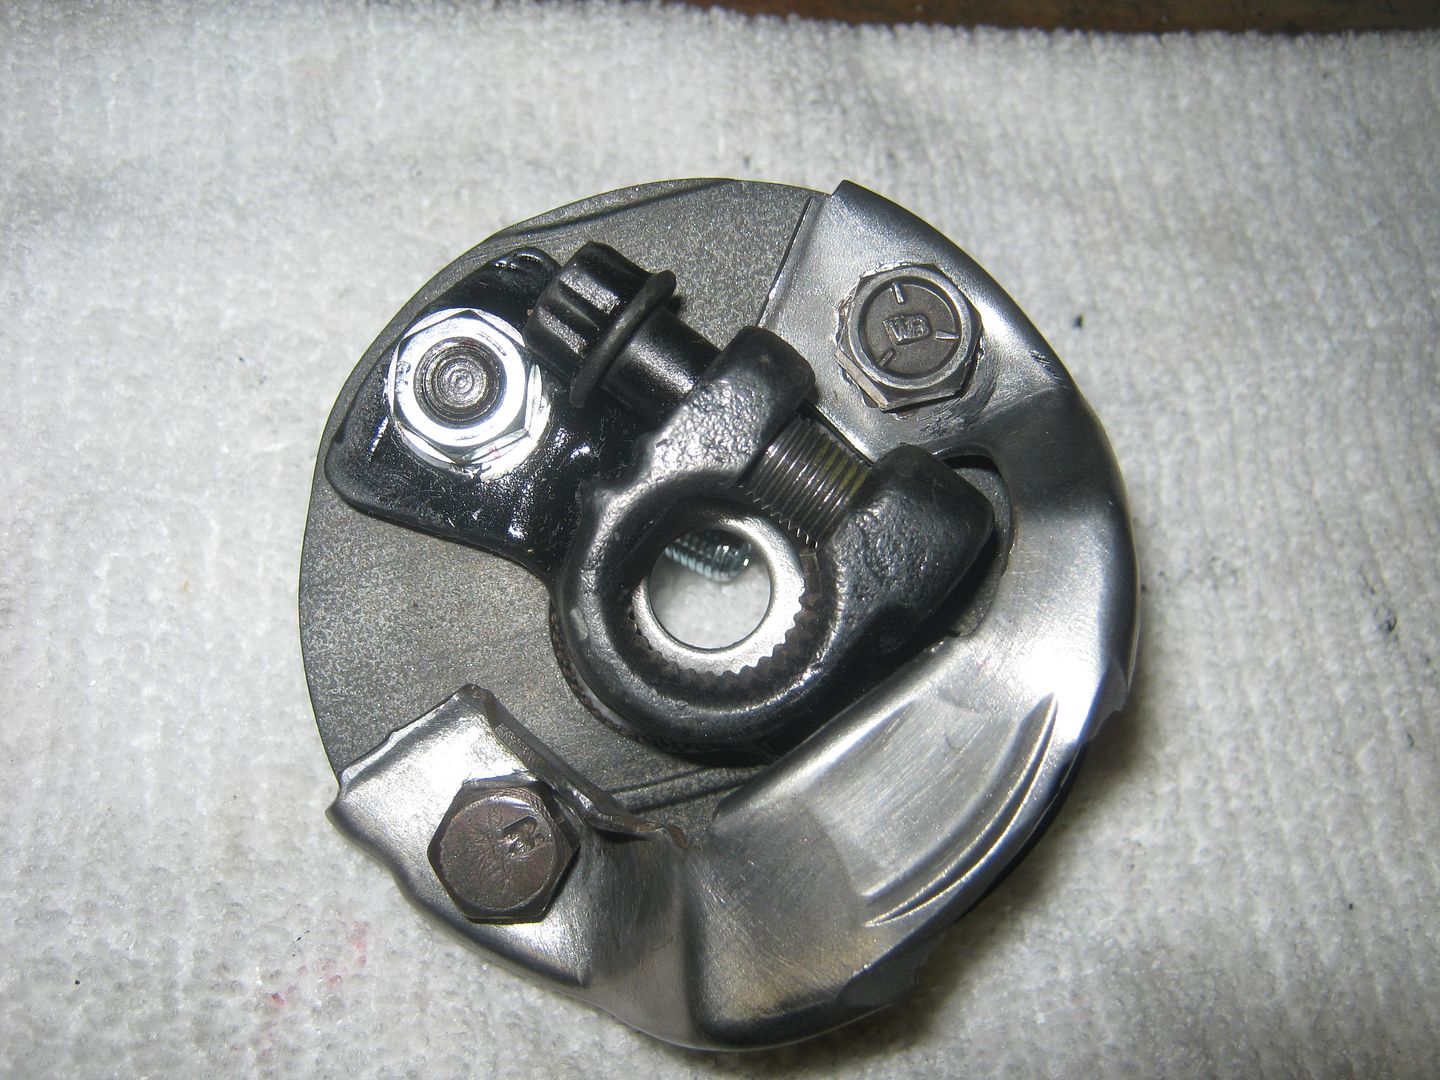 I plan on finishing the steering box and column installation this weekend, and I'll post up all the details.
__________________
Check out my latest endeavor: https://roundsixpod.com My build threads: '55 Chevy: http://67-72chevytrucks.com/vboard/s...d.php?t=247512 '64 C-20: http://67-72chevytrucks.com/vboard/s...d.php?t=446527 |
|
|

|
|
|
#372 |
|
Registered User
Join Date: Sep 2012
Location: Midway, NC
Posts: 3,275
|
Re: Project '64 Cheapskate
That's really kool.....and cheap.!
__________________
http://67-72chevytrucks.com/vboard/s...d.php?t=581873 The low buck build threads. Check'em out! http://67-72chevytrucks.com/vboard/s...d.php?t=666022 My build thread Crossmembers CC |
|
|

|
|
|
#373 |
|
Registered User
 Join Date: Mar 2005
Location: apple valley, ca
Posts: 2,670
|
Re: Project '64 Cheapskate
Had a little time today, so I installed the steering box and tied it into the column, hopefully for the last time.
Clean and painted the steering box (1979 Chevy truck) and installed the rebuilt rag joint. The intermediate shaft is from the same '79 Chevy truck, just had to adjust the length a little to account for the different style of u-joint. 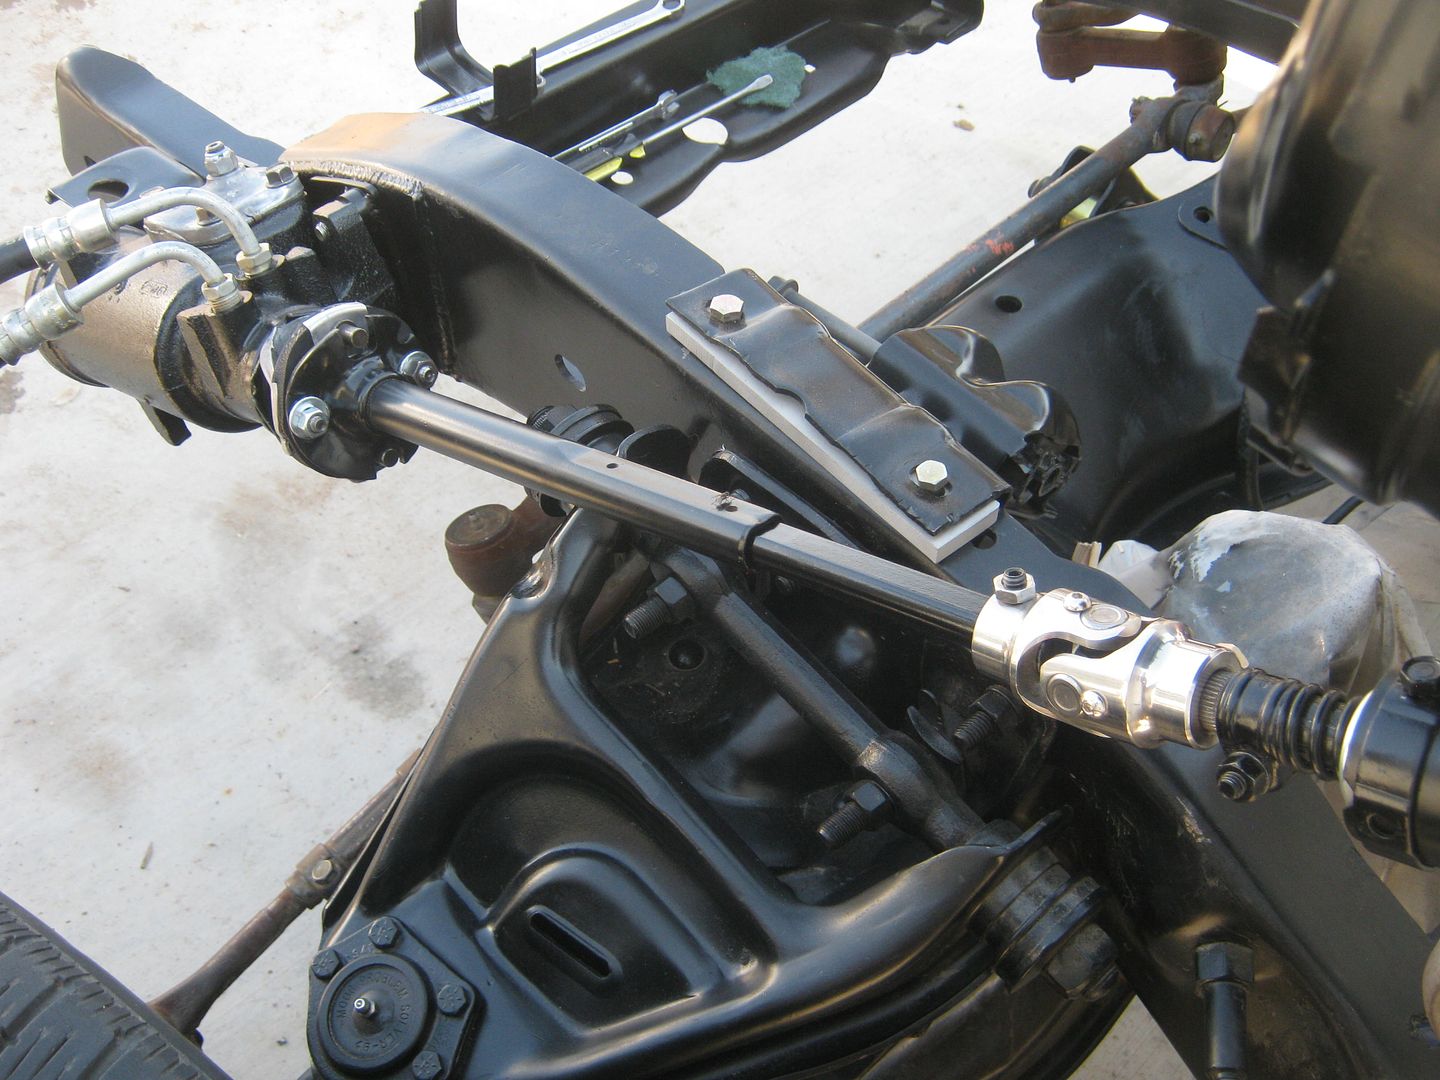 The steering u-joint is a Borgeson that I got for cheap off of ebay. It's brand new, but the only problem (for me) is that it's a shiny one. I would have preferred a steel one that I could paint black, but for the price I got it for, I can't complain. The steering column is a bit of a "Frankenstein" concoction. I never cared for the stock steering shaft on the 60-66 GM trucks because it's a solid shaft from the steering wheel to the steering box and won't collapse in a crash. So, I took the steering shaft and the lower bearing retainer out of a '67 column that Brad had kept for parts, and with a little bit of effort, got it all to work. I changed out the lower bearing while I had it apart. Man, it operates as smooth as silk, and with the collapsable intermediate shaft, the column is much safer. 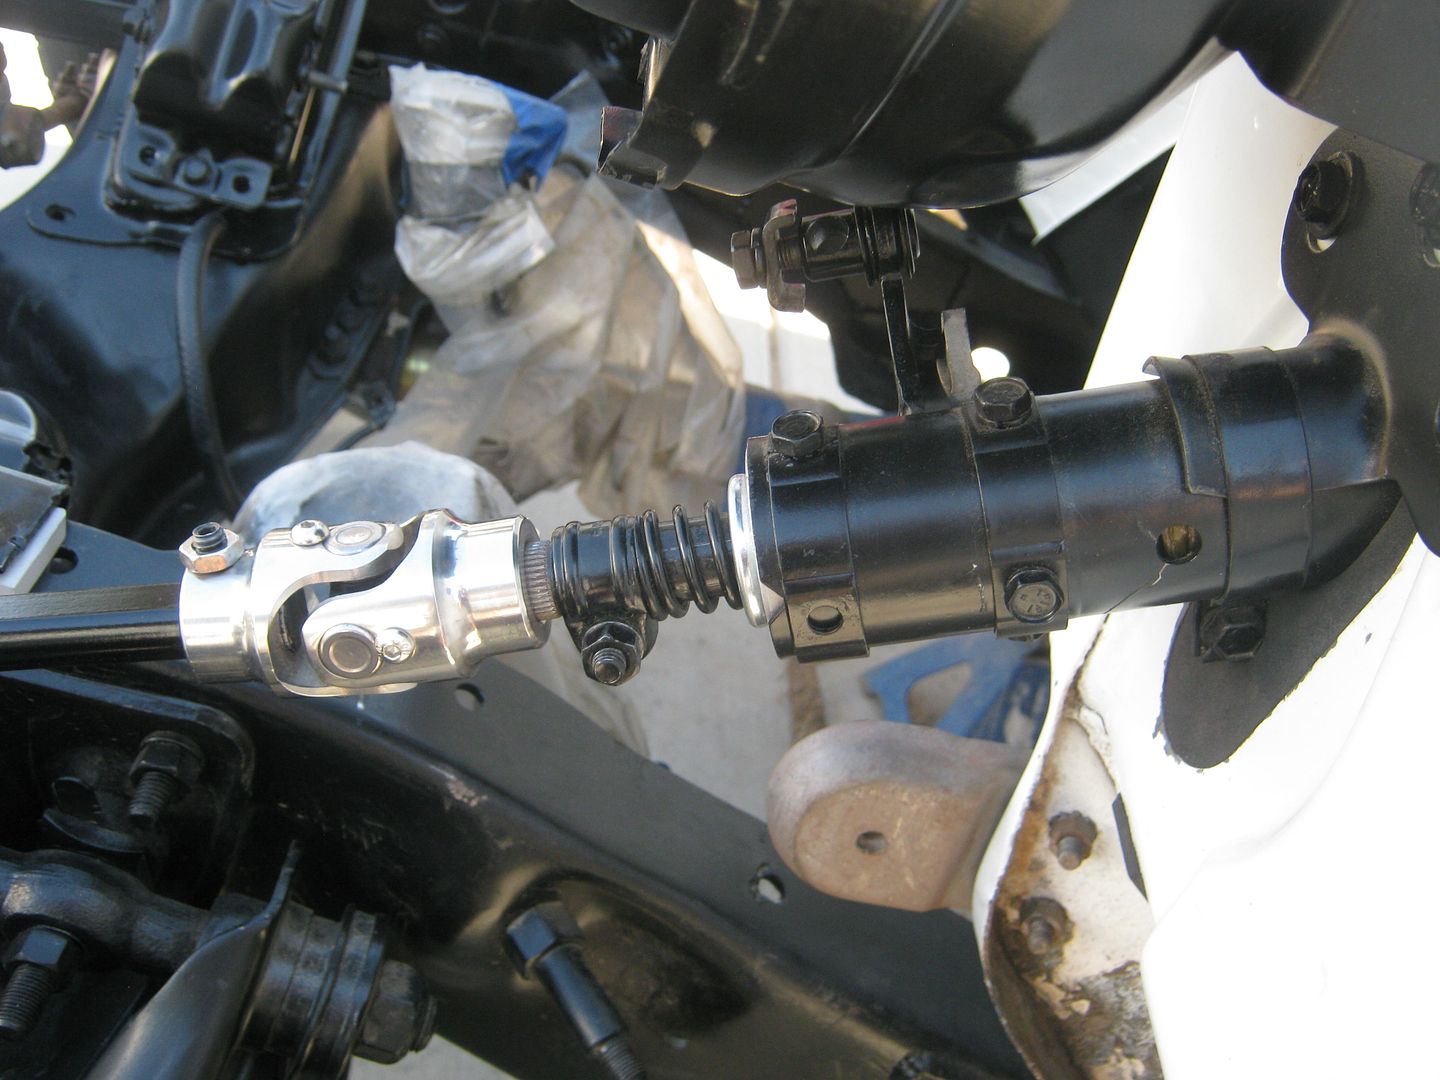 Next up: Install the master cylinder, prop valve bracket and prop valve, and start plumbing brakes.
__________________
Check out my latest endeavor: https://roundsixpod.com My build threads: '55 Chevy: http://67-72chevytrucks.com/vboard/s...d.php?t=247512 '64 C-20: http://67-72chevytrucks.com/vboard/s...d.php?t=446527 |
|
|

|
|
|
#374 |
|
chevy only
 Join Date: Sep 2006
Location: Phoenix, AZ
Posts: 6,619
|
Re: Project '64 Cheapskate
I dig your work kat!!
__________________
CHEVY ONLY... Nothin Else ! |
|
|

|
|
|
#375 |
|
Registered User
Join Date: Apr 2003
Location: Indep, MO
Posts: 5,893
|
Re: Project '64 Cheapskate
Aaaaack! Shiny parts! Looks good, putting things on!
Posted via Mobile Device
__________________
Boppa's Old Yeller Truck Build, Old Yeller's New Heart! Project Buzz Bomb Flyin' Low! |
|
|

|
 |
| Bookmarks |
|
|