
 |
|
|
#351 |
|
Registered User
Join Date: Jan 2012
Location: Motown
Posts: 7,680
|
Re: 1957 Chevy truck re-rebuild
truck is looking good stepside
 chevrolet never thought we'd be doing this stuff to our trucks or they would have ironed a few wrinkles out of the inner fenders. my inners are full of wrinkles, like they thought wtf, no one will see that  luckily most of the wrinkles are down low. i see many 55-57 trucks assembled like this without the core support. not sure you could assemble a 58-59 truck like this, everything hangs on the core support.
__________________
cool, an ogre smiley  Ogre's 58 Truk build Ogre's 58 Truk buildhow to put your truck year and build thread into your signature shop air compressor timer |
|
|

|
|
|
#352 |
|
Registered User
Join Date: Aug 2012
Location: Salem Mo
Posts: 652
|
Re: 1957 Chevy truck re-rebuild
_Ogre, you are correct,the radiator core support will be a big part of the front end when done.
As I've been rebuilding the truck I am leaving nothing unchecked, right down every nut and bolt. I've found in every crevice, every small area that everything has had something touched and not in a good way either. Let's see, I had to remove the brake rotors, no way this could uncover something mess with, ha, someone replaced the bearing washer that has the notch that fits the spindle so it can't turn backwards with one with out a notch. I was fitting the rear traction bars when I noticed some one actually tack welded the bottom leaf spring to the axle perch. Then I noticed they lengthened the U bolts by cutting the existing threads and welding threads extensions on to the u bolts to make them longer. I could go on, but you all get the idea. Then I have to wonder, hmmm, while rubbing my chin, what have others uncovered that I did 20 or 30 years ago.  Oh well, just keep on keepin on. 
|
|
|

|
|
|
#353 |
|
Registered User
Join Date: Apr 2009
Location: Chandler AZ
Posts: 750
|
Re: 1957 Chevy truck re-rebuild
Stepside thanks for sharing, I am subscribed. Really diggin your fab skills.
|
|
|

|
|
|
#354 |
|
Registered User
Join Date: Oct 2013
Location: HOUSTON
Posts: 355
|
Re: 1957 Chevy truck re-rebuild
wow, thats really fantastic work. love the truck
|
|
|

|
|
|
#355 |
|
Registered User
Join Date: Aug 2012
Location: Salem Mo
Posts: 652
|
Re: 1957 Chevy truck re-rebuild
sqrlnts and NASTY-LSX, thanks and thanks for checking in.
I've been sidetracked with some winter preparation projects around the house and shop. One project being gathering fire wood. My old work horse for nearly 30 years has been an Willys truck I put together. It'll be getting some cab work done to it when the Chevy is done. 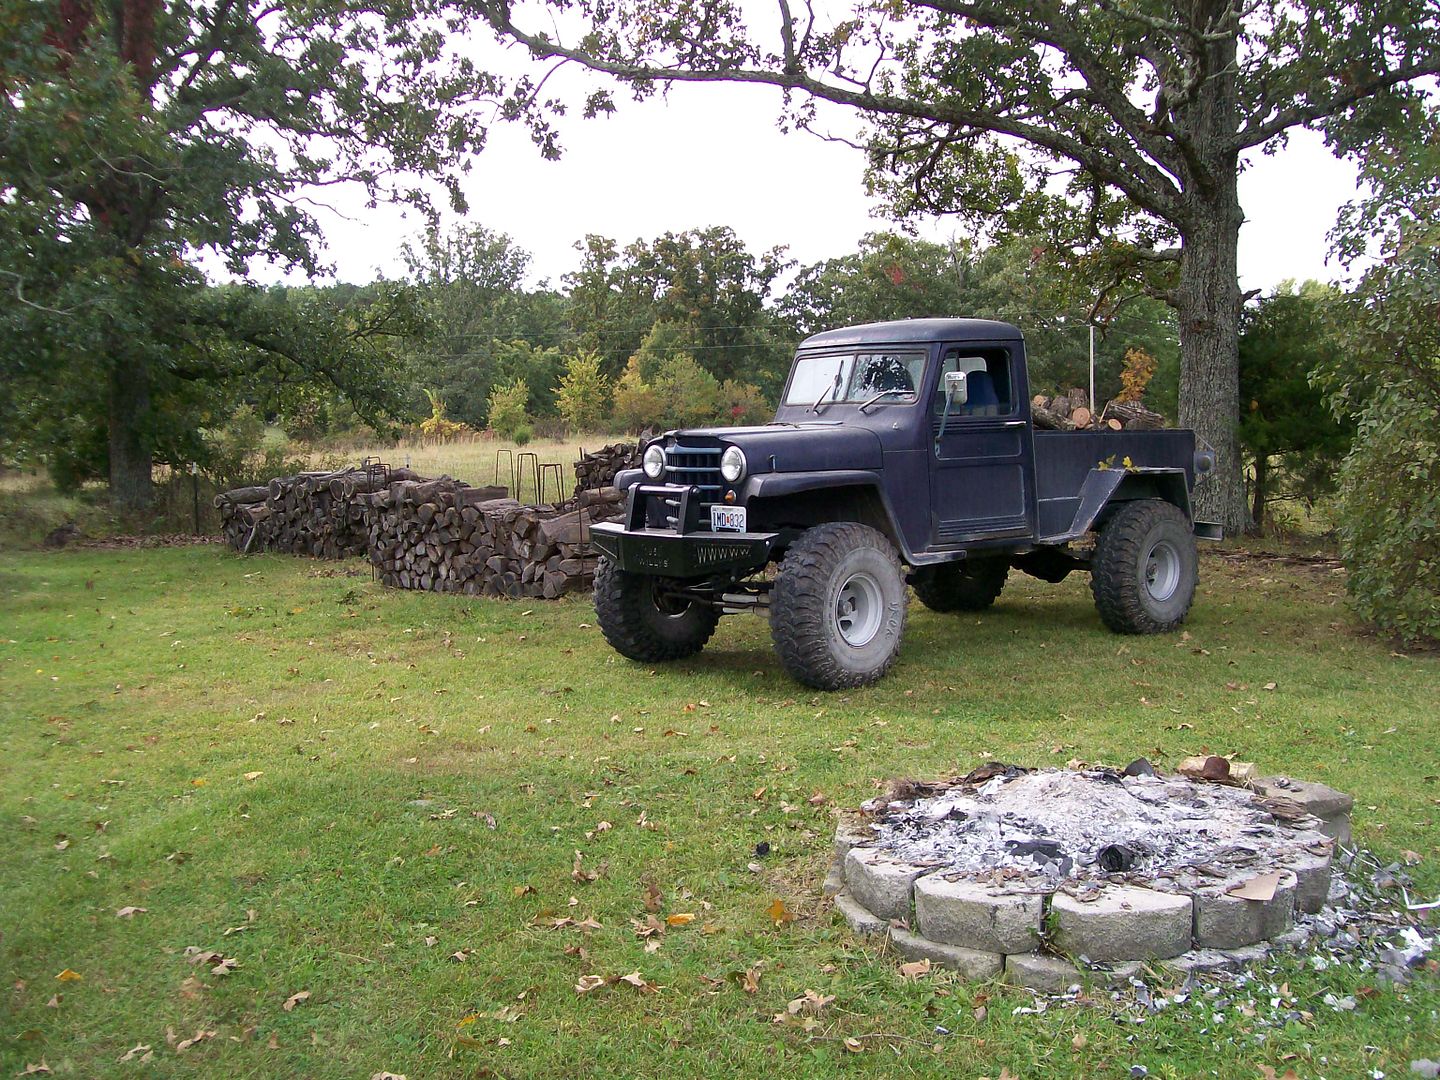 Some time back once I finished the steering column and I used the universal joints and a solid "D" shaft in between I've been troubled with the idea of the solid shaft. What stands out for many people is the idea of a front on collision, the possibility of the steering box being shoved back thus the solid shaft, then the steering column being forced back in the drivers chest, not a good thought. Well ok, I understand safety concerns but I've never been one to build unsafe stuff, but on the other hand, if I have no choice in a matter, I will continue to build one way or another. My true issue with the solid shaft between the steering box and the steering column has to do with body vs cab flex. I know that while driving, the distance between the cab/column and the steering gear box will change, but the solid shaft will not. Something has to give, I feared the u joints to the splined shafts will give and become loose over time. For those with 3 u joints, yours will flex at the middle u joint so I figure these concerns are already taken care of. For mine, as I was going through the catalog I found a telescopic "D" shaft set up, just what I wanted. 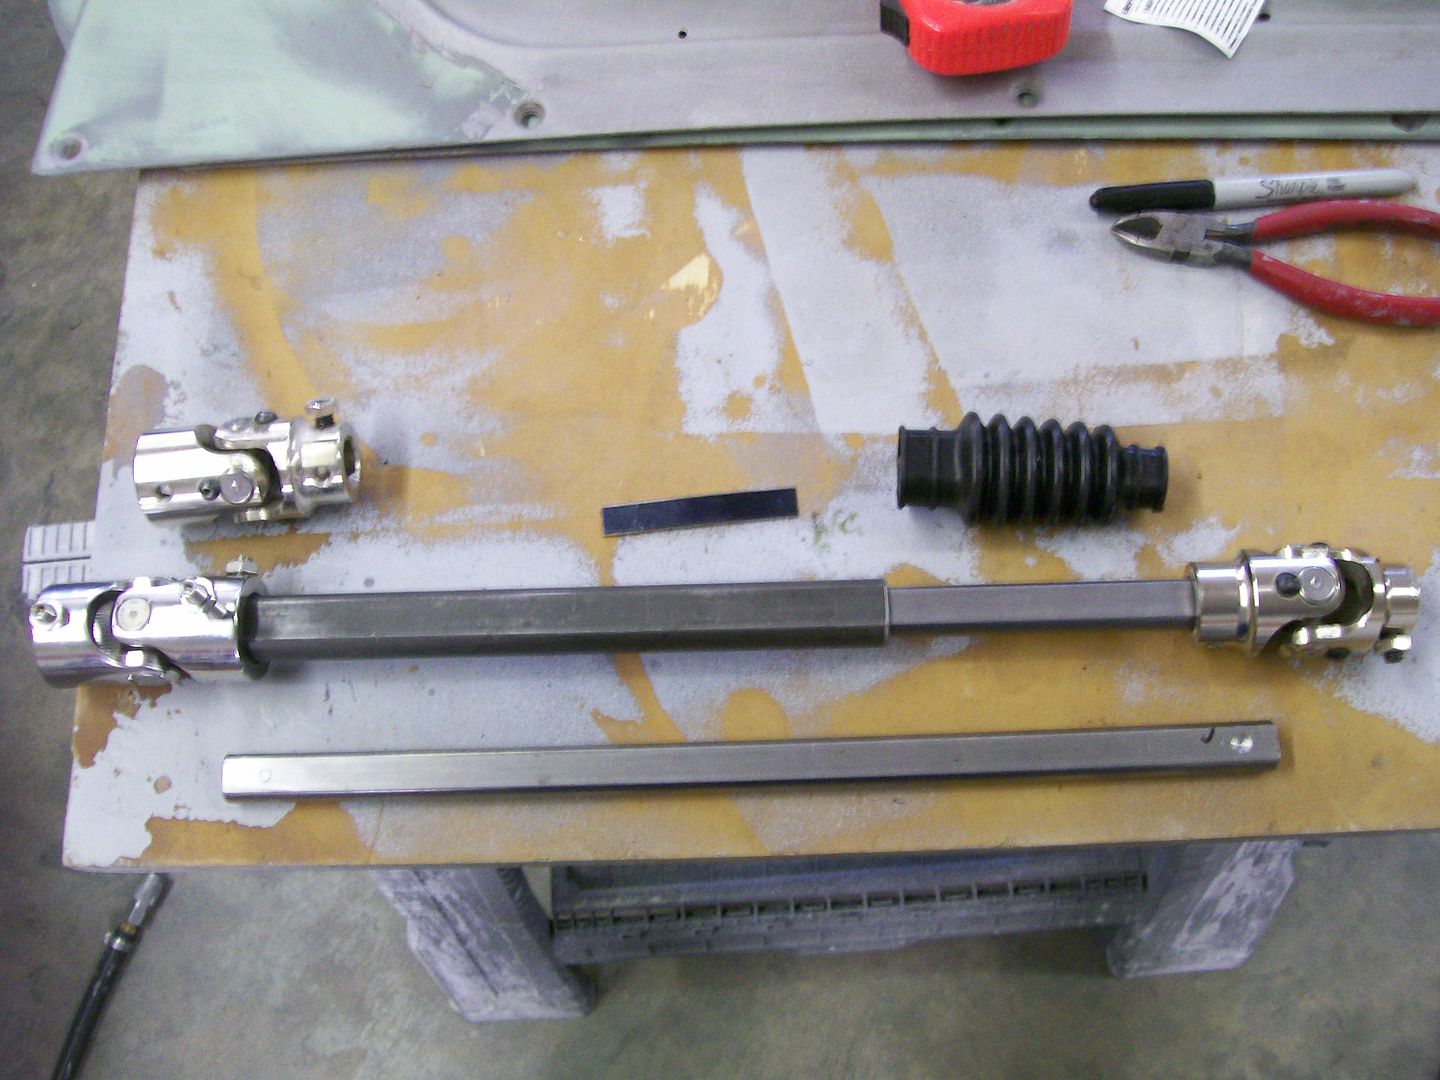 I had to cut it to length and get a different u joint for the column end but it's exactly what I was looking for. It comes with the rubber boot, it has about 4 1/2 inches to collapse and it will flex as needed for normal driving. Since it has a 3/4" ID-OD fit there could be a slight sloppiness over time or perhaps a chattery vibration. The makers machined a flat spot into the inner shaft, this machined area allows the short piece of bent spring steel to fit in as you assemble the two shafts. This spring steel basically keeps tension between the inner and outer shafts so there will be no slop or chattery vibration. I just wanted to make mention of this product, I think it may be a good way to go. |
|
|

|
|
|
#356 |
|
Registered User
Join Date: Oct 2010
Location: Ocean Springs, MS
Posts: 1,746
|
Re: 1957 Chevy truck re-rebuild
I totally agree with you on the shafts, I see many people running a solid shaft between 2 u-joints, which leave no place for the cab/frame movement to go. I have found that the column is usually the weak point in this, and flexing shoves the shaft right up into the column.
I cut up a 73-80 intermediate shaft to make my last one, I did not know 3/4 I.D. shafts and U-joints were sold.
__________________
Gary 1971 Chevrolet C/10 1951 GMC 100 1977 GMC C15 1955 Chevrolet 3100 |
|
|

|
|
|
#357 | |
|
Registered User
Join Date: Aug 2012
Location: Salem Mo
Posts: 652
|
Re: 1957 Chevy truck re-rebuild
Quote:
 I stumbed across this set-up from Jegs, just what I was looking for. I stumbed across this set-up from Jegs, just what I was looking for.Things have been quite in the shop. I've had a struggle with the drive train. Of course we all want good low end acceleration, but we also want good highway cruising. I was gonna settle with a 3.08, a good in between but not what I want. Overdrive transmission is an option but I just didn't want to go there. Next choice is keeping the turbo 350 and adding an overdrive. I went with the Gear Vendors unit. Now I can go with a 3.73 rear and in overdrive have the ratio of a 2.91, yes, now I can move forward. Main items are the over drive and the mounting adapter.  Yes, it is one of the longer mounting adapters, as a matter of fact I will be installing a longer tail shaft in the transmission to permit the longer mounting adapter. The location for the overdrive in my situation has to be back to allow my X pipe to cross in front of the over drive unit. If I cross behind the over drive I have no space for the mufflers and have the exits leave trough the bed steps. The longer length of the new adapter vs the original tail housing. 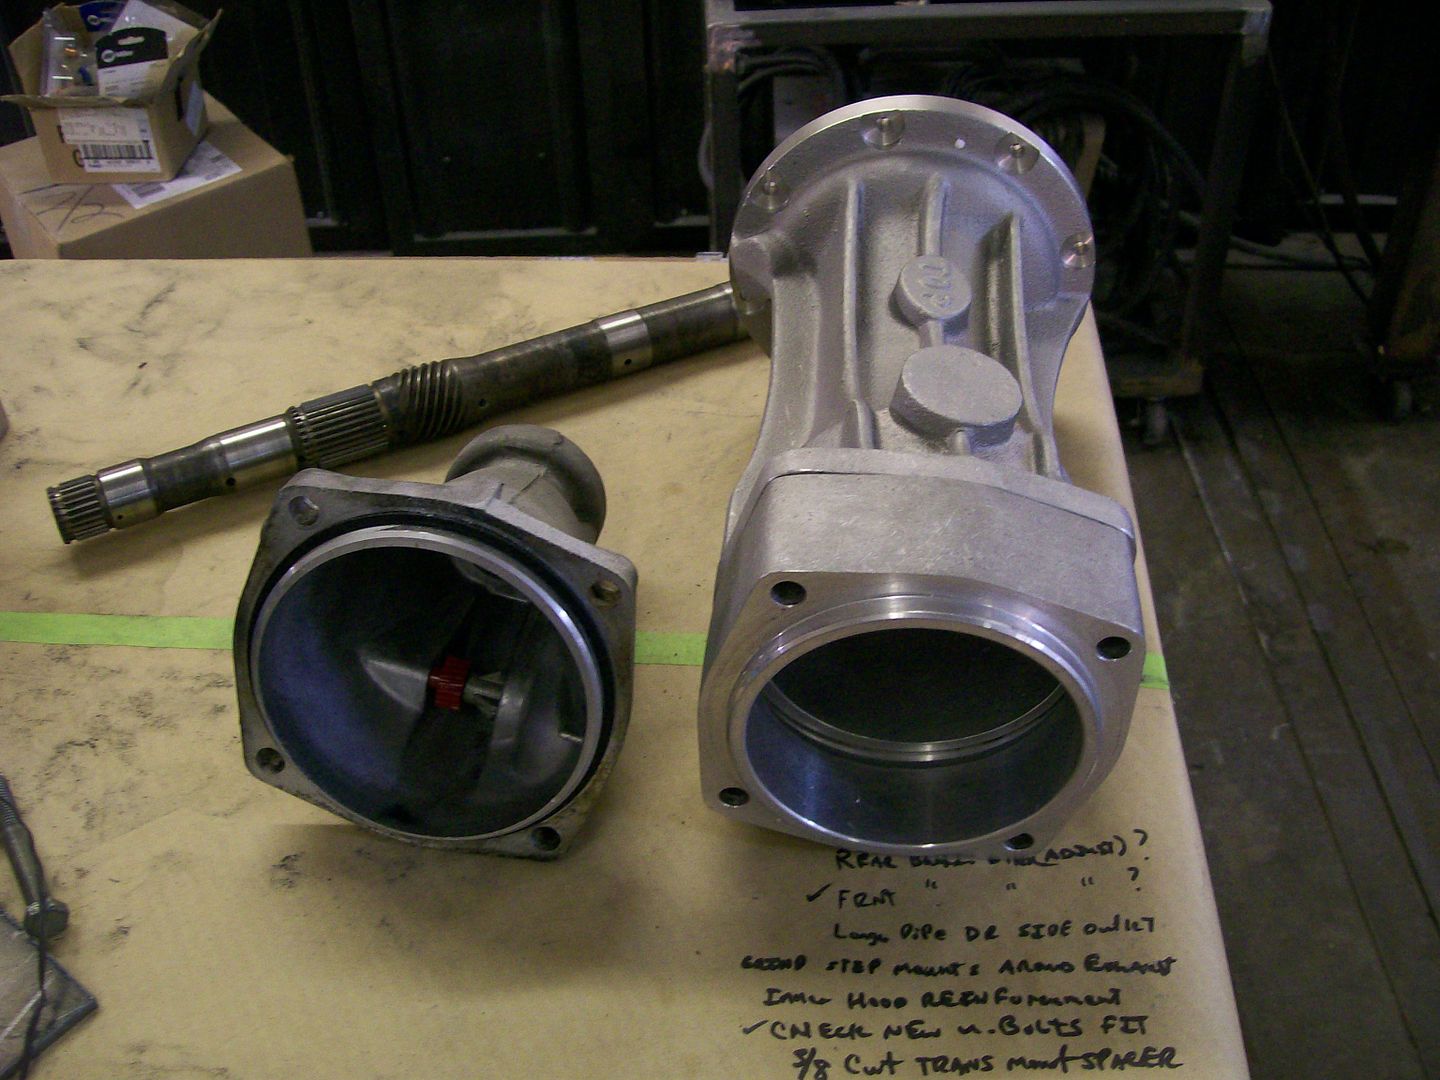 Installing the adapter is simple, remove the original housing and put on the new one. 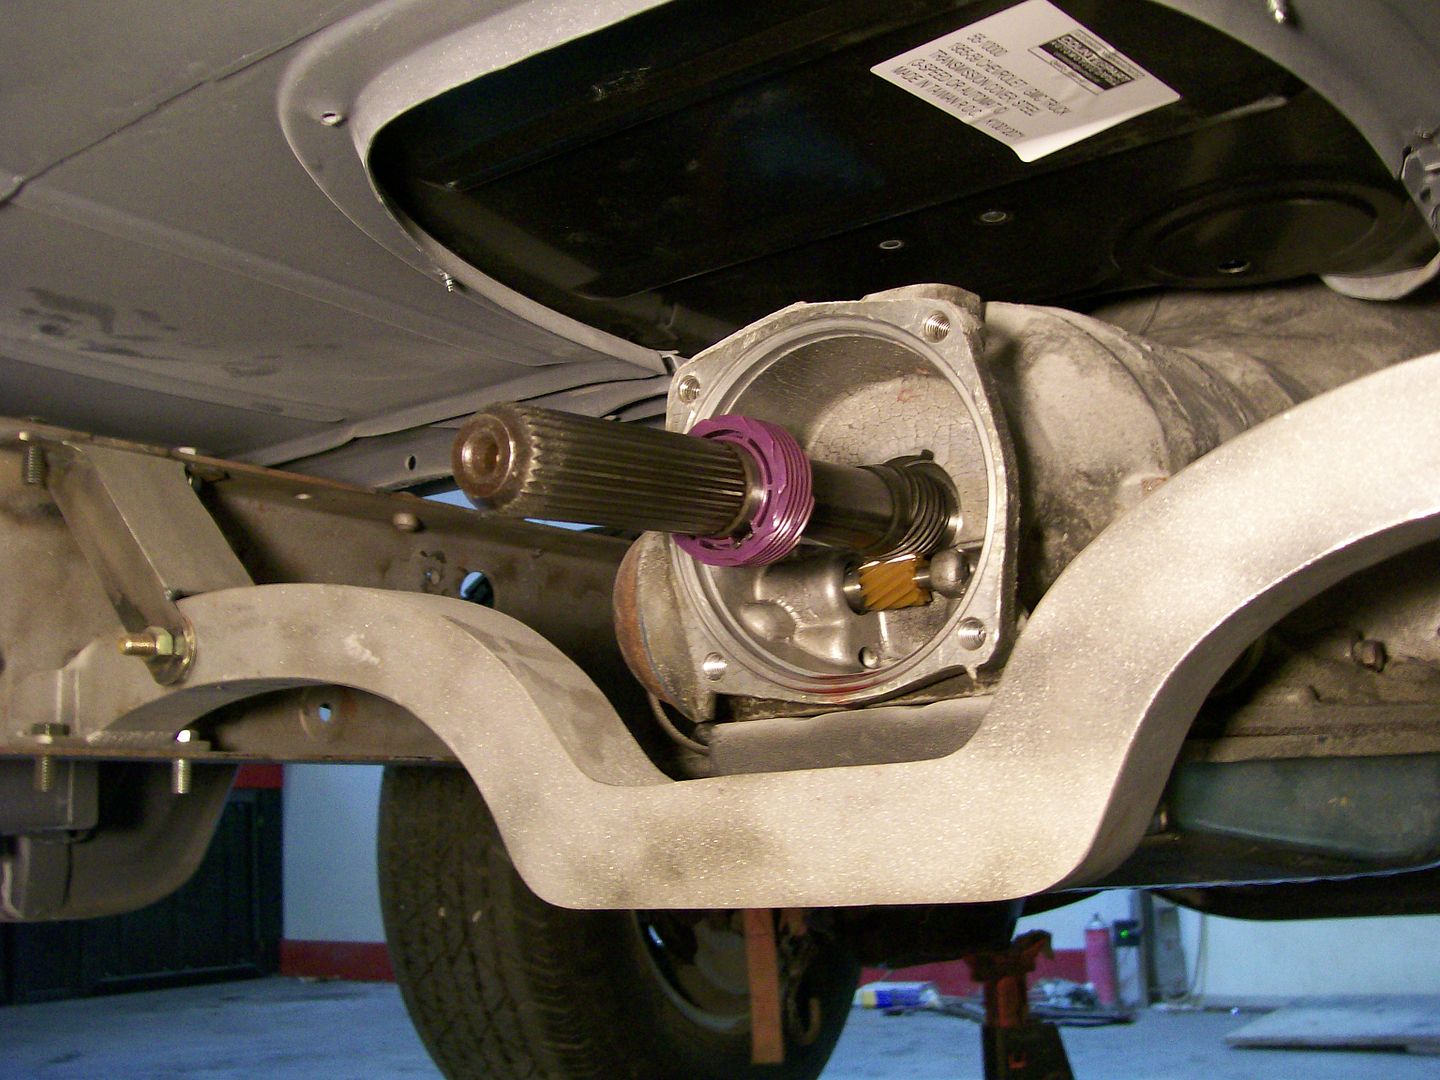 The adapter in place. If I had the longer tail shaft installed it be seen at the end of the new adapter. 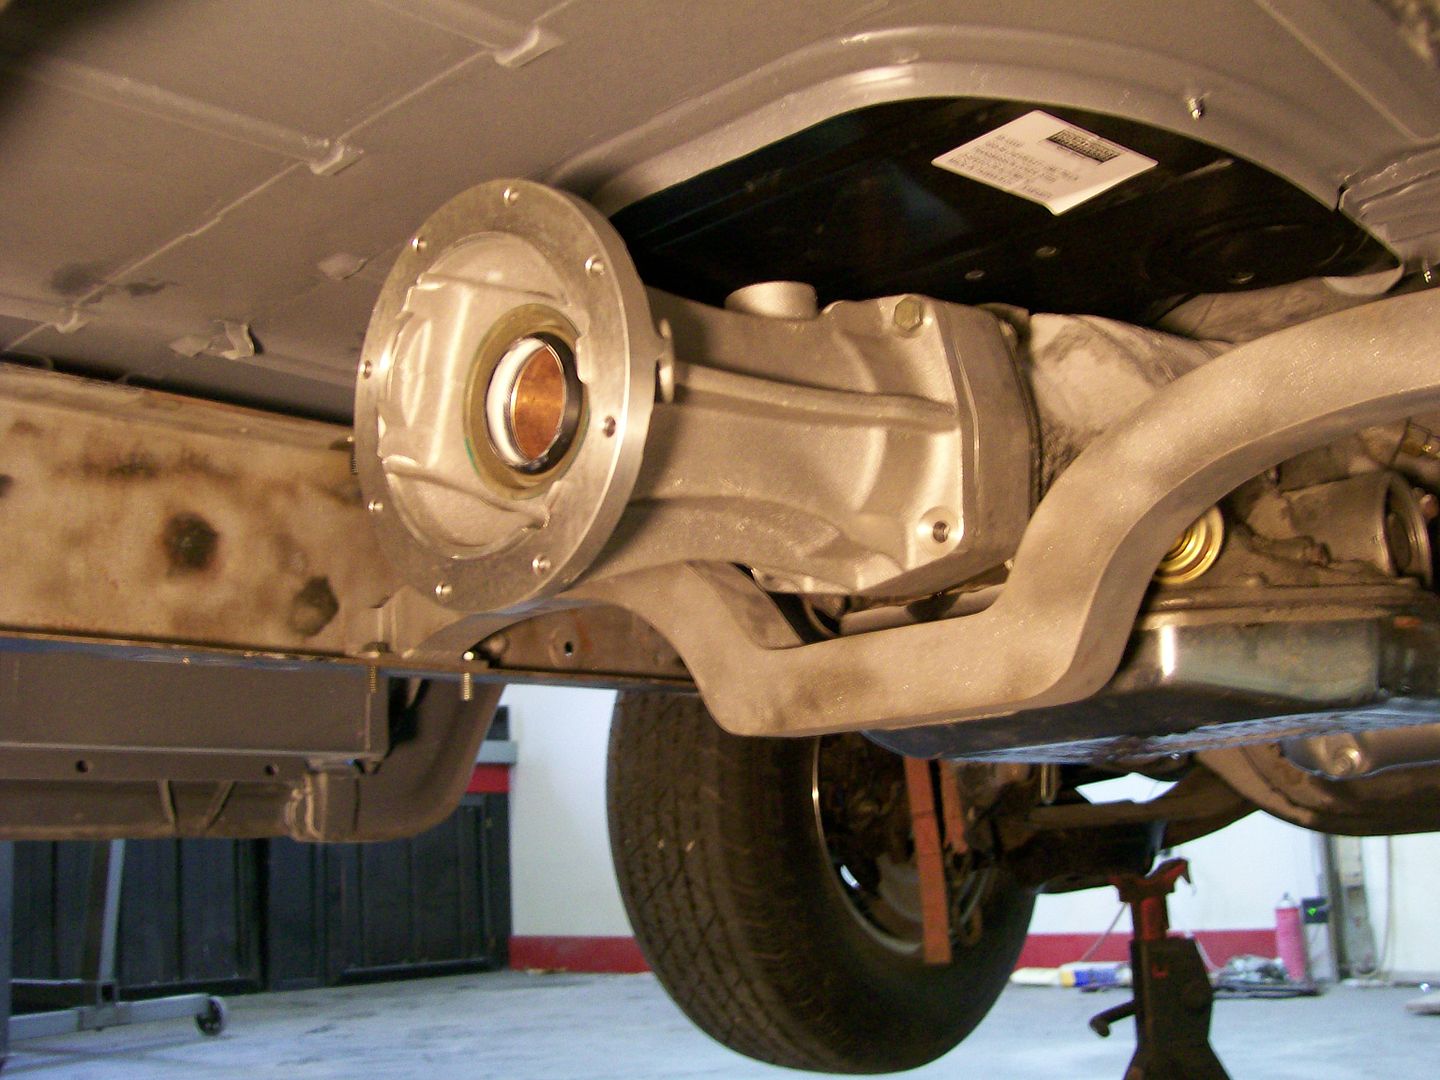 I still have to cut and revise my exhaust but at least I have plenty of space to get it all to fit when done. More to follow.... 
|
|
|
|

|
|
|
#358 |
|
Registered User
Join Date: Aug 2007
Location: Corona, California
Posts: 7,998
|
Re: 1957 Chevy truck re-rebuild
Very cool.
Kim |
|
|

|
|
|
#359 |
|
Registered User
Join Date: Jul 2010
Location: Granite city, Ill.
Posts: 236
|
Re: 1957 Chevy truck re-rebuild
This is coming along great, going to be a great truck!
|
|
|

|
|
|
#360 |
|
Registered User
Join Date: Aug 2012
Location: Salem Mo
Posts: 652
|
Re: 1957 Chevy truck re-rebuild
Thanks Kim and Longbike, I've about put as many tricks and toys into this truck as I can think of, it should be a blast to drive when done.
Today I cut up much of the exhaust I built last year. I was able to save all the real tricky parts like the X and the splits there after and the tail sections. I know when I was researching the details of the overdrive kit I didn't find any real clear pictures of the assembly. I have pictures, I shall post them. Having the tail shaft separate will make for a good pictures here. They give you a coupler that sides onto the splines of the overdrive unit, on the other end are splines that match your particular tail shaft. 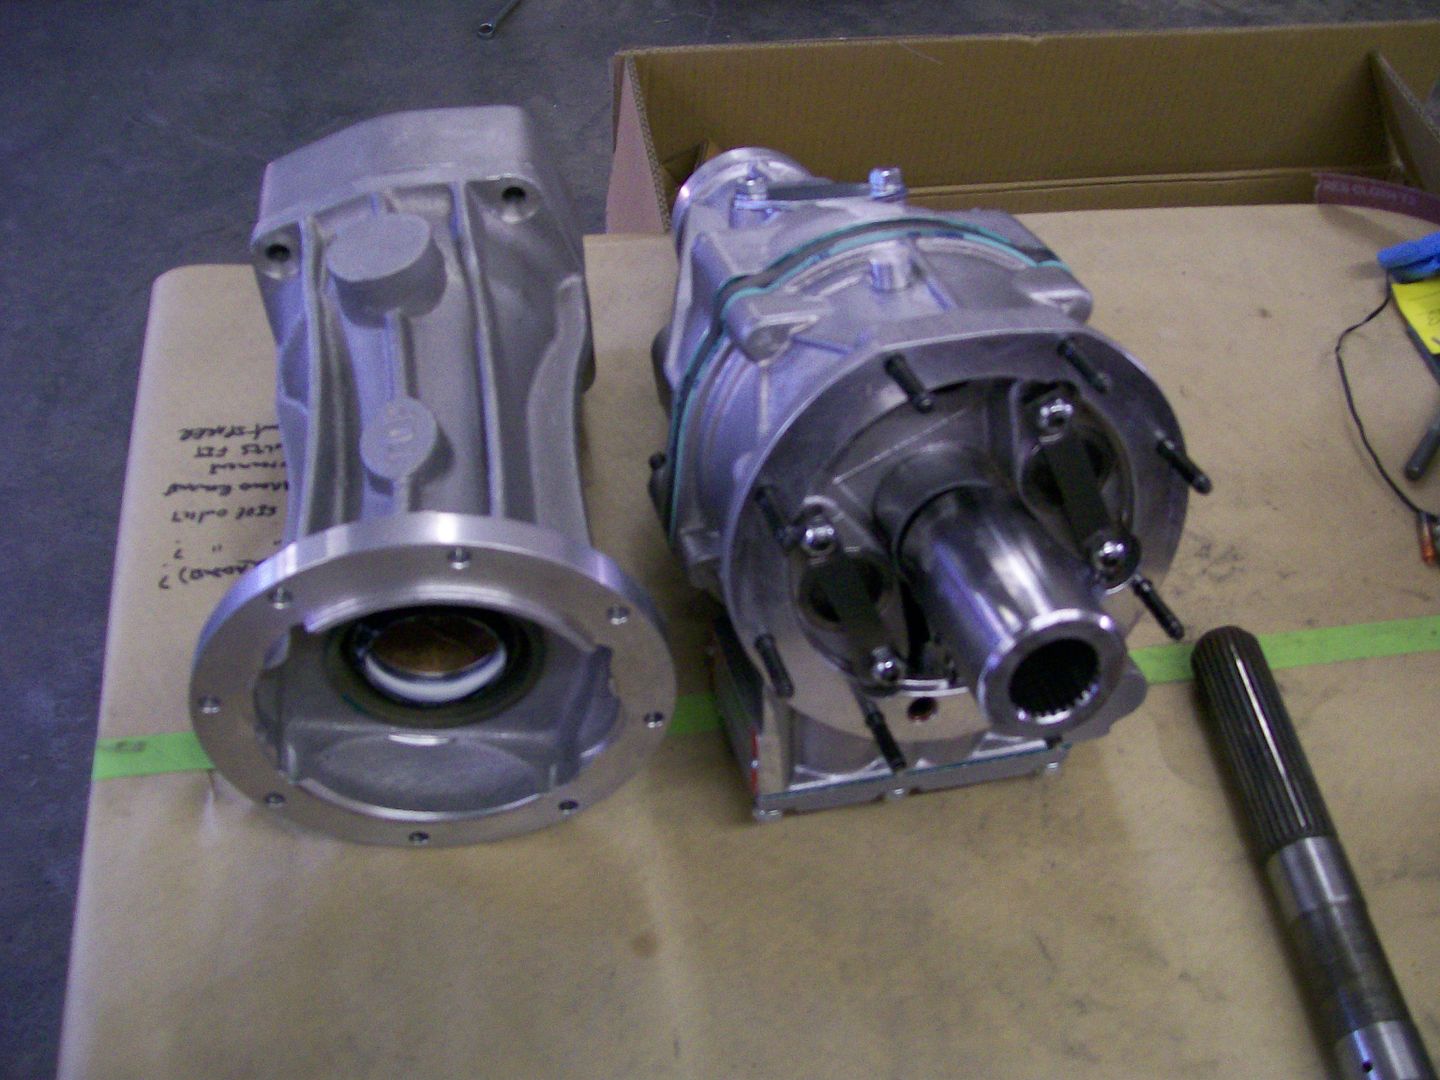 Here you see the tail shaft fitted into the coupler. 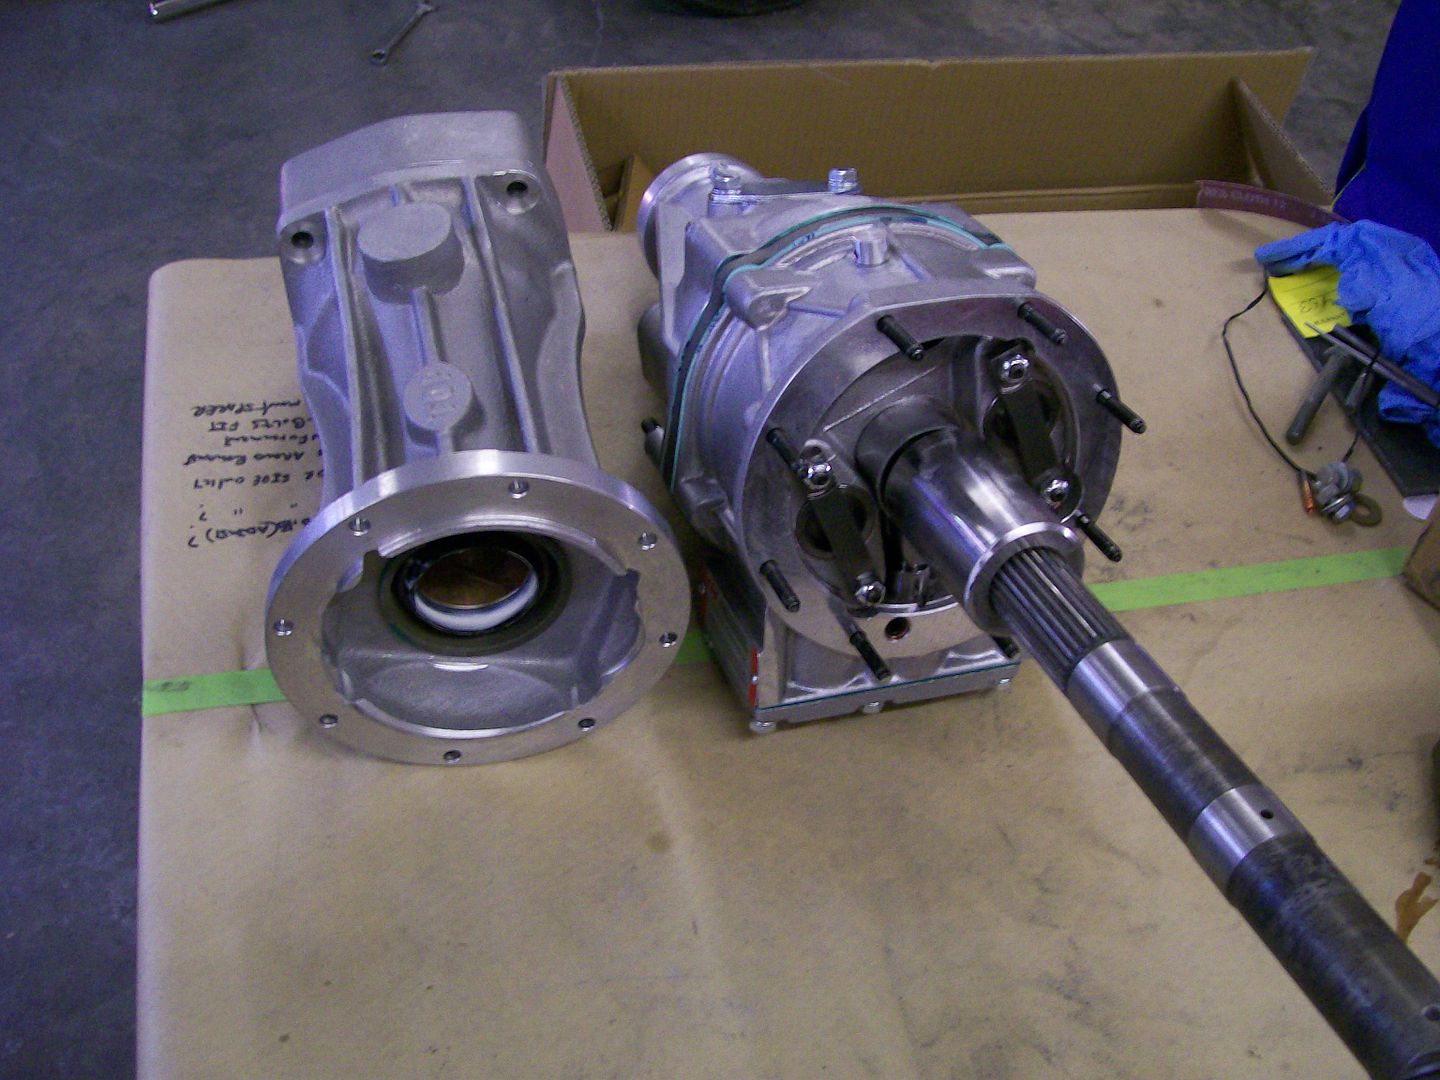 Here all the pieces together. 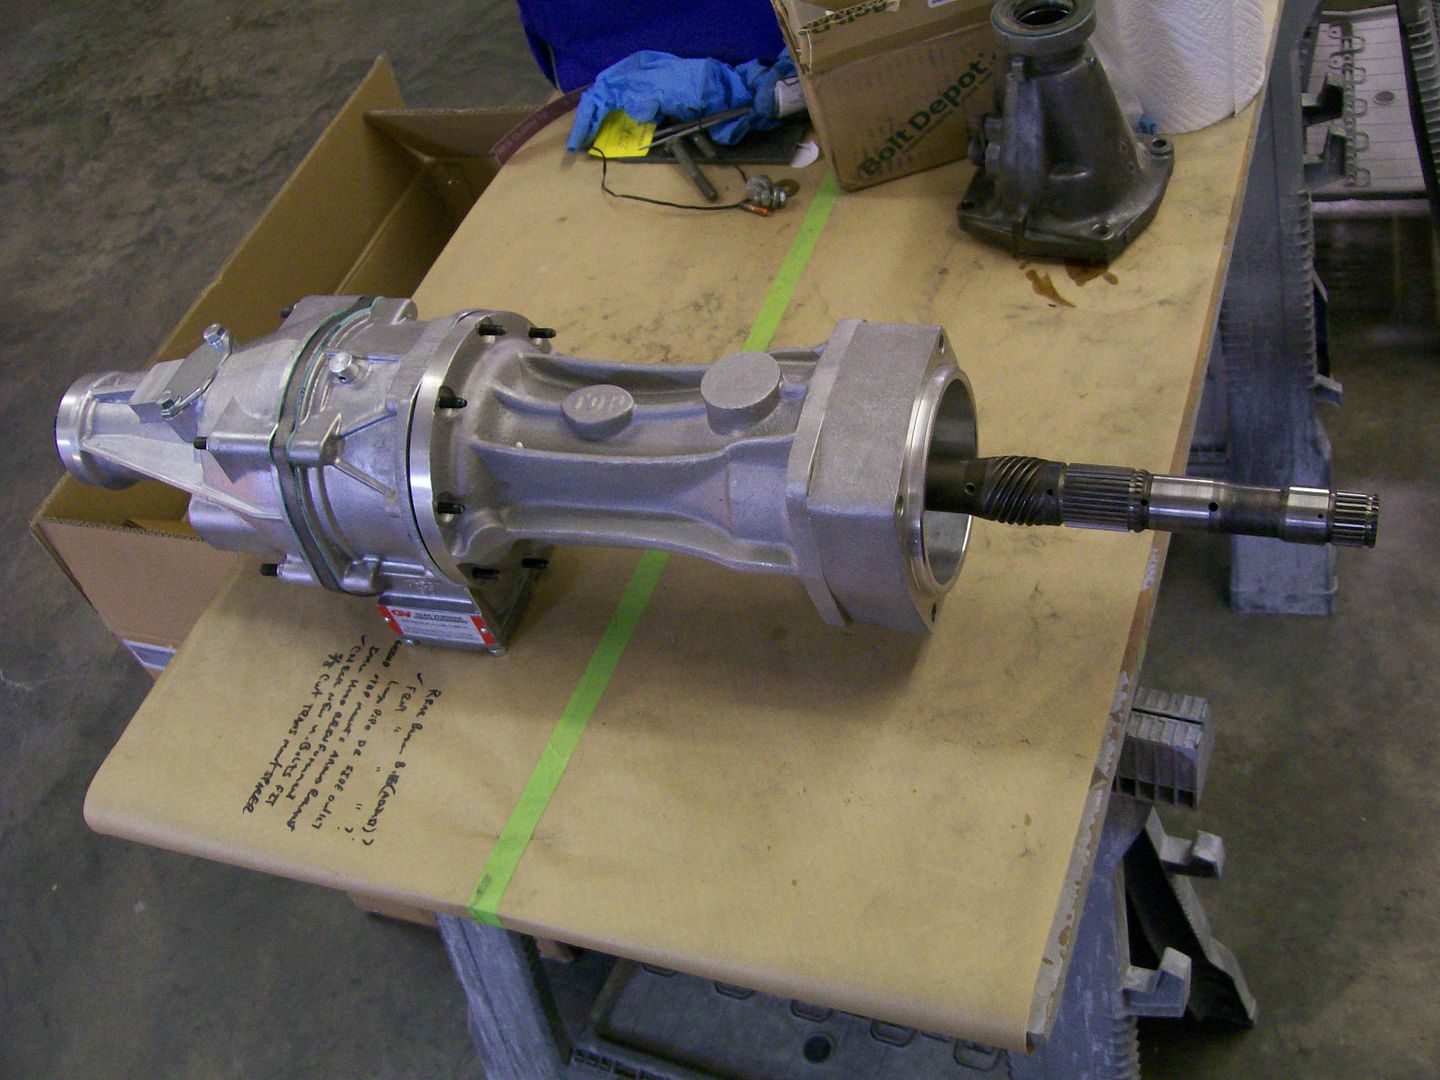 One thing I had to get used to is the additional length, it is what it is. 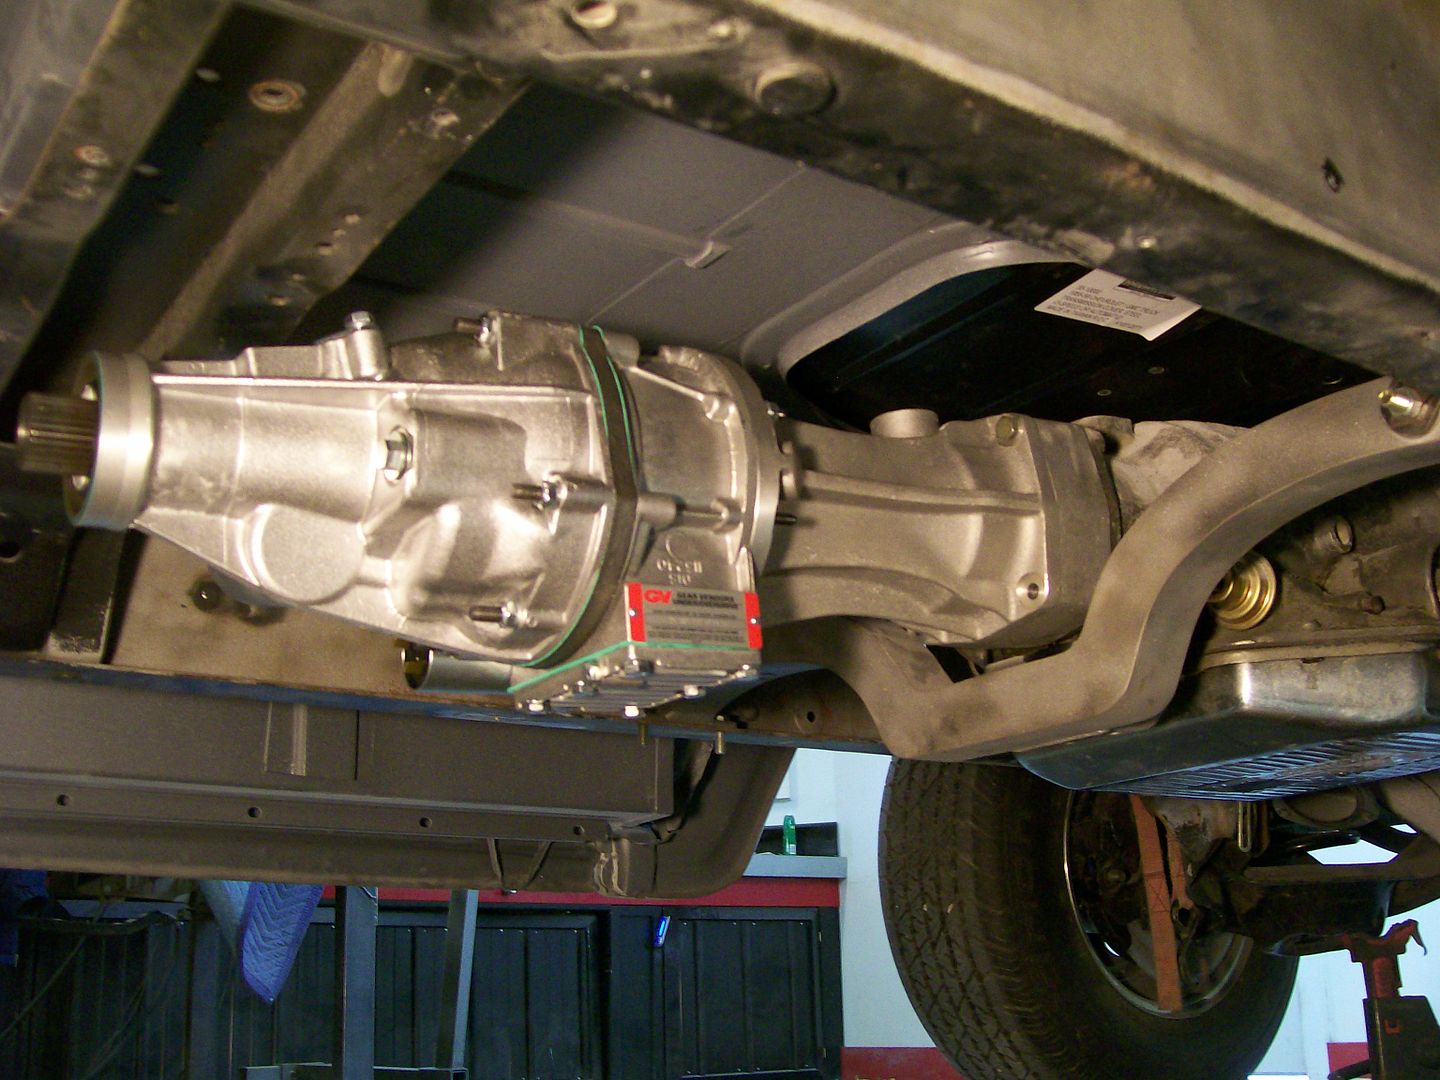 Sad thing is..... I moved the engine forward 2 years ago, meaning I had the drive shaft lengthened, of course, I never used it. Now, I have to remeasure and have it shortened. Grrrrrrrr. lol You would think it would need a second support for the over drive but it really isn't very heavy. In real time I have most of the exhaust mocked up in place and in my case you can't tell there is an over drive unit there. I'll have exhaust pictures next. |
|
|

|
|
|
#361 |
|
Registered User
Join Date: Aug 2007
Location: Corona, California
Posts: 7,998
|
Re: 1957 Chevy truck re-rebuild
Nice looking unit.
Kim |
|
|

|
|
|
#362 |
|
Registered User
Join Date: Feb 2013
Location: Lakeside Ariz
Posts: 445
|
Re: 1957 Chevy truck re-rebuild
I really like the idea of the overdrive unit. I might have to do that myself. Rich
my build http://67-72chevytrucks.com/vboard/s...d.php?t=576185 |
|
|

|
|
|
#363 | |
|
Registered User
Join Date: Aug 2012
Location: Salem Mo
Posts: 652
|
Re: 1957 Chevy truck re-rebuild
Quote:
I upgraded to a Tremec 5 speed overdrive, now, 75 to 80 mph, bring it on. I just didn't want to deal with the same issue with the truck. This overdrive will take care of highway issues. One other aspect of this overdrive is it can be used in each gear providing a 6 speed close ratio automatic. It is a matter of engaging and disengaging it as you run through the gears. It comes with a computer to read vehicle speed to automatically engage in all three gears. Of course the final overdrive is my main issue, if what they call gear splitting works well, great, it's another trick to have fun with. When I built the exhaust I figured it back far enough that if the rear seal leaked it wouldn't land right on the X, I also had the X back far enough that I could remove the trans without touching the exhaust. Things have changed, I must modify, the X is now hitting the small oil pan of the over drive. 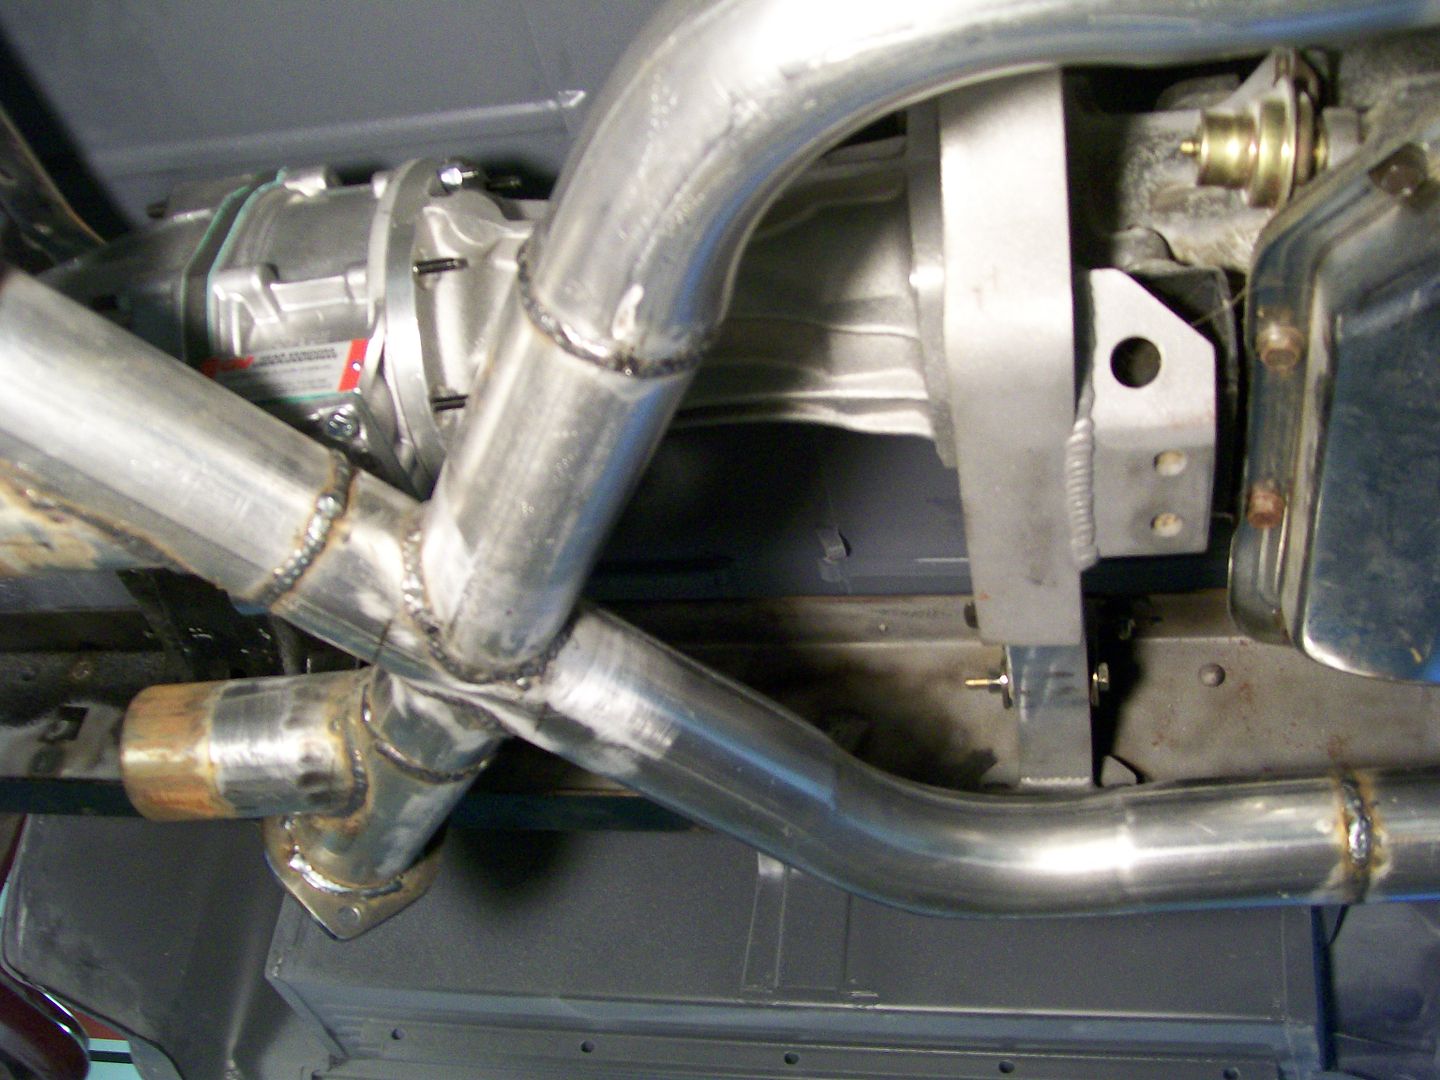 It's gonna hurt but I have to cut up the exhaust, kleenex please. 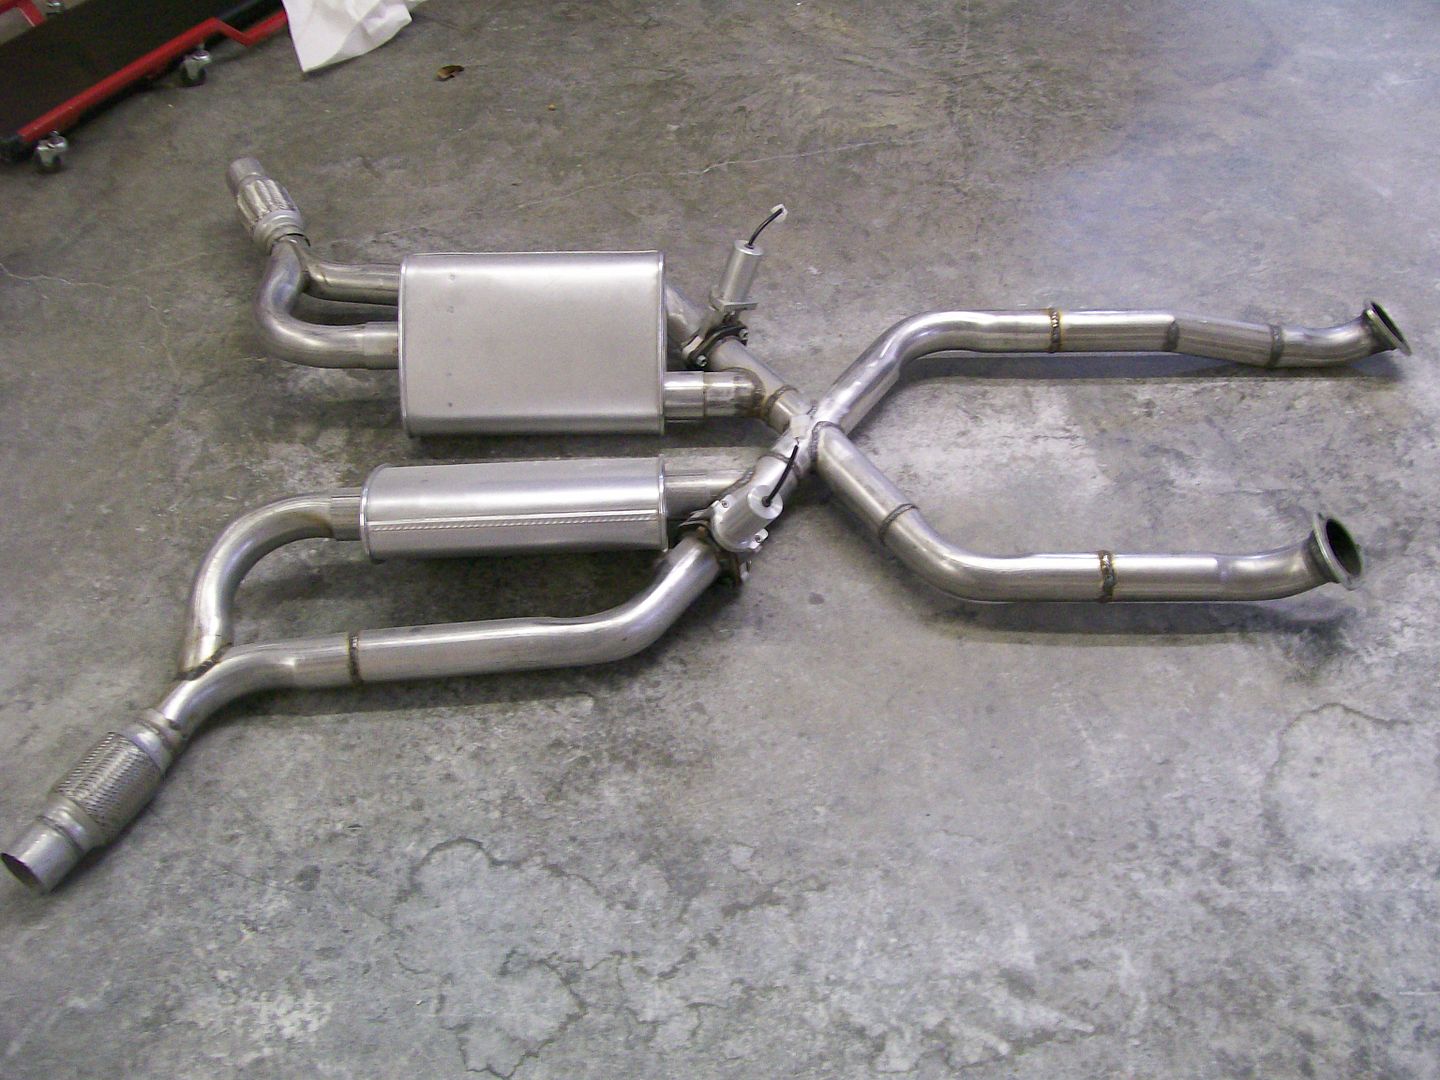 I figured 3" would move the X forward just enough to cross under the adapter. 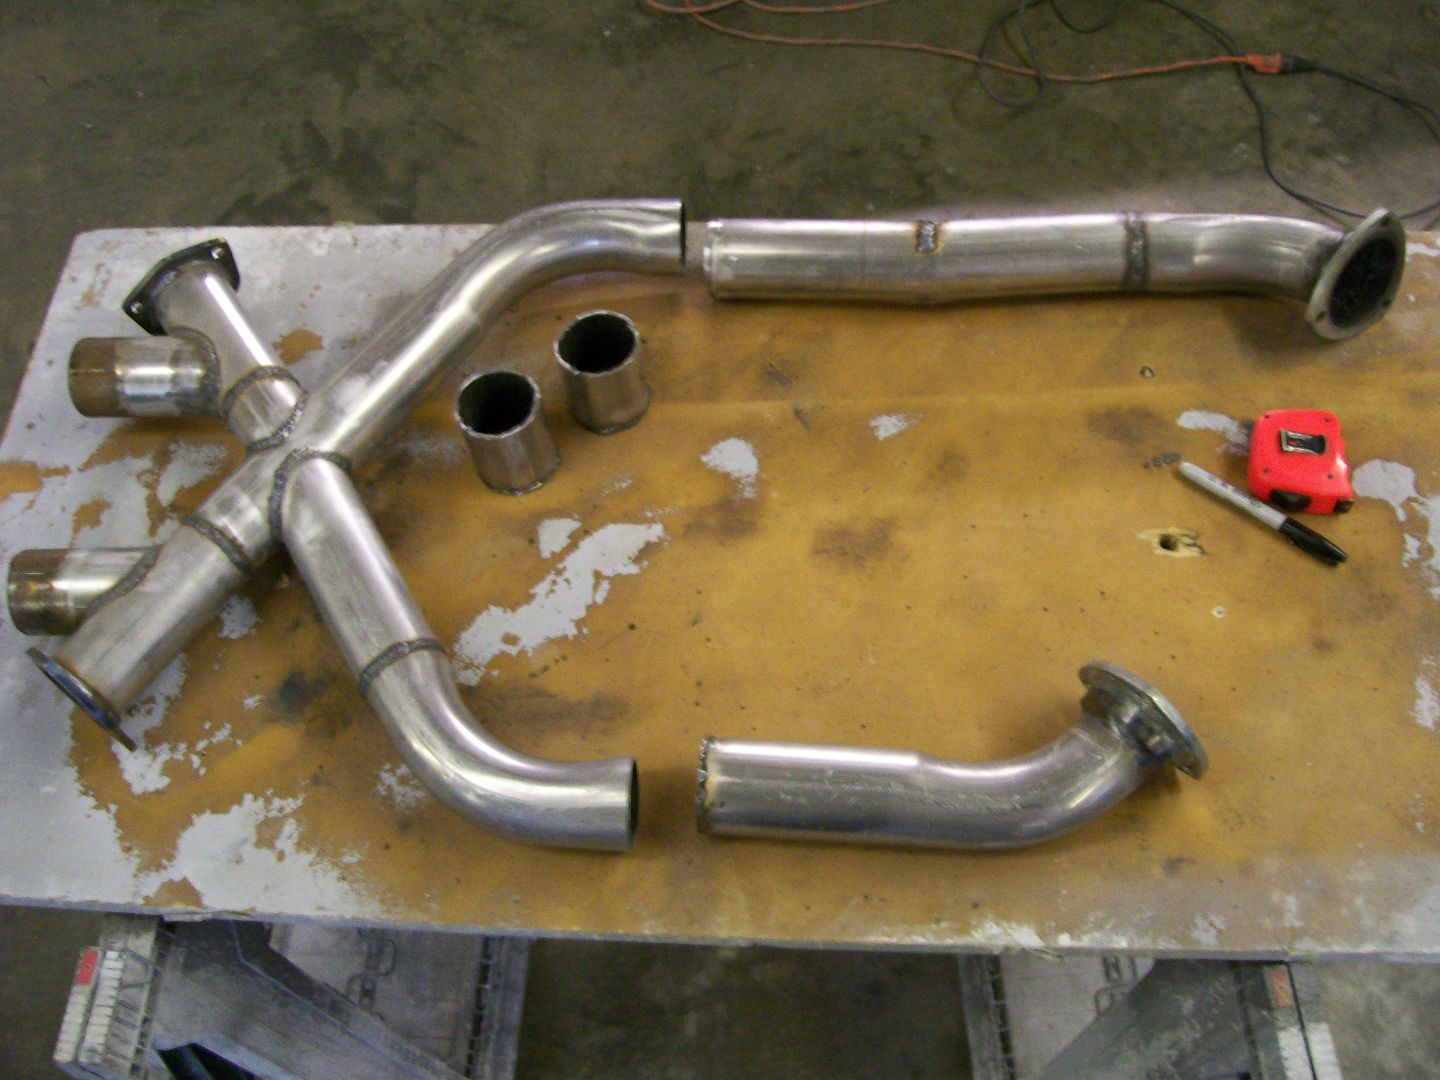 More to follow, still fitting pieces together.... |
|
|
|

|
|
|
#364 |
|
Registered User
Join Date: Aug 2007
Location: Corona, California
Posts: 7,998
|
Re: 1957 Chevy truck re-rebuild
Coming along nicely.
Kim |
|
|

|
|
|
#365 |
|
Registered User
Join Date: Aug 2012
Location: Salem Mo
Posts: 652
|
Re: 1957 Chevy truck re-rebuild
Ok, it took some doing but I got the exhaust and the overdrive to fit together.
With the 3" taken out of the head pipes thus moving the X back 3", the X centered nicely under the over drive adapter. Had I gone with the short shaft adapter for the over drive I really would have had to cut up the exhaust. 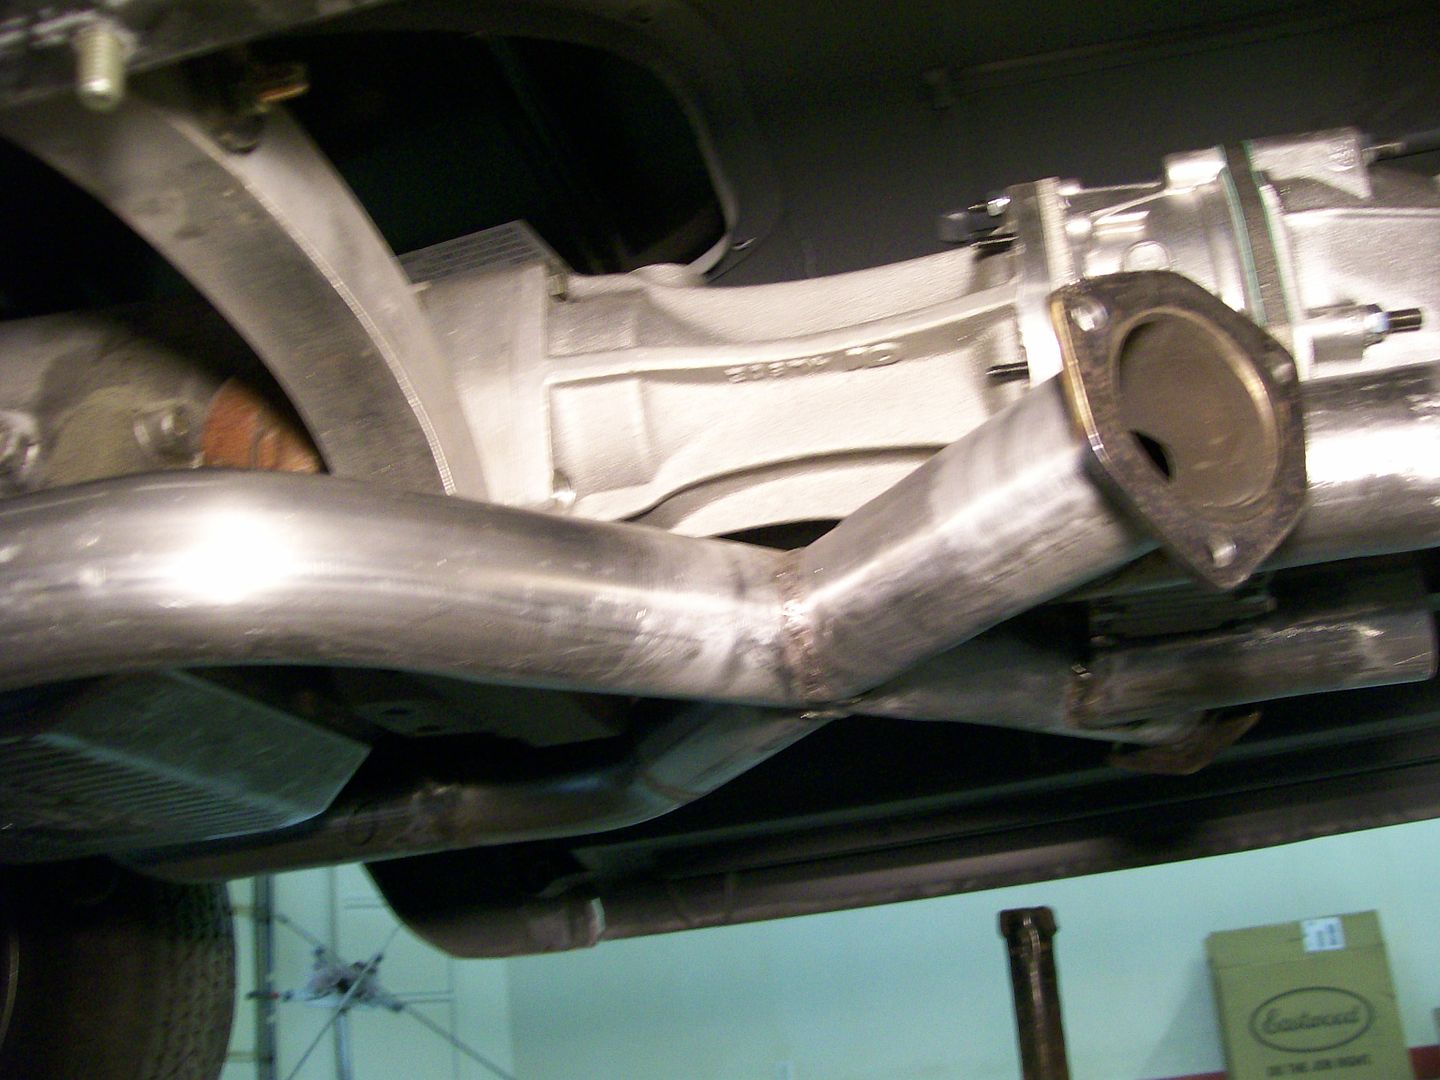 I had to add a couple short pieces between the X and the 3 bolt flanges. The oil pan of the over drive was wider than the distance I had for the pipes where the mufflers attached. I added the sections then cleaned up the welds. Moving further back I had to split the pipes that went around the mufflers for the open exhaust. Once everything was bolted back in place I had a gap and a slight offset. Welding a short piece here along with the slight angle difference would look ugly, not gonna happen. 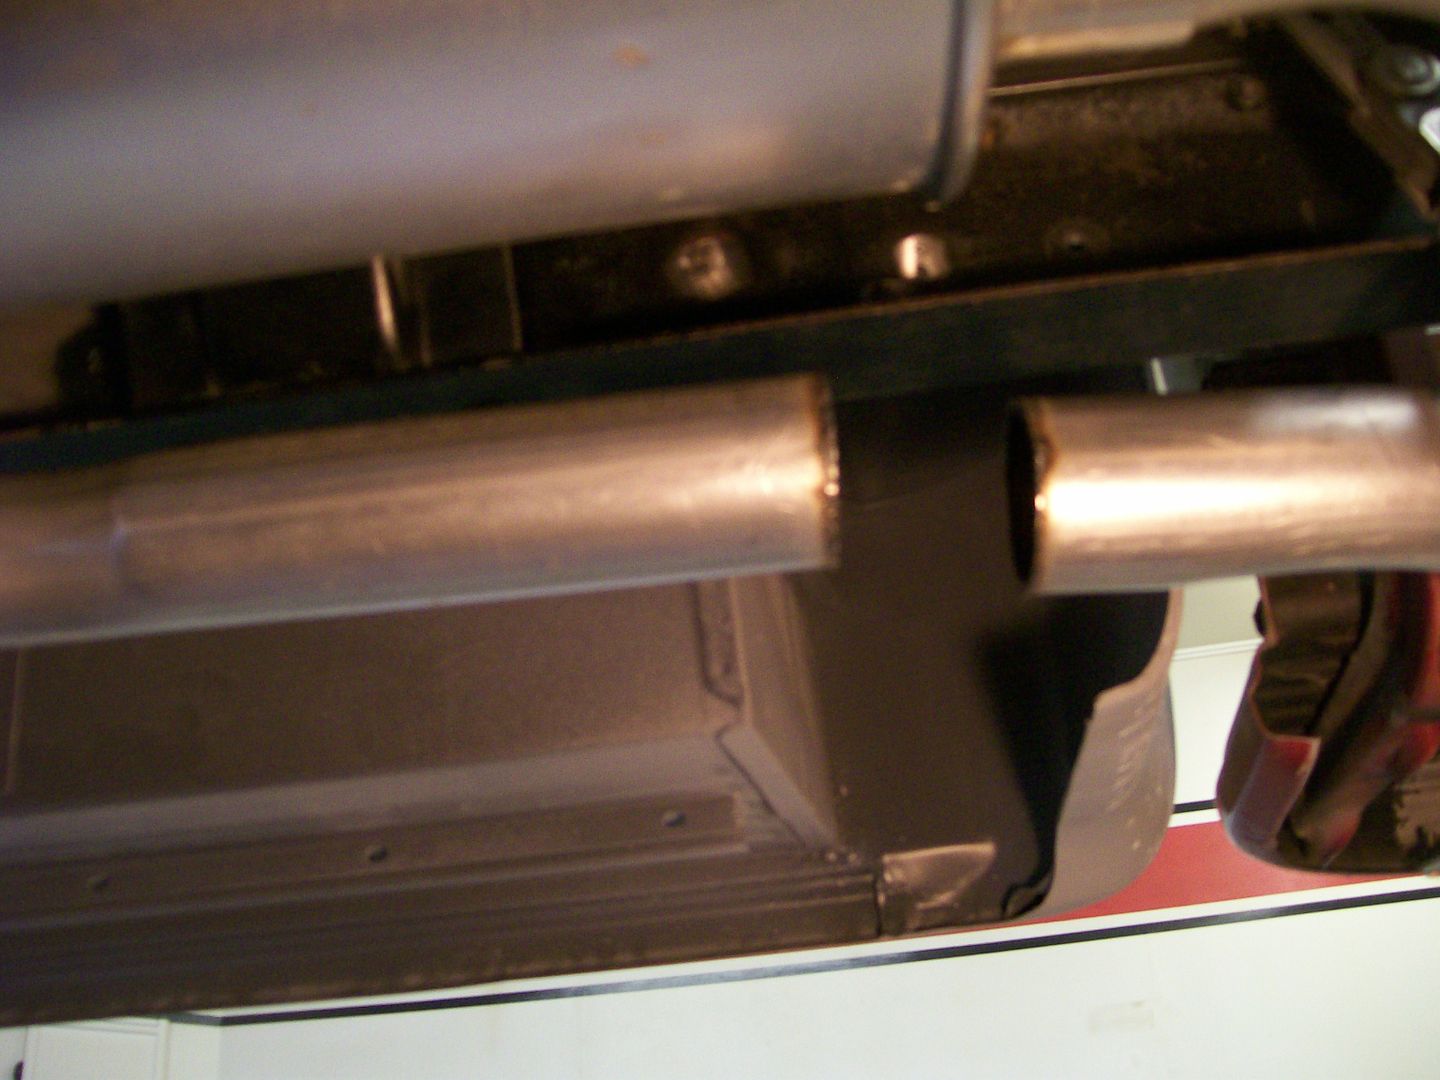 Not wanting to recut new 3 bolt flanges and getting pipe bent to replace the whole section I simply cut the whole straight section out. 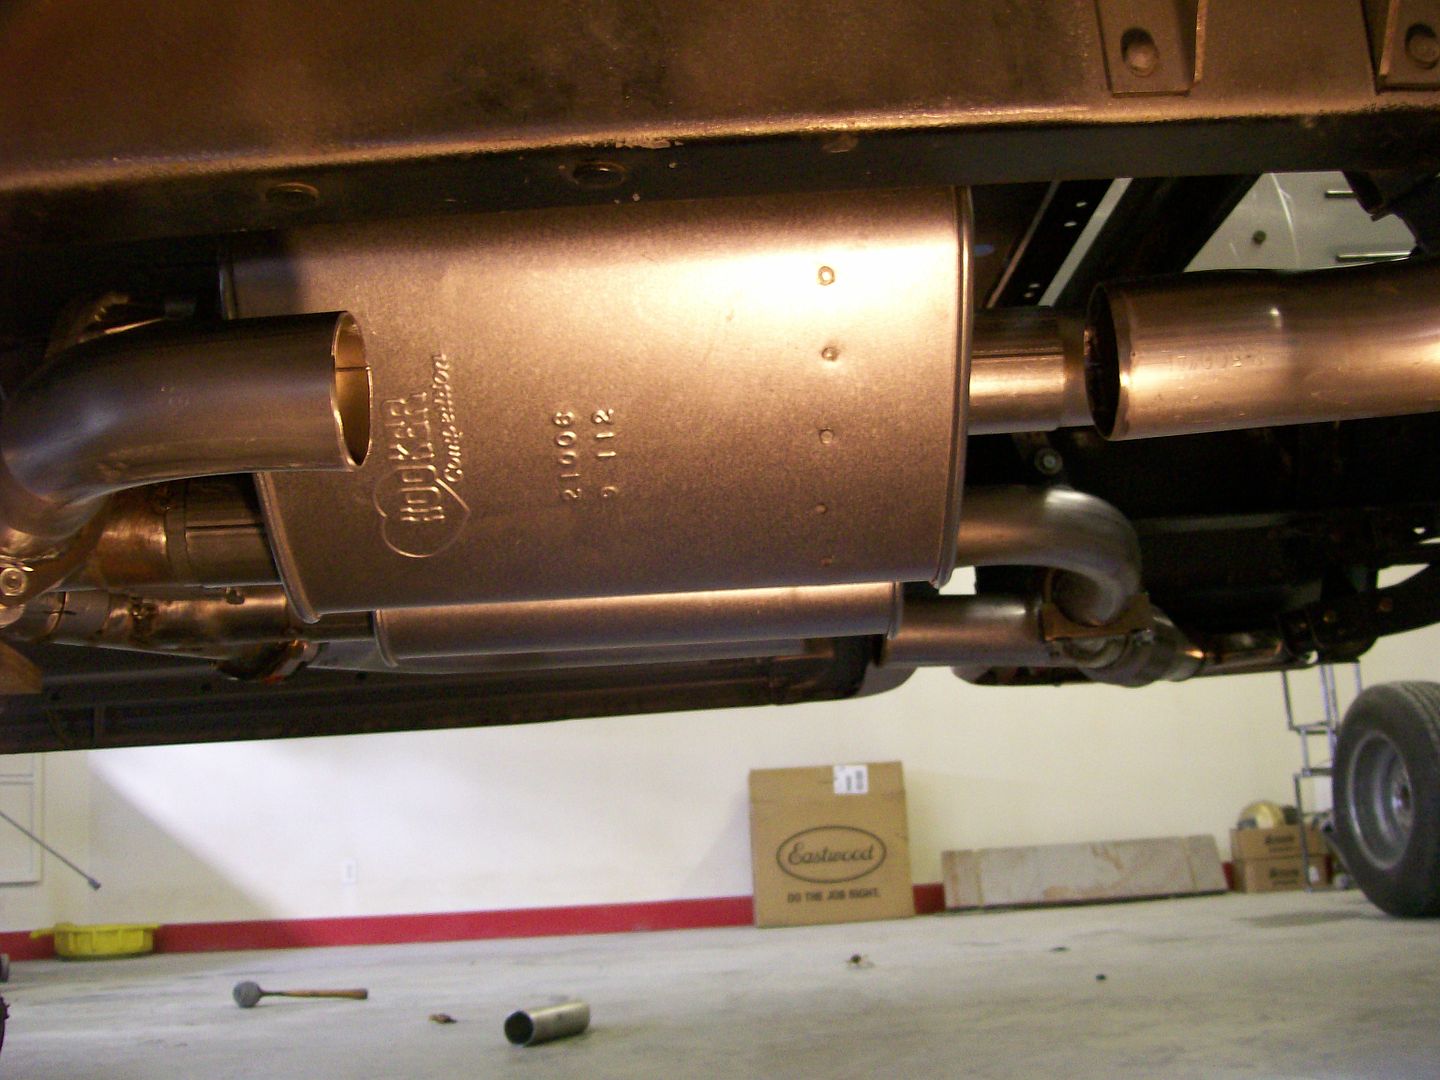 By changing a longer section I limited the look of the angle to a minimal and took care of the gap. Now for a full weld and I'll remove the weld bead so it'll look like it never happened. 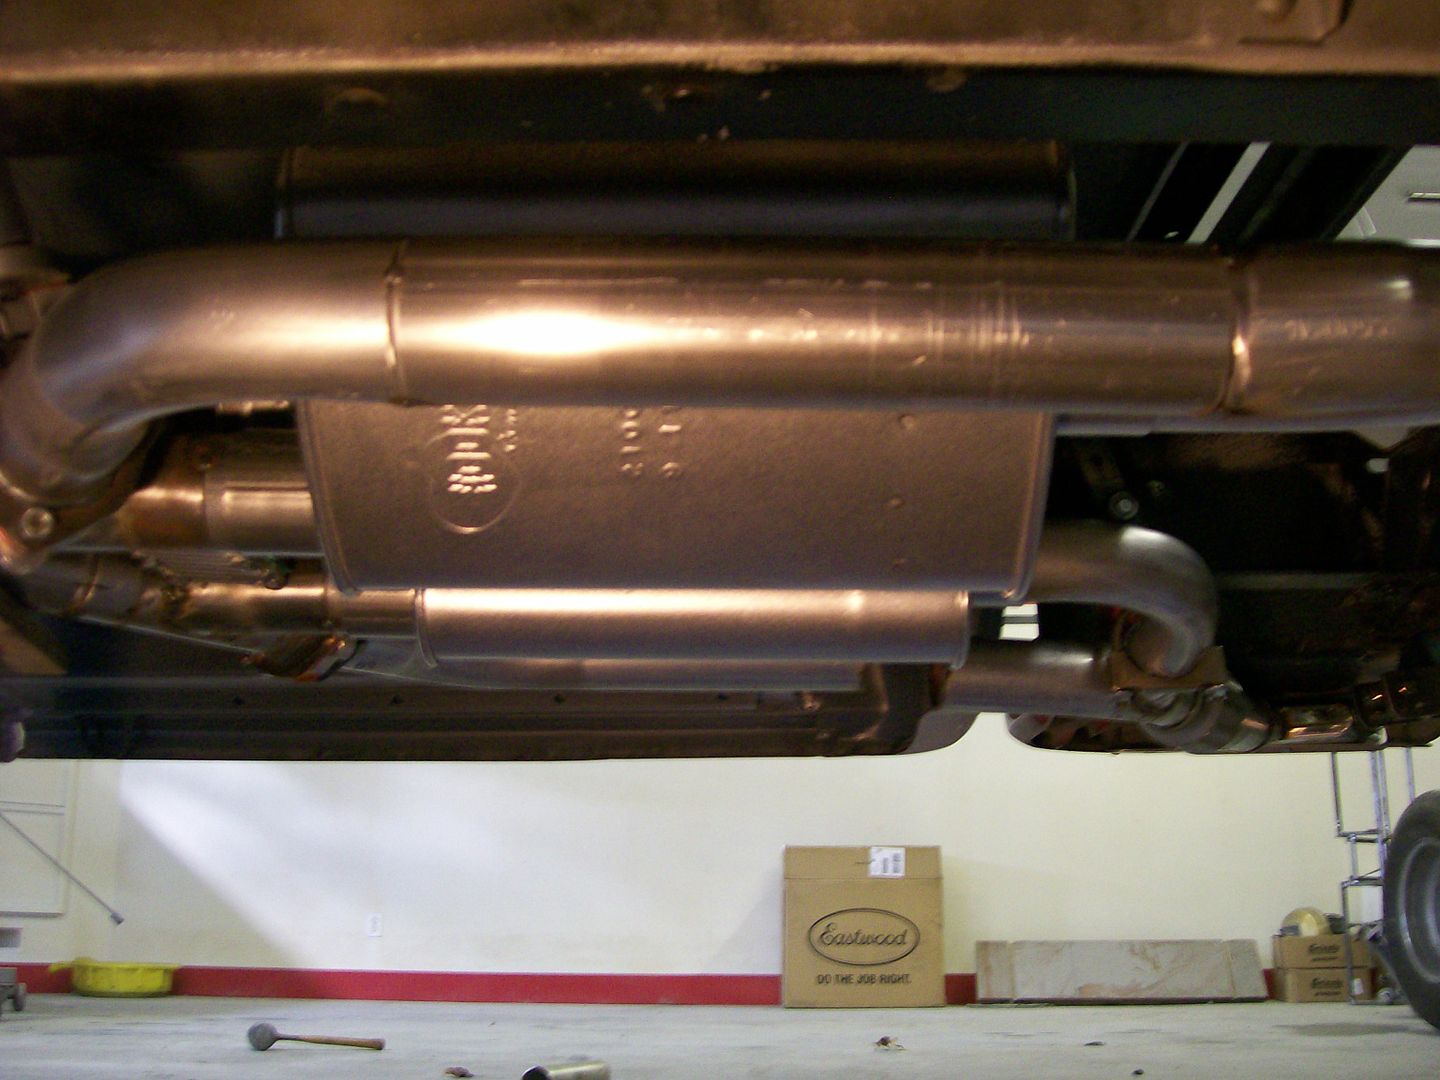 This should do it for the over drive mechanical install. I sent the driveshaft off today to have it cut to length and get the proper u-joint yoke welded on to match the slip yoke provided with the over drive kit. Sad thing about the over drive now......no will see it under there. |
|
|

|
|
|
#366 |
|
Senior Member
 Join Date: May 2011
Location: Cypress, Tx.
Posts: 1,504
|
Re: 1957 Chevy truck re-rebuild
Hi Jim~You're amazingly clever! I'm intrigued by the overdrive system you have~ I didn't know they exist in a sense that it just bolts on. What makes it click into overdrive?
I was offered a chance to go on a group run about 100 miles away, and I feared running at 65-70mph knowing my Rpm's would be up. I have a 3:08 and seems to really help, but I don't have a tach to know what's actually going on and my speedometer needs attention(I use an app on my Iphone for speed at this time). one other question~is it costly? I'm subscribed now~ don't know how I missed your build! dne'
__________________
'72 Ford Bronco project(July 17 2021-?) https://67-72chevytrucks.com/vboard/...d.php?t=828015 59 Apache (sold 6-25-2021) 67 Ford Mustang (re-restored after Harvey) 1968 Jeep Cj5 (2-8-2020 to present) 1992 Jeep Yj (8-17-20 to present) (Jurassic build) www.Classiccarsandtools.com |
|
|

|
|
|
#367 |
|
Registered User
Join Date: Aug 2007
Location: Corona, California
Posts: 7,998
|
Re: 1957 Chevy truck re-rebuild
Nice work making the exhaust fit.
Kim |
|
|

|
|
|
#368 |
|
Registered User
Join Date: May 2010
Location: Lawrenceville, Ga
Posts: 2,646
|
Re: 1957 Chevy truck re-rebuild
Jim, I looked up "art" in the dictionary and there is a pic of your truck there, LOL. You do some beautiful work.
D'ne, measure the height of your rear tires and go to this website to find out engine RPM at any speed. http://www.ringpinion.com/Calculators/ |
|
|

|
|
|
#369 | |
|
Registered User
Join Date: Aug 2012
Location: Salem Mo
Posts: 652
|
Re: 1957 Chevy truck re-rebuild
Quote:
You have hit the nail on the head with taking a road trip. To me the RPMs of the engine are one thing, and sometimes it's the matter of listening to the engine rev needlessly while you're trying to sit back and enjoy the ride in a classic vehicle. It's no fun after a while. Highway driving in a classic wasn't so bad til they raised the speed limits back to 65 and 75 mph, then we noticed the change when a family of 4 passed us up in their mini van. Ouch. I remember when you mentioned your 3:08 a while back, I also was going to have same 3:08, only because it was a happy in between gear. I really didn't want to settle for an in between, I wanted a 3:73, I googled-Turbo 350 overdrive and I found Gear Vendors over drive units. I will now go with a 3:73, great for burn outs and fun. Once at highway speed in overdrive I will have the ratio similar of a 2:91 rear axle. Now I can have my cake and eat it too. As for a bolt on unit, as long as you have nothing in the way such as I did with the exhaust, the unit bolts on as you see in the pictures. The driveshaft does have to be shortened and the front u-joint yoke has to be changed to match the slip yoke they provide with the kit. The overdrive engages with a 12 volt power source. There are choices as to how you send the 12 volts to the over drive. The system can be set up to engage at 47 miles an hour, this would be an automatic engagement just as a regular overdrive trans works. You have a choice to engage over drive in every gear. You then have a close ratio 6 speed...... first, first over, second, second over, third and third over. There are components to help you engage and disengage for this type of shifting. The unit is made to be engaged under a full load, and supposed to engage similar to a strong trans with a shift kit. You had to ask price, yes, for most it is pricey, approx $2700.00. You will need to have... well lets see..... Valentines day, your birthday, perhaps an anniversary and some special night to get the funds for this.  lol lolI'm not rich by no means, but I have committed myself to put into this truck everything I want now vs. later thinking, I wish I would have. Hope this answers most of your questions Denee007, good to hear from you. |
|
|
|

|
|
|
#370 |
|
Registered User
Join Date: Aug 2012
Location: Salem Mo
Posts: 652
|
Re: 1957 Chevy truck re-rebuild
Thanks Kim, I see you're gonna get that cab smoothed out, should look great when done.
Russell Ashley, I used the term "----- in the dictionary" before also. For you to use it is a great compliment, thank you. Now that I've got my drive train figured out I'm getting real excited to get this truck going. |
|
|

|
|
|
#371 |
|
Registered User
Join Date: Aug 2012
Location: Salem Mo
Posts: 652
|
Re: 1957 Chevy truck re-rebuild
I'm gonna flashback a month or so ago. I posted my idea for traction bars for a 1957 Chevy truck, the response was great and got a feeling I better hold on to the rights of the design. I went through Legal Zoom and have now acquired a Patent Pending registration at the US Patent system and I must say, Legal Zoom made it rather painless and found me a lawyer that was very attentive to my needs.
For some, these are a repeat, for others these will new new pics. Wheel hop is the issue, with leaf springs this long I fear this truck is a perfect candidate for wheel hop. 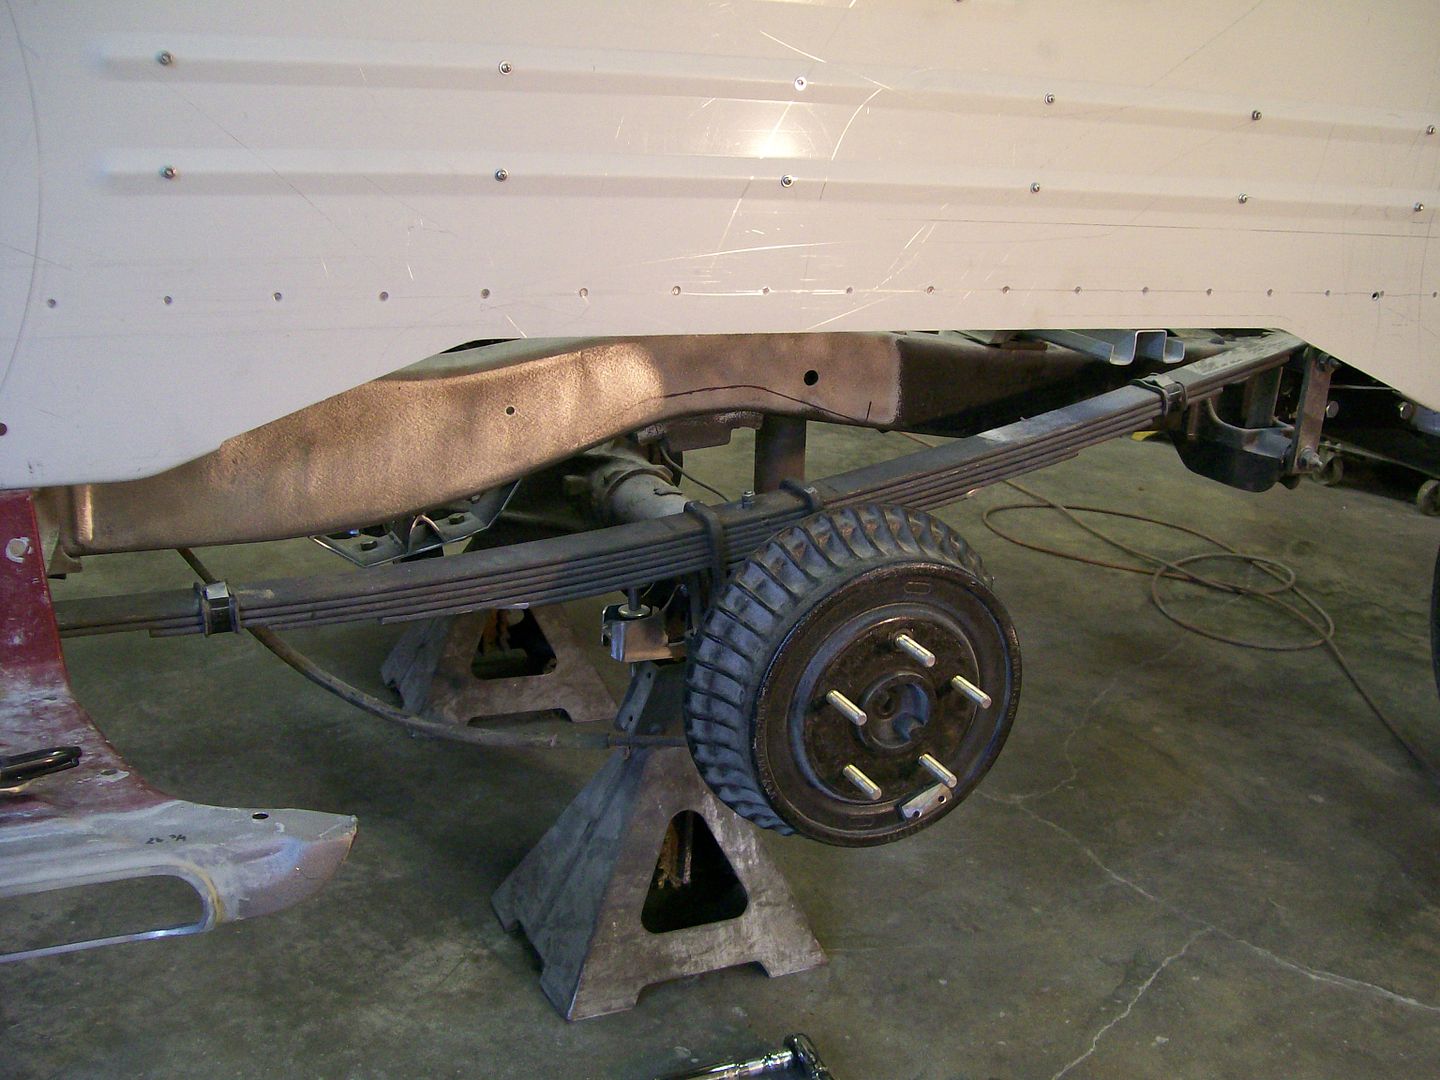 I wanted retain the leaf spring assembly but nobody sold a traction bar for when the spring is over the axle. I understand ladder bars, I understand 4 link I also under stand a pivoting bar, but all these hinder the leaf spring as it compresses, I simply want a slapper bar set-up. So beginning with the first plate I create a way to attach my traction bars to the leaf springs. 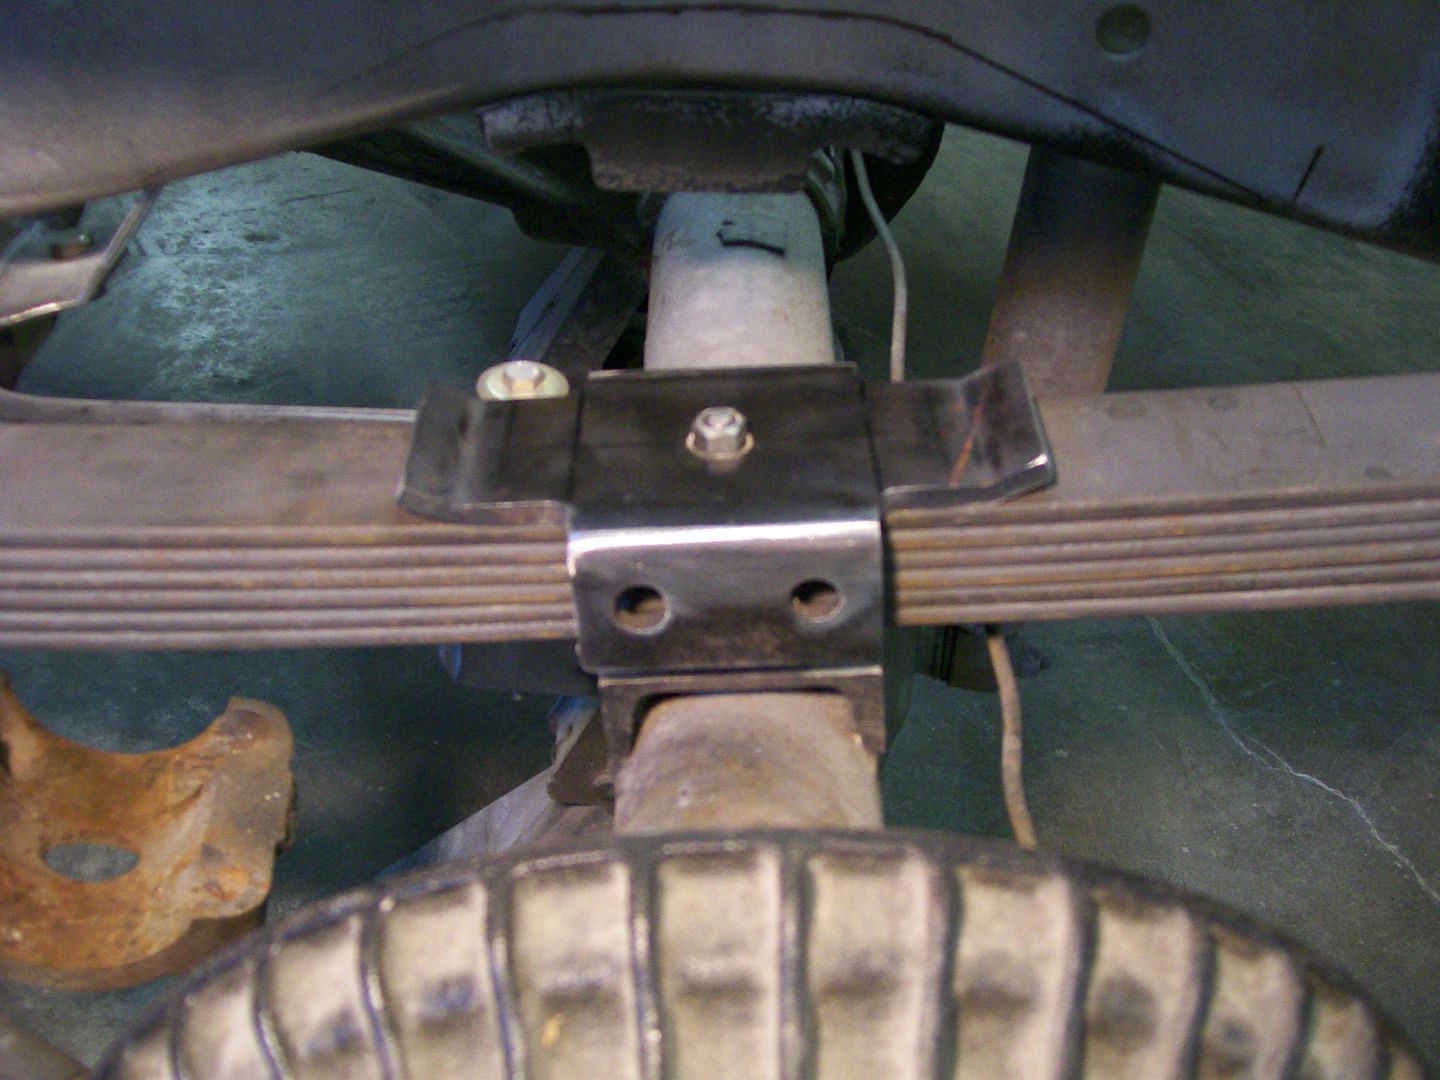 Then a second plate to reinforce the first plate and to stabilize the u-bolts. 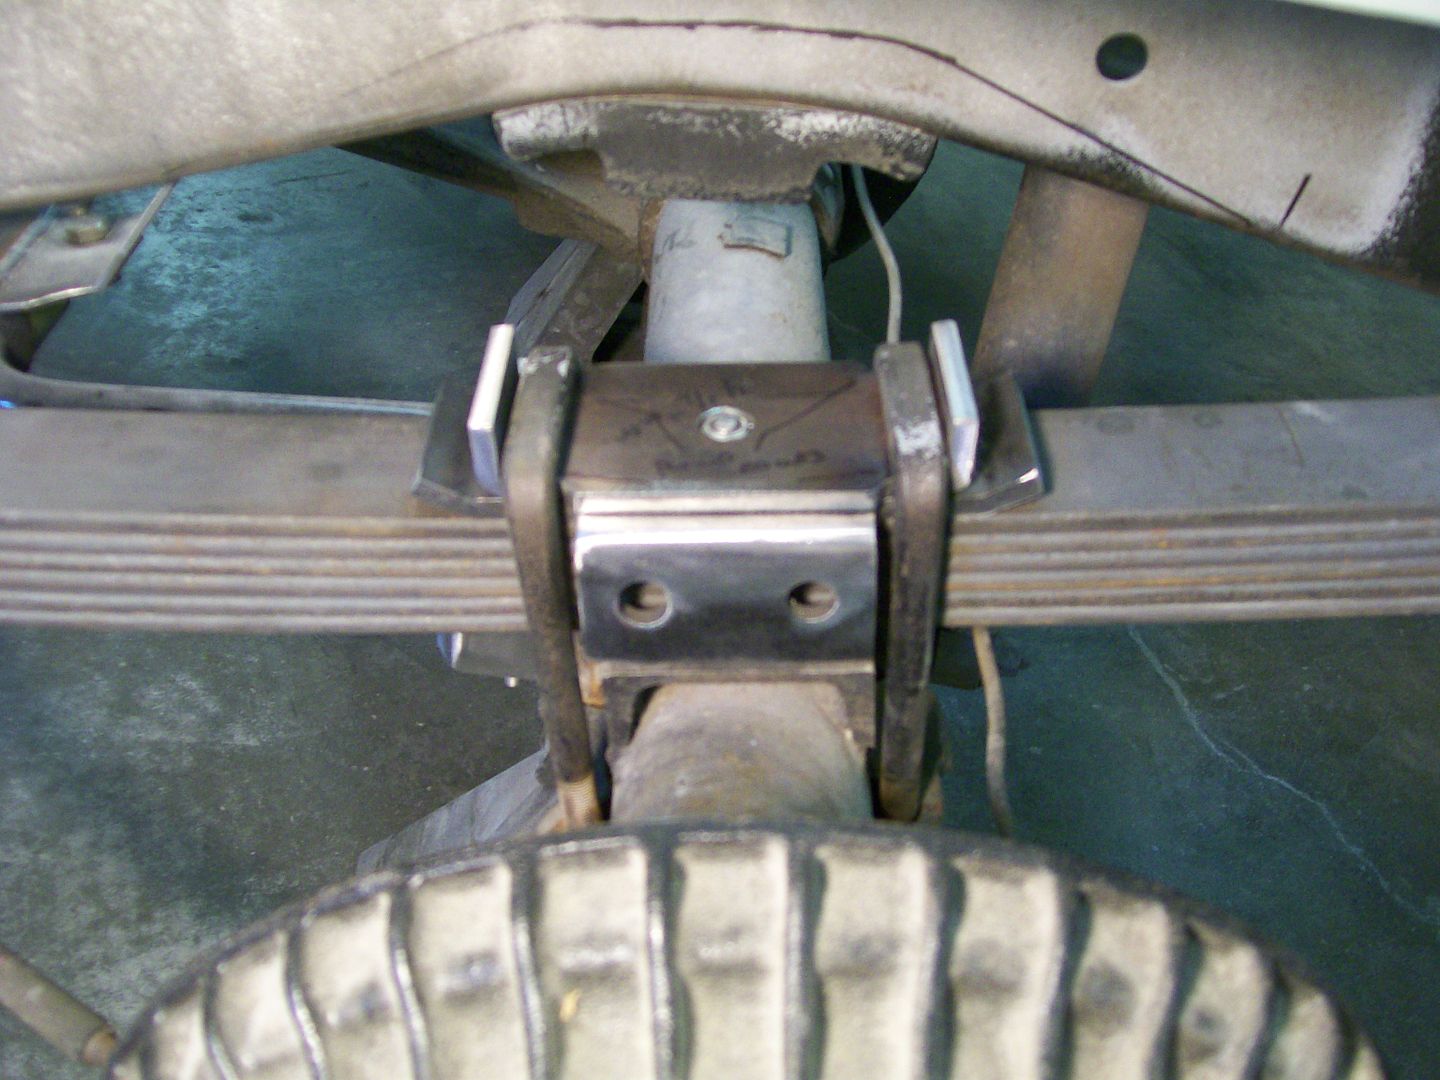 As Kim mentioned before, the theory is there, just working from the top side. As the axle tries to rotate, the assembly will raise in the front and make contact with the bottom of the leaf spring eye. This contact will stop the axle twist thus eliminating the spring wrap issue thus stopping the wheel hop problem. 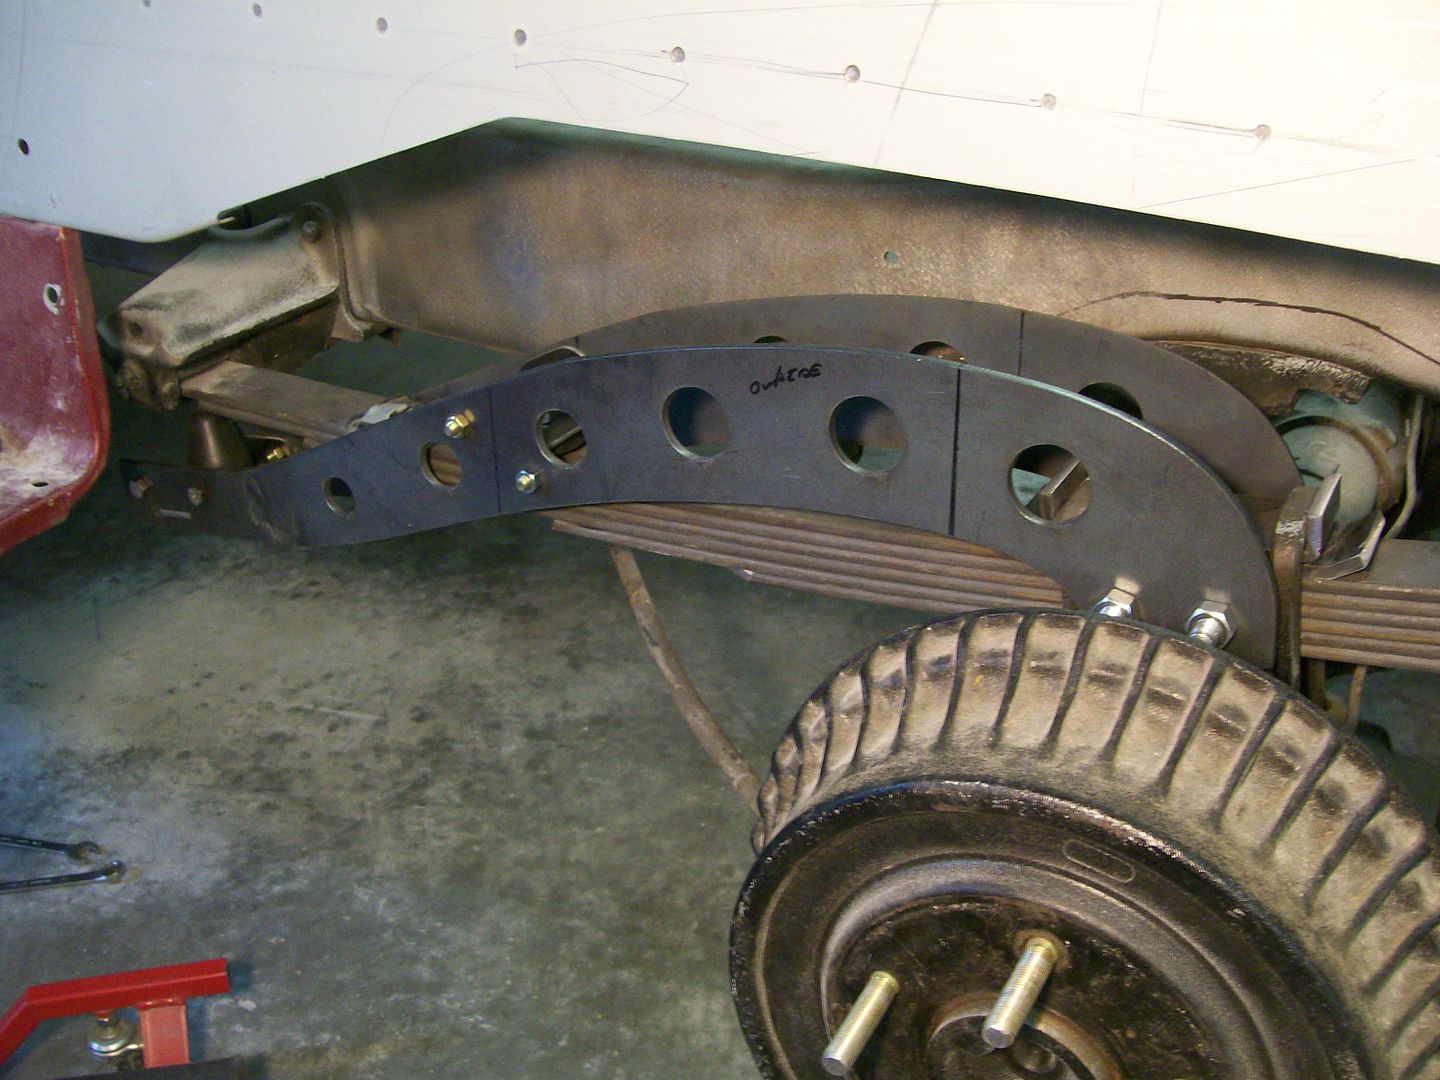 A look at the front rubber bump stop and where it'll make contact. 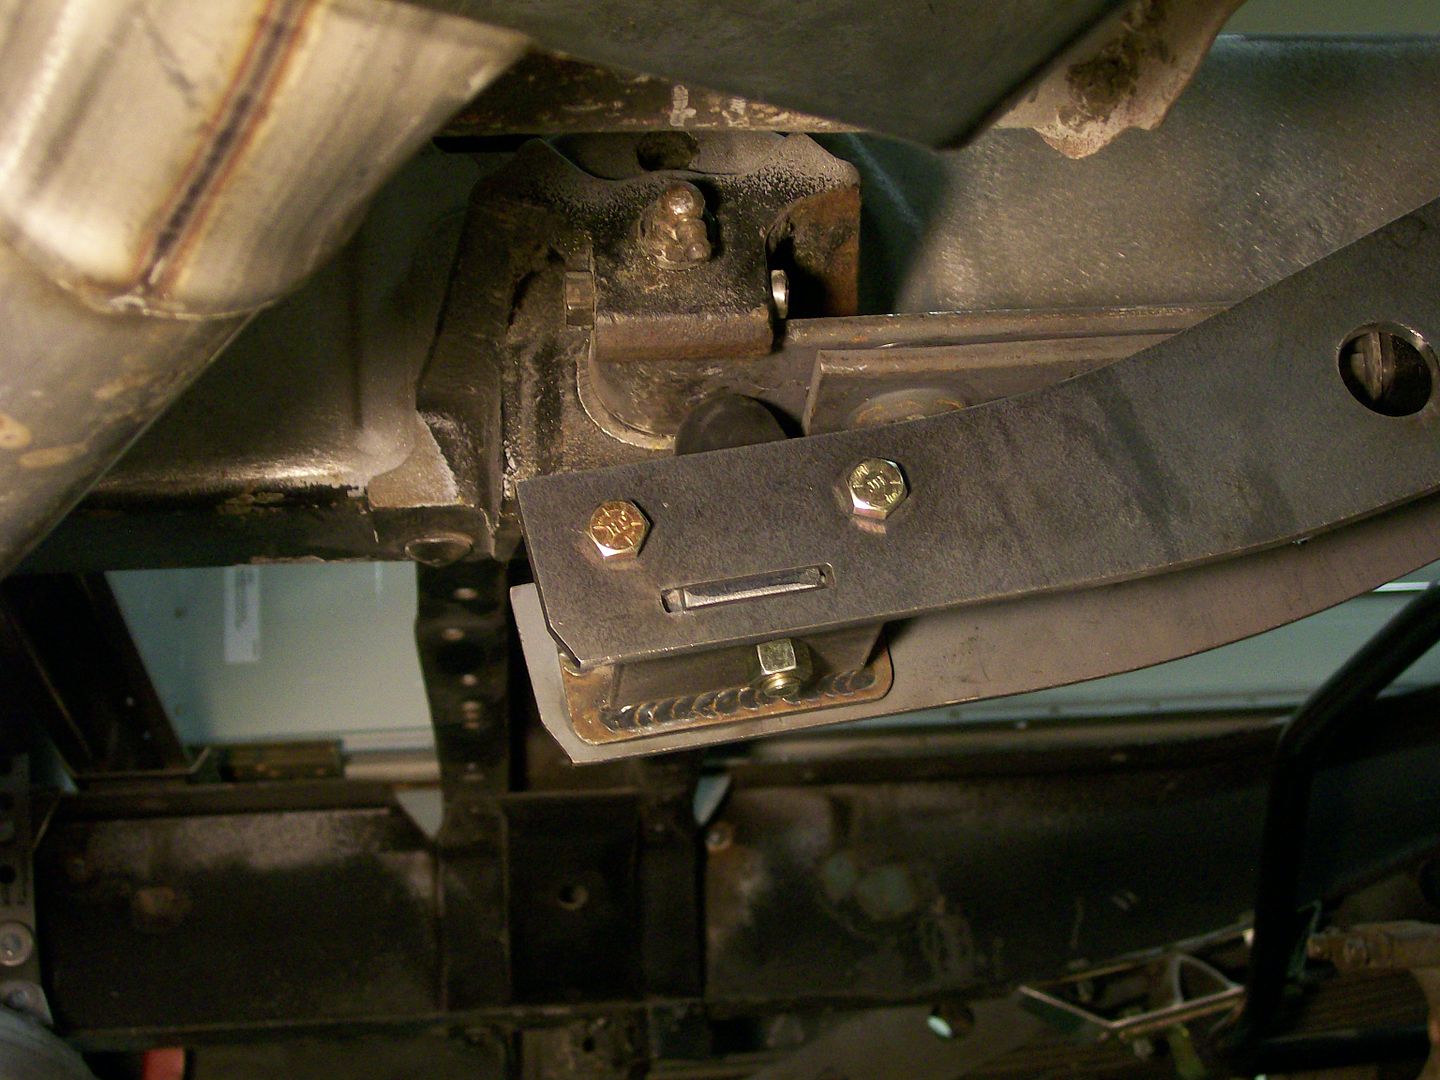 I did get the X brace welded in place to support the two sides and keep them from flexing. Also had a chance for more wigwelding.  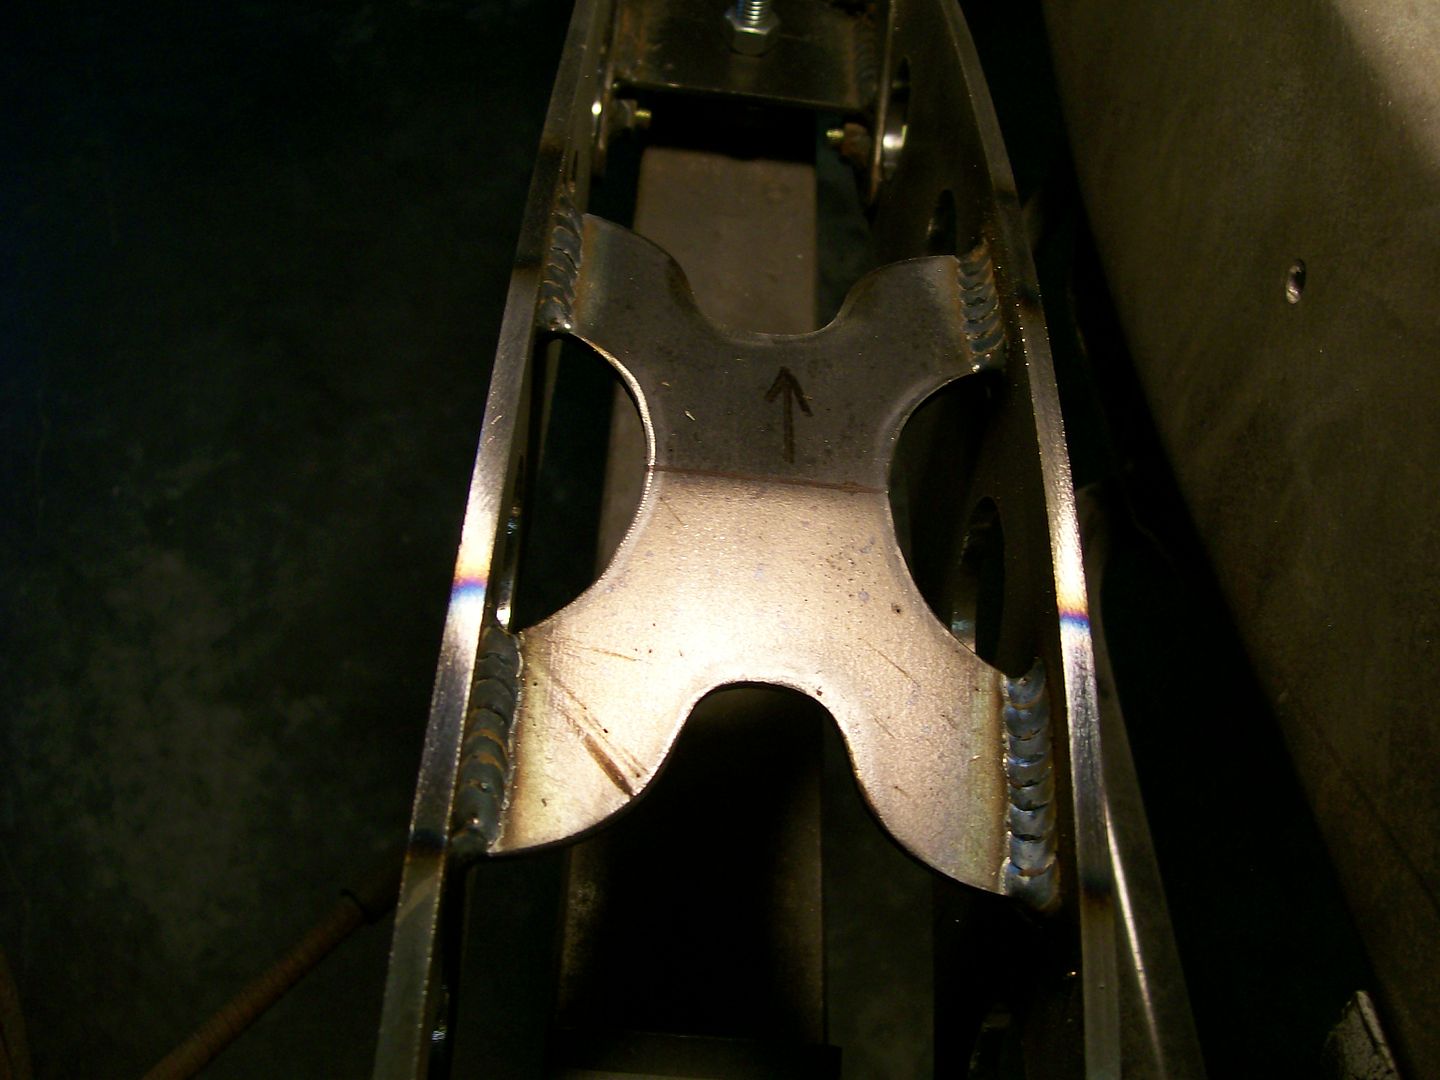 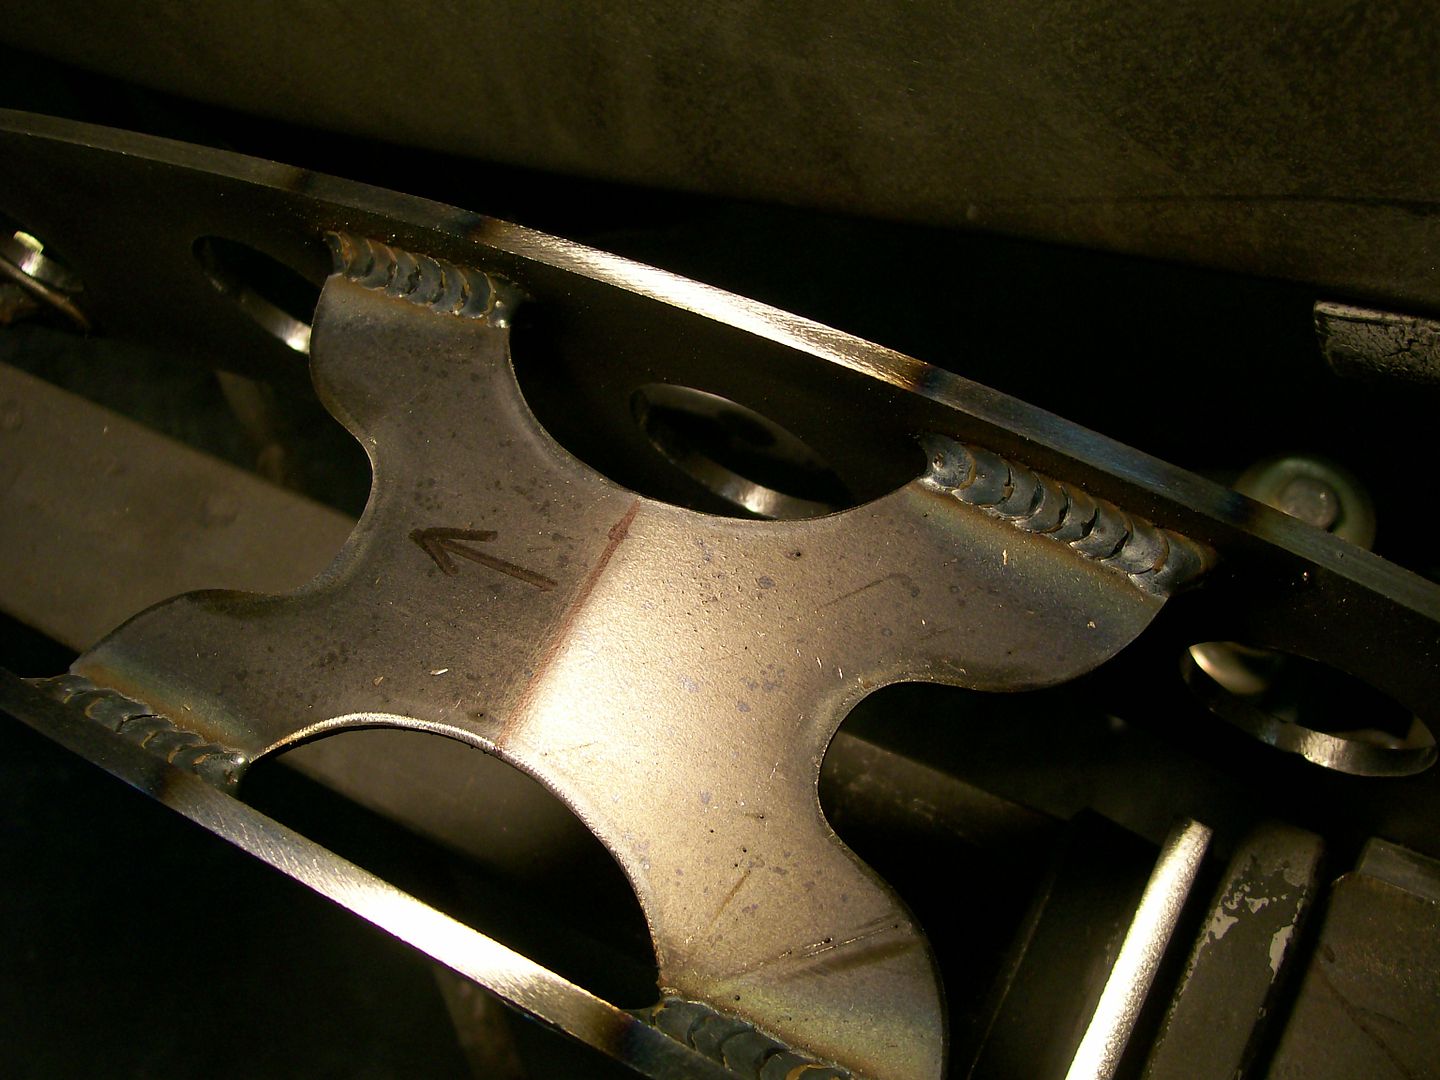 I know everybody likes pictures.... so there we go. 
|
|
|

|
|
|
#372 |
|
Registered User
Join Date: Feb 2013
Location: Lakeside Ariz
Posts: 445
|
Re: 1957 Chevy truck re-rebuild
That is one slick set up for the slapper bars.
Rich |
|
|

|
|
|
#373 |
|
Registered User
Join Date: Apr 2013
Location: LA, CA
Posts: 22
|
Re: 1957 Chevy truck re-rebuild
One of my fav builds to catch up on the Updates. StepsideJim

|
|
|

|
|
|
#374 |
|
Registered User
Join Date: Aug 2007
Location: Corona, California
Posts: 7,998
|
Re: 1957 Chevy truck re-rebuild
That's real cool you got a patent on your design.
They are some nice looking pieces. Kim |
|
|

|
|
|
#375 |
|
Senior Member
 Join Date: Aug 2010
Location: Shasta Lake, CA.
Posts: 1,619
|
Re: 1957 Chevy truck re-rebuild
Great build !
I installed a Gear Vendor's OD in my '05 Avalanche that had 4.10 gears with 20" wheels that we us to tow our 17' Casita. The combo weighs in at 10,000 pounds. The GearVendors gave me 8 speeds with 500 r.p.m. between gears, Sweet ! I generally towed in 3rd over. I use petroleum based gear oil instead of the spendy synthetic oil. It makes for a harsher shift then the synthetic oil. I'd recommend the synthetic oil. Well, we were leaving Clarkston, WA via the old road to the top of the grade with the Casita in tow. AS we started to cross the 4 lane highway with a slight upgrade when the trans upshifted to 2nd (1000 r.p.m. drop ) early I put my foot in it a little harder and the trans downshifted to 1st and the back to 2nd again not quite enough speed. So I pulled it back into 1st and floored it the hit the GearVendors at 6500 r.p.m. and got NEUTRAL and coasted to the far shoulder. After pulling the GV unit we found this. Note the twist in the splines, the result of too many full throttle upshifts with the GV. You say that would cause neutral ? Well the GV adapter sleeve engages the output splines in the last 2" of the shaft right behind the machined grove in the splined area of the 4L60E. We have since sold the Avalanche, and I removed the GV and installed it in our Tahoe. I'll be getting another one for my '57 GMC project.
__________________
Glen & Jane's Rides ‘57 GMC NAPCO Long Bed V8 4 speed Bought 2008 7 other cars & trucks , 5 trailers '56 Chevy Long Bed I6, 4 speed Bought 1990 Sold 8.22.2020 ’56 GMC Suburban Pickup V8, 4 speed Hydramatic Bought 1996 Sold 10.11.2020 My Other Tinkerings http://67-72chevytrucks.com/vboard/s...75#post8967275 |
|
|

|
 |
| Bookmarks |
|
|