
|
|
|
 09-20-2011, 01:08 AM
|
#1 |
|
Registered User
Join Date: Jun 2006
Location: Idaho
Posts: 8,800
|
Re: Project "49 No Buck$"
Good to hear its on the road. I'm firing my engine next weekend. Did you get the photos of the trim??
__________________
1959 Chevy Short Fleetside w/ 74 4WD drive train (current project) OrrieG Build Thread 1964 Chevelle Malibu w/ 355-350TH (daily driver) Helpful AD and TF Manual Site Old Car Manual Project |

|

|
|
09-27-2011, 04:31 PM
|
#2 |
|
Registered User
Join Date: Nov 2008
Location: So. Cal.
Posts: 452
|
Re: Project "49 No Buck$"
Its not on the road yet but its getting closer! Lots of detail stuff now! Trying to finish up all the interior stuff and then I'm driving it!
Posted via Mobile Device
__________________
It's all about the stance, baby! http://67-72chevytrucks.com/vboard/s...d.php?t=320546 |
|
|
|
|
10-03-2011, 12:29 PM
|
#3 |
|
Registered User
Join Date: Nov 2008
Location: So. Cal.
Posts: 452
|
Re: Project "49 No Buck$"
Wow, what a great weekend! Fixed a couple more little issues and got to put another 5 miles or so on the truck and helped Alex get a bunch of stuff done on his truck! It's too fun cruising this thing around! I'm still working on the interior and stereo stuff, so it's not a driver just yet. I was trying to figure out how to run my speaker wire without it pinching the wires as the door closes. I saw a friends truck and the kit they used but me being the cheap-ass did the same thing with very little money. Went to the hardware store and picked up a (1) Screendoor spring 16"x9/16" (2) 7/8" plastic hole plugs and a couple of rubber grommets.
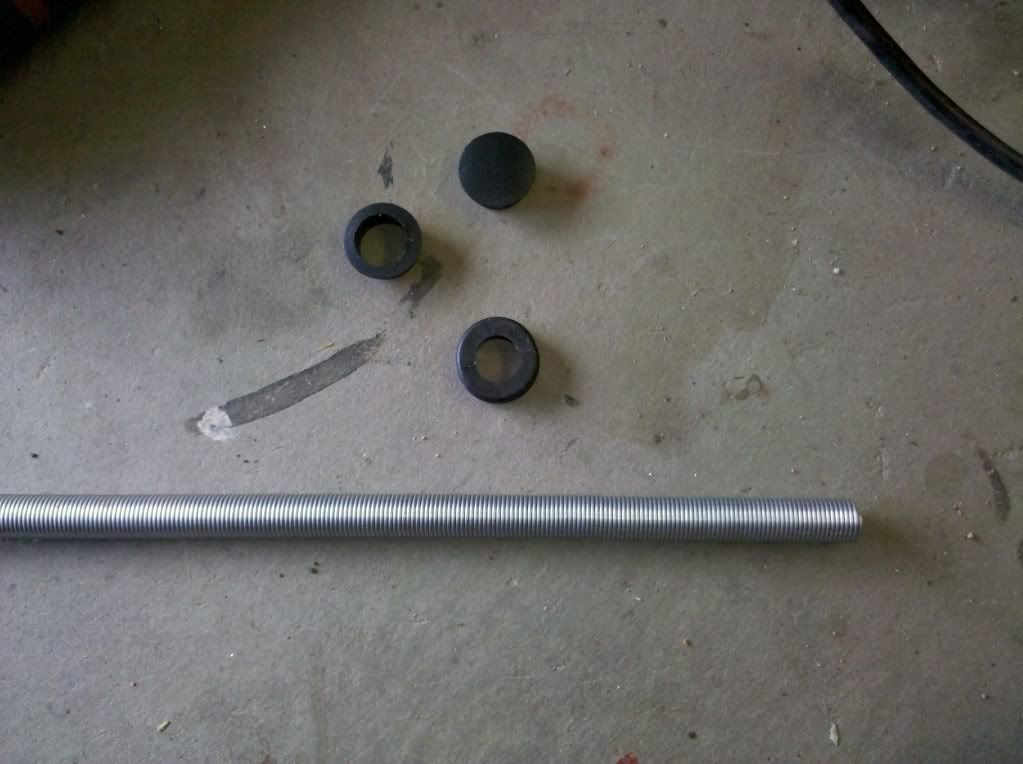 You'll notice I took my die grinder and made a hole in the plastic plug, this is where the spring will slide through. I cut the spring in half so I have an 8" chunk for each side. I should have taken more pics, so I'll have to explain. I drilled a hole in the door jamb about 3" up from the lower hinge hole 3/4" from the inside edge of the door. After taking the die grinder to open the hole up to fit the plastic plug, I got inside the truck, closed the door and reached through the access hole to use my sharpie and trace the hole I drilled onto the door jamb. Now the holes line up. I took my plastic plug that I'd drilled out You'll notice I took my die grinder and made a hole in the plastic plug, this is where the spring will slide through. I cut the spring in half so I have an 8" chunk for each side. I should have taken more pics, so I'll have to explain. I drilled a hole in the door jamb about 3" up from the lower hinge hole 3/4" from the inside edge of the door. After taking the die grinder to open the hole up to fit the plastic plug, I got inside the truck, closed the door and reached through the access hole to use my sharpie and trace the hole I drilled onto the door jamb. Now the holes line up. I took my plastic plug that I'd drilled out 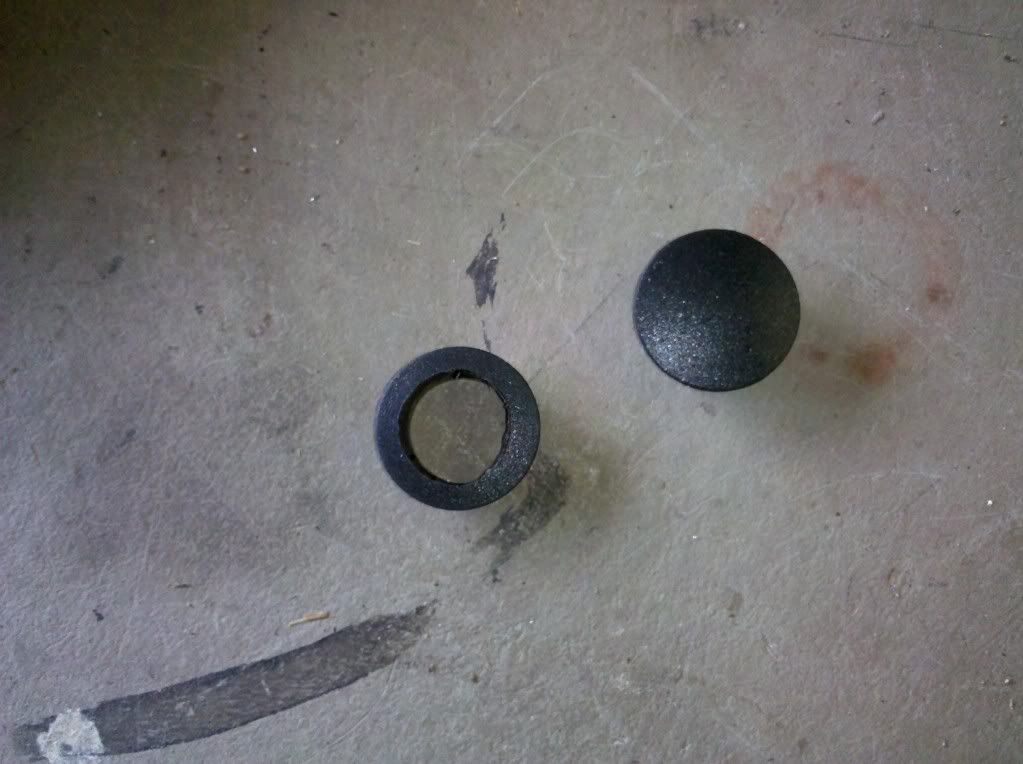 so the spring slides smoothly through it and glued it to the door hole. I then finished opening up the door jamp hole to fit the rubber grommet that has a 9/16" ID (same size as the spring diameter) and installed the grommet. I wrapped a couple turns of electrical tape around the first 2" of spring so it would fit snug into the the grommet and put the other end of the spring into the door. When you close the door the spring stays tight in the jamb, so the spring slides smoothly through it and glued it to the door hole. I then finished opening up the door jamp hole to fit the rubber grommet that has a 9/16" ID (same size as the spring diameter) and installed the grommet. I wrapped a couple turns of electrical tape around the first 2" of spring so it would fit snug into the the grommet and put the other end of the spring into the door. When you close the door the spring stays tight in the jamb, 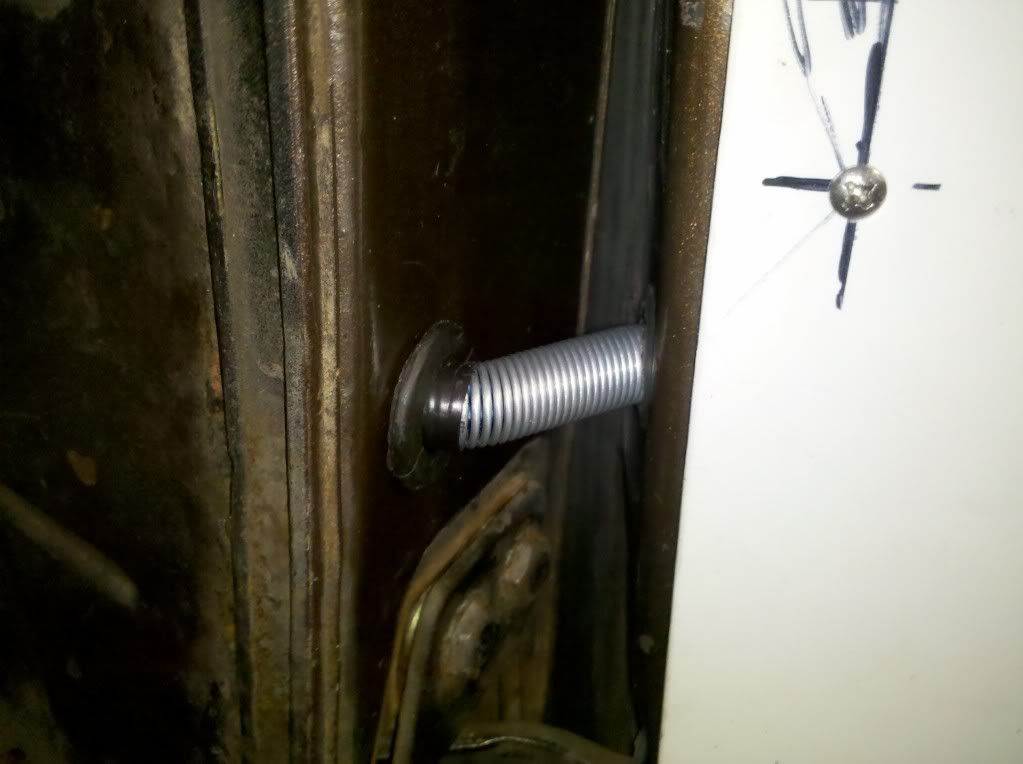 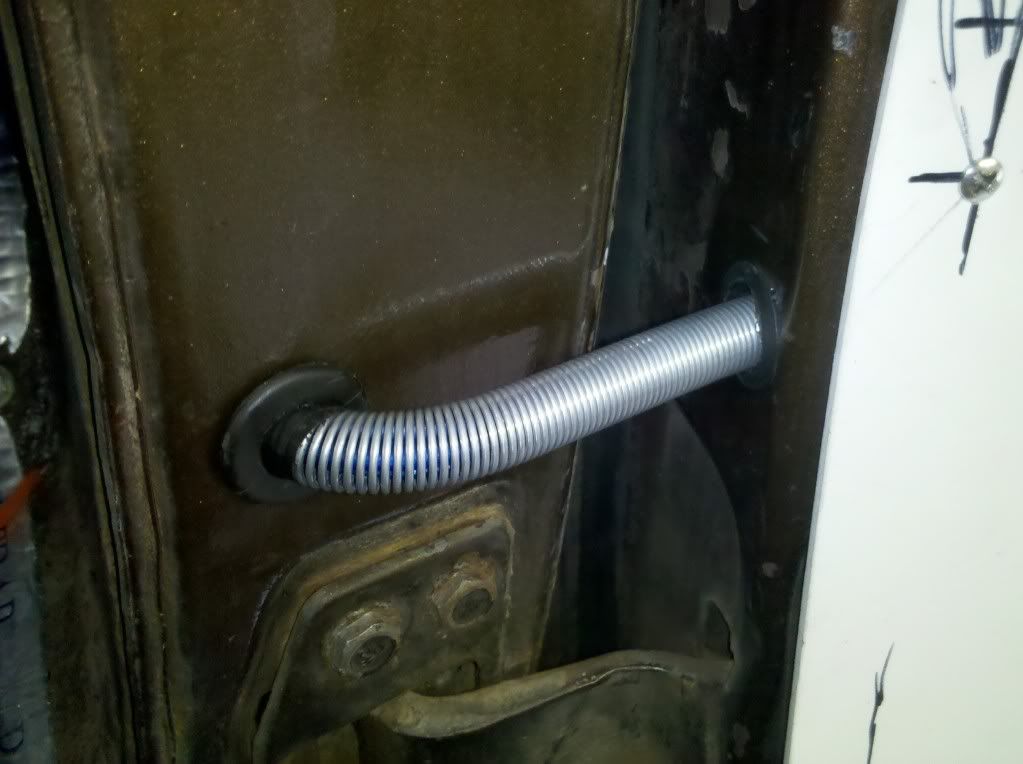 but glides smoothly into the door so the wires don't pinch! Less than $10 in the whole deal and it works great. I actually trimmed the tape so you couldn't see it and put a little dab of weatherstrip adhesive on the grommet and spring so it wont go anywhere. Here's how it works and I'm sorry about the compressor noise! but glides smoothly into the door so the wires don't pinch! Less than $10 in the whole deal and it works great. I actually trimmed the tape so you couldn't see it and put a little dab of weatherstrip adhesive on the grommet and spring so it wont go anywhere. Here's how it works and I'm sorry about the compressor noise!
__________________
It's all about the stance, baby! http://67-72chevytrucks.com/vboard/s...d.php?t=320546 Last edited by kustombrad; 10-03-2011 at 12:35 PM. |
|
|
|
|
10-03-2011, 07:55 PM
|
#4 |
|
A320 Pilot/USAF Retired
Join Date: Mar 2009
Location: Charleston, SC
Posts: 2,622
|
Re: Project "49 No Buck$"
To COOL!
__________________
JJ My 1957 build: http://67-72chevytrucks.com/vboard/s...d.php?t=334552 http://www.trifive.com/forums/showthread.php?t=22037 Instagram - Chuckdriver57 |
|
|
|
|
10-04-2011, 09:18 AM
|
#5 |
|
Registered User
Join Date: Jun 2010
Location: Vancouver Island BC
Posts: 652
|
Re: Project "49 No Buck$"
Yup wicked ingenuity.
|
|
|
|
|
10-04-2011, 11:12 AM
|
#6 |
|
Registered User
Join Date: Aug 2007
Location: Corona, California
Posts: 7,998
|
Re: Project "49 No Buck$"
Very slick mod.
Kim |
|
|
|
|
10-13-2011, 11:09 AM
|
#7 |
|
Registered User
Join Date: Nov 2008
Location: So. Cal.
Posts: 452
|
Re: Project "49 No Buck$"
Here's another little no money deal I just finished. I installed my new/old distributor and coil after yanking out the HEI. I couldn't find the plug wire looms I was looking for, so I whipped up something to get me by until I find what I want. I took some 1/4" washers, welded them together and then flattened the weld with a sledge hammer
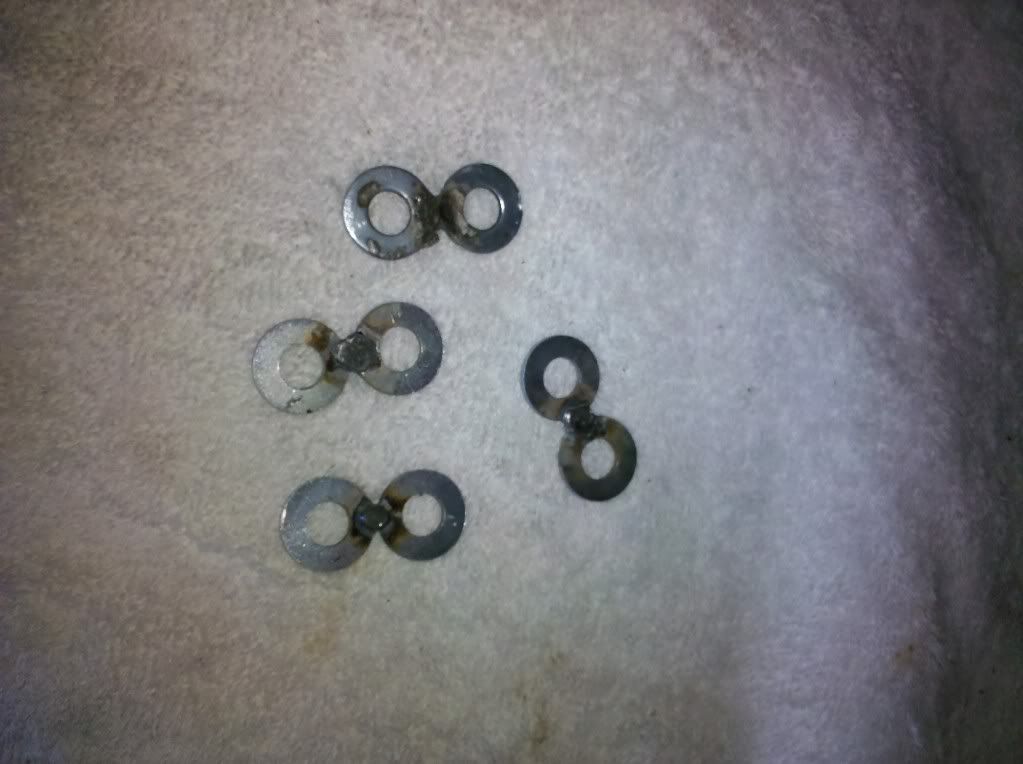 . After painting them black I installed them on the bottom 2 bolts of the valve covers. I routed my wiring before cutting the wires to fit and seperated them with black zip-ties. I cut a couple small chunks of 3/8" fuel line, split it and put the wires inside before zipping them to the washers bolted to the covers . After painting them black I installed them on the bottom 2 bolts of the valve covers. I routed my wiring before cutting the wires to fit and seperated them with black zip-ties. I cut a couple small chunks of 3/8" fuel line, split it and put the wires inside before zipping them to the washers bolted to the covers 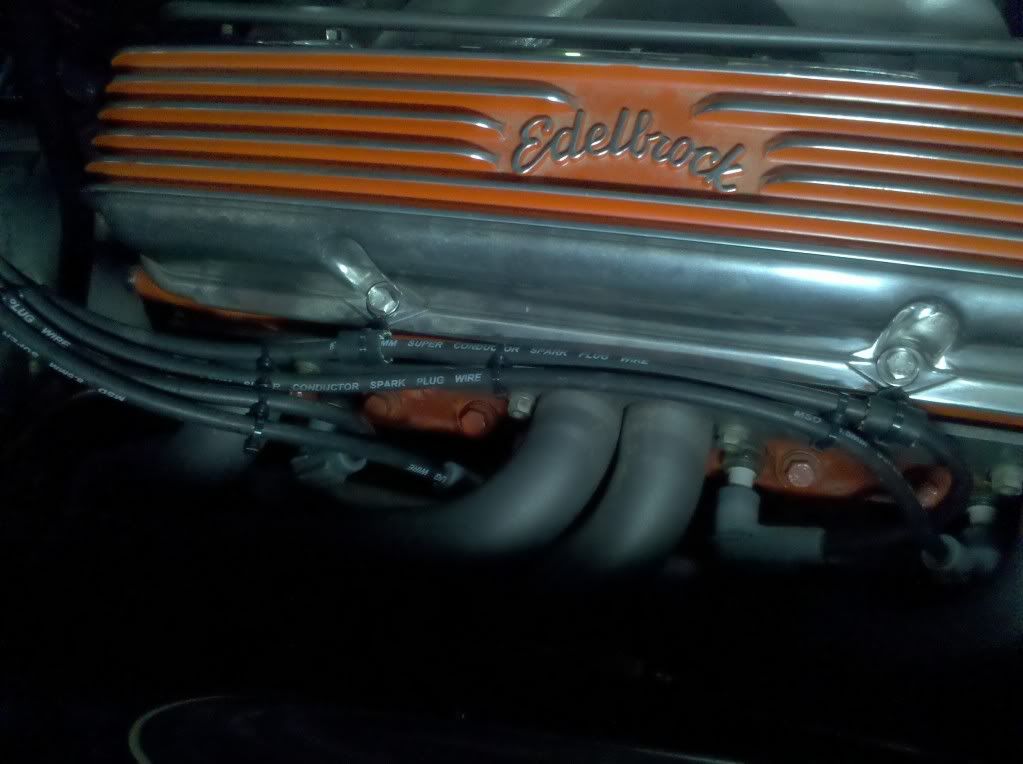  It's very simple and pretty much free! It's very simple and pretty much free!
__________________
It's all about the stance, baby! http://67-72chevytrucks.com/vboard/s...d.php?t=320546 |
|
|
|
|
10-13-2011, 12:25 PM
|
#8 |
|
Registered User
Join Date: Aug 2011
Location: Kingsport, TN
Posts: 36
|
Re: Project "49 No Buck$"
Very clean look, me I'd leave them. Simple. old school look and NO BLING!

__________________
We lust for what we want, weep for what we need... |
|
|
|
|
10-13-2011, 12:25 PM
|
#9 |
|
Registered User
Join Date: Aug 2011
Location: Kingsport, TN
Posts: 36
|
Re: Project "49 No Buck$"
Very clean look, me I'd leave them. Simple. old school look (if we'd had zip ties back then) and NO BLING!
__________________
We lust for what we want, weep for what we need... |
|
|
|
|
10-24-2011, 01:44 PM
|
#10 |
|
Registered User
Join Date: Nov 2008
Location: So. Cal.
Posts: 452
|
Re: Project "49 No Buck$"
More little tricks! Here's how I setup the heater control; I used a choke cable and a water control valve from a motorhome that I scored at Pick and Plunder! When the knob is pushed in, the water flow is shut off (no heat)
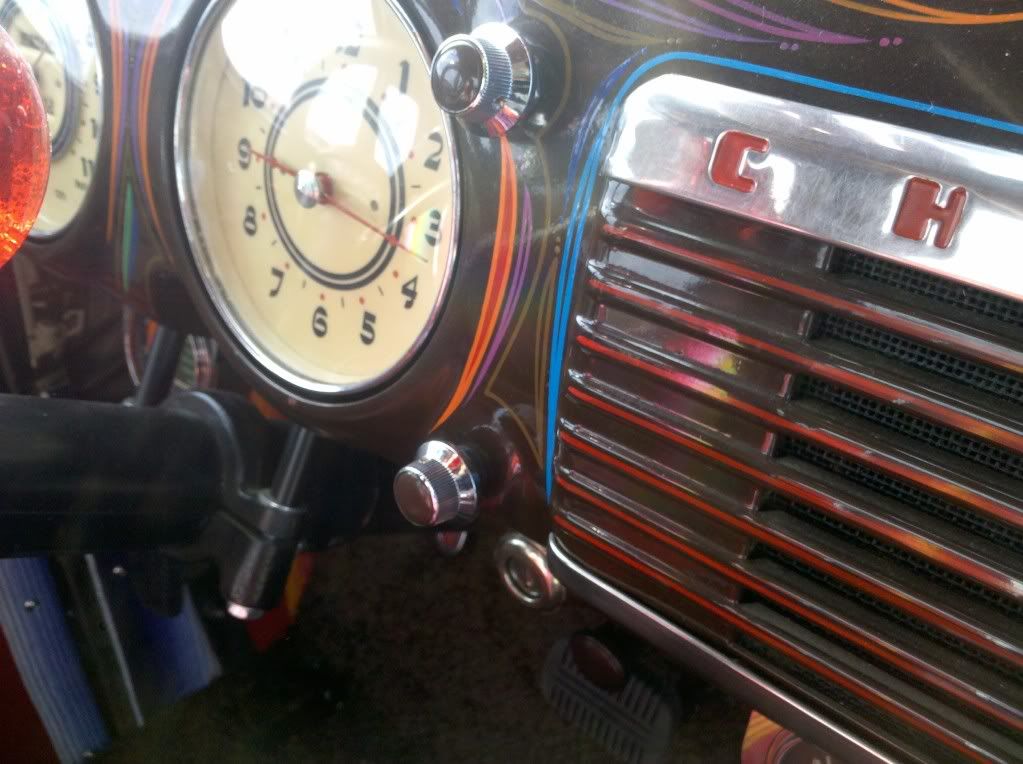 and it's opened when pulled out and it's opened when pulled out 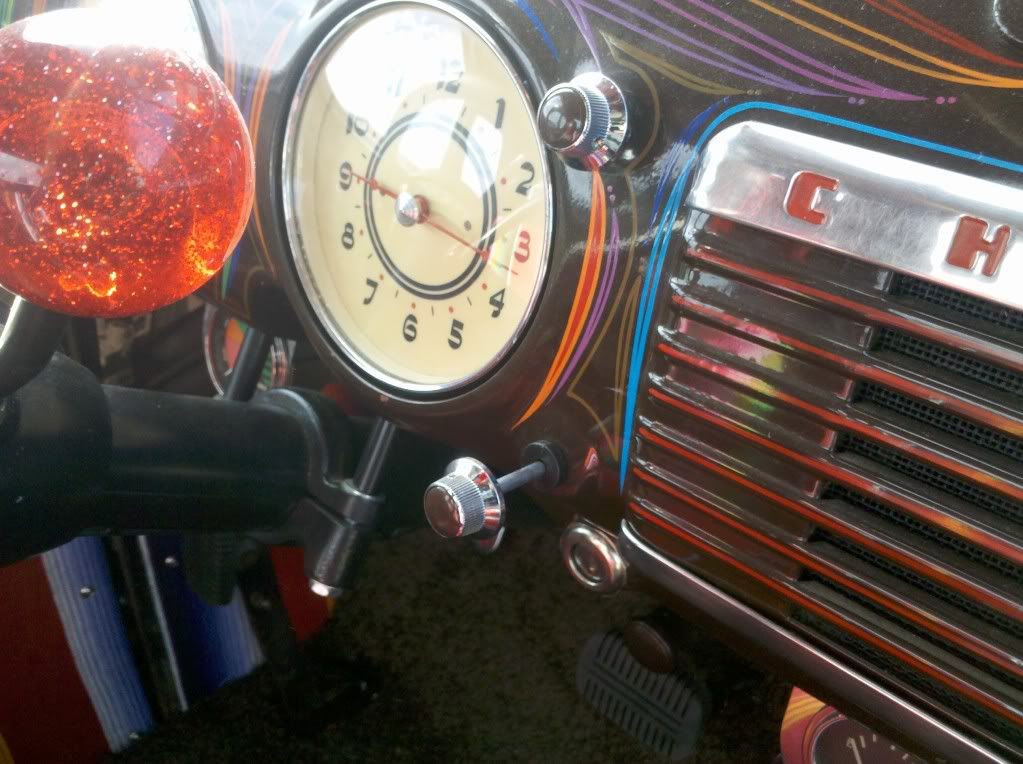 Notice I avoided the normal and used tophat style guitar knobs for the dash stuff! Here's the valve on the heater hose Notice I avoided the normal and used tophat style guitar knobs for the dash stuff! Here's the valve on the heater hose 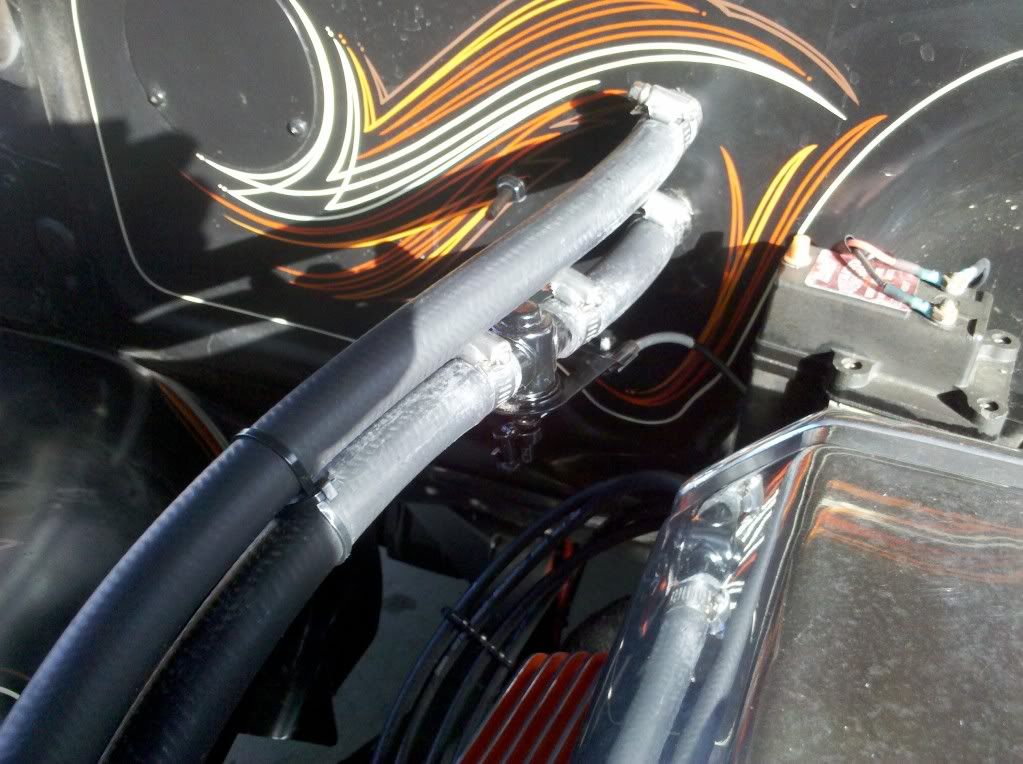
__________________
It's all about the stance, baby! http://67-72chevytrucks.com/vboard/s...d.php?t=320546 |
|
|
|
|
10-24-2011, 05:54 PM
|
#11 | |
|
Registered User
Join Date: Jun 2010
Location: Vancouver Island BC
Posts: 652
|
Re: Project "49 No Buck$"
Quote:

|
|
|
|
|
|
10-24-2011, 01:55 PM
|
#12 |
|
Registered User
Join Date: Nov 2008
Location: So. Cal.
Posts: 452
|
Re: Project "49 No Buck$"
Here's my throttle pedal idea that works really well. The truck had a linkage from an early-mid 60's Chevy truck, so I decided to go with it. By design the rod rubs on the back of the pedal, it works but could be way smoother. I took a flat chunk of 16 gauge sheetmetal and fastened in to the back of my Cal Custom "Foot" pedal for both the "hinge" and pressure point of the pedal.
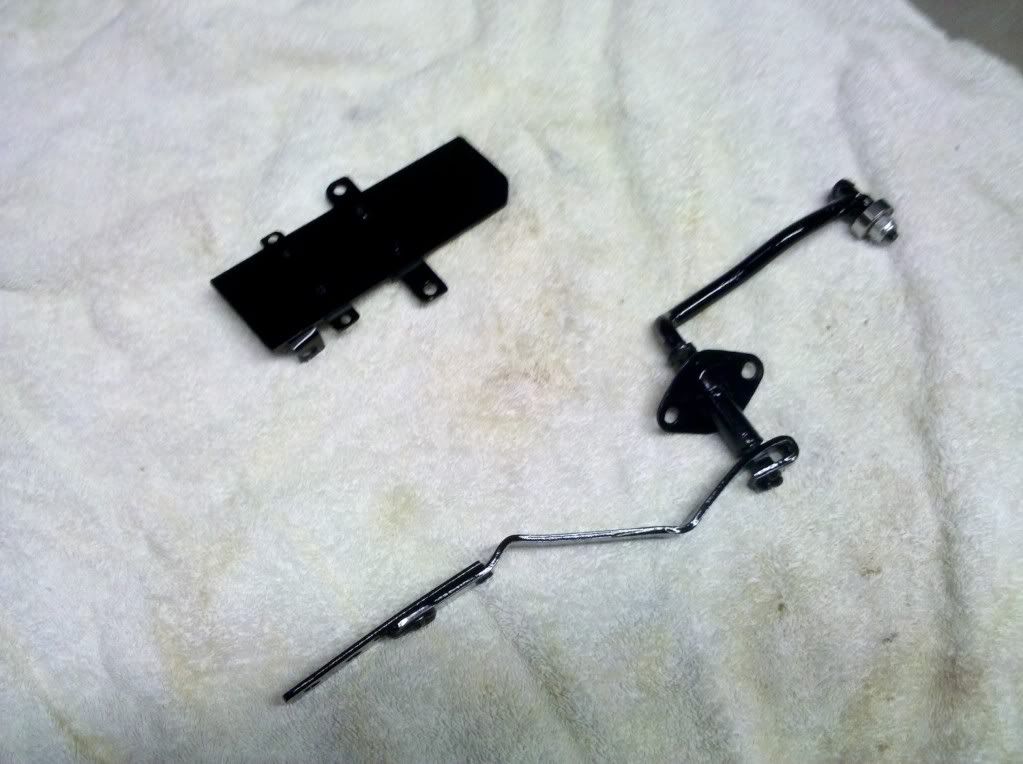 I then proceded to weld a bolt at a 90 degree angle from the rod in order to use a skateboard wheel bearing, so it would roll easily on the flat piece of sheet and not drag I then proceded to weld a bolt at a 90 degree angle from the rod in order to use a skateboard wheel bearing, so it would roll easily on the flat piece of sheet and not drag 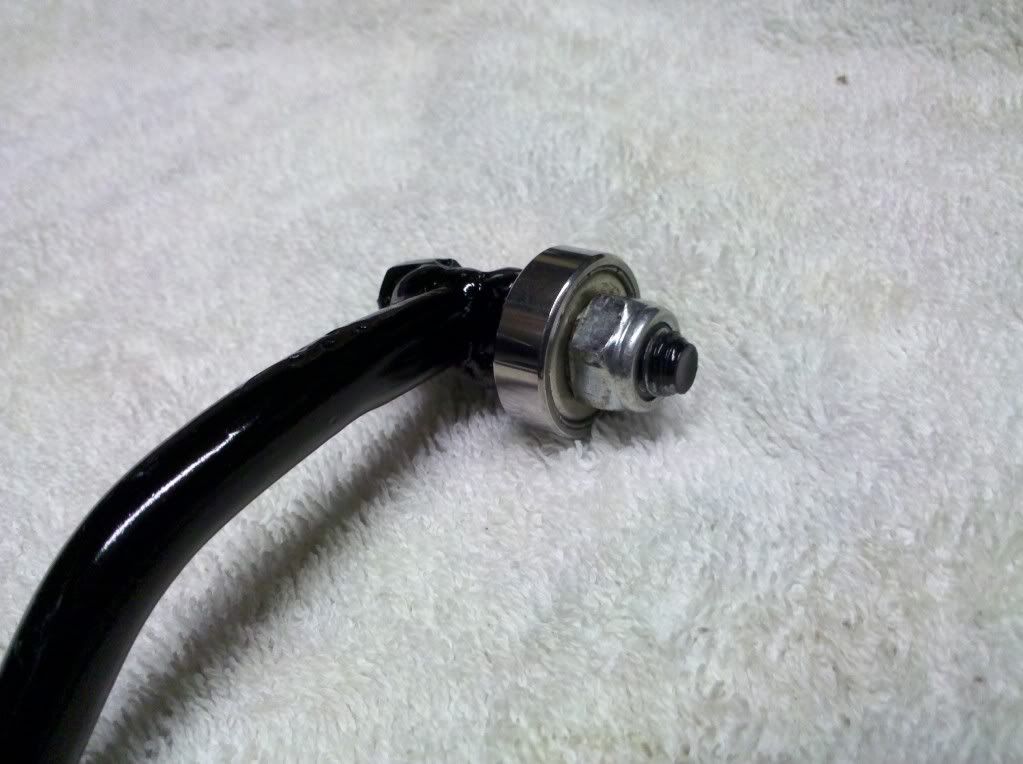 I works awesome and is smooth as butter!! I works awesome and is smooth as butter!!
__________________
It's all about the stance, baby! http://67-72chevytrucks.com/vboard/s...d.php?t=320546 |
|
|
|
|
10-24-2011, 02:03 PM
|
#13 |
|
Senior Member
  Join Date: Nov 2008
Location: Glendora, CA
Posts: 6,336
|
Re: Project "49 No Buck$"
You ARE the Master of Mickey Mouse - but I mean it in the most complimentary and an EXCELLENT way! The more I see of your truck, the more I like it.
|
|
|
|
|
10-24-2011, 02:37 PM
|
#14 |
|
Registered User
Join Date: Aug 2007
Location: Corona, California
Posts: 7,998
|
Re: Project "49 No Buck$"
Very cool stuff.
Kim |
|
|
|
|
10-24-2011, 03:21 PM
|
#15 |
|
Registered User
Join Date: Aug 2011
Location: Kingsport, TN
Posts: 36
|
Re: Project "49 No Buck$"
Dude, you are too much! great work
__________________
We lust for what we want, weep for what we need... |
|
|
|
|
10-25-2011, 12:14 PM
|
#16 |
|
Registered User
Join Date: Nov 2008
Location: So. Cal.
Posts: 452
|
Re: Project "49 No Buck$"
Here's how I did my stereo head unit install. Sorry I didn't get pics of the actual piece I made, but here's the pattern I used.
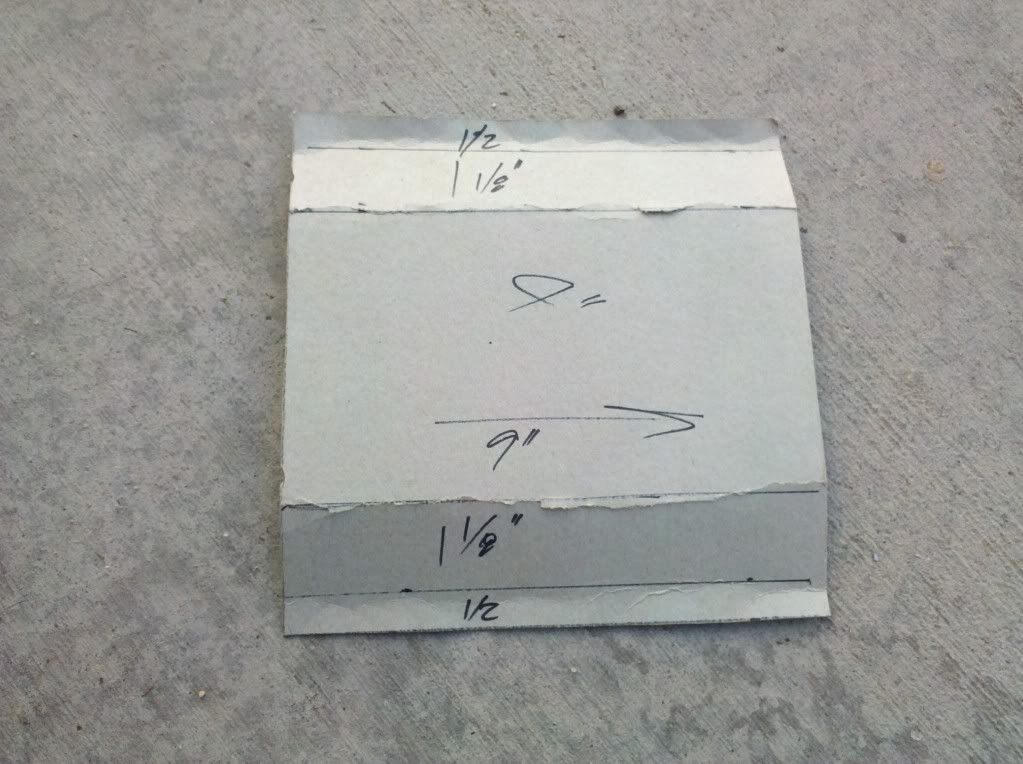 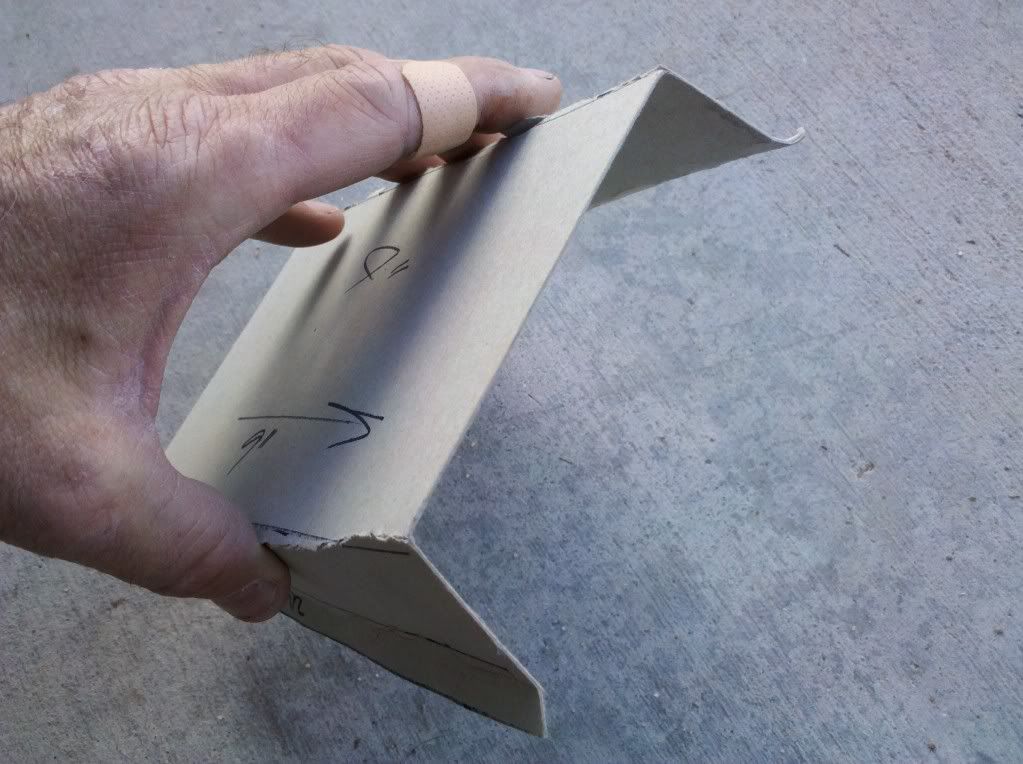 All the bends are 90 degrees and all my measurements are on the cardboard. The center area is 4" tall. I made it out of some 16 gauge aluminum I had laying around, scribed the stereo mount/bracket in the center to cut out with a small cutoff wheel and the painted it black. I then screwed it into the dash with some 10/32's and it's not going anywhere! All the bends are 90 degrees and all my measurements are on the cardboard. The center area is 4" tall. I made it out of some 16 gauge aluminum I had laying around, scribed the stereo mount/bracket in the center to cut out with a small cutoff wheel and the painted it black. I then screwed it into the dash with some 10/32's and it's not going anywhere!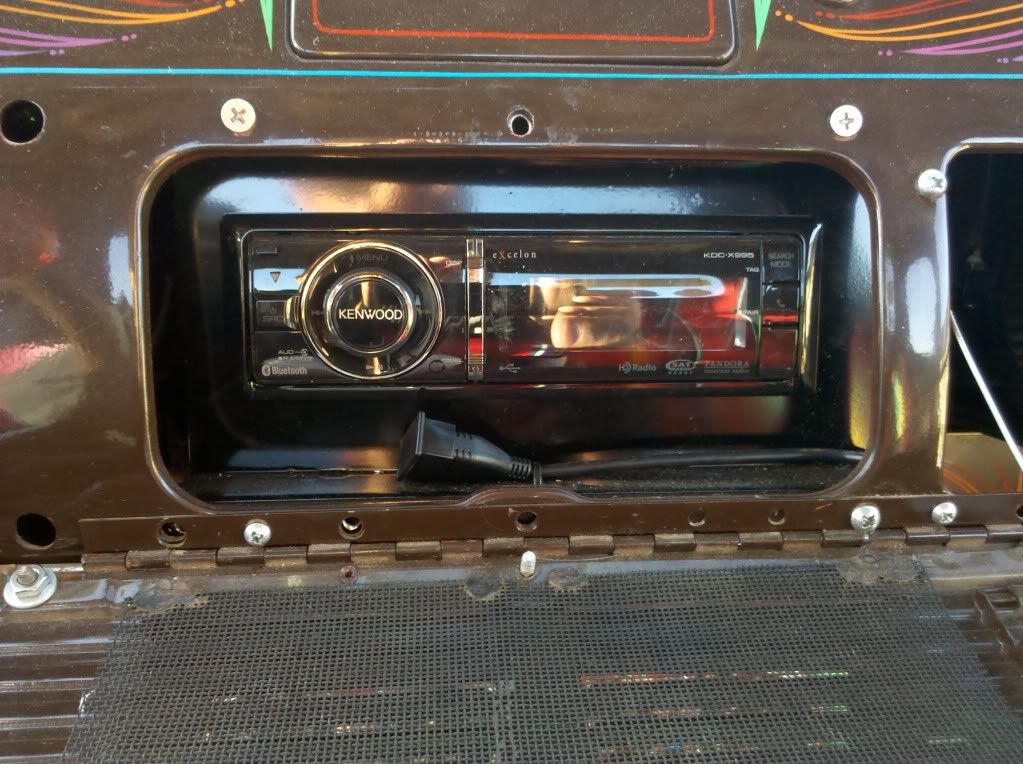
__________________
It's all about the stance, baby! http://67-72chevytrucks.com/vboard/s...d.php?t=320546 |
|
|
|
|
10-25-2011, 12:47 PM
|
#17 |
|
Registered User
Join Date: Nov 2008
Location: So. Cal.
Posts: 452
|
Re: Project "49 No Buck$"
Now for the interior... I used some really cool sign plastic for the door panels and headliner
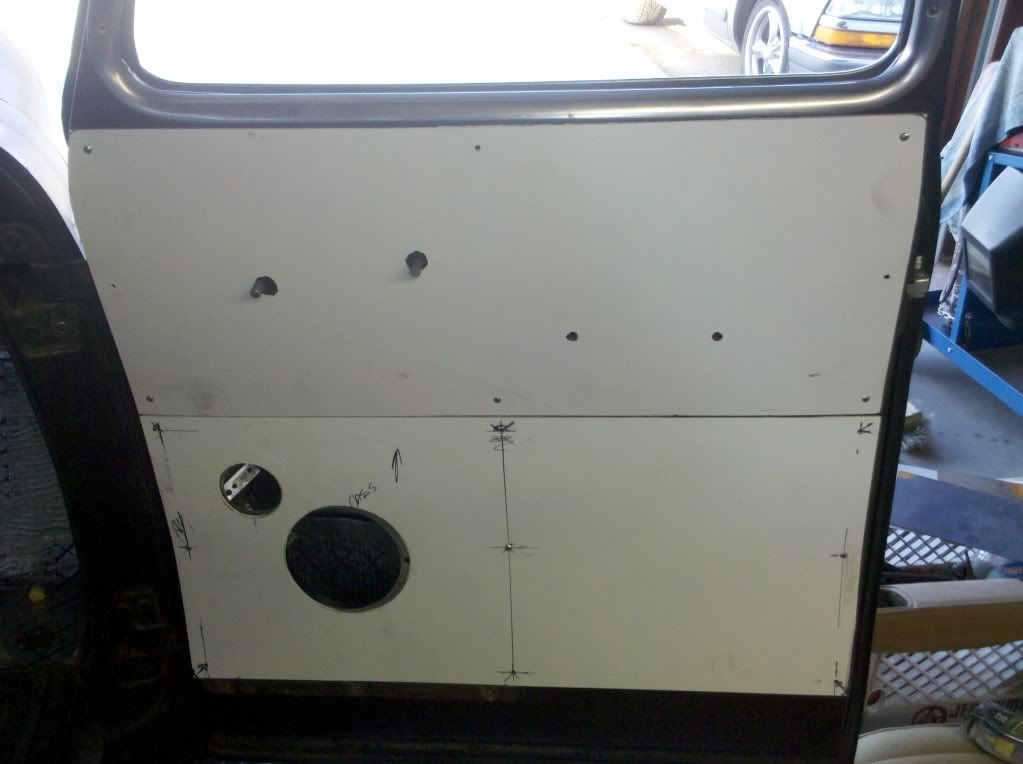 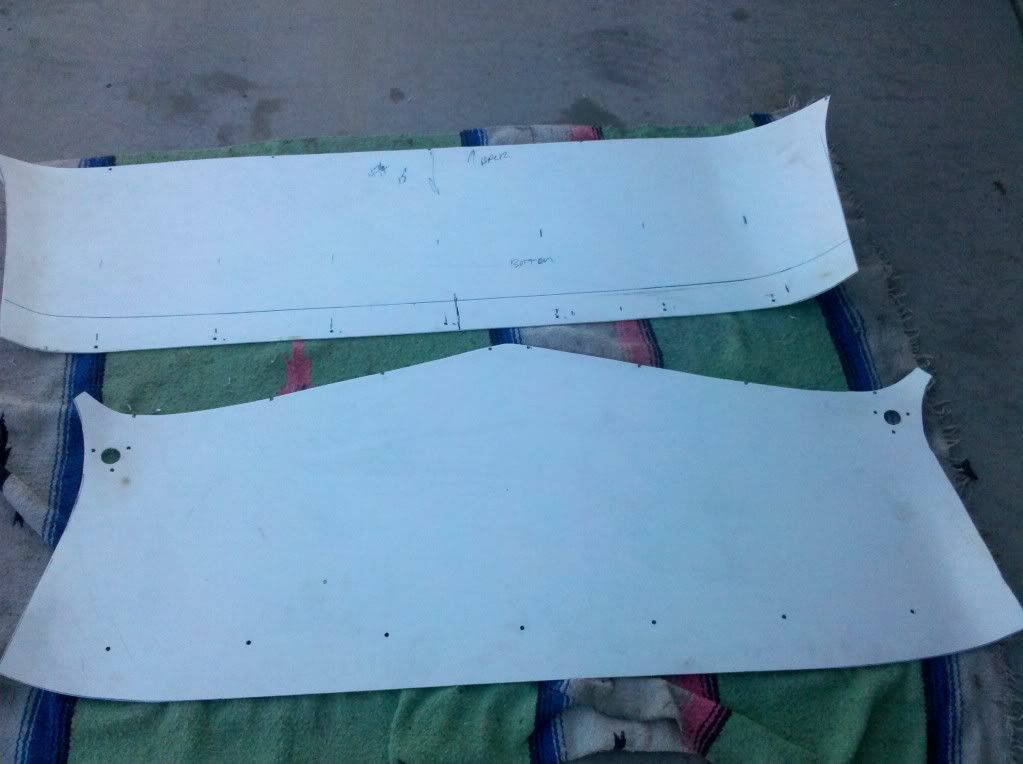 that my friend Joe hooked me up with. This stuff bends and cuts great and I used a propane torch to heat it up for holding it's shape on the headliner! Alex and myself bounced around some cheap interior thoughts and he had a great idea about doing a race collage and using it for the headliner. Awesome idea, but how would it look with my mexican blanket colors idea I was thinking? So now LOTS more idea swapping about how we should we do it and how the 2 ideas will work together. I started collecting pics and put the whole collage thing together in Photoshop and tried to give it the old sepiatone (kinda beige and black instead of grey) look so it would have an vintage feel to it. Once I had it layed out how I thought it would work, my friend Joe printed it up on vehicle wrap vinyl. Here's how it came out... that my friend Joe hooked me up with. This stuff bends and cuts great and I used a propane torch to heat it up for holding it's shape on the headliner! Alex and myself bounced around some cheap interior thoughts and he had a great idea about doing a race collage and using it for the headliner. Awesome idea, but how would it look with my mexican blanket colors idea I was thinking? So now LOTS more idea swapping about how we should we do it and how the 2 ideas will work together. I started collecting pics and put the whole collage thing together in Photoshop and tried to give it the old sepiatone (kinda beige and black instead of grey) look so it would have an vintage feel to it. Once I had it layed out how I thought it would work, my friend Joe printed it up on vehicle wrap vinyl. Here's how it came out... 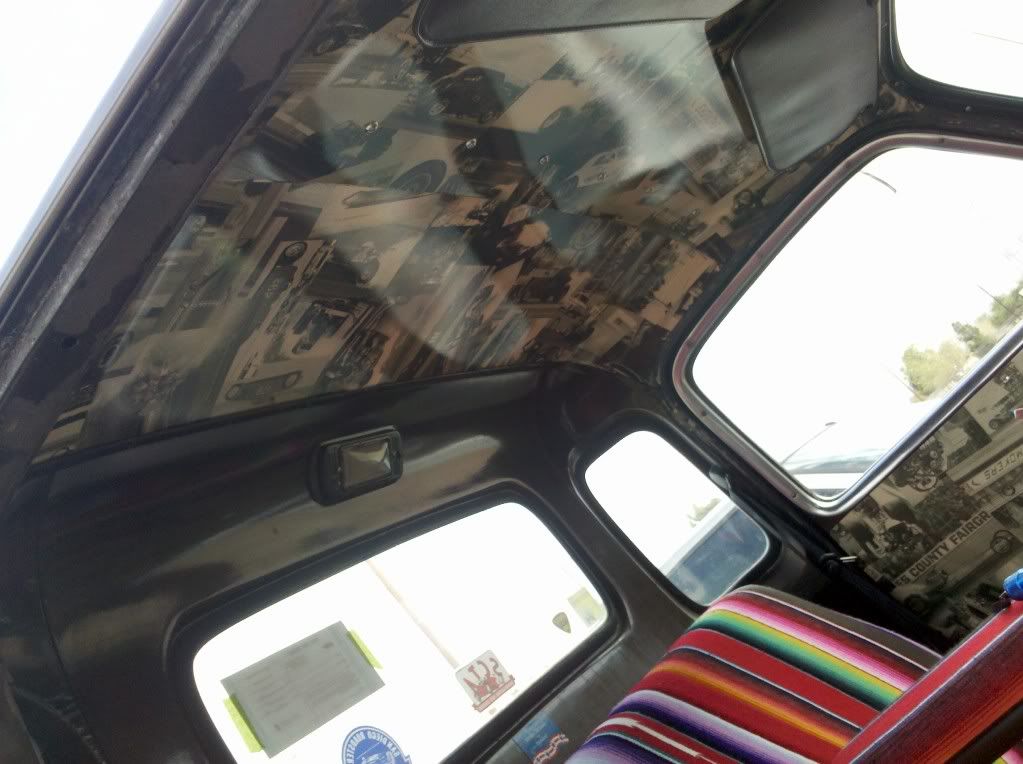 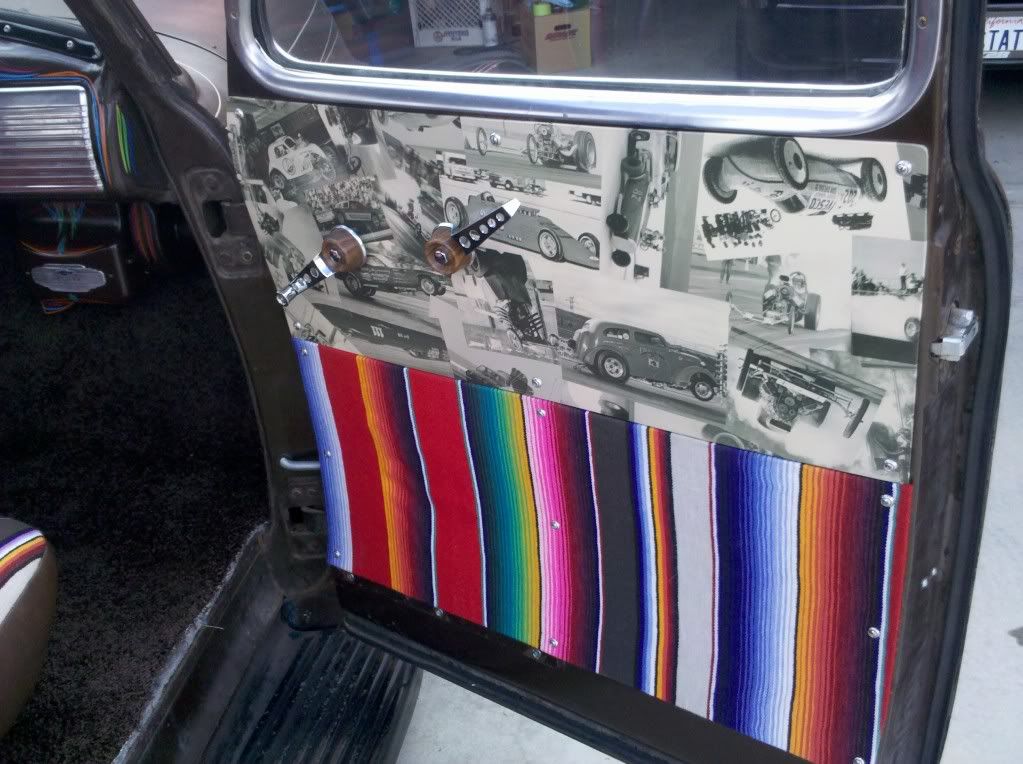 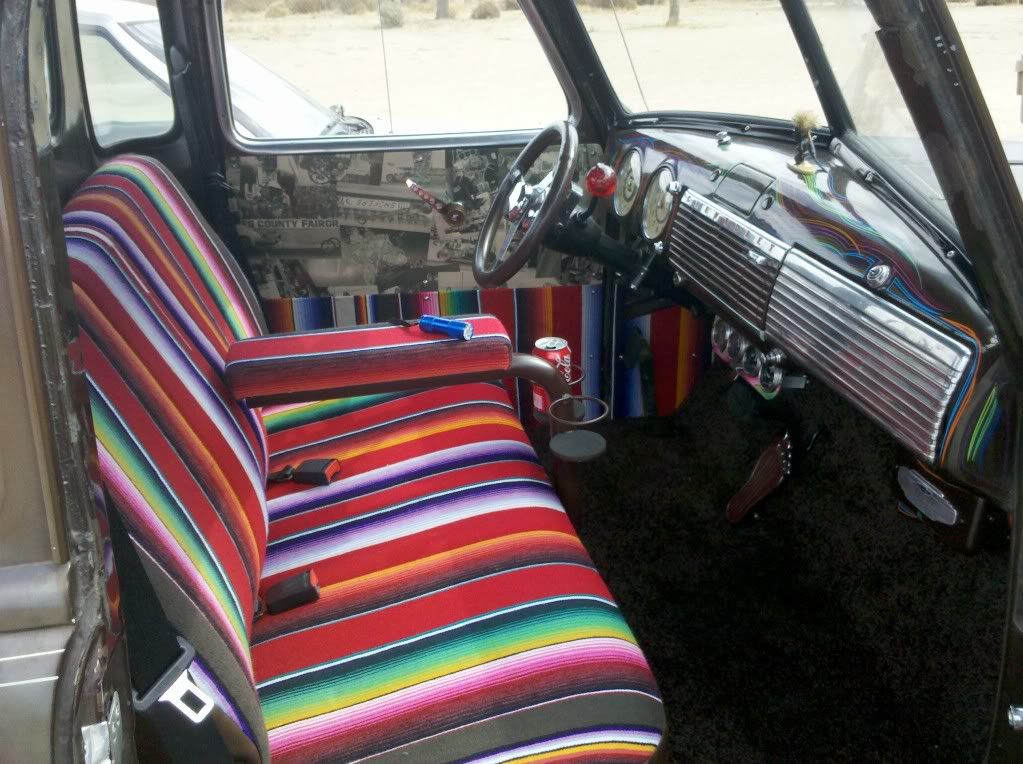 My friend Brian sewed up the seat with some brown vinyl and the blanket I gave him (it looks soooooo cool!) and Alex made the kick panels to finish it up! I scored some old Cal Custom door handles to really give it the vibe! I need to finish the carpet trim pieces at the door jambs and get some arm rests, but the interior is pretty much done! My friend Brian sewed up the seat with some brown vinyl and the blanket I gave him (it looks soooooo cool!) and Alex made the kick panels to finish it up! I scored some old Cal Custom door handles to really give it the vibe! I need to finish the carpet trim pieces at the door jambs and get some arm rests, but the interior is pretty much done!
__________________
It's all about the stance, baby! http://67-72chevytrucks.com/vboard/s...d.php?t=320546 |
|
|
|
|
10-25-2011, 02:41 PM
|
#18 |
|
Registered User
Join Date: Aug 2011
Location: Kingsport, TN
Posts: 36
|
Re: Project "49 No Buck$"
Gets better with every post, you got some really cool ideas.
__________________
We lust for what we want, weep for what we need... |
|
|
|
|
10-26-2011, 11:31 AM
|
#19 | |
|
Registered User
Join Date: Jul 2011
Location: Auburn ca.
Posts: 2,886
|
Re: Project "49 No Buck$"
Quote:
where did you get the sign plastic? It looks like a good way to go for backing on upholstered panels. |
|
|
|
|
|
10-26-2011, 01:05 PM
|
#20 | |
|
Doin' it live!
Join Date: Jan 2010
Location: Eagle Mountain, Utah
Posts: 471
|
Re: Project "49 No Buck$"
Quote:
Is the material you used Styreen? I have some of this left over from a sign project I did. But I found it really hard to cut as the heat from the cutting tool more melted its way through than cut. The edges were really nasty when I was done. Ended up using something else for the project. I would be interesting in knowing what the material was and how you cut it. -Panelrodder
__________________
-Panelrodder 1953 GMC Panel truck - 'Curly' 1961 Chevy Suburban - 'Larry' - Sold 2005 Harley Sportster - 'Shemp' |
|
|
|
|
|
10-25-2011, 02:53 PM
|
#21 |
|
Registered User
Join Date: Sep 2009
Location: Monroe,Iowa
Posts: 4,370
|
Re: Project "49 No Buck$"
This Truck is SO NEAT!!!! I'd love to see it in person,if I ever get to California I gotta look you UP.
|
|
|
|
|
10-25-2011, 04:03 PM
|
#22 |
|
Registered User
Join Date: Aug 2007
Location: Corona, California
Posts: 7,998
|
Re: Project "49 No Buck$"
It's really coming out nice. Looks like you'll have to have at the next Brothers truck show.
Kim |
|
|
|
|
10-25-2011, 07:33 PM
|
#23 |
|
Registered User
Join Date: Jun 2006
Location: Idaho
Posts: 8,800
|
Re: Project "49 No Buck$"
Interior put me over the top on the trampoline! What a great idea on the head liner and doors.
__________________
1959 Chevy Short Fleetside w/ 74 4WD drive train (current project) OrrieG Build Thread 1964 Chevelle Malibu w/ 355-350TH (daily driver) Helpful AD and TF Manual Site Old Car Manual Project |
|
|
|
|
10-25-2011, 09:12 PM
|
#24 |
|
A320 Pilot/USAF Retired
Join Date: Mar 2009
Location: Charleston, SC
Posts: 2,622
|
Re: Project "49 No Buck$"
That's beyond COOL!
__________________
JJ My 1957 build: http://67-72chevytrucks.com/vboard/s...d.php?t=334552 http://www.trifive.com/forums/showthread.php?t=22037 Instagram - Chuckdriver57 |
|
|
|
|
10-25-2011, 09:51 PM
|
#25 |
|
Fun Stuff
 Join Date: Jan 2010
Location: Sedro Woolley, WA
Posts: 400
|
Re: Project "49 No Buck$"
Those ceiling and door panels are awesome!
__________________
Jay 68 C10(project) 88 Honda Accord(DD) 93 Chevy Astro EXT 2wd |
|
|
|
 |
| Bookmarks |
|
|


 Hybrid Mode
