
|
|
|
 05-09-2015, 06:56 PM
|
#1 |
|
Registered User
Join Date: Sep 2013
Location: Kent England
Posts: 1,025
|
Re: 64 C10 Stepside "Jaybird"
Nice tools mine is for insulated crimps . If you can get a tool for a good price I would by it you can never have to many tools . Even when the truck is finished I bet if you give it some time it won't be long before you are restoring or building something else .
__________________
FINALLY PUTTING IT BACK TOGETHER AT LONG LAST MY BUILD THREAD: http://67-72chevytrucks.com/vboard/s...d.php?t=611614 |

|

|
|
05-10-2015, 08:38 PM
|
#2 | |
|
Registered User
Join Date: Sep 2012
Location: Leander, TX
Posts: 969
|
Re: 64 C10 Stepside "Jaybird"
Quote:
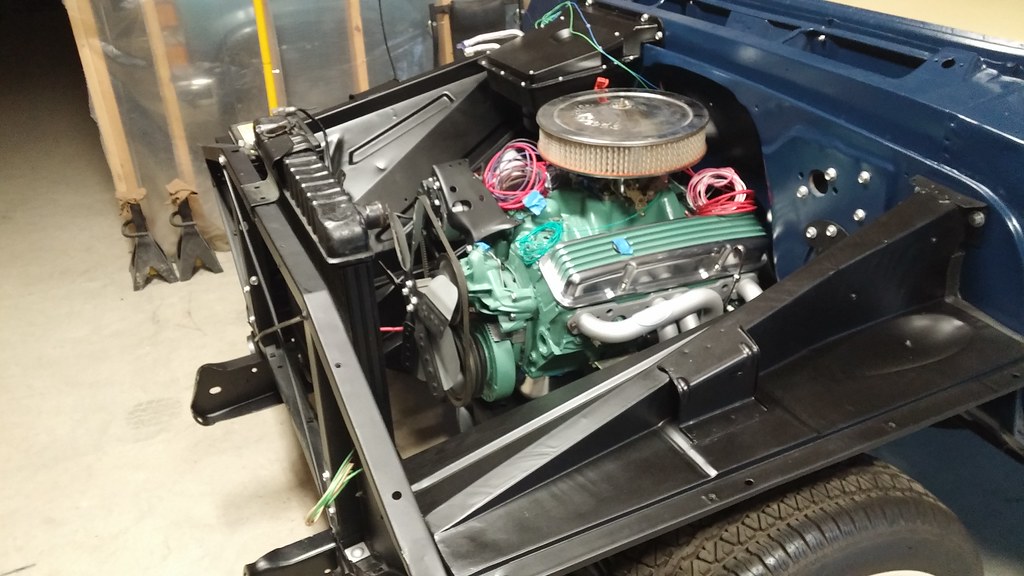
So today I covered the firewall with Peal n Seal. Then I installed the inner fenders. Next I installed the fuse box with the custom mounting plate in the kit that bolts to longer upper inner fender bolts they supply in the kit. Pretty trick. I had to file the holes on the plate just a tad to make it go on both bolts but it came out great. Next I put the core support and battery tray. The wife snapped some pretty cool shots of the boys helping and hanging out.  20150510_153643 by bjohnson388, on Flickr 20150510_153643 by bjohnson388, on Flickr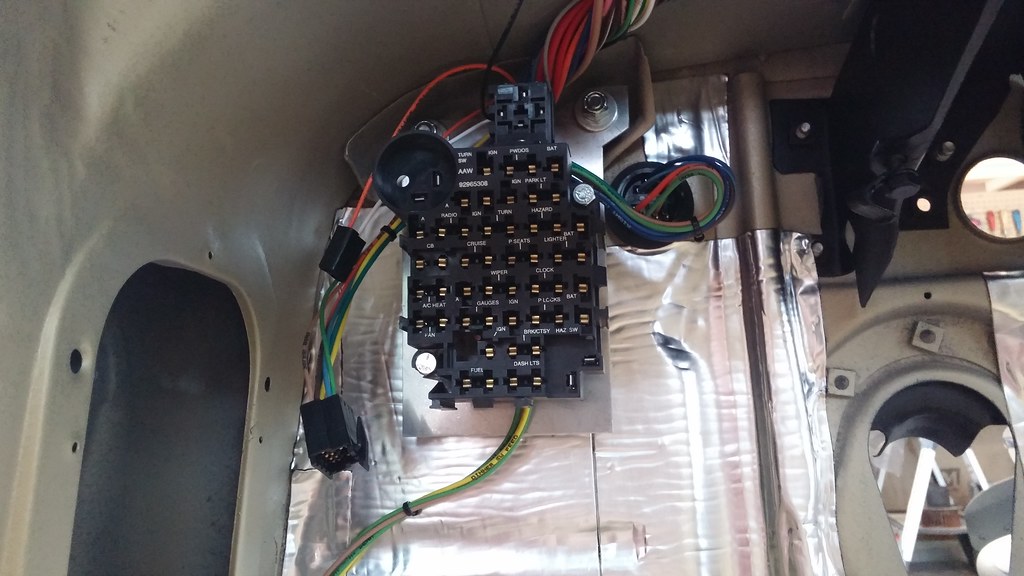 20150510_153709 by bjohnson388, on Flickr 20150510_153709 by bjohnson388, on FlickrThe kit came with these cool insulated clips that mount in the factory holes. 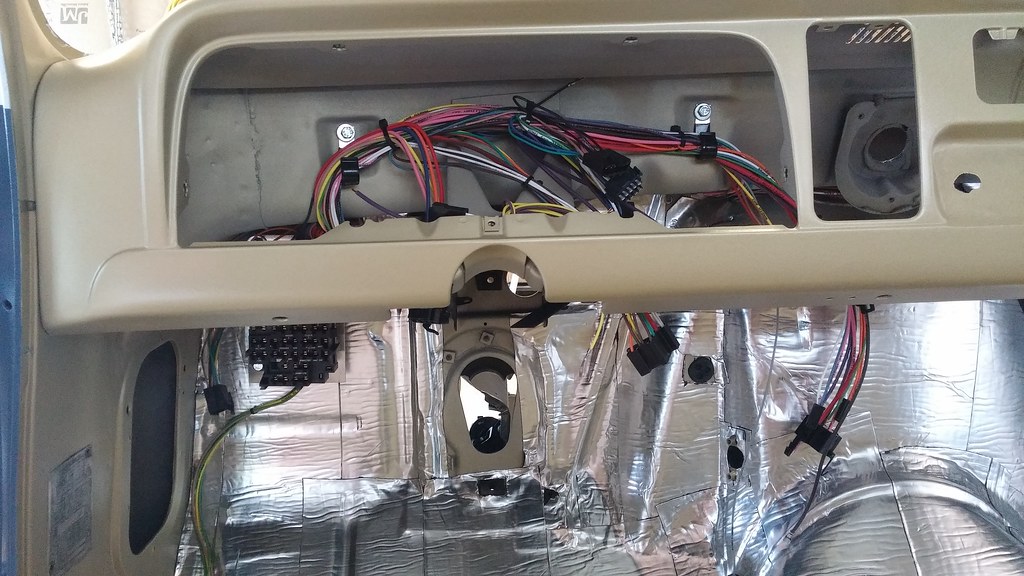 20150510_153700 by bjohnson388, on Flickr 20150510_153700 by bjohnson388, on Flickr 20150510_153726 by bjohnson388, on Flickr 20150510_153726 by bjohnson388, on Flickr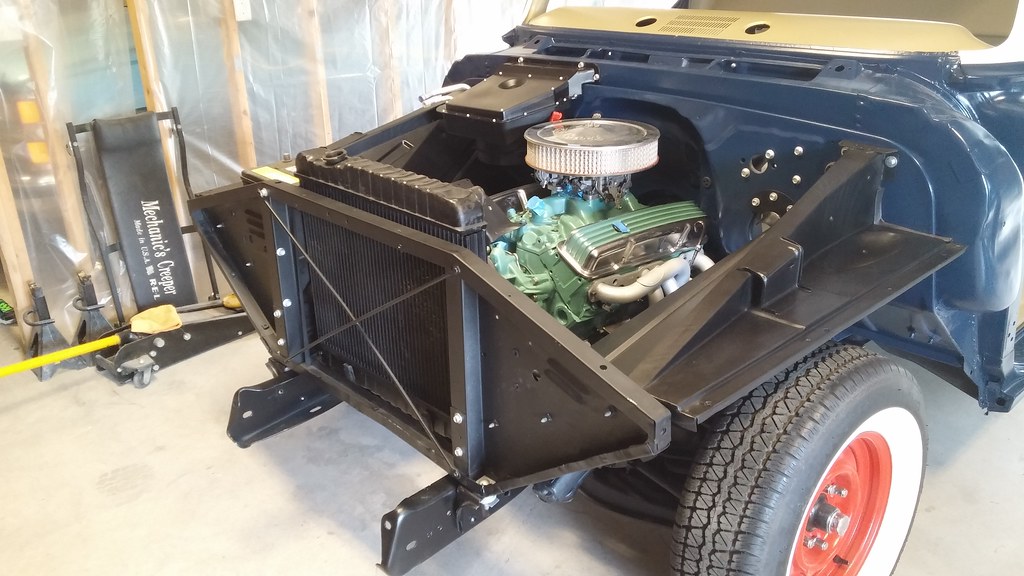 20150510_160228 by bjohnson388, on Flickr 20150510_160228 by bjohnson388, on Flickr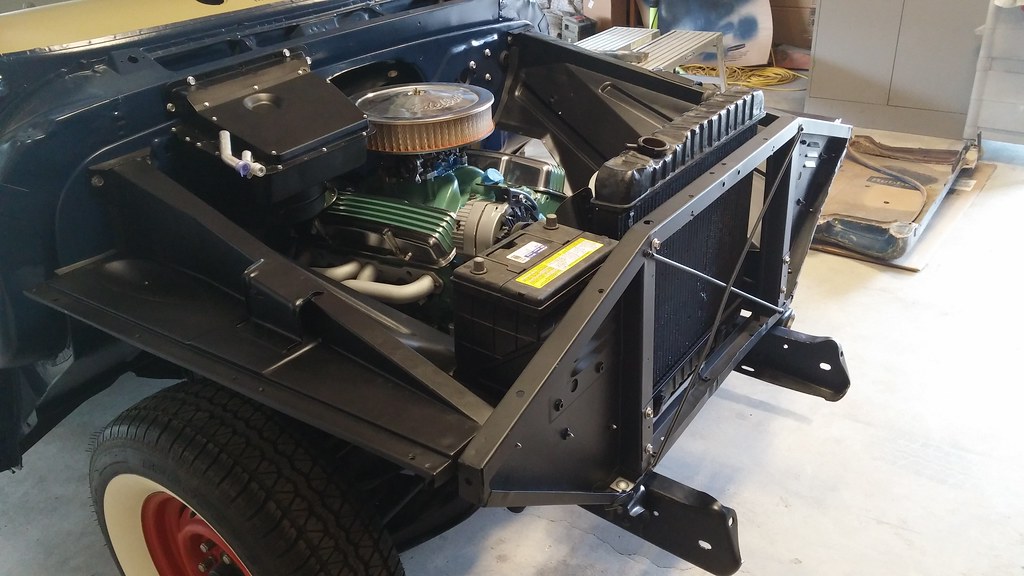 20150510_160239 by bjohnson388, on Flickr 20150510_160239 by bjohnson388, on FlickrCool shots the wife took 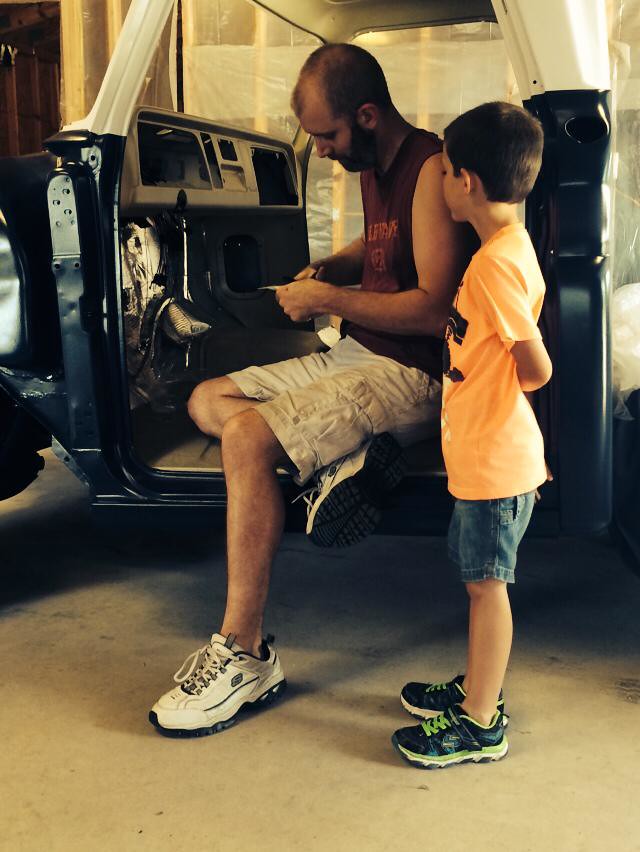 11206018_10204302412261306_5664682619701389829_n by bjohnson388, on Flickr 11206018_10204302412261306_5664682619701389829_n by bjohnson388, on FlickrYoungest helping put the core support bolt on. 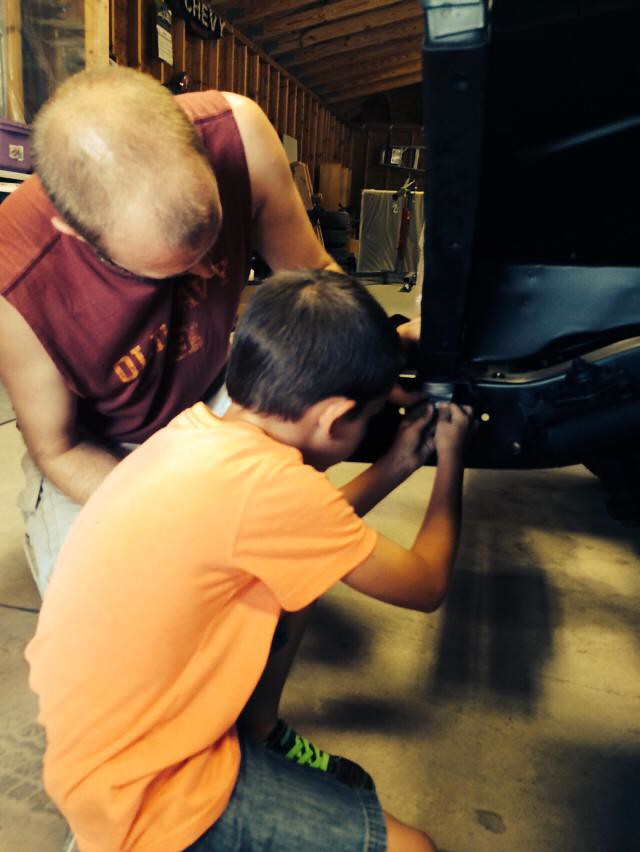 11151057_10204302412781319_4651411636733560669_n by bjohnson388, on Flickr 11151057_10204302412781319_4651411636733560669_n by bjohnson388, on Flickr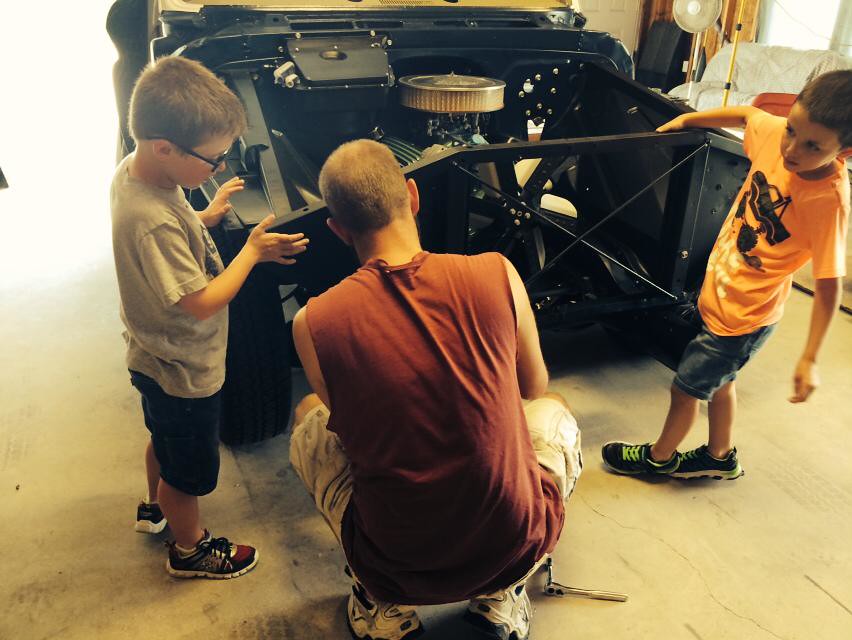 10982844_10204302412421310_4732517005278968044_n by bjohnson388, on Flickr 10982844_10204302412421310_4732517005278968044_n by bjohnson388, on FlickrThis shot is freaking awesome! 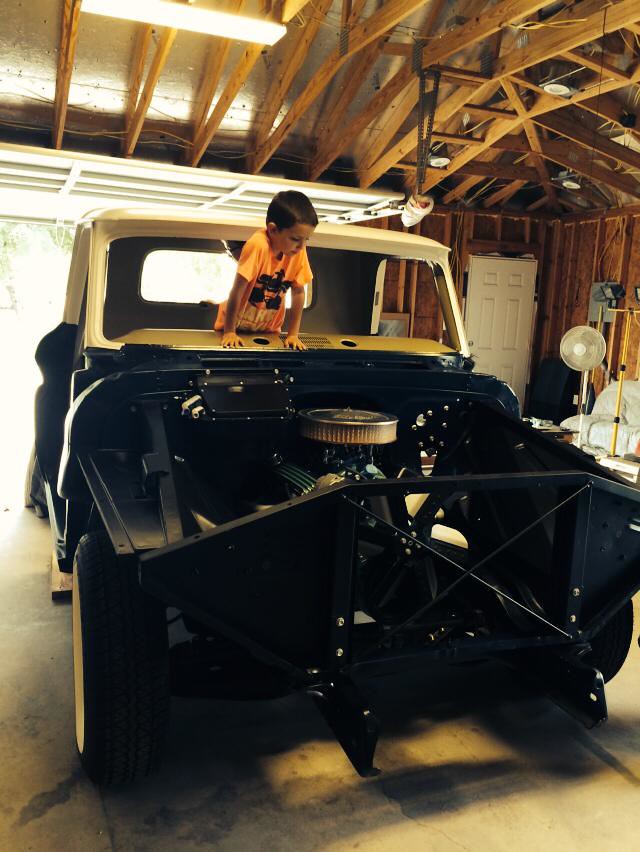 11263130_10204302413461336_1613154913897313992_n by bjohnson388, on Flickr 11263130_10204302413461336_1613154913897313992_n by bjohnson388, on Flickr
__________________
64' Build Thread http://67-72chevytrucks.com/vboard/s...d.php?t=586955 |
|
|
|
|
|
05-10-2015, 08:49 PM
|
#3 |
|
Registered User
Join Date: Mar 2001
Location: RADFORD, VA
Posts: 2,651
|
Re: 64 C10 Stepside "Jaybird"
That's KOOL to see the little guys lending a helping hand....
__________________
1964 BBC 402 4x4   |
|
|
|
|
05-10-2015, 09:31 PM
|
#4 |
|
Registered User
 Join Date: Feb 2014
Location: Forest City PA
Posts: 378
|
Re: 64 C10 Stepside "Jaybird"
Truck is looking great! Awesome that the little guys are helping out. My boy loves helping me in the garage. Great feeling for sure!
|
|
|
|
|
05-10-2015, 09:59 PM
|
#5 |
|
Registered User
Join Date: Dec 2011
Location: Donaldsonville, La.
Posts: 1,024
|
Re: 64 C10 Stepside "Jaybird"
Good job with both the truck and they boys. Always take the time to give them a little fun. Congrats
|
|
|
|
|
05-10-2015, 10:35 PM
|
#6 |
|
Post Whore
Join Date: Mar 2013
Location: Southern Oregon
Posts: 10,384
|
Re: 64 C10 Stepside "Jaybird"
Man BJ! That's awesome!

__________________
1966 Chevy C10 "Project Two Tone" http://67-72chevytrucks.com/vboard/s...d.php?t=596643 1964 GMC "Crustine" semi-build:http://67-72chevytrucks.com/vboard/s...d.php?t=665056 My youtube channel. Username "Military Chevy": https://www.youtube.com/channel/UC_h...fzpcUXyK_5-uiw |
|
|
|
|
05-10-2015, 11:11 PM
|
#7 |
|
Registered User
Join Date: Apr 2012
Location: Searcy, AR
Posts: 4,203
|
Re: 64 C10 Stepside "Jaybird"
That's Awesome, especially getting the young ones involved...
__________________
DON Proverbs 27:17 US Air Force Retarded errr Retired My '65 Stepper Build:http://67-72chevytrucks.com/vboard/s...d.php?t=533920 My '60 Rusty Patina Build:http://67-72chevytrucks.com/vboard/s...66#post7402266 My '72 http://67-72chevytrucks.com/vboard/s...59#post7204359 SOLD |
|
|
|
|
05-11-2015, 02:04 AM
|
#8 |
|
Registered User
Join Date: Sep 2013
Location: Kent England
Posts: 1,025
|
Re: 64 C10 Stepside "Jaybird"
Looking really good Bret . Getting the boys trained will pay off later . I learnt so much from my dad when I used to help him as a boy . As I'm sure you did
__________________
FINALLY PUTTING IT BACK TOGETHER AT LONG LAST MY BUILD THREAD: http://67-72chevytrucks.com/vboard/s...d.php?t=611614 |
|
|
|
|
05-11-2015, 08:14 AM
|
#9 |
|
Registered User
Join Date: Apr 2014
Location: Fate, Texas ( About 35 miles east of Dallas)
Posts: 318
|
Re: 64 C10 Stepside "Jaybird"
That is way cool your boys helping you. Wish I could have afforded it back then. Its a good way to get them interested in our Habit.......I mean in maintenance...!
|
|
|
|
|
05-11-2015, 10:08 AM
|
#10 |
|
Registered User
Join Date: Jan 2012
Location: Killeen, Tx
Posts: 1,360
|
Re: 64 C10 Stepside "Jaybird"
Looking good Bret! Mine would have gone a lot faster if I had all that help. It doesn't look that hard just hard to get to. Perfect time with nothing in the cab. I pieced mine together and I am down to the under dash harness and all are replaced. I guess I'll do it when I get the vintage air system. What crimper are you looking for? I might have it.
__________________
John Z 1962 Chevy C10 Stepside 62 Barnfind My build tread: http://67-72chevytrucks.com/vboard/s...d.php?t=507513 |
|
|
|
|
05-11-2015, 09:27 PM
|
#11 |
|
Registered User
Join Date: Sep 2013
Location: Strawberry Arkansas
Posts: 1,137
|
Re: 64 C10 Stepside "Jaybird"
Truck is looking good! And what memories you and the boys will share for a life time. Priceless
__________________
http://67-72chevytrucks.com/vboard/s...d.php?t=605217 |
|
|
|
|
05-12-2015, 10:00 AM
|
#12 |
|
I'm just glad to be here!
Join Date: Jan 2008
Location: Longview, TX
Posts: 4,788
|
Re: 64 C10 Stepside "Jaybird"
Bret
Here is a few links to a crimper that I use. I was in the wiring department at a previous company I worked at, while the tools AAW had to rent are the premium hand crimp tools, these can be used with very good results. I have a set and have done a few cars with them and they work well. For terminals with the crimp on the wire and one on the insulation, it requires you to do them separately, but does a good job. You have to decide which "slot" to use for the wire size you are doing, but that is no big deal. I have bought from Waytek before and they are a good company. There are other places to get them too. http://www.waytekwire.com/item/419/T...EL-CRIMP-TOOL/ http://terminalsupplyco.com/Store/Pr...?pc=OBT-1028CT http://crimpsupply.com/packard-delph...pack-tool.html
__________________
Karl 1965 Chevy Stepside(Grandpa's Old Blue) and (July 2015 Shop Build!)(2020, the Saga Continues) http://67-72chevytrucks.com/vboard/s...d.php?t=372424 The LST Challenge: http://67-72chevytrucks.com/vboard/s...=1#post7812257 Korbin's 1st Square: "Sunburn" http://67-72chevytrucks.com/vboard/s...d.php?t=418618 1985 GMC Sierra: "White Trash", Korbin's 2nd now... http://67-72chevytrucks.com/vboard/s...d.php?t=632305 Henry - 1984 Chevrolet, Owen's 1st Square |
|
|
|
|
05-12-2015, 05:55 PM
|
#13 | |||||||||||
|
Registered User
Join Date: Sep 2012
Location: Leander, TX
Posts: 969
|
Re: 64 C10 Stepside "Jaybird"
Quote:
Quote:
Quote:
Quote:
Quote:
Quote:
Quote:
Quote:
Quote:
Quote:
Quote:
John I am looking for the Delphi Packard F type terminal single and double crimpers. Aggie91 thanks for all the great links. Still researching and trying to figure out what to do. At this point I really want to buy my own.
__________________
64' Build Thread http://67-72chevytrucks.com/vboard/s...d.php?t=586955 |
|||||||||||
|
|
|
|
05-12-2015, 07:22 PM
|
#14 |
|
Registered User
Join Date: Sep 2012
Location: Leander, TX
Posts: 969
|
Re: 64 C10 Stepside "Jaybird"
Let the madness begin...
 20150512_145149 by bjohnson388, on Flickr 20150512_145149 by bjohnson388, on Flickr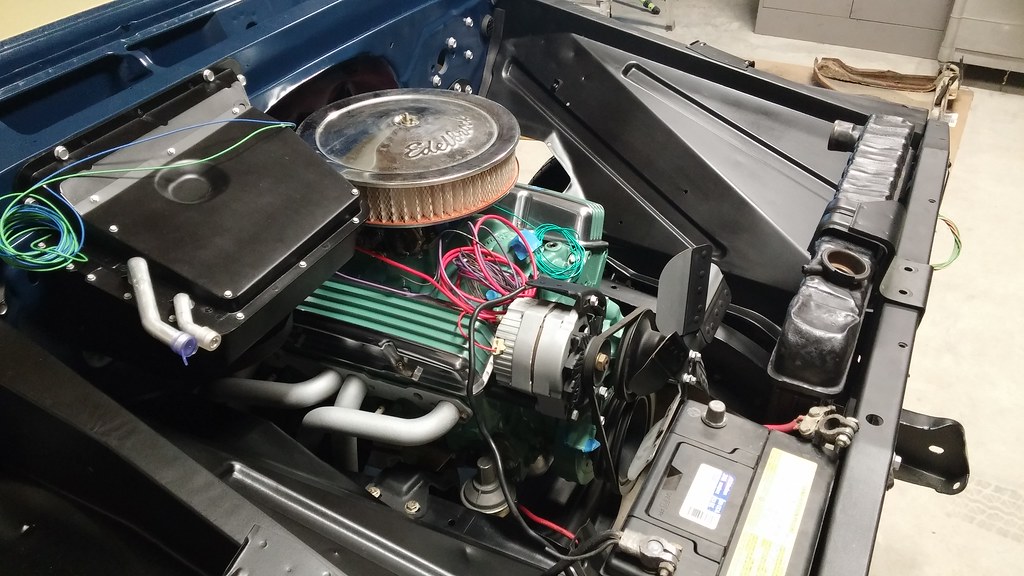 20150512_145049 by bjohnson388, on Flickr 20150512_145049 by bjohnson388, on Flickr 20150512_145043 by bjohnson388, on Flickr 20150512_145043 by bjohnson388, on Flickr
__________________
64' Build Thread http://67-72chevytrucks.com/vboard/s...d.php?t=586955 |
|
|
|
|
05-12-2015, 08:10 PM
|
#15 |
|
Registered User
Join Date: Feb 2014
Location: Pulaski, ny
Posts: 117
|
Re: 64 C10 Stepside "Jaybird"
That really, really looks good!! Have fun with the wiring. Just take your time and take brakes when you feel like it is never going to end. That way you won't get burnt out or make mistakes. By the way did I tell you that it is really look'in good.
Ryan. |
|
|
|
|
05-12-2015, 09:59 PM
|
#16 |
|
Post Whore
Join Date: Mar 2013
Location: Southern Oregon
Posts: 10,384
|
Re: 64 C10 Stepside "Jaybird"
Have fun with that wiring man. lol Be sure to let me know all the secret hiding spots you found for the wiring.

__________________
1966 Chevy C10 "Project Two Tone" http://67-72chevytrucks.com/vboard/s...d.php?t=596643 1964 GMC "Crustine" semi-build:http://67-72chevytrucks.com/vboard/s...d.php?t=665056 My youtube channel. Username "Military Chevy": https://www.youtube.com/channel/UC_h...fzpcUXyK_5-uiw |
|
|
|
|
05-13-2015, 09:58 AM
|
#17 |
|
Registered User
Join Date: Nov 2011
Location: fayetteville nc
Posts: 10,338
|
Re: 64 C10 Stepside "Jaybird"
Loving it and the madness!!!
__________________
1963 Short bed step side SBW 427 big block and borg warner T-16 HD 3 speed manual http://67-72chevytrucks.com/vboard/s...d.php?t=519869 1963 Short bed fleetside BBW 348 1st gen big block w/Powerglide http://67-72chevytrucks.com/vboard/s...d.php?t=619024 1964 Short bed trailer |
|
|
|
|
05-13-2015, 10:22 AM
|
#18 |
|
Registered User
Join Date: Apr 2012
Location: Searcy, AR
Posts: 4,203
|
Re: 64 C10 Stepside "Jaybird"
X2 on the previous comments...
 and the look...
__________________
DON Proverbs 27:17 US Air Force Retarded errr Retired My '65 Stepper Build:http://67-72chevytrucks.com/vboard/s...d.php?t=533920 My '60 Rusty Patina Build:http://67-72chevytrucks.com/vboard/s...66#post7402266 My '72 http://67-72chevytrucks.com/vboard/s...59#post7204359 SOLD |
|
|
|
|
05-13-2015, 08:45 PM
|
#19 |
|
Registered User
Join Date: Sep 2013
Location: Strawberry Arkansas
Posts: 1,137
|
Re: 64 C10 Stepside "Jaybird"
Sweet!!
__________________
http://67-72chevytrucks.com/vboard/s...d.php?t=605217 |
|
|
|
|
05-14-2015, 06:23 PM
|
#20 | |||||
|
Registered User
Join Date: Sep 2012
Location: Leander, TX
Posts: 969
|
Re: 64 C10 Stepside "Jaybird"
Quote:
Quote:
Quote:
Quote:
Quote:
Well I just ordered me some crimpers from Amazon. I did a ton of research on crimpers and open barrel 56 series Packard terminals!!! My brain is fried! I know for sure the crimpers I bought will do single crimping not sure about the double crimps I need to make. If they don't work I will just rent the double crimpers from AAW as I don't have that many double crimps to do. Also for anyone interested in cool electrical stuff download the hot rod catalog on the right of this page from AAW. They have a lot of cool stuff. They have the door jamb switches and they even have a courtesy light delay switch. How cool. http://www.americanautowire.com/download-catalog/ Also been reading these sites. http://www.rowand.net/Shop/Tech/Auto...Connectors.htm http://www.madelectrical.com/ http://www.alanhorvath.com/54chevy/mad_electrical.php http://stovebolt.com/techtips/electr...ade/index.html
__________________
64' Build Thread http://67-72chevytrucks.com/vboard/s...d.php?t=586955 Last edited by bj383ss; 05-14-2015 at 06:32 PM. |
|||||
|
|
|
|
05-14-2015, 08:03 PM
|
#21 |
|
Senior Enthusiast
Join Date: Feb 2007
Location: Spokane Valley, WA
Posts: 8,356
|
Re: 64 C10 Stepside "Jaybird"
I really like the idea of their "intelligent fuses" that glow when they blow out. I'm going to need a set of those eventually!
__________________
My Build Thread: http://67-72chevytrucks.com/vboard/s...d.php?t=444502 |
|
|
|
|
05-14-2015, 08:28 PM
|
#22 | |
|
Registered User
Join Date: Sep 2012
Location: Leander, TX
Posts: 969
|
Re: 64 C10 Stepside "Jaybird"
Quote:
__________________
64' Build Thread http://67-72chevytrucks.com/vboard/s...d.php?t=586955 |
|
|
|
|
|
05-15-2015, 10:14 AM
|
#23 |
|
I'm just glad to be here!
Join Date: Jan 2008
Location: Longview, TX
Posts: 4,788
|
Re: 64 C10 Stepside "Jaybird"
When you say double crimps, do you mean that the wire strands are crimped to the terminal and then there is a crimp of the terminal around the insulation?
If so, the single crimp tools can do that. Just crimp the wire strands first then do the crimp on the insulation. The economy tool that I linked earlier is what I used and does the job well. I have not had an issue with any wires that I have done that way with that tool. Thanks for those links, I think the rowand one will be helpful down the road...
__________________
Karl 1965 Chevy Stepside(Grandpa's Old Blue) and (July 2015 Shop Build!)(2020, the Saga Continues) http://67-72chevytrucks.com/vboard/s...d.php?t=372424 The LST Challenge: http://67-72chevytrucks.com/vboard/s...=1#post7812257 Korbin's 1st Square: "Sunburn" http://67-72chevytrucks.com/vboard/s...d.php?t=418618 1985 GMC Sierra: "White Trash", Korbin's 2nd now... http://67-72chevytrucks.com/vboard/s...d.php?t=632305 Henry - 1984 Chevrolet, Owen's 1st Square |
|
|
|
|
05-15-2015, 05:43 PM
|
#24 | |
|
Registered User
Join Date: Sep 2012
Location: Leander, TX
Posts: 969
|
Re: 64 C10 Stepside "Jaybird"
Quote:
__________________
64' Build Thread http://67-72chevytrucks.com/vboard/s...d.php?t=586955 |
|
|
|
|
|
05-18-2015, 08:30 AM
|
#25 |
|
Registered User
Join Date: Sep 2012
Location: Leander, TX
Posts: 969
|
Re: 64 C10 Stepside "Jaybird"
Update...
Spent all day Sunday wiring. Even though my pictures don't really show the work. I was very picky about where the wires ran and being organized. So on the engine harness I started with the 3 wires running to the starter. Two reds and a purple. One of the reds was a heavy 8 gauge that runs to the Alternator. The other red and purple went inside to the starter switch. I routed them all together and close to the block to keep them away from the header and put 3/4" convoluted tubing around them. I would have run 1/2" but it wouldn't contain the 2 big fusible links on the red wires. 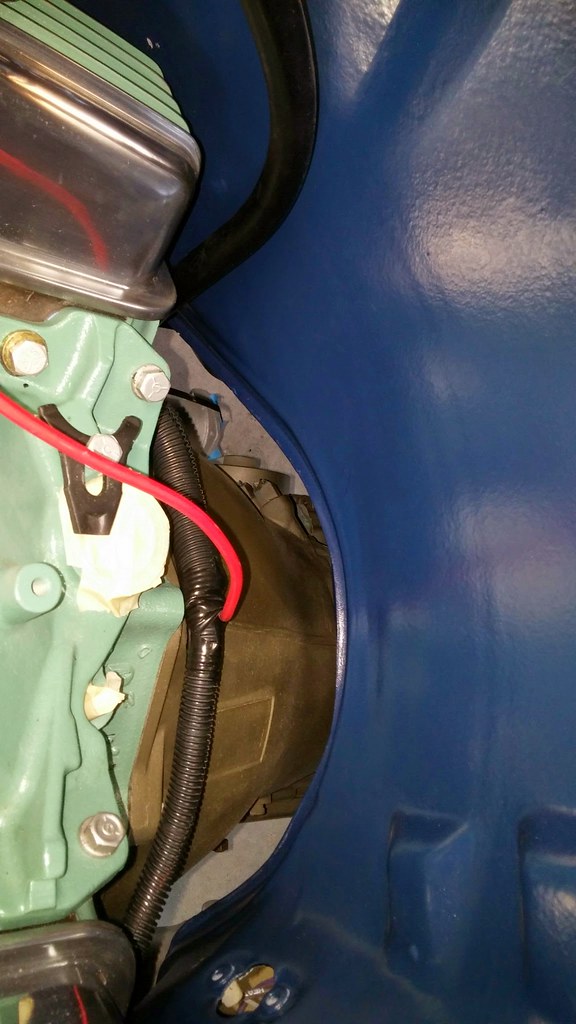 20150517_153325 by bjohnson388, on Flickr 20150517_153325 by bjohnson388, on FlickrSo I came across the back of the engine and the big 8 gauge wire came out to run up to the Alternator. I ran the other two to this top firewall grommet as I all I had planned for here is the oil pressure line and it is very close to the plug on the dash harness. I ran 1/2' convoluted tubing for these 2 wires down to the 3/4" and taped together. 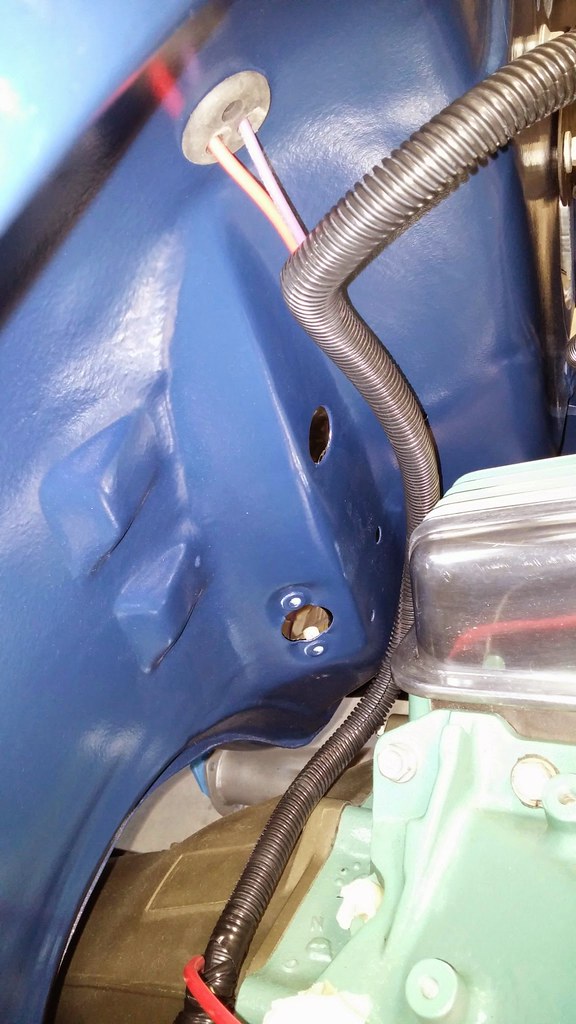 20150517_153343 by bjohnson388, on Flickr 20150517_153343 by bjohnson388, on FlickrHere are those 2 wires. My first and second crimps. Not too bad. The Crimper was adjusted a little tight so I loosened it one notch. 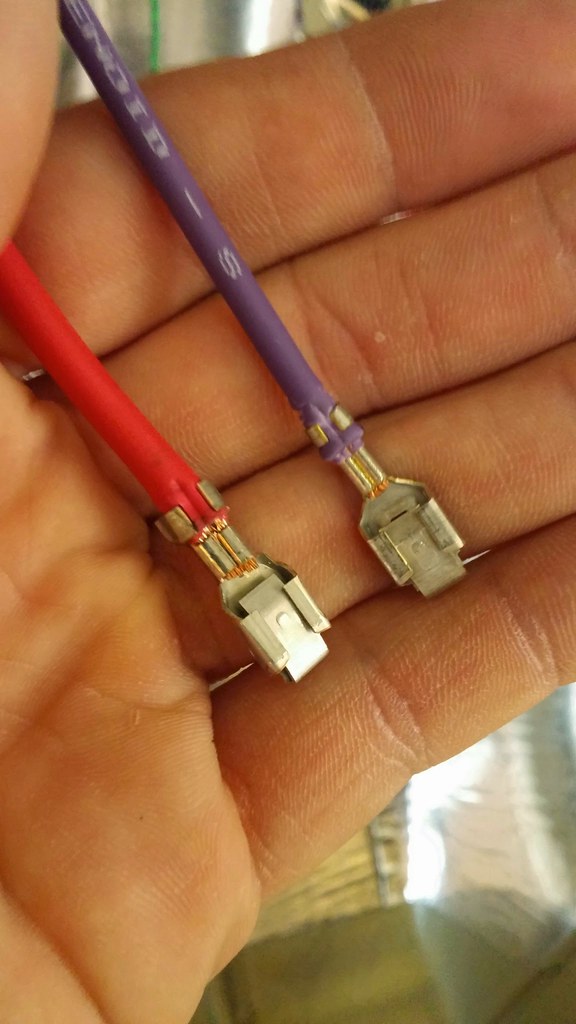 20150517_161447 by bjohnson388, on Flickr 20150517_161447 by bjohnson388, on FlickrHere is the big red 8 gauge wire along with the brown wire from engine harness running to alternator. I used some 1/2" rubber insulated clamps bolted to the valve covers to hold in place. I also ran the hot wire for the electric choke in this tubing which is 3/8" back up to the firewall. I will crimp a male terminal on it and insert it into the engine harness. I removed 2 wires from the engine harness plug I didn't need. The Oil sending unit(since I have gauges) and the other was for alternate temp w/cold light. 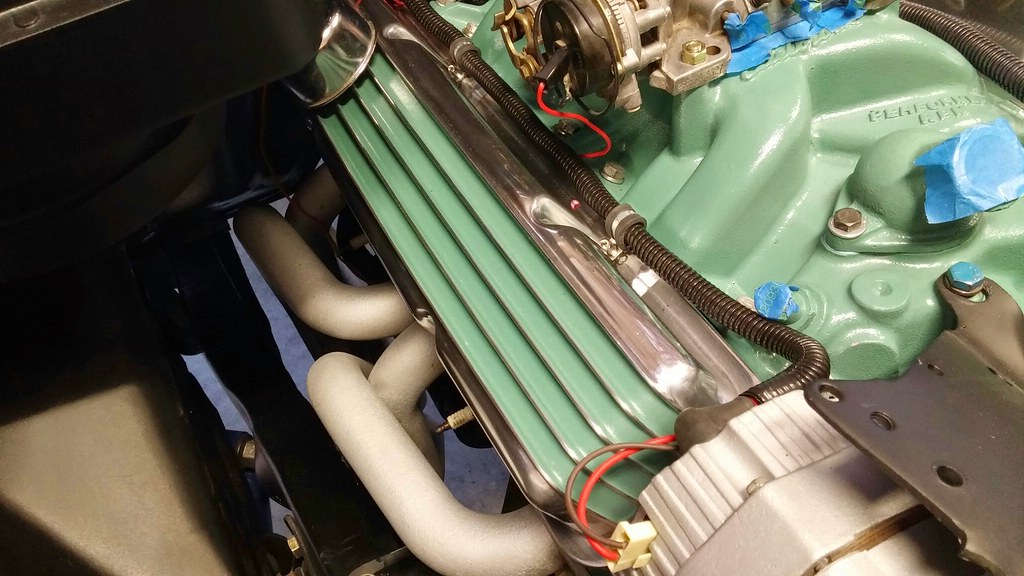 20150517_182226 by bjohnson388, on Flickr 20150517_182226 by bjohnson388, on FlickrSo in this pic you can see the engine harness coming down from the left and the pink and white wires are for the ignition and I ran the green temp wire behind the driver valve cover and down the side. Going to attach it with rubber clamps as well to the valve cover. 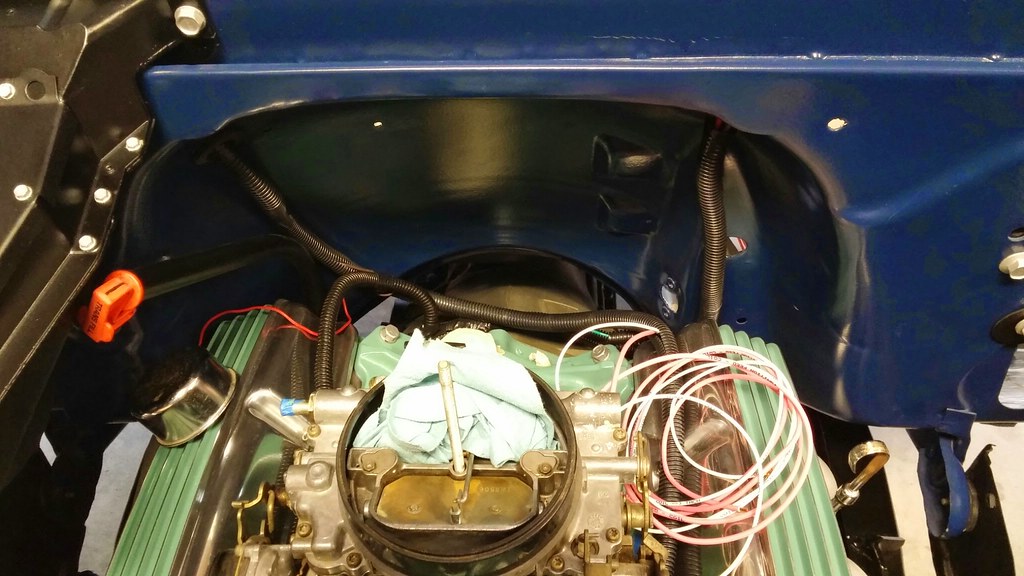 20150517_182207 by bjohnson388, on Flickr 20150517_182207 by bjohnson388, on FlickrIn this pic you can see the green wire on the driver side. I didn't cut any of the tubing yet it looks like a mess. 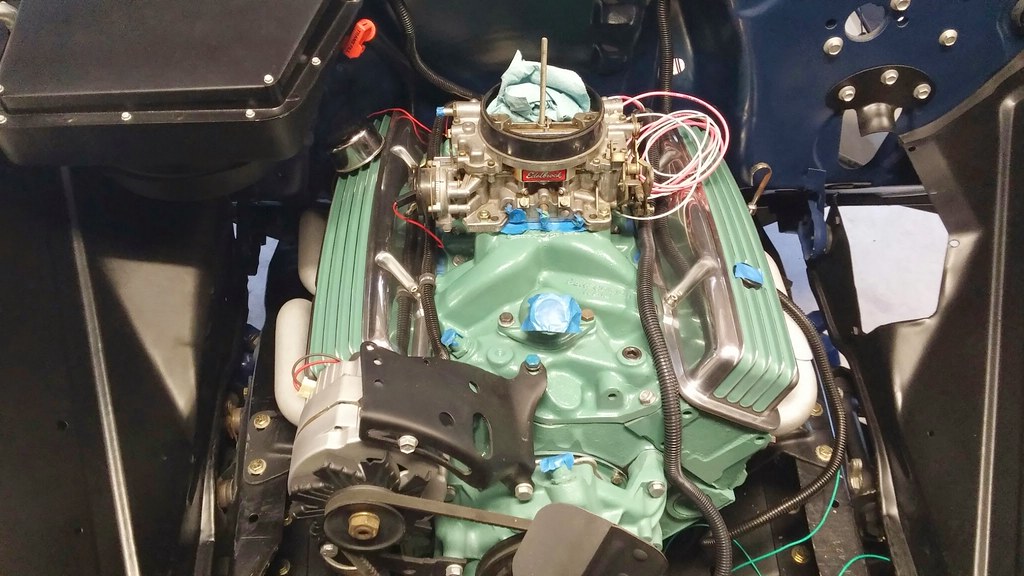 20150517_182156 by bjohnson388, on Flickr 20150517_182156 by bjohnson388, on FlickrI pulled the MSD box, Distributor, coil, and wires from my Caprice to run in the 64'. I painted the cap black to look more like stock. I need to paint the coil black as well and clean up the wires. I originally was going to mount the box under the dash, but have since decided to either mount it under the battery tray or on the other side of the core support behind the battery. Will have to mock that up and see what fits best. The reason I choose to not mount it inside was because I would have to run 4 wires through firewall and I don't want to drill any holes. One last thing. Here are the crimpers I bought. They work really well except for that 8 gauge wire was to big for them so I had to crimp it best I could and them some solder to make sure it was solid. 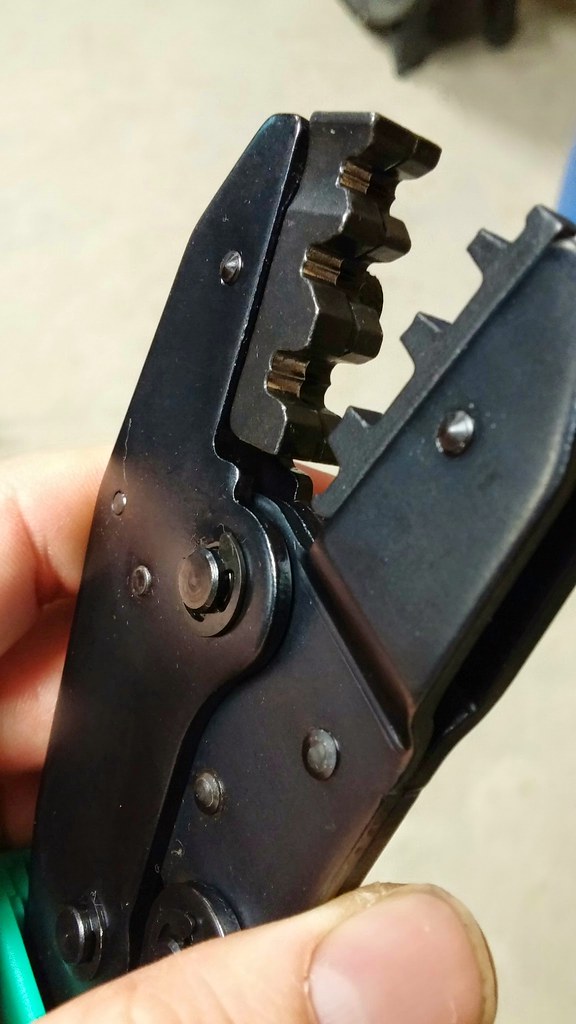 20150517_113055 by bjohnson388, on Flickr 20150517_113055 by bjohnson388, on Flickr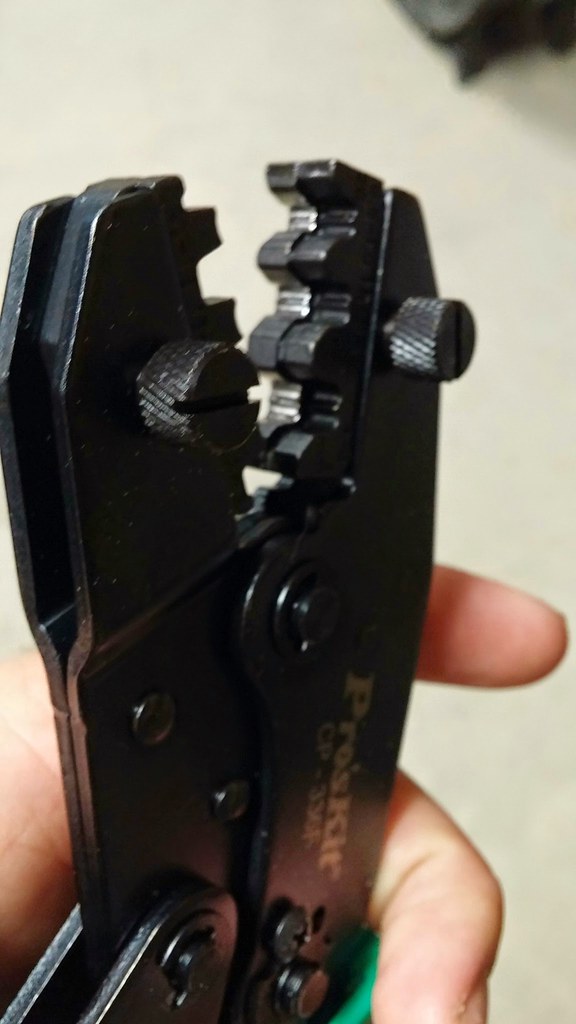 20150517_113042 by bjohnson388, on Flickr 20150517_113042 by bjohnson388, on Flickr
__________________
64' Build Thread http://67-72chevytrucks.com/vboard/s...d.php?t=586955 |
|
|
|
 |
| Bookmarks |
|
|


 Hybrid Mode
