
|
 03-03-2012, 03:25 AM
|
#401 |
|
Registered User
Join Date: Jul 2011
Location: Des Moines, Iowa
Posts: 3,016
|
Re: Project "My Happy Mess"
Thanks hg
 Nice fab work on your latest repair! Nice fab work on your latest repair!-- Here are some pics of the window channel. Not very exciting, just showing what I'm working with and how much rust is present. It could be worse We think our window guy, a friend of The Fixer's, will be able to work with it OK.Worst parts are the top corners. In between, along the top/bottom, are very clean! Drip rails are very clean also. Before shots - 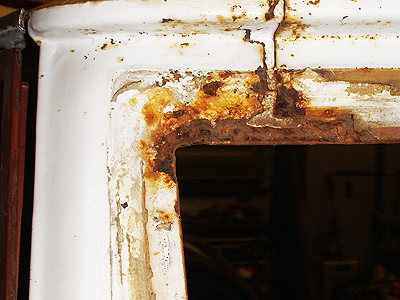  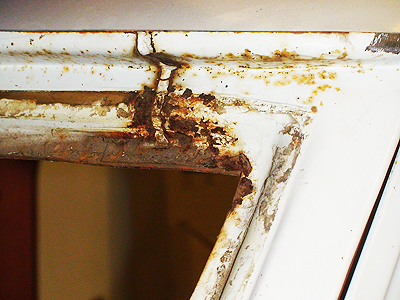     My ghetto masking job  - - And after wire wheeling -       Planning on working a lot more this weekend. Thanks for looking!
__________________
project: "my happy mess" Last edited by litew8; 03-03-2012 at 03:54 AM. |

|

|
|
03-05-2012, 04:10 PM
|
#402 |
|
Registered User
Join Date: Jul 2011
Location: Des Moines, Iowa
Posts: 3,016
|
Removing old paint
Got a lot of paint removed over the weekend. The goal is to remove the paint
in corners so the rest can be hit with the DA later. We'll remove the remaining paint and sand out scratches left by the wire wheel, all in one pass. I've done more (today) since these shots were taken.           Who knows what this is?  Tools used (also a 4" wire wheel) -     
__________________
project: "my happy mess" |
|
|
|
|
03-06-2012, 05:55 AM
|
#403 | |
|
Registered User
Join Date: Dec 2011
Location: Germanton, NC
Posts: 61
|
Re: Removing old paint
Quote:
http://www.mytractorforum.com/showthread.php?t=145850
__________________
Link to my 69 Camaro 6.0/T56 swap: http://ls1tech.com/forums/conversion...69-camaro.html |
|
|
|
|
|
03-06-2012, 10:31 AM
|
#404 | |
|
Registered User
Join Date: Jul 2011
Location: Des Moines, Iowa
Posts: 3,016
|
Re: Removing old paint
Quote:
 Not so mini Not so mini Though none (pgs 2 & 3) in that link are as complete. It's The Fixer's. It will be getting cleaned up too. Maybe throw it in the back of my 71'. 
__________________
project: "my happy mess" |
|
|
|
|
|
03-06-2012, 04:22 PM
|
#405 |
|
Registered User
Join Date: Jul 2011
Location: Des Moines, Iowa
Posts: 3,016
|
Door work
Well, it's nearly 70 degrees here today!
I keep on changing the schedule.Thought we'd hit the kick panels and door jams first, but the way things have been going, I think we'll just wait and hit it all at once instead. The weather looks to be getting better and better each week. Today, spent a few hoursworking on the driver's door. Again, just cleaning up the corners, curves and groves, later we'll hit the flat areas with the DA. I can almost smell the paint! or is that the dust from grinding Not bad, none of the rust has busted through entirely and should clean up nice. The Fixer said we'll hit the rusty areas with a spot blaster later. Before -       After -  
__________________
project: "my happy mess" |
|
|
|
|
03-06-2012, 04:27 PM
|
#406 |
|
VA72C10
 Join Date: Mar 2008
Location: Midlothian, VA
Posts: 25,269
|
Re: Project "My Happy Mess"
Looking good. Know how much a pain that wire wheeling is though.....I've done that a lot and will do a lot more in the future

__________________
Looking for a 67-72 swb or blazer project in or around VA. 
|
|
|
|
|
03-07-2012, 12:21 AM
|
#407 |
|
Senior Member
 Join Date: Mar 2011
Location: West Plains, Missouri
Posts: 7,555
|
Re: Project "My Happy Mess"
Looks like it cleaned up pretty good, a little blasting and you'll be ready for some epoxy primer....Jim
__________________
my build thread: http://67-72chevytrucks.com/vboard/s...d.php?t=459839 Jimbo's long bed step build:http://67-72chevytrucks.com/vboard/s...t=464626<br /> |
|
|
|
|
03-07-2012, 02:05 AM
|
#408 | |
|
Registered User
Join Date: Jul 2011
Location: Des Moines, Iowa
Posts: 3,016
|
Re: Project "My Happy Mess"
Thanks Johnathan. I feel your pain
I fill up on coffee, pull the trigger and don't look at the watch until I get a my goal for the day accomplished. One door down, another to go. Wish the wheels were of better quality, I've been through too many as it is. They're relatively cheap from HF. I find the 4" wheel to be the most productive, even if after they break-in I have to change direction of the spin often. The smaller ones are good to use to go back in after to hit the smaller areas.Quote:
__________________
project: "my happy mess" Last edited by litew8; 03-07-2012 at 02:23 AM. |
|
|
|
|
|
03-07-2012, 02:13 AM
|
#409 | |
|
Registered User
Join Date: Jul 2011
Location: Des Moines, Iowa
Posts: 3,016
|
Re: Project "My Happy Mess"
Thanks Jim. Not sure what epoxy primer is (why I've got The Fixer on board), but if it bites metal (etching primer?) good I think that's what he'll be using. Good quality stuff.
And just in case anyone is wondering - the Ford Victoria in the background, in the above shots, was not painted by The Fixer. He's just putting the engine together and running new wires.Quote:
__________________
project: "my happy mess" Last edited by litew8; 03-07-2012 at 02:40 AM. |
|
|
|
|
|
03-07-2012, 02:17 AM
|
#410 |
|
Registered User
Join Date: Jul 2011
Location: Des Moines, Iowa
Posts: 3,016
|
Re: Project "My Happy Mess"
Considering getting the inner bed sides, end panel, tailgate and wells line-x'd. Maybe color matched Med. Bronze if it can be done, or black. Any opinions? I read it might be a good idea to assemble first so that it's sprayed above the wood (to allow the wood to expand/contract normally).
Just learning about bed-liner. The local shop says this: "Line-X of Des Moines is the highest volume Line-X Spray-On Bedliner franchise in the United States. The Line-X of Des Moines franchise was established in September 2000 in Johnston, IA. Since then, we have sprayed over 16,000 bedliners in central Iowa. This volume results in the most experienced and best trained staff in the Midwest." http://americantoppers.com/ .
__________________
project: "my happy mess" Last edited by litew8; 03-07-2012 at 02:33 AM. |
|
|
|
|
03-07-2012, 02:48 AM
|
#411 | |
|
VA72C10
Join Date: Mar 2008
Location: Midlothian, VA
Posts: 25,269
|
Re: Project "My Happy Mess"
Quote:
__________________
Looking for a 67-72 swb or blazer project in or around VA.
|
|
|
|
|
|
03-07-2012, 03:07 AM
|
#412 |
|
Registered User
Join Date: Jul 2011
Location: Des Moines, Iowa
Posts: 3,016
|
Re: Project "My Happy Mess"
4" wheel in a drill only. Funny we were talking about the cup type today. The Fixer recommended, but I don't like the action of it compared to a wheel, particularly when it gets caught up and jumps around. When I hit the frame a while back, I used a grinder with twisted wheel; aggressive, but when it got caught up - a little nerving
 The 4" wheel, when new, takes the paint off super easy. The wost is when the wheel is worn and I have to work to remove two layers (white/med. bronze) of paint The 4" wheel, when new, takes the paint off super easy. The wost is when the wheel is worn and I have to work to remove two layers (white/med. bronze) of paint Did the factory even use primer? I'm surprised how well the paint has protected the metal over the years. This will prob. sound funny, but it didn't look like there was any seam sealer in the drip rail (along the front), it looked essentially bare. There was some very faint (like paint) black, but nothing thick. I was surprised it hadn't rusted away considering the truck has sat out in the winter uncovered since 2000, and who knows how long before that (prob. parked in a barn). There was some sealer above the doors some and down towards the side of the doors, thick/white and very brittle. Most was removed prior to wheeling with a screwdriver. I should prob. check out the grinder though, but it might not have the same flexibility the wheels have for pressing into curves/corners. Then again I'm not sure. Love this real AMERICAN STEEL. NO FILLER and doesn't take to rust easy.
__________________
project: "my happy mess" Last edited by litew8; 03-07-2012 at 03:21 AM. |
|
|
|
|
03-07-2012, 03:25 AM
|
#413 |
|
VA72C10
Join Date: Mar 2008
Location: Midlothian, VA
Posts: 25,269
|
Re: Project "My Happy Mess"
I agree a drill with a 4" wheel is good and a better choice for spots like the door jambs....the grinder is just much faster over larger areas...
__________________
Looking for a 67-72 swb or blazer project in or around VA.
|
|
|
|
|
03-07-2012, 10:28 AM
|
#414 |
|
Registered User
Join Date: Jul 2011
Location: Des Moines, Iowa
Posts: 3,016
|
Re: Project "My Happy Mess"
For larger areas (mostly flat) we'll use the DA. It will not create the scratches the wire wheels or grinder would cause. We want the metal to be relatively scratch free for primer. The DA will remove the paint super quick/easy. This will help lessen the amount of work.
DA Sander 
__________________
project: "my happy mess" Last edited by litew8; 03-07-2012 at 10:39 AM. |
|
|
|
|
03-07-2012, 10:56 AM
|
#415 |
|
GEARHEAD
Join Date: Aug 2003
Location: MN
Posts: 6,122
|
Re: Project "My Happy Mess"
I will use the wirewheel in an angle grinder, but get tired of being pelted with bits of wire and pulling them out of my clothes. It works, but I only use it occasionally. I prefer to use the 3m stripper wheels on a drill. They work good, last quite a while, and are flexible to get into some tighter areas. Then I will spot sandblast as needed to finish it up, like in the corners of the tailgate letters and in the door jambs.
__________________
If no one knows what you're doing, they can't tell you you're doing it wrong HG's Dream Car Build - Shelby Cobra Kit Build your own adjustable track bar 71  Long Fleet C/10 Long Fleet C/10 72  Jimmy 4x4 (Junkyard Jimmy) Jimmy 4x4 (Junkyard Jimmy)HG's Plow Truck '78  K35 Dually K35 DuallyBigass Farm Truck HG's thread of miscellaneous stuff |
|
|
|
|
03-07-2012, 11:04 AM
|
#416 |
|
Registered User
Join Date: Jul 2011
Location: Des Moines, Iowa
Posts: 3,016
|
Re: Project "My Happy Mess"
The Fixer mentioned how wires from the wheel can come off and stick you. I'm pretty sure he was referring to the wire wheels for the angle grinder. He said it can be kind of dangerous, but that they're cheap wheels that mainly do that (read china). Like the looks of that 3M product hg. I'm running to HF now and will check that out. Thanks. We have access to air tools, so the DA is what we'll use for the majority.
__________________
project: "my happy mess" |
|
|
|
|
03-07-2012, 04:13 PM
|
#417 |
|
Registered User
Join Date: Jul 2011
Location: Des Moines, Iowa
Posts: 3,016
|
Re: Project "My Happy Mess"
Bought one of those stripper wheels. Worked really well and I wore it down after getting a lot cleaned up. Like how it keeps the metal relatively scratch free. Going at a nice slow click, it removed the paint easily. Not so good for small corners etc... but I'll go back and hit them with the wire wheel later.
Took the pass. door off and cleaned it up to about the same as the driver's door yesterday. Tomorrow I'll finished them both up. Couple things from The Fixer. I was mistaken a little about how the DA sander will perform. Might take a little bit to remove all the paint, but then again he said we'll leave the paint on so long as it's decent. We'll just scuff it good and primer over it. No need to remove the paint entirely, and it'll still be similar to taking it down to bare metal. He's going to spray self etching primer on for the first coat, then epoxy primer on top of that. Words of wisdom from The Fixer: "Never start a project you can't finish."
__________________
project: "my happy mess" |
|
|
|
|
03-07-2012, 05:53 PM
|
#418 |
|
GEARHEAD
Join Date: Aug 2003
Location: MN
Posts: 6,122
|
Re: Project "My Happy Mess"
From my experience, and I'll admit it's limited, you either use etching primer or epoxy. Never both. And epoxy primer is best on bare metal, then just use high build primer and whatever filler over the top of it. Might use etch primer to cover spots where you sand through the epoxy. On my cab I had it sandblasted and primered locally. I sprayed epoxy over the top of it (much was bare metal), and had some areas where it would crack and pull off taking the original primer with it.
If the fixer has done this before and knows what he's doing, then just ignore me. When it comes to body work it seems everybody has their own methods and way of doing things. This is just what I have been told. One more thing, in my experience sanding epoxy primer sucks. It packs the paper up fast. I gave up after a while and just used it to seal up and bond to the bare metal. Sanding came after the other primers.
__________________
If no one knows what you're doing, they can't tell you you're doing it wrong HG's Dream Car Build - Shelby Cobra Kit Build your own adjustable track bar 71 Long Fleet C/10 72 Jimmy 4x4 (Junkyard Jimmy)HG's Plow Truck '78 K35 DuallyBigass Farm Truck HG's thread of miscellaneous stuff |
|
|
|
|
03-08-2012, 02:06 AM
|
#419 | |
|
Registered User
Join Date: Jul 2011
Location: Des Moines, Iowa
Posts: 3,016
|
Re: Project "My Happy Mess"
Quote:
Even a simple Google search will provide better information, without much effort. I'll reiterate what The Fixer has said in reply to your comments: You are "wrong, wrong, wrong". And it seems like you have things backwards, for whatever reason. I don't know what the circumstances were when you had the bad experience with the blasting of your cab and the flaking, but I'd guess it was poor prep work to the metal. ------------------------------------ The corrections to your comments: - Etching primer IS for bare metal. - You CAN, and DO, use BOTH etching primer with epoxy primer on top. Here's some info for all to read. In any complete restoration or body repair project, you will to sand primer at one point or another. However, most manufacturers of self-etching primer, due to the acid base of the products, don’t recommend directly sanding the self-etching primer. These manufacturers recommend performing the heavy body work, applying the self-etching primer, allowing that to dry and applying a coat or two of a quality urethane or epoxy primer, and sanding that. It should be noted that self-etching primer is mainly an acid base with pigments added, so you should be wearing a respirator when applying it. Etching primer is a type of primer paint that has a high acid content that allows it to form a superior bond to bare metal. Especially bare metal that has been exposed to the elements for more than a day or so. An even, heavy coat of etching primer will form an excellent base coat that will allow one to either paint over with a regular primer right away, or wait a couple of days before adding any additional coats of primer. Epoxy primer is also a very high quality primer that works very well as a base primer coat for future coats of primer. Self etching primer and epoxy primer have different uses when you’re preparing a vehicle for painting. Both can be important to the process, but each has a different role. It’s important to know what self etching primer can do to help you and when to use epoxy primer. Being knowledgeable will help the final painting of your vehicle as well as the finish and it's durability. Self Etching Primer After you remove the rust scales from the metal on your car, you need to apply self etching primer. It’s a mix of phosphoric acid and zinc. The way it works is that the acid forces the zinc into the top of the metal. It’s purely a surface coating, and it doesn’t stop the rust. It does, however, prevent the rust problem from worsening. You need to make sure that you apply self etching primer to bare metal that’s been thoroughly cleaned in order for it to be fully effective. That means cleaning off everything, even fingerprints, which can leave a little grease. Using Self Etching Primer You’ll notice that the self etching primer is usually a grey color. This simply lets you see where you’ve applied it. You should only use a single coat of it as it is meant as a cover for rust more than anything else. Unlike other primers, you can’t use self etching primer then keep the car outside until you’re ready to paint it. You need something else to seal it such as filler (and more primer) or high build primer, which serves a similar function to filler. You can buy self etching primer as a spray or in two parts to mix together and apply to the car. Applying Epoxy Primer Start by just applying a thin coat to the area you want to cover and then leave it. It doesn’t have to be completely dry before you put on the next coat, merely sticky to the touch. Keep doing this, building up thin layer over thin layer until you’ve reach the thickness you need to fill the dent or crack. At this point, you’ll leave it to dry completely. Only after that can you sand it down. Once sanded and cleaned of all the dust, you’ll be ready to paint the vehicle. Self etching primer and epoxy primer work together, rather than against each other. They both help you prepare the car for painting. sources: http://www.autos.com/auto-repair/can...etching-primer http://www.autos.com/auto-repair/do-...etching-primer http://www.autos.com/auto-repair/sel...-epoxy-primers Also, the reason why we're sanding and trying to keep the scratches at a minimum - is for lessening the prep work later on. The etching primer will do ok on evenly painted surfaces also, which is why we're not going to bring the whole thing down to bare metal. It's minimizing the scratches we're mostly concentrating on. Sorry all if the above reads crass, I don't like misinformation.
__________________
project: "my happy mess" Last edited by litew8; 03-08-2012 at 02:29 AM. |
|
|
|
|
|
03-08-2012, 02:50 AM
|
#420 |
|
Registered User
Join Date: Jul 2011
Location: Des Moines, Iowa
Posts: 3,016
|
Re: Project "My Happy Mess"
edit: The etching primer will do ok on evenly painted, scuffed surfaces also
Over paint if you're certain the metal is clean beneath and the paint is good (adhered well). It too needs prepped (cleaned) thoroughly.
__________________
project: "my happy mess" Last edited by litew8; 03-08-2012 at 02:56 AM. |
|
|
|
|
03-08-2012, 09:52 AM
|
#421 | |
|
GEARHEAD
Join Date: Aug 2003
Location: MN
Posts: 6,122
|
Re: Project "My Happy Mess"
Quote:
__________________
If no one knows what you're doing, they can't tell you you're doing it wrong HG's Dream Car Build - Shelby Cobra Kit Build your own adjustable track bar 71 Long Fleet C/10 72 Jimmy 4x4 (Junkyard Jimmy)HG's Plow Truck '78 K35 DuallyBigass Farm Truck HG's thread of miscellaneous stuff |
|
|
|
|
|
03-08-2012, 08:47 PM
|
#422 |
|
Senior Member
Join Date: Mar 2011
Location: West Plains, Missouri
Posts: 7,555
|
Re: Project "My Happy Mess"
litew8, I'm no expert on paint, can only go by what works for me. I use PPG paint products, so different brand may have different rules. I use PPG's DP epoxy primer over bare metal (after good cleaning). I've always done this to keep moisture from getting to the metal. The data sheet says to cover DP epoxy within 7 days or you need to sand and recoat. I also put on a high build primer within about 2 or 3 days, so I DON'T have to sand the DP epoxy, because it is hard to sand. You put up some very good information on both types of primer and I'm sure everyone can put that to use....Jim
__________________
my build thread: http://67-72chevytrucks.com/vboard/s...d.php?t=459839 Jimbo's long bed step build:http://67-72chevytrucks.com/vboard/s...t=464626<br /> |
|
|
|
|
03-08-2012, 09:20 PM
|
#423 | |
|
Registered User
Join Date: Aug 2008
Location: North GA
Posts: 400
|
Re: Project "My Happy Mess"
Quote:
Wow want some cheese with that wine...I thought he was just stating his opinion and offering some friendly advice...BTW I think you and the fixer are partially misinformed as well.
__________________
"Some of my finest hours have been spent on my back veranda, smoking hemp and observing as far as my eye can see." - Thomas Jefferson 72 C10 SWB "Work in Progress" |
|
|
|
|
|
03-08-2012, 09:29 PM
|
#424 | |
|
Registered User
Join Date: Jul 2011
Location: Des Moines, Iowa
Posts: 3,016
|
Re: Project "My Happy Mess"
Quote:
Why don't you school me on where it is we are misinformed, because you'll not only be teaching me and him, but the manufactures as well.
__________________
project: "my happy mess" Last edited by litew8; 03-08-2012 at 09:34 PM. |
|
|
|
|
|
03-08-2012, 09:49 PM
|
#425 |
|
Registered User
Join Date: Apr 2009
Location: Cody, WY
Posts: 292
|
Re: Project "My Happy Mess"
Just wanted to start out by saying nice build. You're doing a thorough job on this and all the pictures are great!
However, HGS's comments didn't require such a response. Frankly, I agree with him, use either or the other, but not both. There's really no point in using epoxy if you're etching first. Bare metal requires either an etch primer, or an epoxy to stick to bare metal. Although, some 2k high build primers and some polyester primers are now also ok to put direct to bare metal. Back to the point... there's no point in using both. Epoxy is generally a pain to sand, I'd never use it for the High build method that you're referring to, that's what polyester primers or 2k high builds are for. Both of those primers are basically filler in spray form. To say you CAN AND DO use both is wrong. YOU might use both, and I'm sure it's fine, but don't misinform everybody else and tell them that's how it has to be done because it doesn't. BOTTOM LINE: Read your labels. They'll tell you all the specs, bare metal or no bare metal, flash times, recoat times, topcoat times, etc. Try not to mix brands unless you know they're compatible. Some paints use chemicals that aren't any good with other chemicals. We're all here because we love these trucks and enjoy the build process and seeing the awesome things that everyone else is doing. ABOVE ALL, remember that the information you get on the internet is only as good as the person posting it. I found several sites with the exact same text you put in here, and none of them are trustworthy in my mind. Call the paint company if in doubt, if they make it, they know how to use it. |
|
|
|
 |
| Bookmarks |
|
|


 Linear Mode

