
|
|
|
 05-18-2015, 10:25 AM
|
#1 |
|
Post Whore
 Join Date: Mar 2013
Location: Southern Oregon
Posts: 10,384
|
Re: 64 C10 Stepside "Jaybird"
Doing good work man!
__________________
1966 Chevy C10 "Project Two Tone" http://67-72chevytrucks.com/vboard/s...d.php?t=596643 1964 GMC "Crustine" semi-build:http://67-72chevytrucks.com/vboard/s...d.php?t=665056 My youtube channel. Username "Military Chevy": https://www.youtube.com/channel/UC_h...fzpcUXyK_5-uiw |

|

|
|
05-18-2015, 11:56 AM
|
#2 | |
|
I'm just glad to be here!
Join Date: Jan 2008
Location: Longview, TX
Posts: 4,788
|
Re: 64 C10 Stepside "Jaybird"
Quote:
Wiring looks good and those crimps look great. I like the look of the crimper in the pics. Can you post a link or part number to the ones you bought??
__________________
Karl  1965 Chevy Stepside(Grandpa's Old Blue) and (July 2015 Shop Build!)(2020, the Saga Continues) http://67-72chevytrucks.com/vboard/s...d.php?t=372424 The LST Challenge: http://67-72chevytrucks.com/vboard/s...=1#post7812257 Korbin's 1st Square: "Sunburn" http://67-72chevytrucks.com/vboard/s...d.php?t=418618 1985 GMC Sierra: "White Trash", Korbin's 2nd now... http://67-72chevytrucks.com/vboard/s...d.php?t=632305 Henry - 1984 Chevrolet, Owen's 1st Square |
|
|
|
|
|
05-18-2015, 03:54 PM
|
#3 |
|
Registered User
Join Date: Sep 2013
Location: Strawberry Arkansas
Posts: 1,137
|
Re: 64 C10 Stepside "Jaybird"
Looks good!
__________________
http://67-72chevytrucks.com/vboard/s...d.php?t=605217 |
|
|
|
|
05-18-2015, 10:41 AM
|
#4 |
|
Registered User
Join Date: Apr 2012
Location: Searcy, AR
Posts: 4,203
|
Re: 64 C10 Stepside "Jaybird"
Looking Sweet!
__________________
DON Proverbs 27:17 US Air Force Retarded errr Retired My '65 Stepper Build:http://67-72chevytrucks.com/vboard/s...d.php?t=533920 My '60 Rusty Patina Build:http://67-72chevytrucks.com/vboard/s...66#post7402266 My '72 http://67-72chevytrucks.com/vboard/s...59#post7204359 SOLD |
|
|
|
|
05-18-2015, 09:15 PM
|
#5 |
|
Registered User
Join Date: Feb 2014
Location: Pulaski, ny
Posts: 117
|
Re: 64 C10 Stepside "Jaybird"
Very neat and organized.
Ryan. |
|
|
|
|
05-18-2015, 11:29 PM
|
#6 |
|
Registered User
Join Date: Dec 2011
Location: Donaldsonville, La.
Posts: 1,024
|
Re: 64 C10 Stepside "Jaybird"
Good looking work.
|
|
|
|
|
05-19-2015, 07:22 AM
|
#7 |
|
Registered User
Join Date: Sep 2012
Location: Leander, TX
Posts: 969
|
Re: 64 C10 Stepside "Jaybird"
Thanks guys for all the comments. Karl here is the link for the crimpers.
__________________
64' Build Thread http://67-72chevytrucks.com/vboard/s...d.php?t=586955 |
|
|
|
|
05-21-2015, 07:16 PM
|
#8 |
|
Registered User
Join Date: Feb 2012
Location: Grand Rapids, Michigan, otherwise known as Beer City U.S.A.
Posts: 1,081
|
Re: 64 C10 Stepside "Jaybird"
Nice!
I wish that I had those crimpers when I did my wiring... I still may buy a set!
__________________
My Build: http://67-72chevytrucks.com/vboard/s...d.php?t=512904 |
|
|
|
|
05-22-2015, 03:23 AM
|
#9 |
|
Registered User
Join Date: Dec 2012
Location: Rochester, KENT
Posts: 10,509
|
Re: 64 C10 Stepside "Jaybird"
Your build is definitely one of those addictive ones that I keep going back into Bret.
Was looking at that Russian guys woodwork this morning, and along with your work again realised just how "hammer, nails, saw " my woodwork is. You really do put a lot of skill, thought and effort into everything you do. Crimping looks great, thankfully I have Martin to do my crimping when we get to it.
__________________
MY BUILD LINK: http://67-72chevytrucks.com/vboard/s...585901]Redneck Express - 1966 C10 Short Fleetside MY USA ROADTRIPS http://forum.retro-rides.org/thread/...2018-humdinger IF YOU CAN'T FIX IT WITH A HAMMER, YOU'VE GOT AN ELECTRICAL PROBLEM MATE. |
|
|
|
|
05-22-2015, 06:39 AM
|
#10 |
|
Senior Member
Join Date: Oct 2009
Location: Fayetteville, Arkansas
Posts: 1,923
|
Re: 64 C10 Stepside "Jaybird"
nice clean work man... and wiring is one of those things that i choose not to do. i buy the reproduction wiring kits that just plug together. but i appreciate the challenge of doing it yourself. great job...
|
|
|
|
|
05-22-2015, 08:45 PM
|
#11 | |||
|
Registered User
Join Date: Sep 2012
Location: Leander, TX
Posts: 969
|
Re: 64 C10 Stepside "Jaybird"
Quote:
Quote:
Quote:
__________________
64' Build Thread http://67-72chevytrucks.com/vboard/s...d.php?t=586955 |
|||
|
|
|
|
05-22-2015, 08:53 PM
|
#12 |
|
Registered User
Join Date: Sep 2012
Location: Leander, TX
Posts: 969
|
Re: 64 C10 Stepside "Jaybird"
Updates from yesterdays work
Bought a bus bar at Lowe's and mounted it under that dash. Scrapped the paint on the outside where the bolt and washer contact to ground to the cab. Hooked the ground from the fuse box to this bolt along with a jumper wire to the bus bar. You can't really see the jumper wire in this photo. 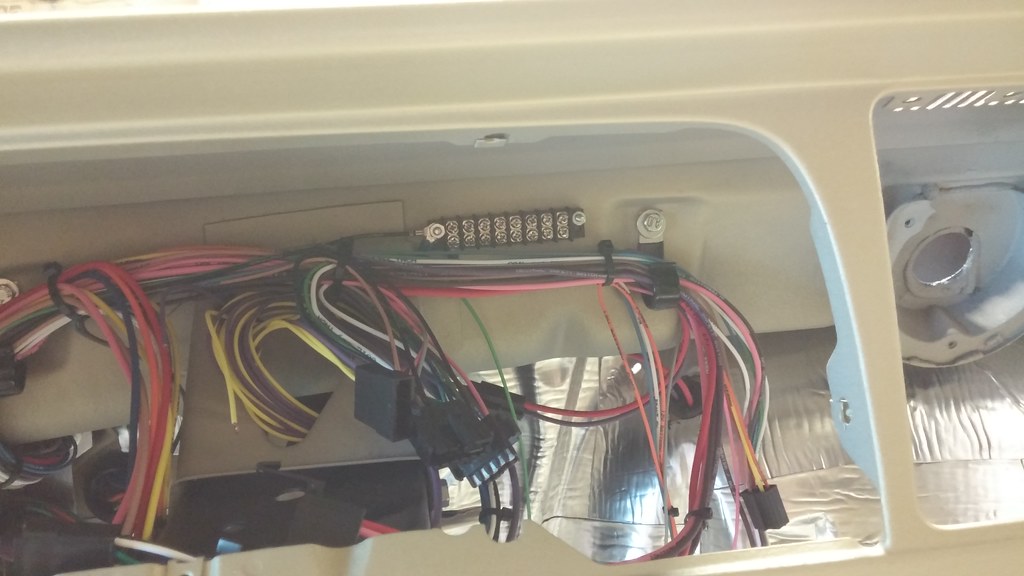 20150521_111247 by bjohnson388, on Flickr 20150521_111247 by bjohnson388, on FlickrGot my MSD box mounted and started routing the wires. I have to extend the two that go to the coil and the two that go to the distributor.  20150521_101034 by bjohnson388, on Flickr 20150521_101034 by bjohnson388, on FlickrI mocked up the grille support and grille. I will have to notch the grill support about a 1/4" in one spot 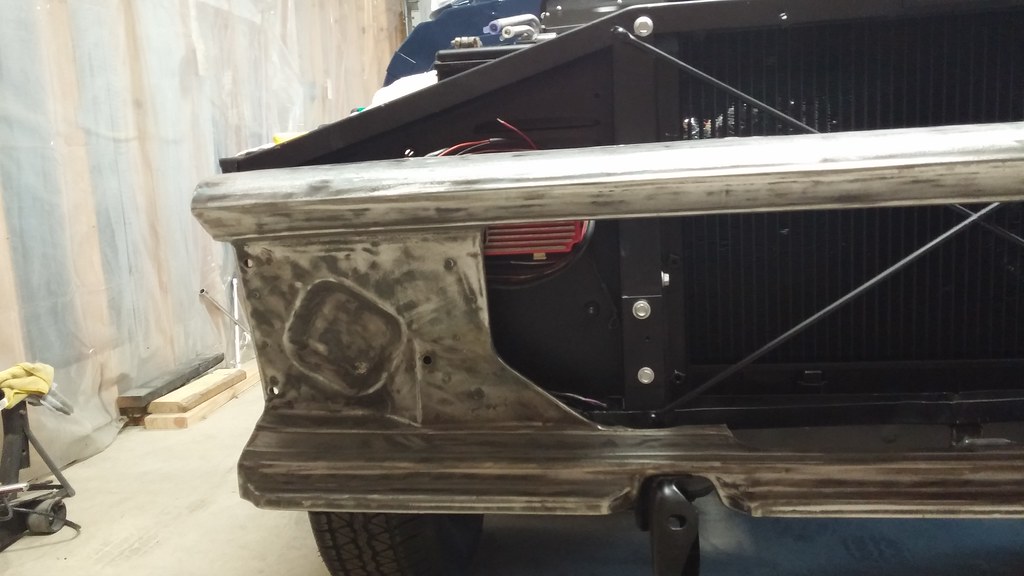 20150521_100910 by bjohnson388, on Flickr 20150521_100910 by bjohnson388, on Flickr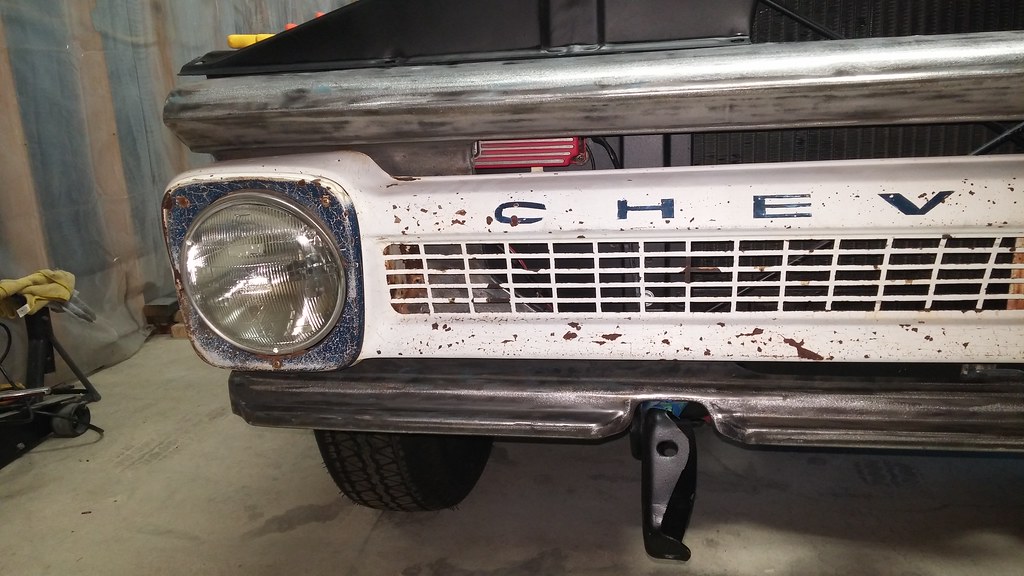 20150521_111151 by bjohnson388, on Flickr 20150521_111151 by bjohnson388, on FlickrAfter I got all the holes drilled and mounted I was feeling proud about its placement until I realized it will get wet if driven in the rain! Fortunately I don't ever plan on driving this thing in the rain. If there is even a chance it won't leave the garage. And I think the MSD box is sealed. I can play FEF for the moment 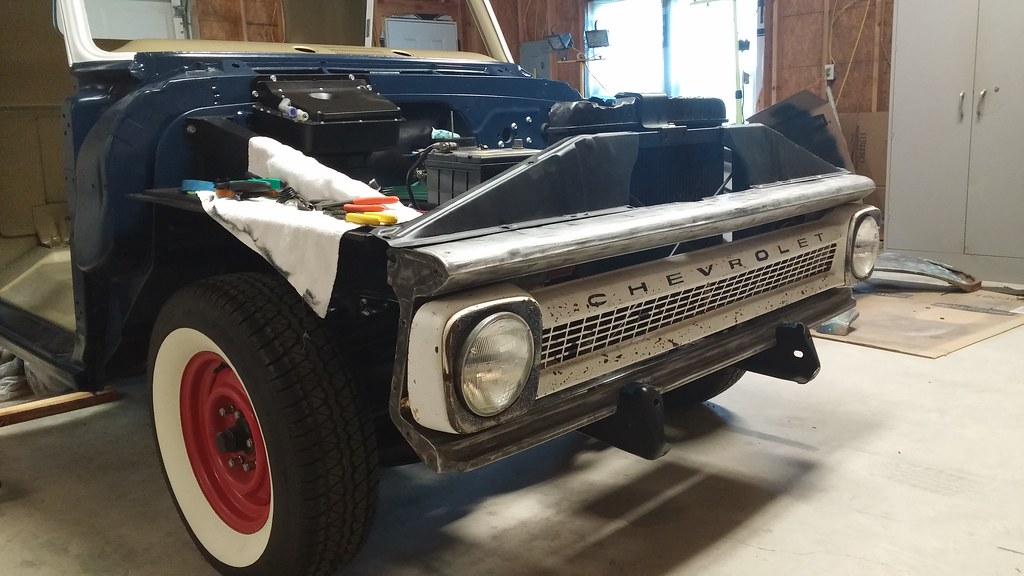 20150521_111109 by bjohnson388, on Flickr 20150521_111109 by bjohnson388, on Flickr
__________________
64' Build Thread http://67-72chevytrucks.com/vboard/s...d.php?t=586955 |
|
|
|
|
05-22-2015, 08:46 PM
|
#13 |
|
Registered User
Join Date: Nov 2014
Location: Omaha
Posts: 558
|
Re: 64 C10 Stepside "Jaybird"

|
|
|
|
|
05-24-2015, 11:55 PM
|
#14 |
|
Registered User
Join Date: Sep 2013
Location: Kent England
Posts: 1,025
|
Re: 64 C10 Stepside "Jaybird"
Looking really good Bret
Wiring looks nice and tidy . There's nothing worse than sorting out other people's wiring when it's a complete mess . That's one of my pet hates . The gauge cluster looks like brand new .
__________________
FINALLY PUTTING IT BACK TOGETHER AT LONG LAST MY BUILD THREAD: http://67-72chevytrucks.com/vboard/s...d.php?t=611614 |
|
|
|
|
05-25-2015, 01:28 AM
|
#15 |
|
Registered User
Join Date: Dec 2012
Location: Rochester, KENT
Posts: 10,509
|
Re: 64 C10 Stepside "Jaybird"
What they all say Bret.
Looking just so right.
__________________
MY BUILD LINK: http://67-72chevytrucks.com/vboard/s...585901]Redneck Express - 1966 C10 Short Fleetside MY USA ROADTRIPS http://forum.retro-rides.org/thread/...2018-humdinger IF YOU CAN'T FIX IT WITH A HAMMER, YOU'VE GOT AN ELECTRICAL PROBLEM MATE. |
|
|
|
|
05-25-2015, 08:39 AM
|
#16 |
|
Registered User
Join Date: Apr 2012
Location: Searcy, AR
Posts: 4,203
|
Re: 64 C10 Stepside "Jaybird"
Gauge cluster is sweet...
What did you use to clean the lens that has the speedo and gauge printing on it? just a side note, are you leaving the mileage as is or rolling back to zero? Happy Memorial Day! 
__________________
DON Proverbs 27:17 US Air Force Retarded errr Retired My '65 Stepper Build:http://67-72chevytrucks.com/vboard/s...d.php?t=533920 My '60 Rusty Patina Build:http://67-72chevytrucks.com/vboard/s...66#post7402266 My '72 http://67-72chevytrucks.com/vboard/s...59#post7204359 SOLD |
|
|
|
|
05-25-2015, 08:51 AM
|
#17 | |
|
Registered User
Join Date: Sep 2012
Location: Leander, TX
Posts: 969
|
Re: 64 C10 Stepside "Jaybird"
Quote:
To answer your questions I used 3M mico polishing compound with a machine. I was going to reset the speedo but couldn't figure out how. I actually increased the mileage! It doesn't really matter to me as the engine and trans are not new. Have a good Memorial Day. Remember what is important. The Heroes who died for or freedom!
__________________
64' Build Thread http://67-72chevytrucks.com/vboard/s...d.php?t=586955 |
|
|
|
|
|
05-25-2015, 03:11 PM
|
#18 | |
|
Registered User
Join Date: Dec 2011
Location: Donaldsonville, La.
Posts: 1,024
|
Re: 64 C10 Stepside "Jaybird"
Quote:
|
|
|
|
|
|
05-26-2015, 10:58 AM
|
#19 | |
|
Registered User
Join Date: Apr 2012
Location: Searcy, AR
Posts: 4,203
|
Re: 64 C10 Stepside "Jaybird"
Quote:
I scored a bunch of gauge cluster parts last week from another member who had sold his truck, so I now have another cluster lens, I believe both are originals… The only questions still remaining are… Am I right in assuming you polished both sides of the lens with the product you mentioned, and did you take any special precautions concerning the markings? And if you consider re-setting your odometer, give me a call, it's a rather easy process...
__________________
DON Proverbs 27:17 US Air Force Retarded errr Retired My '65 Stepper Build:http://67-72chevytrucks.com/vboard/s...d.php?t=533920 My '60 Rusty Patina Build:http://67-72chevytrucks.com/vboard/s...66#post7402266 My '72 http://67-72chevytrucks.com/vboard/s...59#post7204359 SOLD Last edited by Ta2Don; 05-26-2015 at 11:00 AM. Reason: Add Comment |
|
|
|
|
|
05-26-2015, 08:53 PM
|
#20 | |
|
Registered User
Join Date: Sep 2012
Location: Leander, TX
Posts: 969
|
Re: 64 C10 Stepside "Jaybird"
Quote:
Post up a pic of yours to confirm. But the original one I had the lettering is a paint and light greenish like the gauges. If you run your fingers across you can feel it. The other one I had the lettering was an off white and obviously printed as one swipe and it was gone. I started out slow on the original and the applied more pressure until I was sure it wasn't going to come off. I polished the front side 4 times and the back once and then finished with a coat of wax. Here a before and after. Most of the nastiness was on the outside.  DSCN7483 by bjohnson388, on Flickr DSCN7483 by bjohnson388, on Flickr DSCN7484 by bjohnson388, on Flickr DSCN7484 by bjohnson388, on FlickrIt still has some imperfections and deep scratches the polishing won't take out but I think it looks much better than before and it is saving an original part. The worst scratch on mine is to the left of the oil pressure gauge. You can still see it in the pic. It has polishing compound in it.
__________________
64' Build Thread http://67-72chevytrucks.com/vboard/s...d.php?t=586955 |
|
|
|
|
|
05-26-2015, 10:19 PM
|
#21 |
|
Senior Member
Join Date: Aug 2013
Location: corktown,mi.
Posts: 5,194
|
Re: 64 C10 Stepside "Jaybird"
good job on the oem equipment save, I just finished the same project.
|
|
|
|
|
05-27-2015, 08:39 AM
|
#22 |
|
Registered User
Join Date: Nov 2011
Location: fayetteville nc
Posts: 10,338
|
Re: 64 C10 Stepside "Jaybird"
Great job on the wiring and the cluster & cluster lens!!!!! Makes a huge difference in appearance.
__________________
1963 Short bed step side SBW 427 big block and borg warner T-16 HD 3 speed manual http://67-72chevytrucks.com/vboard/s...d.php?t=519869 1963 Short bed fleetside BBW 348 1st gen big block w/Powerglide http://67-72chevytrucks.com/vboard/s...d.php?t=619024 1964 Short bed trailer |
|
|
|
|
05-27-2015, 10:42 AM
|
#23 |
|
Registered User
Join Date: Apr 2012
Location: Searcy, AR
Posts: 4,203
|
Re: 64 C10 Stepside "Jaybird"
Bret, here is a pic of the 2 I have, both are OEM Survivors…
The printed sides look to be in pretty good shape and the outer sides are decent as well, both have a couple of decent scratches that I hopefully can buff out...   IMG_3392 by Donald Olivo, on Flickr IMG_3392 by Donald Olivo, on FlickrI'm going to refurb this gauge cluster prior to install so as I spot others doing this I'm gathering as much info up front as possible, Thanks again... One more question… did you use a buffer as in one to do paint work, or would a buffing wheel on a bench grinder work also?  I sure don't want to destroy either of these...
__________________
DON Proverbs 27:17 US Air Force Retarded errr Retired My '65 Stepper Build:http://67-72chevytrucks.com/vboard/s...d.php?t=533920 My '60 Rusty Patina Build:http://67-72chevytrucks.com/vboard/s...66#post7402266 My '72 http://67-72chevytrucks.com/vboard/s...59#post7204359 SOLD Last edited by Ta2Don; 05-27-2015 at 10:45 AM. Reason: added comment |
|
|
|
|
05-28-2015, 07:52 AM
|
#24 | |
|
Registered User
Join Date: Sep 2012
Location: Leander, TX
Posts: 969
|
Re: 64 C10 Stepside "Jaybird"
Quote:
Got these from this forum but lost the thread they are from
__________________
64' Build Thread http://67-72chevytrucks.com/vboard/s...d.php?t=586955 |
|
|
|
|
|
05-28-2015, 10:18 PM
|
#25 | |
|
Senior Member
Join Date: Aug 2013
Location: corktown,mi.
Posts: 5,194
|
Re: 64 C10 Stepside "Jaybird"
Quote:
|
|
|
|
|
 |
| Bookmarks |
|
|


 Hybrid Mode
