
|
|
|
 12-07-2011, 04:56 PM
|
#1 |
|
Registered User
Join Date: Nov 2008
Location: So. Cal.
Posts: 452
|
Re: Project "49 No Buck$"
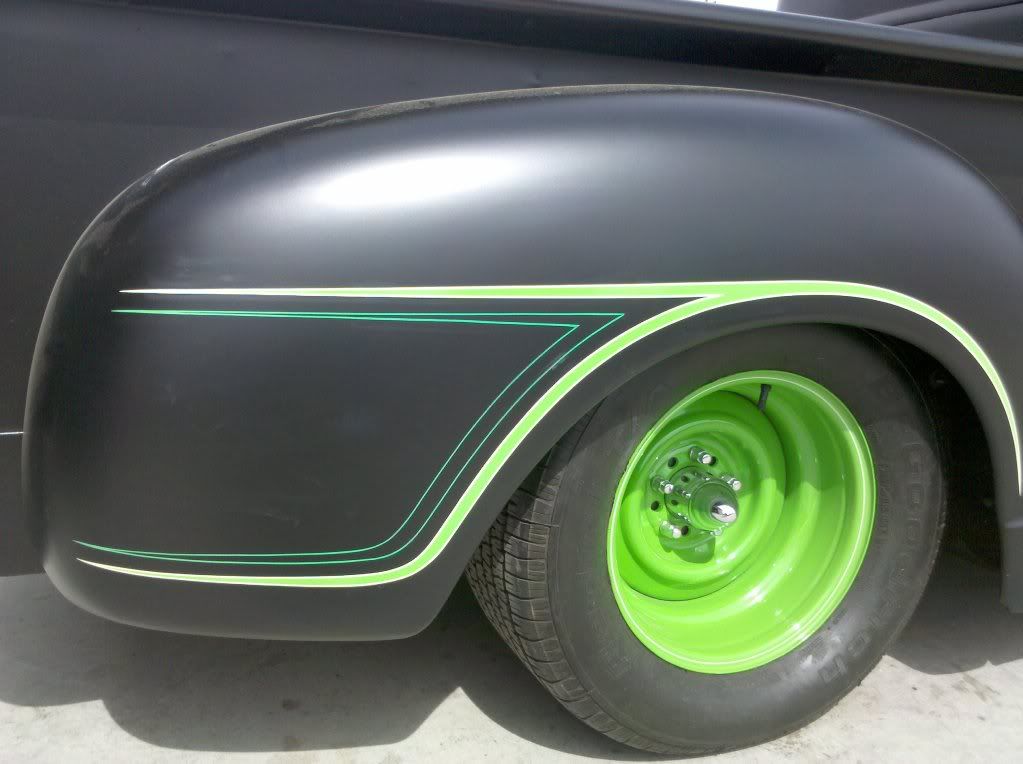
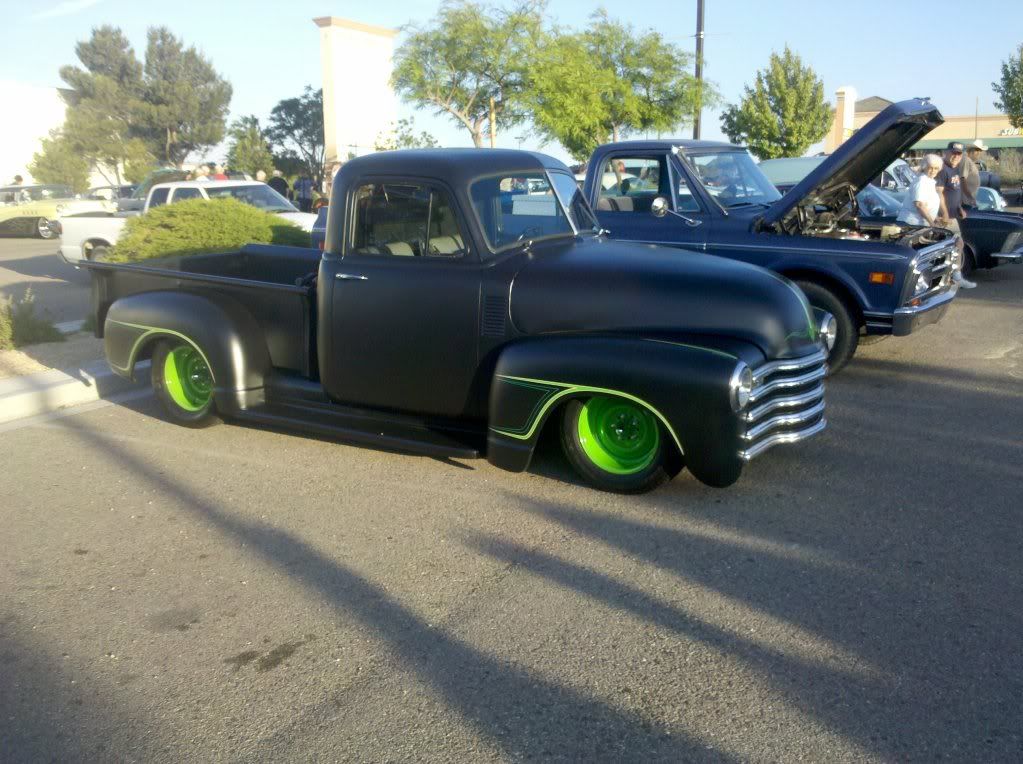
Thank you! The exhaust paint isnt holding up as well as planned. The first 18" of header is looking kinda rough, but the rest looks great.
__________________
It's all about the stance, baby! http://67-72chevytrucks.com/vboard/s...d.php?t=320546 |

|

|
|
12-13-2011, 05:51 PM
|
#2 |
|
Registered User
Join Date: Nov 2008
Location: So. Cal.
Posts: 452
|
Re: Project "49 No Buck$"
I've been working on the book and it's coming along pretty good! I'm probably a third of the way into it and I'm doing it more in the order of how you'd actually build it, since my posts were kind of all over the place.
Posted via Mobile Device
__________________
It's all about the stance, baby! http://67-72chevytrucks.com/vboard/s...d.php?t=320546 |
|
|
|
|
12-30-2011, 11:26 PM
|
#3 |
|
Registered User
Join Date: Nov 2008
Location: So. Cal.
Posts: 452
|
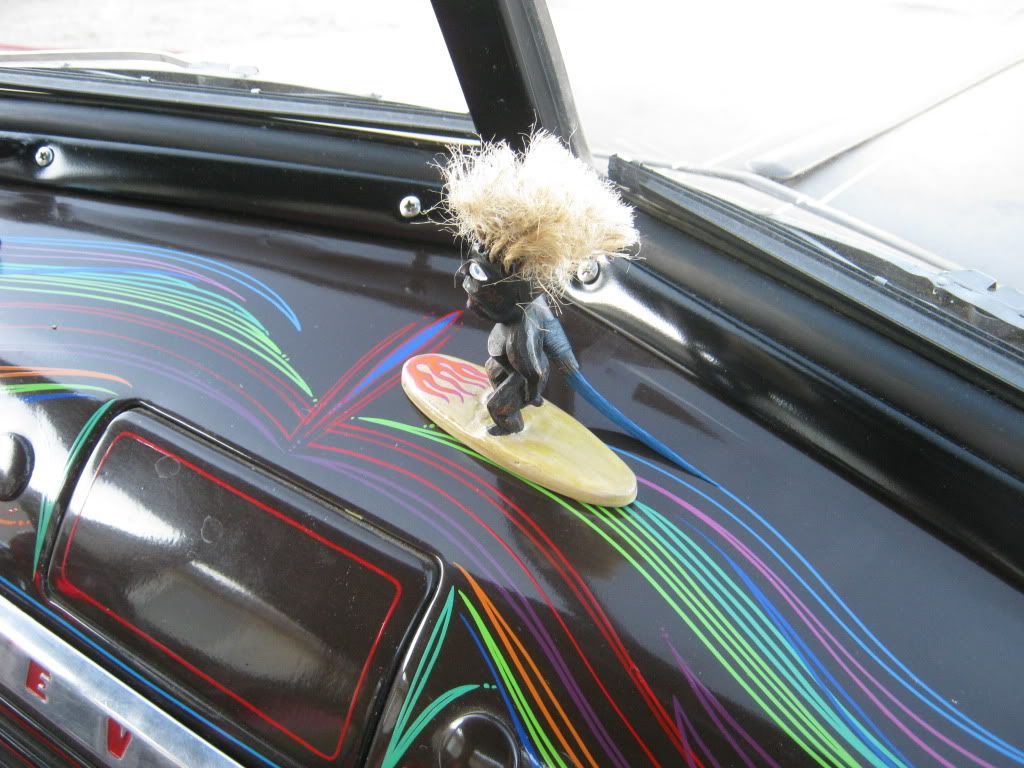
Re: Project "49 No Buck$"
The book is getting closer and Tiki Dude is still surfin'!
__________________
It's all about the stance, baby! http://67-72chevytrucks.com/vboard/s...d.php?t=320546 |
|
|
|
|
01-01-2012, 02:04 PM
|
#4 |
|
Registered User
Join Date: Dec 2011
Location: Czech Rebublic / Europe
Posts: 165
|
Re: Project "49 No Buck$"
Ok Brad I'm gonna say that again friend! You have a mad skills! Love the fact that you decorate your truck by yourself. Love your pinstriping! And totally can't believe what you've done to your pedals! Looks super tight! Also the interior came out really nice! Great job and amazing progress. Thanks a lot for sharing all this hard work! Very motivating! Keep it up!
|
|
|
|
|
01-09-2012, 11:54 PM
|
#5 |
|
Registered User
Join Date: Nov 2008
Location: So. Cal.
Posts: 452
|
Re: Project "49 No Buck$"
This is another one of those I’m real cheap deals! Instead of just buying the lower door seal, I figured I’d build my own and use it to hold my carpet down at the same time. I went and picked up a piece of 1 ½” x 1/8” aluminum angle and cut them to the length of the door opening. The rubber is from the back doors of a ‘79 Suburban (practically free at any wrecking yard!) and it slides onto the bottom of the aluminum.
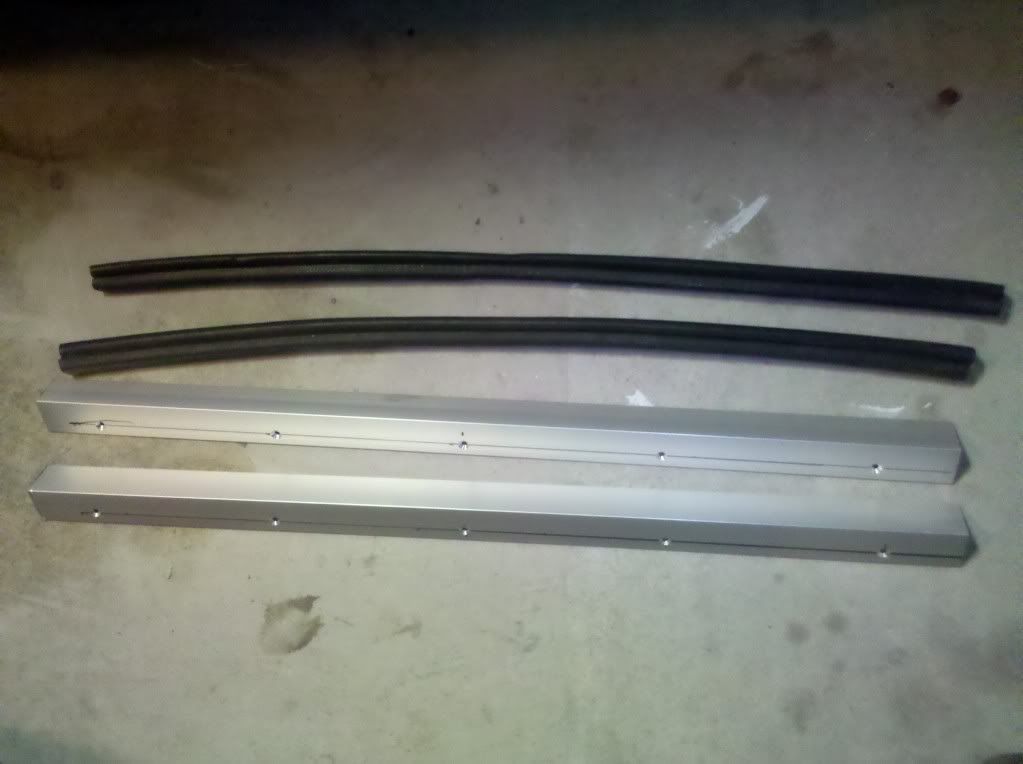 I squirted some weather strip adhesive in the pinch area and slid the rubber in place. I squirted some weather strip adhesive in the pinch area and slid the rubber in place.  I used a black sharpie to mark (I hadn’t removed the line yet) where my holes needed to be drilled, then countersunk them. I used some stainless oval head screws to hold it in place. The rubber seals up right below the door panel and it keeps out what air was sneaking around into the cab! I used a black sharpie to mark (I hadn’t removed the line yet) where my holes needed to be drilled, then countersunk them. I used some stainless oval head screws to hold it in place. The rubber seals up right below the door panel and it keeps out what air was sneaking around into the cab! 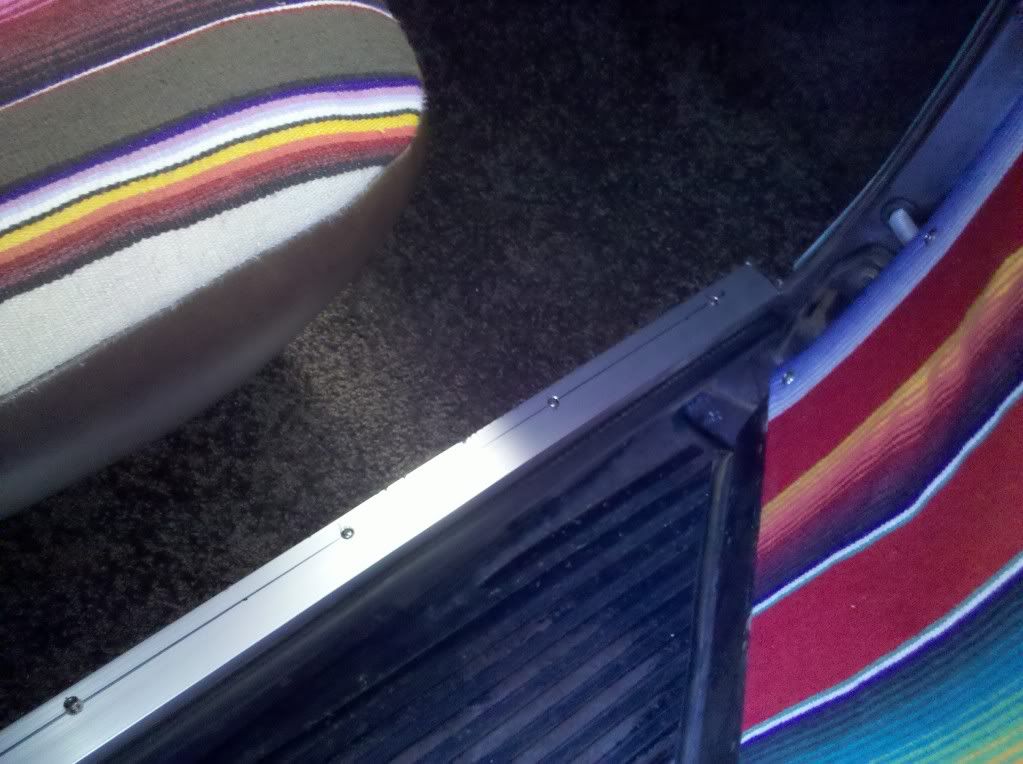
__________________
It's all about the stance, baby! http://67-72chevytrucks.com/vboard/s...d.php?t=320546 Last edited by kustombrad; 01-10-2012 at 12:16 AM. |
|
|
|
|
01-22-2012, 11:42 AM
|
#6 | |
|
Registered User
Join Date: Jan 2012
Location: el campo texas
Posts: 322
|
Re: Project "49 No Buck$"
Quote:
|
|
|
|
|
|
01-10-2012, 12:19 AM
|
#7 |
|
Registered User
Join Date: Aug 2007
Location: Corona, California
Posts: 7,998
|
Re: Project "49 No Buck$"
Always with the neat lo-buck stuff.
Kim |
|
|
|
|
01-10-2012, 09:28 PM
|
#8 |
|
A320 Pilot/USAF Retired
Join Date: Mar 2009
Location: Charleston, SC
Posts: 2,622
|
Re: Project "49 No Buck$"
Nicely done, as always!
__________________
JJ My 1957 build: http://67-72chevytrucks.com/vboard/s...d.php?t=334552 http://www.trifive.com/forums/showthread.php?t=22037 Instagram - Chuckdriver57 |
|
|
|
|
01-10-2012, 11:36 PM
|
#9 |
|
Registered User
Join Date: Nov 2011
Location: Keokuk, Iowa
Posts: 6
|
Re: Project "49 No Buck$"
Very impressed with every aspect of your build! I'm in for a book, keep us informed on the progress.
Damon |
|
|
|
|
01-11-2012, 12:08 AM
|
#10 |
|
Registered User
Join Date: Dec 2009
Location: Ventura, Ca.
Posts: 439
|
Re: Project "49 No Buck$"
your killin it with 66,000 views !!!!!! of course cuz its sweet work....
stole some of your pics for examples on my brake line work, hope you dont mind.... no money changed hands  thanks for sharing bb
__________________
http://67-72chevytrucks.com/vboard/s...d.php?t=385404 |
|
|
|
|
01-11-2012, 01:17 AM
|
#11 |
|
Registered User
Join Date: Jun 2006
Location: Idaho
Posts: 8,800
|
Re: Project "49 No Buck$"
Great minds think alike. Last month I did the same thing, put to hold down and trim the edge of some vinyl flooring on the top stair step at my Dad's place. Had a hard time finding a metal ctr sink bit (in a strange town), finally just got a cheap wood one and wore it out.
__________________
1959 Chevy Short Fleetside w/ 74 4WD drive train (current project) OrrieG Build Thread 1964 Chevelle Malibu w/ 355-350TH (daily driver) Helpful AD and TF Manual Site Old Car Manual Project |
|
|
|
|
01-22-2012, 03:34 PM
|
#12 |
|
Registered User
Join Date: Nov 2008
Location: So. Cal.
Posts: 452
|
Re: Project "49 No Buck$"
It didn't have a core/radiator support when I got it, so I just kinda faked it. I left the hood on and took the fenders, grill and the other sheetmetal off as one piece. When I put it back together I closed the hood, bolted the frontend to the cab and made the front frame support brackets (see page 10) to support the sheetmetal. It works good!
Posted via Mobile Device
__________________
It's all about the stance, baby! http://67-72chevytrucks.com/vboard/s...d.php?t=320546 |
|
|
|
|
01-22-2012, 09:16 PM
|
#13 | |
|
Registered User
Join Date: Jan 2012
Location: el campo texas
Posts: 322
|
Re: Project "49 No Buck$"
Quote:
|
|
|
|
|
|
01-24-2012, 12:11 AM
|
#14 |
|
Registered User
Join Date: Nov 2008
Location: So. Cal.
Posts: 452
|
Re: Project "49 No Buck$"
If anyone gets bored, here's the build on the 'Camino I did for my dad http://www.chevelles.com/forums/show...29#post2797929
__________________
It's all about the stance, baby! http://67-72chevytrucks.com/vboard/s...d.php?t=320546 |
|
|
|
|
01-24-2012, 01:30 AM
|
#15 |
|
Registered User
Join Date: Aug 2007
Location: Corona, California
Posts: 7,998
|
Re: Project "49 No Buck$"
The El Camino came out great.
Kim |
|
|
|
|
01-30-2012, 12:29 PM
|
#16 |
|
Registered User
Join Date: Nov 2008
Location: So. Cal.
Posts: 452
|
Re: Project "49 No Buck$"
I forgot to show this awhile back. I found this in an old motorhome and thought it would be cool in the truck. An SW Motor Minder vacuum gauge! It's kinda cool watching how it works while cruising!

__________________
It's all about the stance, baby! http://67-72chevytrucks.com/vboard/s...d.php?t=320546 Last edited by kustombrad; 01-30-2012 at 12:30 PM. Reason: added stuff |
|
|
|
|
01-30-2012, 01:16 PM
|
#17 |
|
Registered User
Join Date: Jun 2006
Location: Idaho
Posts: 8,800
|
Re: Project "49 No Buck$"
Vaccum gauge is becoming a forgotten dianostic tool. If you look in the old (before mid-60's) auto manual it is the first tool of choice for figuring out what is going on in a carburated engine. I learned from my Dad how you can use it to check timing, vaccum leaks, and valve and ring sealing. That and a timing light and dwell meter could cover most of the tuning problems. I'll need to check out your Elky link, I'm a Gold member over there but haven't spent much time since I started on the truck.
__________________
1959 Chevy Short Fleetside w/ 74 4WD drive train (current project) OrrieG Build Thread 1964 Chevelle Malibu w/ 355-350TH (daily driver) Helpful AD and TF Manual Site Old Car Manual Project |
|
|
|
|
01-30-2012, 01:22 PM
|
#18 |
|
Registered User
Join Date: Nov 2008
Location: So. Cal.
Posts: 452
|
Re: Project "49 No Buck$"
This one was more for the goofy cool factor, but I use a vacuum gauge for most of my engine stuff! Use it for dialing in the idle air bleeds on the Holley and adjusting the valves! It's amazing how helpful they are for tuning a motor!
__________________
It's all about the stance, baby! http://67-72chevytrucks.com/vboard/s...d.php?t=320546 |
|
|
|
|
01-30-2012, 02:06 PM
|
#19 |
|
Registered User
Join Date: Jan 2010
Location: Titusville, PA
Posts: 3,585
|
Re: Project "49 No Buck$"
second that on the vacuum, I run a gauge on my firewall. I'd trust it over a timing tape if you don't know if your balancer is true zero. It's just a great tool all way around.
__________________
51' 99toLife finished 2011,355 sbc,5speed, patina, redoing whole truck, inter, bags, etc http://67-72chevytrucks.com/vboard/s...d.php?t=382481 49Hardtimes s/10 susp- bagged, vortec sbc, 5 speed, patina, sold http://67-72chevytrucks.com/vboard/s...d.php?t=594874 VIDEOS https://youtu.be/E8zHhjgS_lA https://youtu.be/E8zHhjgS_lA Geronimo 54' LS engine, static drop IFS, Client build, just about done http://67-72chevytrucks.com/vboard/s...62#post7399162 52' 3100 Slowly in progress, will be painted two toned, have 235 with a t-5, lowered OG frame Other projects, 49' farmuse 3100, killer Patina, will be slammed, LS engine, full done interior up next! www.coffeeandcustoms.com |
|
|
|
|
02-07-2012, 11:44 AM
|
#20 |
|
Registered User
Join Date: Nov 2008
Location: So. Cal.
Posts: 452
|
Re: Project "49 No Buck$"
Hey Guys! I went with the Malibu front clip because I knew where to score one for nothing and didn't want to spend the money on the Mustang II front suspension. The same price, not even close! You could find a front clip for a $200, drop spindles for $150, bushings etc. $250, turn the rotors and go! Waaaaay cheaper than the other, just lots more fab work. The S10 thing is kind of cool. I had a truck here I did some paint work on that was an S10 chassis and other than not liking how they mounted the rear shocks (way wrong) it drove very nice! It had front and rear wheels with very little backspace
   to kick them out without using spacers and it wasn't bad. For the price it's not a bad idea either! to kick them out without using spacers and it wasn't bad. For the price it's not a bad idea either!
__________________
It's all about the stance, baby! http://67-72chevytrucks.com/vboard/s...d.php?t=320546 |
|
|
|
|
02-07-2012, 12:13 PM
|
#21 |
|
Registered User
Join Date: Jan 2007
Location: York, Pa.
Posts: 1,386
|
Re: Project "49 No Buck$"
kustombrad, On my panel I used the whole Malibu chassis, just made it to the wheelbase I needed. On it I did not even need to run spacers/adapters and the wheels fit great. Now on a truck I would just use the clip because I do not know how the rear frame would be with bed. But most just raise the bed floor anyway, so it would probably work to. Nice looking truck.
Shannon
__________________
48 Panel Truck 1948 Chevy / S10 1954 Chevy / S10 1951 Chevy / C4 47 Step van Lowered 1996 Dually |
|
|
|
|
02-23-2012, 03:19 PM
|
#22 |
|
Registered User
Join Date: Nov 2008
Location: So. Cal.
Posts: 452
|
Re: Project "49 No Buck$"
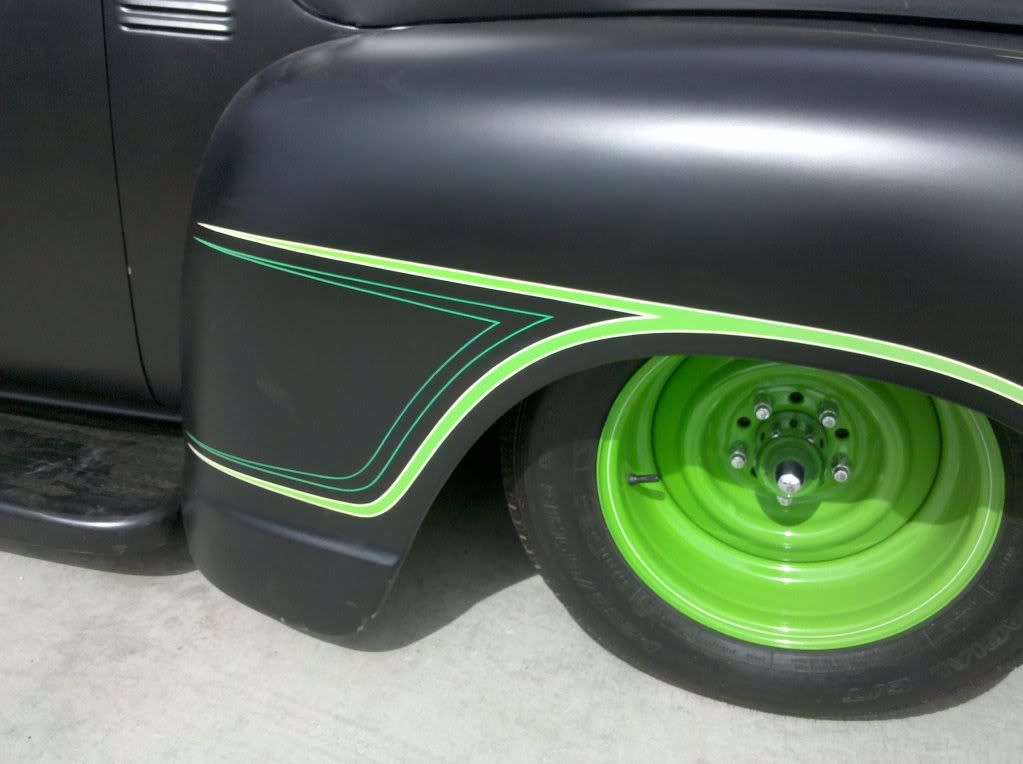
Trying to finish up some little details and one was the door armrests. New they cost between $30-35 per side and with as little as I've spent I couldn't justify it. I took a measurement of the door screw spacing and figured I'd do a little research. One thing I love about the Chevy R&D guys is they used a lot of the same things and measurements on LOTS of their stuff! Makes it nice when you want to be creative. So I'm walking around the boneyards looking for something that would work and noticed the 70's Chevy vans had the same screw spacing as the early truck! DON'T use the later ones because the holes go at an upward angle and won't work. Alex found 2 perfect ones out of a '77 (Ice Cream van!) with no windows, so they didn't get rotted out. 8 bucks for the pair, cleaned them up, sprayed the same vinyl dye I used on the other plastic in the truck and I have my low-buck arm rests!
__________________
It's all about the stance, baby! http://67-72chevytrucks.com/vboard/s...d.php?t=320546 Last edited by kustombrad; 02-23-2012 at 03:36 PM. |
|
|
|
|
02-24-2012, 12:37 AM
|
#23 |
|
VA72C10
 Join Date: Mar 2008
Location: Midlothian, VA
Posts: 25,269
|
Re: Project "49 No Buck$"
Those look great! Look like the 69-71 style ones...
__________________
Looking for a 67-72 swb or blazer project in or around VA. 
|
|
|
|
|
03-24-2012, 08:37 PM
|
#24 |
|
Registered User
Join Date: Jan 2012
Location: el campo texas
Posts: 322
|
Re: Project "49 No Buck$"
just wondering if you used the ad core support with the malibu front steer . what kind of clearance problems would you run into
|
|
|
|
|
03-27-2012, 12:34 PM
|
#25 |
|
Registered User
Join Date: Nov 2008
Location: So. Cal.
Posts: 452
|
Re: Project "49 No Buck$"
For those who were wondering, there are 2 versions of the plastic I used; Komatex and Sintra sign PVC. I'm pretty sure I used the 4mm thick version. Hope that helps...
__________________
It's all about the stance, baby! http://67-72chevytrucks.com/vboard/s...d.php?t=320546 |
|
|
|
 |
| Bookmarks |
|
|


 Hybrid Mode
