
 |
|
|
|
|
#1 |
|
Senior Enthusiast
Join Date: Feb 2007
Location: Spokane Valley, WA
Posts: 8,356
|
Re: Markeb01 Build Thread
It’s hard to believe myself but mounting the new fender emblems took a full 8 hour Saturday. In my youth the same task would probably have taken 30 minutes, but these days I strive to put a little more quality into everything I undertake. The photos don’t always exactly match the text, but following are the sequence of events:
Although my truck rides high in the front by contemporary standards, it is still somewhat nose down overall, even on a garage floor with a substantial uphill slope toward the front. To make sure the emblems came out level on the fenders, the first thing I did was level the truck (along the line of the front fender) by jacking up the front end.  The next step was measuring down 3” from the body crease and running a horizontal tape line so I could capture consistent vertical dimensions in the emblem area.  From this line, all measurements off the flag emblem were on center at the top of the V area between the flags. 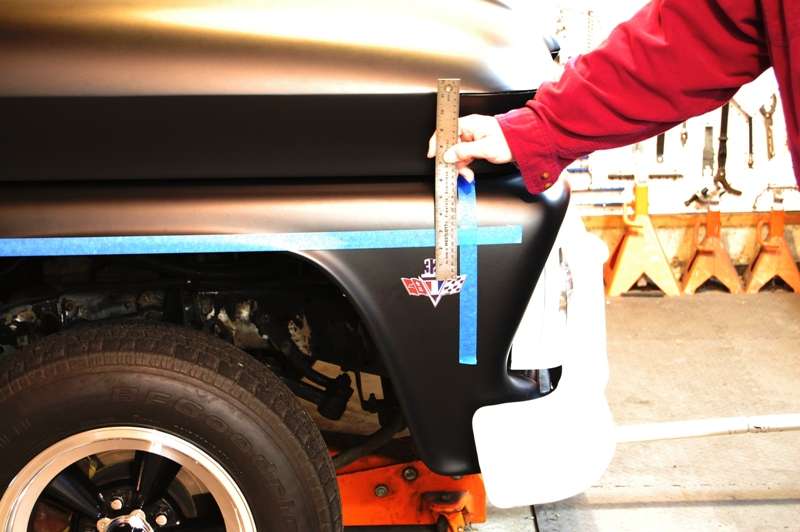 Next was extending another tape line down from the corner hood seam, for front to back emblem measurements. To make sure this remained the same on both sides, I confirmed the distance from the rear of the fender (at the tape line) on both sides of the truck.  I then set about placing the magnetic photo emblem in various places, taking 3 angle photos (3/4 front, side, ¾ rear) of each position while noting dimensions for each spot. Front to back measurements were taken from the center of the V.  There were at least 6 or 7 different positions, high, low, forward, and back. Next the photos were downloaded and studied. Once I arrived at the perfect position, I pulled the tape to get clean photos before drilling.  Removing the tape changed the whole perspective and I didn’t like the looks at all.  So I started over without any tape this time. When I was finally satisfied again with the positioning, it all had to be retaped to get the dimensions needed to replicate the other side.  The most critical aspect (at least to me) is the alignment and spacing between the 327 and the V in the center of the flags. A Google search will show more crooked installations than those leveled and aligned. And those are the glaring details that drive me nuts when not done correctly. So the flags were done first and taped in place. A line was marked ¼” above the true top of the V to insure alignment and spacing. Since the pins on the 327 emblem are not equally spaced on the mounting bar, I flipped the emblem to where it was pointing face down, and placed the mounting bar under the 327 numbers directly on top of the V. This centered it perfectly with the flags. I then outlined the mounting pins on the tape with an ink pen (shown in the photo above). The next step was simply center punching the marks at the intersection of the pins on the line ¼” above the V, drilling, pulling tape, and bolting everything in place. And after all that, here are the actual emblems, which don’t look all that much different than the photo magnet (at least not in pictures)! 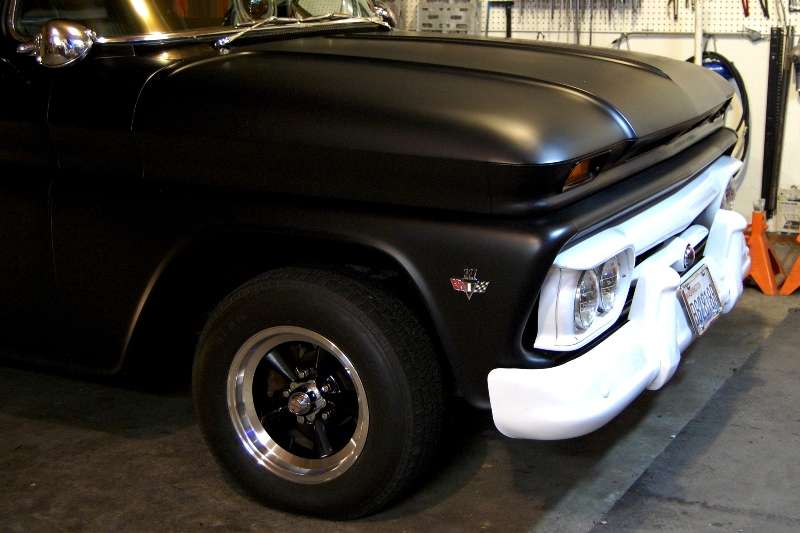  The truck is covered in sheets at the moment to keep it clean until we get a decent weather day to attempt capturing a Post Card quality photo (which may take a few days). I’d really like to capture at least one fantastic photo worth framing, because unless I win the Lottery, the truck is cosmetically done at this point. I’d like one great photo the way it looks right now because it’s unlikely to ever look any better in the future, after wear and tear have taken their toll. Although the snapshots aren’t at all impressive, standing back and looking at the overall truck I’m glad the emblems are in place and the Moon Equipped decals are gone. To me at least they seem to add a more balanced look with the stainless windshield trim and the bed rails.
__________________
My Build Thread: http://67-72chevytrucks.com/vboard/s...d.php?t=444502 Last edited by markeb01; 10-30-2012 at 02:24 AM. |
|
|

|
|
|
#2 |
|
Registered User
 Join Date: Mar 2012
Location: Shallow Lake Ontario,Canada
Posts: 201
|
Re: Markeb01 Build Thread
Nice work, Looks great!!
|
|
|

|
|
|
#3 |
|
Registered User
Join Date: Apr 2012
Location: Searcy, AR
Posts: 4,203
|
Re: Markeb01 Build Thread
Awesome, Love the Attention to Detail... You are an inspiration Sir!
__________________
DON Proverbs 27:17  US Air Force Retarded errr Retired My '65 Stepper Build:http://67-72chevytrucks.com/vboard/s...d.php?t=533920 My '60 Rusty Patina Build:http://67-72chevytrucks.com/vboard/s...66#post7402266 My '72 http://67-72chevytrucks.com/vboard/s...59#post7204359 SOLD |
|
|

|
|
|
#4 |
|
Registered User
Join Date: Jun 2012
Location: Selkirk Ontario Canada
Posts: 1,141
|
Re: Markeb01 Build Thread
looks killer nice job
__________________
My 63 GMC Panel Slow Build http://67-72chevytrucks.com/vboard/s...=1#post5457281 63 
|
|
|

|
|
|
#5 |
|
Rollin' Old Skool
Join Date: Jun 2007
Location: Hattiesburg, MS
Posts: 5,371
|
Re: Markeb01 Build Thread
great job once again! looking forward to your Post Card quality photo

__________________
_____________________________________________ Phillip My Build threads: 1966 Chevy C-10 "Black Betty" shortbed, fleetside, BBW, 327 V8/ Powerglide (under construction) http://67-72chevytrucks.com/vboard/s...ighlight=betty 1997 Chevy Tahoe, 2dr/2wd, mild custom (Daily driver) http://67-72chevytrucks.com/vboard/s...d.php?t=601142 Pics: '66 C-10 https://flic.kr/s/aHsjHWD4h9 '97 Tahoe https://flic.kr/s/aHsjGZ7wKP '93 C-1500 https://flic.kr/s/aHskxdpdnQ '88 S-10 Blazer https://flic.kr/s/aHsjYGx4Md Previous Rides: 1993 Chevy S-10 ext. cab, 4.3L, 4/5 drop (Sold) 1993 Chevy C-1500 short/step Retro-Rod (Sold) 1988 S-10 Blazer 2dr/2wd mild custom (Sold) |
|
|

|
|
|
#6 |
|
Registered User
Join Date: Nov 2011
Location: fayetteville nc
Posts: 10,338
|
Re: Markeb01 Build Thread
Great job as usual Mark. I like the magnet trick to mock up. Looks great.
__________________
1963 Short bed step side SBW 427 big block and borg warner T-16 HD 3 speed manual http://67-72chevytrucks.com/vboard/s...d.php?t=519869 1963 Short bed fleetside BBW 348 1st gen big block w/Powerglide http://67-72chevytrucks.com/vboard/s...d.php?t=619024 1964 Short bed trailer |
|
|

|
|
|
#7 |
|
Registered User
Join Date: Apr 2012
Location: Cambridge, Ontario, Canada
Posts: 1,771
|
Re: Markeb01 Build Thread
Looks awesome Mark, can't wait to see more pictures of the finished project.
__________________
Craigerrr My build thread, CRGRS 66 Winter Build: http://67-72chevytrucks.com/vboard/s...09#post5638709 |
|
|

|
|
|
#8 |
|
Senior Enthusiast
Join Date: Feb 2007
Location: Spokane Valley, WA
Posts: 8,356
|
Re: Markeb01 Build Thread
Thanks for all the comments guys. I do consider myself fortunate having such a willing and supportive partner. It’s a nice benefit of marrying a country girl with a passion for horses. They’re never put off by hard work or getting dirty.
As for JB Weld and gas tank necks, that’s actually how I eliminated the filler neck hole in my cab. Details are shown on post #9 (starting with the 6th picture) on the first page of my build thread. It may not be very clearly spelled out, but picture #6 is the patch I made from part of an original front filter (shown inside the cab). The patch was slathered with about ¼” of JB Weld and held in place for 24 hours with duct tape. The outside face of the hole was covered in wax paper and more duct tape. Once everything went off, the coverings were removed and a few pinholes found in the surface were also filled with JB Weld. Once that cured, a small amount of Rage body filler blended the surface for primer. After thousands of door slammings since 1998, the fact the hole was closed with JB instead of welding cannot be detected.
__________________
My Build Thread: http://67-72chevytrucks.com/vboard/s...d.php?t=444502 |
|
|

|
|
|
#9 |
|
Senior Enthusiast
Join Date: Feb 2007
Location: Spokane Valley, WA
Posts: 8,356
|
Re: Markeb01 Build Thread
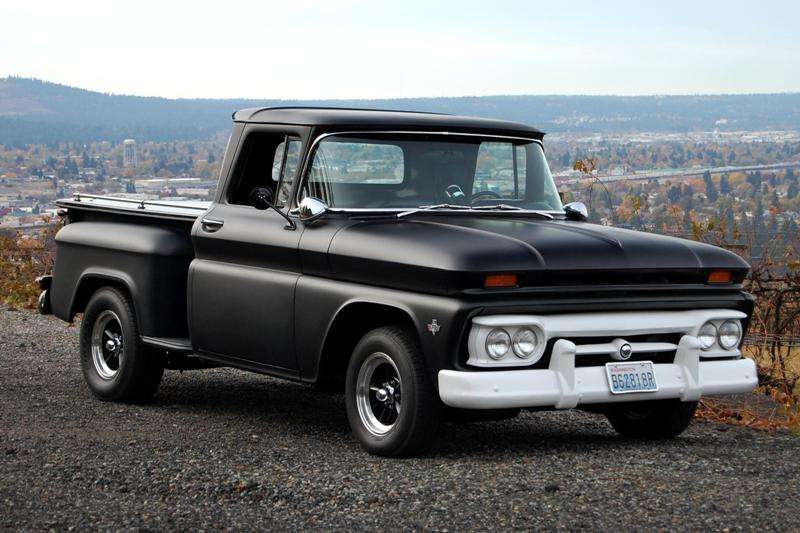
Finally got a chance to take a picture in between rain showers. I think I'm about ready to call it done (if that's even possible):
__________________
My Build Thread: http://67-72chevytrucks.com/vboard/s...d.php?t=444502 |
|
|

|
|
|
#10 |
|
Registered User
Join Date: Apr 2012
Location: Cambridge, Ontario, Canada
Posts: 1,771
|
Re: Markeb01 Build Thread
Looks very distinguished Mark. Done... for now anyways!
__________________
Craigerrr My build thread, CRGRS 66 Winter Build: http://67-72chevytrucks.com/vboard/s...09#post5638709 |
|
|

|
|
|
#11 |
|
Registered User
 Join Date: Nov 2010
Location: Kalamazoo, MI
Posts: 1,008
|
Re: Markeb01 Build Thread
Looks Great Mark!!!!
__________________
LIFE IS SHORT HAVE FUN |
|
|

|
|
|
#12 |
|
Registered User
Join Date: Apr 2012
Location: Searcy, AR
Posts: 4,203
|
Re: Markeb01 Build Thread
Very Nice! Looking forward to saying that myself some day... Awesome Pic
Posted via Mobile Device
__________________
DON Proverbs 27:17  US Air Force Retarded errr Retired My '65 Stepper Build:http://67-72chevytrucks.com/vboard/s...d.php?t=533920 My '60 Rusty Patina Build:http://67-72chevytrucks.com/vboard/s...66#post7402266 My '72 http://67-72chevytrucks.com/vboard/s...59#post7204359 SOLD Last edited by Ta2Don; 10-31-2012 at 04:35 PM. |
|
|

|
|
|
#13 |
|
Senior Member
 Join Date: Oct 2009
Location: Fayetteville, Arkansas
Posts: 1,923
|
Re: Markeb01 Build Thread
your truck is beautiful and mean looking at the same time... great build mark.
soooo, whats next? |
|
|

|
|
|
#14 |
|
Registered User
Join Date: Jun 2012
Location: Selkirk Ontario Canada
Posts: 1,141
|
Re: Markeb01 Build Thread
can you take some shots of the lights just under the window where you came in on the inside
__________________
My 63 GMC Panel Slow Build http://67-72chevytrucks.com/vboard/s...=1#post5457281 63 
|
|
|

|
|
|
#15 | ||
|
Senior Enthusiast
Join Date: Feb 2007
Location: Spokane Valley, WA
Posts: 8,356
|
Re: Markeb01 Build Thread
Thanks to everyone for taking the time to look at my build and all the comments that have been offered. They are greatly appreciated.
Quote:
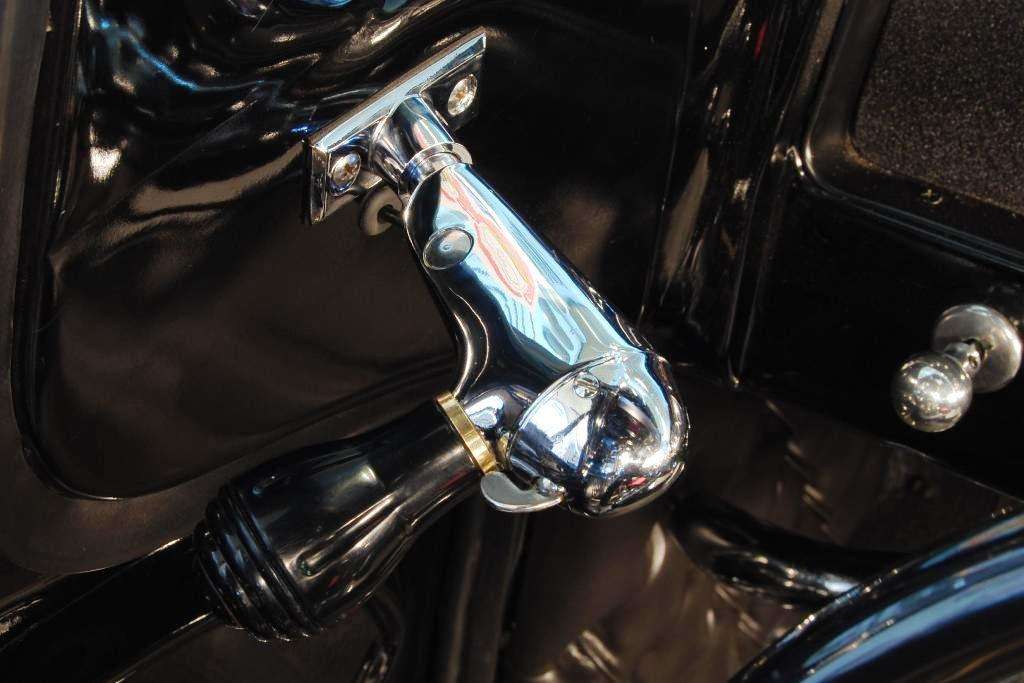
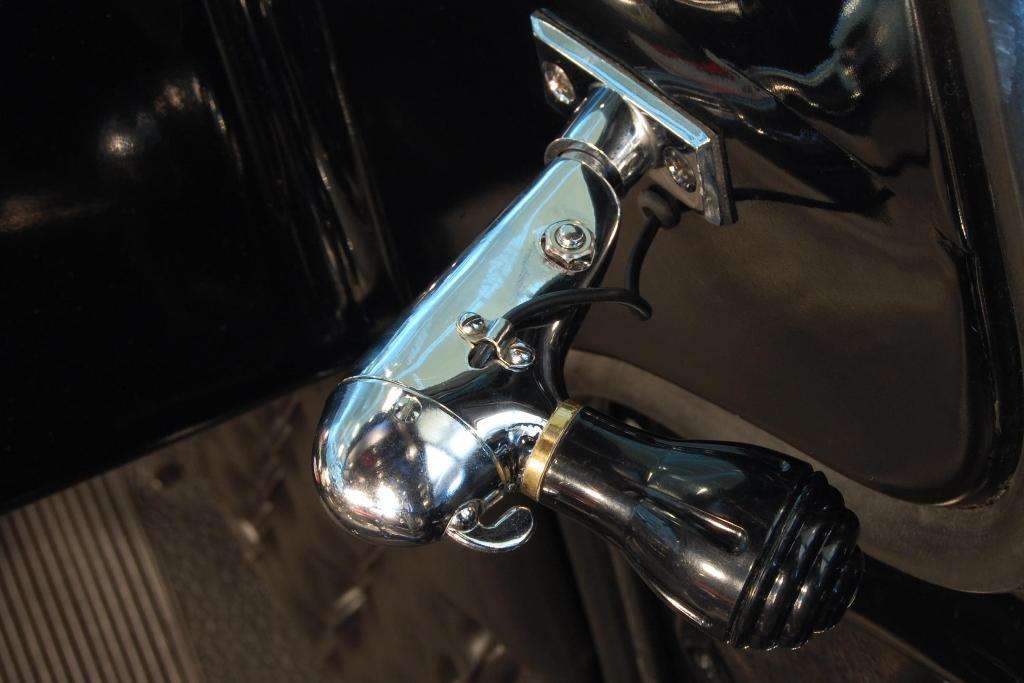
What’s next is a good question, and thanks for asking. I’m kind of in a state of transition at the moment, having put so much attention into the truck over the last 20+ years, I’m not sure what I want to do next. I hate to admit it to myself, but there won’t be any more street rods or restorations. I’m just too worn out and broken to start over on another build. Although the truck is essentially done, there are a couple of trinkets left on the “maybe” list. Chrome vent windows and chrome metal door glass frames, (if I ever find any in great shape and affordable – which is unlikely). Exhaust cutouts behind the tires are a possibility. And a new engine would be nice if it ever fits in the budget. But none of these are very high on the priority list. During the winter months I’ll be making progress on model cars, trucks, and dioramas. I’ll also be constructing a new basement bathroom, and diamond tufting an antique rocking chair. Then next spring and summer I’m looking forward to hitting a bunch of local rod runs and taking the truck on some longer day trips up to a couple hundred miles from home. Quote:
  http://67-72chevytrucks.com/vboard/s...d.php?t=401449
__________________
My Build Thread: http://67-72chevytrucks.com/vboard/s...d.php?t=444502 |
||
|
|

|
|
|
#16 |
|
Registered User
Join Date: Jun 2012
Location: Selkirk Ontario Canada
Posts: 1,141
|
Re: Markeb01 Build Thread
that works perfect thanks
__________________
My 63 GMC Panel Slow Build http://67-72chevytrucks.com/vboard/s...=1#post5457281 63 
|
|
|

|
|
|
#17 |
|
Registered User
Join Date: Aug 2012
Location: Hudson Bay SK Canada
Posts: 15
|
Re: Markeb01 Build Thread
was wondering what model and size are your spot lights
|
|
|

|
|
|
#18 |
|
Senior Enthusiast
Join Date: Feb 2007
Location: Spokane Valley, WA
Posts: 8,356
|
Re: Markeb01 Build Thread
They are identified as Unity Model S6, and are generally referred to as 6” spotlights. In truth that is the diameter of the widest part of the head. The actual diameter of the bulb that shows through the rim is closer to 5” across.
Here’s a thread that shows all the details of the lamps: http://67-72chevytrucks.com/vboard/s...d.php?t=403869 And here’s a thread that shows how to install them in a 60-63 cab: http://67-72chevytrucks.com/vboard/s...d.php?t=401449
__________________
My Build Thread: http://67-72chevytrucks.com/vboard/s...d.php?t=444502 |
|
|

|
|
|
#19 |
|
Registered User
Join Date: Sep 2011
Location: Tacoma, WA
Posts: 2,425
|
Re: Markeb01 Build Thread
It really does look awesome Mark!
By any chance you ever get up to Arbor Crest winery up above Plants-Ferry? The old mansion and the view up there are fantastic. Your latest photo just reminded me of it.
__________________
Michael McMurphy My 66 Stepside My 64 Tow Truck My 66 Tempest Table Of Contents Added to Page1 |
|
|

|
|
|
#20 |
|
Senior Enthusiast
Join Date: Feb 2007
Location: Spokane Valley, WA
Posts: 8,356
|
Re: Markeb01 Build Thread
Good eye Mike! Indeed that is where the latest picture was taken. They’ve made a lot of improvements to the grounds and parking area making it even more enjoyable to visit.
__________________
My Build Thread: http://67-72chevytrucks.com/vboard/s...d.php?t=444502 |
|
|

|
|
|
#21 |
|
Senior Member
 Join Date: Mar 2011
Location: Tucson, Arizona
Posts: 2,082
|
Re: Markeb01 Build Thread
Your truck looks great Mark! The last few final touches have really made a huge difference in the truck. I'm not saying that it didn't already look fantastic, but now it's perfect. I kinda wish you weren't done. I'll miss following your projects. They're a great source of motivation and information. Thanks for sharing.
|
|
|

|
|
|
#22 |
|
Just here to tinker
 Join Date: Jun 2008
Location: Holland, MI
Posts: 3,697
|
Re: Markeb01 Build Thread
Hey Mark, you should seriously consider coming to Billetproof in Chehalis next year. It is an awesome time and your truck would do very well. Plus I'd like to see it in person
 Posted via Mobile Device
__________________
78 C10 SWB Diesel #1 (wrecked)http://67-72chevytrucks.com/vboard/s...1978+silverado 78 C10 SWB Diesel #2 (sold)http://67-72chevytrucks.com/vboard/s...d.php?t=650751 60 GMC Suburban (sold)http://67-72chevytrucks.com/vboard/s...d.php?t=445526 60 GMC 1000 (sold)http://67-72chevytrucks.com/vboard/showthread.php?t=298235 67 GMC 1500 (sold) http://67-72chevytrucks.com/vboard/s...d.php?t=803695 73 Chevy C20(Daily)http://67-72chevytrucks.com/vboard/s...d.php?t=852767 86 Suburban(summer unit) http://67-72chevytrucks.com/vboard/s...d.php?t=810697 88 Suburban 4x4(sold) |
|
|

|
|
|
#23 | |
|
Registered User
Join Date: Sep 2011
Location: Tacoma, WA
Posts: 2,425
|
Re: Markeb01 Build Thread
Quote:
You totally beat me to it, awesome! You will probably recognise the back drops for these photos then as well.... They were just quick captures on a cheap digital camera, sadly all my big photo $$ is into my old 35mm SLR (lenses and filters and such)...  My 66... The wife's 72...
__________________
Michael McMurphy My 66 Stepside My 64 Tow Truck My 66 Tempest Table Of Contents Added to Page1 |
|
|
|

|
|
|
#24 |
|
Registered User
Join Date: Sep 2012
Location: Bethesda Maryland
Posts: 158
|
Re: Markeb01 Build Thread
Really nice story and great looking truck to boot!
|
|
|

|
|
|
#25 |
|
Senior Enthusiast
Join Date: Feb 2007
Location: Spokane Valley, WA
Posts: 8,356
|
Re: Markeb01 Build Thread
Thanks again guys for all the comments, compliments, and suggestions. I’ve finally reached a point where I can start enjoying more of what everyone else is doing. I’m surprised when I find there are some really great build threads that have been progressing for a long time, and I’ve never seen some of them before. There are just too many to keep up with.
The Chehalis Billetproof event sounds like it would be fun and just the kind of stuff I like. Regrettably my back is so deteriorated I haven’t traveled more than an hour from home in over 10 years, but a new medication is really helping. Who knows, maybe next year? Spent much of today changing over to snow tires on both the daily driver Honda and the truck. I was hoping to leave the mags on a while longer and maybe get some additional photo opportunities, but I’ve got a slow leak in a rear tire that needs attention. We’re also supposed to have subfreezing temperatures and snow by next weekend, so I figured I’d rather change over now when the weather is more agreeable. I also finally discovered the source of the chirping windshield trim squeak. Previously I mentioned I hadn’t made any other recent changes to the truck, but I forgot about one and that was the culprit. It turned out to be the chromed steel Hurst shifter handle. I’d never had that mounted up against the shifter adapter plate before (shown in post #39, only the aluminum handles had been used. Since there are no serrations in the adapter, even under maximum fastener torque it still managed to wiggle enough to squeak. Rather than cutting serrations in the plate, I just went back to the aluminum handle for now, and thankfully the irritation is completely gone. The windshield trim was a minor contributor, but that noise was eliminated on the first attempt. Amazing how hard some of those things can be to diagnose.
__________________
My Build Thread: http://67-72chevytrucks.com/vboard/s...d.php?t=444502 |
|
|

|
 |
| Bookmarks |
|
|