
|
 04-17-2011, 10:22 PM
|
#451 |
|
GEARHEAD
Join Date: Aug 2003
Location: MN
Posts: 6,126
|
Re: Junkyard Jimmy Super Low Buck Build Thread
I finally picked up the tires for the jimmy. The seller contacted me last week asking about a windshield frame, I had one, so we worked out a trade. I got a set of 4 32x11.5x15 tires with good tread, a pair of turquoise door panels (for my C-10) and he got the windshield frame I paid $35 for. We were both happy. I also bought an inside heater box. Not realizing this tub didn't have one, I probably sent 5 of these to scrap. About $20 for that part. I'll probably just cut some sheetmetal to blank off the heater hole for the summer, then install a heater later.
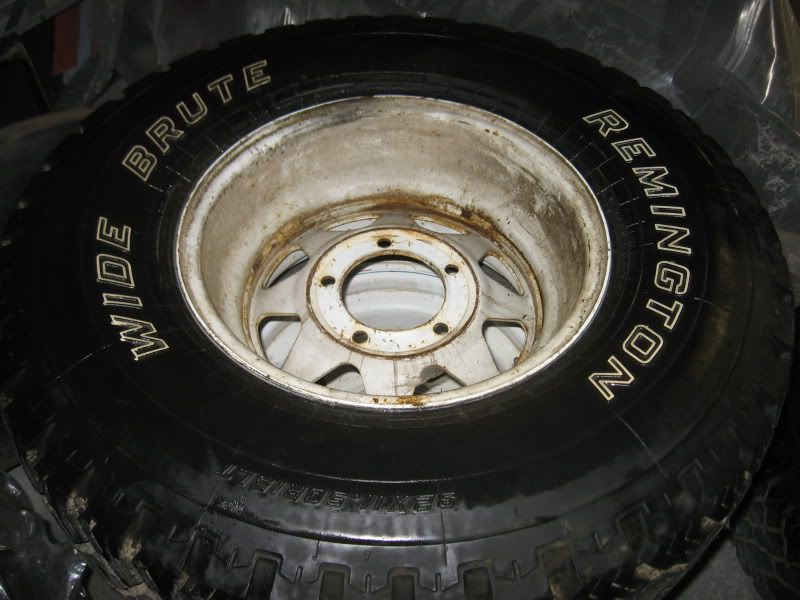 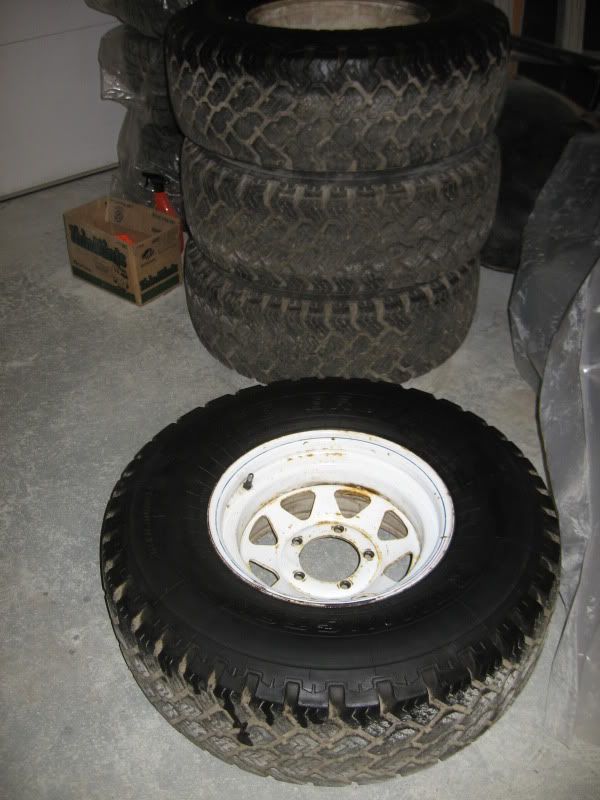 Anyone need some ford 5 lug wagon wheels, cheap!? Now that I had tires, I figured I better start cleaning up the wheels. They were nasty. Heres a pic of an uncleaned one by one I worked on a bit.  And a pic of 2 cleaned ones. 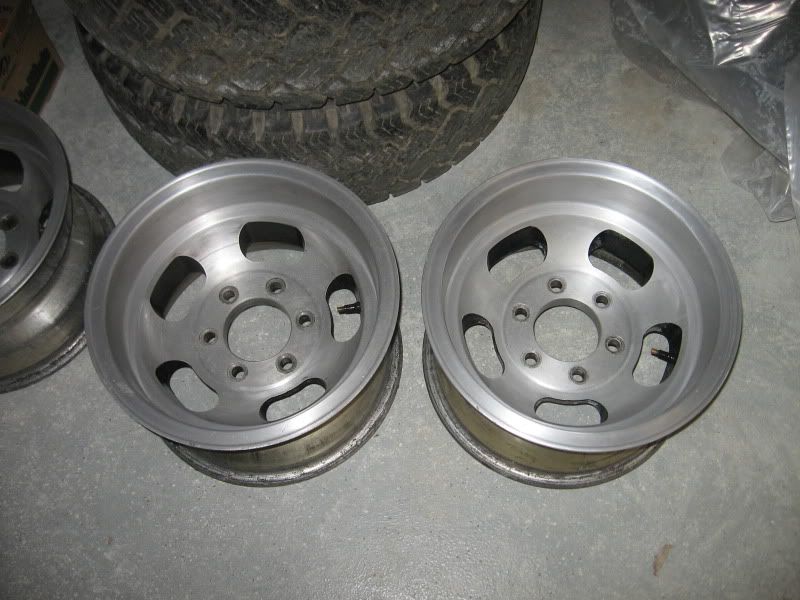 I still need to work on all of them, and will probably continue to clean and rub the whole set as I have time. For now though, they are ok. I need to find center caps. One surprise was that it is not a matched set. There are 2 ansen sprints and 2 shelby 500's. There are very small differences in the overall look, but one set has a larger center hole. I should get them mounted up this week. Also got underneath to try and identify the source of leakage. It's possible it's the tranny pan gasket. I thought I did a good job on it, but there was definitely some leakage there. I tightened the bolts a bit, and I'll just have to keep an eye on it, see if it keeps dripping. Oh yeah, I measured the hieght difference front to back using the top of the wheel well and the rear is about 3.5" lower. The guy I got the tires from might have a set of 4" lift blocks, or I'll find another set. I was not expecting that much drop or sag. The lift blocks will work until the springs get replaced some time down the road.
__________________
If no one knows what you're doing, they can't tell you you're doing it wrong HG's Dream Car Build - Shelby Cobra Kit Build your own adjustable track bar 71  Long Fleet C/10 Long Fleet C/10 72  Jimmy 4x4 (Junkyard Jimmy) Jimmy 4x4 (Junkyard Jimmy)HG's Plow Truck '78  K35 Dually K35 DuallyBigass Farm Truck HG's thread of miscellaneous stuff Last edited by hgs_notes; 04-20-2011 at 11:42 AM. |

|

|
|
04-17-2011, 10:40 PM
|
#452 |
|
VA72C10
 Join Date: Mar 2008
Location: Midlothian, VA
Posts: 25,267
|
Re: Junkyard Jimmy Super Low Buck Build Thread
Those will look nice and tough on there.
On the rear sag, probably is sagging about 1.5" more than stock. My blazer had new parts on it and a 2/4 lift kit which made it sit perfectly level. So the rear is typically 2" lower from the factory....
__________________
Looking for a 67-72 swb or blazer project in or around VA. 
|
|
|
|
|
04-20-2011, 11:49 PM
|
#453 | |
|
GEARHEAD
Join Date: Aug 2003
Location: MN
Posts: 6,126
|
Re: Junkyard Jimmy Super Low Buck Build Thread
Quote:
The solution will eventually present itself in what becomes available at the right price. Got an hour or so out in the driveway tonight. I was bolting in the passenger seat. The interior has always had the smell of pee, I always assumed it was from mice. I had cleaned out the side vents and cowl last fall, but the smell didn't go away. So it was probably in the seats. Anyway, small bits of foam were falling out of the seat back while I was working on it, so I decided to pull off the back cover. 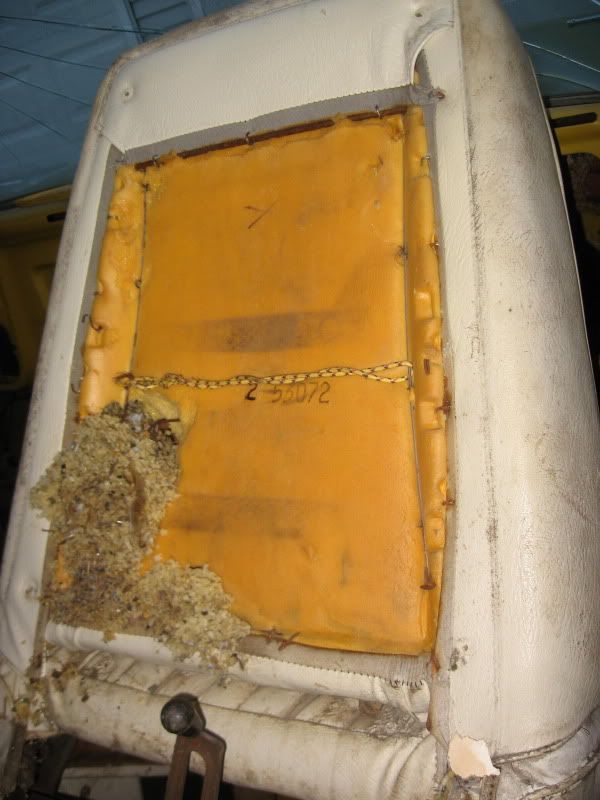 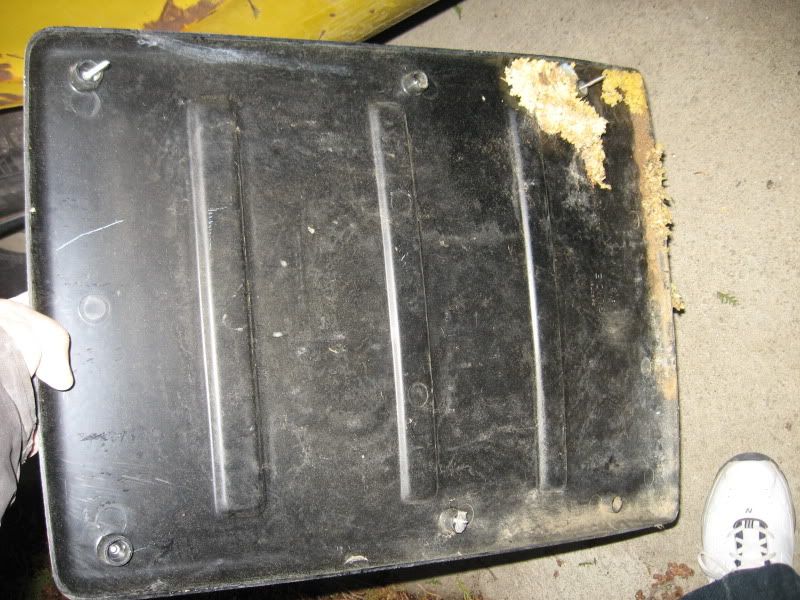 I vacuumed out the hole, which by the way included the remains of the industrious little bastard, and was left with this... 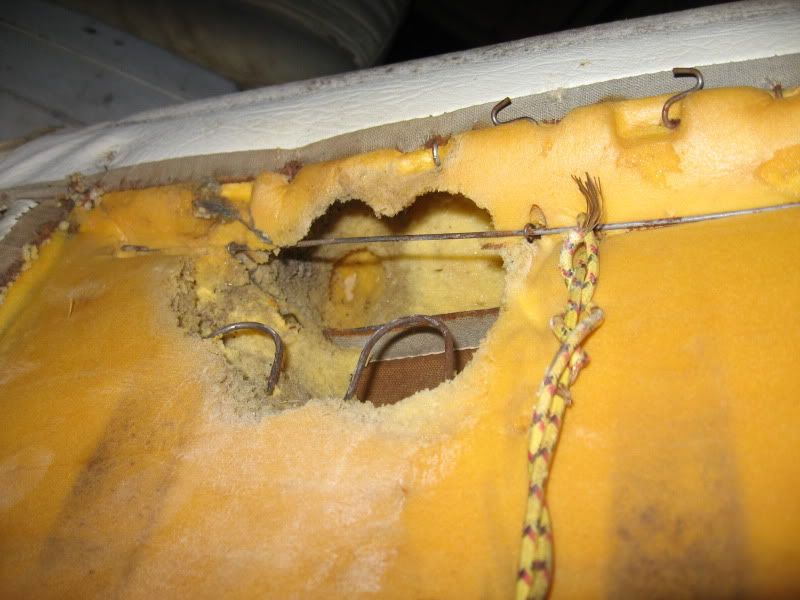 So I'll have to get a piece of foam to carve into the correct shape and glue it back inside the hole. I'll check the other seat out in the next couple days. If they continue to smell, I have another set I can use in similar condition sans the odor. One of my new tires did not hold air, so before I spent a bunch of cash remounting the set to the slot wheels, I brought that one in to find the leak. I told them if it was good to swap it to the slot wheel I brought in with it. It was just leaking at the valve and on the bead, so I have one mounted now. The other threee should be done and mounted by this weekend. I was putting on the glove box door, but found it was missing the stop that keeps it level when open, and the latch on the dash was gone. So a couple little doodads to scrounge at the yard tomorrow. I was in a yard monday and found a straight chevy tailgate for $125. Just needs sandblasted and primered. Now I have 2 good chevy tailgates and I really want a good GMC gate. Looking to trade if anyone has one, PM me.
__________________
If no one knows what you're doing, they can't tell you you're doing it wrong HG's Dream Car Build - Shelby Cobra Kit Build your own adjustable track bar 71 Long Fleet C/10 72 Jimmy 4x4 (Junkyard Jimmy)HG's Plow Truck '78 K35 DuallyBigass Farm Truck HG's thread of miscellaneous stuff |
|
|
|
|
|
04-21-2011, 12:00 AM
|
#454 |
|
VA72C10
Join Date: Mar 2008
Location: Midlothian, VA
Posts: 25,267
|
Re: Junkyard Jimmy Super Low Buck Build Thread
removing the remains might help with the smell
 I've also found the automotive version of febreez does well to remove odors including animal urine that a cat had "watered" a mat I keep in the garage...it took two applications but did the trick.... I've also found the automotive version of febreez does well to remove odors including animal urine that a cat had "watered" a mat I keep in the garage...it took two applications but did the trick....nice find on the gate. If i run across a nice GMC one I'll pm ya! big or small letters? (or you could always do a gmc band on the nice chevy one )
__________________
Looking for a 67-72 swb or blazer project in or around VA.
|
|
|
|
|
04-21-2011, 12:09 AM
|
#455 | |
|
GEARHEAD
Join Date: Aug 2003
Location: MN
Posts: 6,126
|
Re: Junkyard Jimmy Super Low Buck Build Thread
Quote:
When I get some time and cooperative weather, I want to try out the new deadmans valve I got for my sandblaster and clean up both tail gates. Then spray 'em with the epoxy primer. Then I can put an ad in the classifieds for a trade or sell one to buy another.
__________________
If no one knows what you're doing, they can't tell you you're doing it wrong HG's Dream Car Build - Shelby Cobra Kit Build your own adjustable track bar 71 Long Fleet C/10 72 Jimmy 4x4 (Junkyard Jimmy)HG's Plow Truck '78 K35 DuallyBigass Farm Truck HG's thread of miscellaneous stuff |
|
|
|
|
|
04-21-2011, 07:41 PM
|
#456 |
|
GEARHEAD
Join Date: Aug 2003
Location: MN
Posts: 6,126
|
Re: Junkyard Jimmy Super Low Buck Build Thread
Got the other tires mounted and balanced today. Should be bolting them on this weekend. That cost $48, plus the $46 I spent for the tires and heater box. Also found a glove box latch and stop today, as well as the shift indicator. Total spent $3345.
__________________
If no one knows what you're doing, they can't tell you you're doing it wrong HG's Dream Car Build - Shelby Cobra Kit Build your own adjustable track bar 71 Long Fleet C/10 72 Jimmy 4x4 (Junkyard Jimmy)HG's Plow Truck '78 K35 DuallyBigass Farm Truck HG's thread of miscellaneous stuff |
|
|
|
|
04-22-2011, 07:30 PM
|
#457 |
|
GEARHEAD
Join Date: Aug 2003
Location: MN
Posts: 6,126
|
Re: Junkyard Jimmy Super Low Buck Build Thread
It's a cold wet spring so far and kind of miserable to work in the driveway, but yet I do. Nothing big, but got the glove box door installed, with latch, etc. Put on the transfercase shift knob, installed the pointer for the shift indicator.
The smell has greatly improved since cleaning the seat out. There is an uphulstory shop here in town that I think can help me repair the foam. I just ordered shocks from rockauto.com. Got a great deal. Rear air shocks, $23 for the pair (gabriel 49162). That will take care of some of the sagging problem. And the front shocks were a bargain too at $31.50 for the pair (gabriel 61516). They were so cheap I bought a set for my C-10 while I was at it.
__________________
If no one knows what you're doing, they can't tell you you're doing it wrong HG's Dream Car Build - Shelby Cobra Kit Build your own adjustable track bar 71 Long Fleet C/10 72 Jimmy 4x4 (Junkyard Jimmy)HG's Plow Truck '78 K35 DuallyBigass Farm Truck HG's thread of miscellaneous stuff |
|
|
|
|
04-23-2011, 12:45 PM
|
#458 |
|
VA72C10
Join Date: Mar 2008
Location: Midlothian, VA
Posts: 25,267
|
Re: Junkyard Jimmy Super Low Buck Build Thread
there's a gmc gate on the parts board for trade for a chevy gate right now...
http://67-72chevytrucks.com/vboard/s...d.php?t=460584
__________________
Looking for a 67-72 swb or blazer project in or around VA.
|
|
|
|
|
04-23-2011, 01:13 PM
|
#459 | |
|
GEARHEAD
Join Date: Aug 2003
Location: MN
Posts: 6,126
|
Re: Junkyard Jimmy Super Low Buck Build Thread
Quote:
Progress, new shoes installed. 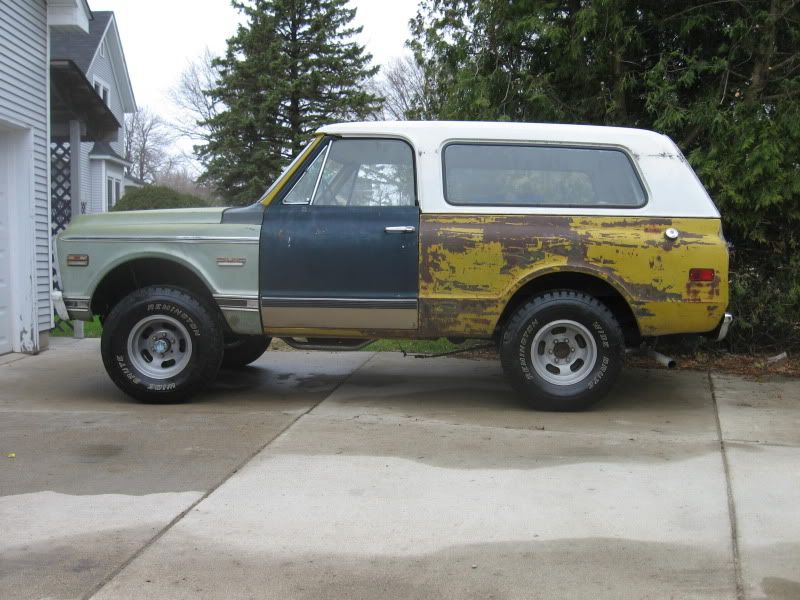
__________________
If no one knows what you're doing, they can't tell you you're doing it wrong HG's Dream Car Build - Shelby Cobra Kit Build your own adjustable track bar 71 Long Fleet C/10 72 Jimmy 4x4 (Junkyard Jimmy)HG's Plow Truck '78 K35 DuallyBigass Farm Truck HG's thread of miscellaneous stuff |
|
|
|
|
|
04-23-2011, 02:18 PM
|
#460 |
|
VA72C10
Join Date: Mar 2008
Location: Midlothian, VA
Posts: 25,267
|
Re: Junkyard Jimmy Super Low Buck Build Thread
No problem....and the new shoes look great!
__________________
Looking for a 67-72 swb or blazer project in or around VA.
|
|
|
|
|
04-23-2011, 02:28 PM
|
#461 |
|
Senior Member
Join Date: Nov 2003
Location: Brookings, SD
Posts: 10,497
|
Re: Junkyard Jimmy Super Low Buck Build Thread
That thing's looking really good!!
__________________
Some people are like slinkies, they aren't good for anything, but you can't help but smile when you see one tumble down the stairs. |
|
|
|
|
04-23-2011, 04:46 PM
|
#462 | |
|
Conversion Truck Addicted
Join Date: Sep 2009
Location: Denmark, Europe
Posts: 1,551
|
Re: Junkyard Jimmy Super Low Buck Build Thread
Man i love this build, im picking up a old 77-80 shorty stepside in parts rolling frame and crushed cab, this is what i plan to do with put somthing that was destined to the scrapyard into a good working truck might not be pretty but atleast it saved
__________________
Thomas Quote:
|
|
|
|
|
|
04-23-2011, 07:09 PM
|
#463 | |||
|
GEARHEAD
Join Date: Aug 2003
Location: MN
Posts: 6,126
|
Re: Junkyard Jimmy Super Low Buck Build Thread
Quote:
Quote:
Quote:
MN has an odd law on the books concerning windshields. Apparently, they are not required. The rule is if you have one, you must have wipers. See where I'm going with this...
__________________
If no one knows what you're doing, they can't tell you you're doing it wrong HG's Dream Car Build - Shelby Cobra Kit Build your own adjustable track bar 71 Long Fleet C/10 72 Jimmy 4x4 (Junkyard Jimmy)HG's Plow Truck '78 K35 DuallyBigass Farm Truck HG's thread of miscellaneous stuff |
|||
|
|
|
|
04-25-2011, 01:17 AM
|
#464 |
|
GEARHEAD
Join Date: Aug 2003
Location: MN
Posts: 6,126
|
Re: Junkyard Jimmy Super Low Buck Build Thread
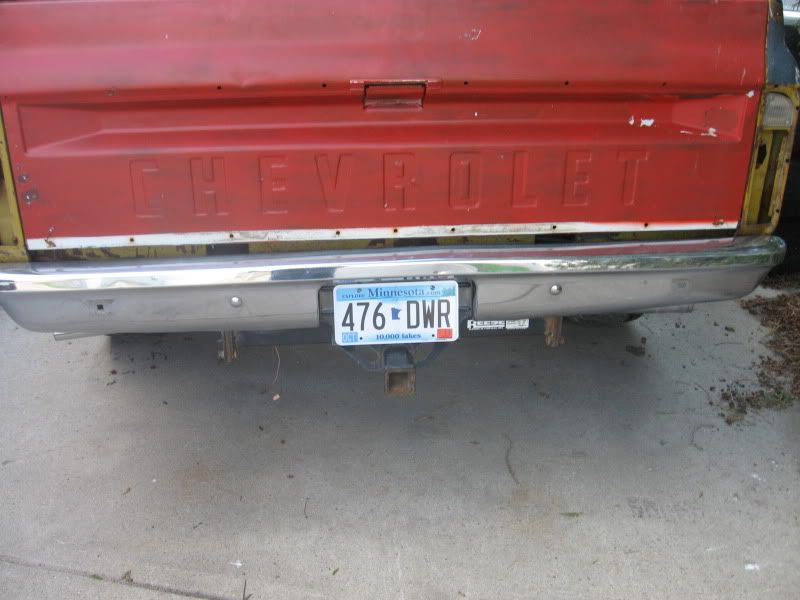
Did some work sunday, which was kinda unexpected, but a nice treat (to go along with my dove truffle eggs). The weather was perfect and I just didn't want to be inside. I started by swapping out the rear bumper. I had found a better one in my stash. I think I have the outer brackets in the garage somewhere.
 Then I was vacuuming out my wifes truck, and decided to see how the pee smell was going in the jimmy. Still bad, so I started spraying febreeze around, etc. But came back to the nest hole in the seat, took a sniff, and found that it was a completely different smell than the pee. I decided to see if there was anything in the passenger door (driver side was open, no panel)... 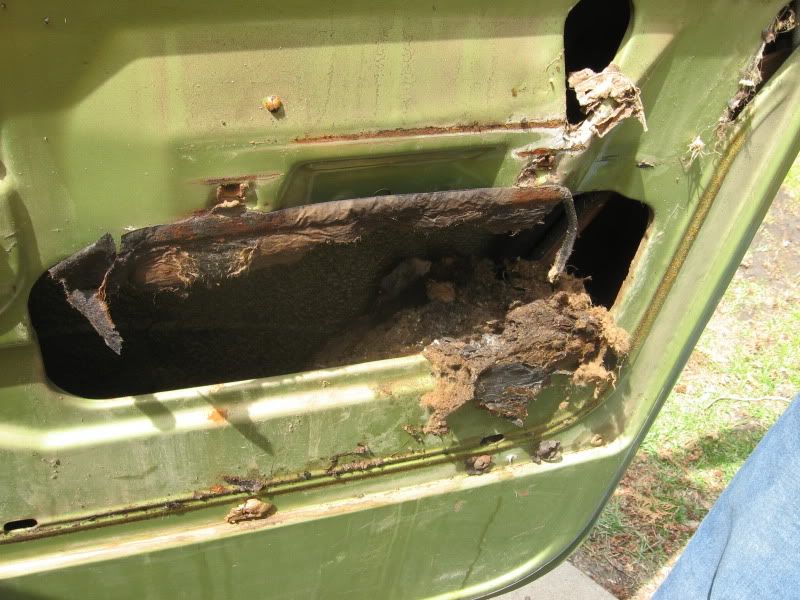 Yep, and man was it ripe. The rain has been washing through the nest and depositing the odor throughout the door. I hosed out the door, still stunk. I sprayed it down with simple green, better but still stunk. Hand wiped out the inside as far as I could reach, then hosed it again, much better now. Still sprayed febreeze in it again anyway. Then lubed up the window mechanism as much as I could, cleaned the panel and arm rest and put it back together. I think I got it cleaned out now. I wiped down the seats and dash. Pulled out the console for cleaning, and decided to swap it for one that has cup holders. I had enough parts around to put one together. Still needs more cleaning and/or paint, but it'll do the job for now. 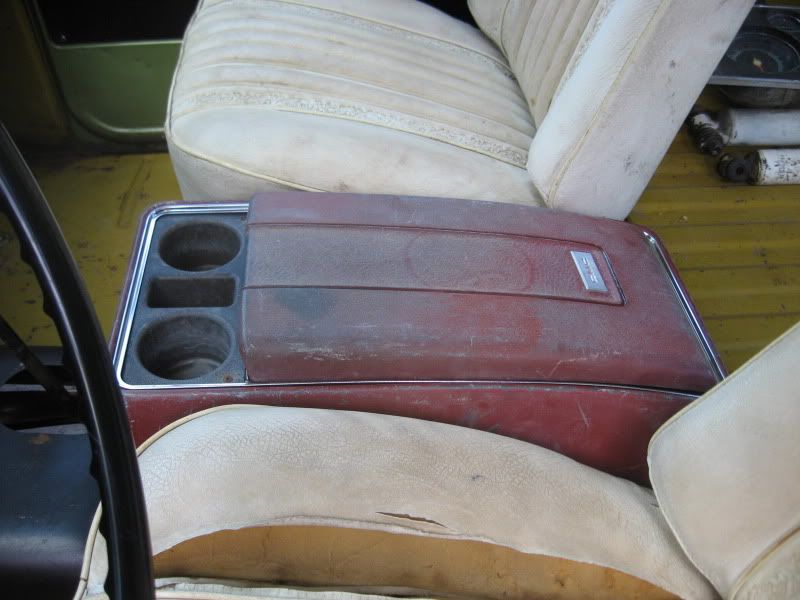 Monday is supposed to be another great day, so I am planning to use part of it in the driveway. Maybe I can get started on the e-brake cables or tail lights.
__________________
If no one knows what you're doing, they can't tell you you're doing it wrong HG's Dream Car Build - Shelby Cobra Kit Build your own adjustable track bar 71 Long Fleet C/10 72 Jimmy 4x4 (Junkyard Jimmy)HG's Plow Truck '78 K35 DuallyBigass Farm Truck HG's thread of miscellaneous stuff |
|
|
|
|
04-25-2011, 04:21 AM
|
#465 |
|
Local Redneck Authority
Join Date: Mar 2009
Location: Grand Rapids, MI
Posts: 584
|
Re: Junkyard Jimmy Super Low Buck Build Thread
Very cool build! Good luck finding any more homes in your rig!
__________________
-Kevin four on the floor feel the beat in your soul movin to the rhythym pumpin til ya cant take no more dance if you want to do what you came to you cant ignore the feeling of that four on the floor |
|
|
|
|
04-25-2011, 09:08 AM
|
#466 |
|
VA72C10
Join Date: Mar 2008
Location: Midlothian, VA
Posts: 25,267
|
Re: Junkyard Jimmy Super Low Buck Build Thread
yeah....that would make a lil stink
Glad you chased that down. It's fun being able to swap out nice parts like that. I can't wait till I can afford to keep a truck around and do the same with my parts stash again 
__________________
Looking for a 67-72 swb or blazer project in or around VA.
|
|
|
|
|
04-25-2011, 07:38 PM
|
#467 | ||
|
GEARHEAD
Join Date: Aug 2003
Location: MN
Posts: 6,126
|
Re: Junkyard Jimmy Super Low Buck Build Thread
Quote:
Quote:
As for the bed side, finally, SUCCESS! The local yard has 3 67-72 trucks. I have looked them over half a dozen times at least. I knew there were parts there, but just took what I thought I needed at the time. Took another look today and found the bedside I needed. It's from a longhorn, but will work just fine as a patch panel. Just surface rust and minor dings. And it only cost me a couple hours of my time plus $50. 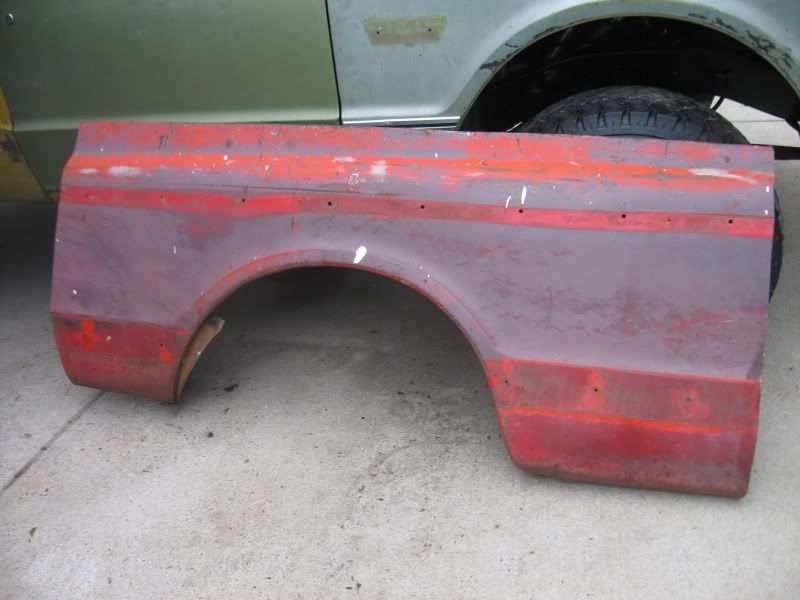 Another member has a taillight section for me. No hurry to put it on, but I can breath a sigh now that it's in hand. I'm going back later this week to get a 67 grill for my 2wd blazer ($45) and another manual throttle set up (can't believe I missed it before, thought it was a choke) and some red interior parts.
__________________
If no one knows what you're doing, they can't tell you you're doing it wrong HG's Dream Car Build - Shelby Cobra Kit Build your own adjustable track bar 71 Long Fleet C/10 72 Jimmy 4x4 (Junkyard Jimmy)HG's Plow Truck '78 K35 DuallyBigass Farm Truck HG's thread of miscellaneous stuff |
||
|
|
|
|
04-25-2011, 08:05 PM
|
#468 |
|
VA72C10
Join Date: Mar 2008
Location: Midlothian, VA
Posts: 25,267
|
Re: Junkyard Jimmy Super Low Buck Build Thread
nice score on the bedside! And sounds like some good scores still waiting for you for next time! I need to find a semi-local yard to me or move....all the ones i've found focus on late model stuff and simply crush anything older than the 80's...
__________________
Looking for a 67-72 swb or blazer project in or around VA.
|
|
|
|
|
04-26-2011, 11:04 AM
|
#469 |
|
I miss this truck.
Join Date: Dec 2001
Location: Lexington, KY U.S.A.
Posts: 2,863
|
Re: Junkyard Jimmy Super Low Buck Build Thread
Man, the progress is amazing. I've got to find the time to check in more often.
__________________
'07 GMC Acadia SLT. Sweet ride. '08 Crew Cab Z-71 short bed. Really like this truck A LOT. |
|
|
|
|
04-29-2011, 08:29 AM
|
#470 |
|
GEARHEAD
Join Date: Aug 2003
Location: MN
Posts: 6,126
|
Re: Junkyard Jimmy Super Low Buck Build Thread
The new shocks came yesterday, so I started installing them and thought it would be a fairly quick easy deal, but it never is. I started with the rear air shocks because I wanted to see it leveled out once. Spent about $16 in new grade 8 hardware. The shocks mounted up easy enough, the problem was the airlines. I hooked it all up, but couldn't get air into them. Nothing. I thought it might be the valve not sticking out far enough for the air nozze to engage, and ended up over tightening the cheap plastic tee and it broke off. The local napa (the only open part store) did not have any air shocks on hand to get a new valve out of. I looked through my hardware drawers and found a tire schrader valve extension and was able to get it on the broken stub and with a little silicone it actually sealed up ok. Still no air going through the tubing. pulled the tubes out ofthe fittings and blew threw them, actually attempted to blow through them, and nothing. No kinks in the lines I could see. I'll pull them ut today and run a wire through to find the blockage. And I might have to find a new valve tee anyway, but I want to see them work once.
The fronts will take like 5 minutes to install. Pics when it works.
__________________
If no one knows what you're doing, they can't tell you you're doing it wrong HG's Dream Car Build - Shelby Cobra Kit Build your own adjustable track bar 71 Long Fleet C/10 72 Jimmy 4x4 (Junkyard Jimmy)HG's Plow Truck '78 K35 DuallyBigass Farm Truck HG's thread of miscellaneous stuff |
|
|
|
|
05-03-2011, 11:46 PM
|
#471 |
|
GEARHEAD
Join Date: Aug 2003
Location: MN
Posts: 6,126
|
Re: Junkyard Jimmy Super Low Buck Build Thread
I got some time to play outside and the weather cooperated. So the front shocks got bolted in, but not before I made another quick trip to the hardware store for bolts. Two were just a bit short for the top shock mount.
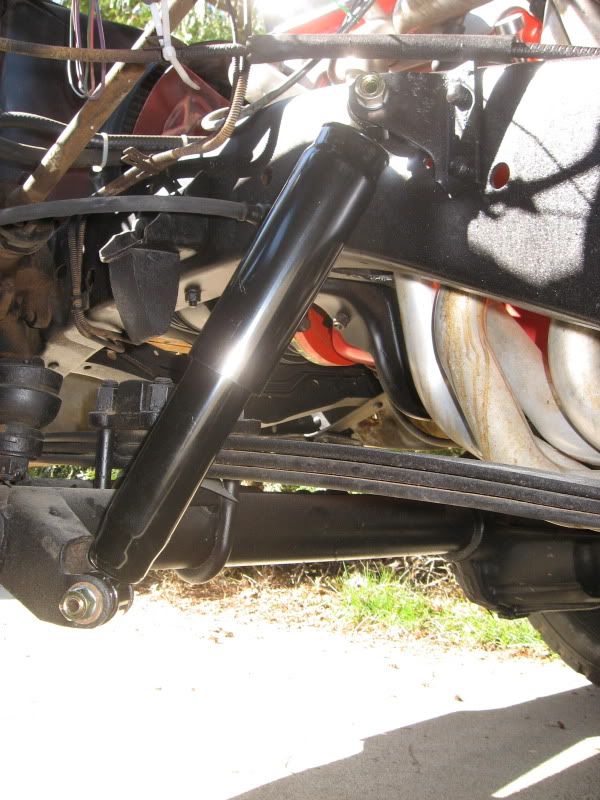 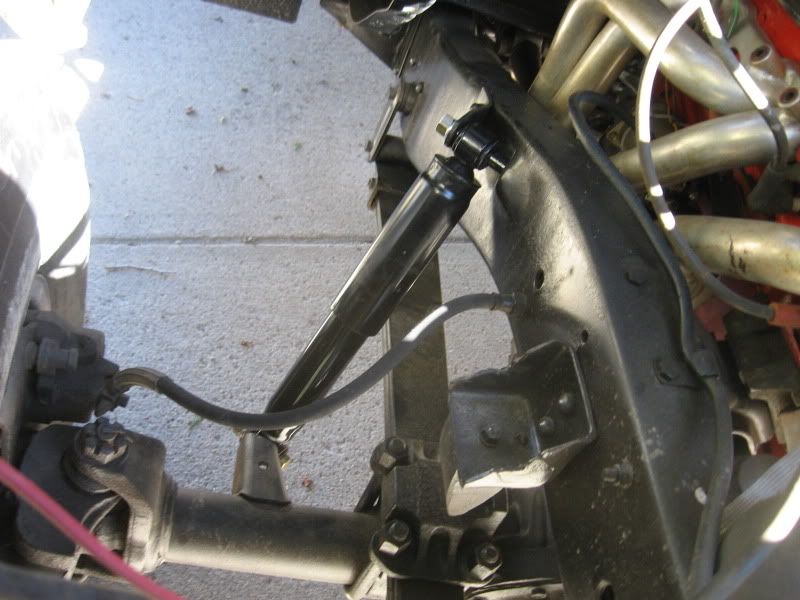 I called rockauto.com yesterday about the air line problem and they are shipping a new hose kit. So I should be able to pump them up next week. As I thought, I had a manual choke cable in the corner of the garage, and after about 10 minutes, had it installed. Works great. The pic also shows the glove box door installed. I realized I had the wrong shift indicator on, but found the correct one in a box the other day, so I'll swap that out soon.  My battery charger has an alternator test feature I never used before today. I've had problems with the battery draing, so I tested it and it says the alternator voltage is low. Oddly enough, I had it tested at the napa store before I installed it and it checked out ok then. Oh well, replacements are not hard to find. Not much else to say, except that I had to try a burnout with the new tires and it'll roast the 32's just fine. Got a nice long smokey one on the street. I am trying some tranny leak stop to see if that helps. Tightening the pan bolts a bit helped also. Need to do something with the transfer case leaks though. The driveway is looking rough under there right now. Will probably work on the rear brakes next and then the lights.
__________________
If no one knows what you're doing, they can't tell you you're doing it wrong HG's Dream Car Build - Shelby Cobra Kit Build your own adjustable track bar 71 Long Fleet C/10 72 Jimmy 4x4 (Junkyard Jimmy)HG's Plow Truck '78 K35 DuallyBigass Farm Truck HG's thread of miscellaneous stuff |
|
|
|
|
05-03-2011, 11:56 PM
|
#472 |
|
VA72C10
Join Date: Mar 2008
Location: Midlothian, VA
Posts: 25,267
|
Re: Junkyard Jimmy Super Low Buck Build Thread
nice progress! I can't wait to get back to a build. (mine's on hold pending a new donor truck
) I want my next one to be like this one is now where I can drive it and make improvements as I go...
__________________
Looking for a 67-72 swb or blazer project in or around VA.
|
|
|
|
|
05-06-2011, 09:04 PM
|
#473 | |
|
GEARHEAD
Join Date: Aug 2003
Location: MN
Posts: 6,126
|
Re: Junkyard Jimmy Super Low Buck Build Thread
Quote:
Todays progress, worked on the rear sat. Why? Hellifiknow. Actually there is a reason. The seat was taking up valuable space in the garage and I needed to make room to pull the bed off my C-10. So rather than stuff it into another corner, I put it where it belongs. Strted by welding the re-inforcing strapon he right seat mount back down to the bed floor.I had cut it last year in order to get the odd size bolt out of the hole. Then I ran a tap through all of the seat mount and seat belt mount holes. 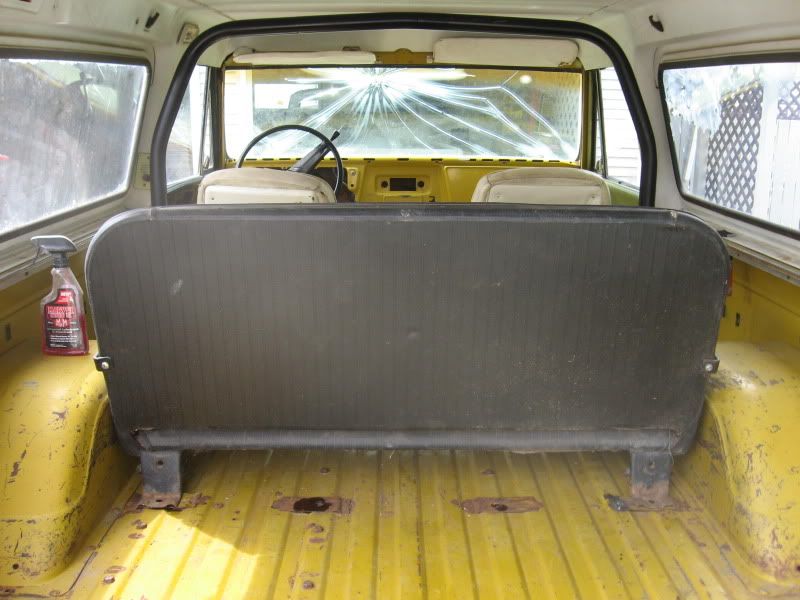 While I was doing that I soaked the belts in the kitchen sink in hot soapy water. Once the jimmy was prepped for the seat, I went in and scrubbed the hell out of the belts. I think they turned out pretty good.  So the rear seat mounts are bolted in, the seat belts are bolted in, but I need to find the front mounts. I think they are in the garage attic. 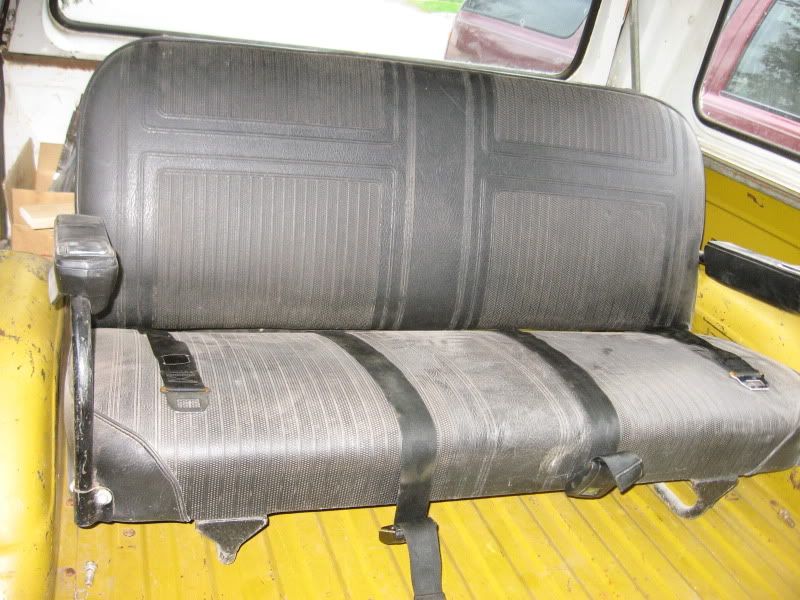 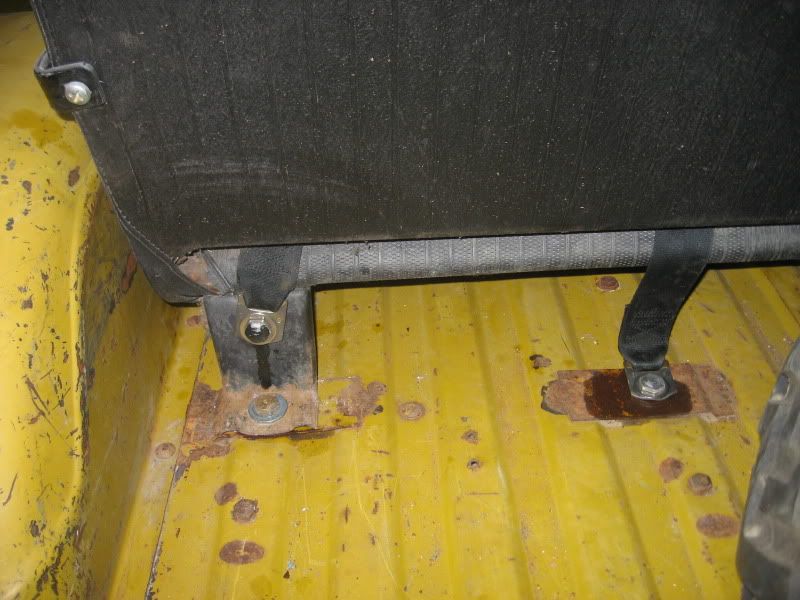 And then, just out of curiousity, I set the push bar in place and used some wire ties to hold it up. I'm undecided on whether or not to use this. If I did, what color should it be? Seems odd to have a black bar and white bumper. Give me some opinions please. 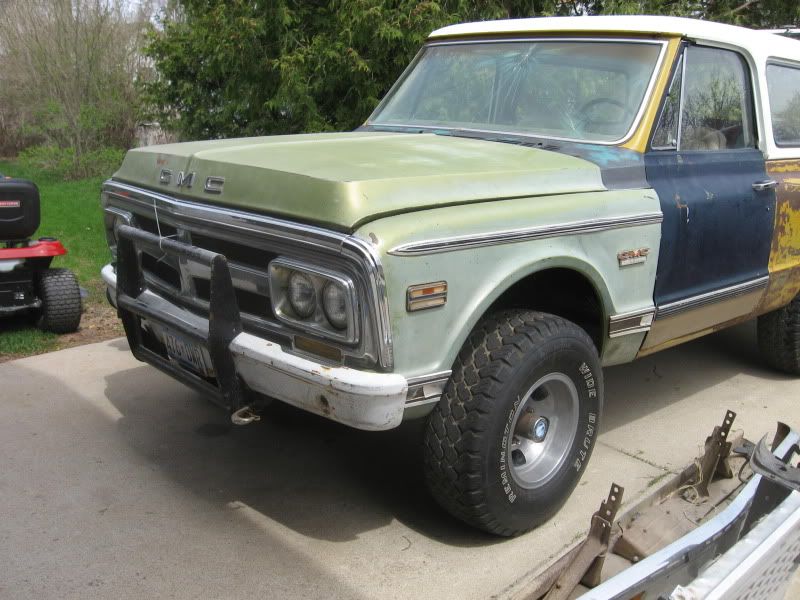 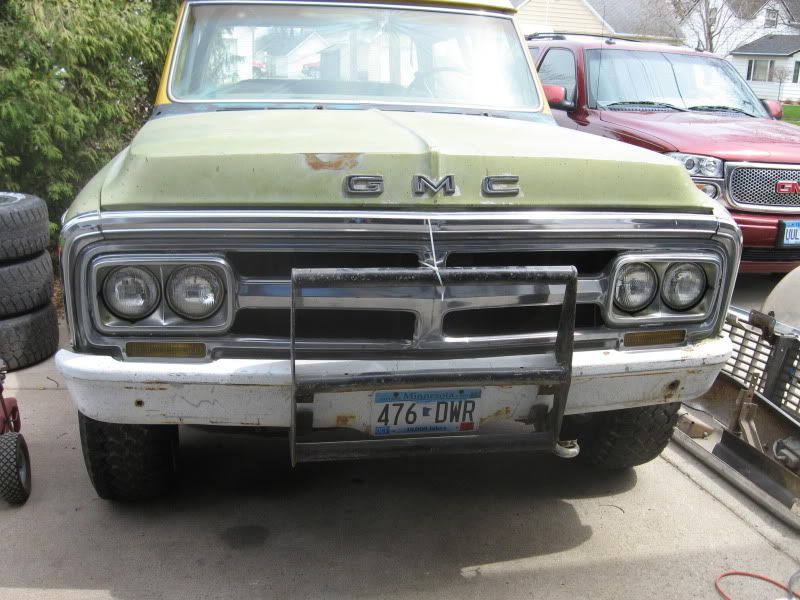 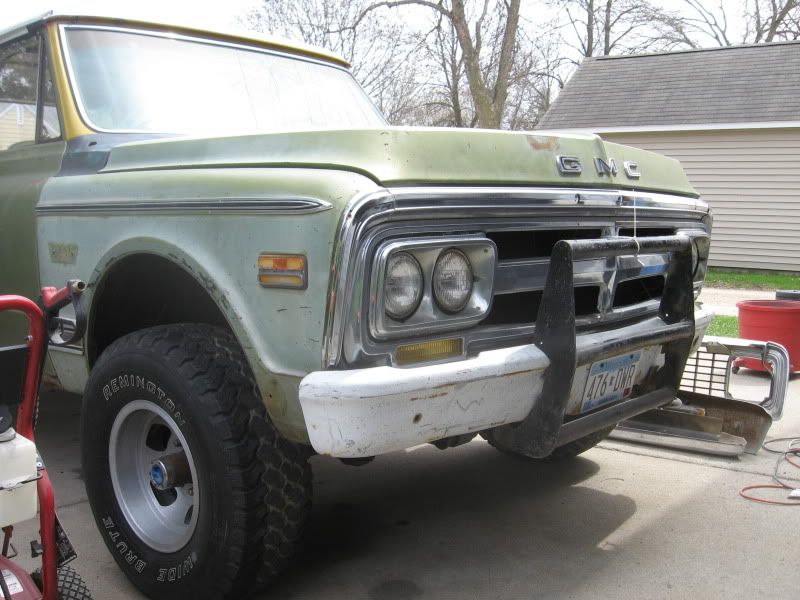
__________________
If no one knows what you're doing, they can't tell you you're doing it wrong HG's Dream Car Build - Shelby Cobra Kit Build your own adjustable track bar 71 Long Fleet C/10 72 Jimmy 4x4 (Junkyard Jimmy)HG's Plow Truck '78 K35 DuallyBigass Farm Truck HG's thread of miscellaneous stuff |
|
|
|
|
|
05-06-2011, 09:54 PM
|
#474 |
|
VA72C10
Join Date: Mar 2008
Location: Midlothian, VA
Posts: 25,267
|
Re: Junkyard Jimmy Super Low Buck Build Thread
nice progress! Those belts look great!
__________________
Looking for a 67-72 swb or blazer project in or around VA.
|
|
|
|
|
05-06-2011, 10:05 PM
|
#475 | ||
|
Senior Member
 Join Date: May 2002
Location: Hammond, WI
Posts: 1,817
|
Re: Junkyard Jimmy Super Low Buck Build Thread
Quote:
__________________
Mike 2001 Dakota R/T - Silver CC - 1 of 1671 360 w/46RE 392 limited slip 1972 Chevy Suburban - Turquoise/Black 1969 Chevy C/10 - Blue LWB 350 w/ 700R4 3.73 posi PS PB A/C - SOLD  Using your turn signal is not "giving information to the enemy" 67-72 FAQ Quote:
Last edited by nightmare; 05-06-2011 at 10:06 PM. |
||
|
|
|
 |
| Bookmarks |
|
|


 Linear Mode

