
 |
|
|
|
|
#1 |
|
Registered User
Join Date: Nov 2008
Location: So. Cal.
Posts: 452
|
Re: Project "49 No Buck$"
Now moving to the front of the truck, I cut off 8 1/2" of the front stub.
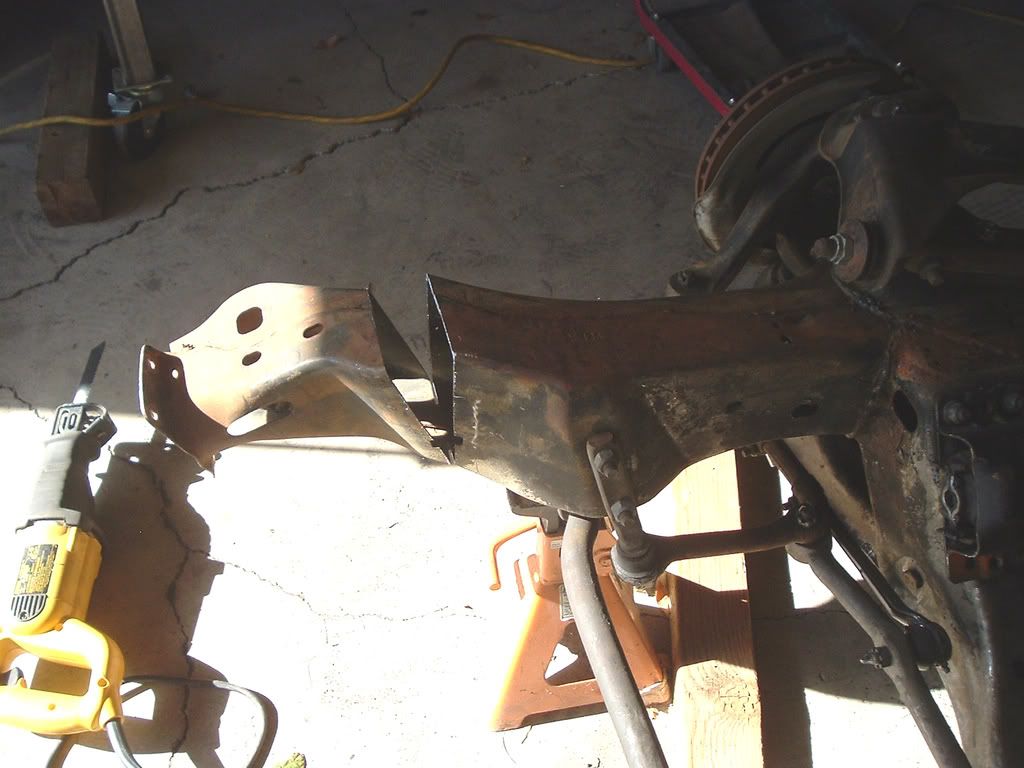 Now I slid my front frame stub jig into place (slide back to marks made on concrete) to see where my frame/bumper brackets come out at. I made a crossmember out of 3/16" x 2" square tubing that I welded in place so that the bottom of the tube was the height the top of the stubs needed to be. (whew!) Now I slid my front frame stub jig into place (slide back to marks made on concrete) to see where my frame/bumper brackets come out at. I made a crossmember out of 3/16" x 2" square tubing that I welded in place so that the bottom of the tube was the height the top of the stubs needed to be. (whew!) 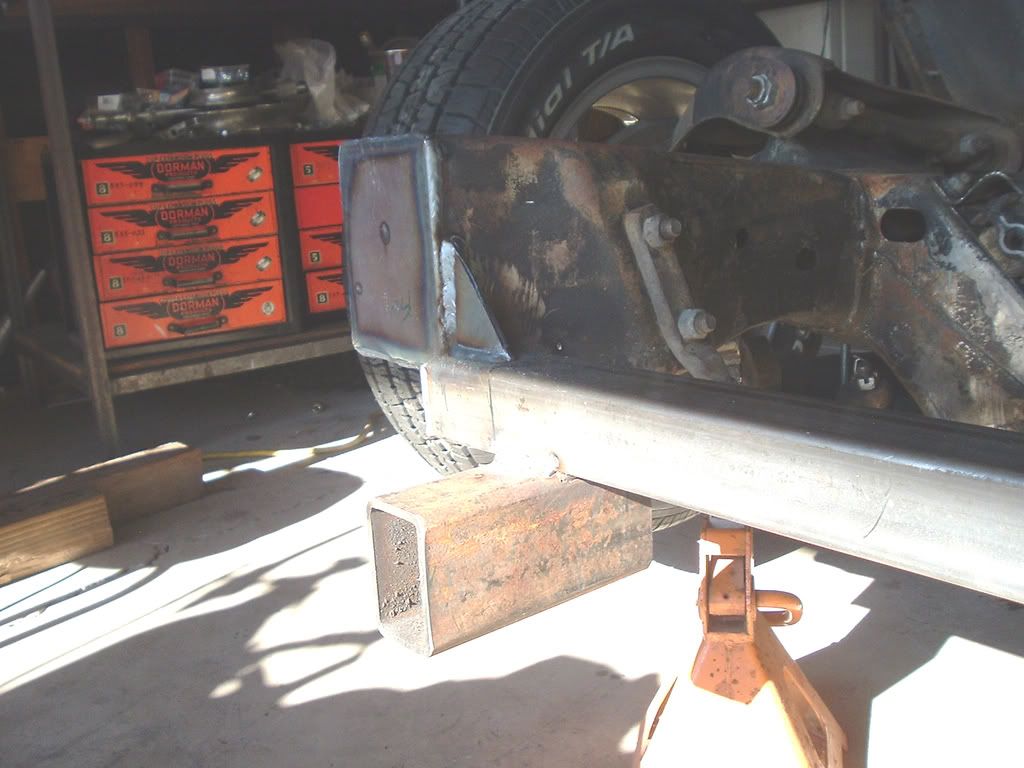 We made the bumper stubs out of some 2x3" 1/4" tubing had laying around (remember cheap!) After everything was welded into place, we welded flat plates (those actually held the truck up for layout and now have a new home!) on the front and tried to fill in everything nicely. We made the bumper stubs out of some 2x3" 1/4" tubing had laying around (remember cheap!) After everything was welded into place, we welded flat plates (those actually held the truck up for layout and now have a new home!) on the front and tried to fill in everything nicely. 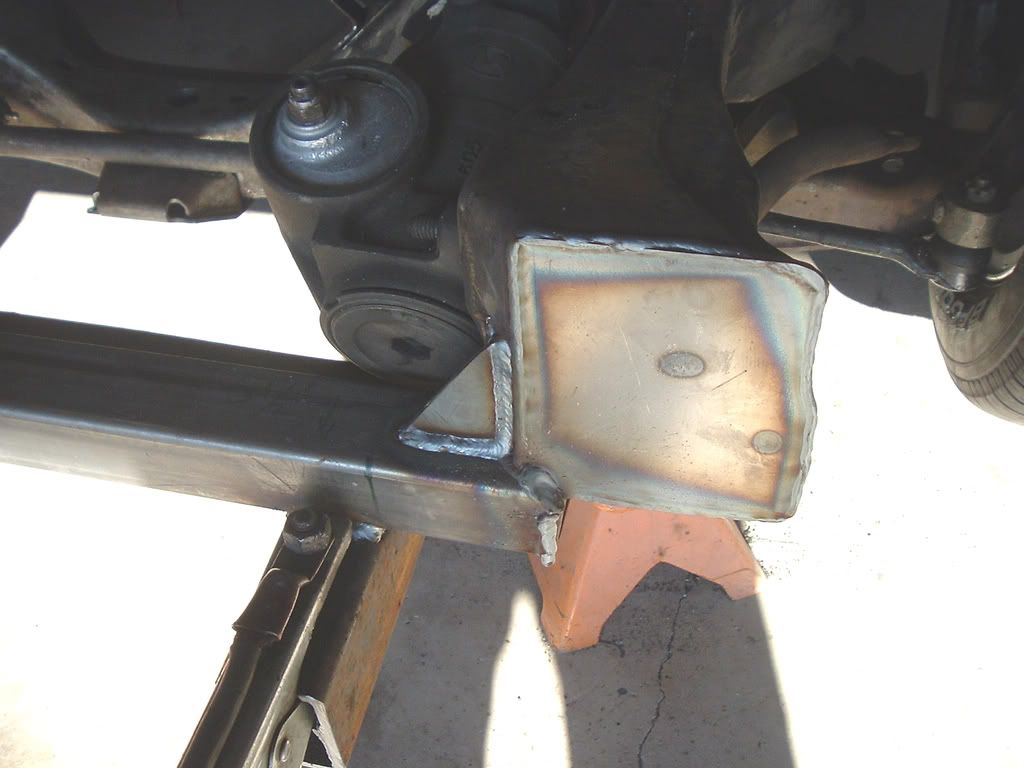 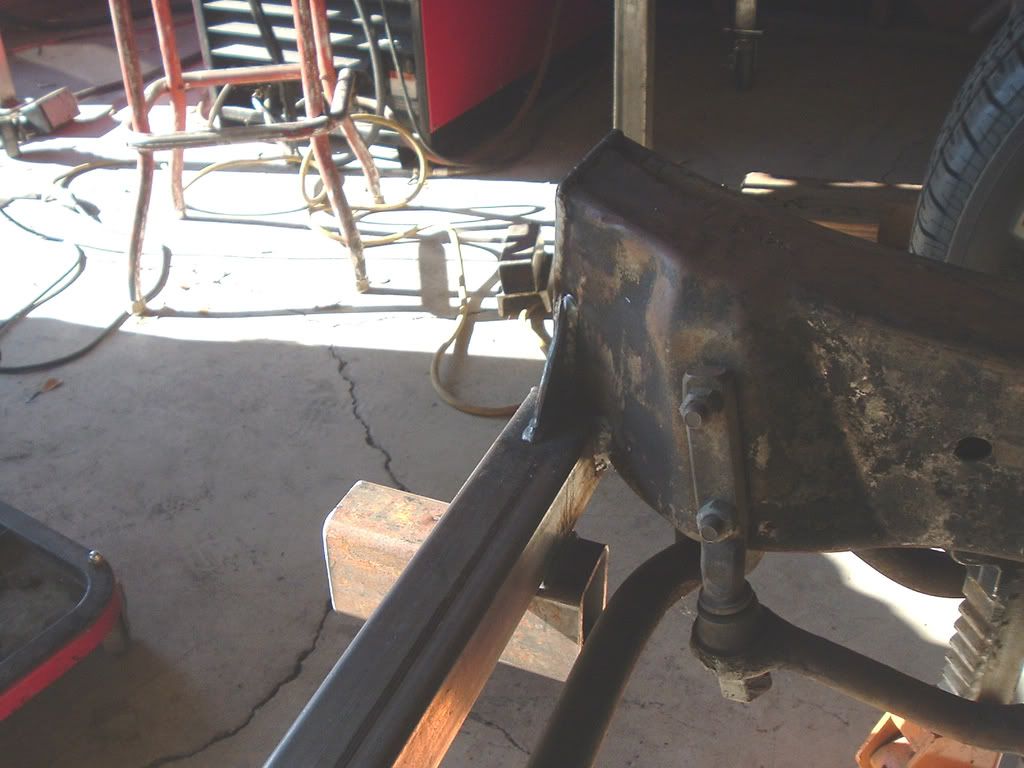 It looks a little weird, but with the sheetmetal on you can only see the bumper stubs below the grille. So far so good and waaaaay low with all the suspension travel of a stock car (I love low, but don't like my kidneys bleeding from a crappy ride)! It looks a little weird, but with the sheetmetal on you can only see the bumper stubs below the grille. So far so good and waaaaay low with all the suspension travel of a stock car (I love low, but don't like my kidneys bleeding from a crappy ride)!
|
|
|

|
|
|
#2 |
|
Registered User
Join Date: Feb 2008
Location: st cloud, fl
Posts: 266
|
Re: Project "49 No Buck$"
When installing a Camaro IFS you usually use the upper shock holes to make sure the IFS is square in respect to the AD frame. THe G body shock holes are not symetrical, thus the question....what points did you use on the G body sub frame to measure to?
thanks Don |
|
|

|
|
|
#3 |
|
Registered User
Join Date: Jul 2011
Location: bush louisiana
Posts: 213
|
Re: Project "49 No Buck$"
i also built a 1949 truck on the cheap. 1981 malibu car for sub frame 100 dollars, 1973 camaro rearend 100 dollars,1988 astro van(4.3 v6 700r4 master cylinder drive shaft(exact fit) an variuos other parts) 300 dollars. an i did use the shock towers to square off every thing an it workd perfectly, truck drives strait an true. i welded mine in just about the same way
|
|
|

|
|
|
#4 |
|
Registered User
Join Date: Jun 2008
Location: Louisiana
Posts: 493
|
Re: Project "49 No Buck$"
nice looking welds and fab work
__________________
1971 Corvette convertible 454@ 525 hp  1936 Chevy Truck street rod 1952 Chevy truck hot rod build http://www.killbillet.com/showthread...2-Chevy-Cut-up 1964 F 100 custom street rod http://www.ford-trucks.com/forums/12...mark-viii.html 1950 custom Chevy Truck |
|
|

|
|
|
#5 |
|
Registered User
Join Date: Dec 2006
Location: Glenpool OK
Posts: 255
|
Re: Project "49 No Buck$"
Truck looks great love the stance. from the start I was hoping you were gonna leave that paint as is and the lettering really sets it off.
|
|
|

|
|
|
#6 |
|
Slugish
 Join Date: Jan 2005
Location: Earlysville, Va.
Posts: 1,024
|
Re: Project "49 No Buck$"
LOW BUCK BUILD ?? what do you consider low buick . I coulnt afford the 5 window ( sweeet ) 50 truck for starters.
|
|
|

|
|
|
#7 |
|
Registered User
Join Date: Nov 2008
Location: So. Cal.
Posts: 452
|
Re: Project "49 No Buck$"
Hey Don... On that particular frame there were 2 sets of holes on the back of the frame behind the upper A-arm and another 3 sets in front. We measured out the front AND the back, cross checked them and used both sets. If you have one of those chassis, you can see all the different sets of holes Chevy was so nice to give us. DON'T use the body mount holes as they aren't even close! My shock holes were busy holding the allthread in place anyway, so I couldn't use those if they were straight. Thanks, Brad
|
|
|

|
|
|
#8 |
|
Registered User
Join Date: Jan 2007
Location: tacoma wa.
Posts: 1,037
|
Re: Project "49 No Buck$"
great so far. those pic's are great and the bumper mount is sweet. your having too much fun building your cheap ride.

|
|
|

|
|
|
#9 |
|
Registered User
Join Date: Nov 2008
Location: So. Cal.
Posts: 452
|
Re: Project "49 No Buck$"
Here's how the stock motor mounts are located.
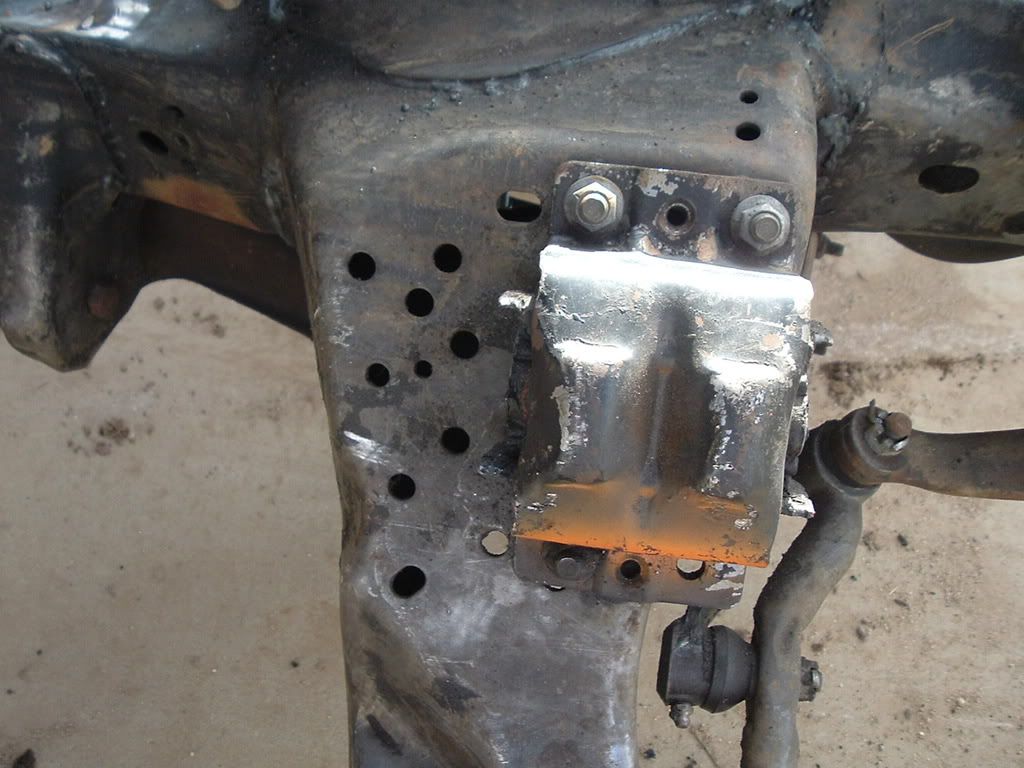 They are too far forward in this spot for what I wanted. Thanks Chevrolet for making LOTS of other holes to move the mounts around! I took the 3 bolts out and slid them back to the next set, which is about an 1 1/4" from the front spot. They are too far forward in this spot for what I wanted. Thanks Chevrolet for making LOTS of other holes to move the mounts around! I took the 3 bolts out and slid them back to the next set, which is about an 1 1/4" from the front spot. 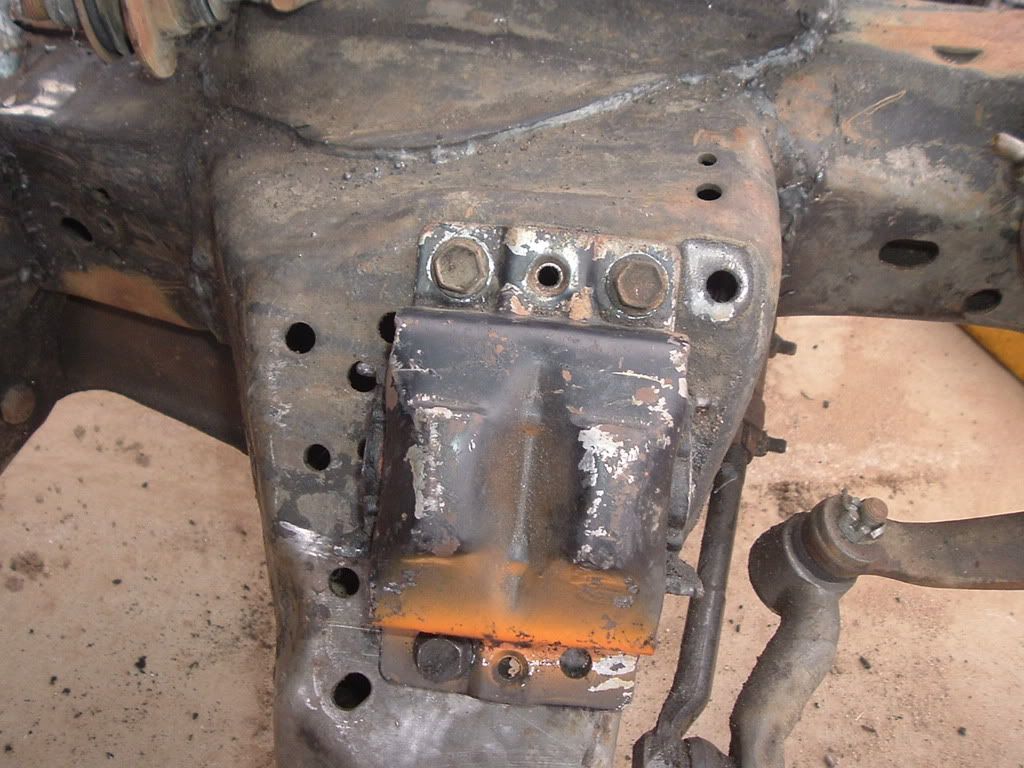 Now I know stuff looks rough and messy, buts that's ok because I'm just building the truck roughly at this moment. When it's all built and all the fab work is done, it will come apart and get sandblasted, painted and put together with new fasteners, bushings, tie rods, etc. so I'm not worrying too much about perfection at this moment. The truck will be new and tight underneath, but like an old truck from the outside. Now that the mounts are slid back, the trans will hit the front of the firewall tunnel. Now I know stuff looks rough and messy, buts that's ok because I'm just building the truck roughly at this moment. When it's all built and all the fab work is done, it will come apart and get sandblasted, painted and put together with new fasteners, bushings, tie rods, etc. so I'm not worrying too much about perfection at this moment. The truck will be new and tight underneath, but like an old truck from the outside. Now that the mounts are slid back, the trans will hit the front of the firewall tunnel. 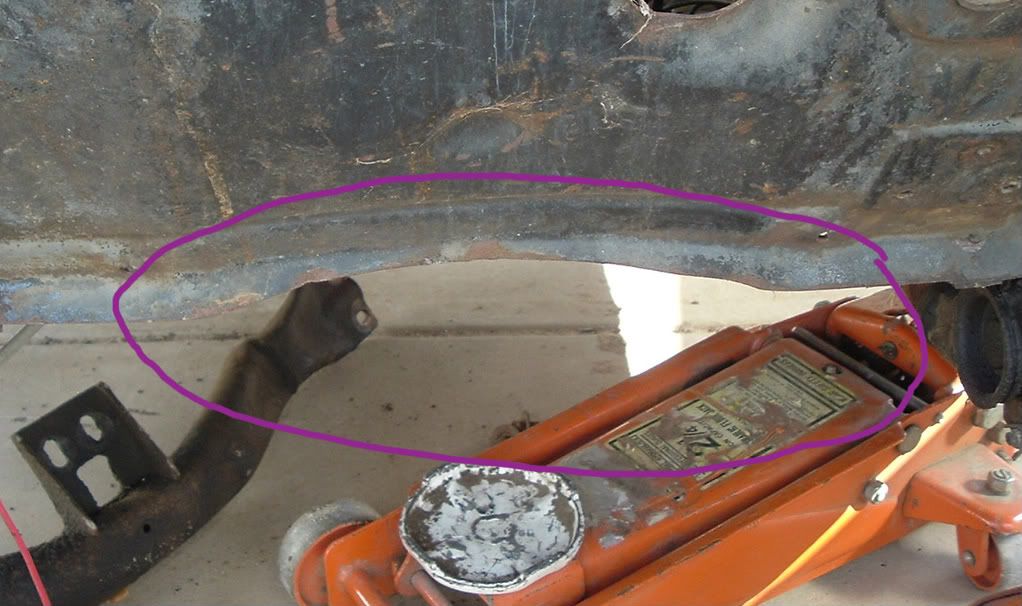 I took a pair of channel locks and folded the lip back and under to get an extra 3/4" clearance for the trans ( a few smacks with a hammer to make it nice and even finishes it up) I took a pair of channel locks and folded the lip back and under to get an extra 3/4" clearance for the trans ( a few smacks with a hammer to make it nice and even finishes it up) 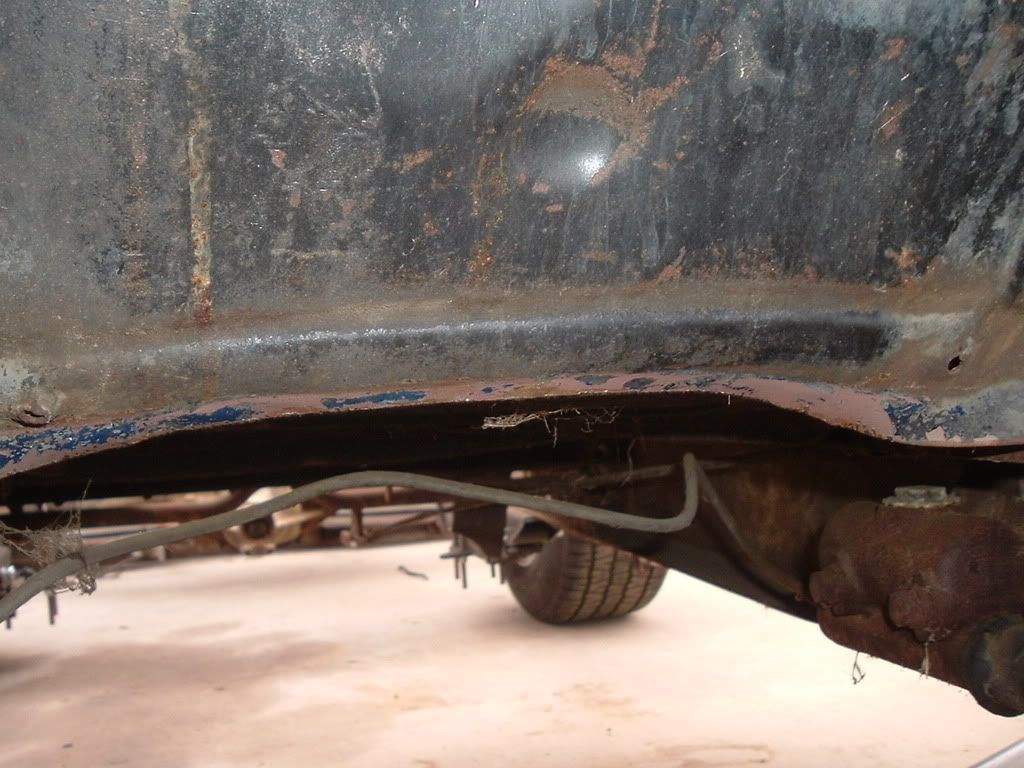 Next up.. Installing an engine and trans to put the exhaust together and installing the 69 Nova fuel tank (more cheap!!!) Next up.. Installing an engine and trans to put the exhaust together and installing the 69 Nova fuel tank (more cheap!!!)
|
|
|

|
|
|
#10 |
|
Senior Member
Join Date: Jun 2005
Location: Clovis Ca.
Posts: 3,311
|
Re: Project "49 No Buck$"
Nice job on the clip! Your truck sits perfect!
__________________
Classic Trucks Link http://www.classictrucks.com/feature...uck/index.html 1958 GMC.Project Build http://67-72chevytrucks.com/vboard/s...d.php?t=162816 1966 Chevelle Build http://67-72chevytrucks.com/vboard/s...d.php?t=443576 Video http://www.youtube.com/watch?v=prrNKo8F7Zw#GU5U2spHI_4 Last edited by CAL 58 GMC; 12-16-2009 at 06:42 PM. |
|
|

|
|
|
#11 |
|
Registered User
Join Date: Nov 2008
Location: So. Cal.
Posts: 452
|
Re: Project "49 No Buck$"
I started on the exhaust with a pile of u-bends (3") that I'd bought on Ebay and a 10' tube of 3" muffler pipe I'd had laying around. Now being the cheap guy I am, I figured I'd rather make it than going to the muffler shop. I had a set of 1 5/8" med. tube Thorley headers and figured I'd start from there. I mocked up the left side and decided move the flange back. I cut off the original flange and after cutting up some bends moved it back another foot and a half.
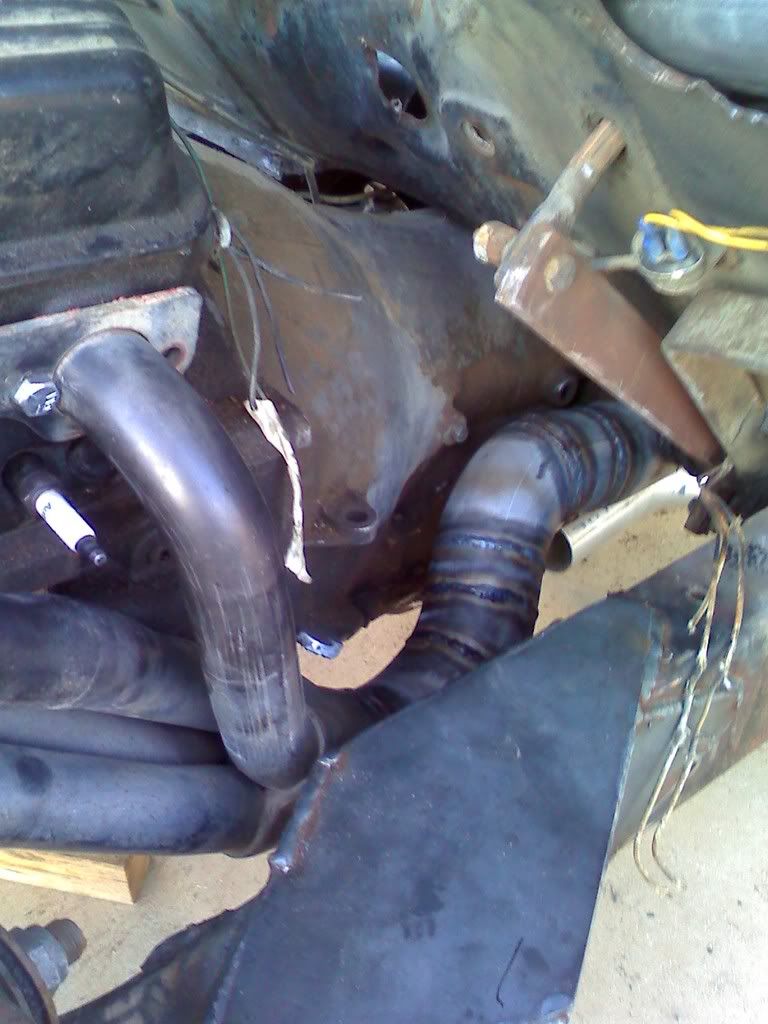 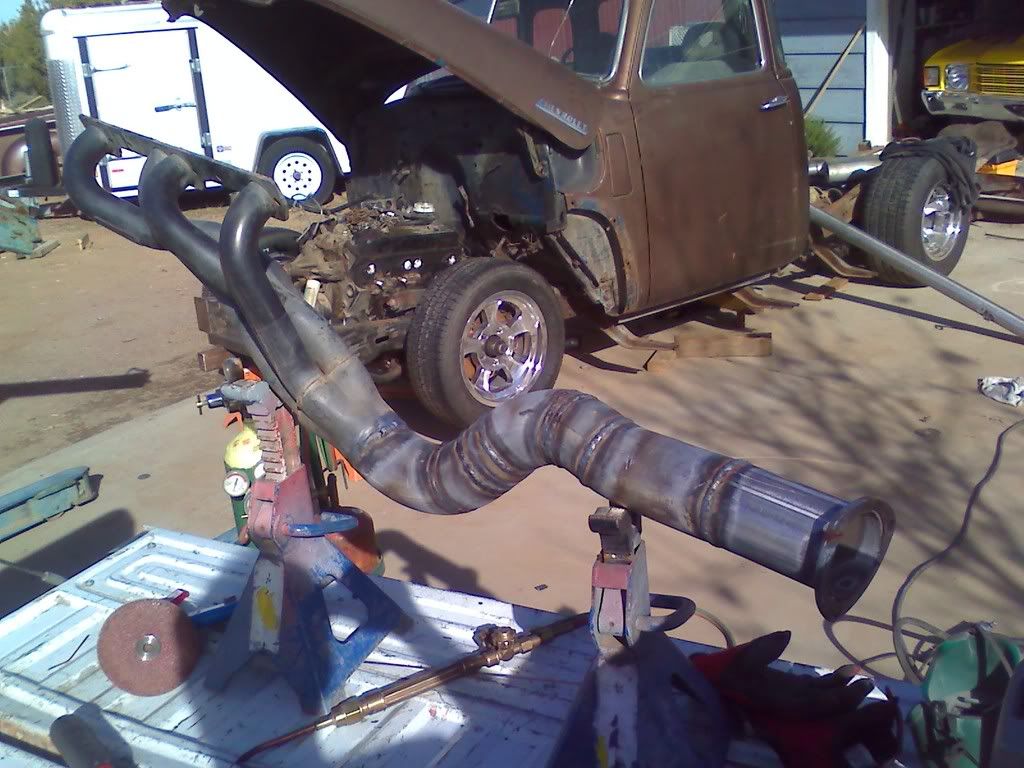 I went the high route because I didn't want the exhaust hanging too low and getting banged up. Next I did the pass. side. I hade to notch the frame a smidge (sorry, I like the word) so I had clearance for engine movement. Did the same with the flange on that side too. I went the high route because I didn't want the exhaust hanging too low and getting banged up. Next I did the pass. side. I hade to notch the frame a smidge (sorry, I like the word) so I had clearance for engine movement. Did the same with the flange on that side too. 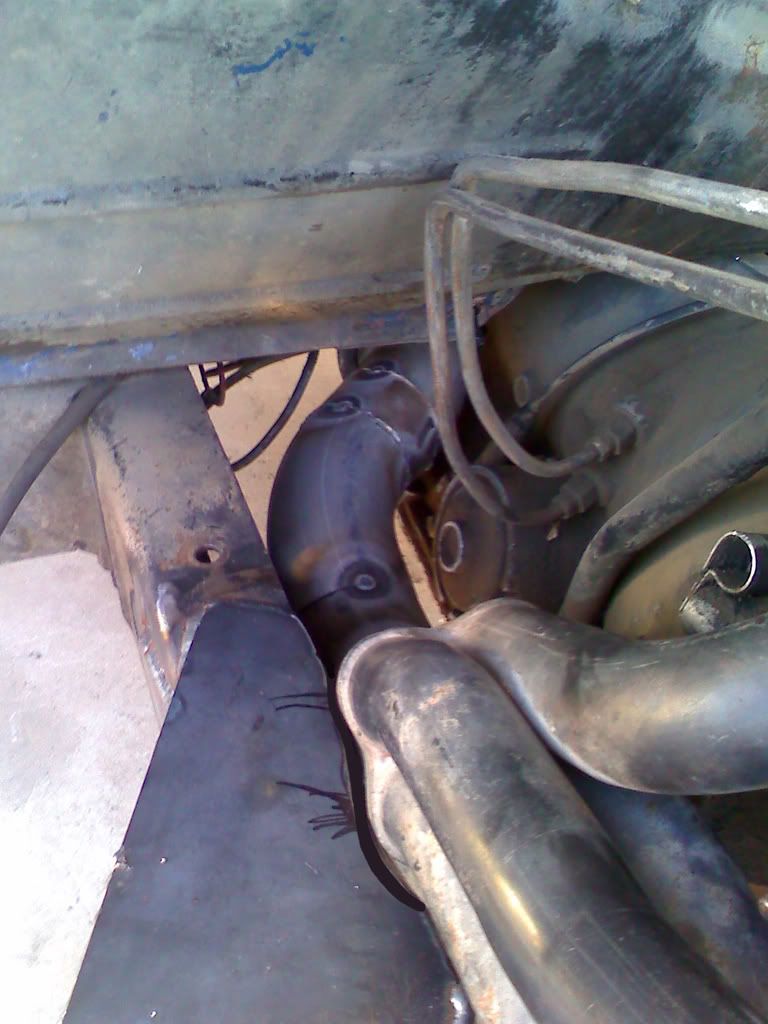 and then ran some pipe to the back of the cab. Trying to keep it all up high I figured I'd mount the mufflers at an angle, plus it keeps them out of the way. I need to finish adding the bolt flanges to the mufflers (thought I had enough and was 1 set short) so I need to finish those. and then ran some pipe to the back of the cab. Trying to keep it all up high I figured I'd mount the mufflers at an angle, plus it keeps them out of the way. I need to finish adding the bolt flanges to the mufflers (thought I had enough and was 1 set short) so I need to finish those. 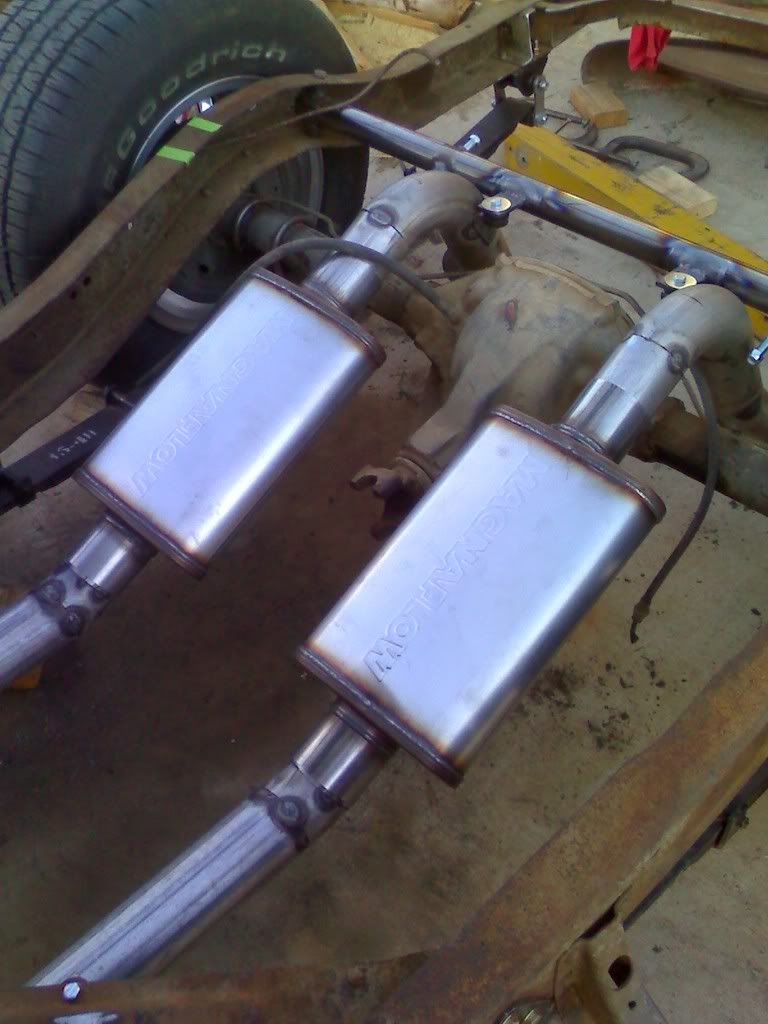 Ended up using Magnaflow mufflers after deciding I wanted to drive the crap out of this thing and not be deaf from using Flowmasters! Went against my plan, because I already had the flowmasters. Oh well! I gas welded the tubes together and a mig for all the brackets and heavier stuff. After I ran the tubes over the rearend, I decided to kick them out about 2" to the inside of the leafsprings. Ended up using Magnaflow mufflers after deciding I wanted to drive the crap out of this thing and not be deaf from using Flowmasters! Went against my plan, because I already had the flowmasters. Oh well! I gas welded the tubes together and a mig for all the brackets and heavier stuff. After I ran the tubes over the rearend, I decided to kick them out about 2" to the inside of the leafsprings. 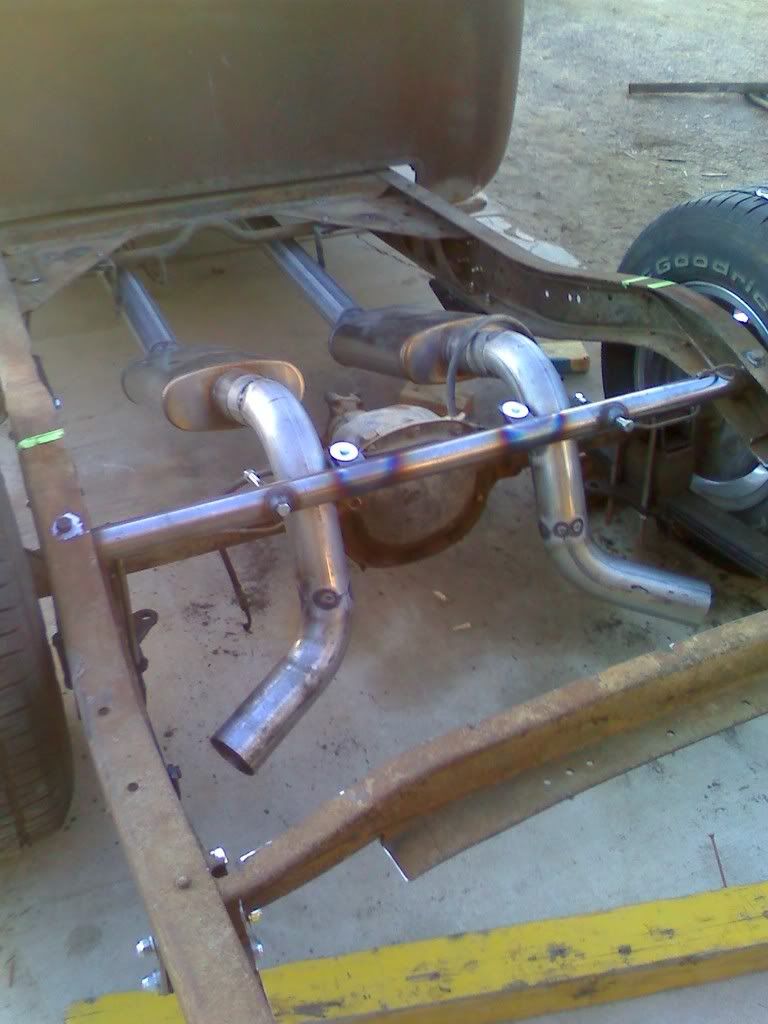 You could run them out farther if you wanted, but I hate seeing pipes sticking out of the sides of the truck. I need to finish welding the tubes up and then we move to the fuel tank mounting! You could run them out farther if you wanted, but I hate seeing pipes sticking out of the sides of the truck. I need to finish welding the tubes up and then we move to the fuel tank mounting!
|
|
|

|
|
|
#12 |
|
Registered User
Join Date: Sep 2006
Location: thousand oaks, California
Posts: 732
|
Re: Project "49 No Buck$"
I've always wanted to ask what clearances should you have on the exhaust. i mean how close should your pipes be to you tank or your bed wood. also how close can you put your exhaust to wires.. what is the norm?
GT ps i love your welding on your pipes!
__________________
Greg 1953 chevy 1/2 ton 5 window, chevy 350 330 horse 700r tranz, lowering spindels mustang 2 frount. ford 9", airbags on 4 corners . purchased in 1983 for $325 while in high school http://67-72chevytrucks.com/vboard/s...=215079&page=5 |
|
|

|
|
|
#13 |
|
Registered User
Join Date: Nov 2008
Location: So. Cal.
Posts: 452
|
Re: Project "49 No Buck$"
Thanks! I always tried to keep exhaust at least an inch from anything too critical. On this one it will be a little different. Since it was a 3" system, room went away REAL fast. I'll end up wrapping this one in the close areas by the trans, master cylinder and frame. It's about an 1 1/2" away from any part of the fuel tank, so no worries there. I'll also end up covering the trans cooler lines when I run them, so they stay cool also. Hope that helps. By the way... You have a VERY nice truck!!!
Last edited by kustombrad; 01-20-2009 at 03:00 PM. |
|
|

|
|
|
#14 |
|
Registered User
Join Date: Nov 2008
Location: So. Cal.
Posts: 452
|
Re: Project "49 No Buck$"
I need a drivers window for this truck. Anybody have anything in not too bad of shape they want to sell? Thanks, Brad
Last edited by kustombrad; 01-22-2009 at 12:21 PM. |
|
|

|
|
|
#15 |
|
Registered User
Join Date: Nov 2008
Location: So. Cal.
Posts: 452
|
Re: Project "49 No Buck$"
Here's an illustration I just did for a guy who's doing a VERY cool frame up f100. He wanted to see how it was going to look finished. Should be cool!

|
|
|

|
|
|
#16 |
|
Registered User
Join Date: Oct 2003
Location: Carmichael, California
Posts: 3,006
|
Re: Project "49 No Buck$"
When I was a kid my babysitters husban had a 56 F100 painted black with flames. I forget what kind of wheels he had on it at the time but it looked alot like your picture. He still has the truck and it`s still painted the same but now it`s tubbed with a Jag rearend and Centerline Convo Pro`s.
__________________
Anthony |
|
|

|
|
|
#17 | |
|
Registered User
Join Date: Dec 2011
Location: Czech Rebublic / Europe
Posts: 165
|
Re: Project "49 No Buck$"
Quote:
Great job again! |
|
|
|

|
|
|
#18 |
|
Registered User
Join Date: Oct 2003
Location: Carmichael, California
Posts: 3,006
|
Re: Project "49 No Buck$"
Any updates?
__________________
Anthony |
|
|

|
|
|
#19 |
|
Registered User
Join Date: Mar 2008
Location: Wilmington,Delaware
Posts: 13
|
Re: Project "49 No Buck$"
Brad, Great project. I am trying to build the same project on the East coast. Are the wheels you have American Racing Hopsters and what are the offsets on the front wheels? I have a sub framed chassis and the hub to hub is 61.5", so I need a narrow wheel and around 4" of offset.
Thanks for sharing your build with us! |
|
|

|
|
|
#20 | |
|
Registered User
Join Date: Oct 2003
Location: Carmichael, California
Posts: 3,006
|
Re: Project "49 No Buck$"
Quote:
http://jdwheels.com/
__________________
Anthony |
|
|
|

|
|
|
#21 | |
|
Registered User
Join Date: Mar 2008
Location: Wilmington,Delaware
Posts: 13
|
Re: Project "49 No Buck$"
Quote:
Has anybody bought from this company? With only"10" responses I am a little reluctant to buy from them. Thanks |
|
|
|

|
|
|
#22 |
|
Senior Member
 Join Date: Nov 2001
Location: Rapid City, SD
Posts: 2,281
|
Re: Project "49 No Buck$"
Dude, love the wheels...
These are on my "68 shortbox 2wd build... 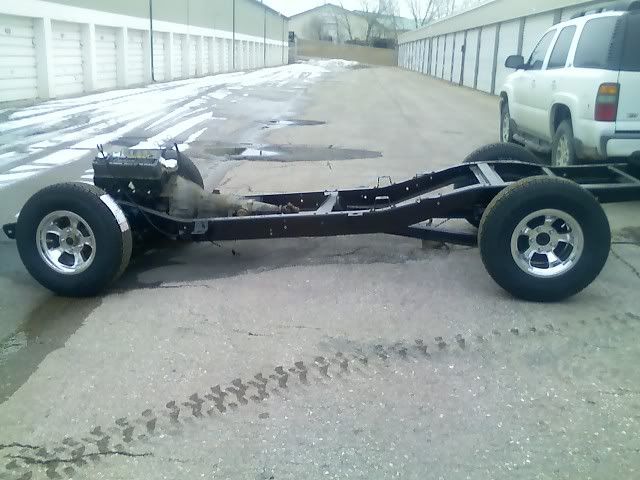
__________________
My Trucks: 1967 Chevrolet Short Wide Box 327 TH350 9" w/3.90 gears paint will be White - Current Project 1967 Chevrolet Custom LWB 283 TH400 3.73 Posi, no-AC, no-PS, no-PB, bench-seat, small-window - mostly orig driver 1967 Chevrolet CST LWB originally a 327 TH400 3.73 Posi AC PS PB, had Buddy Buckets, Small Window - parts truck 1967 Chevrolet CST LWB, 283 MT 3.73 had Buddy Buckets, Panoramic Window - parts truck 2001 Chevrolet 3500 2WD Crew Cab Dually 8.1L Allison White Last edited by 67 cst swb; 03-06-2009 at 04:05 AM. |
|
|

|
|
|
#23 | |
|
Registered User
Join Date: Dec 2008
Location: Oak Hills, California
Posts: 393
|
Re: Project "49 No Buck$"
Quote:

__________________
1952 Chevy Pick Up 1962 Chevy C10 Short Bed 1963 Chevy C10 Long Bed 1986 Chevy Silverado Short Bed 2004 Chevy Suburban-wifies ride 
|
|
|
|

|
|
|
#24 |
|
Registered User
Join Date: Jan 2012
Location: el campo texas
Posts: 322
|
Re: Project "49 No Buck$"
brad , my buddies are all telling me it cost just as much to do the mustang ll as it would your way with doing all the bushings balljoints etc. i told them they were on crack. tell me im wrong
|
|
|

|
|
|
#25 |
|
Registered User
Join Date: Jan 2010
Location: Titusville, PA
Posts: 3,585
|
Re: Project "49 No Buck$"
The cheapest IFS I have seen complete was like 1100 and most are like 1800+ depending on your preference with bagging or what stages you want. I'd say you can considerably do the s-10 cheaper. I got my drop spindles used but pretty much bought new everything, stripped it and painted it and I'd have to look at receipts but I doubt it was even 1100 and we are talking front to back. It can be long debated but s-10 route will be cheaper. It's all preference. If I had money falling into my pockets I'd do IFS's on most builds but the s-10 has its pros and cons. I definitely like having the strength of the s-10 frame though. Just my take on it.
__________________
51' 99toLife finished 2011,355 sbc,5speed, patina, redoing whole truck, inter, bags, etc http://67-72chevytrucks.com/vboard/s...d.php?t=382481 49Hardtimes s/10 susp- bagged, vortec sbc, 5 speed, patina, sold http://67-72chevytrucks.com/vboard/s...d.php?t=594874 VIDEOS https://youtu.be/E8zHhjgS_lA https://youtu.be/E8zHhjgS_lA Geronimo 54' LS engine, static drop IFS, Client build, just about done http://67-72chevytrucks.com/vboard/s...62#post7399162 52' 3100 Slowly in progress, will be painted two toned, have 235 with a t-5, lowered OG frame Other projects, 49' farmuse 3100, killer Patina, will be slammed, LS engine, full done interior up next! www.coffeeandcustoms.com |
|
|

|
 |
| Bookmarks |
|
|