
 |
|
|
#26 |
|
Senior Member
 Join Date: Sep 2017
Location: Bryan, Texas
Posts: 2,358
|
Re: Wife's 48
Got the 48 home today.
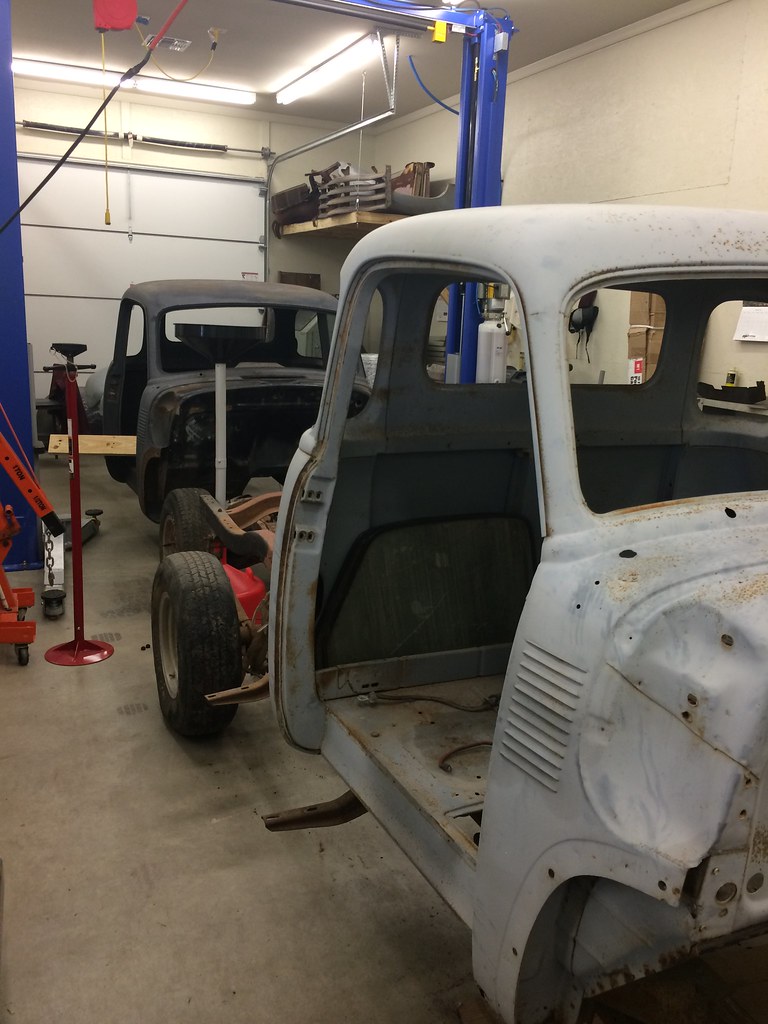 IMG_1781 by Robert Moorman, on Flickr IMG_1781 by Robert Moorman, on FlickrThat's it in front. It is in better shape than the 54, but since it has the split windshield, I think I'm going to practice on the body work on it first. It has the Firebird front end mated to the rear frame of the 48, with an S10 rear axle. After looking at it, I know why I got a spare dash, someone hacked the old dash up at the radio. I did get all the body panel parts to repair it, so starting on it and getting it to something either for me to keep or sell will give me some experience and should be ok. I need the practice with the mig. Oh, and two gratuitous pictures of the current project, 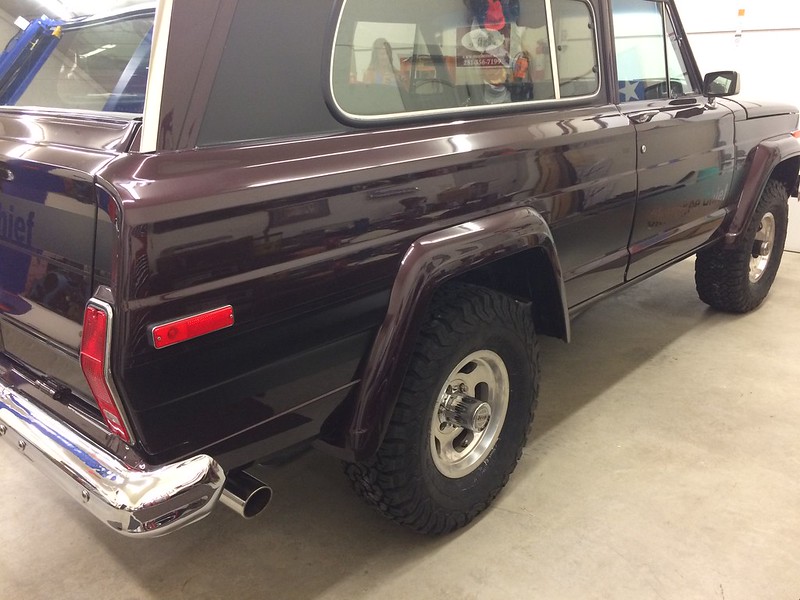 IMG_1670 by Robert Moorman, on Flickr IMG_1670 by Robert Moorman, on Flickr IMG_1671 by Robert Moorman, on Flickr IMG_1671 by Robert Moorman, on FlickrI promise, last pic of the 79 on this board. I didn't realize how much bondo the 54 had on it until I got the 48 near it. There is no "roll" between the rear windows and the lower body panel. So before I start anything on it I'll get it media blasted and primed, but I doubt that it will be soon. Last edited by 8man; 05-04-2019 at 04:54 PM. |
|
|

|
|
|
#27 |
|
Post Whore
  Join Date: May 2015
Location: Alabama
Posts: 14,663
|
Re: Wife's 48
nice looking jeep ya got there...
just for future reference.."the roll"...your talking about is called the beltline on these trucks...and wow...that's a lot if bondo |
|
|

|
|
|
#28 |
|
Senior Member
 Join Date: Sep 2017
Location: Bryan, Texas
Posts: 2,358
|
Re: Wife's 48
Thanks, I hope to have it out and about in a week or two.
Yes, that is a lot of bondo and I just realized it. I hate bondo. I do like the belt (thanks for the terminology) and that bondo has to go. |
|
|

|
|
|
#29 |
|
Registered User
Join Date: Nov 2010
Location: calgary alberta
Posts: 8,210
|
Re: Wife's 48
https://www.autobodyspecialt.com/cgi...&category=0120
http://www.brotherstrucks.com/Roof-R...products/1227/ lower panel also available here https://www.chevsofthe40s.com/dept/S.../cat/Cab+.html prolly quicker to replace and have fresh stuff |
|
|

|
|
|
#30 |
|
Senior Member
 Join Date: Sep 2017
Location: Bryan, Texas
Posts: 2,358
|
Re: Wife's 48
Raven, thanks for the links. Once I have the media blast done to see what I have those will probably be the way I go.
I have some cab corners and other pieces that came with the 48 that I will use to try and eliminate the rust from it before I tackle the 54. Last edited by 8man; 10-27-2017 at 06:17 PM. |
|
|

|
|
|
#31 |
|
Senior Member
 Join Date: Sep 2017
Location: Bryan, Texas
Posts: 2,358
|
Re: Wife's 48
Ok, got a little time today in the shop to compare the 48 and the 54. There are some subtle differences, more than just the windshield.
So here is what I have. The fire wall of the 54  IMG_1791 by Robert Moorman, on Flickr IMG_1791 by Robert Moorman, on FlickrFirewall will clean up nicely, but notice the rust in the lower cab. Now the 48 firewall 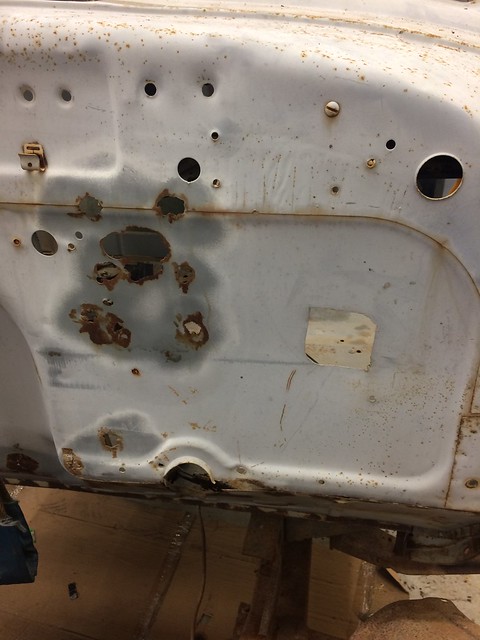 IMG_1790 by Robert Moorman, on Flickr IMG_1790 by Robert Moorman, on FlickrKinda hacked up, won't clean up as easily. From inside the 48 cab, looking down at the body right front bolt. 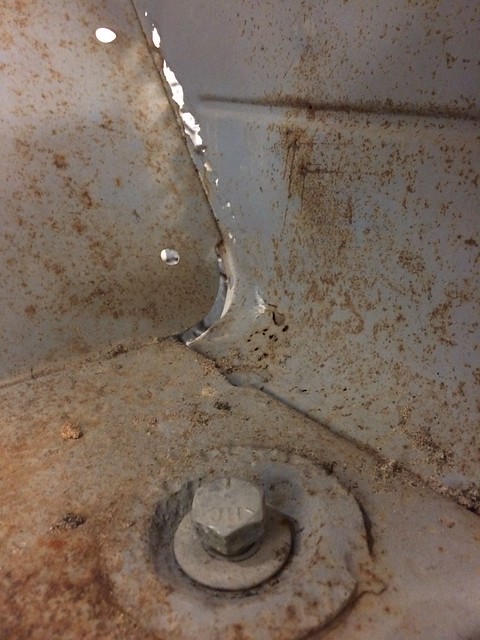 IMG_1789 by Robert Moorman, on Flickr IMG_1789 by Robert Moorman, on FlickrYes that is a "see through" kick panel seam. Also, I think the "washer" for the body bolt has been replaced since it sits above the floor. And now the 54 front body bolt 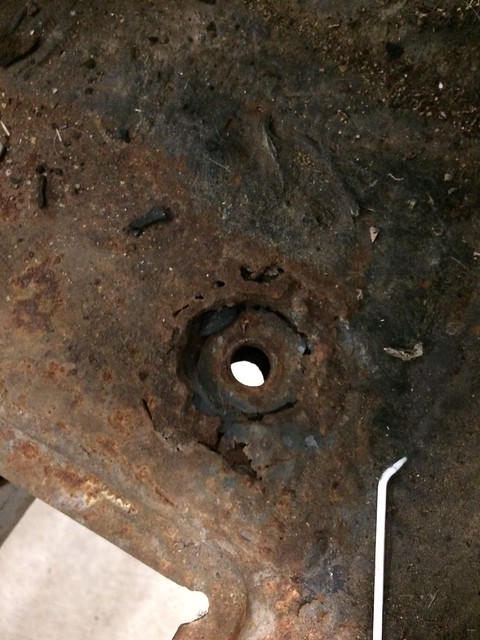 IMG_1783 by Robert Moorman, on Flickr IMG_1783 by Robert Moorman, on FlickrI think that is the way it is supposed to sit, but I doubt it is supposed to be that rusty! I'll know more about what I have when I get the fiberglass removed. Again, the 54 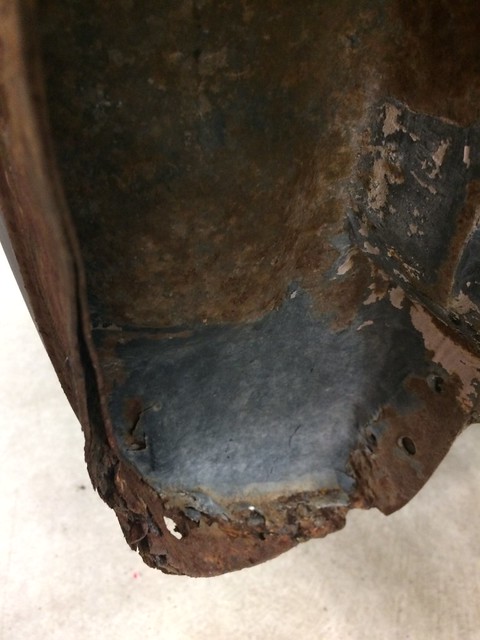 IMG_1784 by Robert Moorman, on Flickr IMG_1784 by Robert Moorman, on FlickrYes, that is fiberglass on top of rust. I hope I can replace it with new metal and make it look good. I thought the 48 was in better shape, but not by much. I'm going to have to do cab corners, some supports and the firewall on both. I still think I'll do both trucks, and I think I'll start on the 48, since I have the parts and I want to practice. What do you sit the truck on to work on the body steel? I'm going to try to get a body dolly built next weekend. Is that what you would use? Do you cut panels off while sitting on the dolly or is a rotisserie a better plan? |
|
|

|
|
|
#32 |
|
Senior Member
 Join Date: Sep 2017
Location: Bryan, Texas
Posts: 2,358
|
Re: Wife's 48
Also, the 48 has some rear inner cab corners, but the 54 has none. Is that normal?
|
|
|

|
|
|
#33 |
|
Registered User
Join Date: Nov 2010
Location: calgary alberta
Posts: 8,210
|
Re: Wife's 48
my buddies 54 had inners, yours probably just got rusty enough to fall out. they are available I think. I would install them just to keep the dirt and water out, be sure to leave a drain hole though.
|
|
|

|
|
|
#34 |
|
Senior Member
 Join Date: Sep 2017
Location: Bryan, Texas
Posts: 2,358
|
Re: Wife's 48
Well, I started the body work on the 48 this afternoon. I started on the RH front corner. I cut out the rusty parts, thinking I had all of the parts I needed to repair it.
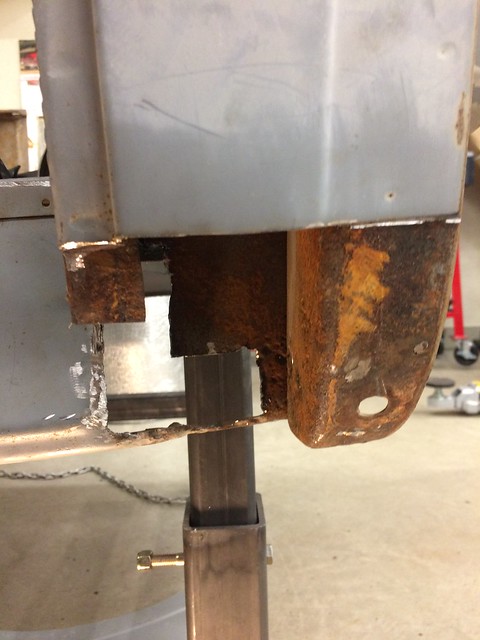 IMG_1835 by Robert Moorman, on Flickr IMG_1835 by Robert Moorman, on FlickrThe rust that is left is just dust and the metal is solid. From the inside. 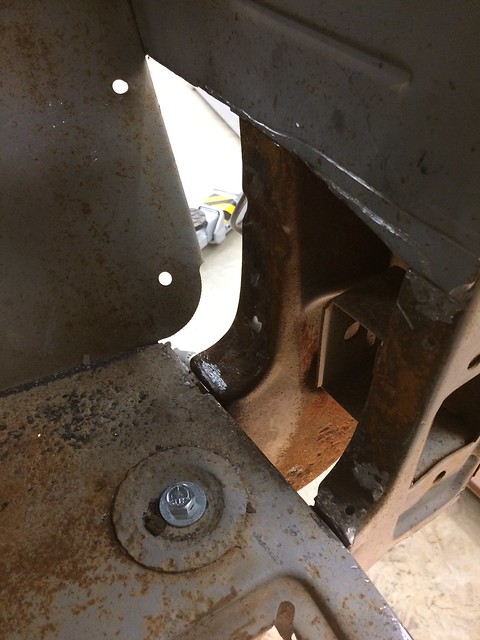 IMG_1836 by Robert Moorman, on Flickr IMG_1836 by Robert Moorman, on FlickrThen I was test fitting the lower cowl repair panel.  IMG_1837 by Robert Moorman, on Flickr IMG_1837 by Robert Moorman, on FlickrThe gap is less than a nickel, so I think it will weld up pretty well. I tried to order the lower front pillar patch, as I've had to cut out the lower portion to get rid of rust. I'm not sure the order went through until I contact them tomorrow to find out. I test fit all the other patches, and as soon as I have the pillar patch, I can start welding on this corner. This is the worst of it on the 48. The 54 is a different story! I've got it up where I can send it out for media blast and prime. Then I can see how bad it really is. However, with Christmas coming, family time will once again eat into shop time. Oh well, lucky I like Christmas and most of my family. 
|
|
|

|
|
|
#35 |
|
Registered User
Join Date: Oct 2014
Location: Kitchener, Ontario, Canada
Posts: 3,254
|
Re: Wife's 48
Nice project and glad to see your diving in right away that will help it get done. I like your Jeep, Wagoner or Grand Cherokee? I have a '67 CJ5 I've had on the road for 23 years.
__________________
http://67-72chevytrucks.com/vboard/s...d.php?t=648459 https://67-72chevytrucks.com/vboard/...d.php?t=769441 1951 MG TD 1967 Jeep CJ5 1.9L TDI 33X13.5X15 Mud Grapplers. 1952 GMC 9700 p/u 7.3L diesel on air, dually |
|
|

|
|
|
#36 |
|
Senior Member
 Join Date: Sep 2017
Location: Bryan, Texas
Posts: 2,358
|
Re: Wife's 48
The Jeep started life as a 79 Cherokee Chief. It has a few modern touches now.
|
|
|

|
|
|
#37 |
|
Senior Member
 Join Date: Sep 2017
Location: Bryan, Texas
Posts: 2,358
|
Re: Wife's 48
Got the 54 blasted and primed with weld through primer. It is in worse shape than I had hoped. I don't have it home yet, so no pics.
However, I got the 1947-54 Chevy Truck Assembly Manual and started looking at parts, and trying to find the correct name for some of them. I am going to have to replace the body outer lower rear panel, the body outer upper rear panel and apparently the roof skin panel, IF I can find one. Does anyone have a lead on a 54 roof skin panel? Looking at the manual, it appears that the panels go on in order of the lower, upper and roof. Is that correct? I'm going to have to retire to get these two done! Work is taking way too much time away from the shop! |
|
|

|
|
|
#38 |
|
Senior Member
 Join Date: Sep 2017
Location: Bryan, Texas
Posts: 2,358
|
Re: Wife's 48
Does anybody have a lead for the roof skin and the rear upper window outer panel?
|
|
|

|
|
|
#39 | |
|
Senior Member
 Join Date: May 2007
Location: Doodah Kansas
Posts: 7,774
|
Re: Wife's 48
Quote:
I dont think anyone ever has been encouraged by blasting  good luck though! good luck though!
__________________
the mass of men live lives of quiet desperation if there is a problem, I can have it. new project WAYNE http://67-72chevytrucks.com/vboard/s...d.php?t=844393 |
|
|
|

|
|
|
#40 |
|
Senior Member
 Join Date: Sep 2017
Location: Bryan, Texas
Posts: 2,358
|
Re: Wife's 48
Well I have really started, time is still in short supply, but things are moving in the right direction.
I have 3 of the 4 cab corners welded up on the 48. No filler yet, just a little primer to keep the rust away. These are my first attempt at body panel welding, so be kind, but constructive criticism is appreciated. In the first picture the bottom is a new front lower pillar, in black, it gets lost, the lower cowl panel and the lower front cowl piece were replaced as well. You can see daylight from this angle. There is a big drain hole in the outer panel, and I have not finished welding the two pieces when this was taken. 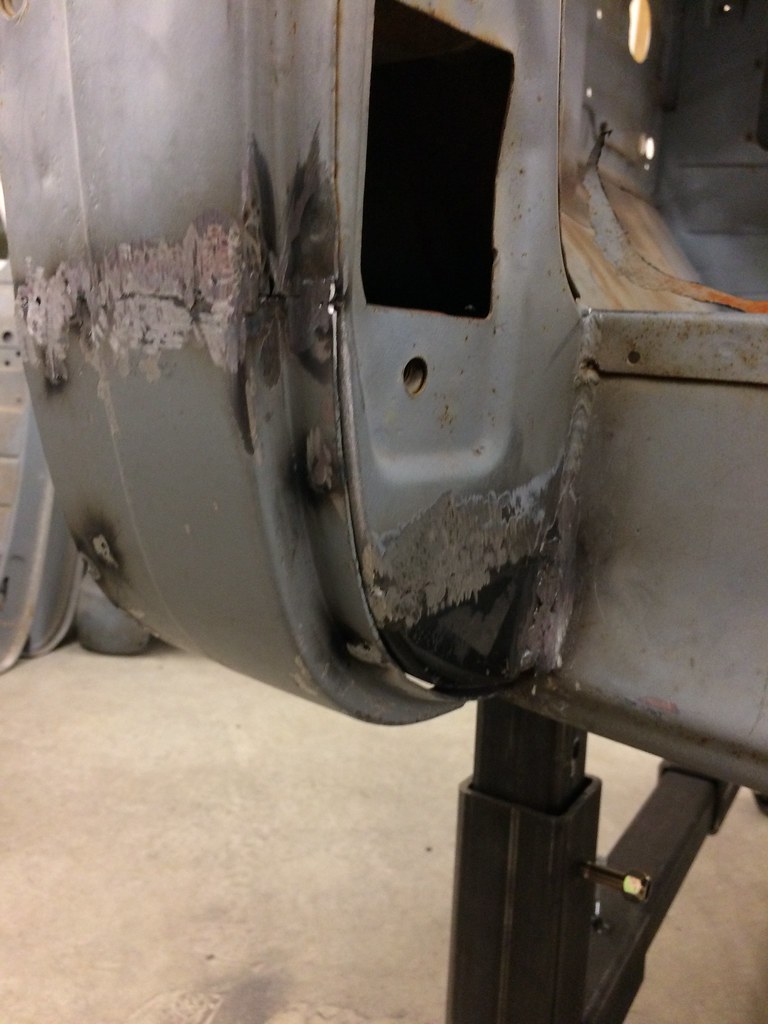 IMG_1919 by Robert Moorman, on Flickr IMG_1919 by Robert Moorman, on Flickr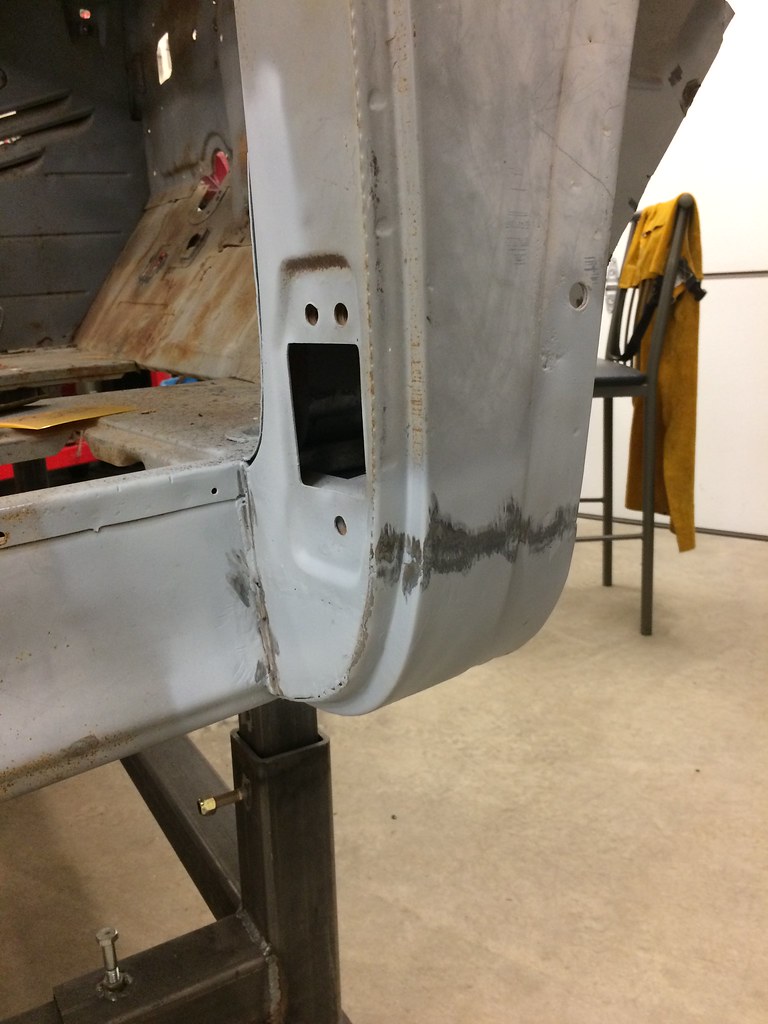 IMG_1918 by Robert Moorman, on Flickr IMG_1918 by Robert Moorman, on Flickr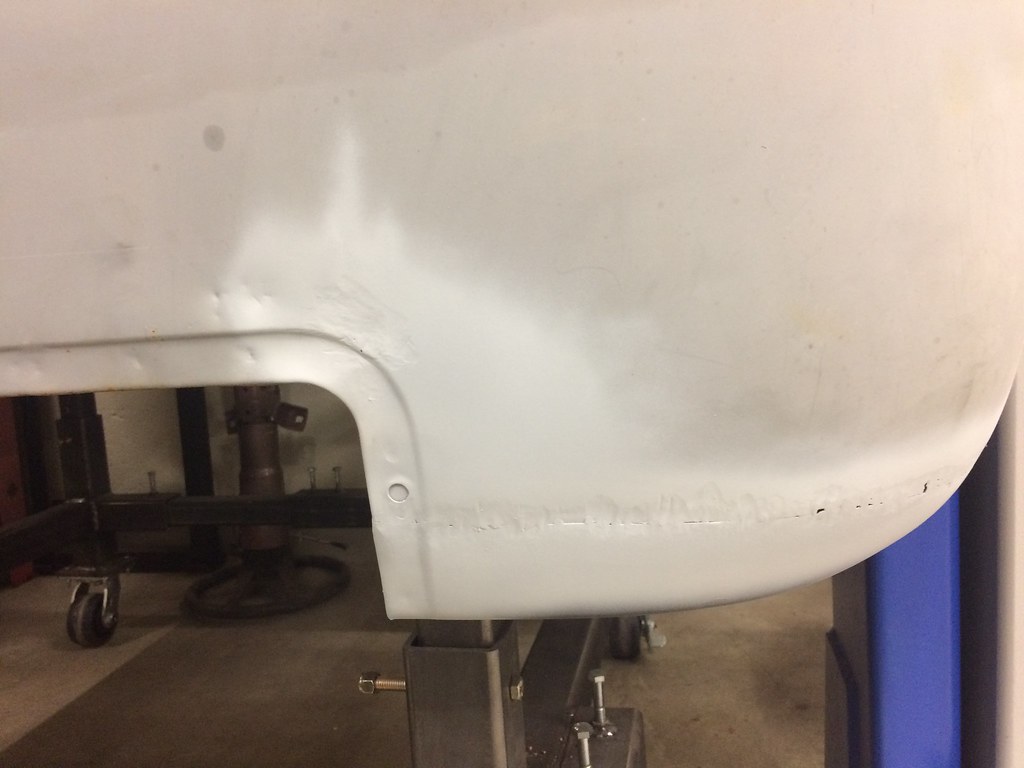 IMG_1896 by Robert Moorman, on Flickr IMG_1896 by Robert Moorman, on FlickrI got the last corner started. I was going to start treating for rust, weld through primer on the inside and weld it up. I turned on the gas to the MIG and no surprise, NO GAS! So I had to stop at this point. I did go ahead and treat the rust and then prime the inside. The inner cab corner was cut to fit, but I think I need to weld it in prior to starting the outer panel, since the outer panel fits up against the inner corner. 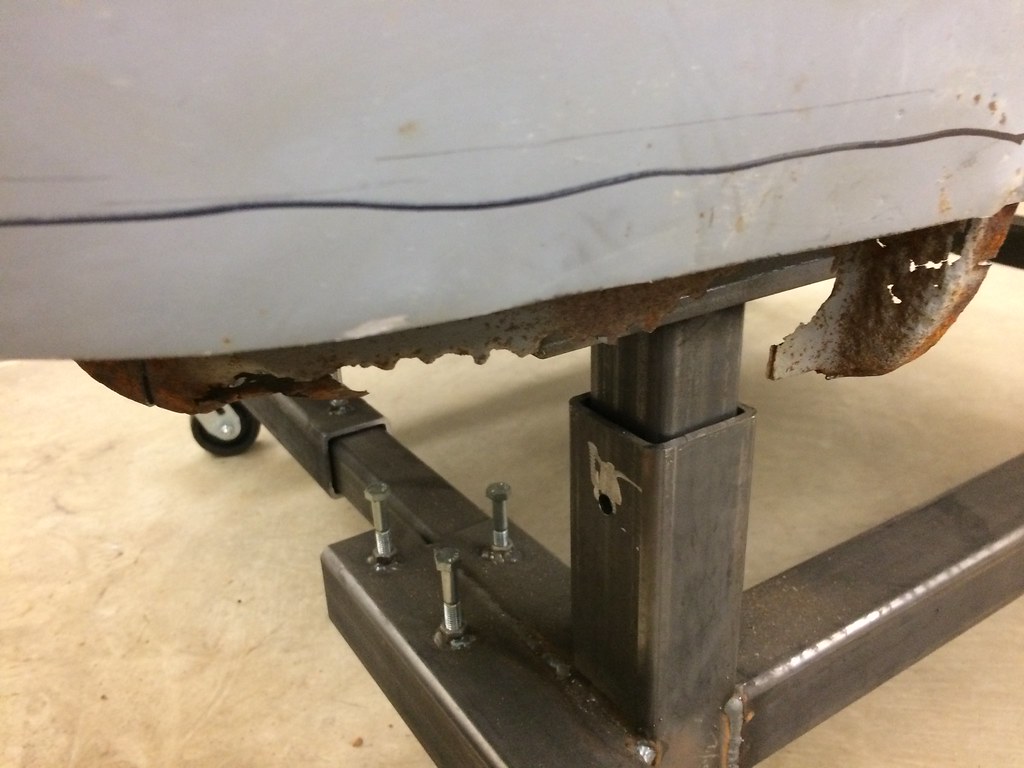 IMG_1917 by Robert Moorman, on Flickr IMG_1917 by Robert Moorman, on FlickrSo the only thing I could do then was do some more fitting. I showed the dash in an earlier post. It was really hacked up. I got an unmolested dash with the truck. So out with the ugly hacked up dash. 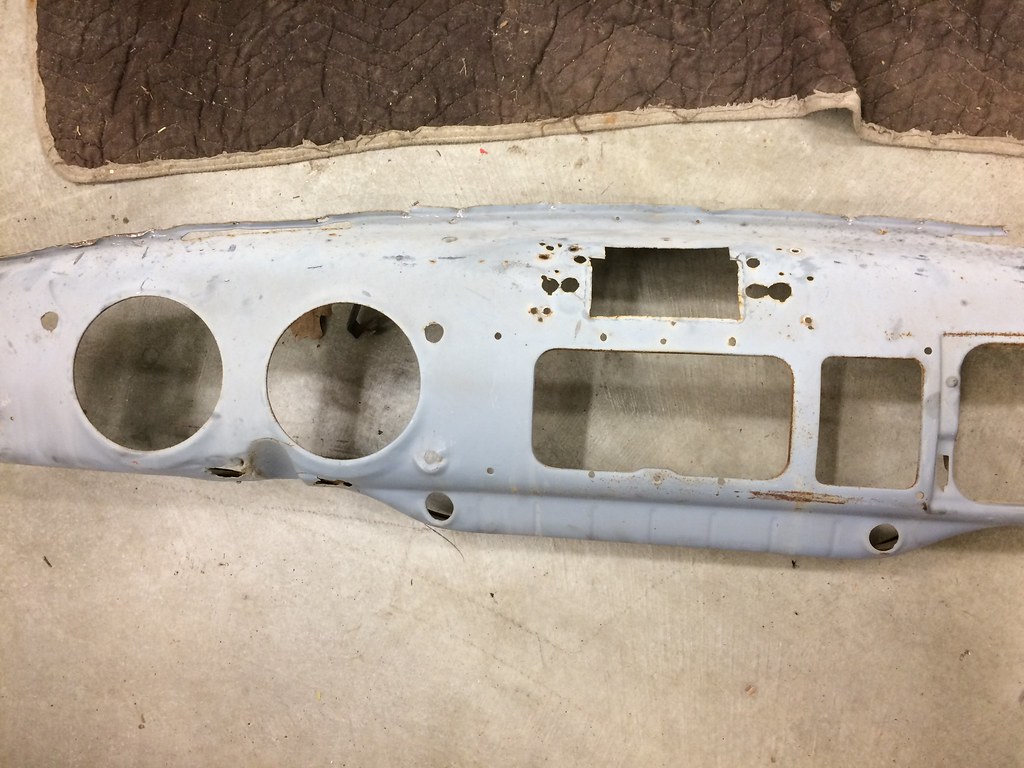 IMG_1920 by Robert Moorman, on Flickr IMG_1920 by Robert Moorman, on FlickrAnd then I removed the old "cab" from the "new" dash with a grinding wheel, cutting the welds from the outside to remove the dash from that cowl metal, and then test fit it. 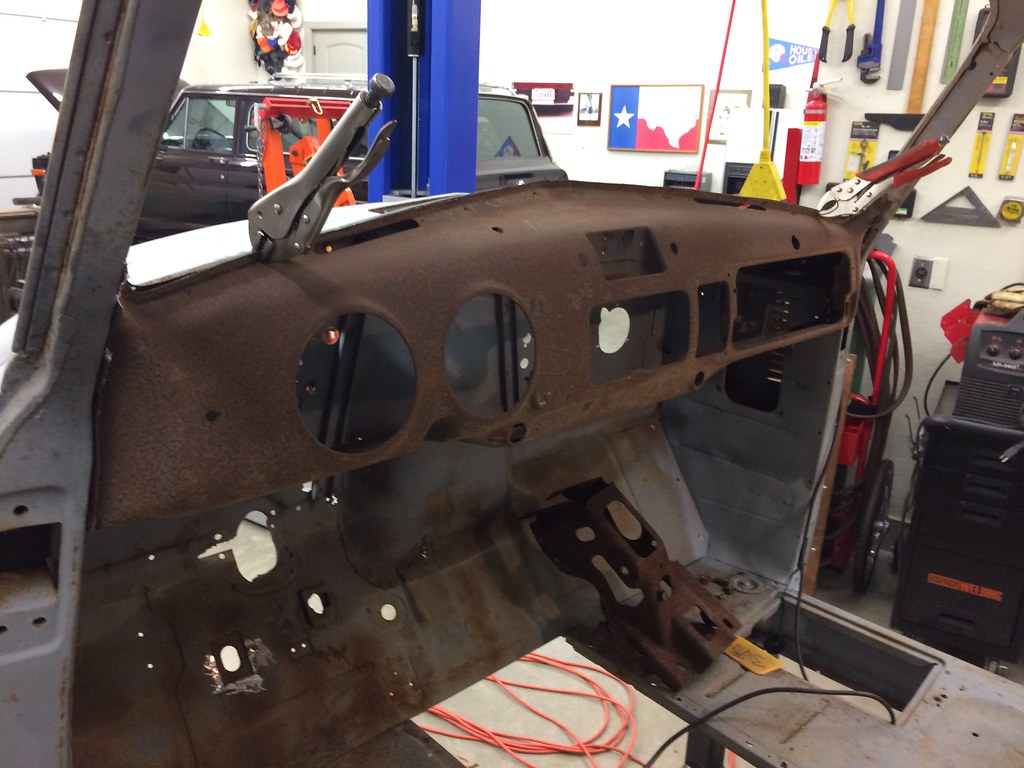 IMG_1921 by Robert Moorman, on Flickr IMG_1921 by Robert Moorman, on FlickrI called it "new" not "pretty". I removed it again until I can get it blasted and primed. I don't think it will rust anymore if it takes a few weeks to get around to that. Fortunately, the 48 does not have the channel around the door openings for the weatherstrip, so I didn't have to hack that up to get the dash out. I need to do the 54 too, as that cab has dash issues too. However, one good thing about the 54 cab is that the westherstrip channel is all in tact and in good shape. So HOW in the world do you get the dash out with that channel in place? If that is not an option, how/where do you remove the channel? If you have to remove it, where do you get some more, and do you spot weld it in? |
|
|

|
|
|
#41 |
|
Post Whore
  Join Date: May 2015
Location: Alabama
Posts: 14,663
|
Re: Wife's 48
looking good...but...in your 3rd pic in post 40 of the cab corner. .it looks like theres a few holes left in your welded seam...be sure to weld those up solid...
__________________
Mongo...aka Greg RIP Dad RIP Jesse 1981 C30 LQ9 NV4500..http://67-72chevytrucks.com/vboard/s...d.php?t=753598 Mongos AD- LS3 TR6060...http://67-72chevytrucks.com/vboard/s...34#post8522334 Columbus..the 1957 IH 4x4...http://67-72chevytrucks.com/vboard/s...63#post8082563 2023 Chevy Z71..daily driver |
|
|

|
|
|
#42 |
|
Registered User
Join Date: Nov 2010
Location: calgary alberta
Posts: 8,210
|
Re: Wife's 48
what is your process for metal prep with your project. are you sand blasting the entire project or just the repair areas? if blasting everything are you covering the whole project in weld through primer or just the welded areas prior to welding?
|
|
|

|
|
|
#43 |
|
Registered User
Join Date: Oct 2014
Location: Kitchener, Ontario, Canada
Posts: 3,254
|
Re: Wife's 48
That looks good, everyone starts somewhere.
__________________
http://67-72chevytrucks.com/vboard/s...d.php?t=648459 https://67-72chevytrucks.com/vboard/...d.php?t=769441 1951 MG TD 1967 Jeep CJ5 1.9L TDI 33X13.5X15 Mud Grapplers. 1952 GMC 9700 p/u 7.3L diesel on air, dually |
|
|

|
|
|
#44 |
|
Senior Member
 Join Date: Sep 2017
Location: Bryan, Texas
Posts: 2,358
|
Re: Wife's 48
Mongo, I was looking at that picture after I posted it. I was wondering if all metal would fill and cover. Apparently not, so I'll go back and touch it up with the MIG once I get to the welding supply and get some gas.
Raven, the project was media blasted and primed before I bought it, but it sat for years since the primer was done before I got it. So for my repairs, I'm using a wire wheel to clean off the primer and any rust from the spot where I need to weld prior to welding. Then I am spraying the areas that will be covered with new metal with the weld through primer. Then I'm covering those areas up with new patches and welding them in place. Then I'm spraying some more primer on until I can get the whole cab blasted and primed properly. Lower50's, thank you. I know others are laughing at my work, but starting a project like this with no prior body repair experience, I do feel like I am learning and improving. I have a ways to go, but looking at the welds, they are not proud, so any filler will smooth over them, and they are getting better. Oh, and I've removed rusted out panels. |
|
|

|
|
|
#45 |
|
Registered User
Join Date: Nov 2010
Location: calgary alberta
Posts: 8,210
|
Re: Wife's 48
ok, got it.
one hint that has worked for me for welding to the edge of the panel is to start on the edge and work inwards, small welds, spaced apart. that way it doesn't overheat as easily and not complete the weld to the edge of the part. if you weld from the inside towards the outside then the metal is already hot and the edge falls off so that part becomes a void. I start by tack welding the pieces together and moving around with the tacks until I have the part well secured and fitting well. tacks can be 3/4" apart when done this job, then weld a bead 1/4-3/4" long at a time between the tacks, depending on how the metal reacts, then allow to cool.hammer on dolly each weld when still smokin hot. move to another cold part so things don't warp. sometimes, for thin stuff, I weld 1/16-1/8" long bursts but leave the wire in the puddle, wait a couple of secs and pull the trigger again for a short burst, wait a couple secs, and on and on. do a 1/2-3/4" piece then pull away, hammer on dolly the weld and cool the part. go somewhere else and do the same thing. when done a flap disc on a mini grinder works well to flatten the beads out. better than a grinding disc. 40 or 60 grit works well for starters but be careful not to use a really floppy one or the disc flexes and starts to take away the metal next to the weld as well. don't flap disc too much without upping the grit of the flap disc, too many big scratches otherwise. having a cut out of the contour it is supposed to be is also helpfull because you can see right away if the metal is distorting from the weld or if you are getting a valley where the weld is. better to fix that before continuing because it is easier than doing it after. when all done if you have some gigh spots they can be shrunk down with your clothes iron, set on super hot, laid flat against the high spots. when you take the iron off run a cold wet sponge over the area and watch the high spots shrink. the area only needs to get hot enough to make the water steam a bit. cool the entire panel before doing too much at a time. less bondo required this way. a shrinking disc is another option but more spendy. there are videos on youtube that show how they work. hope that was usefull info for somebody. it's just what works for me. |
|
|

|
|
|
#46 |
|
Senior Member
 Join Date: Sep 2017
Location: Bryan, Texas
Posts: 2,358
|
Re: Wife's 48
Good advice, thanks. I will try that next chance I get to work on the sheet metal. Thanks.
|
|
|

|
|
|
#47 |
|
Registered User
Join Date: Oct 2014
Location: Kitchener, Ontario, Canada
Posts: 3,254
|
Re: Wife's 48
I don't think anyone on here is laughing. They all are a bunch of great ppl. I don't care who you are everyone starts somewhere. If at the end of the day you can stand back and be proud of what you did, that's all that matters. Just start by tacking the panel on and then start making your tacks longer jumping from tack to tack is what I do.
__________________
http://67-72chevytrucks.com/vboard/s...d.php?t=648459 https://67-72chevytrucks.com/vboard/...d.php?t=769441 1951 MG TD 1967 Jeep CJ5 1.9L TDI 33X13.5X15 Mud Grapplers. 1952 GMC 9700 p/u 7.3L diesel on air, dually |
|
|

|
|
|
#48 |
|
Registered User
Join Date: Nov 2010
Location: calgary alberta
Posts: 8,210
|
Re: Wife's 48
yeah, if anybody is laughing it is because they were once in the same boat as you are now, big job with minimal experience.
keep plugging away and soon you will look back and see how far you've come.pick a job and do the best you can. post pics and guys will give their 2 cents on how you can proceed, different tactics, things to watch out for etc. end of the day just try to think about what you do and how it will affect the longevity of the repair. if you have a big part that needs to be patched you can also use panel adhesive, no heat there to warp panels. the reason I was quizzing you on weld through primer is because I have found it works great between parts getting welded or for a quick coating to preserve fresh bare steel where you will sand it off before continuing later. but not so much on the parts that will eventually get epoxied over the weld through and then painted later. I find it comes off easy when rubbed against etc and especially if it is a thick coat. it is usually zinc or copper based so it could also be an issue with paint sticking to it. basically like cold galvanizing. wouldn't want to see all that work done and then you blow paint off at the first car wash. if in doubt check at the local autobody paint supplier or online. another quick pointer would be to use your mig wire cutters all the time to cut the end off the mig wire after each use. this gives you a nice chisel tip to scratch through the primer and also starts the weld process clean with less spatter and contaminants. especially if welding through a hole, like spot welding with the mig. |
|
|

|
|
|
#49 |
|
Senior Member
 Join Date: Sep 2017
Location: Bryan, Texas
Posts: 2,358
|
Re: Wife's 48
Guys, thanks for the advice. I was not using the weld through for anything but cover for the interim until I can get it blasted and primed properly, and the MIG advice is great.
|
|
|

|
|
|
#50 |
|
Registered User
Join Date: May 2014
Location: ID
Posts: 663
|
Re: Wife's 48
Yes, great advice. No one is laughing. It takes experience to gain experience.
I'm a very competent sheetmetal whacker/welder. Last month I have been helping my dad on a rusted door. We fought contamination and blowouts. I had it all TIG welded, and planished out, looking good. Shined a flashlight through the back and found LOTS of places I missed the line, or didn't penetrate enough and ground off the bead...  When it comes to sheet metal, there are 4 simple rules. You can cut it, weld it, shrink it, or stretch it. That's it. I cringe when I hear the word: WARP. There is no such thing. In the process of cutting, and welding, you upset the metal. It is going to happen. When you are done, you need to stretch and/or shrink places to get it back into shape. Cutting stretches, and all welds shrink! Learning to deal with this = experience. Flame suit on... |
|
|

|
 |
| Bookmarks |
|
|