
|
Register or Log In To remove these advertisements. |
|
|
|
|||||||
 |
|
|
Thread Tools | Display Modes |
 03-06-2008, 08:43 PM
|
#26 |
|
Weekend Warrior
Join Date: Oct 2004
Location: CT
Posts: 1,787
|
Re: My attempt at door repair
Thanks for the kind words guys. I'm no expert, and actually that door skin that I pictured is the first welding I've done across a door or large outer body panel. I was nervous (I've done rockers and cab corners, but nothing like welding across a door) Just a couple of tips that I picked up and helped me get that acomplished. It is more time consuming than it is difficult.
There are alot of guys more talented than me on this board - who probably could give you some better tips & advice. Kevin "LFD" is one of them. I'm going to be installing a cab corner on an S10 this afternoon hopefully. If I remember I'll try and take some pictures of the welding so you can see the "flat pea" (of couse that is if all goes well, I might have some ugly grapes too  ) )
__________________
-'07 GMC Sierra K2500HD -'66 C10 Suburban -'68/'71 K20 Service Bed Project -'69 Chevy C30 Mason Dump -'33Ford P/U 396ChevyPowered   
|

|

|
|
03-06-2008, 08:48 PM
|
#27 | |
|
Registered User
Join Date: May 2005
Location: PA
Posts: 2,696
|
Re: My attempt at door repair
Quote:
Last edited by Jim_PA; 03-06-2008 at 08:49 PM. |
|
|
|
|
|
03-06-2008, 09:07 PM
|
#28 | |
|
Weekend Warrior
Join Date: Oct 2004
Location: CT
Posts: 1,787
|
Re: My attempt at door repair
Quote:
__________________
-'07 GMC Sierra K2500HD -'66 C10 Suburban -'68/'71 K20 Service Bed Project -'69 Chevy C30 Mason Dump -'33Ford P/U 396ChevyPowered
|
|
|
|
|
|
03-07-2008, 06:49 PM
|
#29 |
|
Weekend Warrior
Join Date: Oct 2004
Location: CT
Posts: 1,787
|
Re: My attempt at door repair
I didn't get to the Cab Corner, but I had to re-weld some of the rocker panel on the S-10. I installed this rocker right on the edge below the door - mainly because I didn't want to get involved pulling the seat belts and trim, and painting the lower jam. I can just blow a little color on the bottom edge and not worry about it. I did both sides this way. They aren't perfect, but it is a '91 S-10 and I don't care, I just need to get it on the road.
Here is a picture of the "flat peas" that I was trying to describe. Now note, there was very little gap as this was already welded 1ce, but was so thin that it cracked. I just rewelded it up. Each of those little peas is a pull on the trigger, it wasn't a "continuous weld". Basically I hit the trigger 1ce for every little circle. If you count them there should be 10 on the center one. I welded those 10 peas then cooled it with the air. Then went to a differant spot and did the same thing. It just worked out to 10. When you first start you may only want to do a 3-5 untill you get @ least 50% welded. You'll see what I mean when you try it. Get the gaps as close as possible - it makes life alot easier.Oh yeh and that rusty looking junk is the bottom of the door. 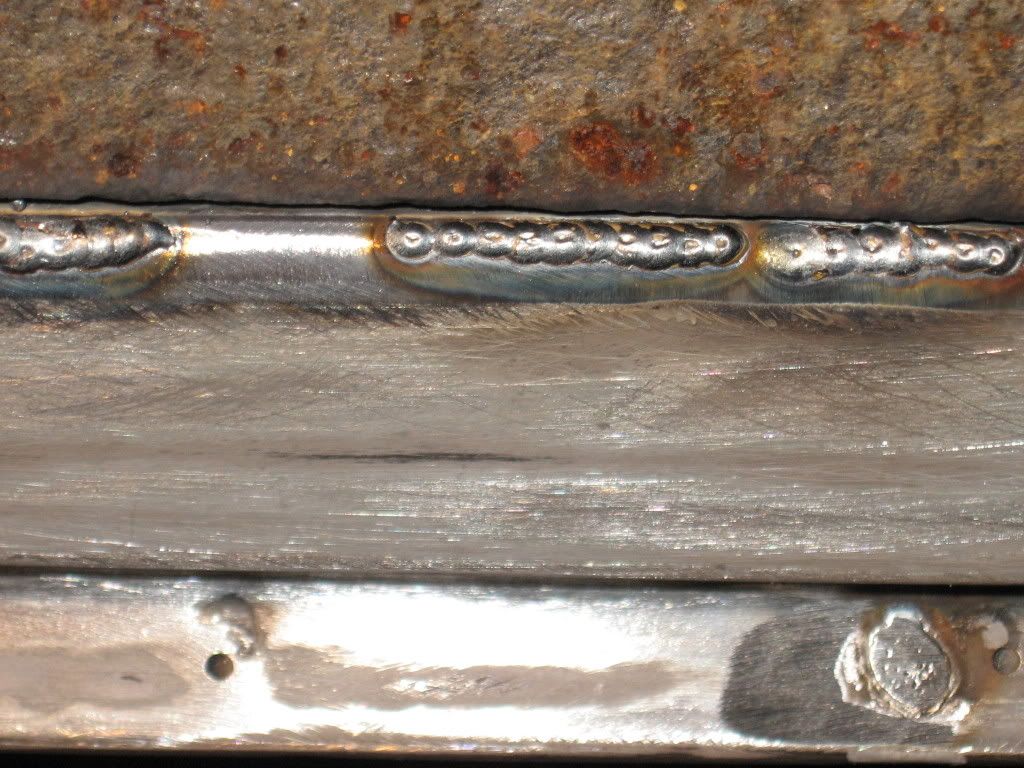 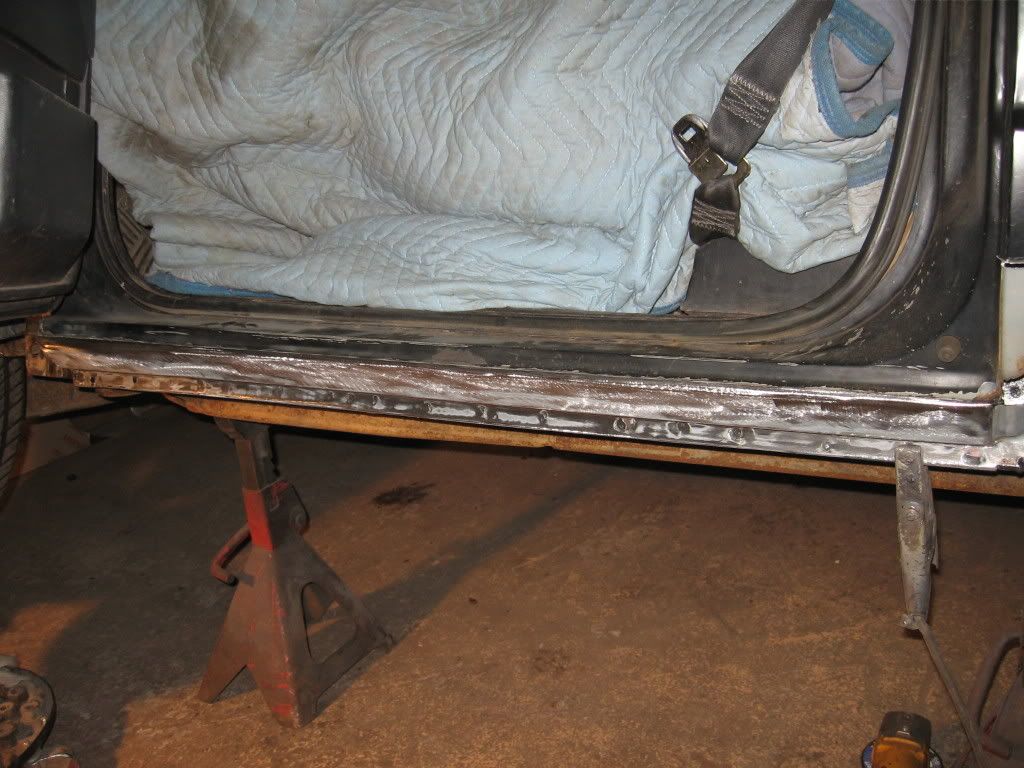 There are more pictures here: http://s152.photobucket.com/albums/s.../Andys%20S-10/
__________________
-'07 GMC Sierra K2500HD -'66 C10 Suburban -'68/'71 K20 Service Bed Project -'69 Chevy C30 Mason Dump -'33Ford P/U 396ChevyPowered
Last edited by arkracing; 03-07-2008 at 06:54 PM. |
|
|
|
|
03-07-2008, 07:12 PM
|
#30 |
|
great southern land
Join Date: Feb 2008
Location: perth - australia
Posts: 6,194
|
Re: My attempt at door repair
arkracing your rite on the money there - great info - we all have diffrent ways to do it, im more of a smash repairer than a restorer.
keep at it and just take your time. 
|
|
|
|
|
03-07-2008, 07:58 PM
|
#31 |
|
Registered User
Join Date: May 2005
Location: PA
Posts: 2,696
|
Re: My attempt at door repair
Pics helped greatly -- Thanks!
|
|
|
|
|
03-07-2008, 08:15 PM
|
#32 |
|
Weekend Warrior
Join Date: Oct 2004
Location: CT
Posts: 1,787
|
Re: My attempt at door repair
No problem.
I'm no professional, but it works well for me.
__________________
-'07 GMC Sierra K2500HD -'66 C10 Suburban -'68/'71 K20 Service Bed Project -'69 Chevy C30 Mason Dump -'33Ford P/U 396ChevyPowered
|
|
|
|
|
03-08-2008, 05:51 PM
|
#33 |
|
Registered User
Join Date: May 2005
Location: PA
Posts: 2,696
|
Re: My attempt at door repair
Change of plans.... That lower inner door repair piece is 100% garbage. It's not even remotely close to the same as the original.
I'm going to have to position the skin and tack it on so I can hang the door and see if the lines work. If it does, I'm going to take the door back off, and then I can basically start fitting the inner door bottom to the door skin. What a terrible reproduction. |
|
|
|
|
03-08-2008, 06:03 PM
|
#34 |
|
Registered User
Join Date: Mar 2008
Location: Rochester NY
Posts: 1,022
|
Re: My attempt at door repair
that sucks! where did you get them so we know where NOT to get them from? Ive been followong this as I have a similar repair issue
__________________
67/68 K/20 "The BEAST" 68 K15 V6 LWB. 73 K20 GMC Burb "The Bomber" 74 K/5 74 K20 Custom Deluxe 86 K10 Shorty 92 K2500 Burb 95 K2500 GMC Life is what you make it Live each day like it was your last Old GM Trucks never go out of style |
|
|
|
|
03-08-2008, 06:50 PM
|
#35 |
|
Registered User
Join Date: Nov 2001
Location: Concord, NC
Posts: 2,489
|
Re: My attempt at door repair
An easier way to make sure your door repair will fit well in its opening is to make a template from the cab side "B" pillar where the door meets it when closed. Just make a long template from window to rocker. This way you can check often as you work. Its a lot easier than hanging the door several times.
|
|
|
|
|
03-08-2008, 07:49 PM
|
#36 | |
|
Registered User
Join Date: May 2005
Location: PA
Posts: 2,696
|
Re: My attempt at door repair
Quote:
and to glimmertwin01: I got the patch from a local place, they are made by triplus. Looking in all other online catalogs, all these patches look the same, so I doubt getting one from somebody else would make a difference. In general, there is just no line definition in the patch, and several creases in the door don't even exist in the patch piece. I'm still not giving up on this one because I've gone this far, but since my drivers side door is much worse than this one, I'm not sure what I'll do over there. |
|
|
|
|
|
03-08-2008, 08:16 PM
|
#37 | |
|
Registered User
Join Date: Mar 2005
Location: Alberta
Posts: 316
|
Re: My attempt at door repair
Quote:
Unfortunately thats the name of the game with reproduction parts, its going to take work to get them right. You probably have better selection of doors down there but if theres no other options... |
|
|
|
|
|
03-08-2008, 08:31 PM
|
#38 | |
|
Registered User
Join Date: May 2005
Location: PA
Posts: 2,696
|
Re: My attempt at door repair
Quote:
Now, the lower skin on the other hand seems to be very nice! |
|
|
|
|
|
03-08-2008, 09:10 PM
|
#39 |
|
Registered User
Join Date: Mar 2005
Location: Alberta
Posts: 316
|
Re: My attempt at door repair
looking at your pics on the first page you've left most of the creases that I had to remake in mine. The piece looks just the one I dealt with including those annoying kicks at the corner. Had to add material to the flat section on one so the outer skin would fold around it properly.
Now if you're trying to get those little bends around the outside edge then I don't think anyone makes a patch with those started. It was a little while ago but I think some of the things I ran into were the piece was actually a little too wide, the radius of the corners needed some work, theres big creases in the corners, the outer edges were too long on one side and short on the other, the main body line sloped off to the outside instead of the 3 creases which had to be made, the lower shelf kicked out at a slightly wrong angle and the outer edges at front and rear were also wrong angle |
|
|
|
|
03-08-2008, 09:11 PM
|
#40 |
|
Registered User
Join Date: Mar 2005
Location: Alberta
Posts: 316
|
Re: My attempt at door repair
and drainage slots had to be added. lots easier to do this before you tack the piece in
|
|
|
|
|
03-08-2008, 09:20 PM
|
#41 | |
|
Registered User
Join Date: May 2005
Location: PA
Posts: 2,696
|
Re: My attempt at door repair
Quote:
When I put the one half up and around the one corner where it's supposed to go, the bottom piece angle starts going way off course. |
|
|
|
|
|
03-09-2008, 07:12 AM
|
#42 |
|
Weekend Warrior
Join Date: Oct 2004
Location: CT
Posts: 1,787
|
Re: My attempt at door repair
Yeh you usually have to monkey around with aftermarket stuff to get it to fit right. Lots of modifications. Efabman will tell you - I think he said that on several occasions he had to use 2 rocker panels to make one that fit right.
Anyway I did the driver's side cab corner on the S-10 this afternoon. Luckily This corner was from another s-10 so it was original "GM". On the passenger side I have a Tri-Plus replacement, we'll see how that goes tomorrow. Here are some pictures, and there are more photos in the album link. Usually when you are welding rusty stuff, you get crappy looking welds like these Ok I just clicked on efabmans site and saw the pictures of his stuff - maybe you should take his advice instead of mine  I'd like to see some pictures of his welding. I'd like to see some pictures of his welding.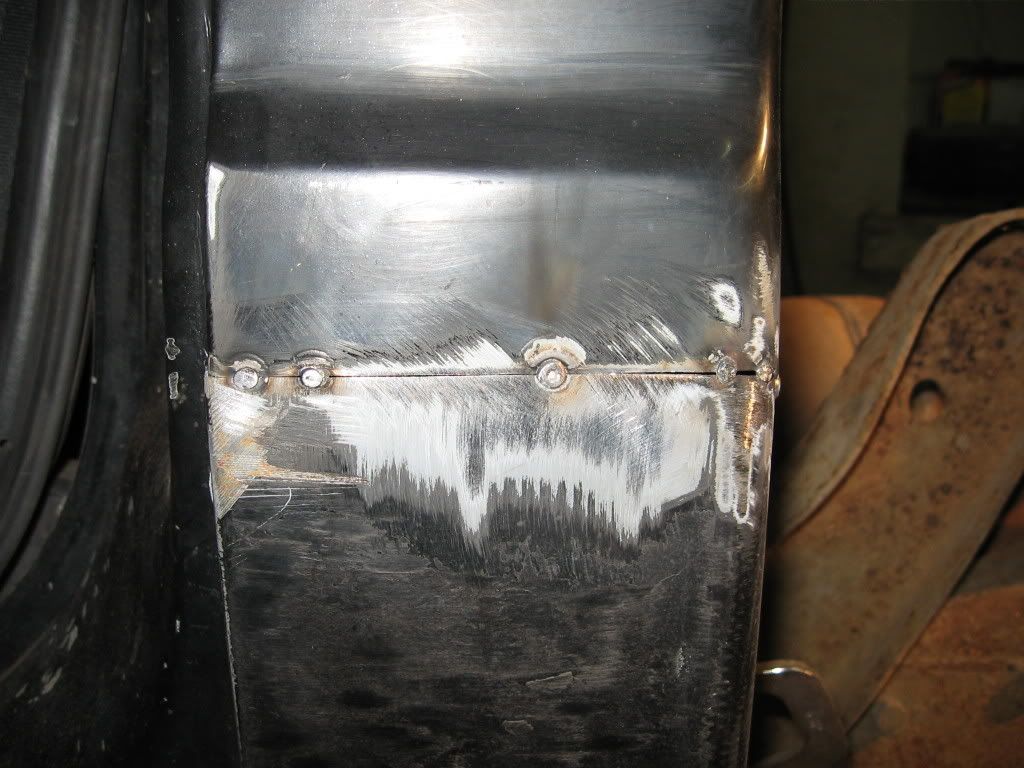 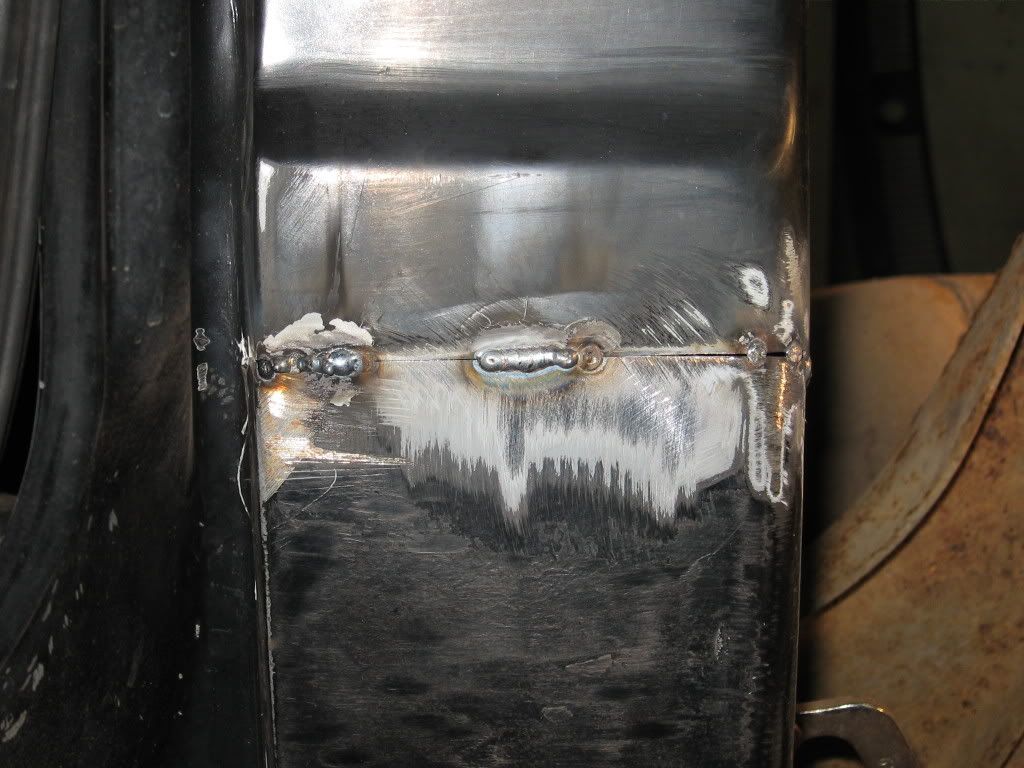 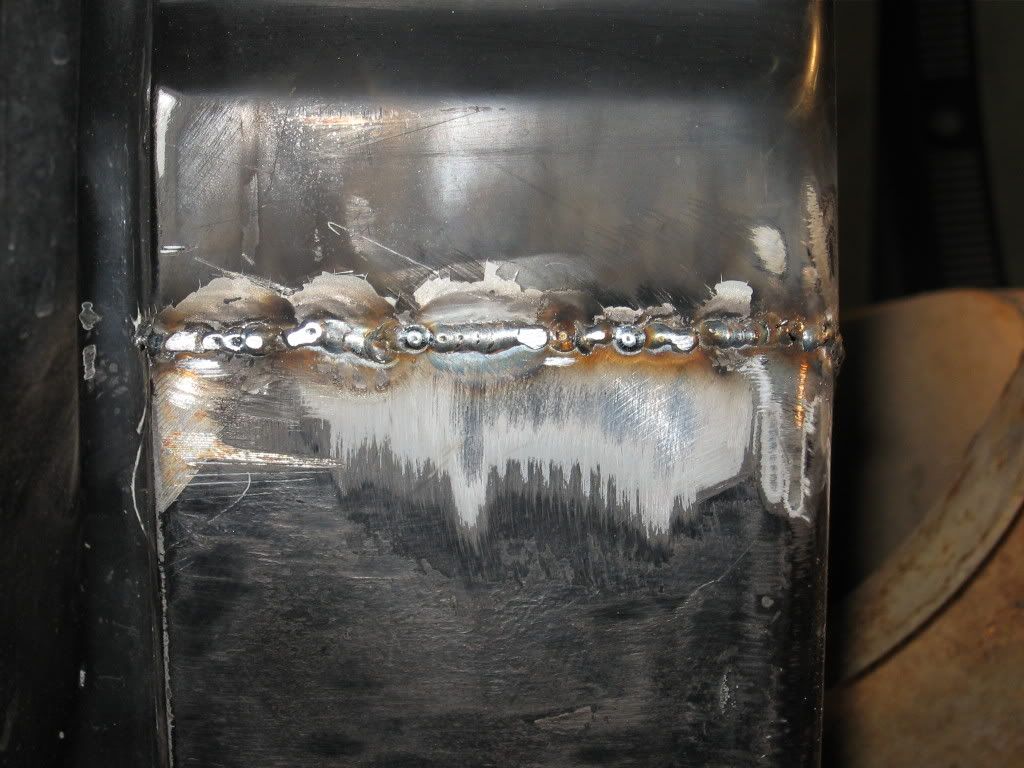 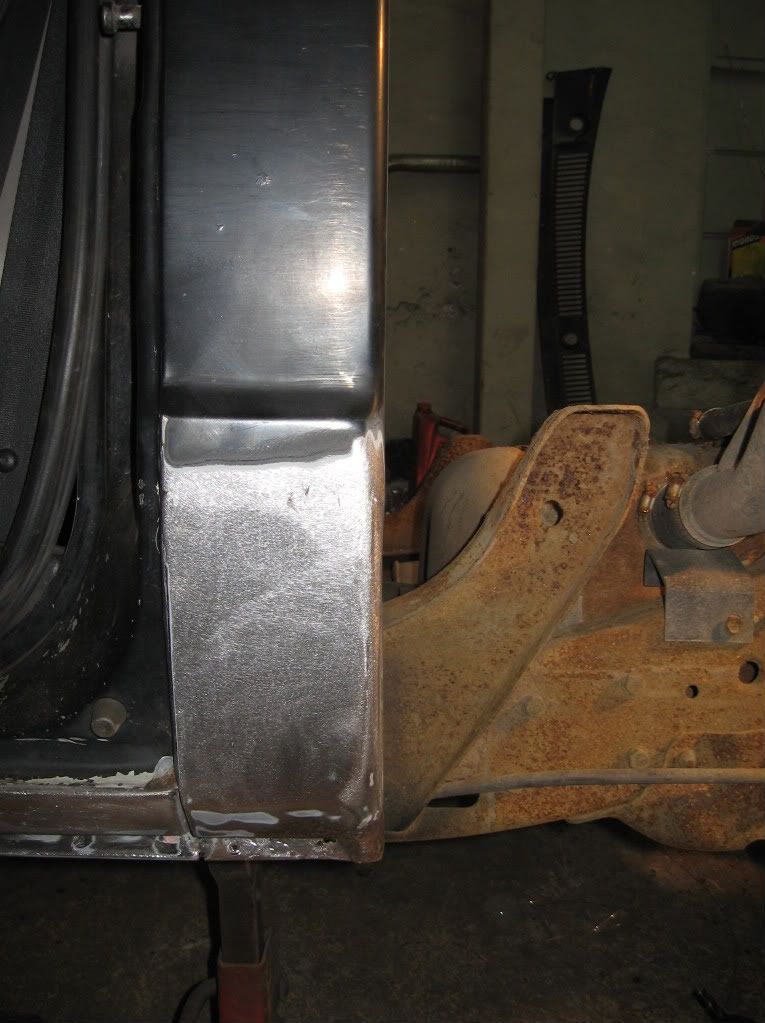 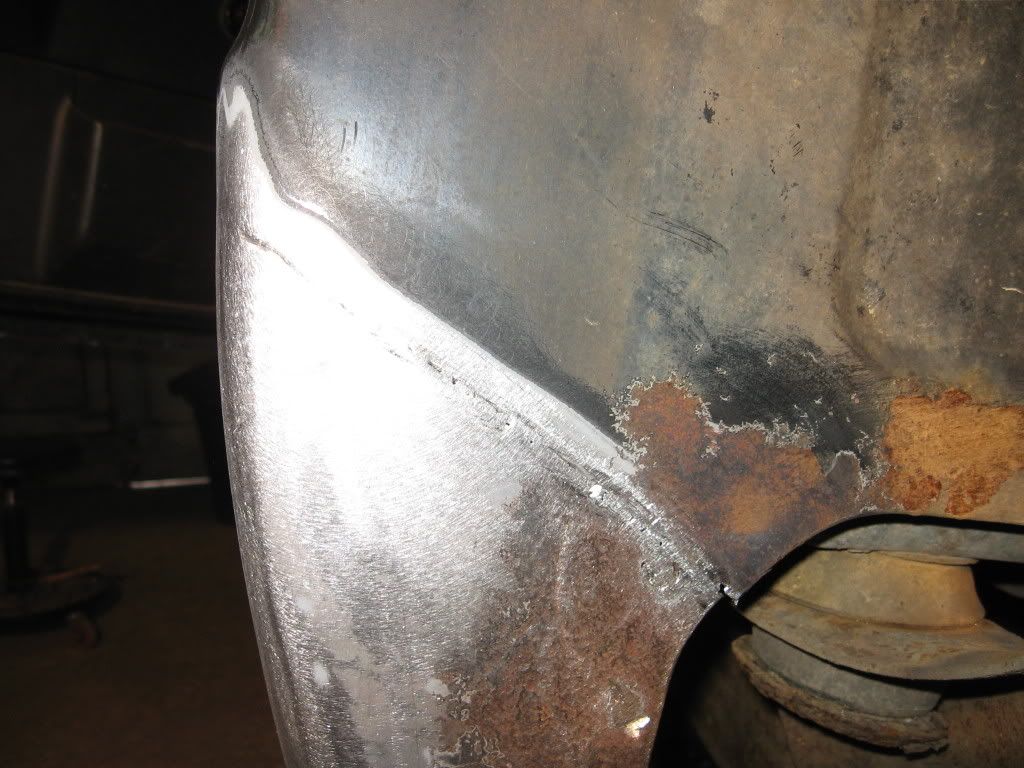 Rest of the pictures here: http://s152.photobucket.com/albums/s.../Andys%20S-10/
__________________
-'07 GMC Sierra K2500HD -'66 C10 Suburban -'68/'71 K20 Service Bed Project -'69 Chevy C30 Mason Dump -'33Ford P/U 396ChevyPowered
Last edited by arkracing; 03-09-2008 at 07:28 AM. |
|
|
|
|
03-09-2008, 07:21 AM
|
#43 |
|
Registered User
Join Date: Jan 2008
Location: Orwigsburg PA
Posts: 59
|
Re: My attempt at door repair
Looks like we are about in the same place as far as door repairs go. I started a Build thread in the wrong place of course.
http://67-72chevytrucks.com/vboard/s...d.php?t=280314 We most likely got the panels from the same place. The Tool Shed? This inner needs a lot of rework I am hoping to work on mine some more this weekend. Those little blocks in the last pic are the HF clamps. Since the outside of my door was not real bad I cut cardboard forms before I cut anything. Training DVDs helped me a lot. http://www.ebfabman.com/ (This is the same guy who post in your thread) http://www.paintucation.com/ If you are on a budget you might want to rent the videos first. http://smartflix.com/store/category/25/Bodywork You are going to want to buy the ebfabman videos at some point. There is no way I could absorb everything in there in one week.
__________________
It is better to live one day as a Lion then 100 years as a Sheep Dingers Build Thread Dingers Before Pic's My 67 Camaro Last edited by Gorn; 03-09-2008 at 07:24 AM. |
|
|
|
|
03-09-2008, 07:33 AM
|
#44 |
|
Registered User
Join Date: Jan 2008
Location: Orwigsburg PA
Posts: 59
|
Re: My attempt at door repair
LOL I just noticed you have almost 1000 posts and I am telling you about EBfadman Ha! I can be a real moron at times
__________________
It is better to live one day as a Lion then 100 years as a Sheep Dingers Build Thread Dingers Before Pic's My 67 Camaro Last edited by Gorn; 03-09-2008 at 07:34 AM. |
|
|
|
|
03-09-2008, 10:57 PM
|
#45 |
|
Looks good at 20-ft .....
Join Date: Apr 2005
Location: Mtn Home, AR
Posts: 707
|
Re: My attempt at door repair
Hot Rod Magazine did a new-subscriber giveaway set of 6 DVD's (I think 6) of major body panel replacement & restoration work. I've seen the first three DVD's. A buddy of mine subscribed to Hot Rod just to get the set, and I wish I had known about it while they were doing it. I have seen his copies, and he hasn't got the full set yet. Very good stuff.
The DVD set apparently was filmed at the Goodmark factory-store shop, "starring" a bodywork-restoration guy on their staff working on a Malibu convertible that I might have called a real rust-bucket. Same car throughout the DVD set, start-to-finish. Pre-restoration evaluation, teardown procedures, floor pans, trunk pan, quarters, bracing, door skinning, making patch panels where no new replacement panel is made ... pretty much the works in doing replacement panels is what I've seen so far. One thing he stresses in all the DVD's is that: "none of this stuff fits exactly right, and it all needs some tweaking for it to work." Then he shows how to fit it, modify it, & do the installation. Good welding training. I've never yet cut into my truck, and I know I need some (fortunately) minor rust repair replacement panels, but this DVD set has convinced me that I can do it, when it's time. |
|
|
|
|
03-14-2008, 09:11 AM
|
#46 | |
|
Registered User
Join Date: May 2005
Location: PA
Posts: 2,696
|
Re: My attempt at door repair
Quote:
NOTE TO SELF: Don't try to repair a door this way again This type of re-construction isn't going to work with this patch panel (ok, I'm going to make it work, but this definitely seems like the most difficult way to go about it). Things got so bad, I even decided to re-use a piece I initially cut out. I cut the bottom in 3 pieces to make things line up somewhat close. and looking at the 3 sections... those are only 2-cuts with a 1/16" thick cutting wheel, and it looks like I need another 3/4-1" after fitting them where I need the pieces to go. I'm not sure how I'll fill in those gaps, but at this point I'm not giving up  Oh, and arkracing, I'm not ignoring your advice about the sheet metal clamps, but I have more pieces to try to hold together than I know what to do with, so I'm using them for training wheels this time.   
Last edited by Jim_PA; 03-14-2008 at 09:46 AM. |
|
|
|
|
|
03-14-2008, 04:48 PM
|
#47 |
|
Registered User
Join Date: Jan 2008
Location: Orwigsburg PA
Posts: 59
|
Re: My attempt at door repair
Don't forget the drain
http://67-72chevytrucks.com/vboard/s...d.php?t=282453 Seem like its going to be a lot of work to save a $29.99 panel.
__________________
It is better to live one day as a Lion then 100 years as a Sheep Dingers Build Thread Dingers Before Pic's My 67 Camaro |
|
|
|
|
03-14-2008, 07:20 PM
|
#48 | |
|
Registered User
Join Date: May 2005
Location: PA
Posts: 2,696
|
Re: My attempt at door repair
Quote:
Truer words haven't been spoken, but as I said, it is what it is, and I'm going to press onward with it this time. Next time I'll use more of the repair piece. Lesson learned At least I'll get some good practice tacking, cutting, fitting and grinding
Last edited by Jim_PA; 03-14-2008 at 07:21 PM. |
|
|
|
|
|
03-14-2008, 08:28 PM
|
#49 |
|
Weekend Warrior
Join Date: Oct 2004
Location: CT
Posts: 1,787
|
Re: My attempt at door repair
No problem. Its all about what works for you better. I've used them and they work if you have nice clean metal. But when welding rusty thin garbage, the closer the gap the less change of blowing through and creating more problems.
Sorry to hear that the panels were that much work to fit. Seems like the way to go on the other door would be to grind the edges of the skin, but leave it on the door. Then fit the inner panel and get the skin to fit the body, then replace the skin. If you have access to someone with a break, you could just make that piece with a new chuck of steel. Otherwise I would just cut a small strip of metal and weld it in carefully (don't overlap it). Make sure you coat all those welds @ the bottom of the door on the inside with some POR15 or something similar. I would also seam seal the edge where the skin meets the bottom of the door from the inside - so water doesn't collect in the seam and rot it out again. Looks like it is coming along. Once you do it a few times, you'll figure out what works and what you have to do to tweak things. You already found out that you had to modify the replacement parts - a common problem with the repro stuff.
__________________
-'07 GMC Sierra K2500HD -'66 C10 Suburban -'68/'71 K20 Service Bed Project -'69 Chevy C30 Mason Dump -'33Ford P/U 396ChevyPowered
Last edited by arkracing; 03-14-2008 at 08:33 PM. |
|
|
|
|
07-26-2008, 07:15 PM
|
#50 |
|
Registered User
Join Date: Jun 2008
Location: Yamhill, Or
Posts: 17
|
Re: My attempt at door repair
Did you ever finish this repair?
|
|
|
|
|
| Bookmarks |
|
|


 Linear Mode

