
|
Register or Log In To remove these advertisements. |
|
|
|
|||||||
 |
|
|
Thread Tools | Display Modes |
|
|
 01-24-2012, 01:37 AM
|
#1 |
|
Registered User
Join Date: Jul 2010
Location: Sierra Vista, Arizona
Posts: 79
|
Re: '63 GMC 4x4 "Just Because I can/Do It All" Build
This truck used to have a 4 speed in it, but now that I'm putting an automatic in it (TH400), the clutch pedal isn't being used... so I'll get a small master cylinder setup with the clutch pedal, and that will be used for the hydraulic portion of the e-brake caliper, and then I'll use the factory pull handle and cable for the mechanically operated part of the caliper. The factory e-brake pull handle will be used when its parked, and the clutch pedal with master cylinder will be used for doing front digs and such. It's a bit redundant, but I thought it would be a neat feature. And definitely confusing for a car thief!
__________________
'63 GMC K20 Work In Progess - 350/400/205/HO72-60/HO72/52's/56's "Because I can" 
|

|

|
|
01-24-2012, 02:14 PM
|
#2 |
|
Junk Yartist
Join Date: Jul 2009
Location: Greeley, CO
Posts: 2,203
|
Re: '63 GMC 4x4 "Just Because I can/Do It All" Build
Glad to see someone else who likes Eatons! I can't wait to see how your eaton/60 hybrid turns out! I would love to attempt the same thing one day. I will be following along.
__________________
-Jeremy YOU ONLY FAIL IF YOU STOP TRYING 70 Crew Cab Build Link 70 GMC Suburban 4X4 build thread 95 Yukon Daily Driver Rebuilding an NP205 |
|
|
|
|
01-25-2012, 02:28 AM
|
#3 |
|
Senior Member
 Join Date: Aug 2008
Location: Long Beach, CA
Posts: 1,813
|
Re: '63 GMC 4x4 "Just Because I can/Do It All" Build
Awesome fabrication skills! I am jealous. Just starting to learn a lot of this on my 66 K10 build. I'll be following along to see your progress.
__________________
Jason M. @argonaut62 1972 K5 Blazer CST, Turquoise 1966 K20 Short Fleet Pickup, Big Ugly 1964 C10 Short Fleet, Gertrude 2001 Porsche 911 Carrera 1996 Ford Bronco XLT 1980 Jeep Wagoneer 2008 Honda CBR1000RR 2005 Honda RC51 1981 Honda CB750C No dis-assemble Johnny Five! No dis-assemble! |
|
|
|
|
02-09-2012, 11:51 PM
|
#4 |
|
60-66 Nut
 Join Date: Mar 2007
Location: Coeur d'Alene, Idaho
Posts: 23,246
|
Re: '63 GMC 4x4 "Just Because I can/Do It All" Build
Any updates?
__________________
Power Steering Box Adapter Plates For Sale HERE Power Brake Booster Adapter Brackets For Sale '63-'66 HERE and '67-'72 HERE and '60-'62 HERE and "60-'62 with clutch HERE Rear Disc Brake Brackets For Sale. Impala SS calipers HERE Camaro Calipers HERE D52 Calipers HERE 6 Lug HERE Hydroboost Mounting Plates HERE |
|
|
|
|
03-11-2012, 01:37 AM
|
#5 |
|
Registered User
Join Date: Jul 2010
Location: Sierra Vista, Arizona
Posts: 79
|
Re: '63 GMC 4x4 "Just Because I can/Do It All" Build
Sorry for the lack of updates folks, I'm on spring break now so I'll be doing quite a bit more work on this truck. Did quite a bit already though, so just a quickie update for now, pictures will be uploaded tomorrow....
Extended the frame back out to factory length in the rear, had to cut off the last ~10 inches because the previous owner booger welded a hitch to it and wasn't worth trying to remove it from the frame. Used some 4''x2''x3/16'' wall rectangular tube to put the frame back out to factory length, it fit in between the frame rails perfect and I welded it all around, should be stronger than the original! Then I got my leaf spring hangers bolted up as well as the shackle hangers. Leaf hangers are from a 2wd 3/4t 73-87 GM truck and the shackle hangers are from a 4x4 3/4t 73-87 GM truck. Using 56'' 3/4t leafs in the rear with a 4'' block. I didn't really want to use lift blocks, but I can't afford new springs right now and I didn't want to use the 73-87 4x4 leaf hangers because they hang really low and it would've looked stupid, and I've seen lots of trucks that have factory lift blocks in the rear, so I think I should be alright. And I am using the 73-87 tension shackle setup, so I don't think axle wrap will be a problem. Also made a midplate mount from some 1/4'' 6061 aluminum, cut out on the PlasmaCAM at work, bolts between the engine and transmission and will have a poly-bushing on each side, should never have to worry about cracking a TH400 bellhousing with this midplate. I also built that GotTrikes air/hydro tube bender since the last update, and I am very pleased with how it turned out. Still learning how to set up my bends so they are in the right places, but its super easy to work with since it bends in the vertical plane. Expect to see some tube work on this truck in future updates! I cut up a rusted out 64/5/6 chevy cab to use as a mock-up floor and firewall, just cut the back off right below the big dimples and cut the windshield pillows a couple inches above the dash. Has a perfect unmolested dash and firewall to work with for mockup purposes, and its a large hump cab like my GMC cab, great to checking driveline to cab clearance and its light enough without the roof/back that it can be picked up and moved around easily with 2 people. I put it on my frame today after I got the Eaton back under the rear springs and back to rolling frame status again. Tomorrow I'll be working in boxing the frame from the core support forward, since my front leaf hanger crossmember is there and that supports alot of weight, figured it would be better off if I boxed it in. I've got a badly bent 63 1/2t 2wd frame that I can cut the front end off of just ahead of the core support, perfect match for boxing in my frame. After that I'll be starting on my transfer case crossmember and transmission mount crossmember. Pictures of the current progress should be up tomorrow!
__________________
'63 GMC K20 Work In Progess - 350/400/205/HO72-60/HO72/52's/56's "Because I can"
|
|
|
|
|
03-11-2012, 10:27 AM
|
#6 |
|
Registered User
Join Date: May 2007
Location: Deale Md
Posts: 4,663
|
Re: '63 GMC 4x4 "Just Because I can/Do It All" Build
You are using 52" spring for the front are using 56" for the rear because that's what you already had verses using 63".
__________________
James 63 GMC V6 4speed carryall 65 chevy swb bbw V8 auto 68 K20 327/4 speed, buddy buckets 2002 GMC CC Dually Duramax 64 GMC lwb 3/4 V6 4speed SOLD 66 GMC swb bbw buddy buckets SOLD IG duallyjams The only thing that stays the same is constant change! |
|
|
|
|
03-11-2012, 10:13 PM
|
#7 | |
|
Registered User
Join Date: Jul 2010
Location: Sierra Vista, Arizona
Posts: 79
|
Re: '63 GMC 4x4 "Just Because I can/Do It All" Build
Quote:
Pictures are uploading now...
__________________
'63 GMC K20 Work In Progess - 350/400/205/HO72-60/HO72/52's/56's "Because I can"
|
|
|
|
|
|
03-14-2012, 04:45 AM
|
#8 |
|
Registered User
Join Date: Dec 2011
Location: Alaska
Posts: 405
|
Re: '63 GMC 4x4 "Just Because I can/Do It All" Build
Great progress on your truck. I think you are doing an excellent job and your welds are awesome. Keep it up and keep the pictures coming our way.
__________________
C@rnut001 (Owen) Alaskan Members Check In http://67-72chevytrucks.com/vboard/s...22#post5094422 http://67-72chevytrucks.com/vboard/s...18#post6778618 |
|
|
|
|
03-14-2012, 12:44 PM
|
#9 |
|
Registered User
Join Date: Mar 2012
Location: riverside
Posts: 24
|
Re: '63 GMC 4x4 "Just Because I can/Do It All" Build
nice work, i dig the ebrake setup.
|
|
|
|
|
04-28-2012, 07:01 PM
|
#10 |
|
Registered User
Join Date: Jul 2010
Location: Sierra Vista, Arizona
Posts: 79
|
Re: '63 GMC 4x4 "Just Because I can/Do It All" Build
I think it's about time for some updates right?
I got some more done on my transfer case mount setup. Uses 2.5''x2.5''x.25'' square tube welded to the frame, with 2''x2''x.25'' that slides through and bolts into the 2.5''. Not completely finished with it yet though, but the pictures get the point across. 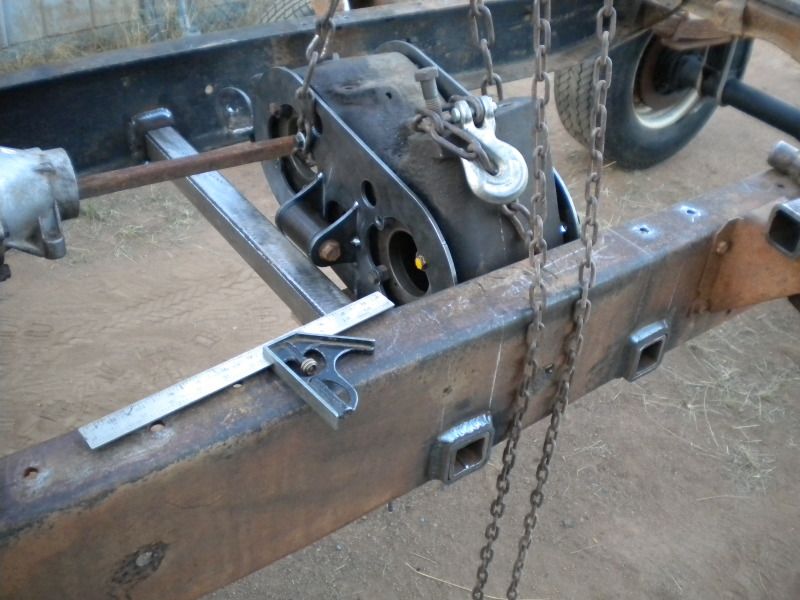 2 bolts per end on the square tube to keep from pinching the 2.5'' tube down and making it difficult to slide the tube out. Showing off my welding with this one too. 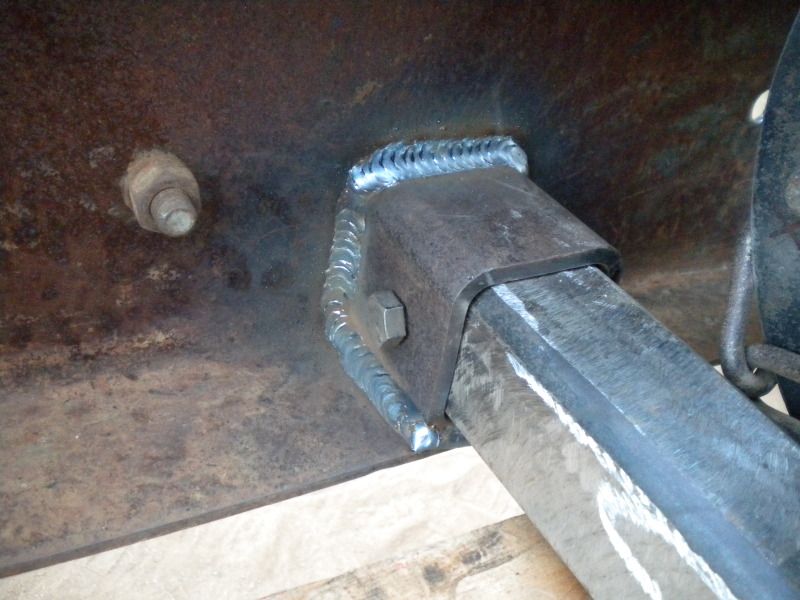 And what it looks like on the outside of the frame rail, mostly just showing off my welding again.  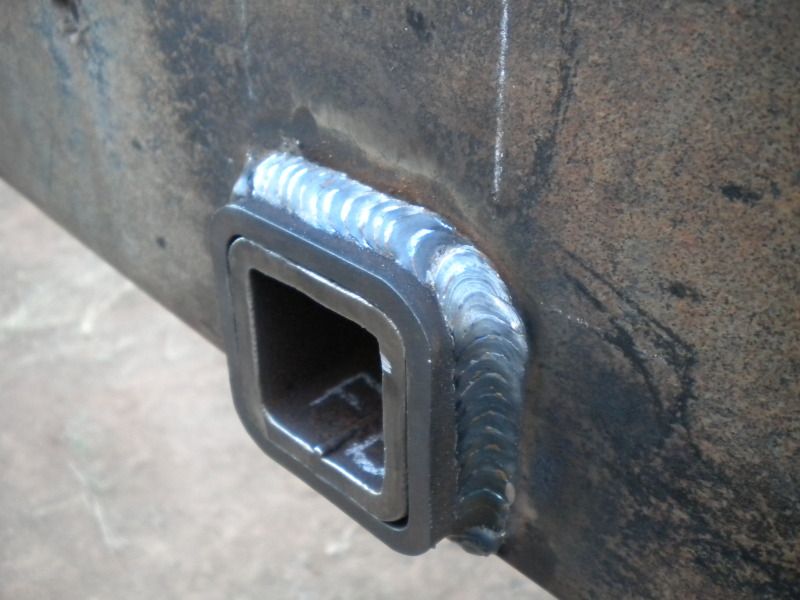 Since my frame had some hack job of a mount and reinforcement plate for a later model power steering box, and was cracked around a couple of the bolt holes, I decided to fix that. Plated and boxed the frame with 3/16'' plate, not completely finished as I still have to box it in from the core support forward and finish welding the passenger side boxing plate in, but the pictures get the point across. Frame is now 3/8'' thick after being plated where the steering box mounts, plus being boxed and sleeved for the bolts, so I shouldn't have any frame flex or cracking issues around the steering box anymore. Spacers will be welded on where the bolts are to set the steering box away from the frame slightly since I don't have a formed section of frame to fit the profile of the steering box.  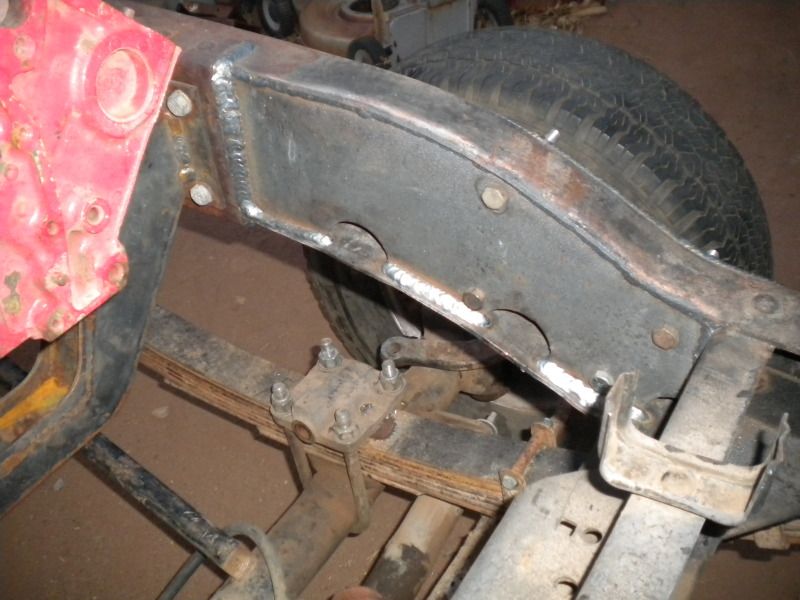 And of course, gotta show off the welds... 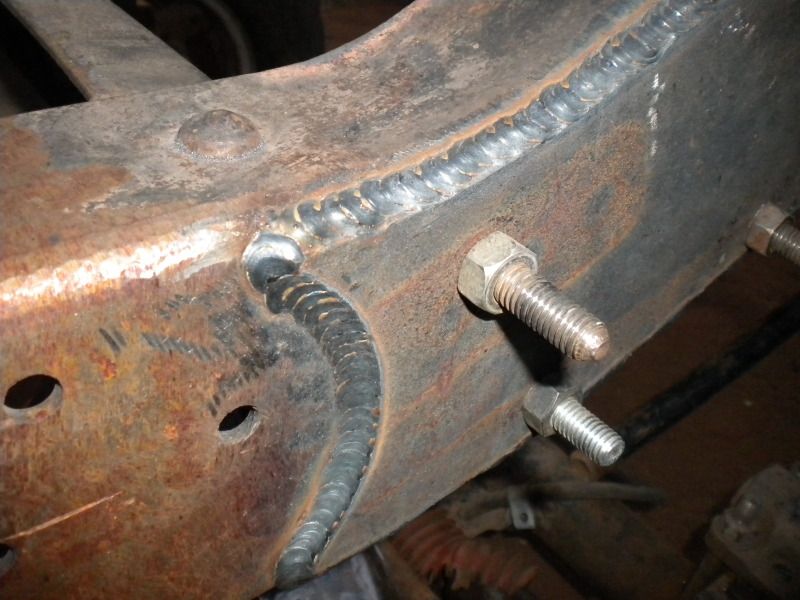 I traded a 14 bolt axle for a set of 6 of these beasts..... 12 bolt Humvee wheels with 37'' military Goodyears. Funny thing about the deal, I was under the impression I was only getting tires, when the guy showed up to pick up the axle, the tires had these wheels in them and he said he knew I wanted the wheels and he didn't feel like pulling them apart to give me just the tires. Win win situation for me, since I have another trick up my sleeve for a different set of 16.5'' wheels that I plan on using and I won't be using the Humvee wheels for a while until I can afford to recenter them ($50 per wheel). 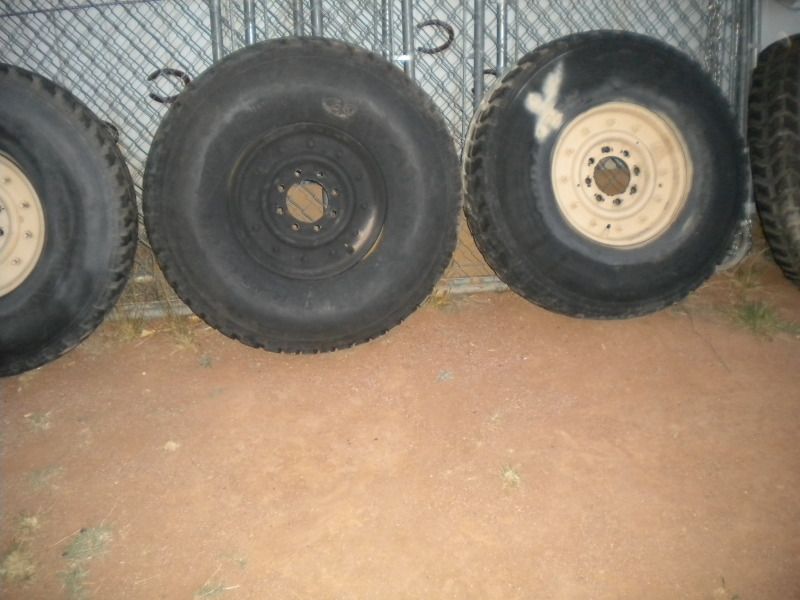 So transmission plans changed with the truck, decided to go with the 4 speed SM465 instead of the TH400, main reason being cost of rebuild and other required parts, and I really don't mind shifting, so the 4 speed it is. Plus the truck already had a SM465 in it when I got it, I already have a good clutch on the engine for it and have all the linkage stuff, and a full rebuild will cost me half of what the TH400 rebuild with a TC and shift kit would. Throw in the $230 Winters/Art-Carr shifter I wanted for the TH400, well that money will go a long way towards driveshaft parts that I need. Went from this setup.... 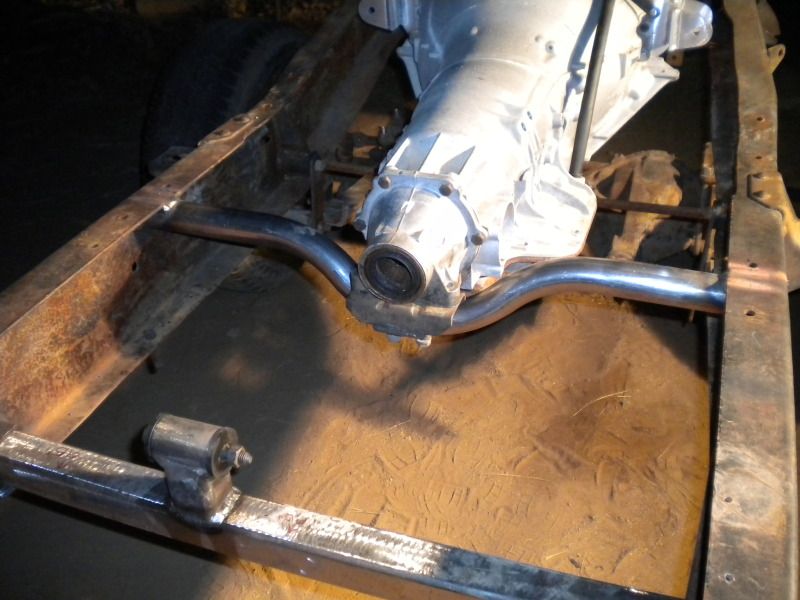 To this.... 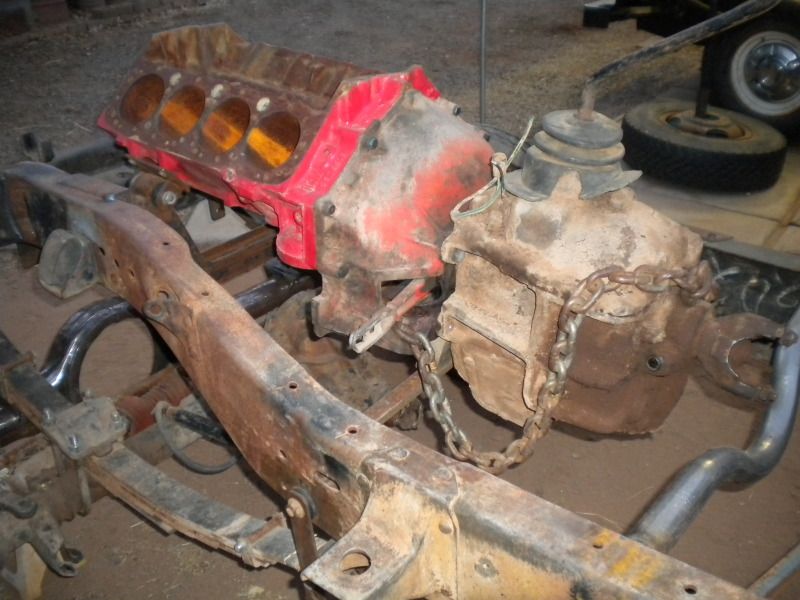 And just to hold your interest in case it takes me a while to post, here is a teaser shot of something I've been waiting quite a while to build... Lets see who can spot it first....  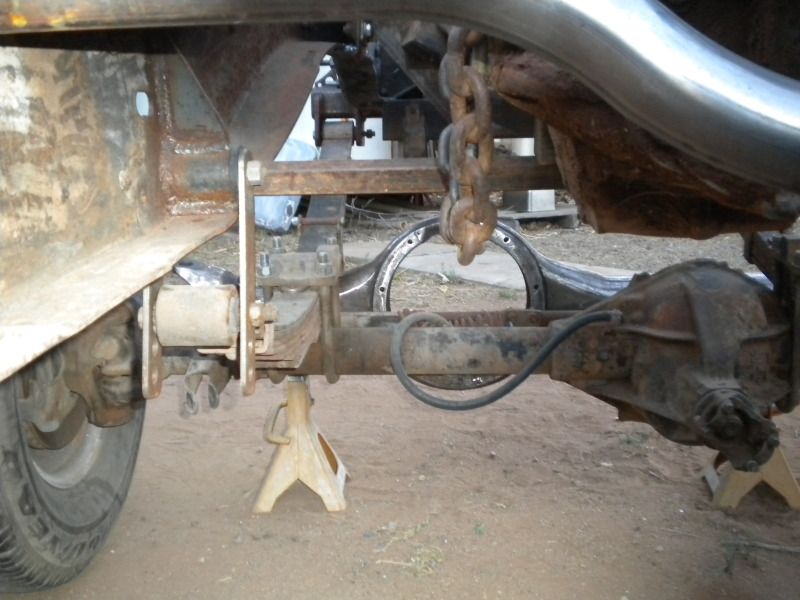
__________________
'63 GMC K20 Work In Progess - 350/400/205/HO72-60/HO72/52's/56's "Because I can"
Last edited by 63GMCKid; 04-28-2012 at 07:13 PM. |
|
|
|
|
04-29-2012, 12:46 AM
|
#11 | |
|
60-66 Nut
Join Date: Mar 2007
Location: Coeur d'Alene, Idaho
Posts: 23,246
|
Re: '63 GMC 4x4 "Just Because I can/Do It All" Build
Looks like your HO72/Dana 60 hybrid differential........
Quote:
Your welds are looking good 
__________________
Power Steering Box Adapter Plates For Sale HERE Power Brake Booster Adapter Brackets For Sale '63-'66 HERE and '67-'72 HERE and '60-'62 HERE and "60-'62 with clutch HERE Rear Disc Brake Brackets For Sale. Impala SS calipers HERE Camaro Calipers HERE D52 Calipers HERE 6 Lug HERE Hydroboost Mounting Plates HERE |
|
|
|
|
|
04-29-2012, 02:40 AM
|
#12 |
|
Registered User
Join Date: Jul 2010
Location: Sierra Vista, Arizona
Posts: 79
|
Re: '63 GMC 4x4 "Just Because I can/Do It All" Build
Alright folks, now time for the coolest part of the build, what I call the "Every Man's Eaton" build, because anyone with access to a lathe, good welding skills, and a lot of time with a tape measure, pen and paper, can build this same axle. But like an idiot, I forgot to get pictures of the making of the most important part, the housing extensions. Anyway, here's a mini-build dedicated to my Eaton HO72/Dana 60 hybrid front axle.
The housing for this project started out as a '58 Eaton HO72 with slide on drums, meaning this axle is about 1/2'' narrower per side than later Eatons (I learned this the hard way after getting this housing all cleaned up and then mocking up my disc brakes....), the difference can be seen in the spindles if you compare one of these older housings to a later Eaton, unfortunately I don't have pictures of that difference but take my word for it, the width difference can also be seen when comparing later Eaton shafts to older ones. It went from this ('58 housing, complete).... 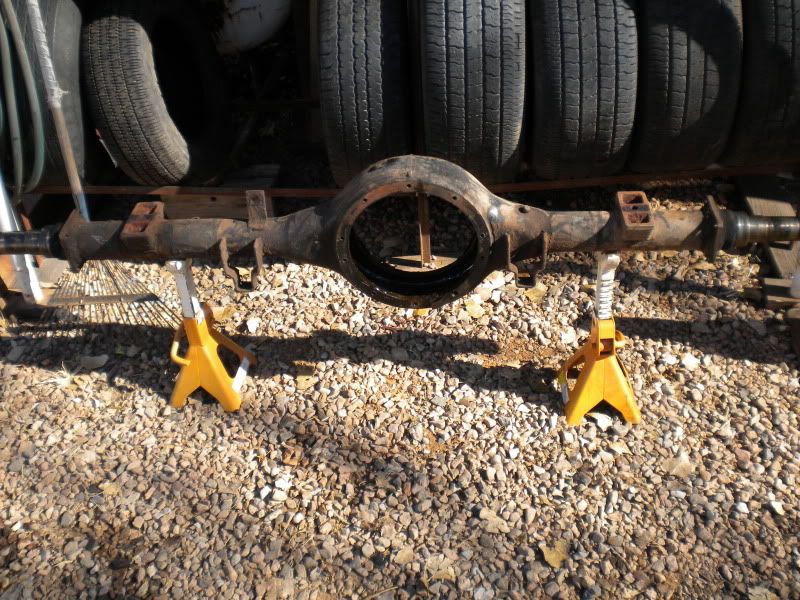 To this, spindles cut off immediately behind the weld holding the backing plate flanges to the housing, everything removed from the housing (leaf perches, shock brackets, etc., the perches you see in the pic are for mock up)... 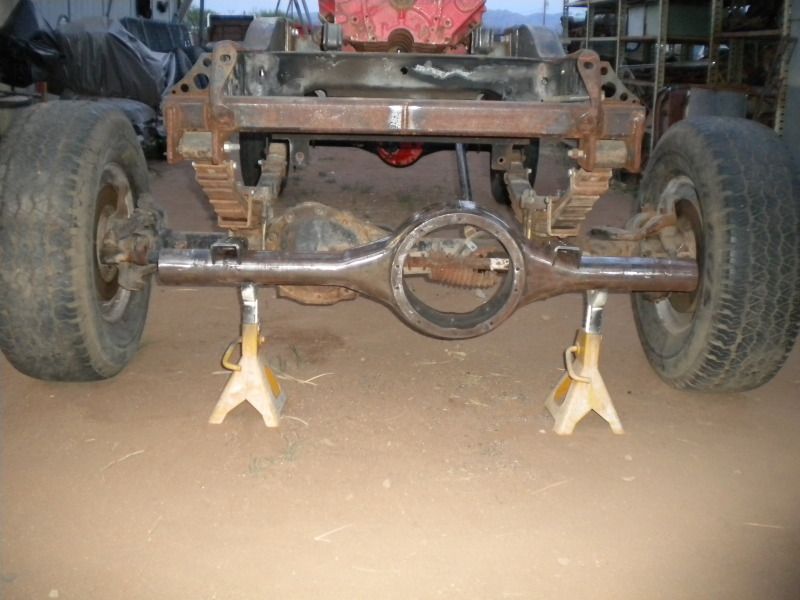 Now keep in mind I am building this without having a Dana 60 to measure stuff from, so I had to track down the information I needed on the internet. I bought my inner C's from ebay and had those, but I have nothing from the knuckles out, so I had to know some basic measurements of a Chevy Dana 60 housing to figure out how wide to make my Eaton housing and tube extensions. For some reason this basic info is non existent on the internet so I had to post on Pirate to get some of the information, and even then it wasn't quite everything I wanted to know but I had to work with it. Anyway, I knew a Chevy Dana 60 front axle has a WMS-WMS width of 69''. I knew this would be too wide for my GMC and it would look stupid with a 65'' wide rear axle, so I wanted to narrow it to 67'' WMS-WMS give or take 1/2''. After posting a request for some Chevy Dana 60 housing measurements, someone was able to get some rough basic measurements for me, good enough to get this axle into the ball park for the width that I wanted. For a Chevy D60 stock housing, with kingpins installed on the inner C's, top of king pin center to top of king pin center is 53'', so this was a very good starting point dimension for me. Would have liked to know the width from end of axle tube to end of axle tube, but couldn't get that info so I went with the 53'' KPC to KPC dimension. I mainly use PlasmaCAM for drawing since I've forgotten how to use AutoCAD. Something cool about PlasmaCAM is I can turn a picture into a line drawing, use a known dimension and scale part of the drawing to that and have a pretty accurate drawing. I found a detail of a Chevy Dana 60 inner C/knuckle/spindle/hub/rotor assembly, scaled the drawing up in PlasmaCAM so the axle tube in the drawing was 3 1/8'' in PlasmaCAM, checked drawing dimensions against known dimensions posted online and everything checked out. I wont make everyone bored with all of the details of drawing it, but I drew it and all measurements checked out in the drawing, so hopefully it will turn out right! Here is a quick screenshot of what the HO72/60 hybrid looks like in 2D... 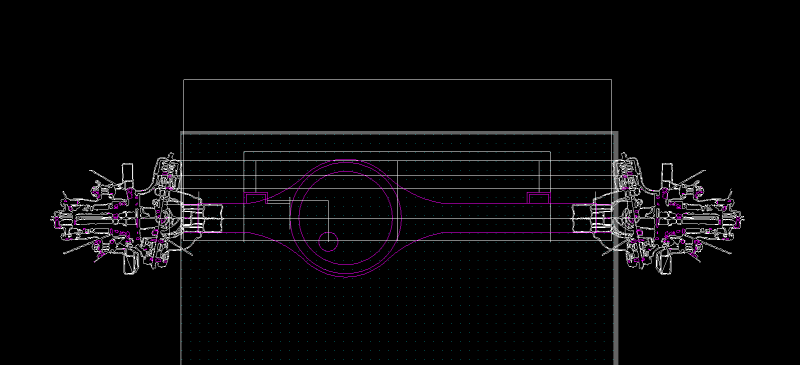 After drawing it up I knew how much more I would need to cut off the short side of the housing and how much I would need to extend the long side. Well I was able to figure out how I could do it without it being obvious that it was extended. The center chunk is a little closer toward the center of the truck, but the pinion center line to leaf spring distance is about the same as a passenger drop Chevy 10 bolt front axle, so no big deal there. Anyway, I set it up so I only had to extend the housing 1.75'' on each side, which is all that each inner C needs to press on to. So to make my life easier, I decided that the extensions would have the same OD as a D60 axle tube, so I could press it onto the C and not deal with trying to have the housing turned down or the C's bored. I ordered 12'' of 3.125''x.5'' DOM tube from Speedymetals (To the tune of $101 shipped!  ) and cut it into two 6'' long pieces and spent a couple hours on the lathe turning the chunks of tube into housing extensions/inner C adapters. Unfortunately I forgot to take pictures of these before I pressed the C's onto them and put everything on the Eaton housing for the final time. So to make up for that, I drew up a quick dimensioned side profile view of these extensions/adapters. ) and cut it into two 6'' long pieces and spent a couple hours on the lathe turning the chunks of tube into housing extensions/inner C adapters. Unfortunately I forgot to take pictures of these before I pressed the C's onto them and put everything on the Eaton housing for the final time. So to make up for that, I drew up a quick dimensioned side profile view of these extensions/adapters.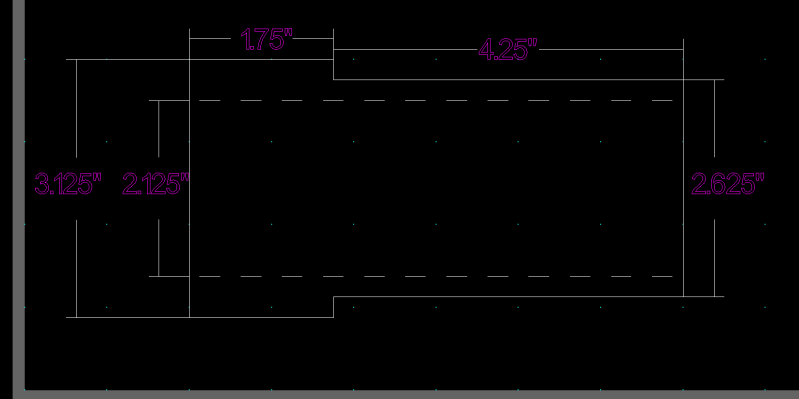 When I pressed the inner C's onto the extensions, I froze the extensions prior to make pressing a bit easier. It was definitely a very tight press fit even with the extensions frozen, I would say very close to factory spec, took something like 34 tons on the 40 ton press where I work.  After that I milled a flat on the extensions to clear the seam of the tubes on the Eaton housing and have a bit of wiggle room to adjust my caster before tacking it together. After that I milled a flat on the extensions to clear the seam of the tubes on the Eaton housing and have a bit of wiggle room to adjust my caster before tacking it together. When I was ready to put the C's with extensions into the Eaton housing, I once again froze them since I turned the extensions to exactly the same OD as the ID of the HO72's tubes, which meant for a very tight fit at room temp, and a snug slip fit when frozen. Set my pinion angle to 6* up at the transfer case, and caster angle to top of inner C's back at 6*, for a total combined angle of 12*. All angles and measurements checked out right on the money, so everything was tacked together after the frozen C's/extensions warmed up to room temp. Prior to all of this I cut 4 holes at the end of the HO72 housing tubes for plug welds, so after everything was tacked, I decided I would go ahead and do the plug welds and grind them smooth with the housing. Next step will be to put the final weld around the C's to secure them to the extensions and main housing. Going to do this at work with a Miller 350P MIG machine set up for pulsed spray transfer, I want a good hot weld that will penetrate well into all 3 parts at each end. So here is how it sits now, caster and pinion angle set, awaiting final weld around the C's, and soon will get a nice pair of 6'' long spring perches from WFO concepts. 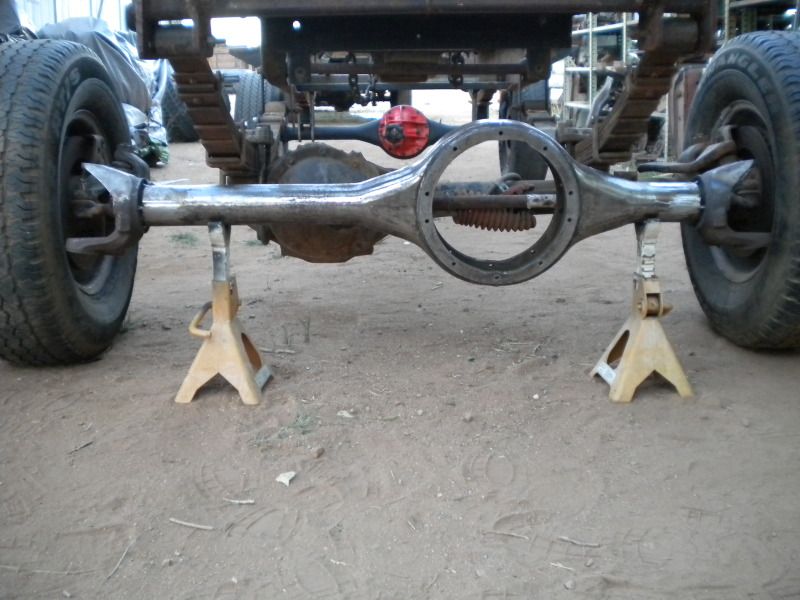 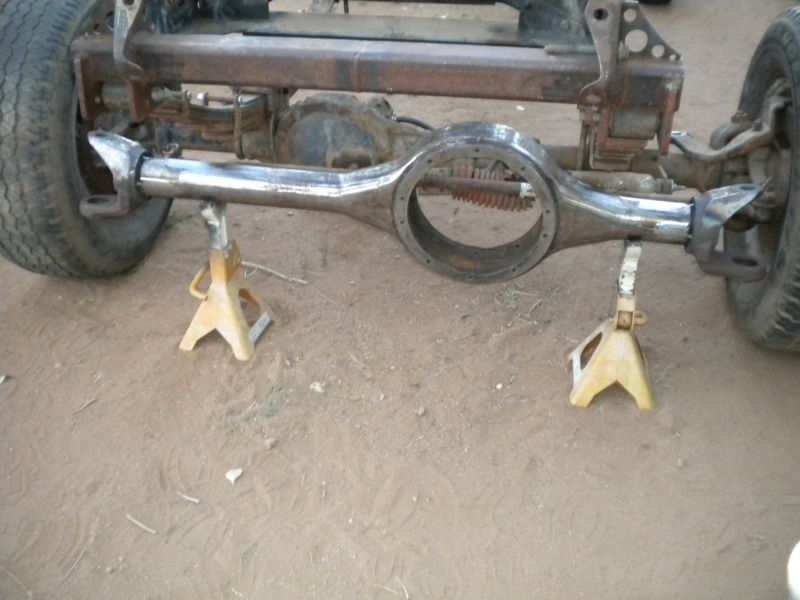 An attempt at a cool looking picture with the macro feature turned on, note the beefy 1/2'' wall tube at the C, same as any Dana 60, so aftermarket outer axle seals will work for this setup. Also note the inner C gussets, because they make it look like I am going to wheel it in such hardcore terrain that I might need such additional strength, and to make it hardcore enough for the Pirate4x4 web wheelers, too...  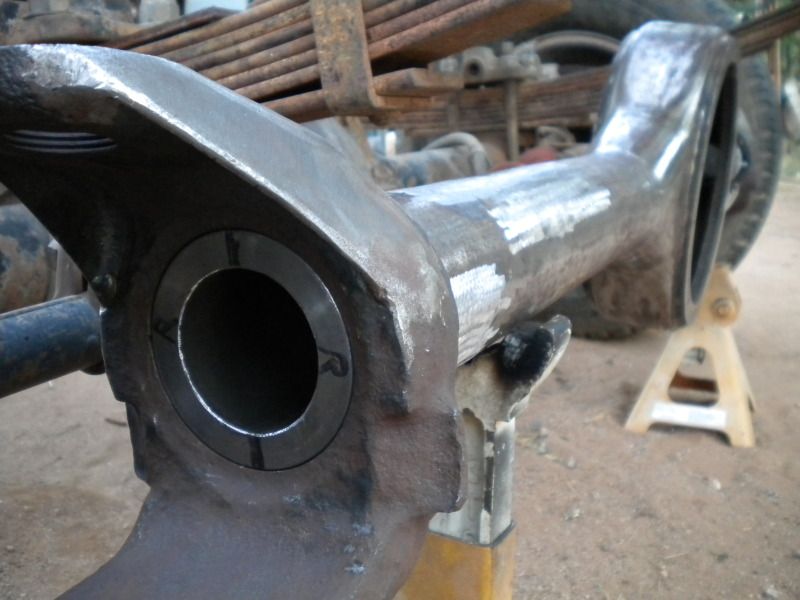
__________________
'63 GMC K20 Work In Progess - 350/400/205/HO72-60/HO72/52's/56's "Because I can"
Last edited by 63GMCKid; 04-29-2012 at 03:03 AM. |
|
|
|
|
04-29-2012, 02:52 AM
|
#13 |
|
Registered User
Join Date: Jul 2010
Location: Sierra Vista, Arizona
Posts: 79
|
Re: '63 GMC 4x4 "Just Because I can/Do It All" Build
Note the bevel on the housing tube end for good weld penetration, as well as a good exposed section of extension for the weld to penetrate as well, and the usual back face of the inner C, slightly beveled from where I ground the weld out to remove the small chunk of tube that both C's had in them when I got them.
 Again, from a little further back. You can also see where I ground the plug welds smooth with the housing. 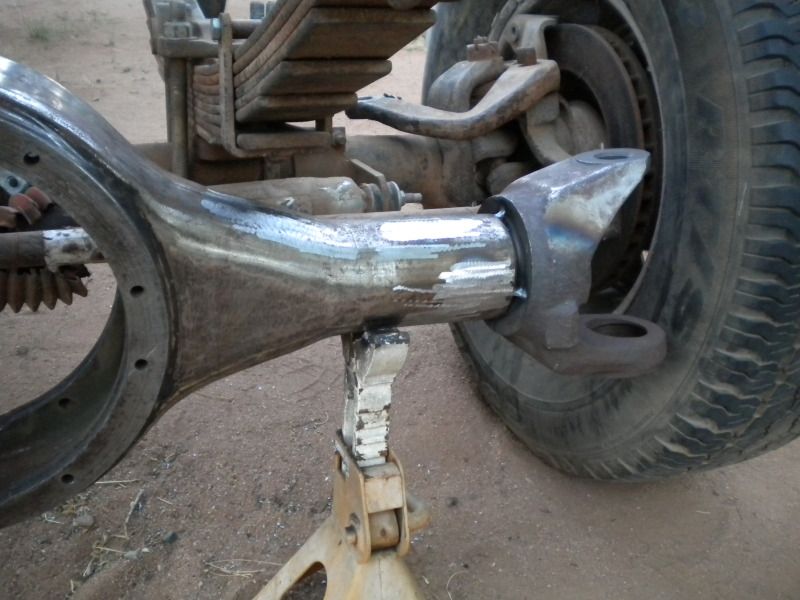 Again, but on the passenger side. 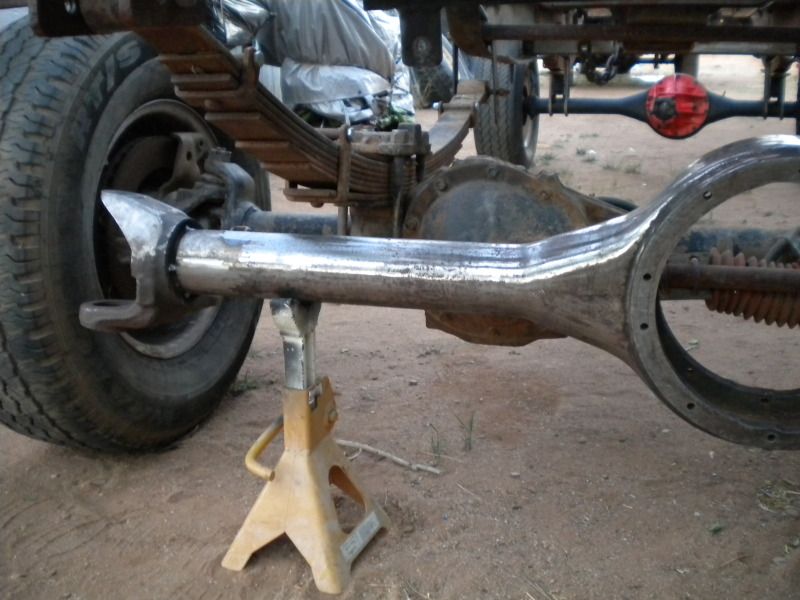 And on the bench measuring for inner shafts, which I am also making.  And for those who are into the offroad world and follow some buggy builds on Pirate, a lot of the custom axles with aftermarket fabricated housings usually have a tag with the company name or logo welded onto the housing somewhere. Well I thought it would be cool to do the same thing but with the Eaton logo, so I made a couple of those tags to weld to the housing (one of the front axle and one for the rear). 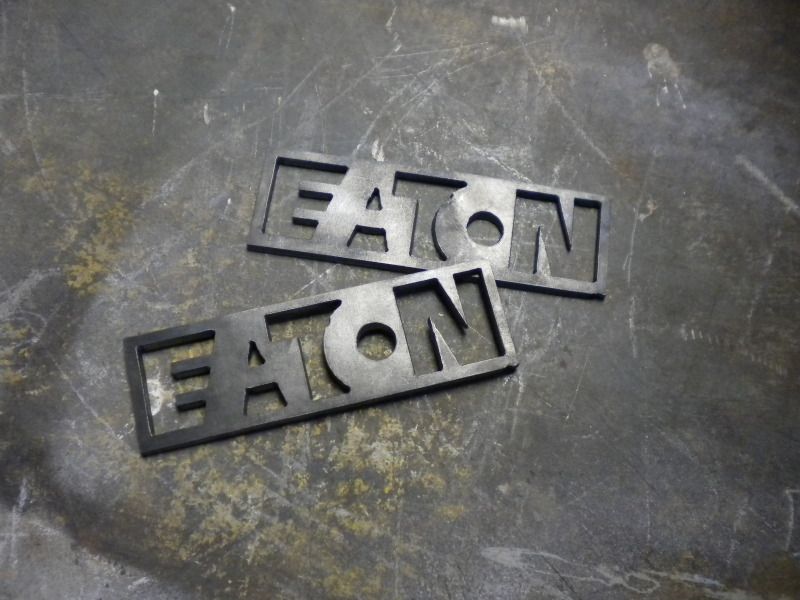  And since I am making my own inner shafts, here is whats left after I attacked a pair of stub axles and '58 HO72 axle shafts with a lathe (for boring a 3/4'' hole in the stub yokes) and a cutoff wheel. 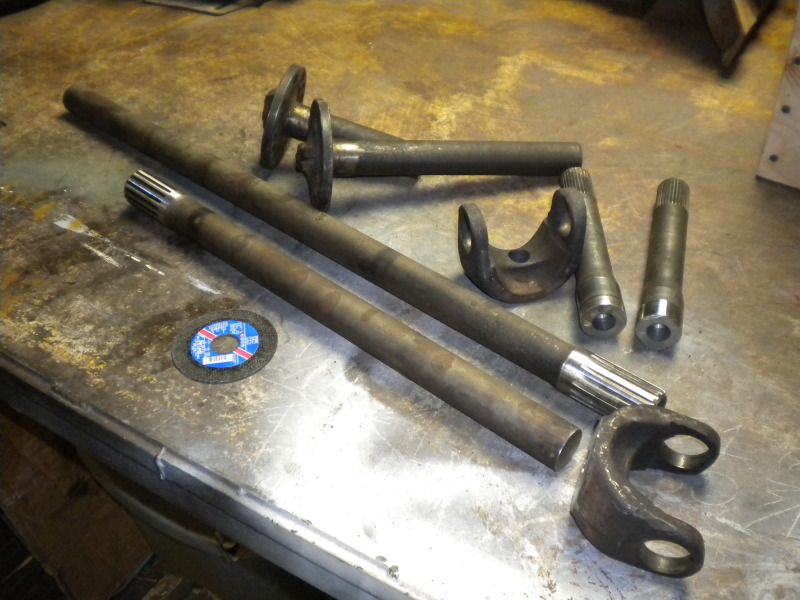 And since we are on the subject of making custom length inner shafts of strange and unique diffs, here are a couple links to some tech that shows how to do such a thing.... http://www.pirate4x4.com/forum/showp...5&postcount=50 http://www.pirate4x4.com/forum/showp...0&postcount=76 (Bottom of the page on this last one) http://www.pirate4x4.com/forum/showp...&postcount=132
__________________
'63 GMC K20 Work In Progess - 350/400/205/HO72-60/HO72/52's/56's "Because I can"
Last edited by 63GMCKid; 04-29-2012 at 03:13 AM. |
|
|
|
|
04-29-2012, 05:49 PM
|
#14 |
|
Registered User
Join Date: Dec 2011
Location: Alaska
Posts: 405
|
Re: '63 GMC 4x4 "Just Because I can" Build
Wow...excellent fabrication! Keep it up!
__________________
C@rnut001 (Owen) Alaskan Members Check In http://67-72chevytrucks.com/vboard/s...22#post5094422 http://67-72chevytrucks.com/vboard/s...18#post6778618 |
|
|
|
|
04-29-2012, 10:33 PM
|
#15 |
|
Registered User
Join Date: Sep 2011
Location: Tacoma, WA
Posts: 2,425
|
Re: '63 GMC 4x4 "Just Because I can" Build
Yep, you are up there with the real heavy hitters like BuiltbyBrooks, Porterbuilt, Dino, and a few others I am not remembering their names just yet.
Too much math for this simple guy, but I am not too addled to know some serious work when I see it!! I may not follow half of what you say, but I am in for the show none the less!!
__________________
Michael McMurphy My 66 Stepside My 64 Tow Truck My 66 Tempest Table Of Contents Added to Page1 |
|
|
|
|
04-30-2012, 12:06 AM
|
#16 |
|
Junk Yartist
Join Date: Jul 2009
Location: Greeley, CO
Posts: 2,203
|
Re: '63 GMC 4x4 "Just Because I can" Build
Did you slide the axle extensions into the housing? I have been thinking about a front HO72, but not sure how to go about it. I will be following closely.
__________________
-Jeremy YOU ONLY FAIL IF YOU STOP TRYING 70 Crew Cab Build Link 70 GMC Suburban 4X4 build thread 95 Yukon Daily Driver Rebuilding an NP205 |
|
|
|
|
04-30-2012, 01:16 AM
|
#17 | ||
|
Registered User
Join Date: Jul 2010
Location: Sierra Vista, Arizona
Posts: 79
|
Re: '63 GMC 4x4 "Just Because I can" Build
Quote:
Yes, the C's were first pressed onto the extensions, then the C/extension assemblies were frozen so they would easily slide into the housing. I'm still kicking myself for not getting pictures of that whole process because its kind of hard to explain all of it with just words now. Something to note though, the extensions are also plug welded (4 plug welds per side) in a staggered pattern around the tube, I've already ground them flush with the housing so its hard to tell, and technically they are a press fit, I just used the awesome thermal expansion/contraction properties of steel to my advantage to make putting everything together easy, so they are a thermal interference fit (press fit at room temp). Also something else I would like to add in is the importance of using a setup bar. I don't own a setup bar simply because I may only ever use it once or twice, however I borrowed one from a friend and used some old bearings as half assed alignment pucks to do a quick check to make sure the housing was straight, and it is straight, but as this post shows, one may not always be so lucky... http://www.pirate4x4.com/forum/showp...0&postcount=41 Really though any good straight piece of heavy wall DOM tube would probably work as a setup bar, I just think that you should use something you can trust as being very straight/true to check it, just to be sure before putting a bunch of time into building an axle that might be bent. From an earlier post, this is what the extension looks like in 2D CAD, the larger diameter part being where the inner C is pressed on, the smaller diameter being what is actually inside of the Eaton housing tubes. Quote:
__________________
'63 GMC K20 Work In Progess - 350/400/205/HO72-60/HO72/52's/56's "Because I can"
|
||
|
|
|
|
05-05-2012, 01:42 AM
|
#18 |
|
Registered User
Join Date: Jul 2010
Location: Sierra Vista, Arizona
Posts: 79
|
Re: '63 GMC 4x4 "Just Because I can" Build
Alrighty folks, I finished welding the C's on the HO72/60 housing, made my inner axle shafts, and got some more done on my e-brake setup. I won't make everyone bored with too many words here, the pictures speak for themselves.
 C's welded on and inner shafts finished, everything on the housing just to see how it looks. 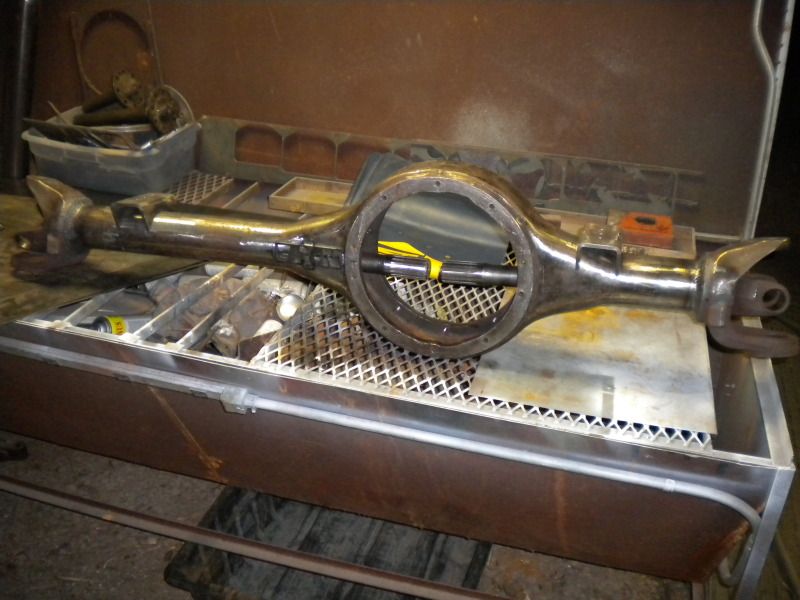 And some shots of the welds on the C's and Shafts.... Something to note on how I welded these, I did a root pass with pulsed spray transfer MIG, which is extremely hot and penetrates very deep, followed by a filler pass over that with pulsed spray transfer to fill the weld area out to a proper size and for more fusion between the C and the housing itself, then all of that covered up with a TIG weld doing a weave pattern, to fill in any under cut from the pulsed spray welds and to make it look good (mostly just to make it look good though ). This was a bit challenging to coax a TIG weld this size from a 200amp Miller Dynasty machine, I had it cranked up to the full 200 amps with high speed amperage pulse turned on for some extra punch and floored almost the whole time, and this was while it was still warm from the pulsed spray welds!(Passenger side C) 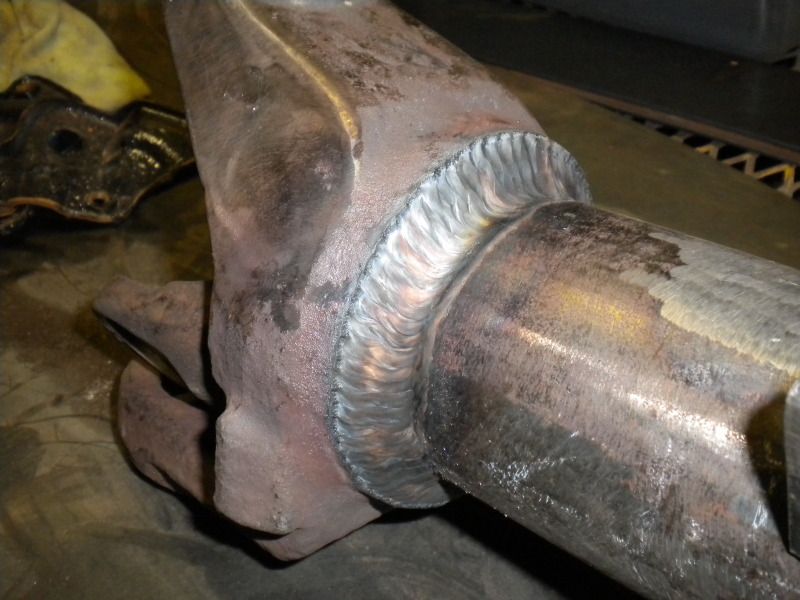 (Drivers side C) 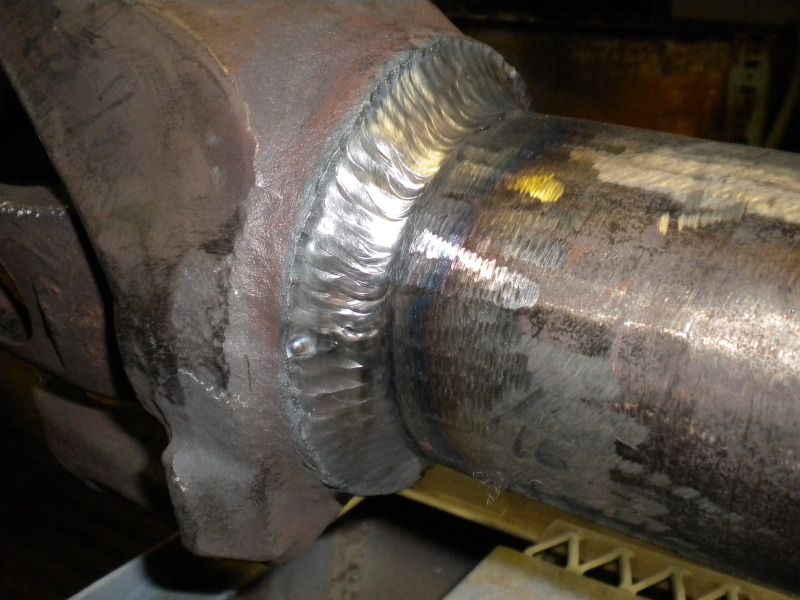 (Passenger side C again) 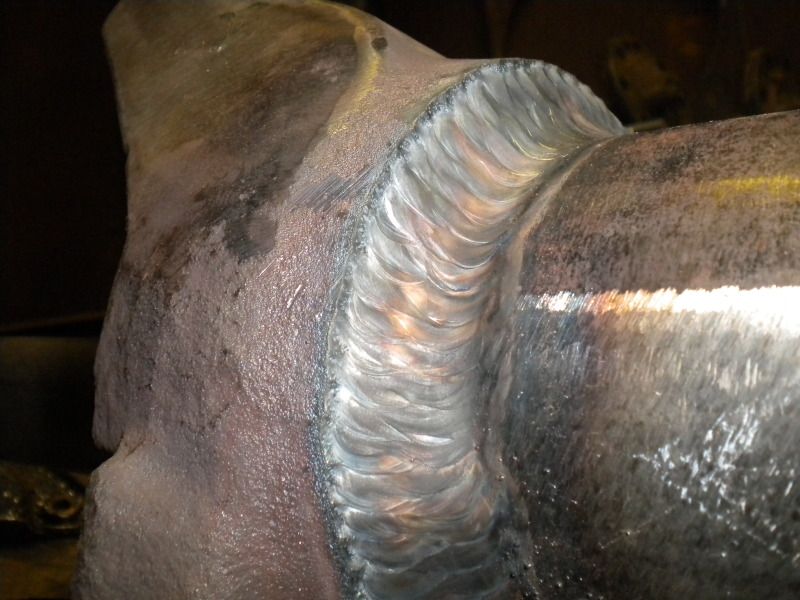 Axle shafts were fully TIG welded. Shafts used a 3/4'' pilot that was pressed into the yokes, plug welded on the bridge area of the yoke, and welded around the base of the yoke/beveled step down to pilot size of the shaft with 3 passes (root, filler, cover). 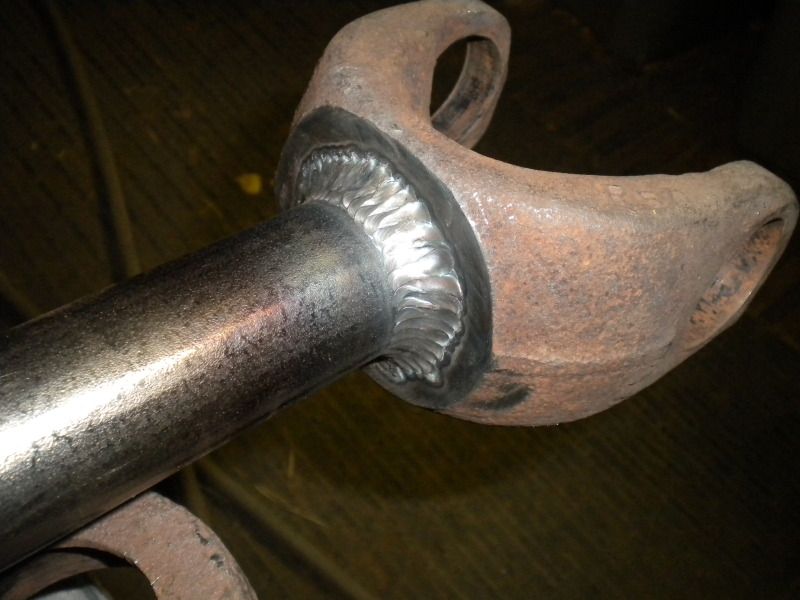 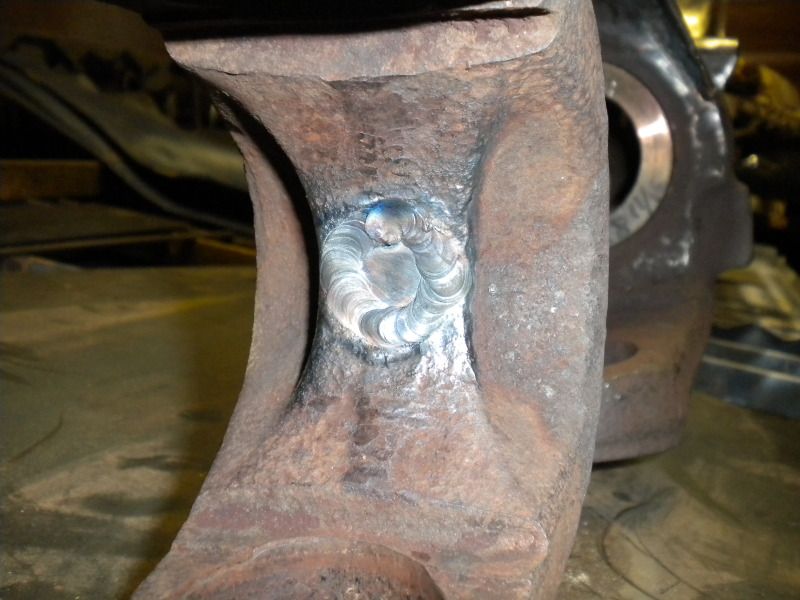 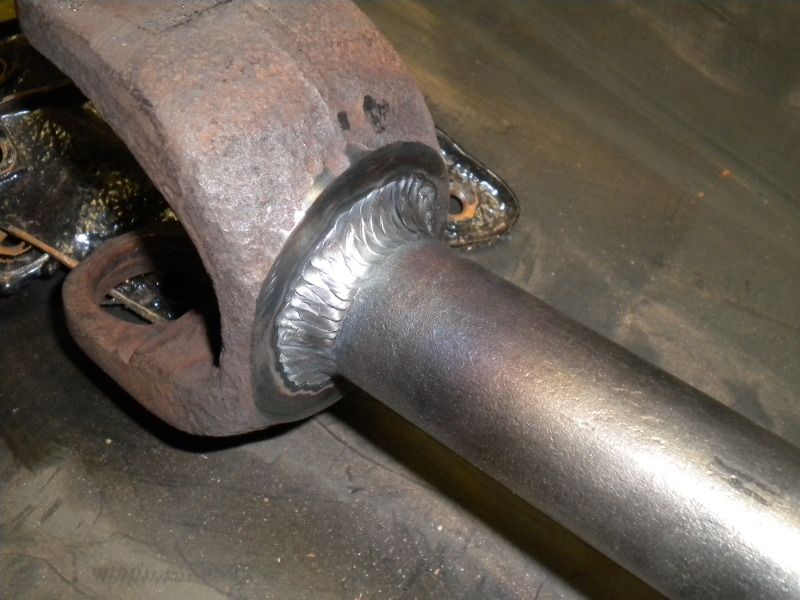 An attempt at an artsy photo of the Eaton tag that I put on the housing... 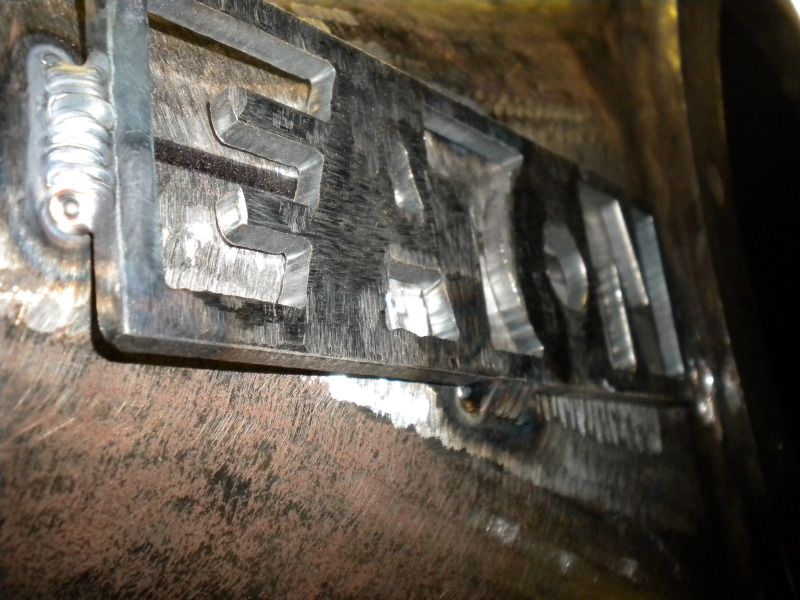 How the Eaton tag looks head on, I think it turned out pretty cool. Hopefully when the truck is all done, someone will see that Eaton tag that knows a thing or two about these old trucks and question what kind of axle its got under it.  And the e-brake assembly, will be bolting it up to one of my NP205's over the weekend to make sure everything fits like it's supposed to. Note the ribs added to the bracket for strength, since I had to remove the section of material that bridged between the two sides of the caliper, I figured a little extra strength wouldn't hurt. 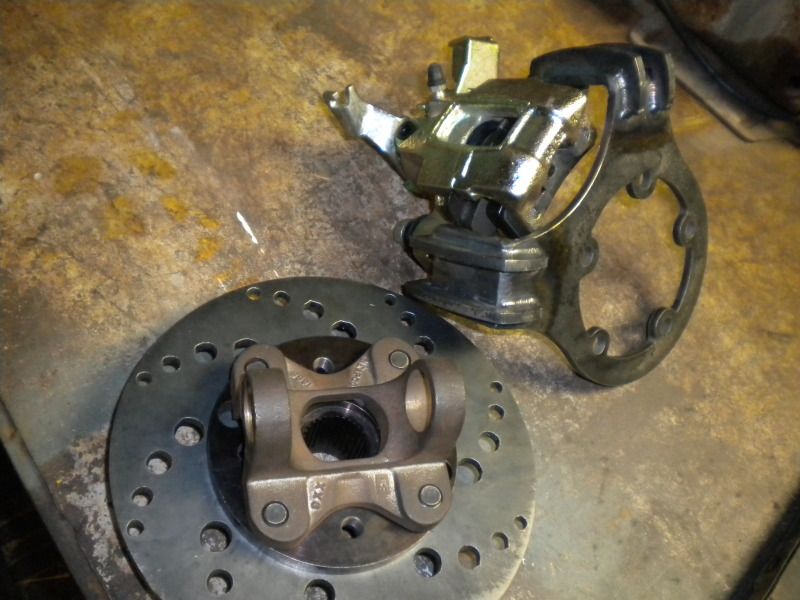 And with it roughly together on the bench 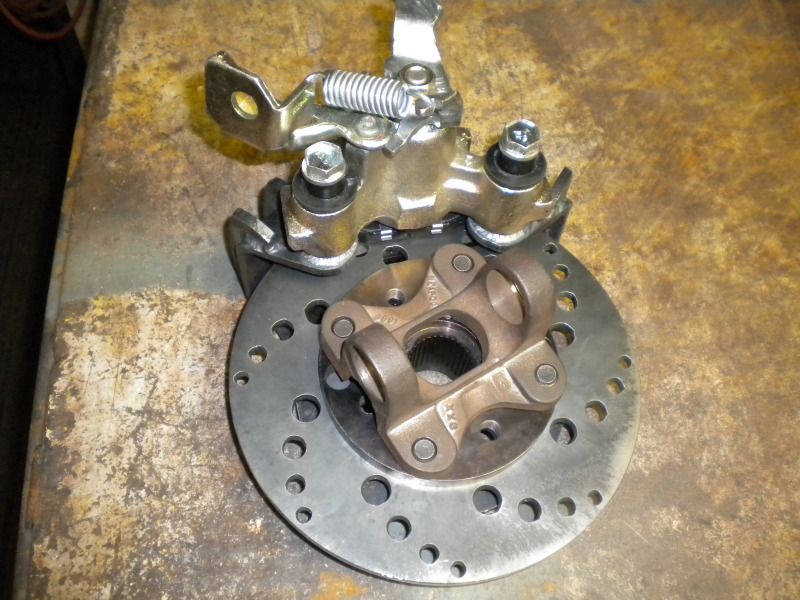 Of course, I have to show off some more of the TIG welds while I'm at it. The entire bracket was TIG welded, and made of beefy 1/4'' steel.  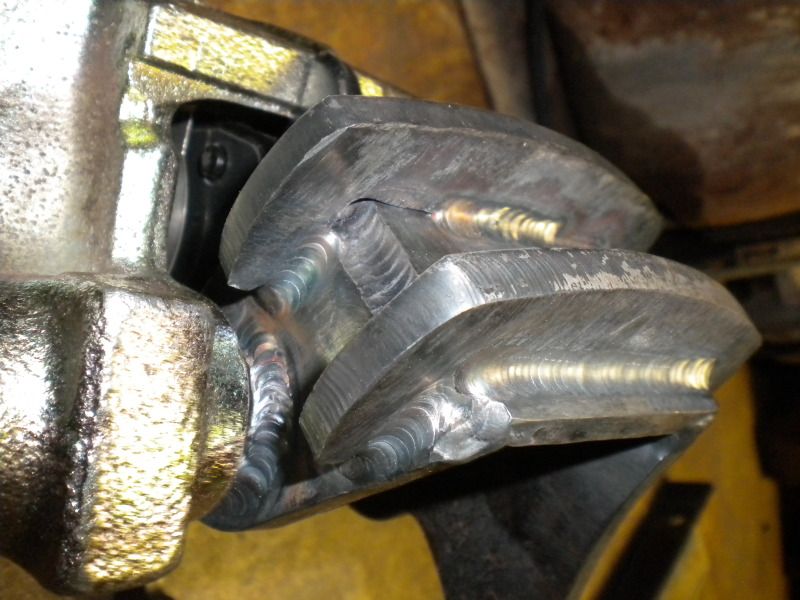 Some more pics should follow tomorrow, I'll be putting the 3rd in the 72/60 housing and making sure the inner shaft lengths are good to go, followed by making some gussets/shock mounts for the inner c's. I also made some 1/2'' thick front shackles from 2 pieces each of 1/4'' plate, TIG welded of course. I'll probably also be finishing the transfer case mount this weekend and if I have time I'll tear into the SM465. Stay tuned!
__________________
'63 GMC K20 Work In Progess - 350/400/205/HO72-60/HO72/52's/56's "Because I can"
|
|
|
|
|
04-30-2012, 01:09 AM
|
#19 | ||
|
Registered User
Join Date: Jul 2010
Location: Sierra Vista, Arizona
Posts: 79
|
Re: '63 GMC 4x4 "Just Because I can" Build
Quote:
Quote:
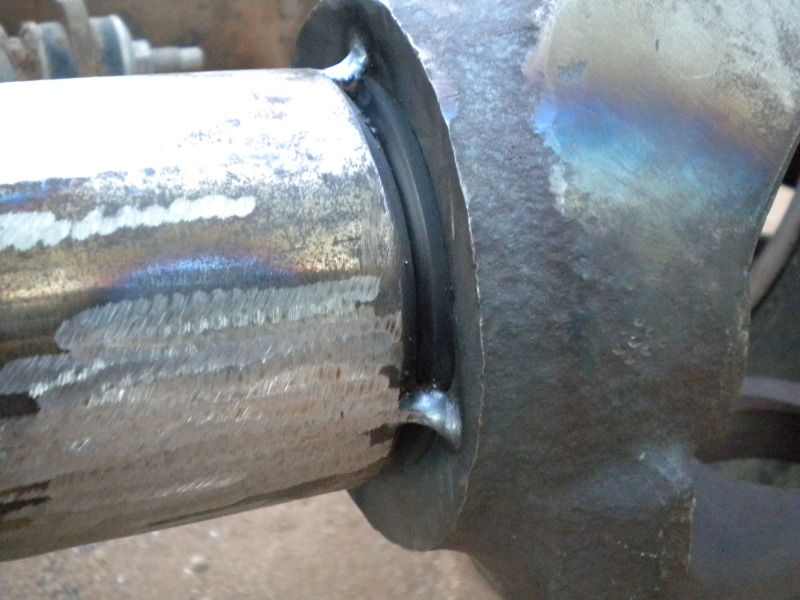
And with a little bit more tech, I got all the measurements for my shafts, I need to machine the back of those yokes down slightly (like .08~.1'') so they don't rub the inner C when it's all together. Will turn the shafts down to 3/4'' to fit in the yokes at 18.0625'' and 28.625'', which is 1/8'' too long on purpose on both sides, and I might add another 1/16'' to that depending on how much I take off the back of the yokes. Length of the 3/4'' diameter section will be determined after I machine the back of the yokes. Luckily the splines are cut extra long on the Eaton shafts, so I can get away with making them slightly too long and can cut them down if need be and still have full spline engagement. After getting it turned, I'll TIG it out with some ER-70S-2, since most of the home built shafts I've found on Pirate are done with MIG and standard ER-70S-6 wire, however I might stop by the local welding supply and see if I can get some ER80S TIG filler instead, every bit of extra strength helps. After that I'll polish about the first 6'' of shaft behind the yoke to act as a good seal surface. Likely going to run some kind of seal like this right near the ends of the axle tubes - http://www.summitracing.com/parts/SIT-EAS2-05/ - I don't like the traditional design of front axles with the seals way down inside of the housing that let the tubes fill with dirt/water/mud/etc, plus they are a PITA to change if they are buried way down near the diff. However, I'm contemplating doing a redundant system with inner and outer seals, if my budget allows, since the Seals-It brand units that will work for inner seals for my application cost $65 each, and the outers are $27 each.
__________________
'63 GMC K20 Work In Progess - 350/400/205/HO72-60/HO72/52's/56's "Because I can"
|
||
|
|
|
|
05-05-2012, 10:28 AM
|
#20 |
|
Registered User
Join Date: Aug 2009
Location: Detroit MI
Posts: 1,209
|
Re: '63 GMC 4x4 "Just Because I can" Build
You can weld on my truck any time.... OK ...
|
|
|
|
|
05-05-2012, 11:49 AM
|
#21 |
|
chevy only
Join Date: Sep 2006
Location: Phoenix, AZ
Posts: 6,619
|
Re: '63 GMC 4x4 "Just Because I can" Build
Were you at in arizona? have you talk to nate about a job?? you got skills
__________________
CHEVY ONLY... Nothin Else ! |
|
|
|
|
05-05-2012, 11:53 AM
|
#22 |
|
Registered User
Join Date: Jul 2010
Location: Sierra Vista, Arizona
Posts: 79
|
Re: '63 GMC 4x4 "Just Because I can" Build
Thanks guys!
I'm in Sierra Vista, I am looking for a job though, so if you know of something within the area or in Tucson I'm interested. Haven't talked to "Nate", not sure who that is, could you PM me with some more details if you have any?
__________________
'63 GMC K20 Work In Progess - 350/400/205/HO72-60/HO72/52's/56's "Because I can"
|
|
|
|
|
05-05-2012, 06:58 PM
|
#23 |
|
Registered User
Join Date: Feb 2011
Location: muskogee, ok
Posts: 1,091
|
Re: '63 GMC 4x4 "Just Because I can" Build
holy s#@t!!!! awsome fab work man
__________________
 bagged 66 longbed build http://67-72chevytrucks.com/vboard/s...d.php?t=449548 my favorite colors.. black, rust, and shiny!!!! instagram: @coulter918 |
|
|
|
|
05-05-2012, 11:55 PM
|
#24 |
|
60-66 Nut
Join Date: Mar 2007
Location: Coeur d'Alene, Idaho
Posts: 23,246
|
Re: '63 GMC 4x4 "Just Because I can" Build
Very nice looking welds and good fab work.
What filler rod did you use on the inner shafts? Did you pre-heat?
__________________
Power Steering Box Adapter Plates For Sale HERE Power Brake Booster Adapter Brackets For Sale '63-'66 HERE and '67-'72 HERE and '60-'62 HERE and "60-'62 with clutch HERE Rear Disc Brake Brackets For Sale. Impala SS calipers HERE Camaro Calipers HERE D52 Calipers HERE 6 Lug HERE Hydroboost Mounting Plates HERE |
|
|
|
|
05-06-2012, 12:13 AM
|
#25 | |
|
Registered User
Join Date: Jul 2010
Location: Sierra Vista, Arizona
Posts: 79
|
Re: '63 GMC 4x4 "Just Because I can" Build
Thanks guys!
Quote:
Once I get all the outer stuff for this axle and confirm that the shafts run true and will for sure work, I'll probably have them cryo treated.
__________________
'63 GMC K20 Work In Progess - 350/400/205/HO72-60/HO72/52's/56's "Because I can"
|
|
|
|
|
|
| Bookmarks |
|
|


 Hybrid Mode
