
|
|
|
 01-06-2011, 10:37 AM
|
#1 | |
|
Registered User
Join Date: Feb 2010
Location: Dayton, OH
Posts: 255
|
Re: Berthas Build
Quote:
Also, how did you figure out the correct length for the pushrod that connects to the brake pedal? I got the hydroboost bracket flipped, drilled the bottom 2 holes in the firewall and the pedal assembly, opened the hole in the firewall for the retaining nut, and mounted the hydroboost on the firewall. Now I believe the only things left with the hydroboost is to figure out what I am going to do with the lines, figure out the right length for the rod that attaches to the brake pedal, figure out if the proportioning valve that came with this hydroboost unit will work for my application, and plumb all of my brake lines. I think that I have a list everything if I don't end up trying to use stock hoses If I go with the AN route for the hydroboost lines, these are the parts I believe I will need: Adapter from 18mm w/o-ring to -6AN Adapter from 16mm w/o-ring to -6AN High Pressure AN Line from pump to hydroboost High Pressure AN Line from hydroboost to steering box Low Pressure Line(either AN for appearance or just rubber hose) from hydroboost return to pump Same as above for steering box return to pump T-fitting to join the two return lines I believe that everything is there. If I am missing something feel free to post it. Now I just need to source this stuff and figure out the right sizes for the return hoses and T-fitting. What kind of hose can I use for the return line and T-fitting? I just mocked up my engine crossmember and motor mounts Tuesday night and I will begin welding them in tonight along with fabricating a crossmember to use with the stock transmission mount. Finally, no more blocks, jackstands, jacks, chains, or hoist locating it in the frame rails! I will get pictures up when I am finished with the transmission crossmember hopefully tonight or tomorrow night. Last edited by dfairchild19; 01-06-2011 at 10:44 AM. |
|

|

|
|
01-07-2011, 02:51 AM
|
#2 | ||||||
|
I had a V-8
Join Date: May 2003
Location: Phoenix AZ
Posts: 1,116
|
Re: Berthas Build
Quote:
Quote:
Quote:
You say you drilled two holes in the firewall. I drilled the other holes for the studs that stick out of the firewall in the hydroboost plate. IIRC, the lower holes would interfere with the column mounting bracket that bolts to the firewall. Maybe not?? Again, its been awhile. Quote:
I would still consider having the hoses made up. You should be able to have them put the fittings and ferrules on the ends of your steel factory lines, buy approximately the right amount of hose, bring it home, mock up the lines so they fit right, mark the position of the hose to the ferrules with a Sharpie, remove everything from truck, take to hose making establishment and have them finish the assemblies by crimping the ferrules in the position you have them marked as. A little brake clean on a rag takes the remnants of the Sharpie off and you're done. Quote:
Quote:
__________________
1972 K20 Suburban, 5.9L Cummins, Banks Power Pack, NV4500HD, NP205, H.A.D., D60/14FF ARB Link To Build: HERE. |
||||||
|
|
|
|
01-21-2011, 12:44 AM
|
#3 | ||
|
I had a V-8
Join Date: May 2003
Location: Phoenix AZ
Posts: 1,116
|
Re: Berthas Build
Quote:
As far as the rod goes, I took the rod that the hydroboost came with and cut the pedal end ring off of it. For the pedal end I took a 73-? female threaded booster rod end and bored it out to a slight press fit on the o.d. of the cut off hydroboost rod. I put it all in the truck, set the pedal 1/2" off the rubber bumper, marked the location on the hydroboost shaft, pulled it all out and welded it together. I'm not a big fan of welding on brake parts, but I figured the part is piloted into the female end and the weld will only be in compression, not tension and there will be no real side-loading. With that going for it, I decided that was my way out of that situation. Quote:
 Oh, wait, :yawn: Oh, wait, :yawn:
__________________
1972 K20 Suburban, 5.9L Cummins, Banks Power Pack, NV4500HD, NP205, H.A.D., D60/14FF ARB Link To Build: HERE. |
||
|
|
|
|
01-07-2011, 03:21 AM
|
#4 |
|
Registered User
Join Date: Sep 2010
Location: ND
Posts: 520
|
Re: Berthas Build
Sweet build! Signing up to see how to do my build.
__________________
Name: Les ---------------------- Couple 80s Couple 70s One 68 
|
|
|
|
|
05-26-2011, 07:02 PM
|
#5 |
|
Registered User
Join Date: Oct 2007
Location: Spanaway
Posts: 8,451
|
Re: Berthas Build
Nice work!
__________________
Mike. Swamp Rat build thread : http://67-72chevytrucks.com/vboard/s...d.php?t=595019 72 3/4T 4X4 4" BDS Lift 33" BFG's |
|
|
|
|
05-27-2011, 10:42 AM
|
#6 |
|
Registered User
Join Date: Feb 2010
Location: Dayton, OH
Posts: 255
|
Re: Berthas Build
I appreciate the compliments guys
|
|
|
|
|
06-12-2011, 10:30 PM
|
#7 |
|
Registered User
Join Date: Dec 2009
Location: Orlando, FL
Posts: 131
|
Re: Berthas Build
What did it cost you for all the stuff needed for the mid-mount AC? Im running into the same issue. And i was going to run a vintage air kit. do you know if there is any issue with the compressor compatibility for an aftermarket ac kit?
|
|
|
|
|
08-09-2011, 01:47 PM
|
#8 |
|
Registered User
Join Date: Feb 2010
Location: Dayton, OH
Posts: 255
|
Re: Berthas Build
I replaced both front and rear main seals as well as adding wear sleeves to the scored crank surfaces. The problem with doing this was that I did not have the $200 a piece tools to press on the wear sleeves. For the rear, I found a local kenworth dealer that had this tool which is universal for both B and C series cummins. The tool pressed both the wear sleeve and the seal onto the crank with the housing installed loosely.
I got the front install tool from the dealer as well but it was specific to a C series and was about an inch too big for my little B series. I called a local shop to see if they had the tool to do it and they suggested just heating the wear sleeve(since it was separated from the sleeve unlike the rear) under a halogen lamp for a while and then sliding it on. The halogen lamp didn't quite work but I did put the wear sleeve in the oven at about 450 degrees for about 20 or 30 minutes, ran it out to the barn, and put it on the end of the crank and smacked it with a 2x4 Anne a hammer far enough to get the balancer bolts to thread over the balancer and just used the balancer to press it on until the balance bottomed out. The wear sleeve and seal kit didn't come with an installed for the seal so I had to come up with another he brew solution. I started a search in the barn for a piece of material that would match the mid diameter of the sleeve to get it started and found that a piece of inter cooler tube works perfectly. So after about 3 weeks of trying to track down the tools to do these wear sleeves, I was able to start assembly of the rest of the drive train. 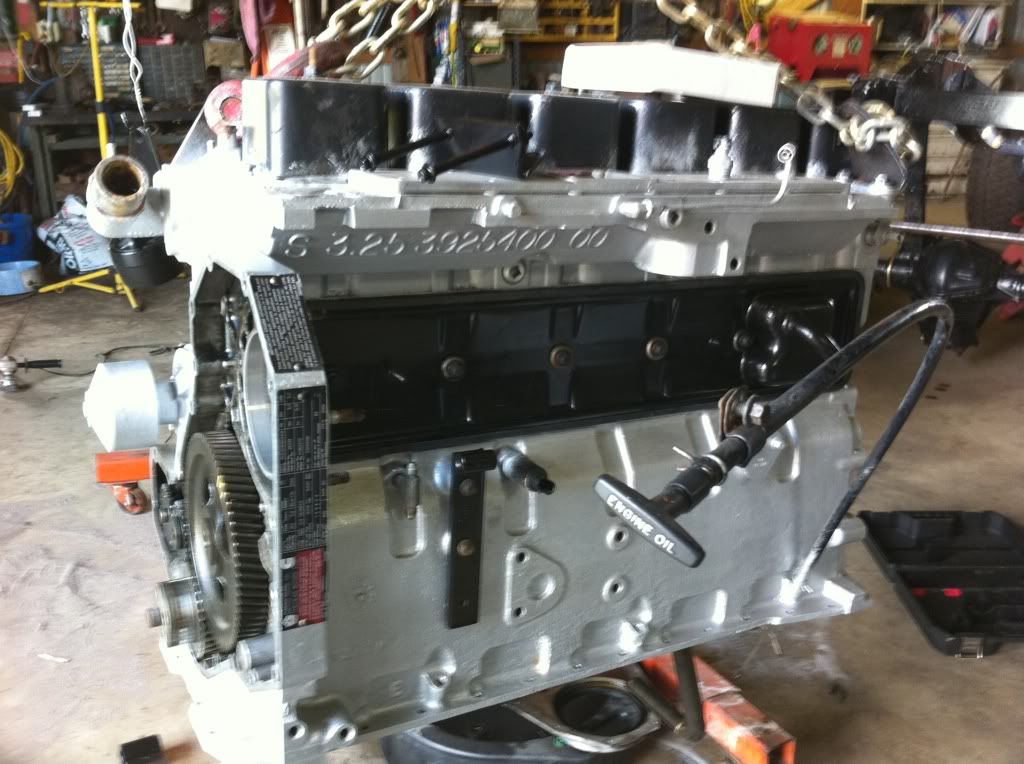 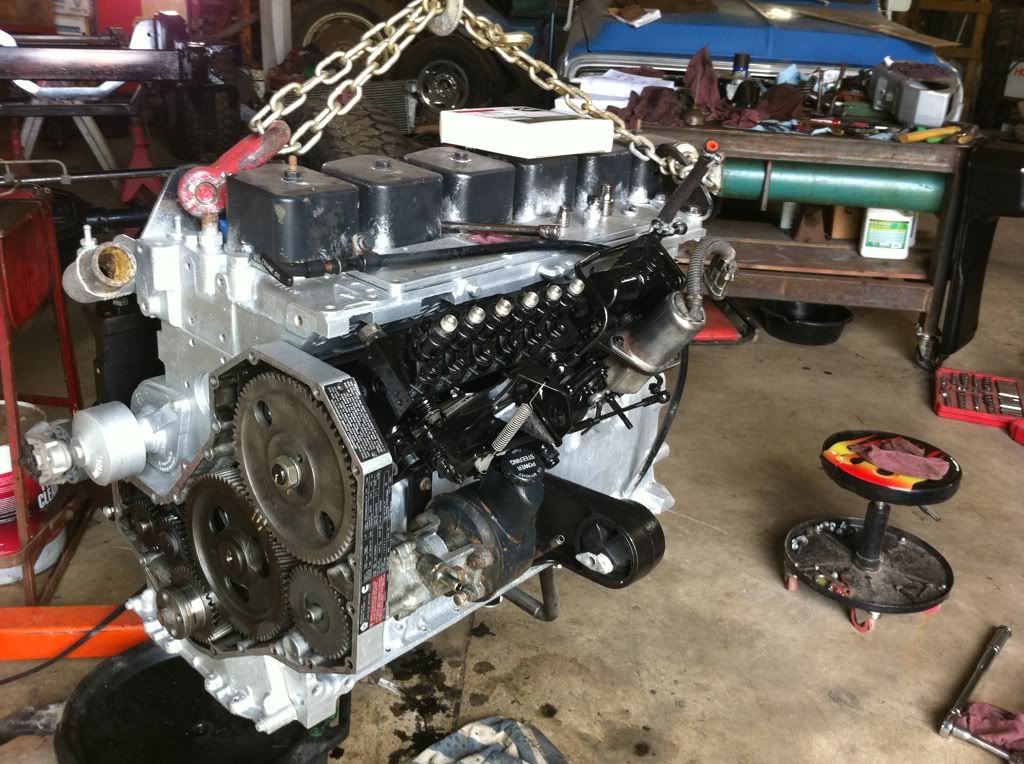 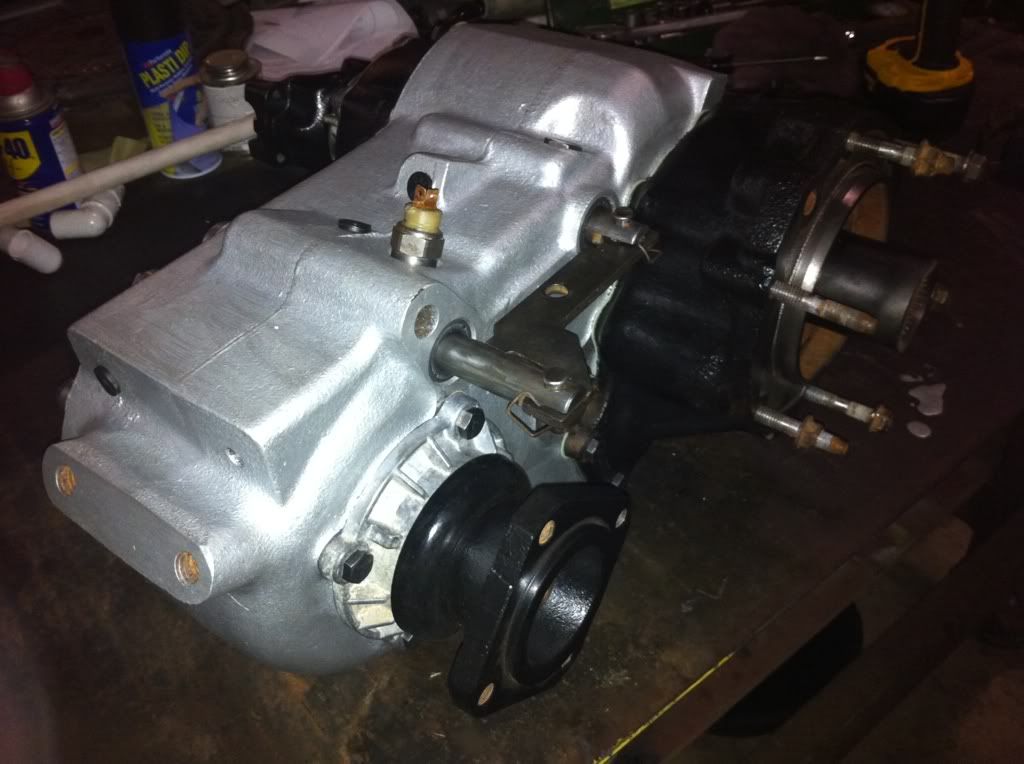 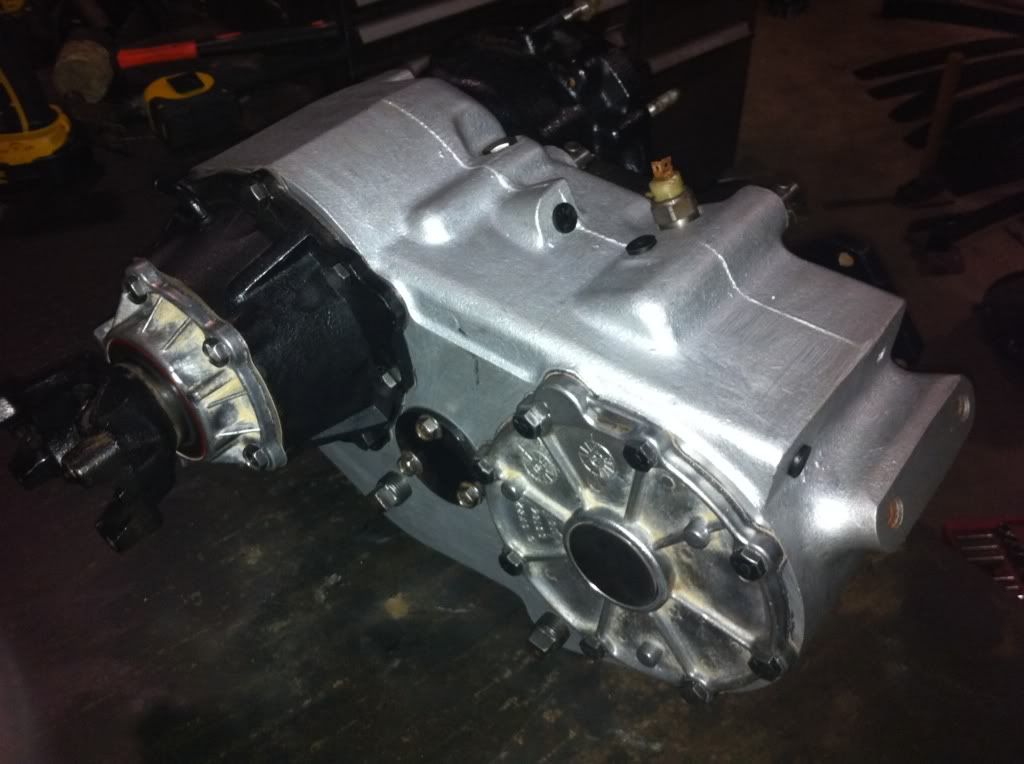 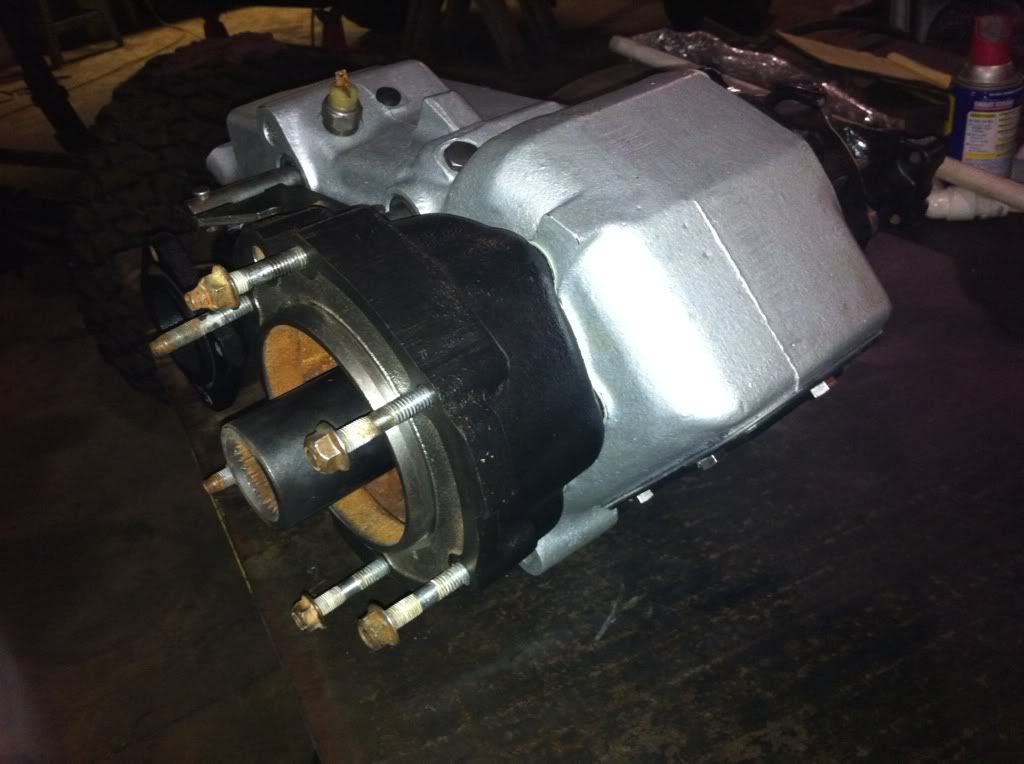 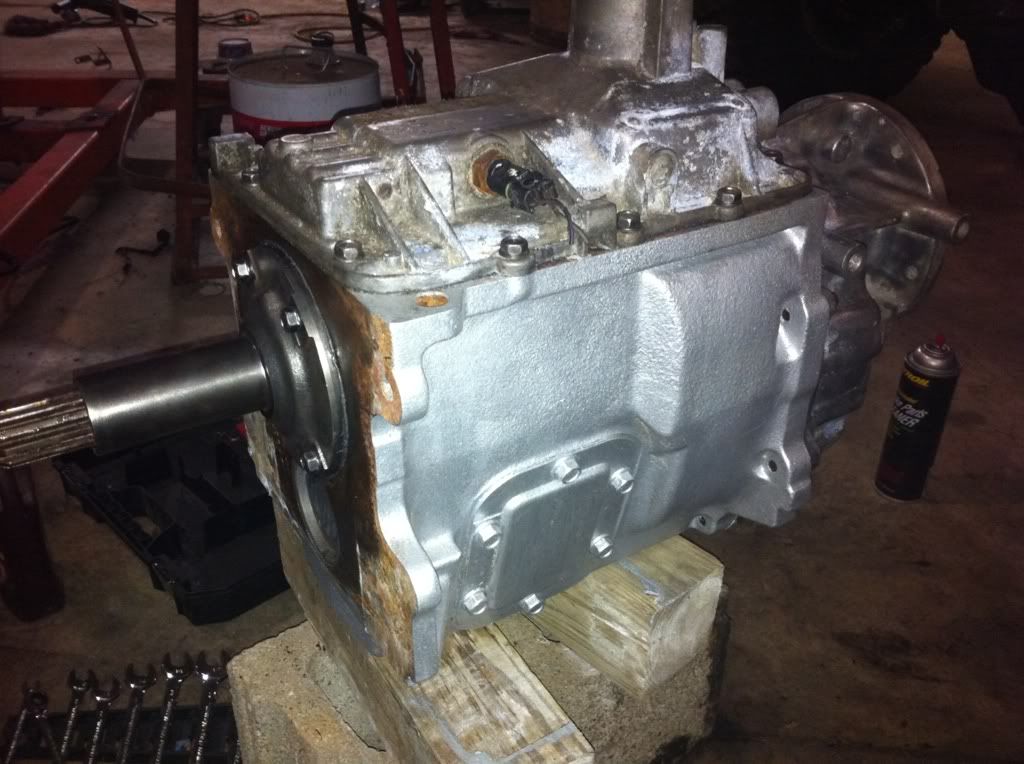 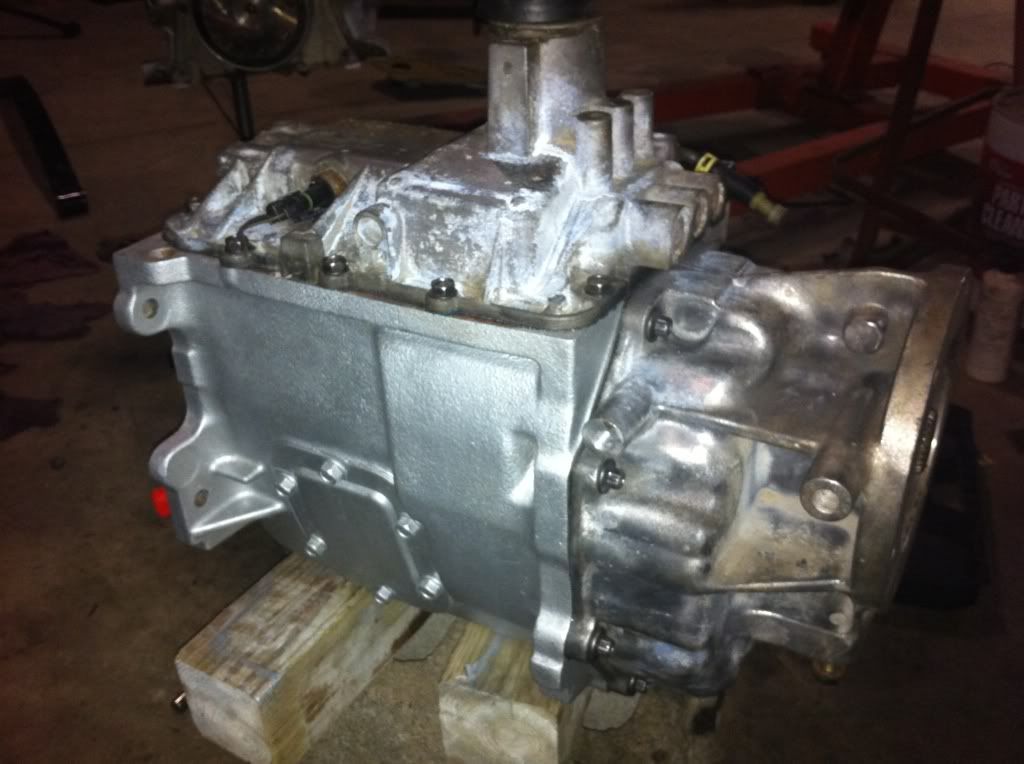 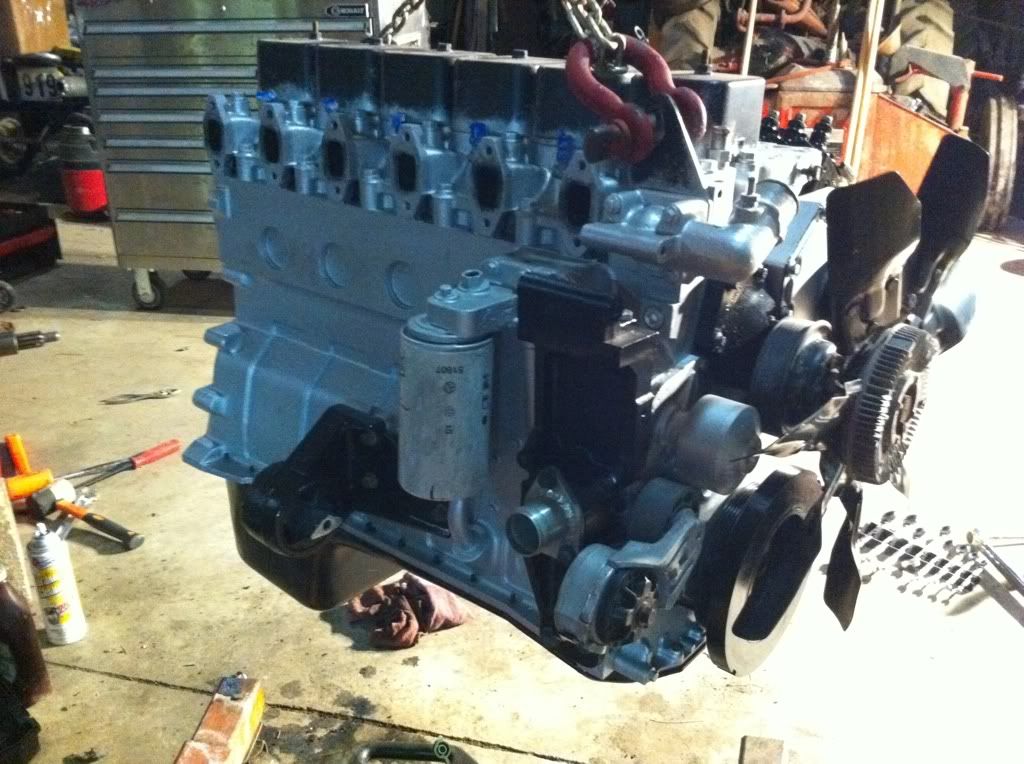 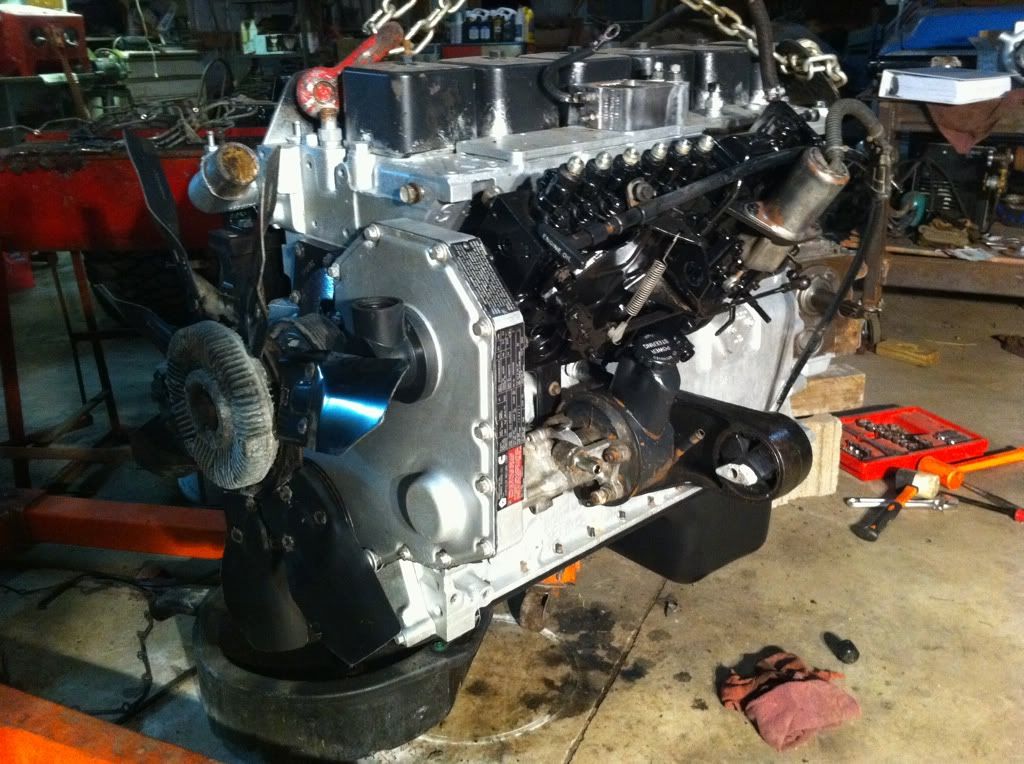
|
|
|
|
|
08-09-2011, 01:48 PM
|
#9 |
|
Registered User
Join Date: Feb 2010
Location: Dayton, OH
Posts: 255
|
Re: Berthas Build
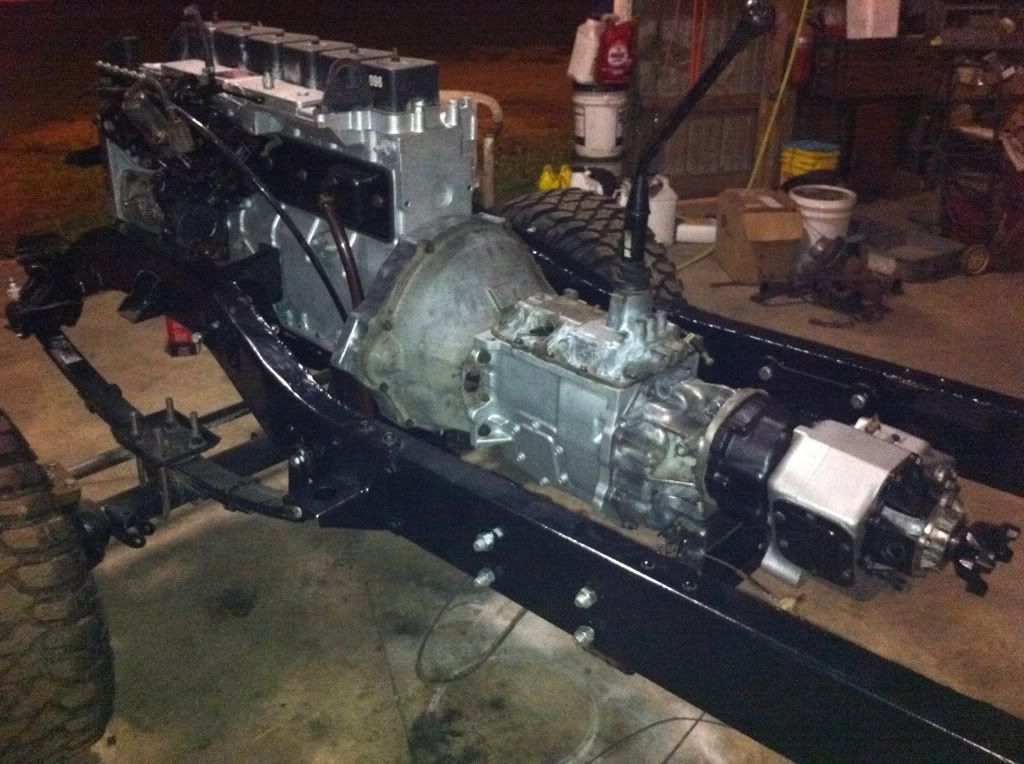
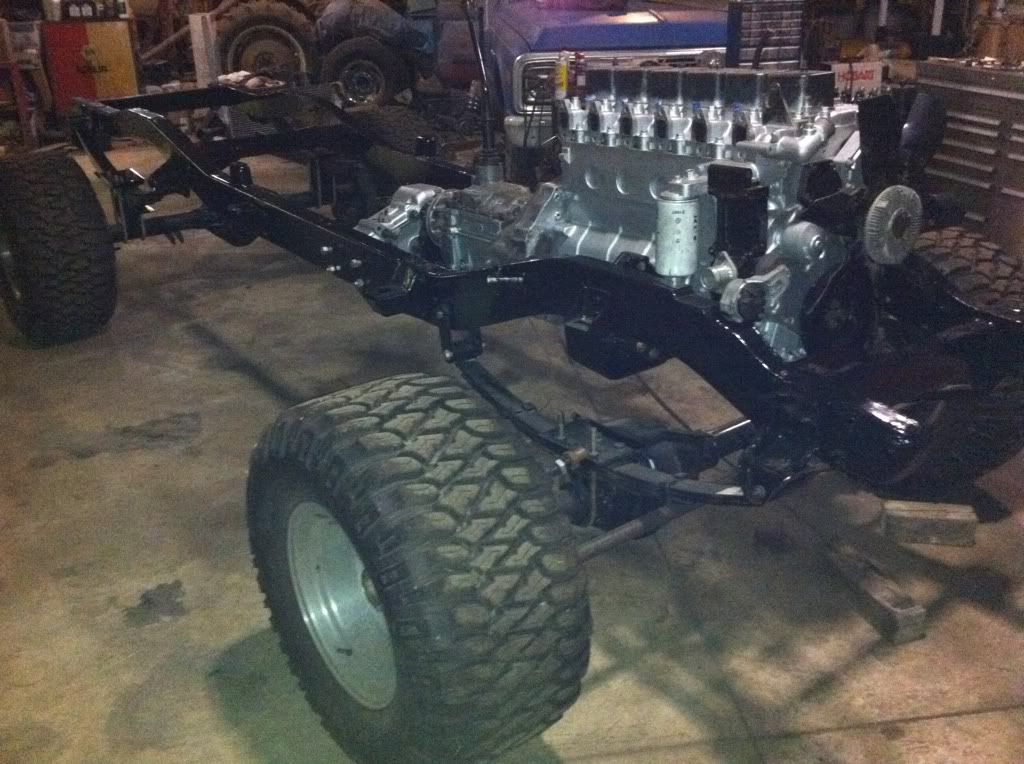
Alright, heres the money shots from last night:
|
|
|
|
|
09-04-2011, 10:28 AM
|
#10 |
|
Registered User
Join Date: Feb 2010
Location: Dayton, OH
Posts: 255
|
Re: Berthas Build
Alright, time for another update.
I finished up my home made crossover steering and got it installed for good. 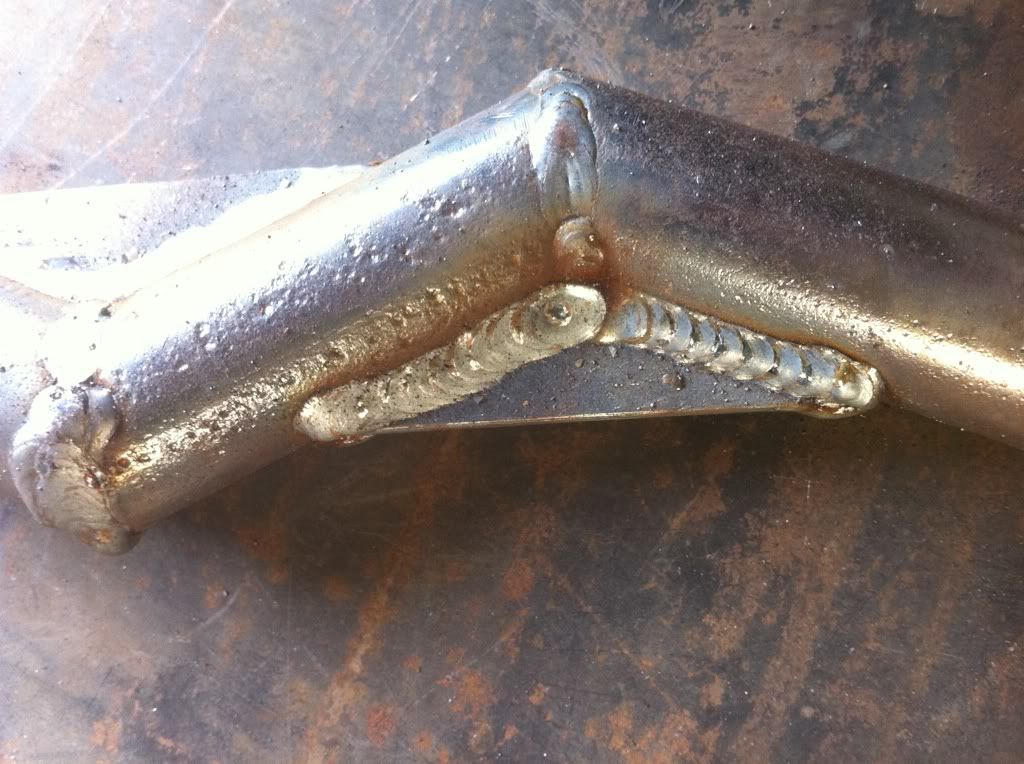 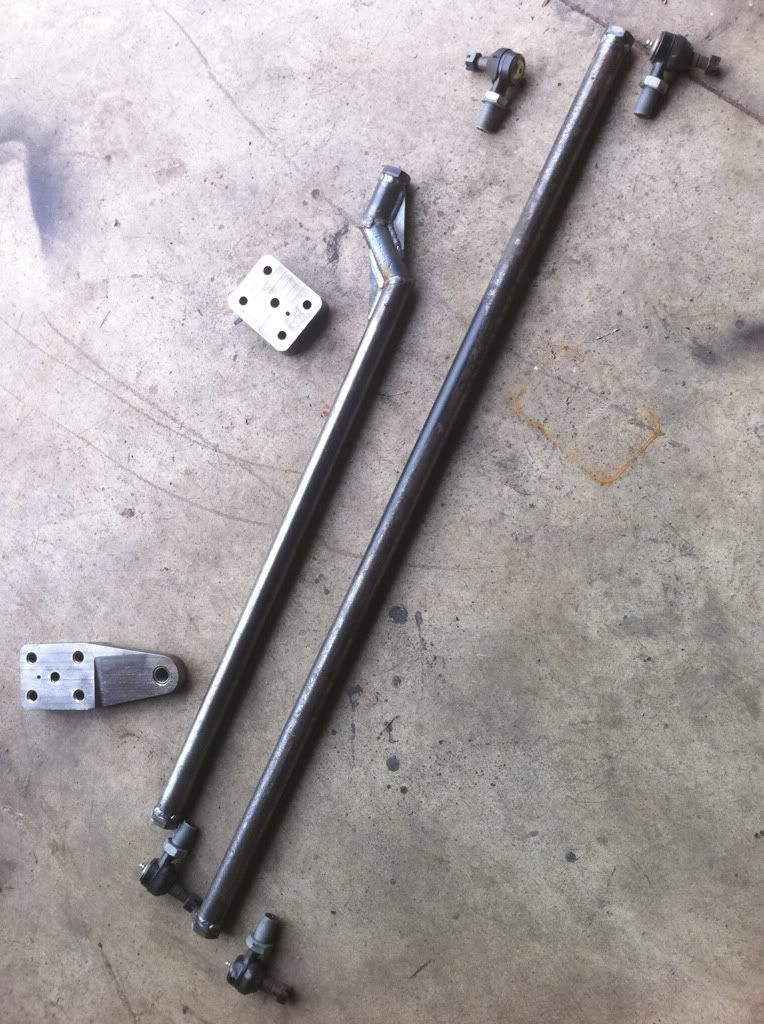 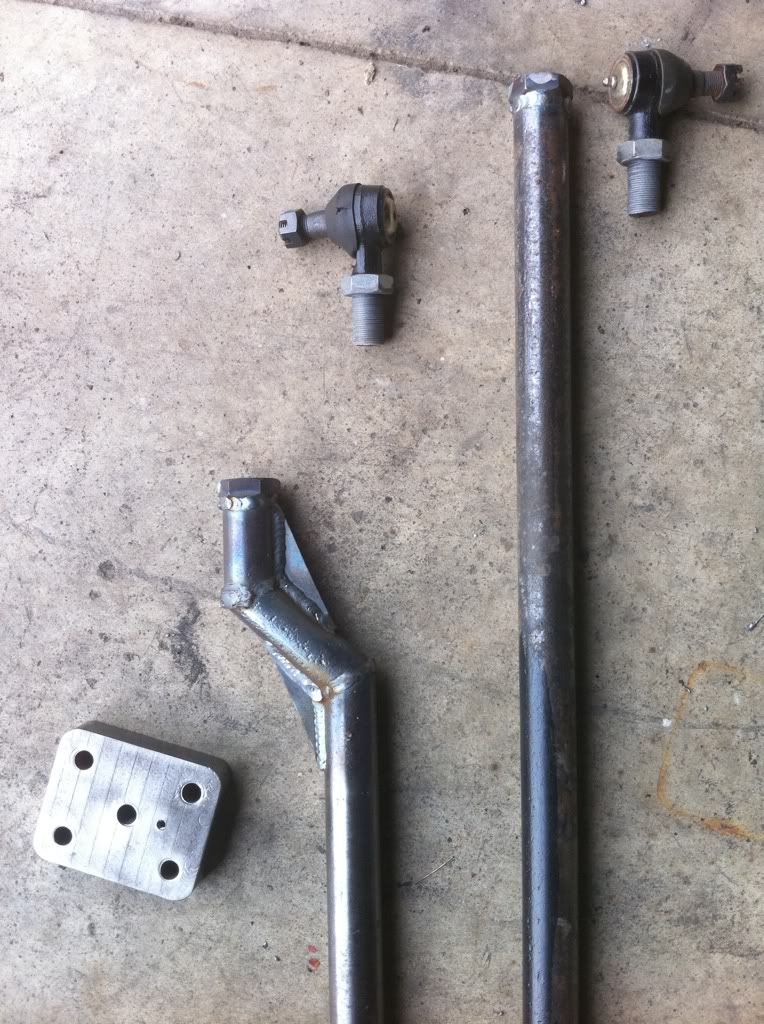 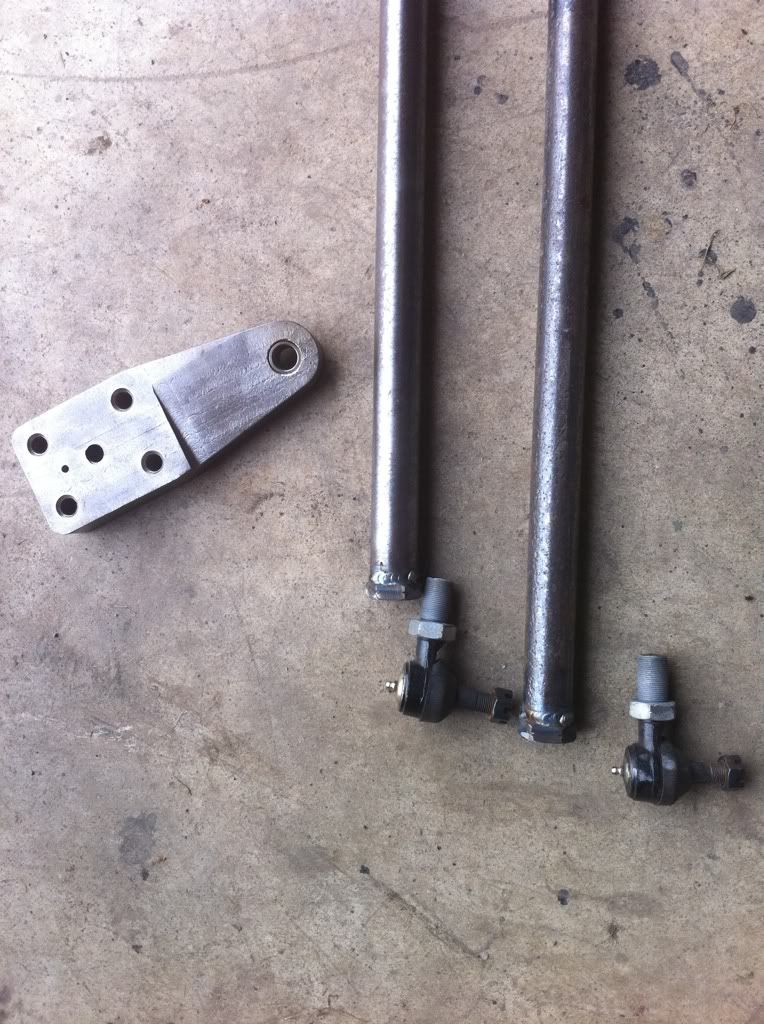 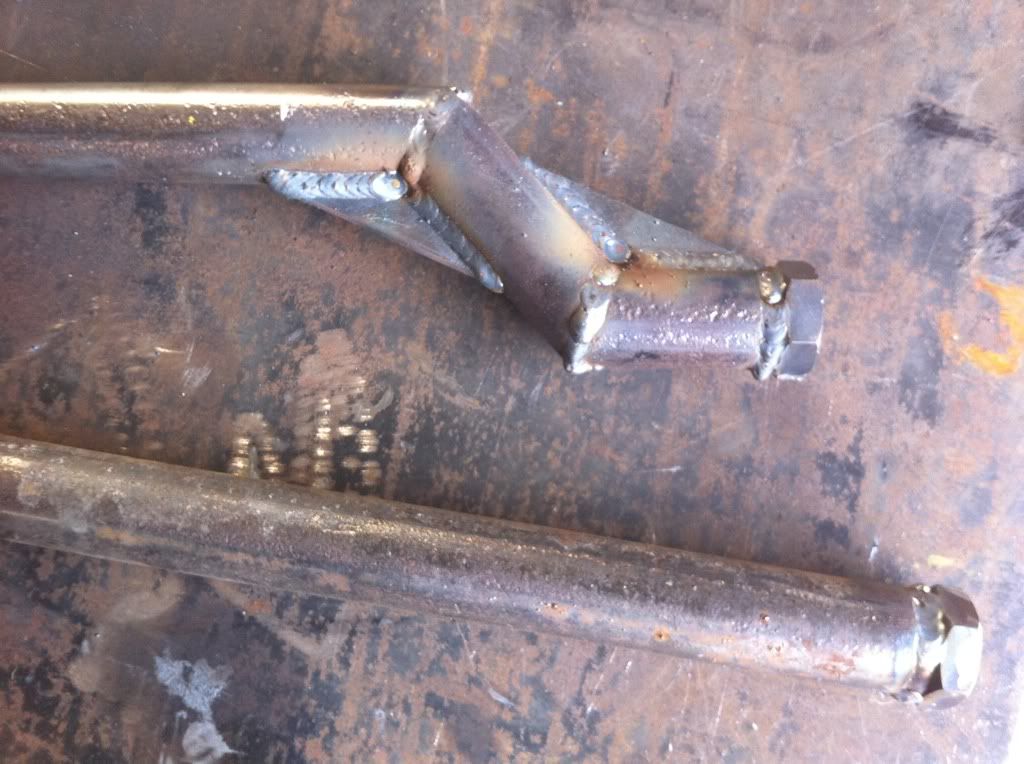   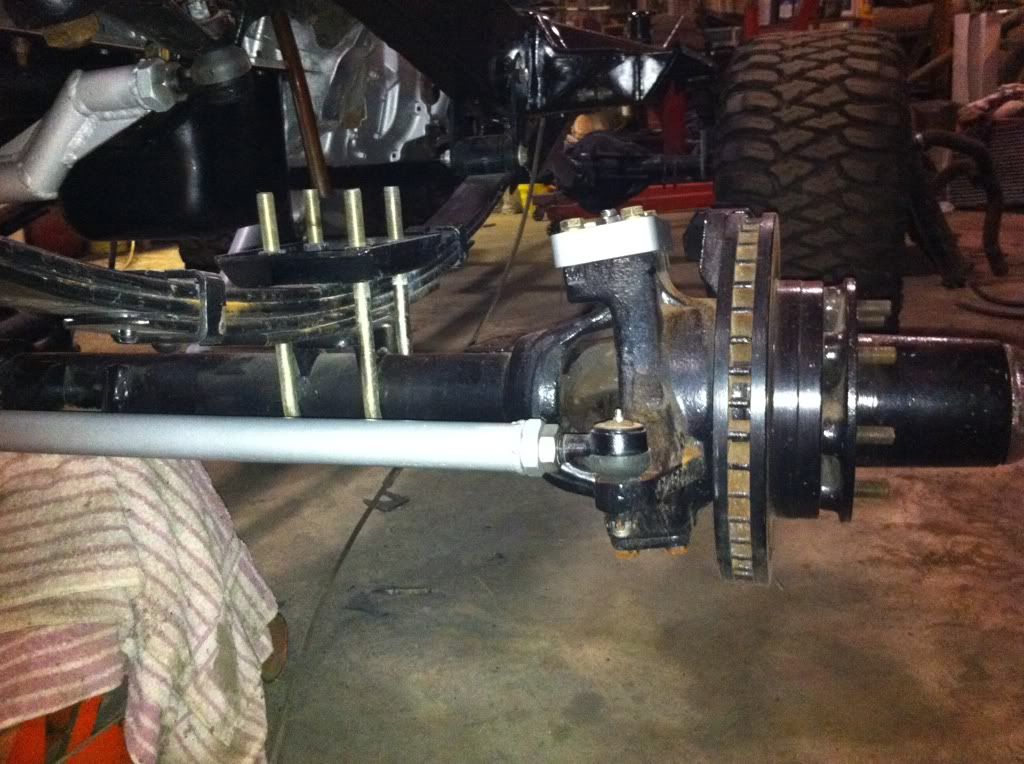 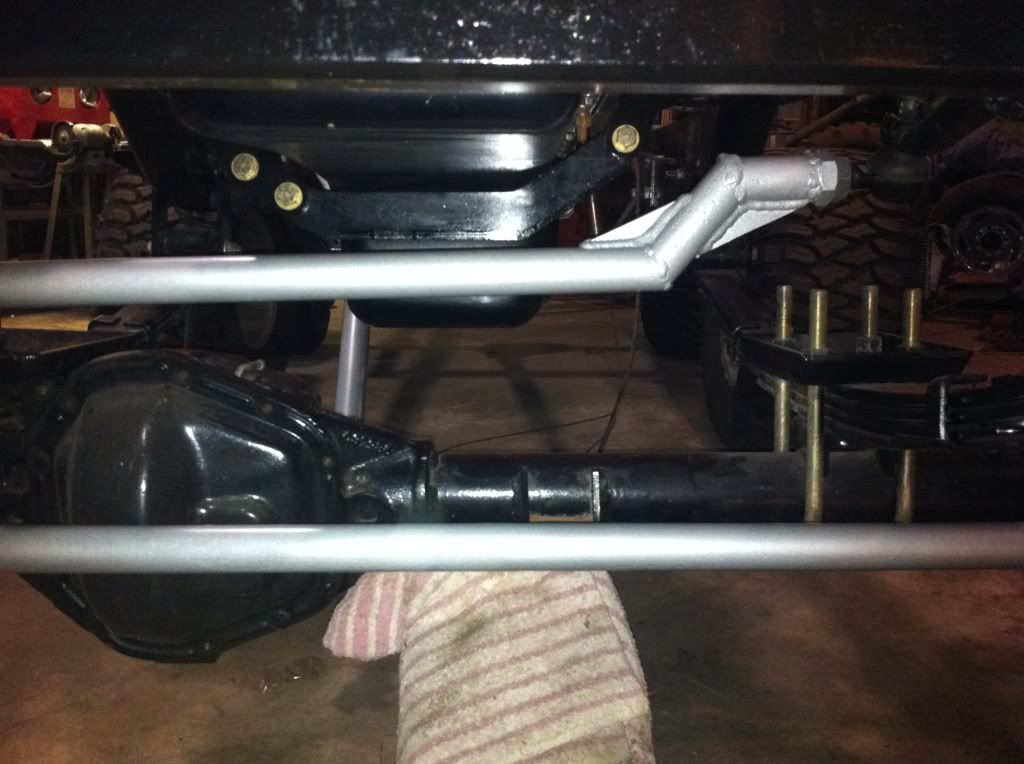
|
|
|
|
|
08-09-2011, 01:47 PM
|
#11 |
|
Registered User
Join Date: Feb 2010
Location: Dayton, OH
Posts: 255
|
Re: Berthas Build
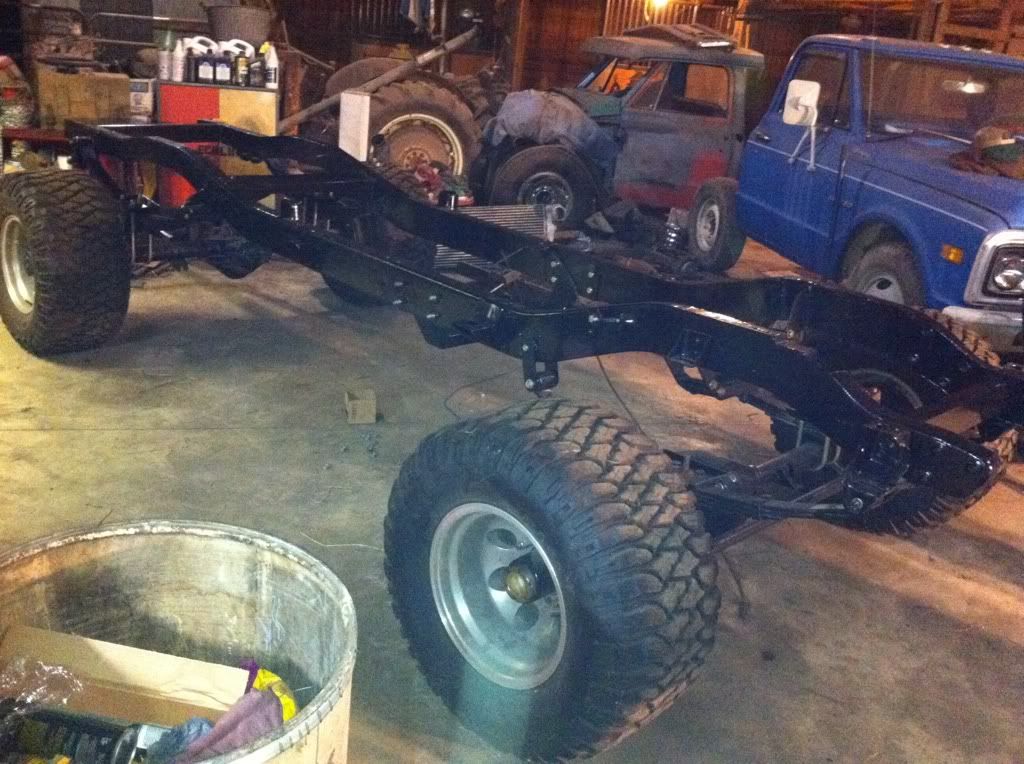
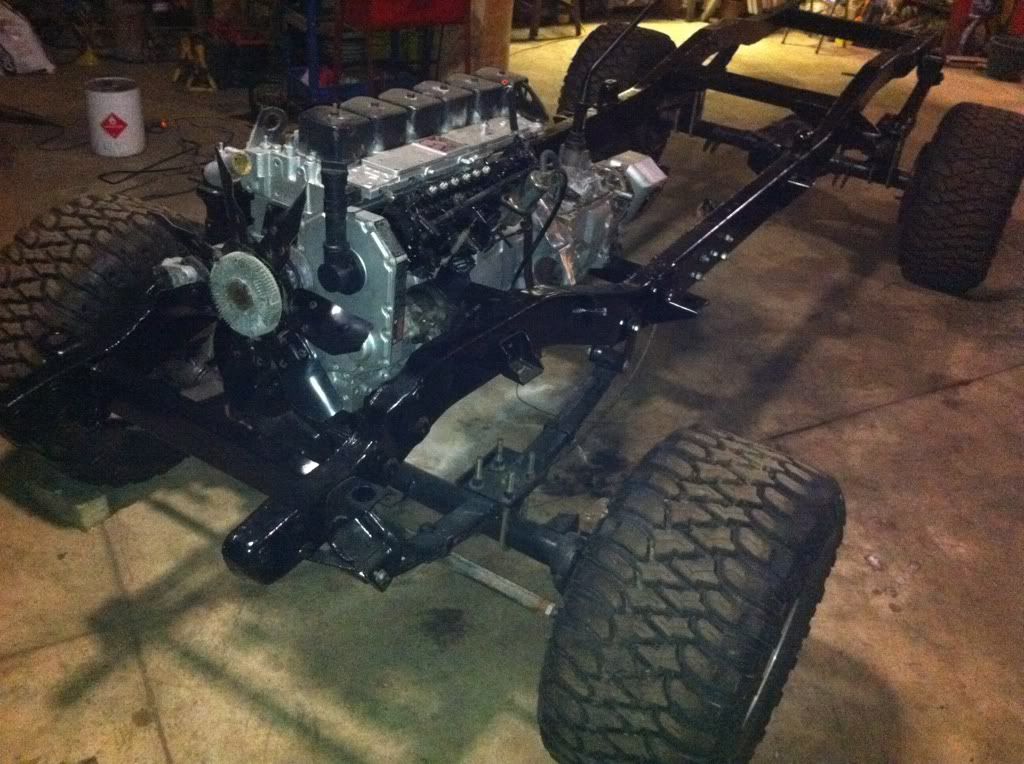
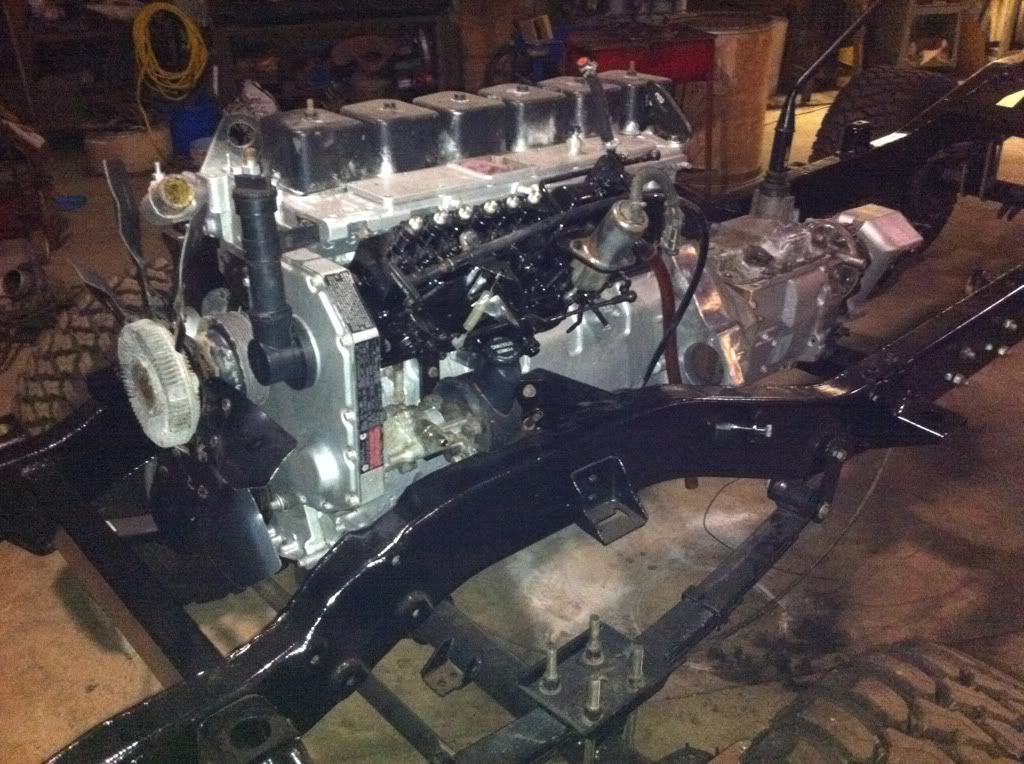
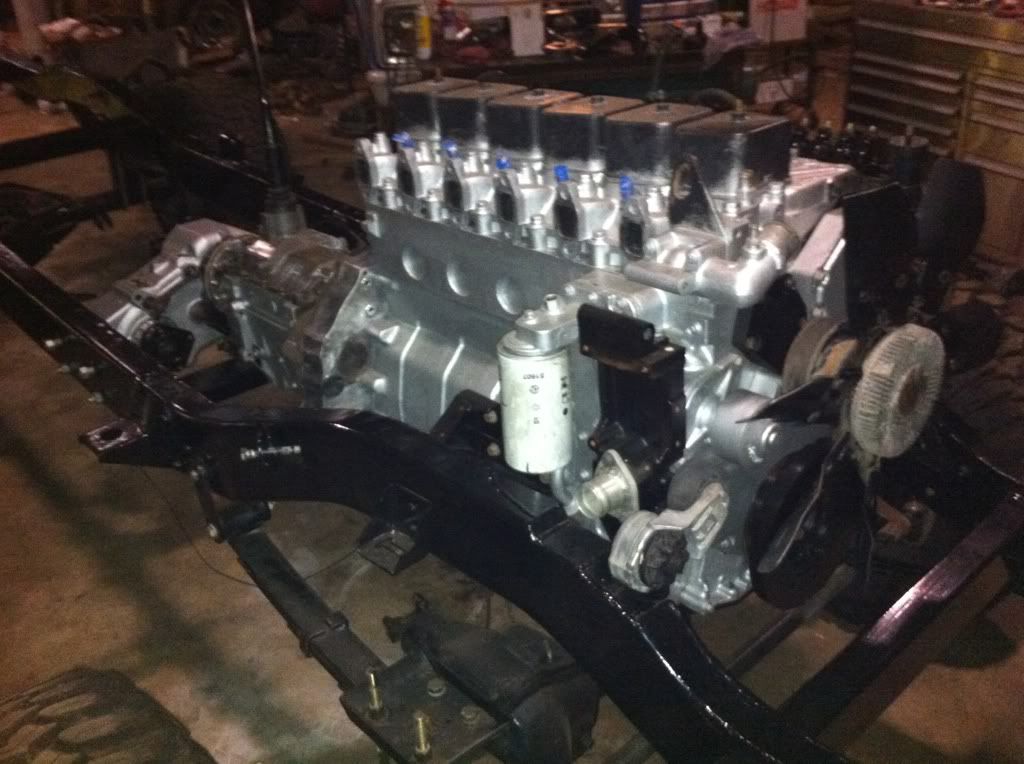
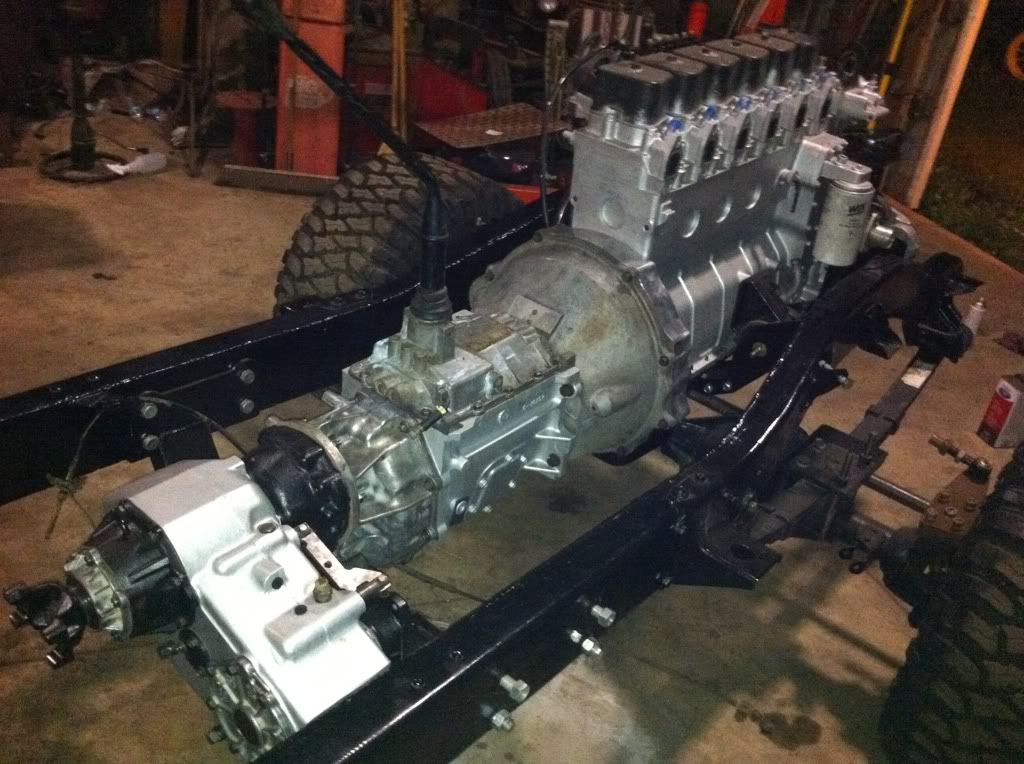
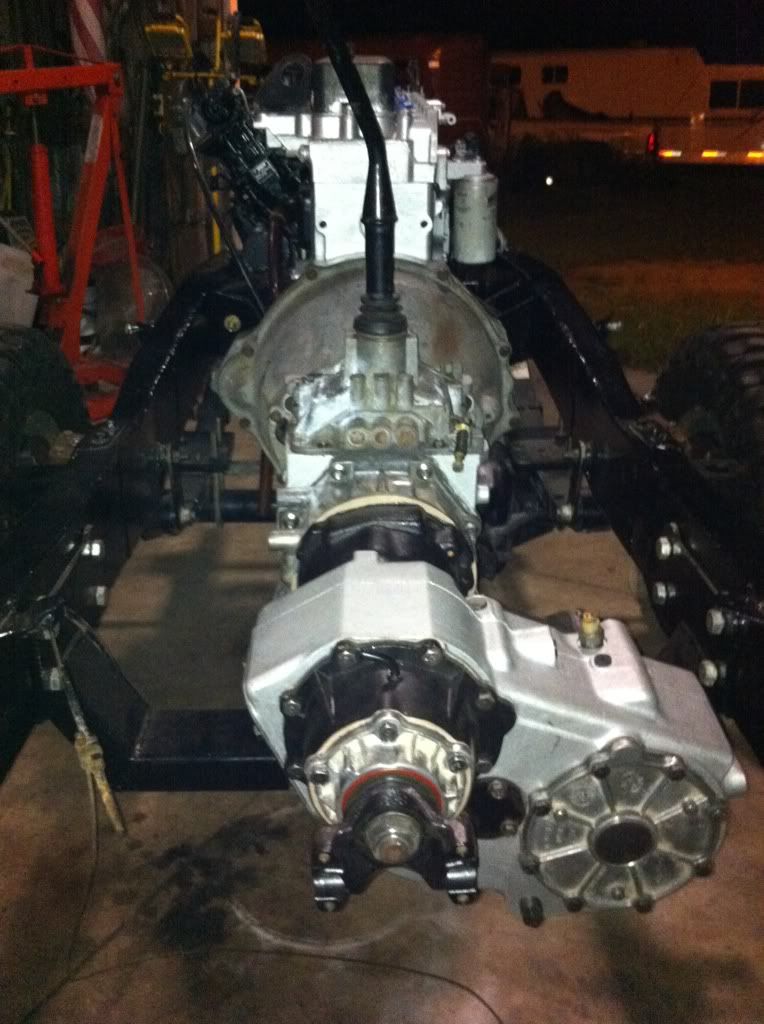
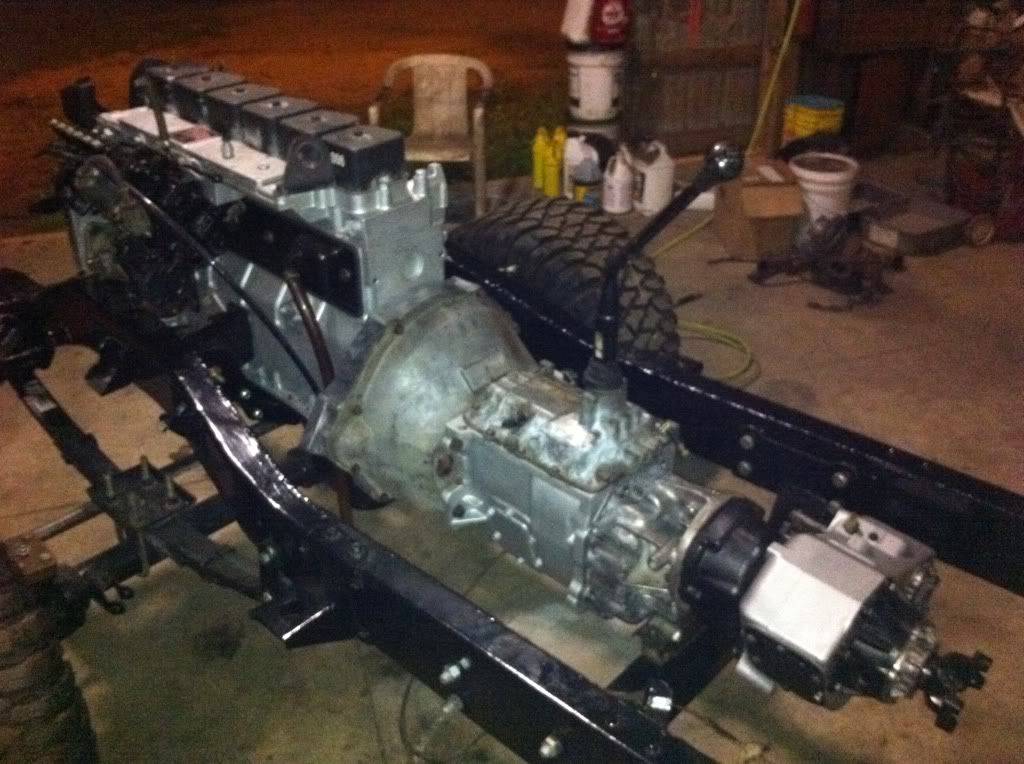
The drivetrain is finally in for good. I need to shorten the stock first gen dodge drive shafts but other than that the drive train is in there for good now. I still have to pull the kingpin cap/steering arm and tie rod and drag link to clean weld and paint for the front end to be finished.
Once those things are complete, I will pull the cab from the frame it is currently on, put some new body mounts under it and get it on the rolling chassis. Once the cab makes it's way to it's new home, the engine compartment will be pieced together with all of the accessories, the fuel system will be installed and the truck will be wired up from front to back with an American auto wire upgrade wiring harness. I still need to order up my hydro boost lines and fittings as well as an xj steering shaft. It's coming along really nicely and this stage was a huge mile stone that I have been looking forward to it for a long time. These are all shots of the progress from the last couple of months since my last post: 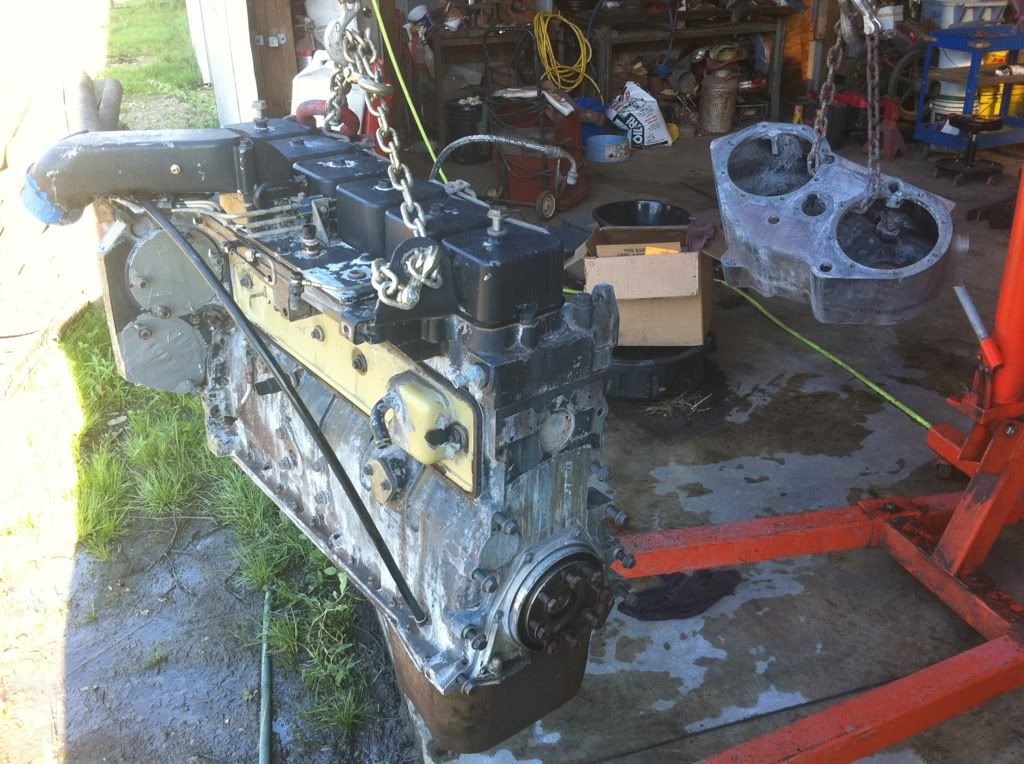 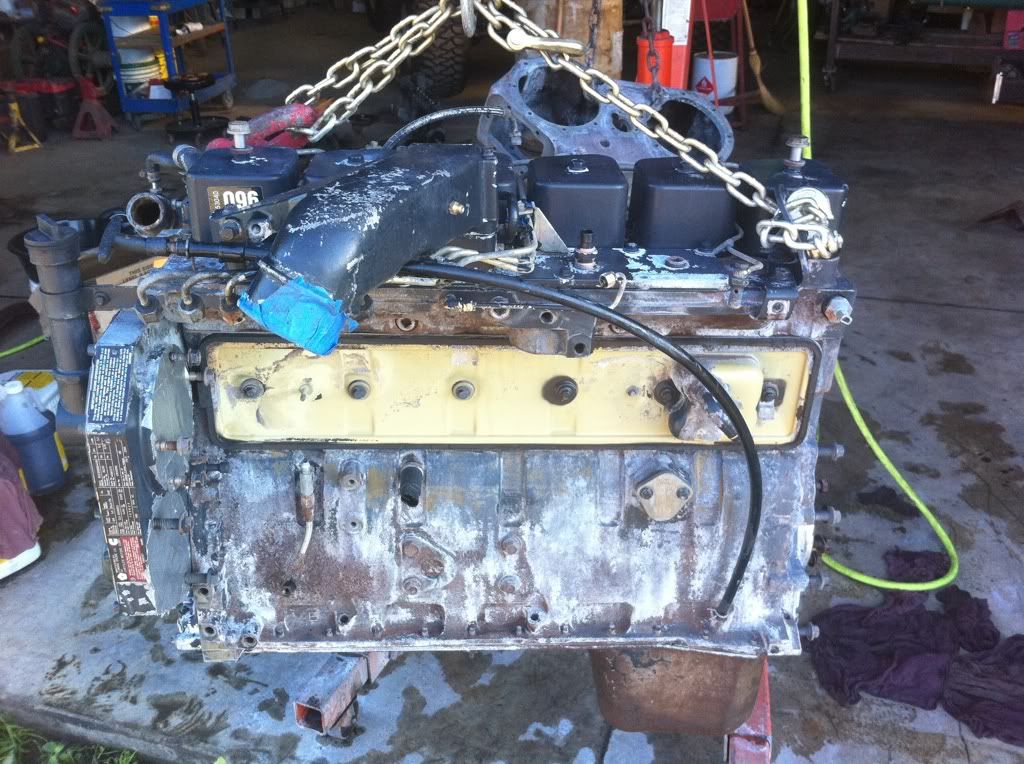  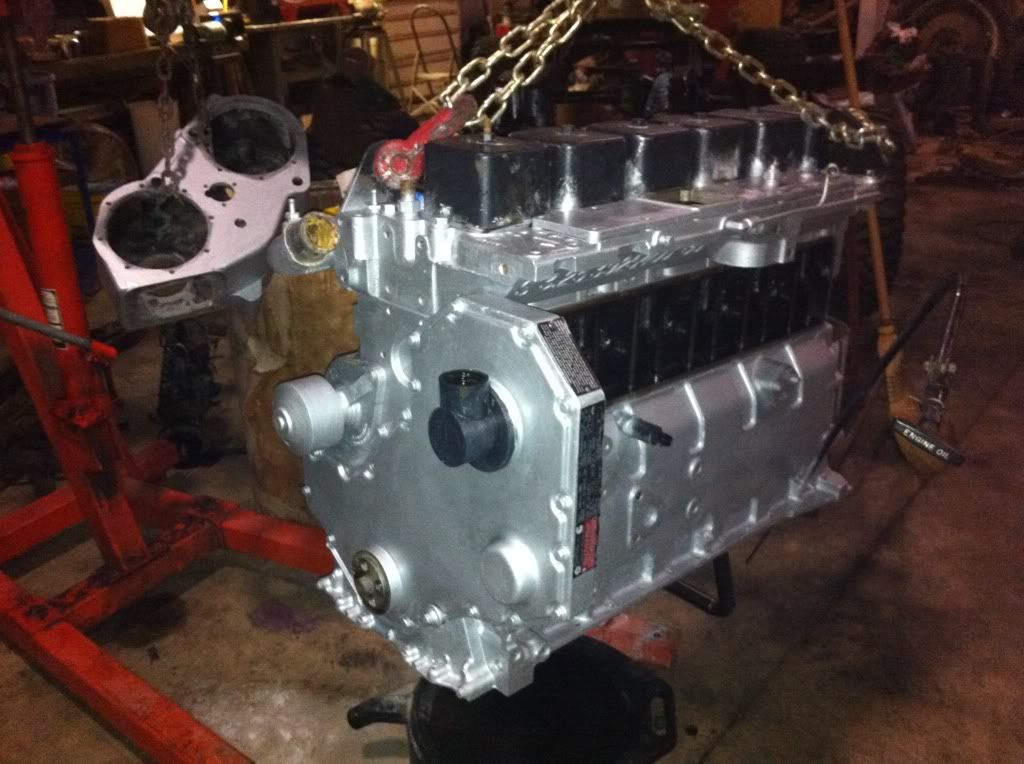  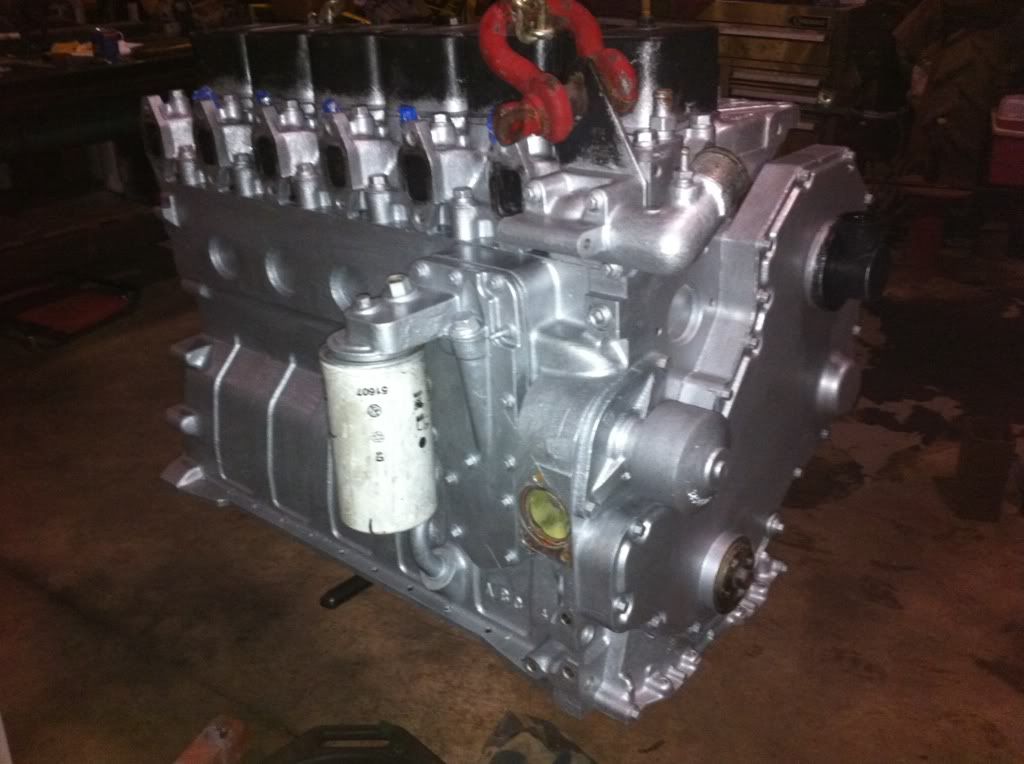
|
|
|
|
|
09-04-2011, 01:06 PM
|
#12 |
|
Registered User
Join Date: Apr 2011
Location: Tacoma, Washington
Posts: 236
|
Re: Berthas Build
Lovin this build. Can't wait to see it finished. Keep up the awsome work.
|
|
|
|
|
09-13-2011, 12:43 PM
|
#13 |
|
Registered User
Join Date: Aug 2010
Location: Ontario, Canada
Posts: 137
|
Re: Berthas Build
That is a fantastic truck!
|
|
|
|
|
09-29-2011, 10:51 AM
|
#14 |
|
Resident of Here
Join Date: May 2008
Location: Wesley Chapel, FL, USA
Posts: 7,716
|
Re: Berthas Build
Subscribed.
__________________
~Bradley~ 2004 Black GTO LS2/T56 too much to list  Miss having a truck 
|
|
|
|
|
02-20-2012, 02:34 AM
|
#15 |
|
I had a V-8
Join Date: May 2003
Location: Phoenix AZ
Posts: 1,116
|
Re: Berthas Build
Kinda quite around here....... You preparing for one of your massive update/photo dumps??
__________________
1972 K20 Suburban, 5.9L Cummins, Banks Power Pack, NV4500HD, NP205, H.A.D., D60/14FF ARB Link To Build: HERE. |
|
|
|
|
02-20-2012, 11:39 AM
|
#16 | |
|
Registered User
Join Date: Feb 2010
Location: Dayton, OH
Posts: 255
|
Re: Berthas Build
Quote:
Ill have to make the time to give an update for you guys. I got married at the end of September(see last post's date.......) and we have been getting settled in to our new house and enjoying married life since then. She does start and run flawlessly. I believe that I did make some progress since the last time i updated. I am at a bit of a crossroads on where to take this build and have had the past 5 months to ponder the couple of directions i could take her. I have an AAW wiring harness that I will definitely be installing but there is one or two slightly major obstacles preventing me from doing so. The cab supports need replaced and there is a small rust hole in the middle of the driver floor pan that needs repaired. I am going to sooner or later(see below options) replace this sheet metal, undercoat(suggestions?) the cab and bed, heat and sound insulate the cab(suggestions?), and give her some diy paint(I have the space and equipment available so i will invest a bit of time and money here to get it straight and crisp, but this truck will be driven so i am not looking/paying for show quality, driver quality will be plenty for me). Suggestions on a diy friendly paint system would be nice. I have looked into the Summit and Duplicolor Paintshop 1 stage systems but have no experience with them. So with all of that, these are my two options: 1) Install the wiring harness(the only wiring currently in the truck is under the dash) and run the body as is. I will have to remove body down the road to undercoat, shave hvac holes in firewall, fix cab supports and floor pans, and to spray between bed and cab. If i install the wiring harness i will have to work around it when i go to disassemble to paint down the road. Pros of this option are that i am able to drive it sooner, i dont have all of the metal and body work to do, and I will be able to work out all of the bugs and be able to tweak, add, remove and change things before having the worry of scratching fresh paint. Cons are that i will have to completely disassemble the body to do all of option two in a couple of years, if i get around to it. 2) Pull cab and bed (very few things to do to be able to pull cab and bed)to replace cab supports and floor pan, undercoat, insulate, and paint. Reassemble with clean and repaired body, install wiring harness and rest of finishing touches. Pros of this option are that I will have done it right the first time and I will have a finished truck when I get it back together. Cons of this option are that it will take longer to be able to drive and enjoy this never ending money pit, which is another con, MONEY! I think that I would regret not doing it right the first time. I have come this far in the project and would hate to cut it short after all of this work. I am all ears to any suggestions anyone has on any of this. |
|
|
|
|
|
12-22-2012, 11:46 PM
|
#17 |
|
Registered User
Join Date: Feb 2010
Location: Dayton, OH
Posts: 255
|
Re: Berthas Build
Process has been made the past year or so, just not as much as hoped......
Battery trays  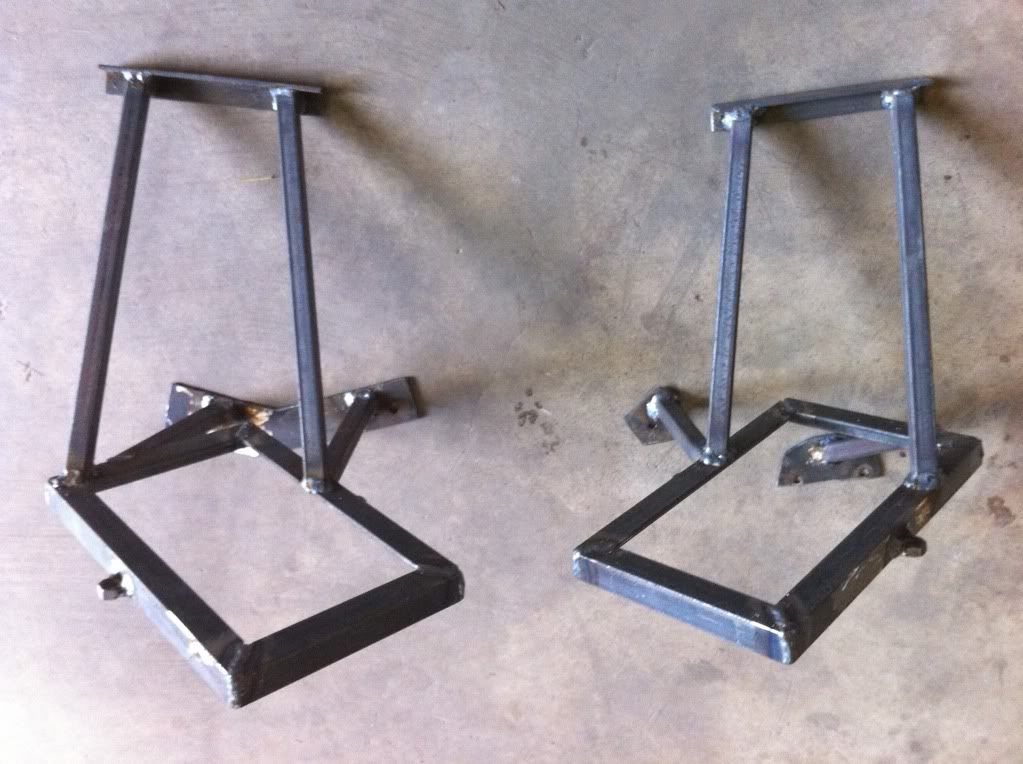 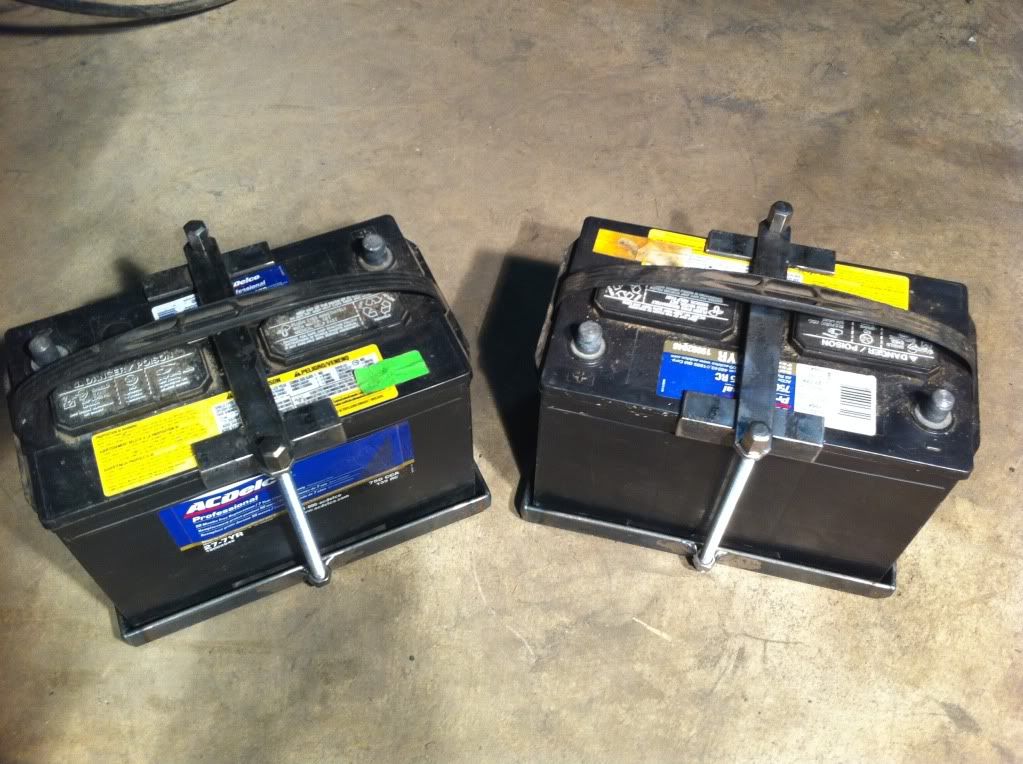 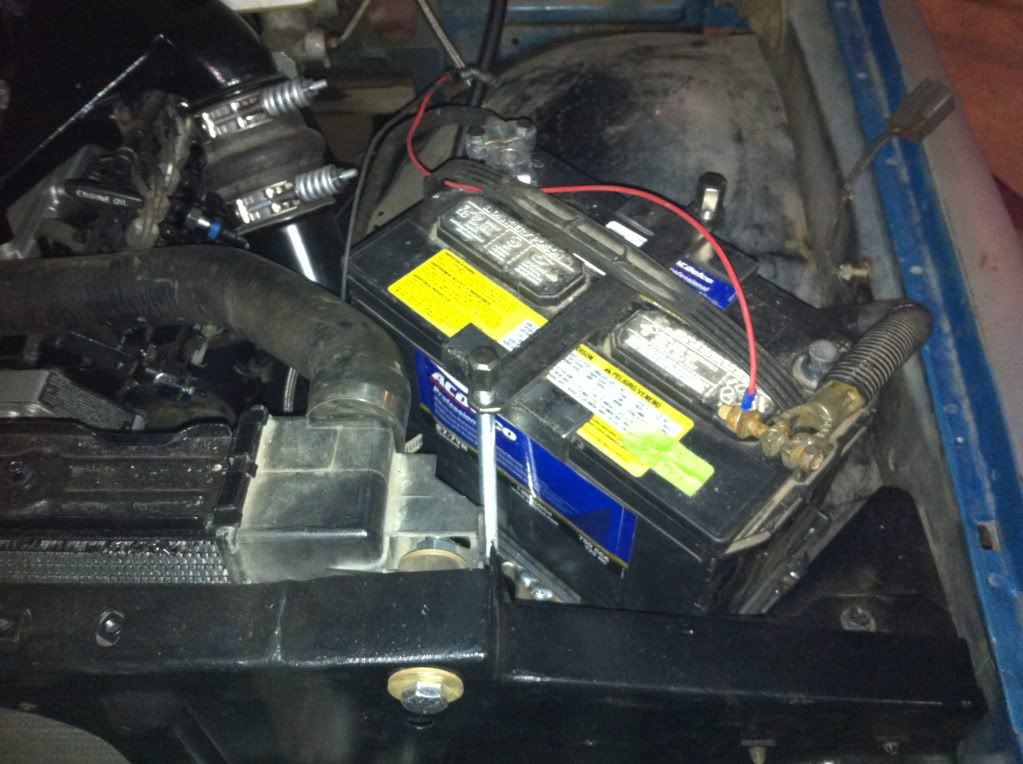 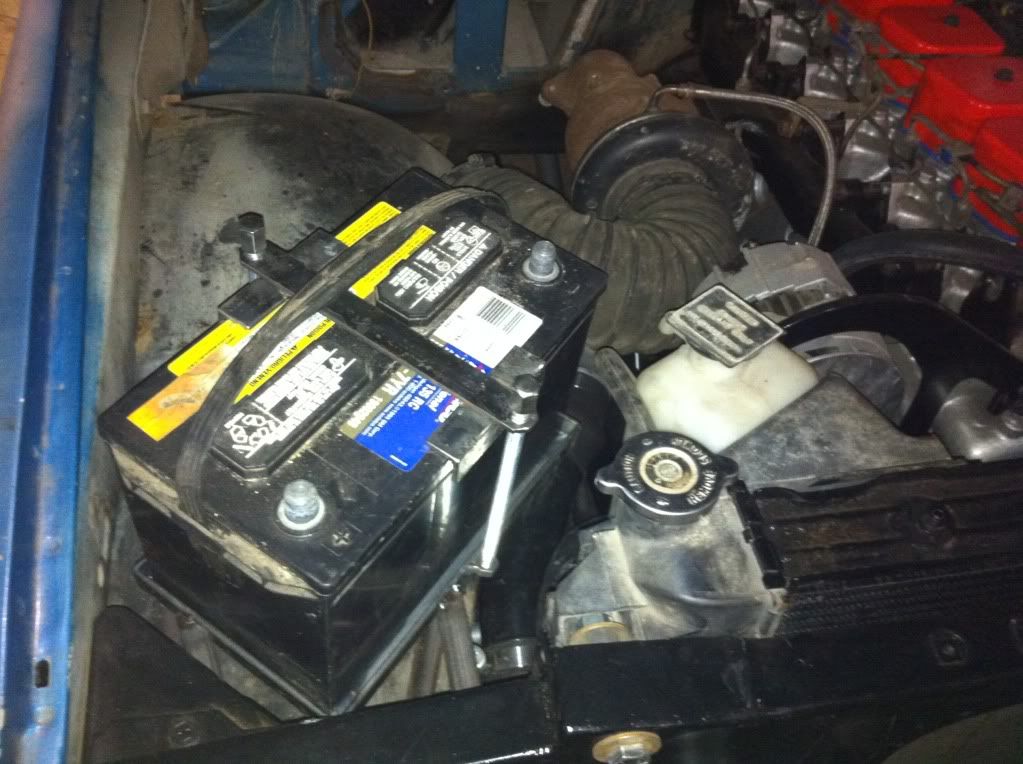 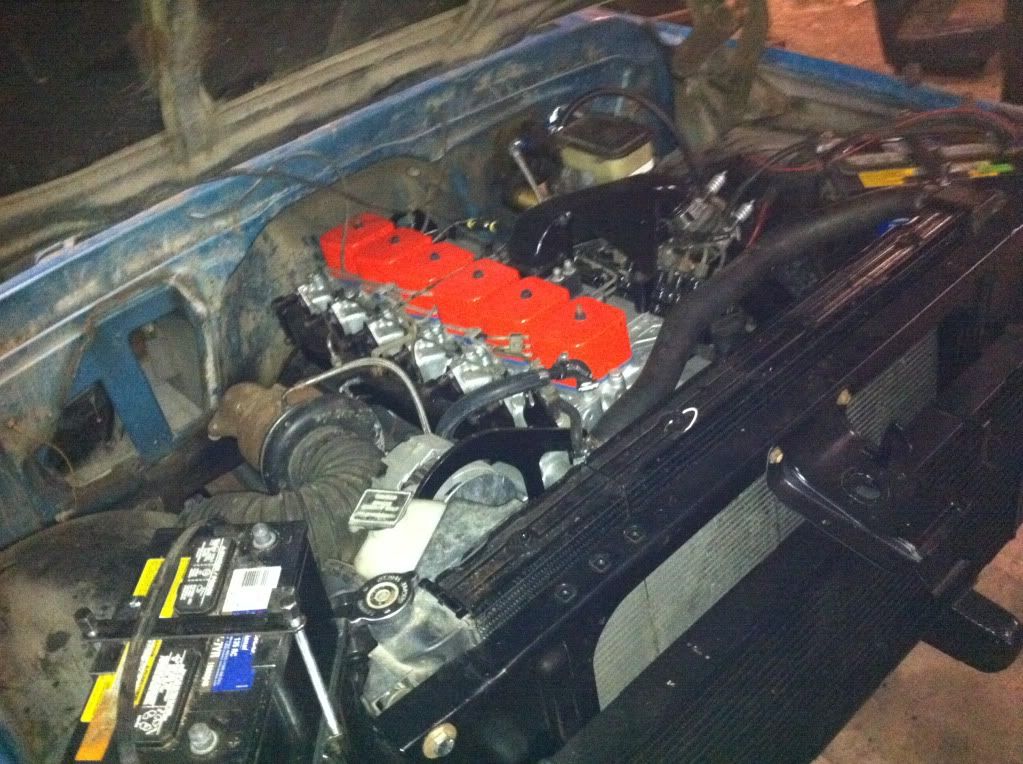 Transfer case shifter bracket 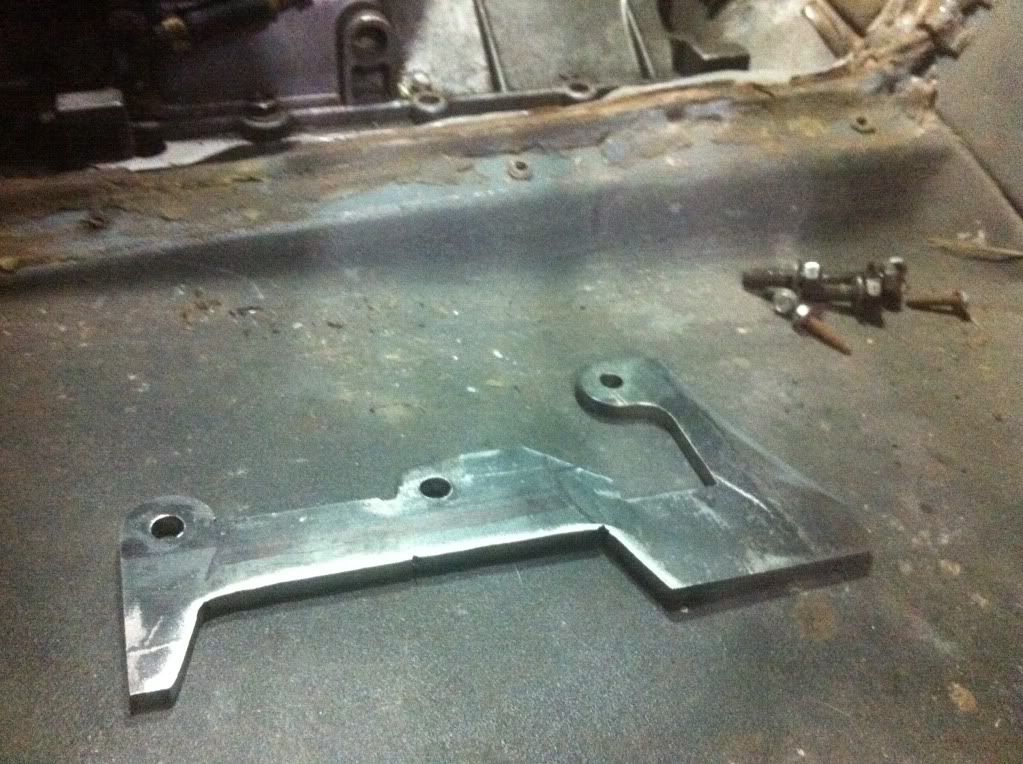 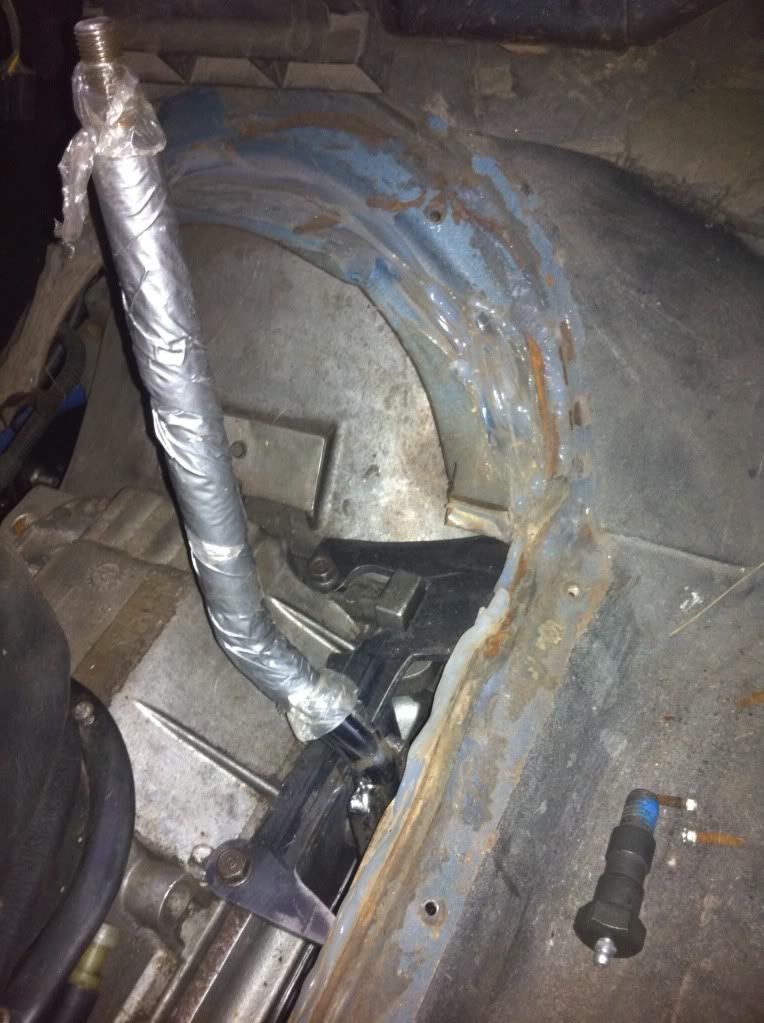 After getting measurements from the mock up piece, i cut a much better looking bracket on the waterjet Mock up:  Waterjet part 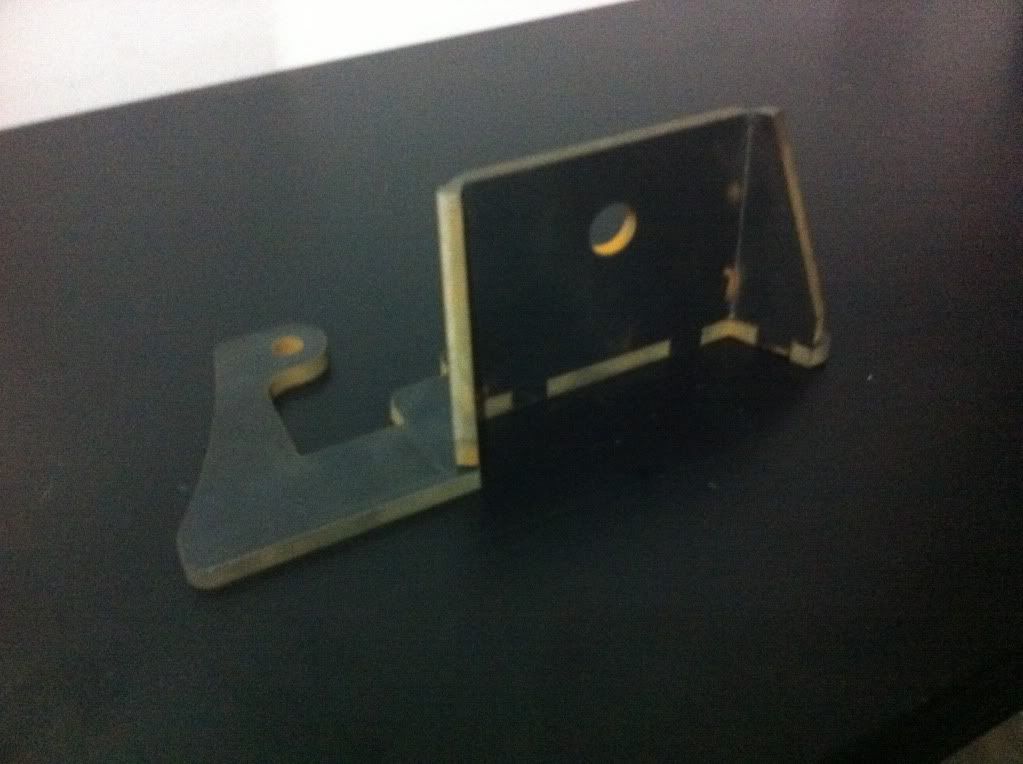 Both 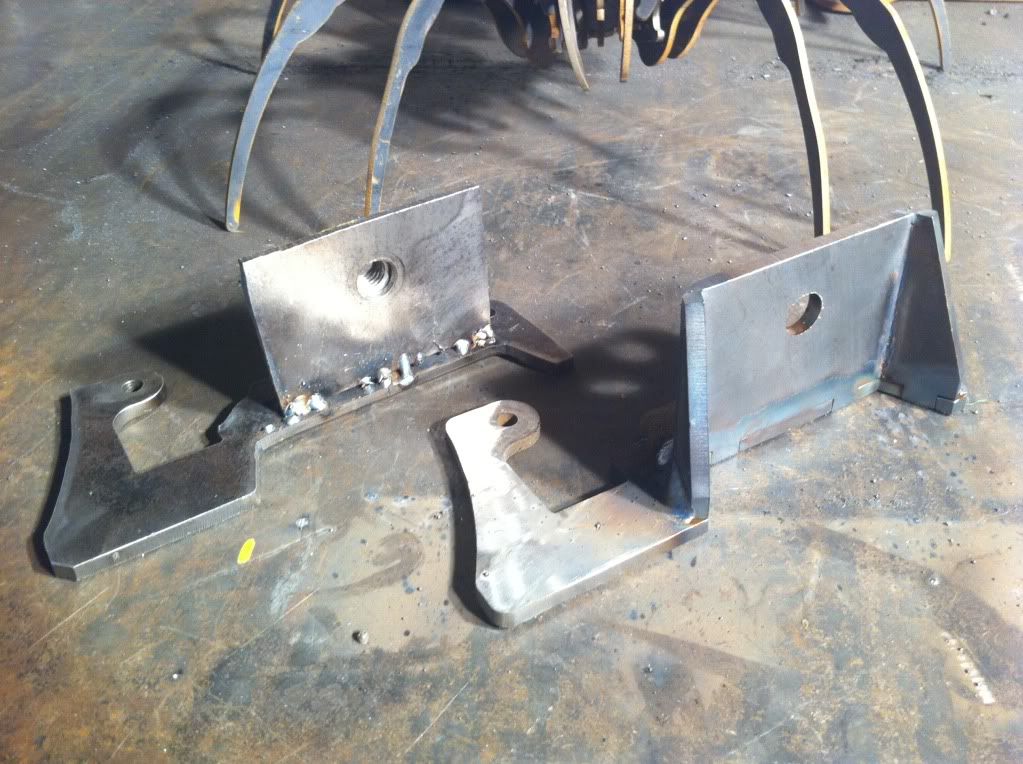 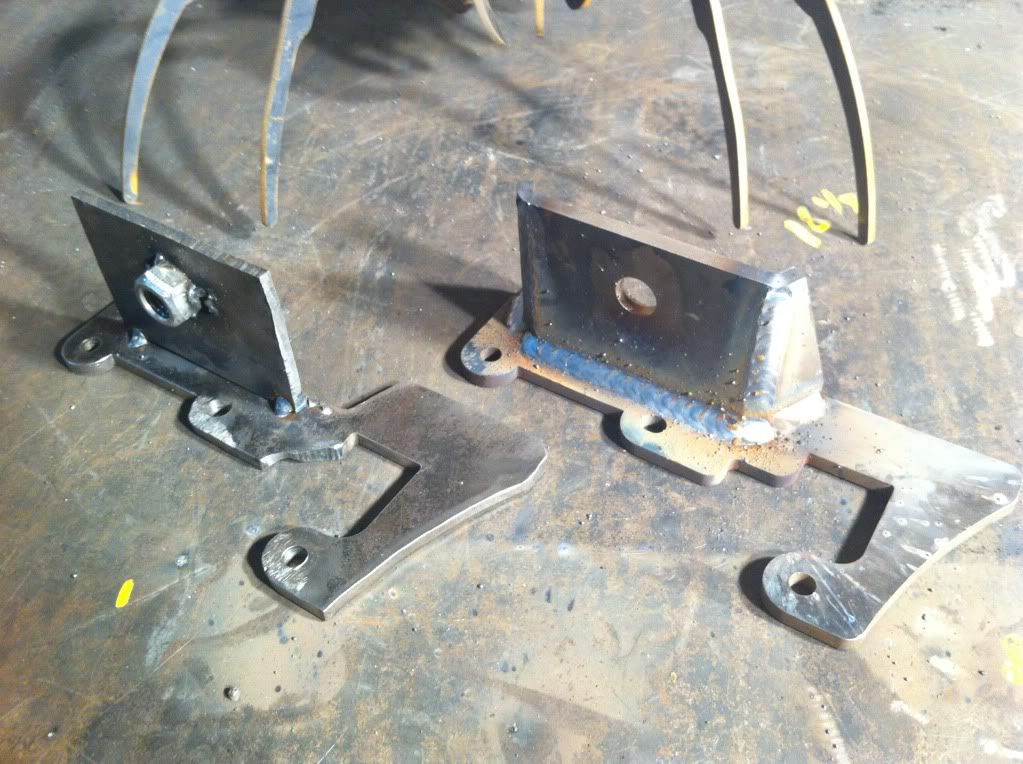 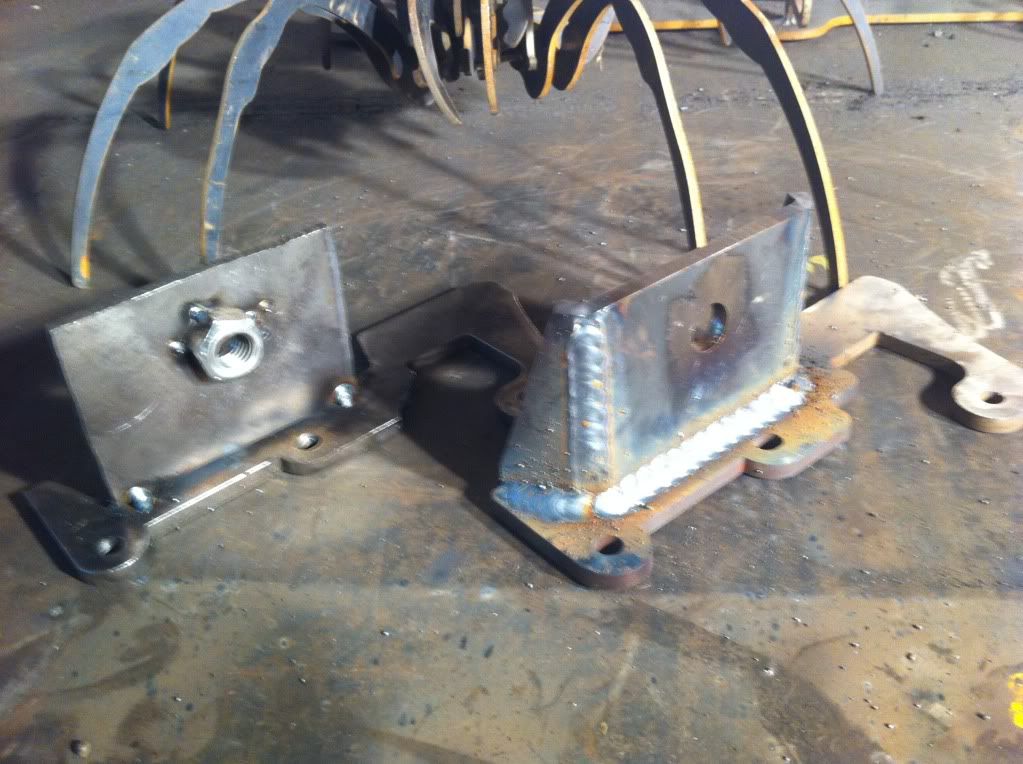 Tranny tunnel 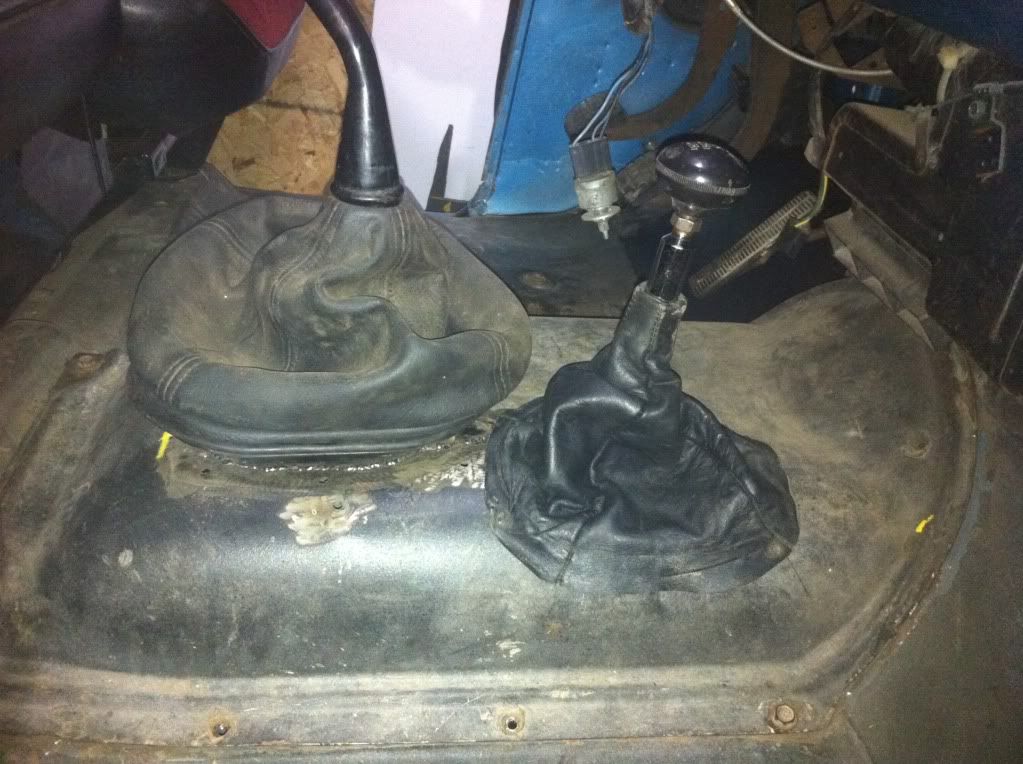 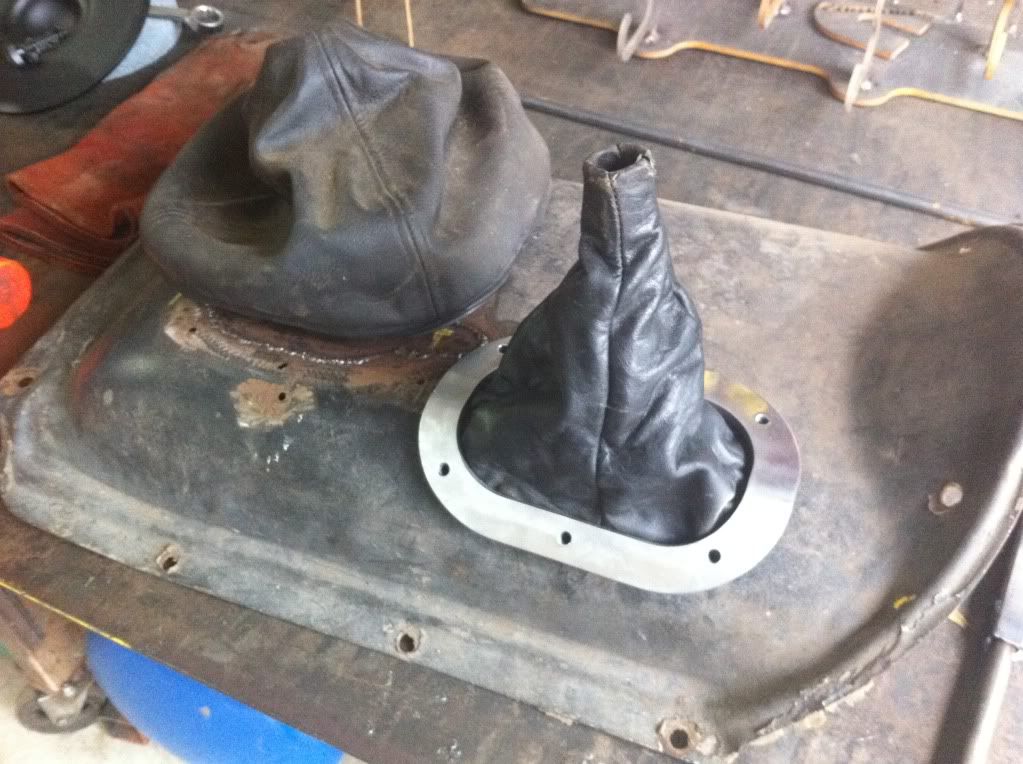 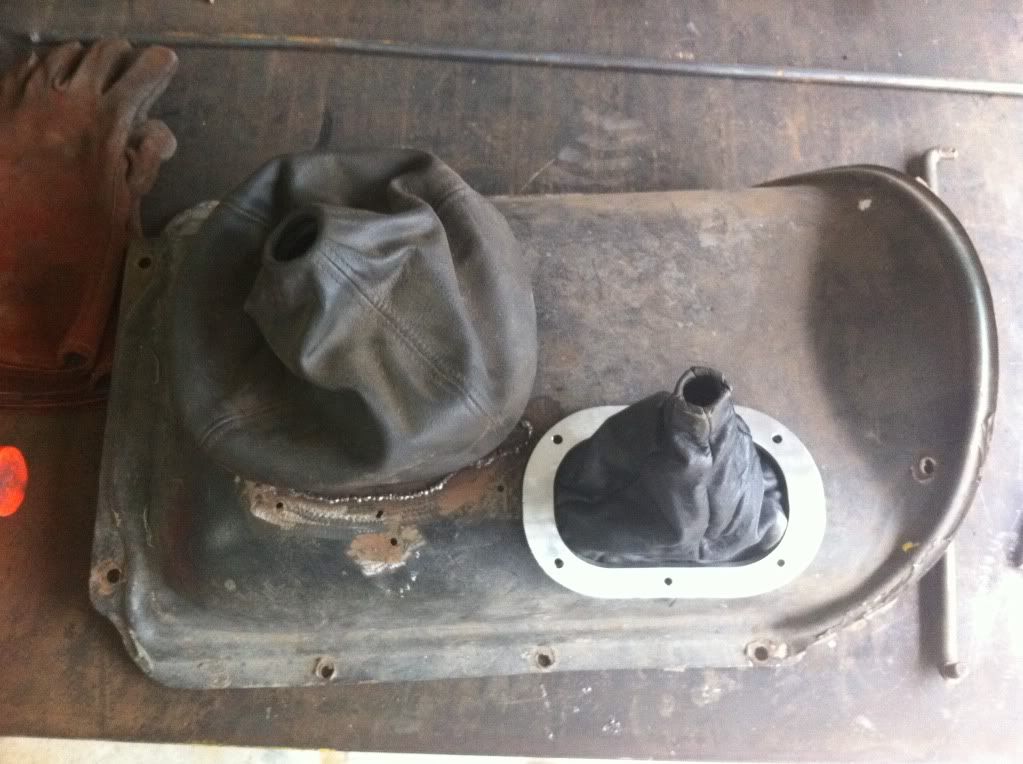 Got my buddy buckets thrown in 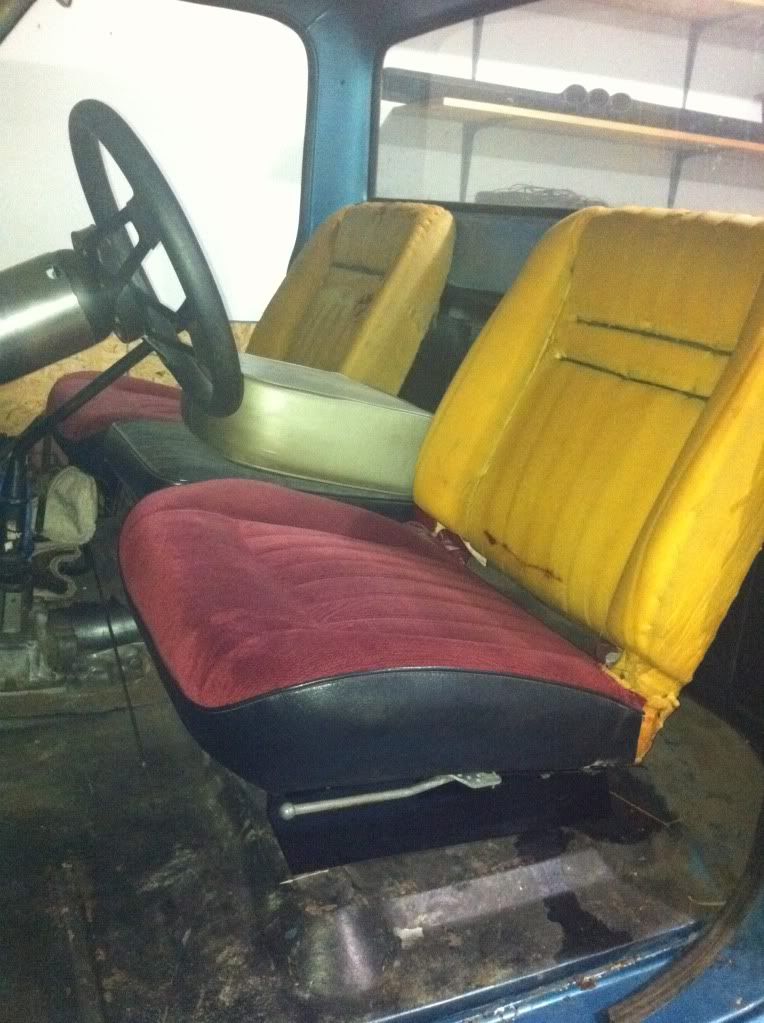
|
|
|
|
|
12-22-2012, 11:47 PM
|
#18 |
|
Registered User
Join Date: Feb 2010
Location: Dayton, OH
Posts: 255
|
Re: Berthas Build
Downpipe
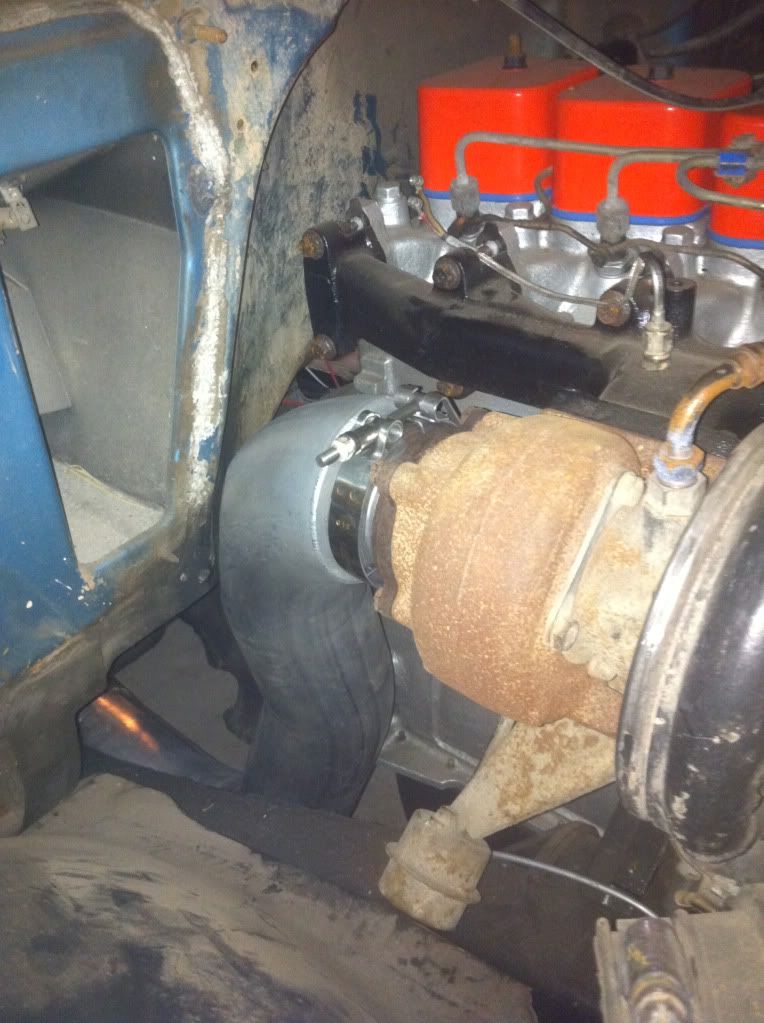 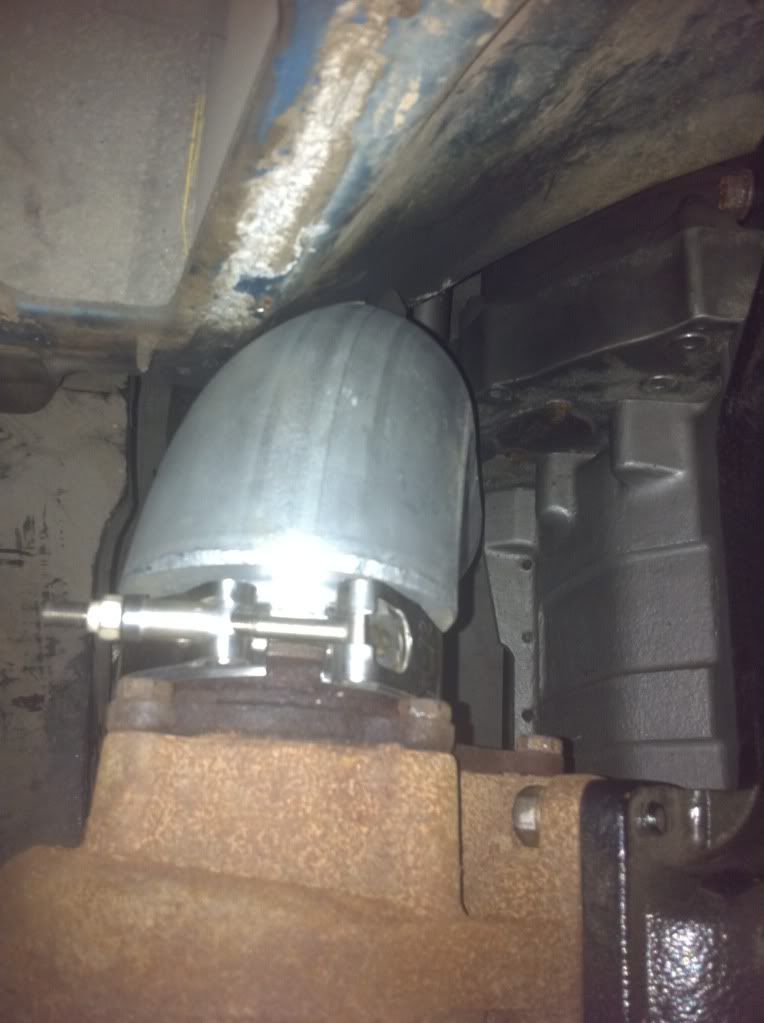 Modified 1st gen exhaust 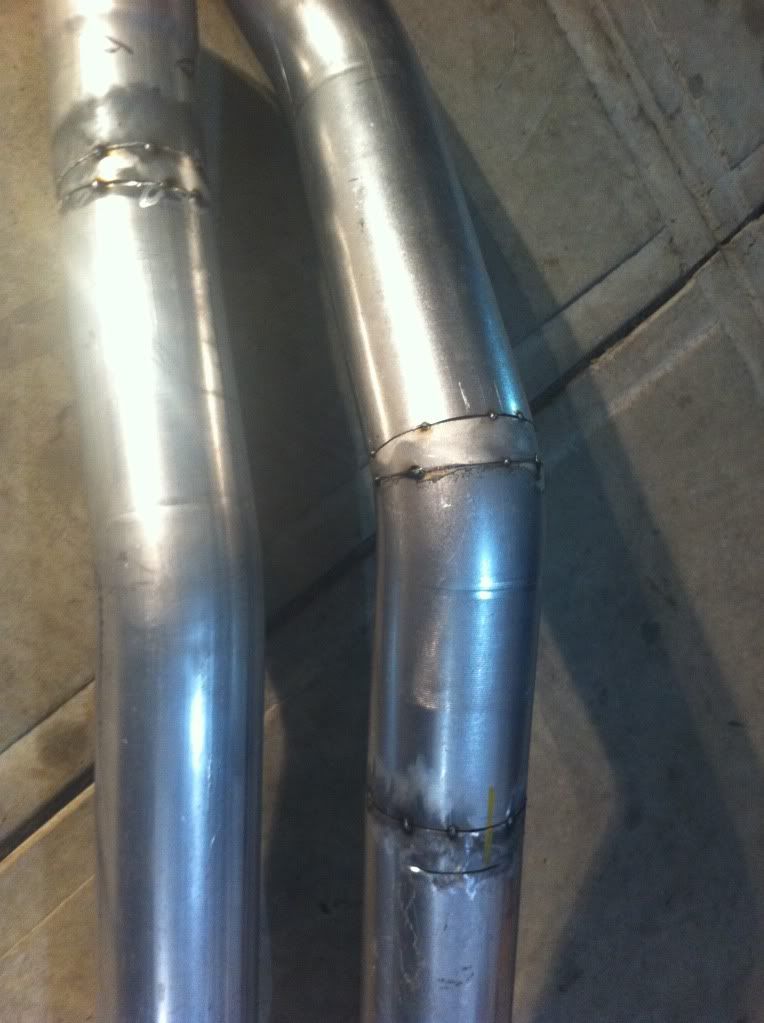 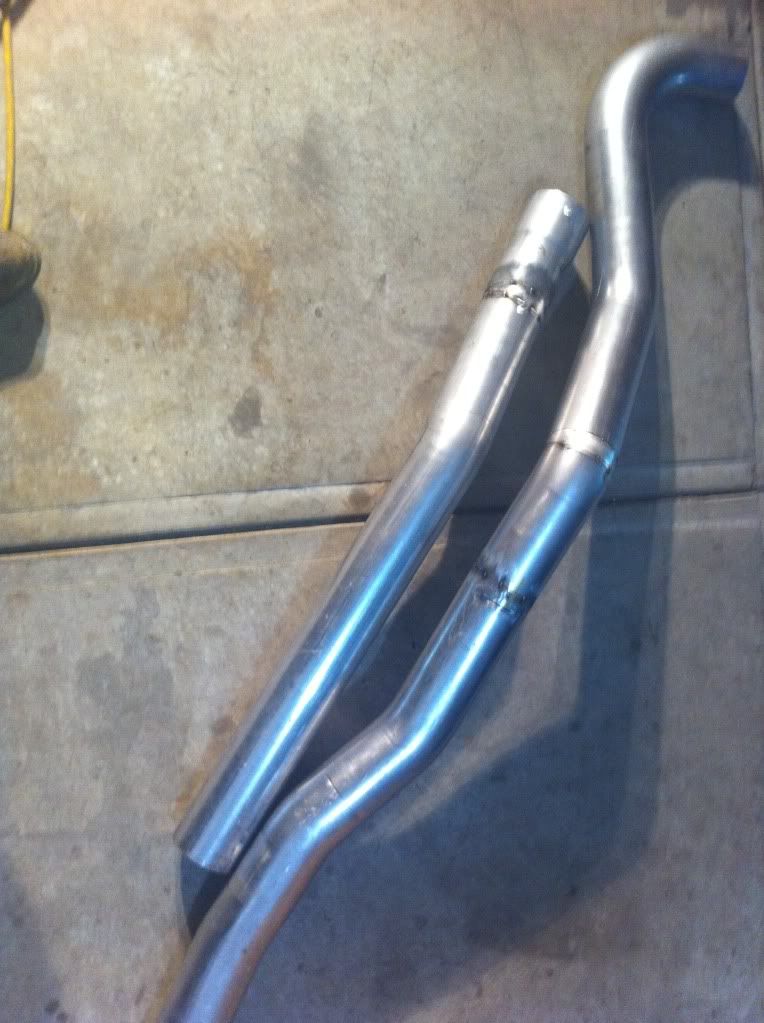 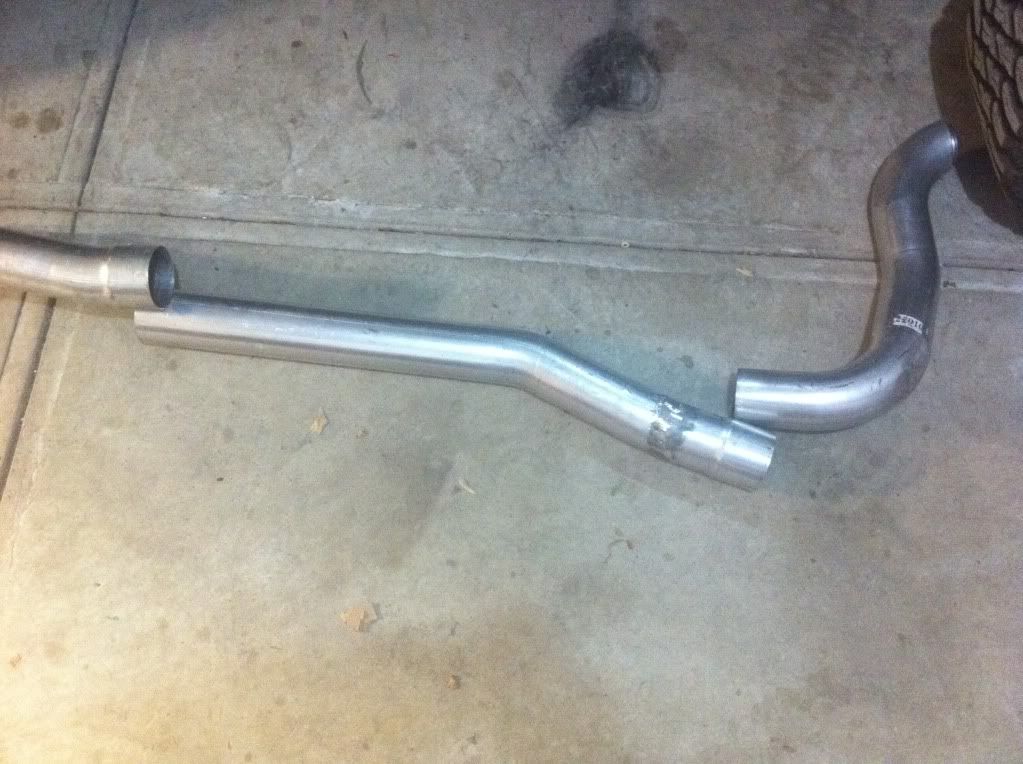 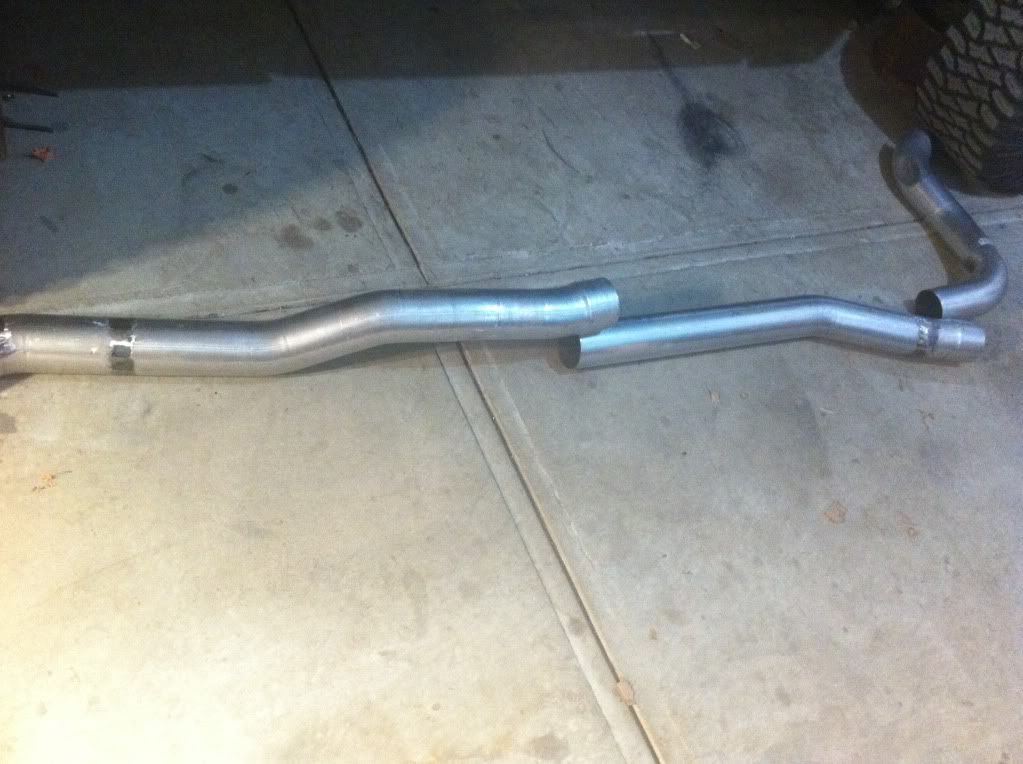 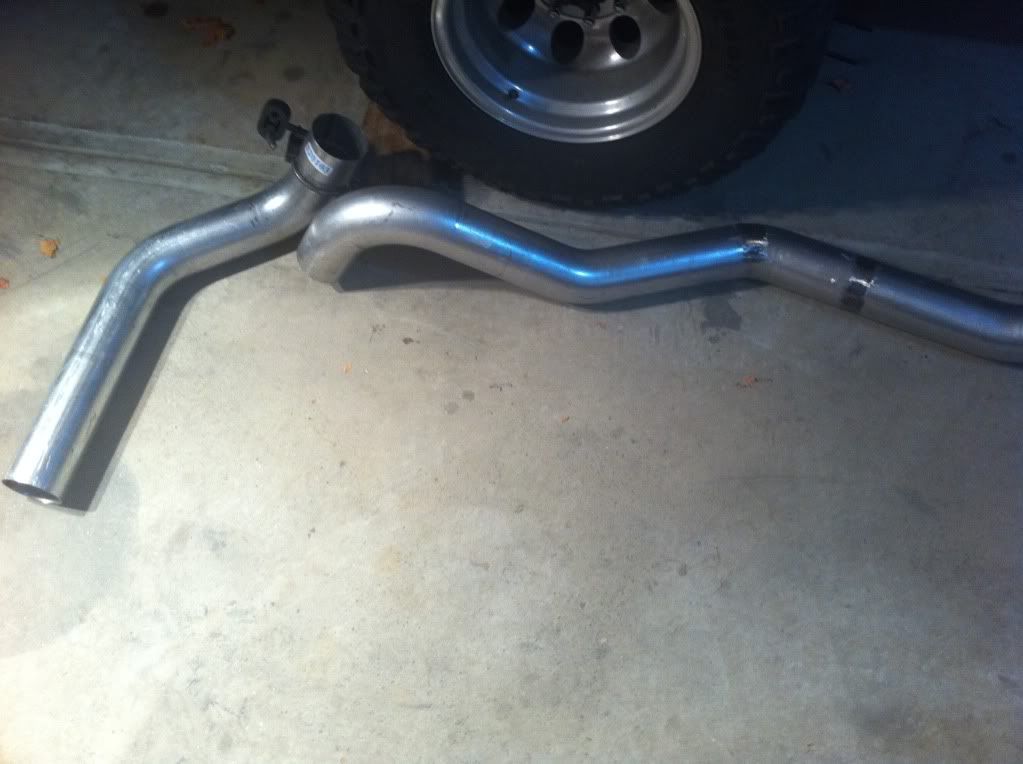 at xcase 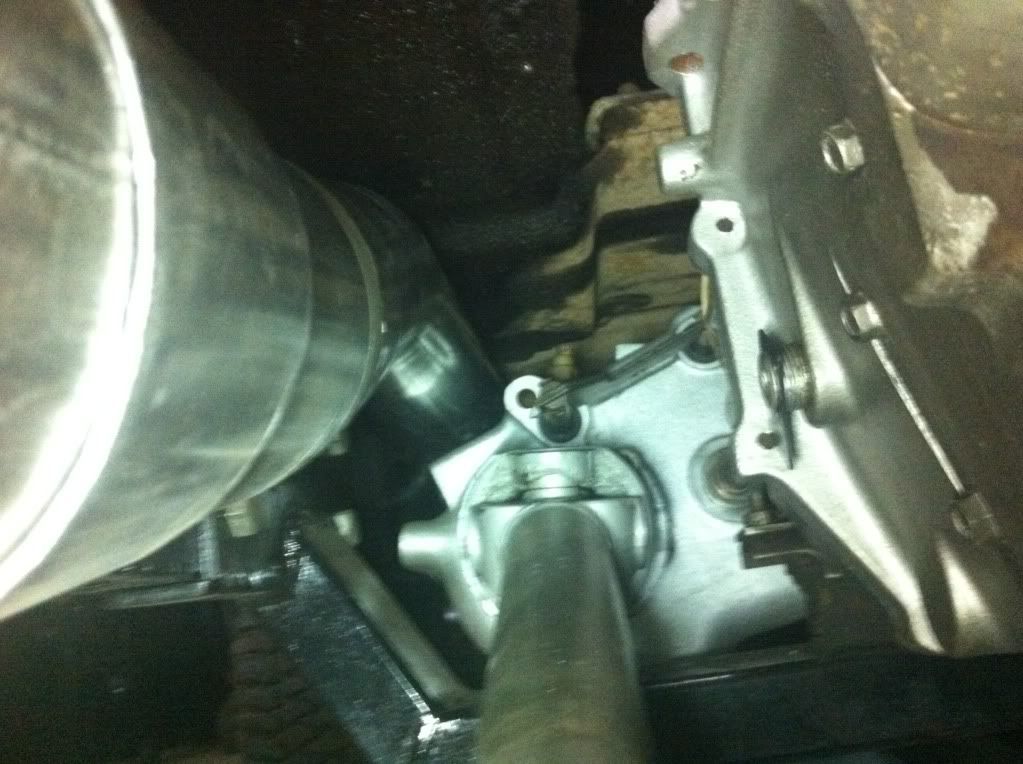 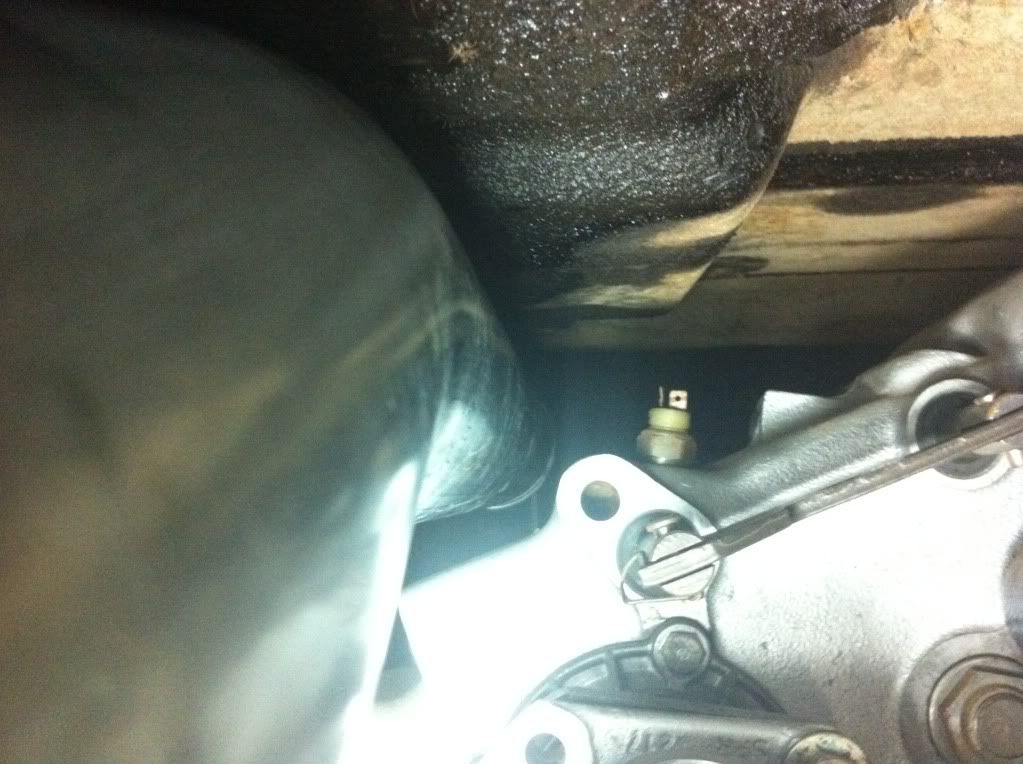 after xcase and over axle 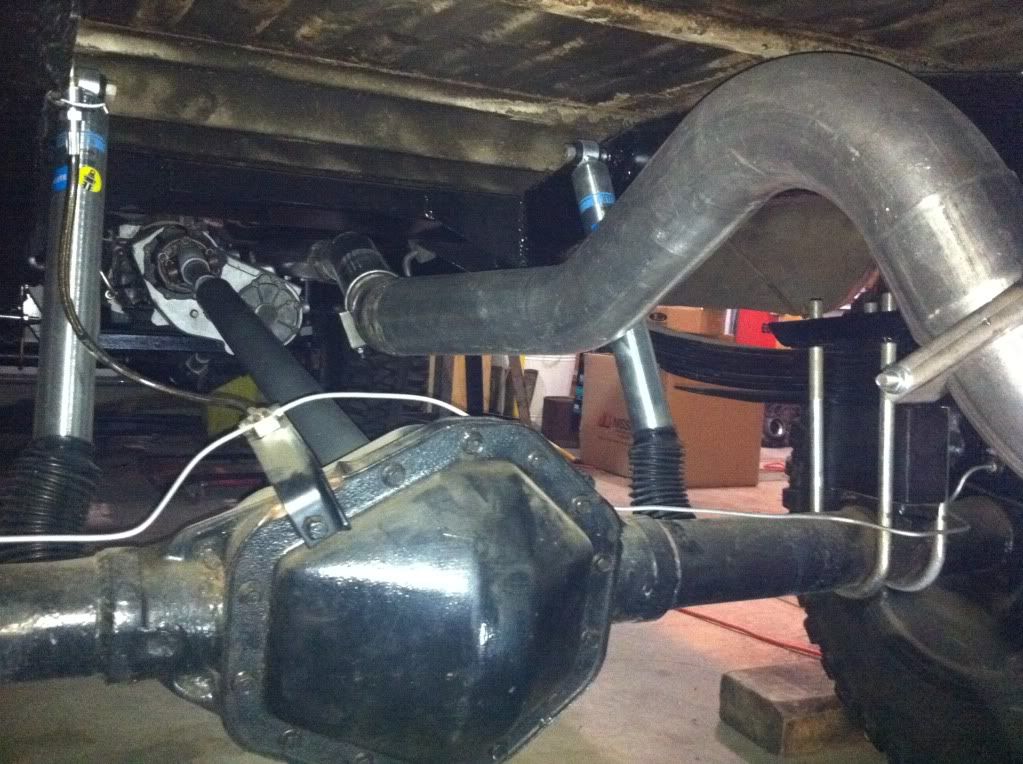 behind the tire 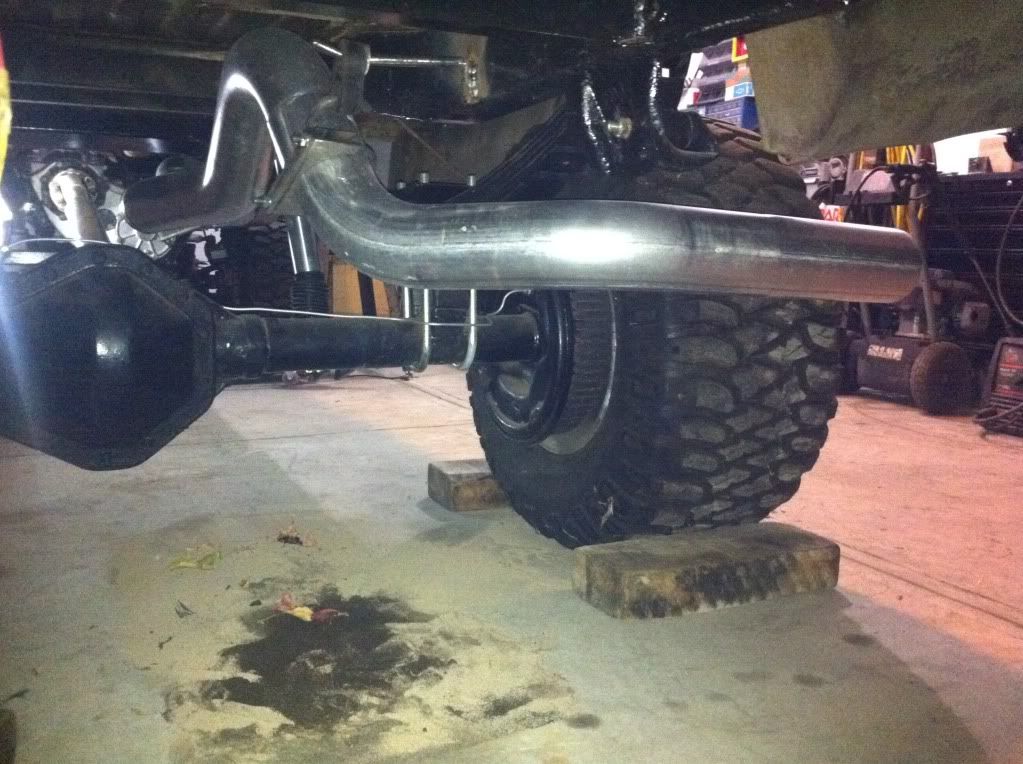 I loaded her up and took her to work where i will pull the cab, take it to the sandblaster, and bring it back home to the garage and repair the cab supports and possibly redo the cab corners and rockers that the previous owner put in(just not work to my standards). i need to install my cab lights, shave the firewall hvac holes and the fuel filler hole, add holes for headliner trim, primer and paint the interior, and trim the rest of the cab to put it on for the final time. i am going to set my birthday (June 24) as my deadline to get this drivable...... well see how many obstacles jump out to try to prevent this...... ill have updates as i make more progress...... |
|
|
|
|
12-23-2012, 02:35 AM
|
#19 |
|
I had a V-8
Join Date: May 2003
Location: Phoenix AZ
Posts: 1,116
|
Re: Berthas Build
Woo-hoo!! Forward progress!! Looks good man. I really like your transfer case shifter bracket. So much better than that POS that Advance Adapters sells. Exhaust looks good too. Post a pic of whatever is behind the transfer case shifter brackets in the pic (waterjet spider??).
Glad to see you back at it.
__________________
1972 K20 Suburban, 5.9L Cummins, Banks Power Pack, NV4500HD, NP205, H.A.D., D60/14FF ARB Link To Build: HERE. |
|
|
|
|
12-23-2012, 03:52 AM
|
#20 |
|
Chevy Enthusiast
Join Date: Jul 2009
Location: Canyon Lake Texas
Posts: 2,024
|
Re: Berthas Build
Very nice progress!
__________________
Tony 1985 GMC K2500 restoration Project: Rust, White & Blue 1989 Chevy R3500 CC Cummins & 4X4 swap some day... 1989 Burb (D60, 14BFF, 12V, NV4500, NP205, 37" tires in progress) |
|
|
|
|
12-23-2012, 12:56 PM
|
#21 |
|
Registered User
Join Date: Feb 2010
Location: Dayton, OH
Posts: 255
|
Re: Berthas Build
That is a spider from the waterjet.......
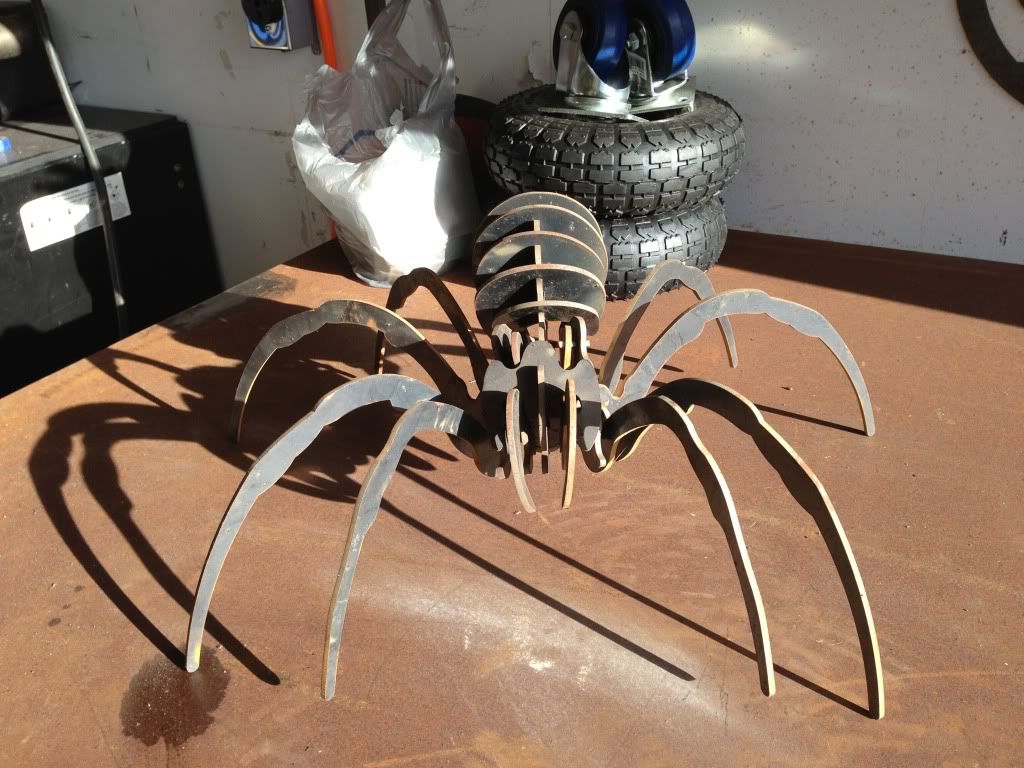 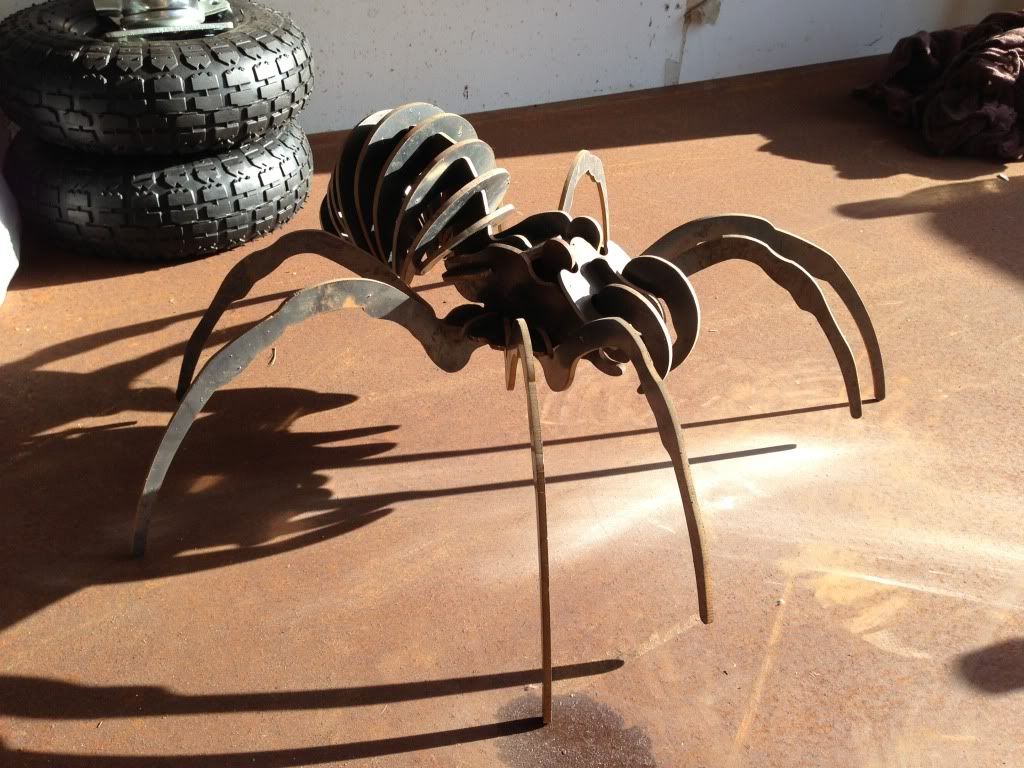 And one with my new 1/2" welding table top that I cut out on the waterjet as well 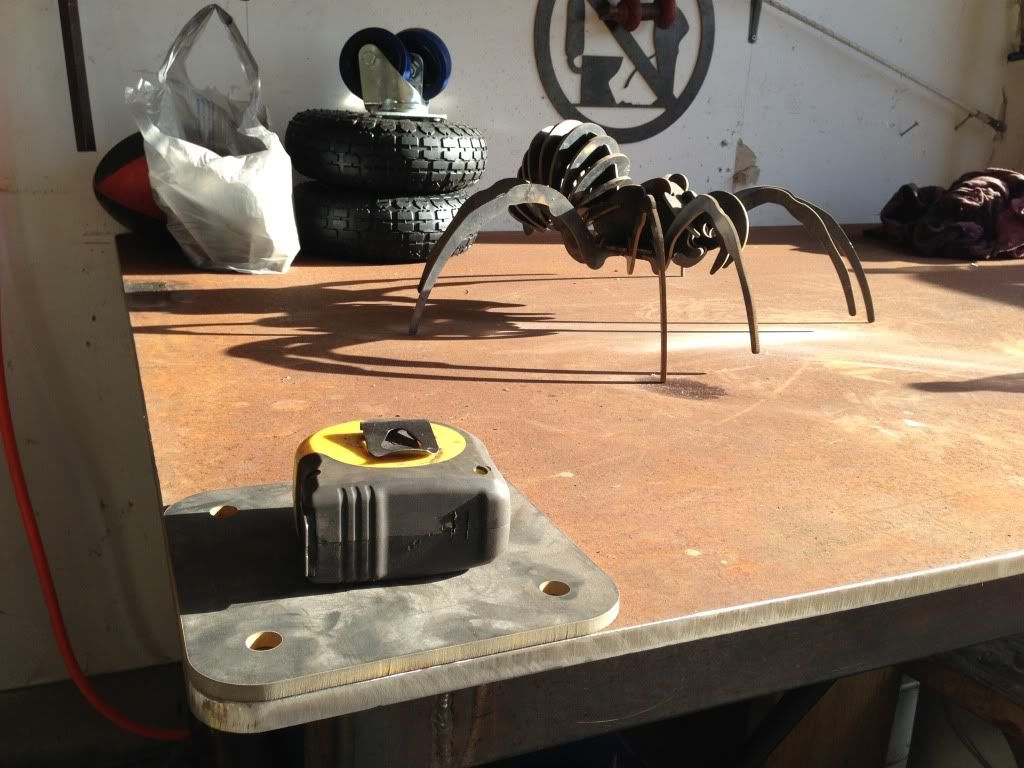 Posted via Mobile Device |
|
|
|
|
12-23-2012, 07:05 PM
|
#22 |
|
Registered User
Join Date: Apr 2005
Location: redding ca
Posts: 1,438
|
Re: Berthas Build
Clean out your inbox your on overload. Pm me a price on a crossmember and the shifter brackets. Thanks and marry x mas!
Posted via Mobile Device |
|
|
|
|
12-23-2012, 08:40 PM
|
#23 | |
|
Registered User
Join Date: Feb 2010
Location: Dayton, OH
Posts: 255
|
Re: Berthas Build
Quote:
Merry Christmas! |
|
|
|
|
|
12-23-2012, 08:09 PM
|
#24 |
|
Registered User
Join Date: Apr 2005
Location: redding ca
Posts: 1,438
|
Re: Berthas Build
I can weld them
Posted via Mobile Device |
|
|
|
|
12-27-2012, 01:10 PM
|
#25 |
|
Registered User
Join Date: Apr 2005
Location: redding ca
Posts: 1,438
|
Re: Berthas Build
what are all the part numbers you ended up getting from cummins asfar as alt,a/c comp and brackets??? did you cut the alt bracket?
|
|
|
|
 |
| Bookmarks |
|
|


 Hybrid Mode
