
|
|
|
 01-18-2009, 08:00 PM
|
#1 |
|
Registered User
Join Date: Oct 2008
Location: Southern, MO
Posts: 233
|
Re: Tommys66 Build
I got the color idea from Alans classic build. The company is powdercoating plus, I think there is a pic of the sign on this page with their phone number.
Last edited by tommys66; 07-09-2009 at 08:49 PM. Reason: too much info |

|

|
|
01-18-2009, 08:33 PM
|
#2 |
|
1 thing at a time is progress.
Join Date: Jun 2007
Location: Ball Ground GA
Posts: 5,511
|
Re: Tommys66 Build
Man that looks awesome
 I'm glad I inspired your color scheme. I'm glad I inspired your color scheme.
__________________
Alan
Philippians 2:14-16 |
|
|
|
|
04-09-2009, 11:51 AM
|
#3 |
|
Registered User
Join Date: Oct 2008
Location: Southern, MO
Posts: 233
|
Re: Tommys66 Build
Got the front suspension mounted, Dont know how the paint will hold up, I used rustoleum gloss black, thinned with ascetone. Havent used this paint before. Made some drop brackets for the sway bar. theyre 1" shorter than original. think i tightned the bushing too much! I thought you just tightned all the way down, guess not. BTW the rotors are from R1 concepts.
|
|
|
|
|
08-11-2009, 09:42 PM
|
#4 |
|
Registered User
Join Date: Jan 2008
Location: Las Vegas, Nv
Posts: 954
|
Re: Tommys66 Build
Great job. The 5.3 4L60E swap looks pretty straight forward. Any other issues with it besides getting motor mounts and the trans leveling spacer? Obviously you'll need a custom drive shaft. Looks like you cranked the sway bar bushings down tight. You should let off a little and put some grease in there if you didn't already. Nice work so far.
__________________
http://67-72chevytrucks.com/vboard/s...54#post3194654 |
|
|
|
|
08-11-2009, 09:50 PM
|
#5 | |
|
Registered User
Join Date: Oct 2008
Location: Southern, MO
Posts: 233
|
Re: Tommys66 Build
Quote:
|
|
|
|
|
|
08-12-2009, 12:03 AM
|
#6 |
|
Registered User
Join Date: Feb 2009
Location: columbus ohio
Posts: 85
|
Re: Tommys66 Build
hey tommy, i'm doing a 5.3 swap also and made adapter plates too. i just picked up a set of manifolds off a trailblazer ss that fit perfectly but they have no egr. also i'm using a 4 speed but i see your using the auto. are you setting the frame level and setting the motor level? you may want to mock something up to check your clearance for the driveshaft. looks awesome though man, good luck. if you run into any problems hit me up i may be able to help. oh and i would definitely find another harness, if you solder all those connections it almost guarantees something won't work properly due to increased resistance or voltage drop. also you may want to check out ls1tech.com theres some good info and parts over there. there are places you can send the computer out to to delete the VATS, egr, rear O2, all kinds of stuff. you can do it yourself but the software is pretty pricey.
__________________
Jason Garverick 64 C10 SWB Stepside 350/muncie - 5.3 vortec (soon)Thread 69 AMC Javelin 360/auto - 417 stroker (soon) 68 Scout (Basketcase) 06 Ram HEMI SWB Reg Cab Daily Driver US Army Vet Last edited by jgarverick; 08-12-2009 at 12:07 AM. |
|
|
|
|
08-19-2009, 11:55 PM
|
#7 |
|
Hey Y'all!!
Join Date: Dec 2007
Location: Bay Minette, Alabama
Posts: 1,755
|
Re: Tommys66 Build
Lookin' good Tommy! Can't wait to get back on mine.
Glad the plates worked but I have to give the credit to olsofti for the dimensions for the plates. He sent me the pic and I just passed it along.
__________________
Just hopin' I live long enough to finish something!!! |
|
|
|
|
09-13-2009, 01:53 AM
|
#8 |
|
Registered User
Join Date: Oct 2008
Location: Southern, MO
Posts: 233
|
Re: Tommys66 Build
I have the firewall the way I want it, but I am stuck on what to use on the bottom side of the cab. I am in between using some type of truck bed coating, or some type of spray on insulation/ceramic coating. Its hard to decide, being there are so many products with a wide price range. Any suggestions would be appreciated
__________________
I love the smell of lead paint! |
|
|
|
|
09-28-2009, 09:45 PM
|
#9 |
|
Registered User
Join Date: Oct 2008
Location: Southern, MO
Posts: 233
|
Re: Tommys66 Build
Got some more work done one the firewall, stripped and primed underside of cab.
__________________
I love the smell of lead paint! |
|
|
|
|
09-29-2009, 12:34 AM
|
#10 |
|
Senior Enthusiast
Join Date: Feb 2007
Location: Spokane Valley, WA
Posts: 8,356
|
Re: Tommys66 Build
I love your workmanship. Meticulous detail and the overall finish work looks show quality. The chassis color is so nice compared to generic black.
|
|
|
|
|
09-30-2009, 06:01 PM
|
#11 | |
|
Registered User
Join Date: Oct 2008
Location: Southern, MO
Posts: 233
|
Re: Tommys66 Build
Quote:
__________________
I love the smell of lead paint! |
|
|
|
|
|
09-30-2009, 06:15 PM
|
#12 |
|
Registered User
Join Date: Oct 2008
Location: Southern, MO
Posts: 233
|
Re: Tommys66 Build
Got my doors fitted. The drivers door fitted pretty good, but the passenger door took some pulling and pushing on the cab. The repop passenger door was 1/8" narrower than the original. I had to redo the LH cab corner again to fit the door, and dropped the rocker down. I got the doors from Mikes Bump and Grind Garage in Texas.
__________________
I love the smell of lead paint! |
|
|
|
|
10-02-2009, 08:49 PM
|
#13 |
|
SSN 706
Join Date: Mar 2009
Location: Pocatello Idaho
Posts: 3,821
|
Re: Tommys66 Build
Looks like the door fits. Love the come -along action. Allan would be proud.

|
|
|
|
|
10-02-2009, 11:26 PM
|
#14 | ||||
|
1 thing at a time is progress.
Join Date: Jun 2007
Location: Ball Ground GA
Posts: 5,511
|
Re: Tommys66 Build
Quote:
Quote:
Quote:
 Quote:
__________________
Alan
Philippians 2:14-16 |
||||
|
|
|
|
10-03-2009, 11:06 PM
|
#15 | |
|
Registered User
Join Date: Oct 2008
Location: Southern, MO
Posts: 233
|
Re: Tommys66 Build
Quote:
__________________
I love the smell of lead paint! |
|
|
|
|
|
11-01-2009, 11:24 AM
|
#16 |
|
Registered User
 Join Date: Feb 2009
Location: Middleton, Idaho
Posts: 235
|
Re: Tommys66 Build
your frame looks good!! Do you have any pics of your trans x-member and spacer. I am curious on how you did that. I am also going to be running a 4l60e.
__________________
1963 Chevy suburban, ls1/4l60e, 3 rows, barn doors 2007 chevy 2500 hd 4x4 duramax |
|
|
|
|
11-01-2009, 10:05 PM
|
#17 |
|
Registered User
Join Date: Oct 2008
Location: Southern, MO
Posts: 233
|
Re: Tommys66 Build
Here is the only pic of the cross member i currently have. I will try to get a close up later. I believe the cross member is possibly out of a 67-72 but not sure. It was already in the truck when I started. I made the spacer from a piece of 1" flat steel, using the stock trans mount as a template.
__________________
I love the smell of lead paint! |
|
|
|
|
11-01-2009, 10:07 PM
|
#18 |
|
Registered User
Join Date: Oct 2008
Location: Southern, MO
Posts: 233
|
Re: Tommys66 Build
pic
__________________
I love the smell of lead paint! |
|
|
|
|
11-06-2009, 10:57 PM
|
#19 |
|
Registered User
Join Date: Oct 2008
Location: Southern, MO
Posts: 233
|
Re: Tommys66 Build
I was scuffing the new rockers I installed to prime and noticed there was surface rust underneath the reproduction sealer! Is this normal? I am gonna go ahead and strip to bare metal then prime to be safe, but wtf?
__________________
I love the smell of lead paint! |
|
|
|
|
11-12-2009, 10:48 PM
|
#20 | |
|
Registered User
Join Date: Oct 2008
Location: Southern, MO
Posts: 233
|
Re: Tommys66 Build
Quote:
__________________
I love the smell of lead paint! |
|
|
|
|
|
11-24-2009, 01:33 PM
|
#21 |
|
Daring to be Different
Join Date: Aug 2008
Location: Hesperia, Ca
Posts: 4,499
|
Re: Tommys66 Build
Subscribed. Now I have to read it all and catch up.
__________________
Dennis  Check out my 65/73 Cheap Build Thread. Check out my 65/73 Cheap Build Thread. http://www.67-72chevytrucks.com/vboa...d.php?t=327644 KUSTOM RIDES FACE BOOK PAGE: https://www.facebook.com/groups/291198124258863/ 1965 C-10 Short Bed 350/700r4 2012 Silverado 1500 Crew Cab 2016 Honda Accord w/ 18" rims 2007 Honda Goldwing Trike w/ NAVI 2001 Yamaha Roadstar Indian look alike "Life's journey is not to arrive at the grave safely in a well preserved body, but rather to skid in sideways, totally worn out, shouting "...WOW!...what an amazing ride!" Live Life Passionately!!! [/COLOR]  I AM WE TODD IT, I AM SOFA KING WE TODD IT |
|
|
|
|
11-24-2009, 04:40 PM
|
#22 |
|
Registered User
Join Date: Aug 2009
Location: Coaldale Alberta
Posts: 174
|
Re: Tommys66 Build
Tommy,
Lookin through your build and here i s see you have the saddles mounted or sitting on the trailing arms and not welded to the axle tube...It this just for the fitting process or are you leaving it like that...im changing diffs on my truck and was planning on welding saddles and track bar mount to the new rear end...let me me know what you did how you did it and pics if you could. You can PM me or post it on here.. Jory
|
|
|
|
|
11-24-2009, 04:41 PM
|
#23 |
|
Registered User
Join Date: Aug 2009
Location: Coaldale Alberta
Posts: 174
|
Re: Tommys66 Build
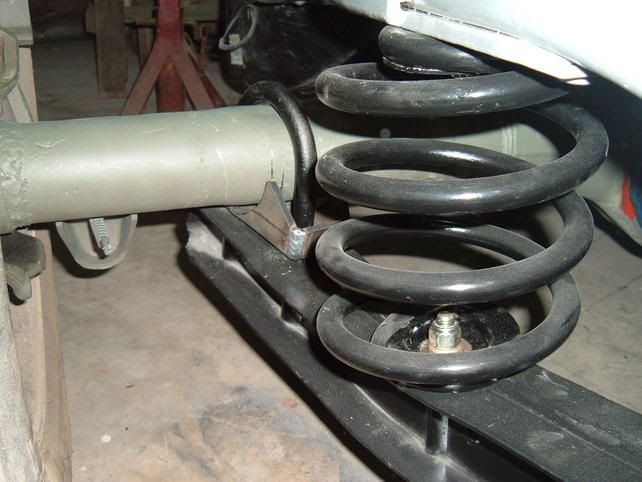 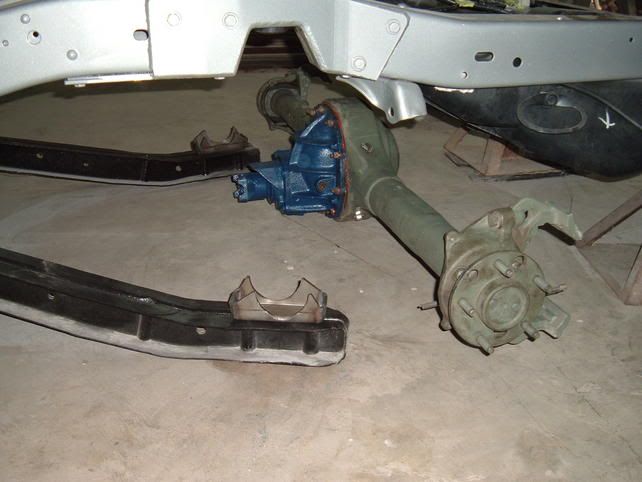 Here is what im asking about... Jory
|
|
|
|
|
11-24-2009, 10:43 PM
|
#24 |
|
Sunburst C10!!!
Join Date: Jan 2009
Location: Texas
Posts: 2,560
|
Re: Tommys66 Build
cool build
__________________
Gage 1967 C10 Shortbed Stepside |
|
|
|
|
11-25-2009, 09:59 PM
|
#25 | |
|
Registered User
Join Date: Oct 2008
Location: Southern, MO
Posts: 233
|
Re: Tommys66 Build
Quote:
__________________
I love the smell of lead paint! |
|
|
|
|
 |
| Bookmarks |
|
|


 "Click it"


 Hybrid Mode
