
|
Register or Log In To remove these advertisements. |
|
|
|
|||||||
 |
|
|
Thread Tools | Display Modes |
|
|
 12-20-2009, 01:21 AM
|
#1 |
|
Registered User
Join Date: Sep 2008
Location: Creston, BC Canada
Posts: 369
|
Re: It finally starts... another S10 swap...
Lol... just a quick prime to seal up the sheetmetal and prevent rust (it is winter in Canada after all)... the sanding and bodywork is in progress now...
Cheers, Ted.
__________________
'51 Chevy Build - In the design stages Aut viam inveniam aut faciam - I will either find a way or make one. If you don't have time to do it right the first time, when will you... My new build - https://67-72chevytrucks.com/vboard/...70#post8958970 |

|

|
|
12-20-2009, 11:21 AM
|
#2 |
|
Registered User
Join Date: Mar 2008
Location: Waukee, Iowa
Posts: 1,608
|
Re: It finally starts... another S10 swap...
Wow, I can't believe you do your blasting inside your shop! It's messy enough outside.
__________________
build threads: 86 Suburban 88 Jeep 6.0 swap 49 Chevy truck 54 Chevy wagon 86 Suburban lowered 4/6 54 Chevy wagon 49 Chevy/s10 mix 88 Jeep Wrangler rockcrawler |
|
|
|
|
12-21-2009, 01:20 AM
|
#3 |
|
Registered Chevy Owner
Join Date: Aug 2008
Location: Snohomish, wa
Posts: 1,557
|
Re: It finally starts... another S10 swap...
Good stuff. Way ta go!
__________________
Love is fleeting, but Chevy trucks are forever!!!!  1970 Chevy CST C10 long box 350/400  2008 Chevy Silverado short box 4x4 Had; 1951 Chevy short box 307/T5 1988 Chevy shot box 4x4 350/350 1971 Chevy C10 long box 4x4 350/350 1971 Chevy C20 long box 350/350 1971 Chevy C10 long box 350/350 |
|
|
|
|
01-02-2010, 01:03 AM
|
#4 |
|
Registered User
Join Date: Sep 2008
Location: Creston, BC Canada
Posts: 369
|
Re: It finally starts... another S10 swap...
Christmas vacation has been wonderful! With the extra work that I've had during the fall, a chance to make and spend some seriously needed money, I finally got all of the replacement sheetmetal to replace the rotten 6" of the cab with some nice new stuff!
So, here's most of what I ordered (minus the driver's rear cab corner and the two pieces from the second shipment, driver's rocker panel and passenger's rear cab corner) 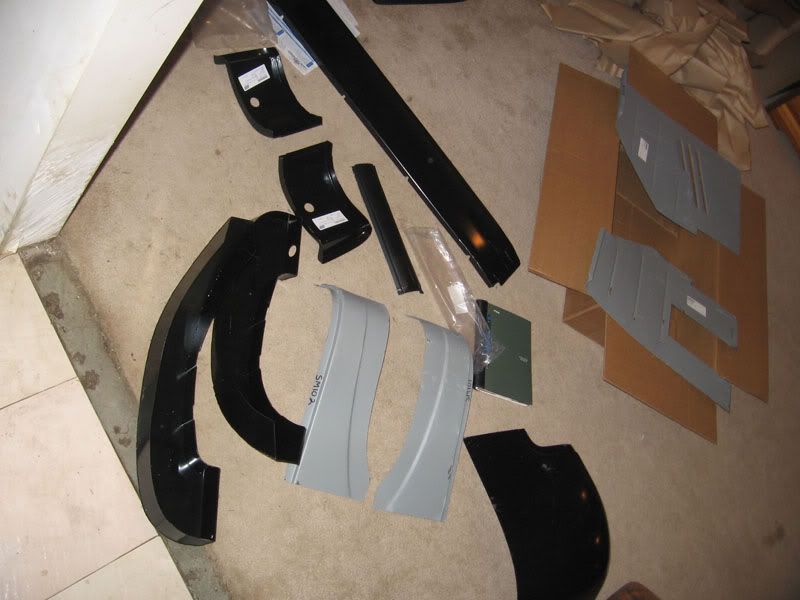 This also didn't preclude the requirement to fab and install new floor pans and a firewall... from scratch! 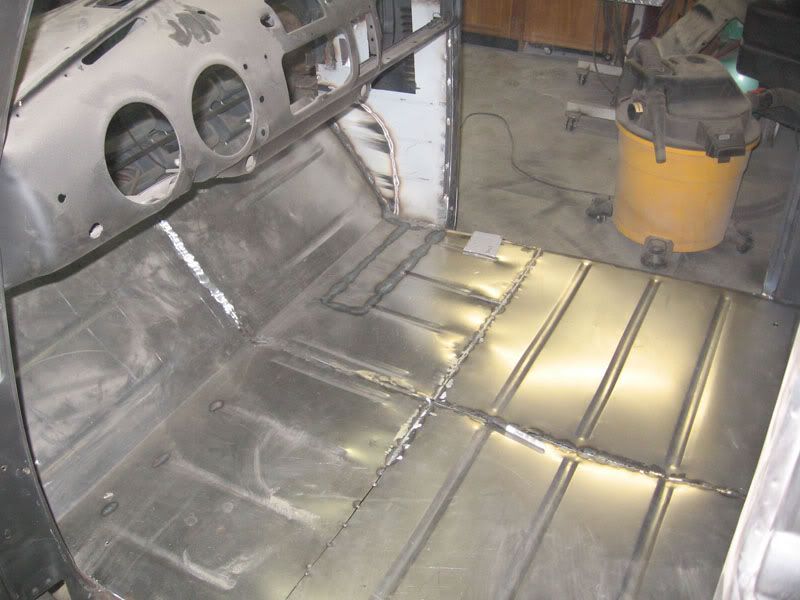 With everything welded in and solid, time to prep for the new priming before it rusts in the beautiful Victoria winter.... ugh! 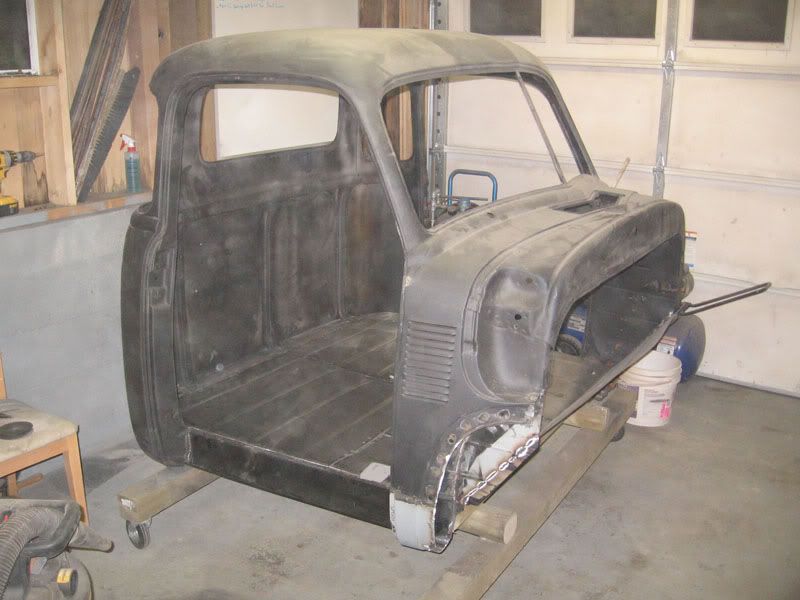 So, rolling it on it's back and priming the underside was the first priority! Had to get at the new cab mounts and such! 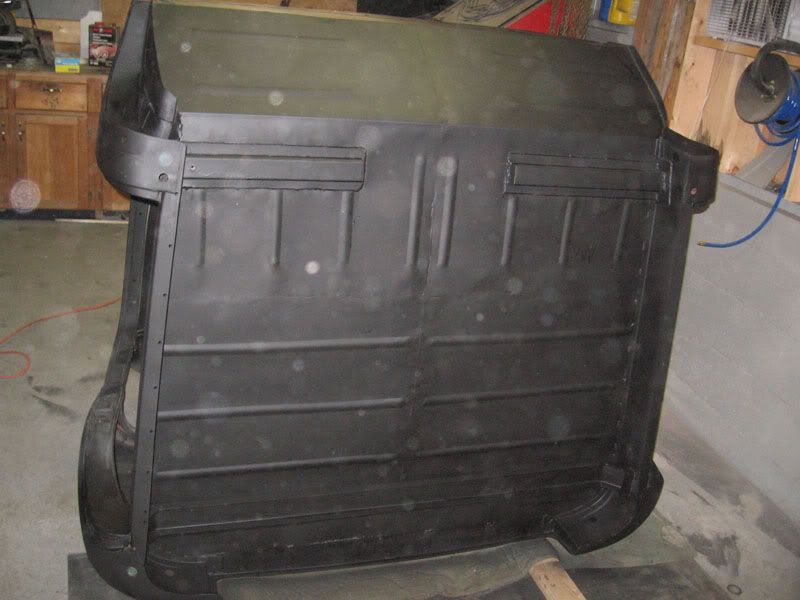 Then to set it back down right on it's dolly and paint the insides!   So, that was all done yesterday and with me being the type of person I am... I had to get it sat tonight so I can finally get the frame and stuff outta the driveway and into someplace dry and semi-warm!  I love the looks of this so far and in the next day or two, I have to cut the floor for the trans tunnel and clean out the nasty hole from the original stereo and plate it in, so I can wrap the dash in black leather. Then onto the seats and mocking in the steering column! Cheers, Ted.
__________________
'51 Chevy Build - In the design stages Aut viam inveniam aut faciam - I will either find a way or make one. If you don't have time to do it right the first time, when will you... My new build - https://67-72chevytrucks.com/vboard/...70#post8958970 |
|
|
|
|
01-02-2010, 02:21 AM
|
#5 |
|
Registered Chevy Owner
Join Date: Aug 2008
Location: Snohomish, wa
Posts: 1,557
|
Re: It finally starts... another S10 swap...
Damn! When you get time you certainly don't waste it. Nice work.
__________________
Love is fleeting, but Chevy trucks are forever!!!! 1970 Chevy CST C10 long box 350/400 2008 Chevy Silverado short box 4x4 Had; 1951 Chevy short box 307/T5 1988 Chevy shot box 4x4 350/350 1971 Chevy C10 long box 4x4 350/350 1971 Chevy C20 long box 350/350 1971 Chevy C10 long box 350/350 |
|
|
|
|
01-02-2010, 02:27 PM
|
#6 |
|
Registered User
Join Date: Jul 2009
Location: Bakersfield CA
Posts: 113
|
Re: It finally starts... another S10 swap...
Man that's looking good. Have any better photos of that custom firewall? Thanks for sharing.
__________________
_____________________________________________ Thanks, Garrett  My 1950 GMC Build Thread: http://67-72chevytrucks.com/vboard/s...d.php?t=351867 My 1950 GMC Photobucket Account: http://s565.photobucket.com/albums/ss95/1950GMC/ |
|
|
|
|
01-02-2010, 09:41 PM
|
#7 |
|
Registered User
Join Date: Sep 2008
Location: Creston, BC Canada
Posts: 369
|
Re: It finally starts... another S10 swap...
The 'custom' firewall was just a piece of 18 ga cold rolled steel that was patterned from the original that I drilled all of the spot welds out of (so about 100 over the span) and laid out exactly where the brake booster is going and without the steering hole, for now. I mig'd every hole back up effectively spot welding the new one back in. I found the best way to close up any gap between the sheet metal was to us an 18" "Quickgrip" and invert it so that closing the grip on the dash forced the tail end of it to push the new firewall forward, then I could dolly the cowl sheet metal back to where I wanted it and mig it up. Do this every 6" or so, then go back and do one in-between the last welds, then so on and so on... no heat issues and all up!
Since I'm using the 4.3 in mine I didn't need to dish it for the rear of the motor or the distributor and it left it nice and clean, both inside and out. Cheers, Ted.
__________________
'51 Chevy Build - In the design stages Aut viam inveniam aut faciam - I will either find a way or make one. If you don't have time to do it right the first time, when will you... My new build - https://67-72chevytrucks.com/vboard/...70#post8958970 |
|
|
|
|
02-10-2010, 09:08 PM
|
#8 |
|
Registered User
Join Date: Oct 2008
Location: Ocean Springs, MS
Posts: 117
|
Re: It finally starts... another S10 swap...
Impressive work! Keep it up.
|
|
|
|
|
03-29-2010, 09:20 AM
|
#9 |
|
Registered User
Join Date: Jul 2009
Location: Bakersfield CA
Posts: 113
|
Re: It finally starts... another S10 swap...
How high is your cab off the frame?
__________________
_____________________________________________ Thanks, Garrett My 1950 GMC Build Thread: http://67-72chevytrucks.com/vboard/s...d.php?t=351867 My 1950 GMC Photobucket Account: http://s565.photobucket.com/albums/ss95/1950GMC/ |
|
|
|
|
03-29-2010, 10:54 AM
|
#10 |
|
Registered User
Join Date: Sep 2008
Location: Creston, BC Canada
Posts: 369
|
Re: It finally starts... another S10 swap...
3 3/4" in the rear, 3 1/2" in the front.
Cheers, Ted.
__________________
'51 Chevy Build - In the design stages Aut viam inveniam aut faciam - I will either find a way or make one. If you don't have time to do it right the first time, when will you... My new build - https://67-72chevytrucks.com/vboard/...70#post8958970 |
|
|
|
|
03-29-2010, 11:03 AM
|
#11 |
|
Registered User
Join Date: Mar 2008
Location: Waukee, Iowa
Posts: 1,608
|
Re: It finally starts... another S10 swap...
Looks good! Looks like you got your hood gaps set pretty well (or as much as I can tell from the pictures). Also looks like you set your box higher for a deeper bed, will you make custom splash guards to fill or filler panels like the EZ swap uses?
How about a closer pic of how you did your front bumper mounts.
__________________
build threads: 86 Suburban 88 Jeep 6.0 swap 49 Chevy truck 54 Chevy wagon 86 Suburban lowered 4/6 54 Chevy wagon 49 Chevy/s10 mix 88 Jeep Wrangler rockcrawler |
|
|
|
|
03-29-2010, 11:18 AM
|
#12 |
|
Registered User
Join Date: Feb 2010
Location: Gainesville, fl
Posts: 187
|
Re: It finally starts... another S10 swap...
looking goood, what did that steering column come out of? i like it, have any photos or info on how you connected it to your steering box?
__________________
http://67-72chevytrucks.com/vboard/s...d.php?t=385860 |
|
|
|
|
03-29-2010, 11:33 AM
|
#13 |
|
Registered User
Join Date: Sep 2008
Location: Creston, BC Canada
Posts: 369
|
Re: It finally starts... another S10 swap...
Box is set about 2" higher than stock... I find it makes it look a little more proportional... always found the AD truck look like they have a really high cab. With that, I pushed the rear fenders down that 2" and yes, I will be making new splash guards (custom) to fill the gaps... I have the originals to start from and we'll see what I can roll up at work (I teach sheet metal for the military and have a ton of tools to play with).
I'll post some bumper mount pics when I get home today... no worries. The column is out of a mid 70's van with no key in the column... used the van ignition in the dash as well, just had to make a custom bezel to screw it in (still working on it and the wiring). Nice thing about the column is that it plugs directly into the S10 harness for signals and then just have to work out the plug for the high/low beam switch which will be going on the floor. Steering column from the van has a spline joint connector so can be tricky to find an intermediate shaft and the S10 steering box does as well. I figured that since both Chev and Dodge used saginaw columns and boxes, I might find it out of a mopar product. Well, I did... I ended up pulling it from a Jeep Patriot (I think it was), had to file one spline groove (the original Jeep one had a missing groove) and it slid right in. Nice part was that it used Ujoints, not a rag joint. There is a pin you can knock out on the upper Ujoint to remove the joint from the shaft, cut it shorter if you need, redrill and pin it with a grade 8 bolt if you find you need to. Cutting and welding steering parts always makes me ansy so I wanted something stock that I could just mock in... this was the best setup I could find. Cheers, Ted.
__________________
'51 Chevy Build - In the design stages Aut viam inveniam aut faciam - I will either find a way or make one. If you don't have time to do it right the first time, when will you... My new build - https://67-72chevytrucks.com/vboard/...70#post8958970 |
|
|
|
|
08-21-2010, 02:02 PM
|
#14 | |
|
Registered User
Join Date: Mar 2009
Location: Derby Kansas
Posts: 564
|
Re: It finally starts... another S10 swap...
Quote:
I used the cab mount diagrams I've seen on the forum and used 4X4 square tubing and the stock S10 cab mount bushings which made my over all height from frame to cab bottom close to 5 inches.
__________________
av8tr33337 AKA Bartman Email av8tr33337@yahoo.comBartman's Ad-S10 Chassis Swap http://67-72chevytrucks.com/vboard/s...d.php?t=415418 My First Youtube Video http://www.youtube.com/watch?v=B6hSt...eature=channel More Pics of the 51 Project http://s668.photobucket.com/albums/v...hassis%20Swap/ 1951 3100 Pickup |
|
|
|
|
|
08-21-2010, 02:24 PM
|
#15 |
|
Registered User
Join Date: Sep 2008
Location: Creston, BC Canada
Posts: 369
|
Re: It finally starts... another S10 swap...
When I set mine up, I put the 4x4 blocks (3 1/2" actual measurements) between the cab supports and the frame, with a 1/4" shim under the rear set. From there I ran a 1/2" bolt down from above, through the S10 mounts (used an Energy Suspension set) then through the cab mounting brackets (the ones you fab'd up and through a huge fender washer on the bottom (made stainless ones for mine).
All of that bolted together, lightly held to the frame, then torqued down the cab mounts to the S10 spec (think it was 55 ft/lbs). Once there, made sure it was all still close to the frame and tack welded the mounts in. The nice part about the Energy suspension bushings is that the through holes are oblong and so it allows you to shift your cab side to side and forward a little, even after the fact. The next time you take the cab off, weld the supports that go from above the frame to the mounts on and finish off the welds that you tack welded on, dress and paint... done. I find that most tend to weld those backside braces on at the beginning and thus have no real height adjustment when setting them up. I'm sure there are many ways of doing this, this was just mine. I believe the S10 Energy suspension bushings were about 1" tall, so this would have made the cab mounts only about 2 1/2" above the frame. But this low, you'll have to cut the floor for the trans... depends on where you wanna go... Hope this helps and isn't confusing... Cheers, Ted.
__________________
'51 Chevy Build - In the design stages Aut viam inveniam aut faciam - I will either find a way or make one. If you don't have time to do it right the first time, when will you... My new build - https://67-72chevytrucks.com/vboard/...70#post8958970 |
|
|
|
|
08-21-2010, 03:09 PM
|
#16 |
|
Registered User
Join Date: Mar 2009
Location: Derby Kansas
Posts: 564
|
Re: It finally starts... another S10 swap...
Thanks Thad. I guess I'll stick with what I have. This way I can still use the stock gas tank and won't have to hump the floor quite as much. I found some beltech 3" drop spindles for 100 bucks on craigslist. From all I've read several guys are going this route.
__________________
av8tr33337 AKA Bartman Email av8tr33337@yahoo.comBartman's Ad-S10 Chassis Swap http://67-72chevytrucks.com/vboard/s...d.php?t=415418 My First Youtube Video http://www.youtube.com/watch?v=B6hSt...eature=channel More Pics of the 51 Project http://s668.photobucket.com/albums/v...hassis%20Swap/ 1951 3100 Pickup |
|
|
|
|
07-19-2010, 10:41 AM
|
#17 |
|
Registered User
Join Date: May 2010
Location: Victoria
Posts: 6
|
Re: It finally starts... another S10 swap...
Hello guys! First post here!
I'm a RL friend of Teds, and have been with him since the start of his build. Since April '09, Ted has been working his butt off working on his 1947 Stepside truck. I've had the honour of being by his side for some of it. Assisting him with various stages of the build. either by manual labour, the odd costum part, or just there to throw idea's off of. Getting the trucks for him last year has became our first annual guys Road Trip! This year we ended up going to the Portland 46th annual swap meet. We had a blast, met up with some good on-line friends, and got some more truck parts for him! These parts completed the major body parts for the truck, but needs many more parts to go! I've been bugging him to update his pics on-line here, as he's sloughed off on them since what?! uhm, MARCH! LOL During our Oregon road trip, I got the idea to build him a model replica of his build. So my search began. I found myself a mid '90s Chevy S10, and a 1950 Stepside truck(same model year) and I started my build, replicating his build! |
|
|
|
|
07-19-2010, 10:50 AM
|
#18 |
|
Registered User
Join Date: May 2010
Location: Victoria
Posts: 6
|
Re: It finally starts... another S10 swap...
He used an extended frame S10, well, models didn't offer that option, so I had to extend the frame...
He (at the time) desided he wanted the 4.3l Vortect engine. The S10 model I got had the 4.3l in it! He also wanted the blanked firewall... ok, done ;o) |
|
|
|
|
07-19-2010, 10:55 AM
|
#19 |
|
Registered User
Join Date: May 2010
Location: Victoria
Posts: 6
|
Re: It finally starts... another S10 swap...
Mounted the battery tray on the passenger side wheelwell... ok.
You can't see in the picks, but its the same steering colomn he's used. He's painting the truck black, so, a nice black shiny paint. Bucket seats insted of the origional bench... Red aluminated guage cluster.... - A test fit of the body on the frame, adjusting it for the hight ride he's looking for. Oh, those are his tires too! |
|
|
|
|
07-19-2010, 10:58 AM
|
#20 |
|
Registered User
Join Date: May 2010
Location: Victoria
Posts: 6
|
Re: It finally starts... another S10 swap...
Getting the side steps ready for the install.
He's used chains to keep the tailgate secured. Then I mounted the truck to a nice display case with lights to really show the truck! |
|
|
|
|
07-19-2010, 11:00 AM
|
#21 |
|
Registered User
Join Date: May 2010
Location: Victoria
Posts: 6
|
Re: It finally starts... another S10 swap...
HAPPY BIRTHDAY BUDDY!!
|
|
|
|
|
07-19-2010, 12:03 PM
|
#22 |
|
Registered User
Join Date: Aug 2009
Location: OKC, OK
Posts: 1,169
|
Re: It finally starts... another S10 swap...
Pretty cool. I have wanted to find a 52 sedan model to build for my dad.
__________________
My AD Truck Build Thread 52 GMC one day laying on the running boards 2004 Chevy Crewcab. 3/5 and notched |
|
|
|
|
08-03-2010, 07:45 PM
|
#23 |
|
Registered User
 Join Date: Jul 2010
Location: Anderson, SC
Posts: 84
|
Re: It finally starts... another S10 swap...
Looking great, gives me lots of ideas for my upcoming S10 swap.
Thanks! Ben |
|
|
|
|
08-03-2010, 08:15 PM
|
#24 |
|
Registered User
Join Date: Mar 2009
Location: Derby Kansas
Posts: 564
|
Re: It finally starts... another S10 swap...
Enjoying following this build. Any chance on getting a peek at the sandblaster, how you modified the propane tank etc. Just a link to photobucket or something would be cool.
__________________
av8tr33337 AKA Bartman Email av8tr33337@yahoo.comBartman's Ad-S10 Chassis Swap http://67-72chevytrucks.com/vboard/s...d.php?t=415418 My First Youtube Video http://www.youtube.com/watch?v=B6hSt...eature=channel More Pics of the 51 Project http://s668.photobucket.com/albums/v...hassis%20Swap/ 1951 3100 Pickup |
|
|
|
|
08-04-2010, 12:16 AM
|
#25 |
|
Registered User
Join Date: Sep 2008
Location: Creston, BC Canada
Posts: 369
|
Re: It finally starts... another S10 swap...
Funny thing is... I didn't take many pictures during the blaster build... wasn't quite my focus.
 However, basically what I did was to purchase a 30 lb propane tank from my local metal recycling yard ($10), vent and purge it with a compressor and allow it to sit for a couple of days, purging it every so often (about 5 times I believe in total). I stripped off all of the paint (no rust on the outside to start with) so it was easier to cut. Flipped the tank upside down and cut open a 2" diameter hole in the bottom to make a sand filling tube, and welded a 2" pipe nipple over the holed, and fitted a cap. The original valve fitting (now on the bottom) was fitted with 1/2" pipe nipple, a ball valve and another 1/2" nipple fitted to a "T" The tank was then welded to a moving dolly cart with the bottom section cut off (the dolly that is) and a 3rd leg welded to the front. A 1/2" air tube was welded to the side of the 2" nipple on the top (don't forget to drill the nipple to let the air through) and another ball valve fitted to it. The plumbing for this is relatively easy, and all 1/2" fitting were used. You start with an air inlet line, to a dryer, reduce and safety valve (very important). The line then t's off, one line to the ball valve at the top of the tank (this is your head pressure line) and the other to another ball valve and down to the T at the bottom of your tank. This controls your air pressure to the blast hose. From the other end of the T on the underside of the tank, I attached a 15' length of flexible brakeline hose (rope core and highly resistant to abrasion) then finally to a deadman nozzle. (recommended to the heavy ceramic tip). After this, it's only a balance between your head pressure to the top of the tank, the amount of sand you allow out the bottom through the ball valve there and the amount of air pressure you send to the underside to pick up that sand. Due to the size of the fittings, you will need atleast 25 cfm from a compressor to maintain full pressure while blasting and it's absolutely critical that you have CLEAN DRY air! I rented a 90 cfm tow behind diesel compressor for the weekend (2 day rate) and did my entire truck's sheetmetal in 3 - 8 hr days with absolutely NO warpage. For grit, I used crushed glass, medium. They say you can only recycle it a couple of times... I did mine quite a bit more than that and by the time I was done, it was basically the consistency of talcum powder, but tore off rust and paint like it was nothing... more like pressure washing dirt off a painted surface than 60 yr old rust and crud. Keep in mind that I have been welding for the better part of 20 years and know my weld's capabilities. If you are hesitant at all about yours, I'd highly recommend finding or paying someone to do it for you! 125 psi in a 30 lb propane tank isn't something I'd want to let go! All of the blaster tanks of this size, around here, ran in the neighborhood of about $500, so this was a deal, but I've seen in the US that they can be had for about $125. If you can find one at this price... I'd recommend that route. Let the manufacturer worry about that liability! Any questions, feel free to holler! Cheers, Ted.
__________________
'51 Chevy Build - In the design stages Aut viam inveniam aut faciam - I will either find a way or make one. If you don't have time to do it right the first time, when will you... My new build - https://67-72chevytrucks.com/vboard/...70#post8958970 |
|
|
|
|
| Bookmarks |
|
|


 Hybrid Mode
