
 |
|
|
#26 | ||
|
GEARHEAD
Join Date: Aug 2003
Location: MN
Posts: 6,126
|
Re: Over 25 Years Later, Finally My 71 C-10 Truck Build
Quote:
Quote:
__________________
If no one knows what you're doing, they can't tell you you're doing it wrong HG's Dream Car Build - Shelby Cobra Kit Build your own adjustable track bar 71  Long Fleet C/10 Long Fleet C/10 72  Jimmy 4x4 (Junkyard Jimmy) Jimmy 4x4 (Junkyard Jimmy)HG's Plow Truck '78  K35 Dually K35 DuallyBigass Farm Truck HG's thread of miscellaneous stuff |
||
|
|

|
|
|
#27 |
|
GEARHEAD
Join Date: Aug 2003
Location: MN
Posts: 6,126
|
Re: Over 25 Years Later, Finally My 71 C-10 Truck Build
Just ordered some of what I'll need once work starts getting done. New door seals, window seals/felts, windshield and rear window gaskets, door sill plates & a cab corner. Just need to wait for the brown truck.
I need to get out to the junkyard to get a dash wiring harness also. Mine works, but I've converted from manual to auto, idiot lights to gages, plus my own wiring disasters, so I need the correct harness. I'm pretty sure I know where to get it locally. It's going to be great to get rolling on this. It will look fantastic and even my daughter will be willing to be seen in it, but I'm really hesitant to start tearing it apart. You know what I mean? It drives. It looks ok, I lived with it this long like it is. What if I tear it apart and end up like so many here and it sits for years? God, I can't stand the idea of that happening. Just shoot me now if it goes that way. But now that the parts are ordered or piling up. Exciting and scary at the same time.
__________________
If no one knows what you're doing, they can't tell you you're doing it wrong HG's Dream Car Build - Shelby Cobra Kit Build your own adjustable track bar 71  Long Fleet C/10 Long Fleet C/10 72  Jimmy 4x4 (Junkyard Jimmy) Jimmy 4x4 (Junkyard Jimmy)HG's Plow Truck '78  K35 Dually K35 DuallyBigass Farm Truck HG's thread of miscellaneous stuff Last edited by hgs_notes; 05-27-2010 at 07:39 PM. |
|
|

|
|
|
#28 |
|
6>8 Plugless........
 Join Date: Sep 2007
Location: Prairie City, Ia
Posts: 17,139
|
Re: Over 25 Years Later, Finally My 71 C-10 Truck Build
Good luck with your truck. I know what you mean about not wanting to tear a complete truck apart. It is so much work getting them back together if you don't have a big area or a lot of time or all of the above.
|
|
|

|
|
|
#29 | |
|
GEARHEAD
Join Date: Aug 2003
Location: MN
Posts: 6,126
|
Re: Over 25 Years Later, Finally My 71 C-10 Truck Build
Quote:
I got part of my ordered parts today. Still waiting for the cab corner. Went to the local junkyard the other day, and no luck with the harness. I got another couple yards I can check yet. Might have found a good drivers side door though.
__________________
If no one knows what you're doing, they can't tell you you're doing it wrong HG's Dream Car Build - Shelby Cobra Kit Build your own adjustable track bar 71  Long Fleet C/10 Long Fleet C/10 72  Jimmy 4x4 (Junkyard Jimmy) Jimmy 4x4 (Junkyard Jimmy)HG's Plow Truck '78  K35 Dually K35 DuallyBigass Farm Truck HG's thread of miscellaneous stuff |
|
|
|

|
|
|
#30 |
|
GEARHEAD
Join Date: Aug 2003
Location: MN
Posts: 6,126
|
Re: Over 25 Years Later, Finally My 71 C-10 Truck Build
I decided to get the cab unloaded into my garage, and see what I could do. I was a little surprised how light it was. We used an engine hoist or a tractor dump bucket loading it, but I unloaded by myself manually. It slid out of the bed, set one side down, then tipped it up and had the truck roll forward a bit and set the other side down. No problem.
I have the cab corner and all the new rubber on hand, working on getting a tunnel hump patch so I can have a low hump in it. I think I found an underdash harness for an automatic and gages truck. I will need new heater vent hoses yet. And I'll probably order a new gage bezel that's nice and shiny. It was a manual tranny cab, I have an auto, so I got the clutch pedal out. I found one more spot of putty and got that cleaned out. Started wire wheeling the gutter grout stuff out, it's all dried out and cracked. There were a couple body mount rubbers on it that I needed a sledge to pound the bolts through, no damage underneath. I cleaned those up with the wire wheel and primered. I got the kick panel vents cleaned out, yucky stuff, but the metal is good. Then there was the sand from the blasting. It was everywhere. I concentrated on the kick panel area and the cab floor supports, rockers, etc. The cab is laying on it's back side for now, so I'll blow out the area below the rear window when it's upright again. After really looking this thing over close, I'm fairly certain it is all original. There are no weld repair joints, looks like original spot welds on everything. Other than the rusty floor board and one cab corner it's in very nice shape. I looked down through the inside of the rockers and there is just a start of surface rust on one side. Definitely a good foundation to start with. I think I can get a small wire brush down there on a rod and clean it up some, then spray some rust preventer or wax in it. Of course there are pics:   
__________________
If no one knows what you're doing, they can't tell you you're doing it wrong HG's Dream Car Build - Shelby Cobra Kit Build your own adjustable track bar 71  Long Fleet C/10 Long Fleet C/10 72  Jimmy 4x4 (Junkyard Jimmy) Jimmy 4x4 (Junkyard Jimmy)HG's Plow Truck '78  K35 Dually K35 DuallyBigass Farm Truck HG's thread of miscellaneous stuff Last edited by hgs_notes; 05-27-2010 at 07:40 PM. |
|
|

|
|
|
#31 |
|
Account Suspended
 Join Date: Jul 2007
Location: Wichita KS
Posts: 1,599
|
Re: Over 25 Years Later, Finally My 71 C-10 Truck Build
Man starting to look good just take your time and she will be good for another 25 years. Just wanted to say thanks for both your builds with the time details and pics that go along with them. I have been addicted to your junkyard build not I have to add another to my list. Keep up the great work.
|
|
|

|
|
|
#32 | |
|
GEARHEAD
Join Date: Aug 2003
Location: MN
Posts: 6,126
|
Re: Over 25 Years Later, Finally My 71 C-10 Truck Build
Quote:
I started cutting out the passenger side floor pan tonight.
__________________
If no one knows what you're doing, they can't tell you you're doing it wrong HG's Dream Car Build - Shelby Cobra Kit Build your own adjustable track bar 71  Long Fleet C/10 Long Fleet C/10 72  Jimmy 4x4 (Junkyard Jimmy) Jimmy 4x4 (Junkyard Jimmy)HG's Plow Truck '78  K35 Dually K35 DuallyBigass Farm Truck HG's thread of miscellaneous stuff Last edited by hgs_notes; 05-27-2010 at 07:40 PM. |
|
|
|

|
|
|
#33 |
|
GEARHEAD
Join Date: Aug 2003
Location: MN
Posts: 6,126
|
Re: Over 25 Years Later, Finally My 71 C-10 Truck Build
Heres the status of the apparatus:
Floor pans out. Just need to clean up the supports a bit and get some rust preventer in those hard to reach places. I'm going to open up the inner rockers for better drainage, cleaning and rust preventer also. Next step is to tip it up so I can cut out the rusted cab corner. Might do that later today. 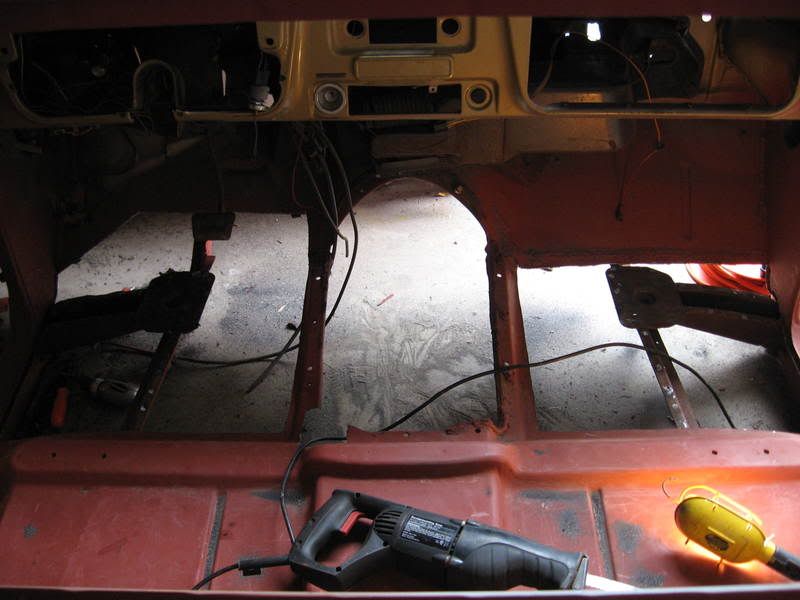 Acouple more of what I'm starting out with. 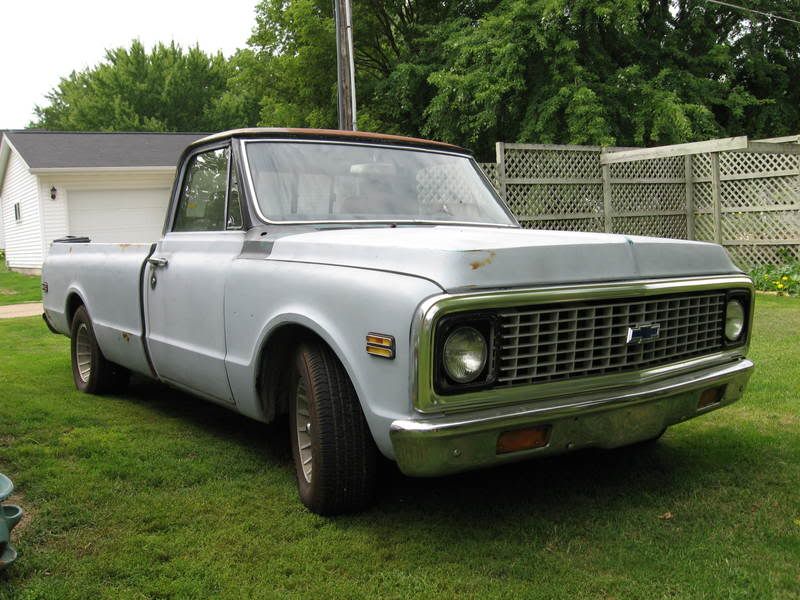 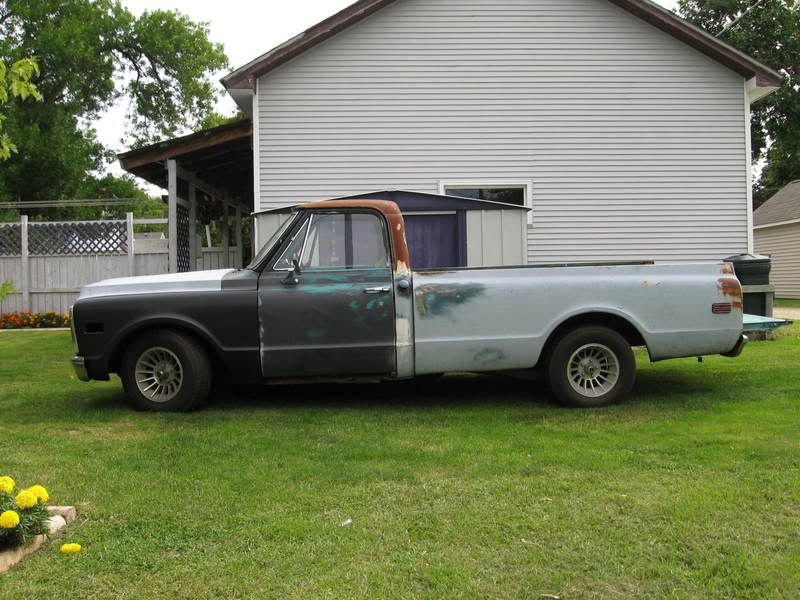 The worst part of the bed is the steel floor. Needs some sand blasting and some patches. It'll get coated with some kind of liner later. 
__________________
If no one knows what you're doing, they can't tell you you're doing it wrong HG's Dream Car Build - Shelby Cobra Kit Build your own adjustable track bar 71  Long Fleet C/10 Long Fleet C/10 72  Jimmy 4x4 (Junkyard Jimmy) Jimmy 4x4 (Junkyard Jimmy)HG's Plow Truck '78  K35 Dually K35 DuallyBigass Farm Truck HG's thread of miscellaneous stuff |
|
|

|
|
|
#34 |
|
GEARHEAD
Join Date: Aug 2003
Location: MN
Posts: 6,126
|
Re: Over 25 Years Later, Finally My 71 C-10 Truck Build
I also have a section of the cab floor coming from jc in New Jersey. I'm going to trim it down to the same dimensions as the high hump cover so it will bolt in, but have the low floor configuration I want.
Edit: received the part today and got it cut to fit.  What do ya think? I'll cut the firewall piece from my cab later. Got the rust cab corner cut, was able to see the inside part that will need a patch also. Overall I thinks it's pretty dam good. I have to do a little more grinding and cleaning before I seal up the hidden spaces, then it'll be time to do some welding. Hopefully we can get that going in a couple weeks. 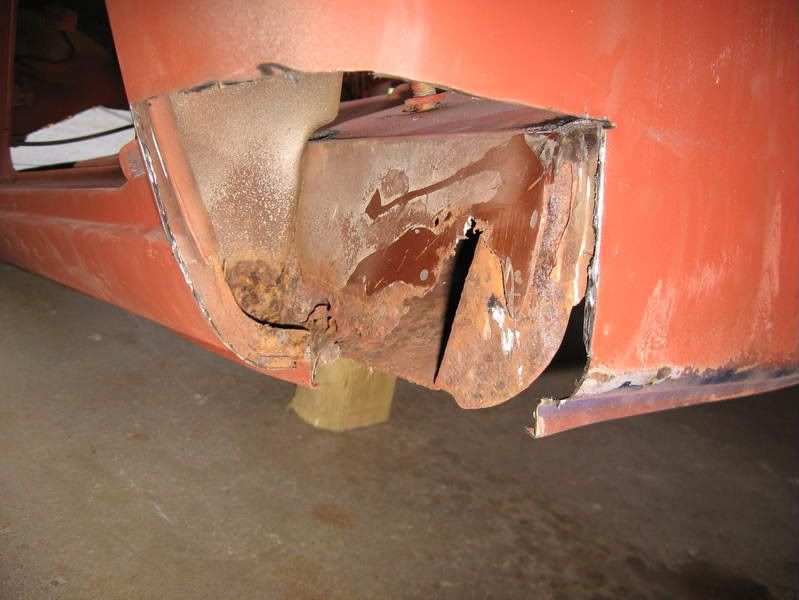
__________________
If no one knows what you're doing, they can't tell you you're doing it wrong HG's Dream Car Build - Shelby Cobra Kit Build your own adjustable track bar 71  Long Fleet C/10 Long Fleet C/10 72  Jimmy 4x4 (Junkyard Jimmy) Jimmy 4x4 (Junkyard Jimmy)HG's Plow Truck '78  K35 Dually K35 DuallyBigass Farm Truck HG's thread of miscellaneous stuff Last edited by hgs_notes; 09-12-2008 at 07:12 PM. |
|
|

|
|
|
#35 |
|
GEARHEAD
Join Date: Aug 2003
Location: MN
Posts: 6,126
|
Re: Over 25 Years Later, Finally My 71 C-10 Truck Build
I've determined that there are very few people who will actually do restoration work. I had to bring the wifes truck in for re-glueing the driver door trim on. I talked him about this cab and he said I should just glue the floor pans in. I had thought about that before, but the kits can be pretty spendy. He said I could borrow their gun, I just had to buy the glue. He said they hardly weld anything anymore, they glue on whole bedsides and have never had a problem. After doing some research, I'm comfortable with it. A lot of manufacturers are going this way also. For those purist restorers and all weld body guys, lets just wait and see how this goes.
So I am going this route on the floor pans. I started with the driver side today. I got the patch panel cut to fit in place the way I want it. I'm using self drilling screws to hold it in place. I will run a bead of glue along the support rails and around the outer edge, then set it in place for curing with the screws around the edge, and some good sized rivits on the supports. I predrilled the holes in the pan for the rivits. Once I glue it and get it set where I want it, I just need to drill the holes through the support rails for the rivits and lock it down. I'll probably remove the screws after it sets, but maybe not. I can say this though. I'm a happier person today knowing it's one more thing I'll be doing myself, and that I made some good progress today. Driver side is completely fitted, passenger side is about half way there. I also got the low hump patch bolted in, except the rear bolts. Those are kind of hard to get to right now. Once the floor patches are all fit up, I just need to pull them out and clean the parts to clean bare metal where the glue will be then put them back in. Wish me luck, should be done with these in a week or 2.
__________________
If no one knows what you're doing, they can't tell you you're doing it wrong HG's Dream Car Build - Shelby Cobra Kit Build your own adjustable track bar 71  Long Fleet C/10 Long Fleet C/10 72  Jimmy 4x4 (Junkyard Jimmy) Jimmy 4x4 (Junkyard Jimmy)HG's Plow Truck '78  K35 Dually K35 DuallyBigass Farm Truck HG's thread of miscellaneous stuff Last edited by hgs_notes; 05-27-2010 at 07:42 PM. |
|
|

|
|
|
#36 |
|
GEARHEAD
Join Date: Aug 2003
Location: MN
Posts: 6,126
|
Re: Over 25 Years Later, Finally My 71 C-10 Truck Build
Here is where it's at today.
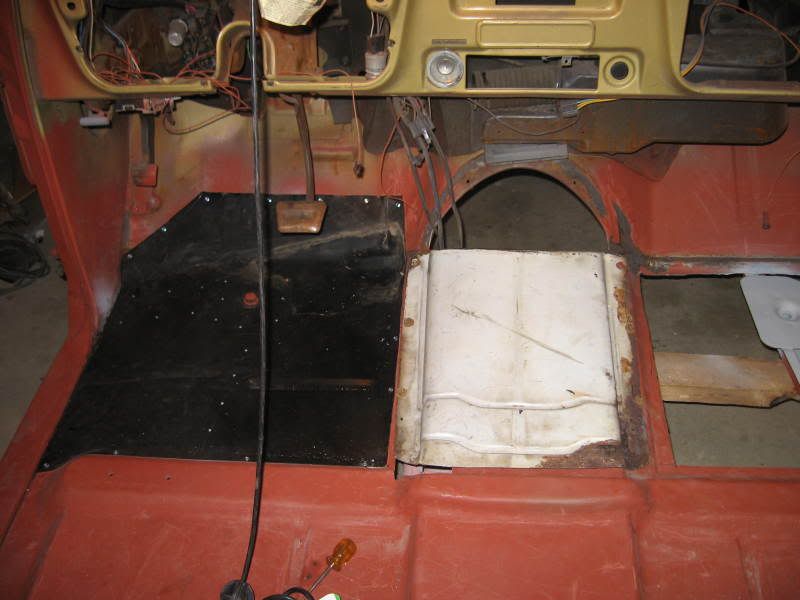 I picked up some cutting wheels today to finish fitting the pass side pan. Here are a couple links for those interested in the non-weld method of installing patch panels. 3M video: http://shows.implex.tv/3MTV/Root/AAD...oginComplete=1 SEM Products: http://semproducts.com/images/Users/...FLYER-2006.pdf I'm not sure which product I'll use yet. The 3M is about $50 a set. the SEM is just over $30. I think the same gun will work for either one and both products are available at the local auto part store. The biggest regret I have is that I could have/should have done this months ago. The adhesive needs temps above 70 F to cure and well, I'm in MN and its about 28 outside right now and my garage is not heated. I have a portable heater and I'll probably use that with some kind of tent over the cab to contain the heat. Redneck curing oven.
__________________
If no one knows what you're doing, they can't tell you you're doing it wrong HG's Dream Car Build - Shelby Cobra Kit Build your own adjustable track bar 71  Long Fleet C/10 Long Fleet C/10 72  Jimmy 4x4 (Junkyard Jimmy) Jimmy 4x4 (Junkyard Jimmy)HG's Plow Truck '78  K35 Dually K35 DuallyBigass Farm Truck HG's thread of miscellaneous stuff Last edited by hgs_notes; 11-17-2008 at 06:06 PM. |
|
|

|
|
|
#37 |
|
Registered User
Join Date: Jan 2008
Location: greenfield indiana
Posts: 241
|
Re: Over 25 Years Later, Finally My 71 C-10 Truck Build
Lookin' good keep it up. i am in indiana and i also have a garage with no heat so it is hard for me to primer my 1991 chevy truck.
|
|
|

|
|
|
#38 |
|
Registered User
Join Date: Jul 2006
Location: Central PA
Posts: 12,201
|
Re: Over 25 Years Later, Finally My 71 C-10 Truck Build
good luck with the floor, pretty nice starting point compared to mine.
__________________
The Garage: 1968 K-10 SWB - "Project Money Pit" 1996 Z-71 - "huntin rig" 1969 C-10 LWB (SOLD) "Project flip that truck or else" 1993 Passport, F@rd 1-ton (SOLD)"Project Cousin Eddie" My Garage Build "The 1,000 footer" |
|
|

|
|
|
#39 | ||
|
GEARHEAD
Join Date: Aug 2003
Location: MN
Posts: 6,126
|
Re: Over 25 Years Later, Finally My 71 C-10 Truck Build
Quote:
Quote:
I got the pass side floor pan fit in. I figured it would be easier because I just did the other side and had the experience. It wasn't. The pan just did not fit in as well. Took a lot of beating and a few extra screws to get it pulled in tight. So next I need to get me some glue and the applicator, clean some steel to bare metal, set up a heater and see what happens.
__________________
If no one knows what you're doing, they can't tell you you're doing it wrong HG's Dream Car Build - Shelby Cobra Kit Build your own adjustable track bar 71  Long Fleet C/10 Long Fleet C/10 72  Jimmy 4x4 (Junkyard Jimmy) Jimmy 4x4 (Junkyard Jimmy)HG's Plow Truck '78  K35 Dually K35 DuallyBigass Farm Truck HG's thread of miscellaneous stuff |
||
|
|

|
|
|
#40 |
|
Registered User
Join Date: Mar 2008
Location: elk river,mn
Posts: 509
|
Re: Over 25 Years Later, Finally My 71 C-10 Truck Build
i have a cab f/s that would shave off ALOT of time fixing that cab,it needs inner/outer rockers and its a ac cab 300 bucks
|
|
|

|
|
|
#41 |
|
Account Suspended
 Join Date: Jul 2007
Location: Wichita KS
Posts: 1,599
|
Re: Over 25 Years Later, Finally My 71 C-10 Truck Build
Looking good glad to see it moving forward again. I had several body shops say they were going to glue in the floor patches on my truck when I got bids kind of made me a little leary. The glue is susposed to work great but welding just seemed right. I will be watching your progres with this to see if I over reacted.
|
|
|

|
|
|
#42 | |
|
GEARHEAD
Join Date: Aug 2003
Location: MN
Posts: 6,126
|
Re: Over 25 Years Later, Finally My 71 C-10 Truck Build
Quote:
The floor rust was a much smaller area than what I cut out. The cab corner should be an easy fix too. I was going to ask you if you still had any 71-72 outer grills, or if you sold 'em.
__________________
If no one knows what you're doing, they can't tell you you're doing it wrong HG's Dream Car Build - Shelby Cobra Kit Build your own adjustable track bar 71  Long Fleet C/10 Long Fleet C/10 72  Jimmy 4x4 (Junkyard Jimmy) Jimmy 4x4 (Junkyard Jimmy)HG's Plow Truck '78  K35 Dually K35 DuallyBigass Farm Truck HG's thread of miscellaneous stuff |
|
|
|

|
|
|
#43 | |
|
GEARHEAD
Join Date: Aug 2003
Location: MN
Posts: 6,126
|
Re: Over 25 Years Later, Finally My 71 C-10 Truck Build
Quote:
If a seam loosens up, use some heat to pull it off and redo it. Or weld it, or put some screws in or rivits in it to hold it. It's not like it will fly out and cause an injury accident. On the paint and body board there are a few threads discussing adhesives. It is the prefered or recommended panel replacement by many manufacturers. It's very strong. It seals the seam and is corrosion resistant. I'm having a hard time finding a reason not to do it this way. Now I'm saying all this without actually completing the job, I'm optimistic. If it doesn't work I will definitely post that too. And I'll be investigating to find out why it doesn't work. If it does work, this could be the ticket for a lot of people that are not welders but are proficient enough with some tin snips and a grinder to overcome the fear to repair their cabs.
__________________
If no one knows what you're doing, they can't tell you you're doing it wrong HG's Dream Car Build - Shelby Cobra Kit Build your own adjustable track bar 71  Long Fleet C/10 Long Fleet C/10 72  Jimmy 4x4 (Junkyard Jimmy) Jimmy 4x4 (Junkyard Jimmy)HG's Plow Truck '78  K35 Dually K35 DuallyBigass Farm Truck HG's thread of miscellaneous stuff |
|
|
|

|
|
|
#44 |
|
GEARHEAD
Join Date: Aug 2003
Location: MN
Posts: 6,126
|
Re: Over 25 Years Later, Finally My 71 C-10 Truck Build
Can you believe that I've been off work for a week and have only a couple hours here and there to work in the garage. It's insane. Anyway, I got the floor pans installed today. The outside temp got into the 40's and with my trusty propane bullet heater, I was able to get the garage warm enough to work the adhesive.
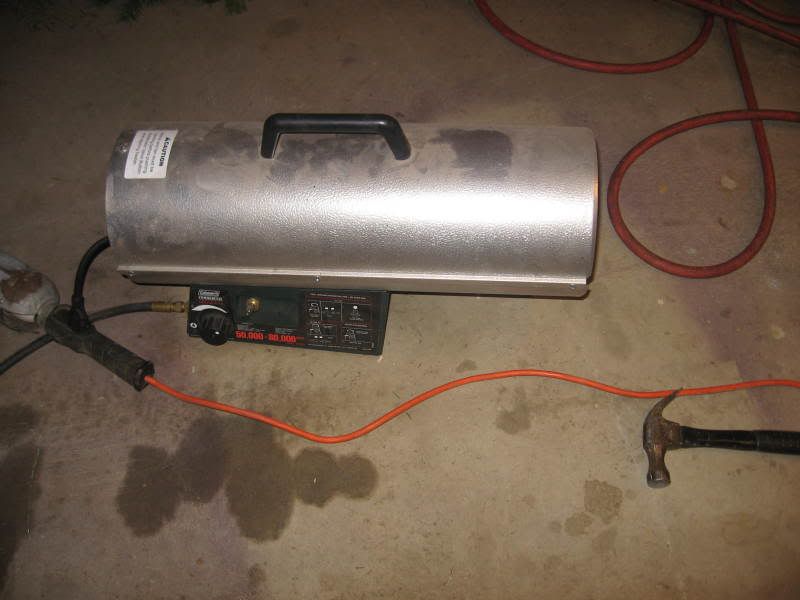 It actually got to almost 80 in there. I was a little short on the adhesive, which really sucks when you just buy one tube and the store is a 20 minute drive, and it's probably closed. I was able to spread it around enough though. I think. I had the pans fitted in as best I could. I scribed an edge around to know where I had to clean off the paint. Took them out and used a wire wheel on the angle grinder to clean all the surfaces where the edhesive goes. 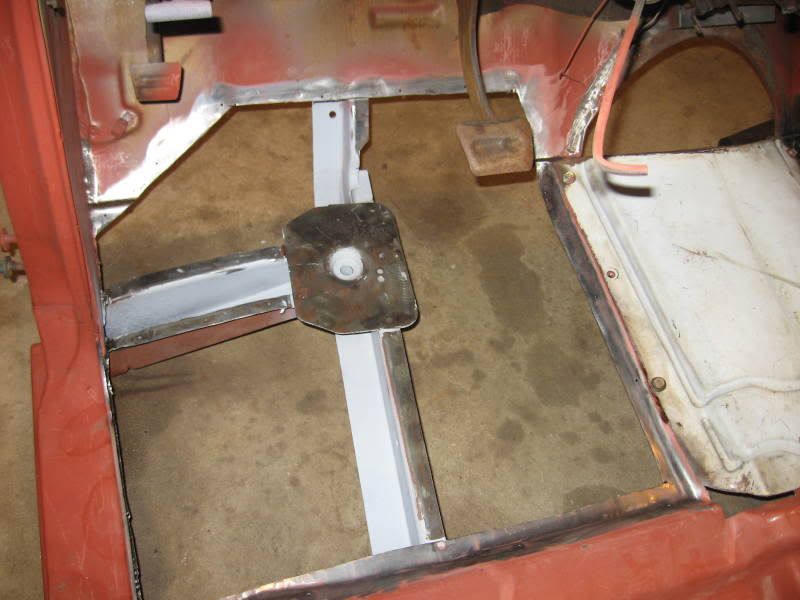 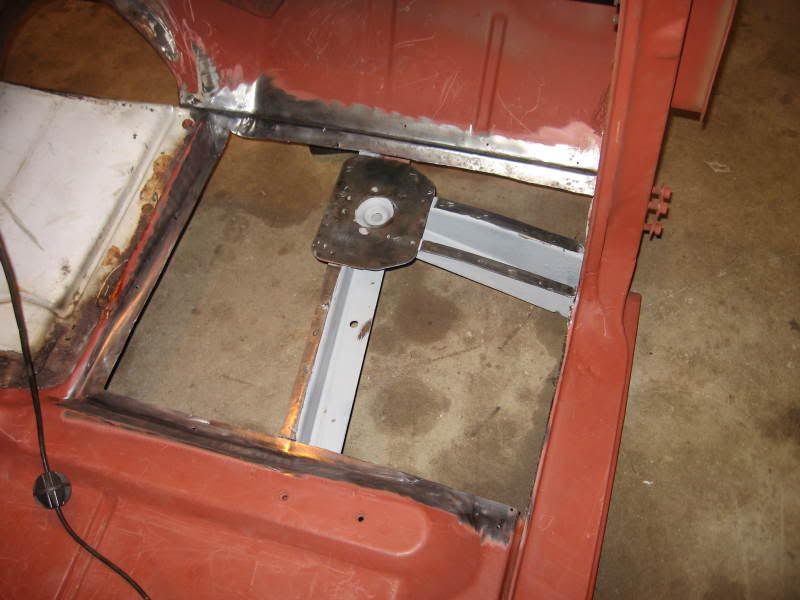 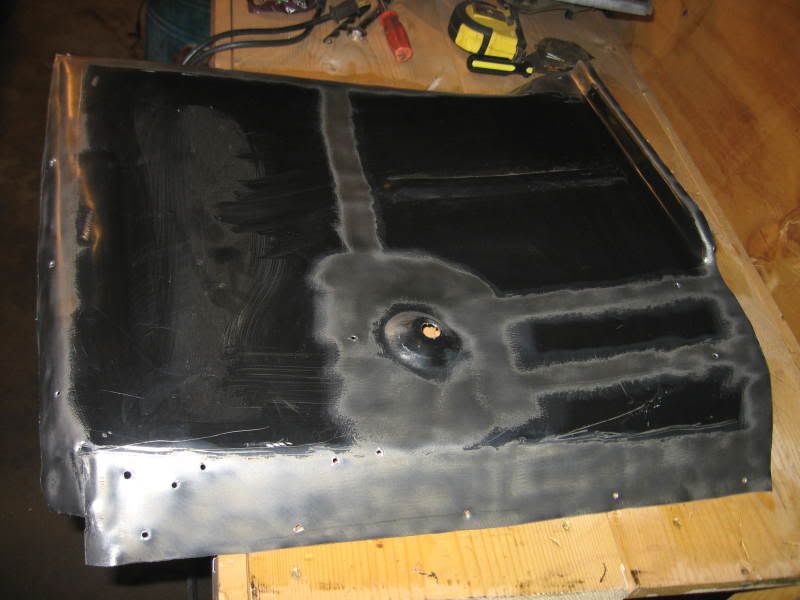 Then lay a bead of glue down, spread it with a brush, set the pan in place and clamp/screw/rivit it in place. It looks good, but I'm in no hurry to pull out the screws. I let the heater go for a couple hours after I put the glue down. I'll have to check iot out tomorrow to see if it set up properly. If it's still tacky, I start up the heater again and maybe use the heat gun. The instructions say you can cure it in an hour at 160F. 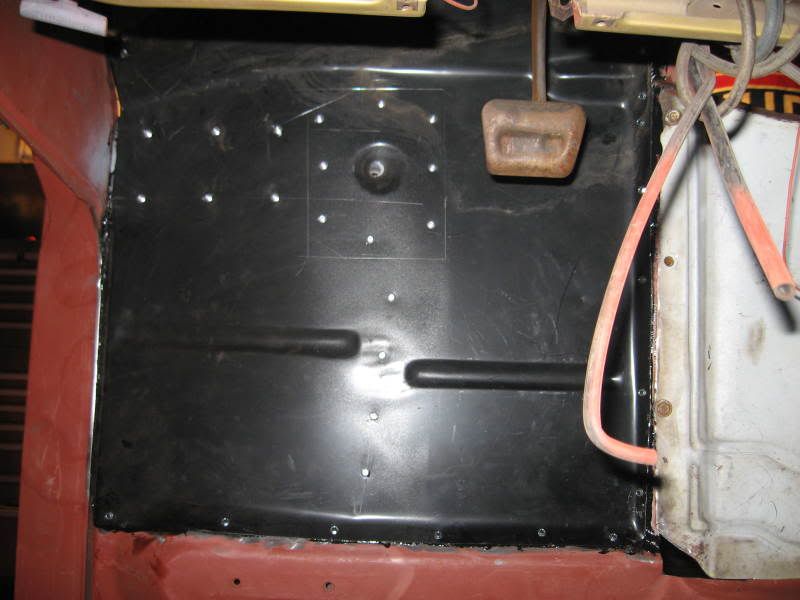 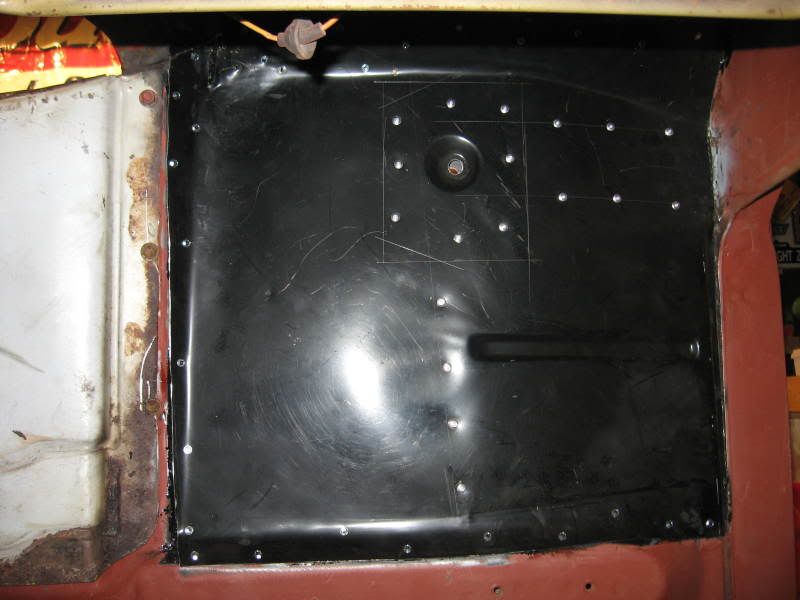 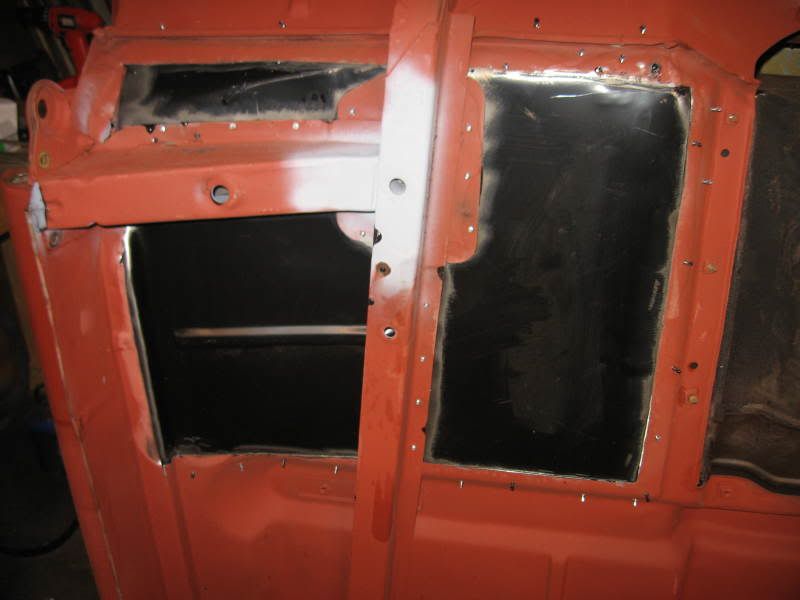 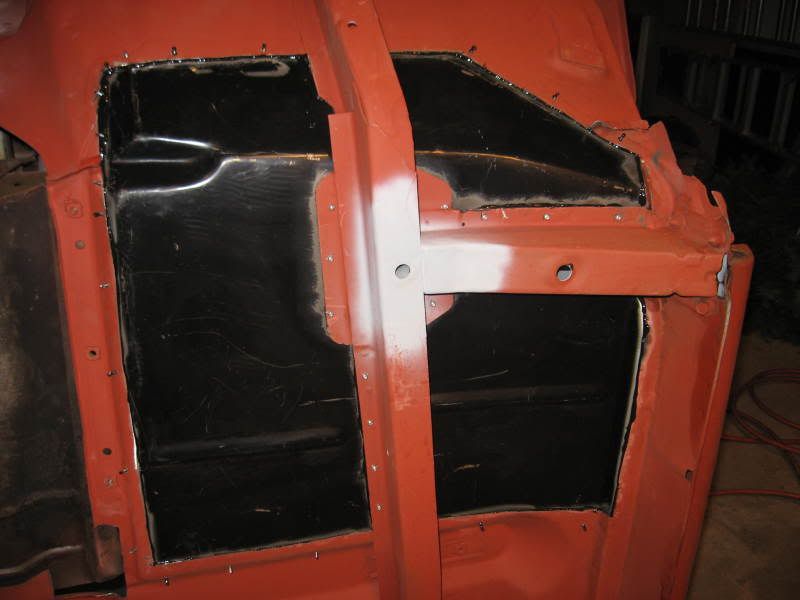
__________________
If no one knows what you're doing, they can't tell you you're doing it wrong HG's Dream Car Build - Shelby Cobra Kit Build your own adjustable track bar 71  Long Fleet C/10 Long Fleet C/10 72  Jimmy 4x4 (Junkyard Jimmy) Jimmy 4x4 (Junkyard Jimmy)HG's Plow Truck '78  K35 Dually K35 DuallyBigass Farm Truck HG's thread of miscellaneous stuff |
|
|

|
|
|
#45 |
|
GEARHEAD
Join Date: Aug 2003
Location: MN
Posts: 6,126
|
Re: Over 25 Years Later, Finally My 71 C-10 Truck Build
It's not done yet. I need to put a backer along the seam with the rocker. I need to clean up the rust at the bottom of the kick panels and I've got the one corner to work on. I need to fill the rain gutter. It needs an undercoating. I need to get some dents pulled out and there are probably other things I'll find as I keep making progress.
__________________
If no one knows what you're doing, they can't tell you you're doing it wrong HG's Dream Car Build - Shelby Cobra Kit Build your own adjustable track bar 71  Long Fleet C/10 Long Fleet C/10 72  Jimmy 4x4 (Junkyard Jimmy) Jimmy 4x4 (Junkyard Jimmy)HG's Plow Truck '78  K35 Dually K35 DuallyBigass Farm Truck HG's thread of miscellaneous stuff Last edited by hgs_notes; 11-29-2008 at 01:08 AM. |
|
|

|
|
|
#46 |
|
Still livin the "dream" in '54
Join Date: Nov 2006
Location: Tucson, AZ
Posts: 2,656
|
Re: Over 25 Years Later, Finally My 71 C-10 Truck Build
Love the work you are doing. I appreciate how you had the cab blasted and taking your time to make sure everything gets put in correctly.
I need to keep my eye on this build, I can't wait to see more progress pics! Don
__________________
Current build. 1954 Chevrolet 3800 "Ella" SOLD! My '67 stepper "Tangerine Dream" "Anything worth doing is worth doing right" James Dean “When you have eliminated all which is impossible, then whatever remains, however improbable, must be the truth.” Sherlock Holmes "There is no spoon." Neo |
|
|

|
|
|
#47 |
|
Registered User
Join Date: Jun 2007
Location: Saskatoon, Saskatchewan,:
Posts: 2,901
|
Re: Over 25 Years Later, Finally My 71 C-10 Truck Build
glad to see this , my wife wants me too finish my truck also, believe it or not we have know each other for 5 years married for 1.5 and she has never driven in it, got to love the women somedays, keep us posted
__________________
James 1968 GMC "HAVOC" 1986 GMC "Frank" J.J.R.H. Design & Consulting My 68`Rebuild "HAVOC": http://67-72chevytrucks.com/vboard/s...d.php?t=316300 A 58' chev build thread: http://www.67-72chevytrucks.com/vboa...d.php?t=311238 1969 Camaro Pro Touring http://67-72chevytrucks.com/vboard/s...61#post3513361 Swiss Cheese: http://67-72chevytrucks.com/vboard/s...d.php?t=384390 Adjustable Trailing Arm How-To: http://67-72chevytrucks.com/vboard/s...d.php?t=321100 1968 Ford Farm Truck: http://67-72chevytrucks.com/vboard/s...=1#post6555587 |
|
|

|
|
|
#48 |
|
GEARHEAD
Join Date: Aug 2003
Location: MN
Posts: 6,126
|
Re: Over 25 Years Later, Finally My 71 C-10 Truck Build
A little more progress. I got the patch put in where the floor was cut for a shifter and over the hole for the gas line. I'll be using a tank under the bed. The adhesive seems to have set up well. I used a little more from the underneath side to seal some gaps up. I think it will work great. I got a couple cans of undercoating that I'm going to try and spray on later, after the latest adhesive sets up. I was going to used the patch adhesive this time because it has a faster set up time, but no one had it in stock, so I ended up using the panel adhesive again. It's ok, just takes longer to set up.
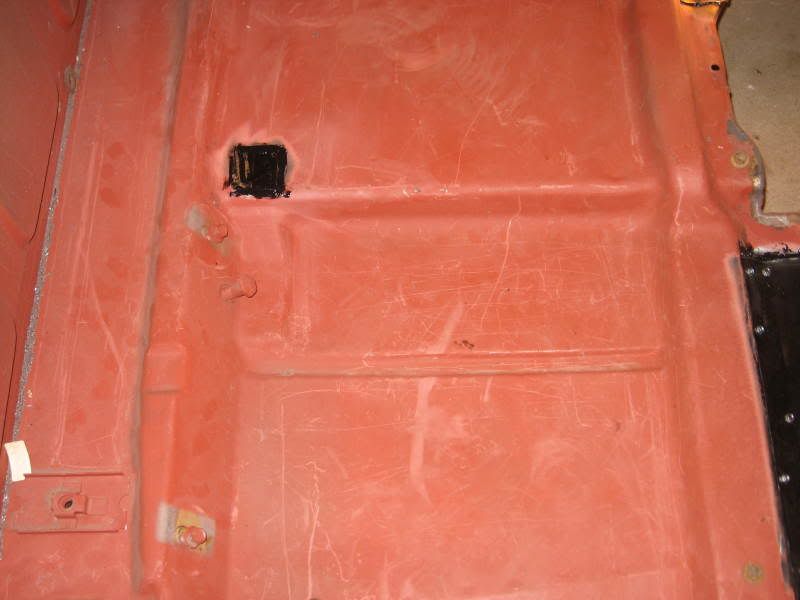 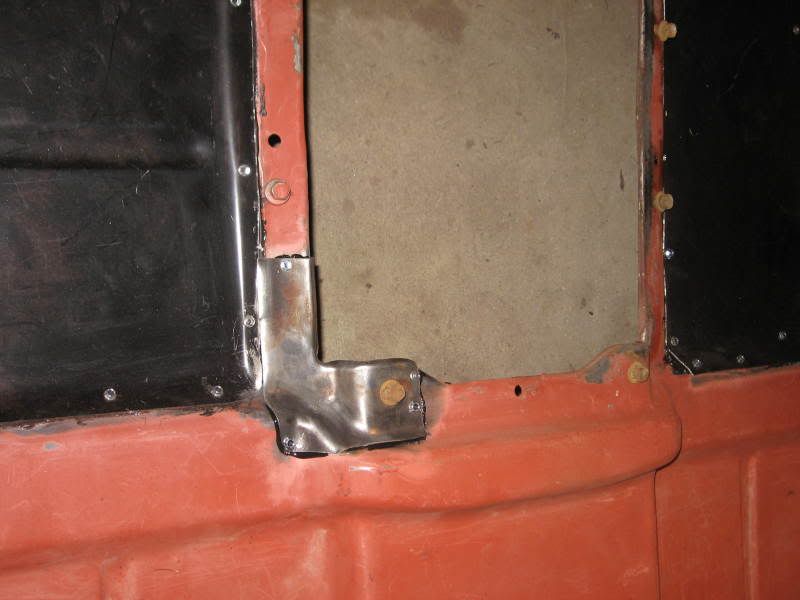 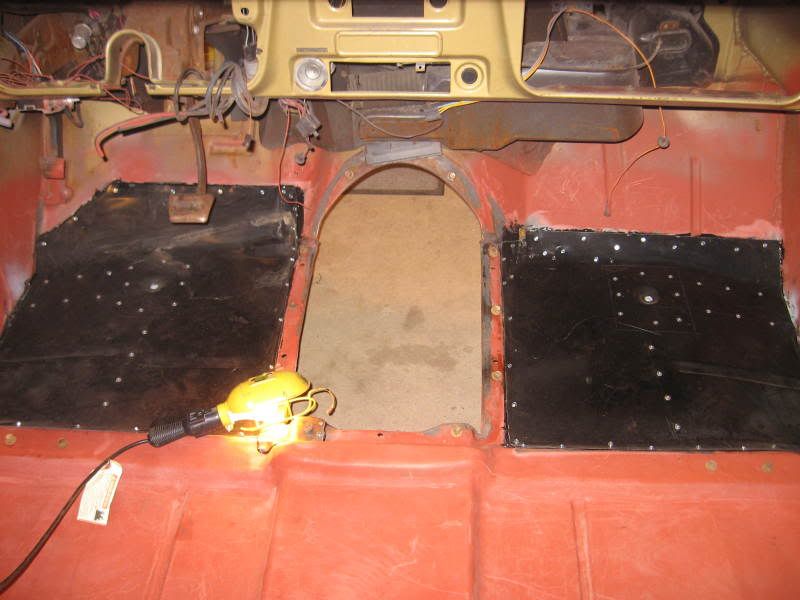 I put bolts in all the seat mount holes and in the hump mount holes to keep the undercoating out of the nuts. The underside of the cab was already blasted and primered, so I should be all set for undercoat.
__________________
If no one knows what you're doing, they can't tell you you're doing it wrong HG's Dream Car Build - Shelby Cobra Kit Build your own adjustable track bar 71  Long Fleet C/10 Long Fleet C/10 72  Jimmy 4x4 (Junkyard Jimmy) Jimmy 4x4 (Junkyard Jimmy)HG's Plow Truck '78  K35 Dually K35 DuallyBigass Farm Truck HG's thread of miscellaneous stuff |
|
|

|
|
|
#49 |
|
GEARHEAD
Join Date: Aug 2003
Location: MN
Posts: 6,126
|
Re: Over 25 Years Later, Finally My 71 C-10 Truck Build
I found out 2 cans of 3M spray undercoat is maybe half of what I need. Oh well, I'll finish that tomorrow and post a pic. Maybe I can get the kick panels and the corner done also. My wife and girls will be gone for the day, no interruptions.
__________________
If no one knows what you're doing, they can't tell you you're doing it wrong HG's Dream Car Build - Shelby Cobra Kit Build your own adjustable track bar 71  Long Fleet C/10 Long Fleet C/10 72  Jimmy 4x4 (Junkyard Jimmy) Jimmy 4x4 (Junkyard Jimmy)HG's Plow Truck '78  K35 Dually K35 DuallyBigass Farm Truck HG's thread of miscellaneous stuff Last edited by hgs_notes; 11-29-2008 at 11:50 PM. |
|
|

|
|
|
#50 |
|
GEARHEAD
Join Date: Aug 2003
Location: MN
Posts: 6,126
|
Re: Over 25 Years Later, Finally My 71 C-10 Truck Build
Well, I got the undercoating sprayed, mostly. I got the patches in the cab corners, not the outer, but the inner part that is against the end of the rear support. I also closed up a small rust hole at the bottom of the B pillar on the driver side. You could see it looking through where the corner was cut out. I found a couple small holes in the passenger side corner that will need a little work. That was all for today. The fumes from the heater were giving me a headache. It's not as bad as the diesel/kerosene heaters, but after 3 days, it bothered me.
I'm going to make the kick panel patches next, then cut down the corner patches. Motivation is strong now, I need to keep going. 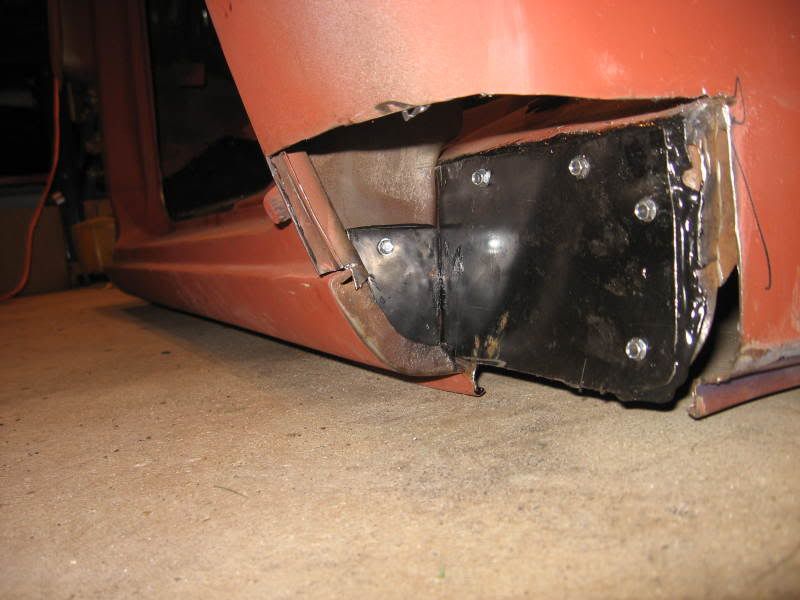 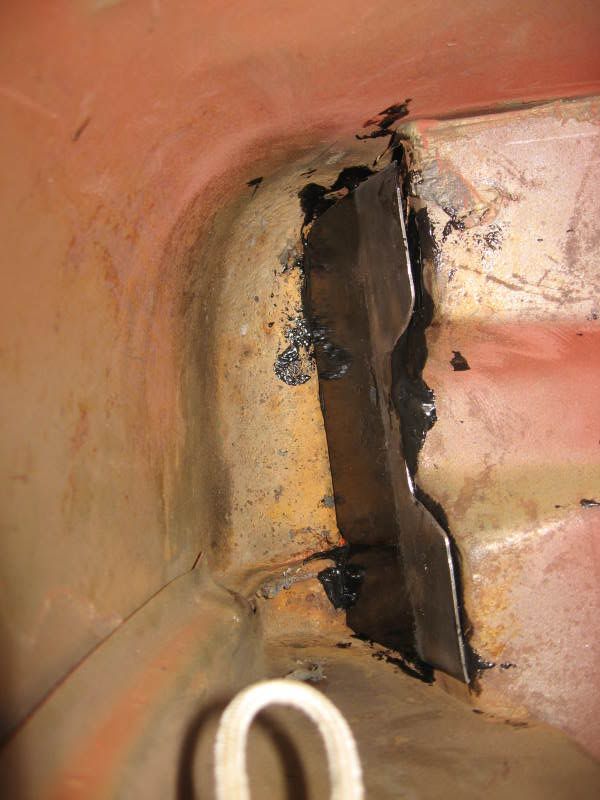
__________________
If no one knows what you're doing, they can't tell you you're doing it wrong HG's Dream Car Build - Shelby Cobra Kit Build your own adjustable track bar 71  Long Fleet C/10 Long Fleet C/10 72  Jimmy 4x4 (Junkyard Jimmy) Jimmy 4x4 (Junkyard Jimmy)HG's Plow Truck '78  K35 Dually K35 DuallyBigass Farm Truck HG's thread of miscellaneous stuff Last edited by hgs_notes; 11-30-2008 at 09:27 PM. |
|
|

|
 |
| Bookmarks |
|
|