
 |
|
|
#26 |
|
Post Whore
 Join Date: Feb 2016
Location: Portland Oregon
Posts: 11,302
|
Thank you.
__________________
Thanks to Bob and Jeanie and everyone else at Superior Performance for all their great help.  RIP Bob Parks. 1967 Burban (the WMB),1988 S10 Blazer (the Stink10 II),1969 GTO (the Goat), 1970 Javelin, 1952 F2 Ford OHC six 4X4, 29 Model A, 72 Firebird (the DBP Bird). 85 Alfa Romeo If it breaks I didn't want it in the first place The WMB repair thread http://67-72chevytrucks.com/vboard/s...d.php?t=698377 |
|
|

|
|
|
#27 |
|
Senior Member
 Join Date: Jul 2012
Location: Oblong, Illinois
Posts: 7,028
|
Re: Working Man's Burbon
Bet that was a stomach crunch work out! Well done!
|
|
|

|
|
|
#28 |
|
Post Whore
 Join Date: Feb 2016
Location: Portland Oregon
Posts: 11,302
|
Man I think it was hardest on my neck muscles. Thanks for the reply.
__________________
Thanks to Bob and Jeanie and everyone else at Superior Performance for all their great help.  RIP Bob Parks. 1967 Burban (the WMB),1988 S10 Blazer (the Stink10 II),1969 GTO (the Goat), 1970 Javelin, 1952 F2 Ford OHC six 4X4, 29 Model A, 72 Firebird (the DBP Bird). 85 Alfa Romeo If it breaks I didn't want it in the first place The WMB repair thread http://67-72chevytrucks.com/vboard/s...d.php?t=698377 |
|
|

|
|
|
#29 |
|
Post Whore
 Join Date: Feb 2016
Location: Portland Oregon
Posts: 11,302
|
While under the WMB doing the mounts I noticed the fenders had no bolts (and thus no shims) in the bottom inside location. I had noticed that sometimes the door hit the fender when you opened it. I had hoped the new body and core support mounts would solve the problem. I started on the passenger side by loosening the fender and wheel well so I could align the fender to the door. This is when I found that in addition to the fenders lower back bolt, 4 of the bolts in the wheel well were missing, as were the 2 bolts that go perpendicular to the chassis into the upper part of the core support. Plus the bolt that goes forward into to the upper grille piece was backed out 1/4" (and no shims) . No wonder the fender moved around! The PO said he had replaced the fenders with aftermarket units. It took me 2.5 hours to get the fender aligned with the door, shimmed up and locked down. Then it was off to the other side where I found only 2 bolts in the wheel well missing along with one stripped out. All the core support bolts were there, but the bolt to the grille was also loose and needing shims. After fighting with the bottom inside bolt and shim pack for at least 30 minutes I realized there must be a bigger issue. I just could not get the shims to work right, every other time I moved the fender and tried to snug it up it would twist all wrong and I would have to back the bolt off and try again. So I removed all the bolts on the rear portion of the fender and pried it out to see what the issue was. See the photo for a better idea of what I am trying to explain. At some time in the past a sliver of metal got pulled out of the hole for the bottom bolt and this would not allow the shims to sit flat thus causing the fender to twist when the bolt was tightened. OK, over the years things happen, maybe the reason this fine rig has had the fenders, hood, and grille replaced was possibly there was an unauthorized contact with an immovable object at some some point, however that was never discussed during the transaction. Moving on, I was able to make a wood block to hold the fender out far enough to get a rotary grinder in and remove the sliver. Now we are to the place where my head wants to explode. It would have been a 30 second job with a 4" grinder when the fender was off! Not 10 minutes with the rotary gringer on your back underneath it with no good angle to get at it and your shirt neck open to catch the metal silvers. But I guess they figured there was no reason to fix it since they weren't going to put the bolt back in. ÀAAAAAAAAARRRRRRRRGGGGGGGGG! Some peoples children.
 I tried to find solace in the fact that since I had access to the area I could Por15 as much as I could reach. Did that and spent the rest of the day scuff sanding the under side of the hood. The next day (had to let the Por-15 dry) with that bolt issue solved, I found I that I had a new issue. The reason there were 2 bolts on this fender were missing is that the fender holes didn't line up with the wheel well holes, I'm pretty sure this also caused the other bolt to be stripped. (If it doesn't fit, force it) so I got things as close as possible and drilled new holes. I ended up having to move the door around to get the body lines to line up in a reasonable fashion. Basically I had to split the difference to minimize the misalignments at the crease below the wing window and the lower crease between the wheel wells. The aftermarket driver's side fender lines are not as good as the passenger side lines. Then more fun times trashing my fingers sanding the hood, but now its ready. I also pulled what was left of the grille out for disposal. I tried to find solace in the fact that since I had access to the area I could Por15 as much as I could reach. Did that and spent the rest of the day scuff sanding the under side of the hood. The next day (had to let the Por-15 dry) with that bolt issue solved, I found I that I had a new issue. The reason there were 2 bolts on this fender were missing is that the fender holes didn't line up with the wheel well holes, I'm pretty sure this also caused the other bolt to be stripped. (If it doesn't fit, force it) so I got things as close as possible and drilled new holes. I ended up having to move the door around to get the body lines to line up in a reasonable fashion. Basically I had to split the difference to minimize the misalignments at the crease below the wing window and the lower crease between the wheel wells. The aftermarket driver's side fender lines are not as good as the passenger side lines. Then more fun times trashing my fingers sanding the hood, but now its ready. I also pulled what was left of the grille out for disposal.
__________________
Thanks to Bob and Jeanie and everyone else at Superior Performance for all their great help.  RIP Bob Parks. 1967 Burban (the WMB),1988 S10 Blazer (the Stink10 II),1969 GTO (the Goat), 1970 Javelin, 1952 F2 Ford OHC six 4X4, 29 Model A, 72 Firebird (the DBP Bird). 85 Alfa Romeo If it breaks I didn't want it in the first place The WMB repair thread http://67-72chevytrucks.com/vboard/s...d.php?t=698377 |
|
|

|
|
|
#30 |
|
Post Whore
 Join Date: Feb 2016
Location: Portland Oregon
Posts: 11,302
|
Re: Working Man's Burbon Rear 1/4 windows (fixed)
The WMB has been on the back burner for a month or so, but I am back on it. The rear door fixed window seal was falling down inside the door so it needed to be replaced. (No photo as I was wayyyy out of focus). The gap was big enough to drop a dime through not to mention the river of water through the door when it rained. The first photo is of the drivers side which isn't as bad. To remove the glass I took the door panel off, rolled the window down, and carefully removed the inner and outer wipers to give more room. Then the 2 screws at the bottom of the felt track/window divider were removed. Then I removed the screw on the top of the window frame that goes down into the felt track/window divider. Carefully wiggle the divider away from the fixed window. The glass would not budge when i tried to pull it out. I then used a single edge razor blade and a small hooked seal remover to cut and pull the seal away from the glass. The glass still would not budge until I had broken the seal between the glass and rubber seal all around the window inside and out. I did manage to avoid damaging the window tint on the passenger side (yet to see if I will be that lucky on the drivers side.). After getting the glass out I now see why the seal had deformed the way it has. The window seal sits on a metal piece that doesn't go the full length of the seal. (Last photo with gray circle). I am thinking about putting a piece of shim stock in to prevent this from reoccurring. The process is slightly different on the drivers side. The screw that holds the top of the divider goes up through a tab in the divider, then up into the frame. I am still arguing with that screw at this time. It may get ugly with voices being raised and blood may be spilled. More to follow.
__________________
Thanks to Bob and Jeanie and everyone else at Superior Performance for all their great help.  RIP Bob Parks. 1967 Burban (the WMB),1988 S10 Blazer (the Stink10 II),1969 GTO (the Goat), 1970 Javelin, 1952 F2 Ford OHC six 4X4, 29 Model A, 72 Firebird (the DBP Bird). 85 Alfa Romeo If it breaks I didn't want it in the first place The WMB repair thread http://67-72chevytrucks.com/vboard/s...d.php?t=698377 |
|
|

|
|
|
#31 |
|
*************
 Join Date: Apr 2005
Location: Pensacola, FL
Posts: 17,860
|
Re: Working Man's Burbon
I'm getting ready to replace my windows and seals. Where did you get the small window seals? Thanks for the pictures!
__________________
Rob - https://www.instagram.com/hart_rod_c10 As Iron Sharpens Iron, So One Man Sharpens Another. Proverbs 27:17 FOR SALE: DBW pedal bracket - http://67-72chevytrucks.com/vboard/s...d.php?t=651123 FOR SALE: Hood Brackets http://67-72chevytrucks.com/vboard/s...d.php?t=679945 1987 Silverado SWB - 34.5K original miles http://67-72chevytrucks.com/vboard/s...d.php?t=801834 1969 SuperBurb - http://67-72chevytrucks.com/vboard/s...d.php?t=200387 1968 Farm truck - http://67-72chevytrucks.com/vboard/s...d.php?t=358692 1968 SWB - http://67-72chevytrucks.com/vboard/s...d.php?t=551258 1948 Chevy - http://67-72chevytrucks.com/vboard/s...=122164&page=3 |
|
|

|
|
|
#32 |
|
Registered User
Join Date: Feb 2009
Location: Southern Oregon
Posts: 1,352
|
Re: Working Man's Burbon
Thanks again for another great write up on the quarter window. Lots of great info in this thread!
__________________
1967 C10 Suburban 454/TH400/3.07's An Average Joe and His 'Burb: http://67-72chevytrucks.com/vboard/s...d.php?t=775843 |
|
|

|
|
|
#33 |
|
Registered User
Join Date: Dec 2011
Location: Earth, NJ
Posts: 479
|
Re: Working Man's Burbon
|
|
|

|
|
|
#34 |
|
Post Whore
 Join Date: Feb 2016
Location: Portland Oregon
Posts: 11,302
|
Re: Working Man's Burbon
Thanks for the encouraging words. I have ordered my window seals from Dan's Classic Chevrolet here in Portland. I will update as to what brand when I have them in hand. I won't reinstall the glass until the paint is sprayed. I am still debating if it is worth the effort to fab a support for the lower part of the seal.
I have spent the last day realigning the passenger side fender and doors. I was unable to get the door to open without touching the fender. The aftermarket fender holes did not line up correctly, so I had to grind the bottom back one, both of the upper back ones and both of the holes through the inner fender well had to be ovalled out. In addition at the front of the fender it hit the bottom of the core support which prevented me from moving the fender forward to increase the gap between it and the door. I was unable to determine if the fender was made wrong or if the frame/core support was tweaked so I split the difference and cut and bent the inner part of the fender (photo #1) for more clearance and I shimmed the core support up (photo #2). The interfering parts of the fender and core support needed to move a 1/2" so the fender could be shifted to clear the door. Shimming the core support up meant that the bolt was now too short. Which became something of an issue as 7/16-14 bolts are not available at Ace hardware or the big box stores. I had to wait until Monday for Winks Hardware to open so I could get a new 3" long bolt to be able to reattach the core support. The third picture shows the final result. The wow just below center is from the fender not being a straight line. After getting the fender set up I went through and readjusted the doors and then tightened the fender down. When doing the doors remember the bolts that attach the hinge to the cab allow the door to move up and down (photo #4) and the bolts that attach the hinge to the door allow the door to move in and out from the cab. There is no adjustment to move the door forward or back in the cab. Removing the latch plate before starting to adjust the door can save you some time as the door can be moved by the latch when you close the door and you won't see any change in the gaps. Short of major door disassembly and reconstruction the best you can do is to try and balance the gaps around the door. For example if I wanted consistent door gaps on my third door I would have to remove and reposition the window frame on the door. After your satisfied with the gaps reinstall the latch plate making sure it doesn't rub on the door when closing. You may have to shim the plate to prevent it from rubbing like I did (last photo). Good luck and if your like me you may have to go to the store and buy a six pack of patience.
__________________
Thanks to Bob and Jeanie and everyone else at Superior Performance for all their great help.  RIP Bob Parks. 1967 Burban (the WMB),1988 S10 Blazer (the Stink10 II),1969 GTO (the Goat), 1970 Javelin, 1952 F2 Ford OHC six 4X4, 29 Model A, 72 Firebird (the DBP Bird). 85 Alfa Romeo If it breaks I didn't want it in the first place The WMB repair thread http://67-72chevytrucks.com/vboard/s...d.php?t=698377 |
|
|

|
|
|
#35 |
|
Post Whore
 Join Date: Feb 2016
Location: Portland Oregon
Posts: 11,302
|
Re: Working Man's Burbon 1\4 windows.
I've gotten back to the rear fixed quarter windows. Since last time I posted about the window I have discovered some old damage to the lower frame of the window. I looks as something was dropped and dented the frame. I don't believe the glass was broken due to the fact the channel for the seal is so distorted and I would expect that someone would of straightened it to make it easier to put the seal back in. It looks like they drilled a hole and used a slide hammer to pull it out part of the dent and just filled the rest with old school pink Bondo. In addition to this there is a crack from the lower rear corner of the frame which may have been caused by this. So I now have even more reasons to pull this window out. The divider on the drivers side has a screw that goes up through a tab to hold the top of the divider in place. Mine was rusted to the point that the Phillips head stripped and I was unable to remove the screw. My next try involved using a left handed drill bit to get it out. This didn't work either and now I have a nice left handed Mac drill bit with only one cutting point.
 But the head did come off and I was able to remove the divider and slide it past the glass to remove the fixed window. On the other side I had a hard time getting the old rubber seal to come free, but since I had ordered new seals I carefully cut it loose with a razor knife. Since then I have learned that the seals I ordered are made wrong and may or may not work (more on this later). Before I started on this side I took a thin putty knife and worked it between the seal and the glass and the seal and the frame all the way around at the same time I sprayed liquid wrench in the gap. After letting it sit for 30 minutes I very carefully worked the seal away from the glass on the front edge. I then pulled it to the side so the glass could be worked free and slid forward without damage to the seal as I may have to reuse it. At first the glass would not budget. By going around the glass again with the thin "flexible" putty knife I was able get the glass to move forward in the seal about a quarter of an inch. I then went around the seal with the putty knife to loosen its hold on the door. After 2 times around seal I managed to get the seal to move by prying the rear edge forward. Once it moved the glass and seal slid right out. With the glass out of the way I was able to easily remove up the old Bondo, which for the most part just popped off as it had been absorbing moisture from the back through the hole left over from the slide hammer. After spot welding the crack to prevent it from growing, I began the repair by enlarging the hole to get rid of the wasted metal around it. I checked the area for high spots, which I tapped down along with straightening the distortion to the seal channel. Then I sanded the area around the hole inside the door. To fill the hole I used short strand fiberglass putty to give me a water proof seal before I used Evercoat Rage Ultra (what a goofy name for a great putty) to finish filling the area. When I was laying the short strand down I made sure that the area around the hole inside the door was smoothed out to get a good grip on the metal. Some light sanding with 80 grit followed by 150 and then a second coat and more sanding. But the head did come off and I was able to remove the divider and slide it past the glass to remove the fixed window. On the other side I had a hard time getting the old rubber seal to come free, but since I had ordered new seals I carefully cut it loose with a razor knife. Since then I have learned that the seals I ordered are made wrong and may or may not work (more on this later). Before I started on this side I took a thin putty knife and worked it between the seal and the glass and the seal and the frame all the way around at the same time I sprayed liquid wrench in the gap. After letting it sit for 30 minutes I very carefully worked the seal away from the glass on the front edge. I then pulled it to the side so the glass could be worked free and slid forward without damage to the seal as I may have to reuse it. At first the glass would not budget. By going around the glass again with the thin "flexible" putty knife I was able get the glass to move forward in the seal about a quarter of an inch. I then went around the seal with the putty knife to loosen its hold on the door. After 2 times around seal I managed to get the seal to move by prying the rear edge forward. Once it moved the glass and seal slid right out. With the glass out of the way I was able to easily remove up the old Bondo, which for the most part just popped off as it had been absorbing moisture from the back through the hole left over from the slide hammer. After spot welding the crack to prevent it from growing, I began the repair by enlarging the hole to get rid of the wasted metal around it. I checked the area for high spots, which I tapped down along with straightening the distortion to the seal channel. Then I sanded the area around the hole inside the door. To fill the hole I used short strand fiberglass putty to give me a water proof seal before I used Evercoat Rage Ultra (what a goofy name for a great putty) to finish filling the area. When I was laying the short strand down I made sure that the area around the hole inside the door was smoothed out to get a good grip on the metal. Some light sanding with 80 grit followed by 150 and then a second coat and more sanding.
__________________
Thanks to Bob and Jeanie and everyone else at Superior Performance for all their great help.  RIP Bob Parks. 1967 Burban (the WMB),1988 S10 Blazer (the Stink10 II),1969 GTO (the Goat), 1970 Javelin, 1952 F2 Ford OHC six 4X4, 29 Model A, 72 Firebird (the DBP Bird). 85 Alfa Romeo If it breaks I didn't want it in the first place The WMB repair thread http://67-72chevytrucks.com/vboard/s...d.php?t=698377 |
|
|

|
|
|
#36 |
|
Registered User
Join Date: Dec 2011
Location: Earth, NJ
Posts: 479
|
Re: Working Man's Burbon 1\4 windows.
Too short on the bottom? If so, I learned that too. I took pictures of the issue, but I haven't sent them in. I think the GM seals were also this way because the new seals pulled into the channel just like the ones that I took out. I was going to talk about getting new ones, but I have so much to do I didn't bother. As it is Precision wants me to try a 3rd set of dooor weather strips on my vehicle since the originals weren't made right, and I wasn't impressed with the re-tooling, so I think they made more changes
|
|
|

|
|
|
#37 |
|
Post Whore
 Join Date: Feb 2016
Location: Portland Oregon
Posts: 11,302
|
As soon as I get some more pictures I will post the information I have. (#$&% battery life) They were from Prescion Rubber. I will have to post some sort of drawing so the problem is apparent to everyone. In the meantime I am looking for a different supplier.
__________________
Thanks to Bob and Jeanie and everyone else at Superior Performance for all their great help.  RIP Bob Parks. 1967 Burban (the WMB),1988 S10 Blazer (the Stink10 II),1969 GTO (the Goat), 1970 Javelin, 1952 F2 Ford OHC six 4X4, 29 Model A, 72 Firebird (the DBP Bird). 85 Alfa Romeo If it breaks I didn't want it in the first place The WMB repair thread http://67-72chevytrucks.com/vboard/s...d.php?t=698377 |
|
|

|
|
|
#38 | |
|
Registered User
Join Date: Dec 2011
Location: Earth, NJ
Posts: 479
|
Re: Working Man's Burbon Rear 1/4 windows (fixed)
Quote:
I mentioned it to GMC Pauls when I installed the passenger side but I never got around to sending them the pictures of the problem. I think Precision may actually rectify the problem once they know there is one, again, I was tired of messing with the seals so I just installed it. The door to body seals were also wrong, they were too short across the top, all three doors. They re-tooled them and sent me new ones but the next ones were still a little off. The top length was good, but the 90 degree door corners were not 90 on the seal, they were obtuse angles and didnt fit into the corner very well. They must have re-done them again because they want me to try another set. I am all for a manufacturer making parts properly, just the time involved to re-install them sucks. I am not ready for paint, so I have to scrape the old glue by hand carefully and it is very time consuming |
|
|
|

|
|
|
#39 | |
|
*************
 Join Date: Apr 2005
Location: Pensacola, FL
Posts: 17,860
|
Re: Working Man's Burbon 1\4 windows.
Quote:
__________________
Rob - https://www.instagram.com/hart_rod_c10 As Iron Sharpens Iron, So One Man Sharpens Another. Proverbs 27:17 FOR SALE: DBW pedal bracket - http://67-72chevytrucks.com/vboard/s...d.php?t=651123 FOR SALE: Hood Brackets http://67-72chevytrucks.com/vboard/s...d.php?t=679945 1987 Silverado SWB - 34.5K original miles http://67-72chevytrucks.com/vboard/s...d.php?t=801834 1969 SuperBurb - http://67-72chevytrucks.com/vboard/s...d.php?t=200387 1968 Farm truck - http://67-72chevytrucks.com/vboard/s...d.php?t=358692 1968 SWB - http://67-72chevytrucks.com/vboard/s...d.php?t=551258 1948 Chevy - http://67-72chevytrucks.com/vboard/s...=122164&page=3 |
|
|
|

|
|
|
#40 |
|
Registered User
Join Date: Dec 2011
Location: Earth, NJ
Posts: 479
|
Re: Working Man's Burbon
This is the top of the window, correct length
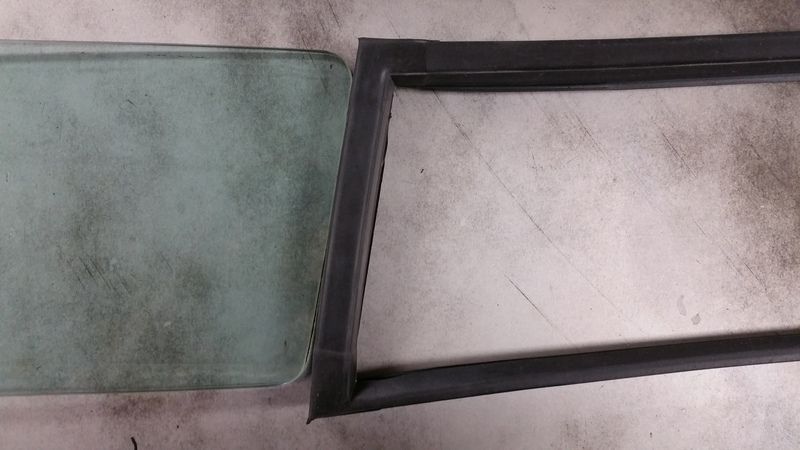 This is the bottom of the window, too short 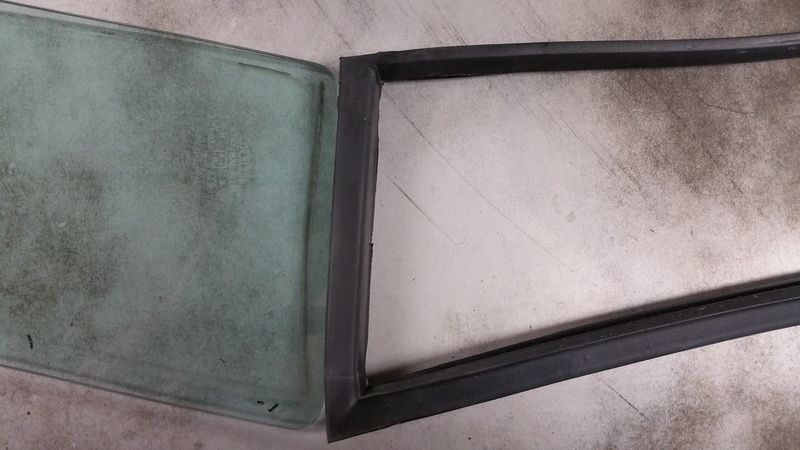 So once you put the seal on the window it does funny things to it. It's not even across the bottom 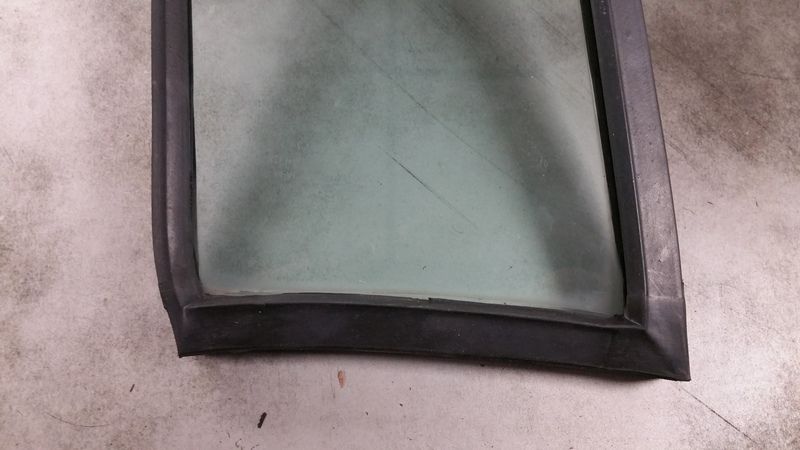 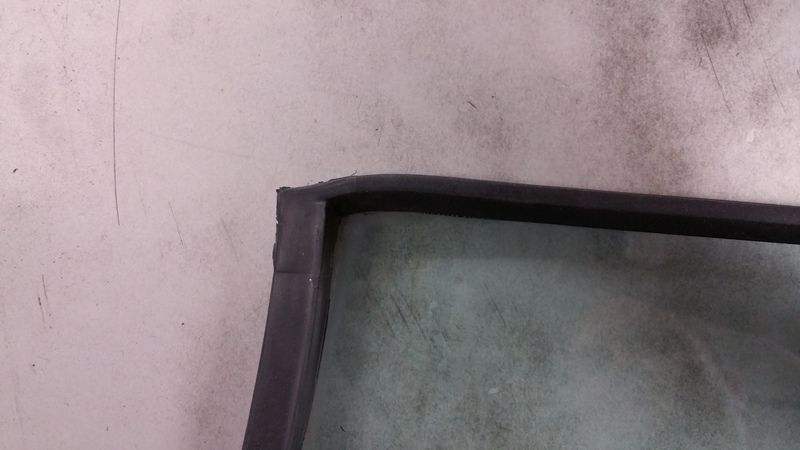 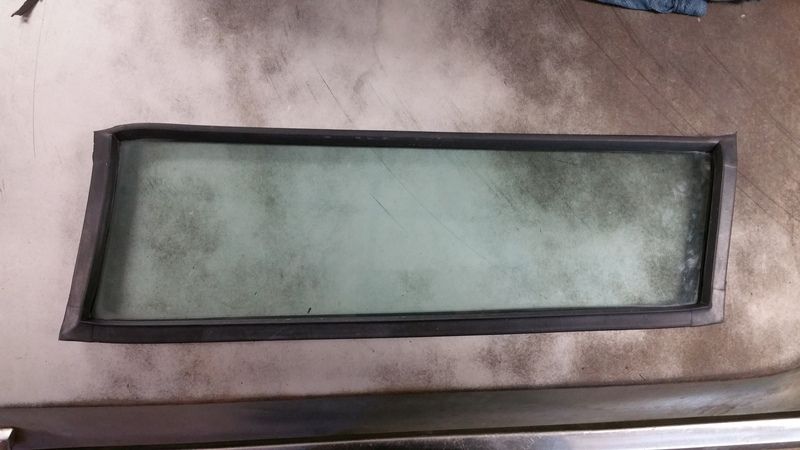 So this is what it does when iit is installed 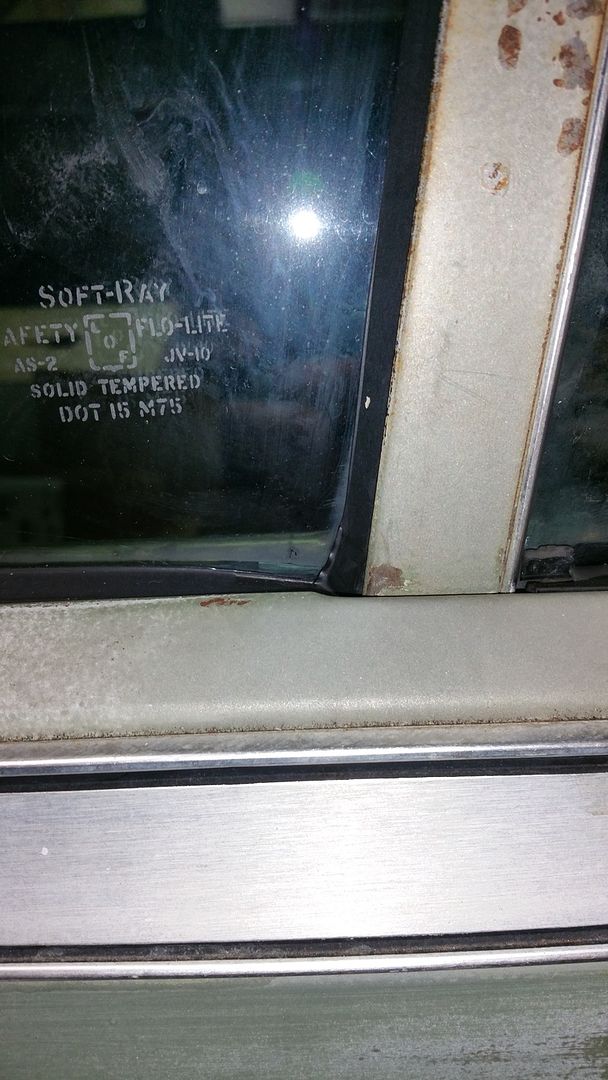
Last edited by notchbackgta; 05-05-2016 at 09:54 AM. |
|
|

|
|
|
#41 |
|
*************
 Join Date: Apr 2005
Location: Pensacola, FL
Posts: 17,860
|
Re: Working Man's Burbon
Thanks!
__________________
Rob - https://www.instagram.com/hart_rod_c10 As Iron Sharpens Iron, So One Man Sharpens Another. Proverbs 27:17 FOR SALE: DBW pedal bracket - http://67-72chevytrucks.com/vboard/s...d.php?t=651123 FOR SALE: Hood Brackets http://67-72chevytrucks.com/vboard/s...d.php?t=679945 1987 Silverado SWB - 34.5K original miles http://67-72chevytrucks.com/vboard/s...d.php?t=801834 1969 SuperBurb - http://67-72chevytrucks.com/vboard/s...d.php?t=200387 1968 Farm truck - http://67-72chevytrucks.com/vboard/s...d.php?t=358692 1968 SWB - http://67-72chevytrucks.com/vboard/s...d.php?t=551258 1948 Chevy - http://67-72chevytrucks.com/vboard/s...=122164&page=3 |
|
|

|
|
|
#42 |
|
Post Whore
 Join Date: Feb 2016
Location: Portland Oregon
Posts: 11,302
|
Re: Working Man's Burbon
It looks as if the current batch of seals may have a different problem. The lengths looked fine on the ones I saw but they were laid out wrong. See my crude drawing to understand. It isn't a mirror image but something different with the thin side on wrong side and the angles backwards.
__________________
Thanks to Bob and Jeanie and everyone else at Superior Performance for all their great help.  RIP Bob Parks. 1967 Burban (the WMB),1988 S10 Blazer (the Stink10 II),1969 GTO (the Goat), 1970 Javelin, 1952 F2 Ford OHC six 4X4, 29 Model A, 72 Firebird (the DBP Bird). 85 Alfa Romeo If it breaks I didn't want it in the first place The WMB repair thread http://67-72chevytrucks.com/vboard/s...d.php?t=698377 |
|
|

|
|
|
#43 | |
|
Registered User
Join Date: Dec 2011
Location: Earth, NJ
Posts: 479
|
Re: Working Man's Burbon
Quote:
|
|
|
|

|
|
|
#44 |
|
Post Whore
 Join Date: Feb 2016
Location: Portland Oregon
Posts: 11,302
|
Re: Working Man's Burbon
The guys at Dan's Classic Chevrolet have been talking to Prescion and it seems that they were confused about how the seal actually fit in the frame. Prescion was checking to see if it was a bad batch or worse. At best it will be six months at best before the correct seals are available. Here are some more photos of my old one.
__________________
Thanks to Bob and Jeanie and everyone else at Superior Performance for all their great help.  RIP Bob Parks. 1967 Burban (the WMB),1988 S10 Blazer (the Stink10 II),1969 GTO (the Goat), 1970 Javelin, 1952 F2 Ford OHC six 4X4, 29 Model A, 72 Firebird (the DBP Bird). 85 Alfa Romeo If it breaks I didn't want it in the first place The WMB repair thread http://67-72chevytrucks.com/vboard/s...d.php?t=698377 |
|
|

|
|
|
#45 |
|
Registered User
Join Date: Dec 2011
Location: Earth, NJ
Posts: 479
|
Re: Working Man's Burbon
OOOOh, whats the second gen in the background?
|
|
|

|
|
|
#46 |
|
Post Whore
 Join Date: Feb 2016
Location: Portland Oregon
Posts: 11,302
|
Re: Working Man's Burbon
It's a customer car. It's a complete restoration that is just about finished. 1970? I think, but SS 350 car with black stripes. Not the best picture but if you want I can get some more if it hasn't been picked up.
__________________
Thanks to Bob and Jeanie and everyone else at Superior Performance for all their great help.  RIP Bob Parks. 1967 Burban (the WMB),1988 S10 Blazer (the Stink10 II),1969 GTO (the Goat), 1970 Javelin, 1952 F2 Ford OHC six 4X4, 29 Model A, 72 Firebird (the DBP Bird). 85 Alfa Romeo If it breaks I didn't want it in the first place The WMB repair thread http://67-72chevytrucks.com/vboard/s...d.php?t=698377 |
|
|

|
|
|
#47 |
|
Registered User
Join Date: Dec 2011
Location: Earth, NJ
Posts: 479
|
Re: Working Man's Burbon
Oh, that's OK. I thought it was yours, I have a 73 so I like to know about other peoples cars
|
|
|

|
|
|
#48 |
|
Post Whore
 Join Date: Feb 2016
Location: Portland Oregon
Posts: 11,302
|
Re: Working Man's Burbon
I do have a 72 formula clone project that hasn't made much progress in a while. Nothing trick and at this time it's just a 350 car.
__________________
Thanks to Bob and Jeanie and everyone else at Superior Performance for all their great help.  RIP Bob Parks. 1967 Burban (the WMB),1988 S10 Blazer (the Stink10 II),1969 GTO (the Goat), 1970 Javelin, 1952 F2 Ford OHC six 4X4, 29 Model A, 72 Firebird (the DBP Bird). 85 Alfa Romeo If it breaks I didn't want it in the first place The WMB repair thread http://67-72chevytrucks.com/vboard/s...d.php?t=698377 |
|
|

|
|
|
#49 |
|
Registered User
Join Date: Sep 2002
Location: Iowa
Posts: 236
|
Re: Working Man's Burbon
I bought precision brand door weatherstrips for my burb and they were all too small and didn't fit the openings.
I got another set from them 4 months later but that didn't help when I needed them for a truck show we ended up driving 3 hours with no weatherstrips to.
__________________
you never have too many suburbans.... |
|
|

|
|
|
#50 |
|
Registered User
Join Date: Dec 2011
Location: Earth, NJ
Posts: 479
|
Re: Working Man's Burbon
|
|
|

|
 |
| Bookmarks |
|
|