
|
Register or Log In To remove these advertisements. |
|
|
|
|||||||
 |
|
|
Thread Tools | Display Modes |
 09-30-2015, 01:09 PM
|
#26 |
|
Registered User
Join Date: Nov 2010
Location: calgary alberta
Posts: 8,338
|
Re: New here , 58 under bed tank questions and more
I think I have attached a pic, not sure. it is the 68-87 chevy truck 2 wheel drive steering box conversion. it goes ahead of the axle. seems cheap enough as well.
|

|

|
|
09-30-2015, 01:14 PM
|
#27 |
|
Registered User
Join Date: Nov 2010
Location: calgary alberta
Posts: 8,338
|
Re: New here , 58 under bed tank questions and more
here is the write up, didn't get the pics for some reason. pretty good article though and lots of pics. you could prolly look it up and see the pics yourself. I just googled "power steering "power steering for 47-59 chevy pick up trucks" this came up from classic performance. seems like you could get everything you need at the wrecker on the cheap.
Steering 1947-1959 Chevy and 1948-1956 Ford pickup trucks Classic Performance Products Adds Power Steering to your '47-'59 Chevy or GMCTrucks In the July 1993 issue of Truckin' magazine, we printed a story called "Power Piloting For Old Chevys" which focused upon a trick new power steering kit for 1947-'59 Chevy truck owners. The kit is manufactured and offered from Classic Performance Products and is designed to be used with any old GM truck, but especially the resto buffs. Well, Classic Performance Products have another power steering kit as well, but this kit is more for the serious customizer who is building a tricked-out ride. The kit uses a late model GM Saginaw power steering box and pitman arm, a late model steering column, and the new drag link, steering arm and other products provided in the kit. The process involves first removing our stock steering column and box assembly, then replacing the steering column with a late model unit (not included in the kit), preferably from a '70s or'80s Chevy van. Then, the stock shock bracket riveted to the frame is removed and reinstalled aft of the axle on the frame, thus relocating the shock. A GM Saginaw power steering gear box (not included in the kit) is attached to the frame using the dimensions provided in the instructions. The kit comes with three spacers that position the steering box appropriately away from the frame and a bracket that is to be welded onto the frame. Also, you will need to acquire a pitman arm that is 6-3/4 inches long. An El Camino or Chevelle has an arm that works well. The Classic Performance Products kit also includes a replacement steering arm that is mounted to the brake backing plate, with an adiustable drag link being attached at the pitman arm on one side, and to the steering arm at the other end. The last focal point is the steering shaft which must be constructed using Borgeson joints and 3/4-inch mild carbon steel intermediate shaft. Attach the Borgeson joints to both the steering column and to the steering box, then measure the distance, cut and weld the joints onto the shaft, making sure that the joints are in time. This power steering installation isn't very hard to accomplish and is more of a custom approach to installing power steering versus the first power steering story we showed in the July issue. Both kits work great, and now you have the option of choosing either or to get the job done as you like. Note: Installation Correction 1. On all years drill 3/8" hole 12-1/2" from center line of axle towards front of vehicle and down 1" from top of framerail. Note: (1947-54 do not use brake line hole as reference. 2. Lower shock brackets are flipped front to back, not left to right. The lower shock bracket will be angled upward allowing clearance for the tie-rod. The kit comes with an adjustable drag link, steering arm, steering box mounting bracket and spacers, and grease cups for the tie-rod ends. You must provide the power steering Saginaw box, new steering column (1970-1980 Chevy Van preferably), and the steering shaft. The first step is to remove the stock pitman arm from the original steering assembly. The factory steering column and gear box can now be removed. The best replacement steering column is a tilt Chevy Van model. This one has been made to fit right into the truck by welding on the dash mounting bracket and floor plate that holds the steering column in place. Simply install the new column in place of the old one once the mounting brackets have been installed. The floor plate holds the steering column firmly but you will have to adjust the bolts a few times when constructing the steering shaft. Here is what the new column looks like extending from the firewall with a Borgeson joint attached. Now we move down to the chassis which has already been jacked-up and properly supported, with the wheels, stock drag link and brake drums removed. Remove the shock from the top mount and remove the lower shock mount entirely. The driver's side lower bracket will be mounted on the passenger side and vice-versa, from the back side. The shock mount on the frame must be removed. The mount is riveted into place, so a chisel and hammer are the only way to break the mount loose. In the instructions, the exact location of the shock bracket is shown, but in this photo, you can see how one hole on the frame is utilized, while two others must be located and drilled. The shock mounting pin should sit right over the hole where the old pitman arm was mounted. When the other two holes are drilled, the shock bracket is firmly mounted. Now, the rivets that you chiseled off will obviously still be in the frame. Use a hammer and center punch to totally remove the rivets and clear the holes. Take a tape measure and put the end on the brake line extending through the frame. From that point, measure out 12-1/2 inches along the top of the frame and mark. (12-1/2 inches from center brake line hole to new mark on frame) From that mark you just made at 12-1/2 inches, measure down one inch and mark. This is where you will drill an additional 3/8 inch steering box mounting hole. The kit provides a triangular bracket that attaches to the Saginaw steering box. This bracket holds the box in place on the frame which will be welded. Using the hole you just drilled and the frame bracket attached to the steering box, mark the two lower holes. Here you can see the two holes to be drilled. Once the holes have all been drilled, the provided bolts and spacers are inserted from the inside of the frame outward with the spacers on the outside of the frame. Have someone hold the power steering box in place while you tighten the bolts, securing the box to the frame. When the steering box has been bolted in place securely, weld the triangular bracket to the frame. Next comes the installation of the new steering arm that is bolted to the axle and backing plate via the two upper assembly bolts. The factory steering arm that you see curving inward can either be cut down or left alone. Now reconnect the tie-rod ends to the axle on both sides of the truck. As long as you didn't mess with the revolutions of the tie-rod ends, the alignment will be fine. To install the shocks, the lower mounting bracket from the opposite side is used so that the shock can now be mounted behind the axle instead of in front. This is how the shock will look when installed properly. While you are out in the junkyard, you must get yourself a GM Pitman arm that measures 6-3/4 inches long. A Chevelle or El Camino version will work and in some cases, you may have to drill out the drag link end to accept the thickness of rod end on the drag link. Install the provided Zerk fittings into the rod ends of the drag link. The drag link is installed from the bottom side of the Pitman arm and secured in place with a cotter pin. The same goes for the other end of the drag link that connects from the underside of the new steering arm. Now, install a Borgeson joint onto the output shaft of the steering box. Insert the bar stock end into the upper Borgeson joint on the steering column and mark the desired length in relation to where the end of the intermediate shaft should be when installed into the joint. Shaft should be made from mild carbon steel. Either a bandsaw or a hacksaw will work to cut the Intermediate shaft. With both ends of the intermediate shaft installed properly into the Borgeson joints, time the joints. Joints on an intermediate shaft should be aligned so the ears of the yokes on that shaft are in line, not 90-degrees out of phase. It should be the same as a driveshaft. Then weld the intermediate shaft and the joints together. This is what the steering box will look like installed with the steering shaft attached. When you are done, this is what the assembly should look like. The only thing to do is to install the power steering pump and lines when you install the engine. Note: the Borgeson Joints are not in phase in this photo. But they were put into phase before they were welded. NOTE: Locating the correct size pitman arm can be very difficult. You can take any pitman arm that fits the steering box and which has the correct hole size for the drag link, and have it shortened. We recommend that you have it shortened and re-welded by a certified welding shop! Or for your convenience, a a shortened and re-welded pitman is also available from us. Classic Performance Products 378 E Orangethorpe Ave., Placentia CA 92870 Tech Line 714-522-2000 TECH | BOOKS | SUSPENSION | BRAKES | STEERING | CONTACT US | HOT PRODUCTS © Classic Performance Products. This "website" and all contents are property of Classic Performance Products. Prices subject to change without notice. Not responsible for errors or omissions. Please note that kits & prices may vary between certain applications. |
|
|
|
|
09-30-2015, 01:28 PM
|
#28 |
|
Registered User
Join Date: Sep 2015
Location: Weiser , Idaho
Posts: 127
|
Re: New here , 58 under bed tank questions and more
Power Steering Conversion Kit
SKU: FPS-5910 I could not find that on their site , i did find this , which i am assuming is similar http://www.brotherstrucks.com/prodin...number=PSC4759 Wow , thanks for the info , i was searching Brothers when you typed all that , thanks !! , i will check into that as well |
|
|
|
|
09-30-2015, 03:12 PM
|
#29 |
|
Registered User
Join Date: Nov 2010
Location: calgary alberta
Posts: 8,338
|
Re: New here , 58 under bed tank questions and more
that looks like the same set up. if you have some skills you could probably make something work, or just buy the kit that comes with a few things that would take a bunch of time to fab, and some guess work.
|
|
|
|
|
10-01-2015, 08:36 PM
|
#30 |
|
Registered User
Join Date: Oct 2013
Location: Massapequa Park, NY
Posts: 873
|
Re: New here , 58 under bed tank questions and more
i have the reproduction 65 mustang tank in my truck from tanks inc. very happy with it. kit came with the correct sending unit to work with stock fuel gauge. from what i understand, the reproduction tank from tanks inc is better than an orignal mustang tank because the feed is on the top of the new tank, while its on the bottom of the original tank, which mean a fuel leak could empty your tank
i did the fill behind a flip down license plate
__________________
Frank 1957 Chevy 3100 2000 Silverado z71 SOLD 2012 Ram 1500 Quad Cab 1992 International 4700 |
|
|
|
|
10-01-2015, 10:03 PM
|
#31 |
|
Hollister Road Co.
Join Date: Apr 2005
Location: Houston
Posts: 6,131
|
Re: New here , 58 under bed tank questions and more
that came out very nice
|
|
|
|
|
10-01-2015, 11:12 PM
|
#32 |
|
Registered User
Join Date: Sep 2015
Location: Weiser , Idaho
Posts: 127
|
Re: New here , 58 under bed tank questions and more
 , that is a nice setup you have there , that is a nice setup you have there 
|
|
|
|
|
10-02-2015, 01:38 AM
|
#33 |
|
Registered User
Join Date: Sep 2015
Location: Weiser , Idaho
Posts: 127
|
Re: New here , 58 under bed tank questions and more
I have a few questions , i have been reading thru the "Projects" and other posts here about suspension , from what i am gathering in keeping the stock suspension , if i were to "flip" the spring location (top to bottom of axle/s) , with the rear i would have to notch the frame ?? , and the front i would have bump steer issues ???
If keeping the stock suspension , , then what is the best way to lower the truck ?? , i am only looking for a few inches (3 or so) , just enough so a set of 15" with low profile tires would not look like they are on a 4x4 , and so they somewhat fill up the wheel openings , for the front would flipping the springs cause bump steer , if so would , dropped spindles ?? , dropped Axle ?? , less leafs in springs ?? , for the rear , can the axle be flipped without notching ?? , and i am guessing the perches would have to be cut off and welded to the bottom of the axle housing ?? , note i will be driving in Idaho , so even the freeways suck as far as potholes and rough roads , and i will be hauling 1 or 2 dirt bikes around , and driving 120+ miles round trip for a day out riding so the ride needs to be able to handle this without bottoming , for now , i just can't afford to do a subframe in the front , maybe in a few years , maybe later this next year , but not right now , so i need to make the straight axle and no frame hacking in the rear work for me , while getting the truck down a bit , and the cheaper the better (within regards to safety) , i most likely wont be doing this till spring or so , Any Idea's/suggestion so i know what to look at/price ?? A stance like Ogre's truck would be nice , but even a little higher would still be fine , just 3" or so lower in the rear and maybe 4" or so in the front Last edited by JimDirt; 10-02-2015 at 01:47 AM. |
|
|
|
|
10-02-2015, 10:46 AM
|
#34 |
|
Registered User
Join Date: Nov 2010
Location: calgary alberta
Posts: 8,338
|
Re: New here , 58 under bed tank questions and more
I think if you do an axle flip out back you will hit the frame especially with a load in. by the time you add a couple of dirt bikes, gas cans a ramp etc and a couple of guys, you will most likely be bottomed or close to it. you could add some load levelling air bags but probably still hit the frame without a notch done as well. you would definately want some really good snubbers in that scenario. up front, when you lower the truck the wheels look like they are too far to one end of the wheel opening. most guys adjust the axle centre line so the wheels look like they are centred in the fender opening. if you just lower it you may not like the look anyway. not trying to make it a bad day for you, just saying it is a lot of work to find out you made a problem for yourself.
|
|
|
|
|
10-02-2015, 10:55 AM
|
#35 |
|
Registered User
Join Date: Nov 2010
Location: calgary alberta
Posts: 8,338
|
Re: New here , 58 under bed tank questions and more
take a look at ogre's build thread, post 3, then imagine how much clearance there would be above the axle if the frame was not notched. I think you would bottom out. notching isn't as hard as a lot of guys make it out to be. if you are a good welder you could definately rig up a jig and weld it on the frame temporarily to hold everything in line, then do the notch and reinforcing, then cut off the jig. weld small areas to avoid heat warping and box the back side fore and aft of the notch. then you don't have to worry about loading dirt bikes or whatever.
|
|
|
|
|
10-03-2015, 12:59 AM
|
#36 |
|
Registered User
Join Date: Sep 2015
Location: Weiser , Idaho
Posts: 127
|
Re: New here , 58 under bed tank questions and more
It looks like lowering , at least for now , is on hold then , as i mentioned before , i am not worried about my welding or fab skill , but i don't have a welder anymore , and my only alternative would be to farm it out , and that is going to cost way more than it would if i did it , but with no way to weld , i would have to load up the truck , trailer it to someone that can , then pay them to do it , which will kill my budget , all i want is to get the H78 15's off it and go to 225 60?? 15's , but i am thinking the 2"-3" gap it has now to the top of the tires , is going to double to 6" or so , and that would look crappy to me , later down the road i can figure out a way to get a welder and do it myself , but for now , its just not a option
I went out and looked at the suspension , and yea , there is not much room as is , let alone putting the axle above the springs , so i see what everyone is talking about Maybe for now (not right now , but starting next month) i will just get the truck running again , with the new cam , engine and tranny crossmembers to get the engine up where it needs to be , do the brakes , and tank relocation , get a new windshield and seat , replace the steering box with something preferably not as worn out , replace the column with a tilt unit , get some primer on it , and drive it for a bit till i get something setup so i can weld again , and go from there , since what i listed is still plenty of work needed to be done I was really hoping just to drop it 3-4 inches , and move on to the next project on it , but it looks like that is way more of a hassle for me right now , then i had thought Well deer and elk hunting start next week , so there goes whats left of my budget for the month , plus i just put some Dick Cepec's on my Toyota today , so that killed a bunch of my budget right there , as my old tires were not going to get me thru winter , so i needed some traction before the snow hits |
|
|
|
|
10-03-2015, 02:14 PM
|
#37 |
|
Registered User
Join Date: Nov 2010
Location: calgary alberta
Posts: 8,338
|
Re: New here , 58 under bed tank questions and more
october issue of classic trucks has a write up on the cpp steering gear install. maybe some ideas for you. it goes through the whole process.
sounds like you have a bunch going on anyway so I would leave the drop till other stuff is done too. it is snowing here in Calgary today, just sayin, good thing you got those tires... I am finishing up a reno so hopefully, when I get all the stuff put away in the shop/dump zone, I will be able to see my 57 again. |
|
|
|
|
10-04-2015, 01:59 AM
|
#38 |
|
Registered User
Join Date: Sep 2015
Location: Weiser , Idaho
Posts: 127
|
Re: New here , 58 under bed tank questions and more
I am right below you in Idaho (southwest side of my state) , i have some relatives in Alberta (the Vokes) , i was born in Hamilton,Ontario , so i know what it gets like there north of the border **I have not been back there since 1974 though**
We should start getting snow here within the next few weeks i would imagine , but its still in the 70's here right now and only down to low 50's at night , so its still T-Shirt weather here , for the next week anyway , but it can snow one day , and be 80 the next here , but i only get about 2 ft of snow at the house normally , so its not that bad , aside from having to plow the 1/4 mile long driveway , i know my cousin in Quebec gets about 10 ft of snow at his place every winter This was last winter here , you can see the driveway going down past the pond on the property , the road at the end of the driveway is at the base of the hillside in the background  These are some of the Elk that hang around on the hillside at the end of the driveway   There are times when there are 300 or more going across the driveway heading to our pond to drink , i took the last 2 pictures from my lawn this spring Last edited by JimDirt; 10-04-2015 at 02:11 AM. |
|
|
|
|
10-04-2015, 12:29 PM
|
#39 | |
|
Registered User
Join Date: Jan 2012
Location: Motown
Posts: 7,680
|
Re: New here , 58 under bed tank questions and more
Quote:
unloaded i used to hit the bump stops, now i run air shocks to keep off them and it has worked well i could never throw a couple dirt bikes in back of truk and run down the road, but that was never my plan  i do like the ride height of truk, but i also run an 09 sierra longbed for when i need a real truk 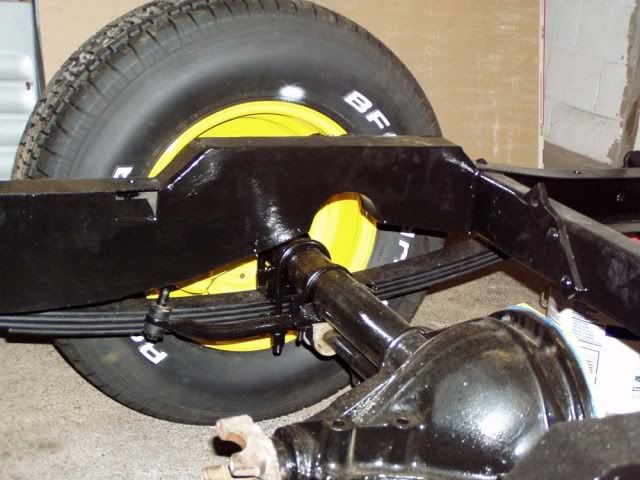
__________________
cool, an ogre smiley Ogre's 58 Truk buildhow to put your truck year and build thread into your signature shop air compressor timer |
|
|
|
|
|
10-04-2015, 03:05 PM
|
#40 |
|
Registered User
Join Date: Nov 2010
Location: calgary alberta
Posts: 8,338
|
Re: New here , 58 under bed tank questions and more
did you say SOME elk? holy!
|
|
|
|
|
10-04-2015, 06:07 PM
|
#41 | |
|
Registered User
Join Date: Sep 2015
Location: Weiser , Idaho
Posts: 127
|
Re: New here , 58 under bed tank questions and more
Quote:
|
|
|
|
|
|
10-04-2015, 07:50 PM
|
#42 | |
|
Senior Member
  Join Date: Nov 2008
Location: Glendora, CA
Posts: 6,344
|
Re: New here , 58 under bed tank questions and more
Quote:

__________________
'55 Big Window Shortbed, Drive-It-&-Work-On-It slid down the "slippery slope" to a Frame-Off Rodstoration! LQ4/4l85e/C4 IFS/Mustang 8.8 rearend w/3.73's Dan's '55 Big Window "Build" - Well, Kinda! |
|
|
|
|
|
10-04-2015, 09:43 PM
|
#43 |
|
Registered User
Join Date: Sep 2015
Location: Weiser , Idaho
Posts: 127
|
Re: New here , 58 under bed tank questions and more
LOL yea i know i grew up there (Sunland/Tujunga), and i remember winter was 55 degree's lol , in Canada (where i was born) , there were winters at our cabin that were 50 below 0 F. , now that is definitely weather for a heavy coat !!
It took me a couple of winters in the early 1990's to get used to the weather here , i was just up in the mountains today doing some scouting for deer for hunting next week , and it was about 42 and i was in a T-Shirt walking around the hills , in February here , i am out on my dirt bike as soon as the snow starts melting , its usually about 25-35 , and i am out there having a blast , its been about 50 here at night lately and i still have my air conditioner on in my bedroom along with 2 fans blowing on me , and only a sheet on the bed because its too hot for a bedspread lol |
|
|
|
|
10-04-2015, 10:03 PM
|
#44 | |
|
Registered User
Join Date: Sep 2015
Location: Weiser , Idaho
Posts: 127
|
Re: New here , 58 under bed tank questions and more
Quote:
So it seems without swapping the entire undercarriage with some better equipped suspension truck chassis that i can lower , i am better off (if using the stock frame) to leave it stock height and just live with the wheels not filling the openings ?? (i do not like 20" etc wheels , i would rather stick with 15" or so) |
|
|
|
|
|
10-05-2015, 12:32 PM
|
#45 |
|
polishing a turd
Join Date: Dec 2004
Location: houston, tx
Posts: 674
|
Re: New here , 58 under bed tank questions and more
or you could set the ride height where you want it while empty, and add helper air bags on top of the springs that you fill when you have a load to level the truck back out.
__________________
59 chevy apache 31 4x4 - my project: http://67-72chevytrucks.com/vboard/s....php?p=8668512 53 buick special - straight 8 sled - blow through turbo 47 gmc - flatbed hot rod build 99 ford econoline e350 - 4x4 converted family roadtrip/overlanding rig AKA 'Monstervan' AKA 'Daddy-Van' |
|
|
|
|
10-05-2015, 12:43 PM
|
#46 | |
|
Registered User
Join Date: Jan 2012
Location: Motown
Posts: 7,680
|
Re: New here , 58 under bed tank questions and more
Quote:
flipping the axle on stock springs will give your truck about a 7'' drop in back you can put a real c-notch in there and air suspension and still drive get a load of gravel all while driving 3'' off the pavement, though i guarantee it will cost you more than $29
__________________
cool, an ogre smiley Ogre's 58 Truk buildhow to put your truck year and build thread into your signature shop air compressor timer |
|
|
|
|
|
10-05-2015, 03:07 PM
|
#47 |
|
Registered User
Join Date: Sep 2015
Location: Weiser , Idaho
Posts: 127
|
Re: New here , 58 under bed tank questions and more
Yea , i understand , my main issue right now is , without the ability to welding/fab working up something in the chassis , because of either funding or the constraints of having to load up the truck on a trailer and hauling it to someone and pay them to do the work (that i could otherwise do), which go hand in hand with funding , i am limited to what i can do to get the truck lower for now , till i can eventually get a welder going here , though i still have to work on the truck in gravel , so no slab to true everything up on , so again , i am limited to what i can do , so i was hoping a simple flip or easy mod to get the truck at least 3"-4" lower , and i would be happy , but it seems these frames were not designed with that in mind and clearance is a big issue
|
|
|
|
|
10-06-2015, 01:06 PM
|
#48 |
|
Registered User
Join Date: Jan 2012
Location: Motown
Posts: 7,680
|
Re: New here , 58 under bed tank questions and more
why not get it running/stopping/moving as is and use it?
when your in a better place in life then modify it as needed i've owned 58 truk for 25 yrs, only 6 yrs in it's current configuration (8 yrs to get it there) it was my dd/work truck for the previous 10 yrs
__________________
cool, an ogre smiley Ogre's 58 Truk buildhow to put your truck year and build thread into your signature shop air compressor timer |
|
|
|
|
10-06-2015, 03:30 PM
|
#49 |
|
Registered User
Join Date: Sep 2015
Location: Weiser , Idaho
Posts: 127
|
Re: New here , 58 under bed tank questions and more
I guess the push was because it was my dads and i just wanted to get it back to what it was AND up to what he and i had talked about doing to it , only the budget is a major factor on that , like i said , if i had a welder , i don't have any issues welding what is needed , and if i thought i could not do it , i have a friend that welds for a living , and he is a car/truck guy like me (he has his dads 67 that his dad bought new) , its just the thought of everything i would need done i would have to load it up and pay someone , to not only do what i can do , but to pay with money i did not take into consideration i would need to do the things i had planned ( as in i figured the suspension was a simple flip parts around and be done , but that is not what it is) , i figure doing what i need to get it running and road worthy , about $1500 ,, including replacing engine components that are bad , getting the engine to sit where it should , getting the brakes in order , and getting a windshield in it and a seat and a rear mounted gas tank (getting it out of the cab) , and priming it , till i get the bodywork situated , which is not bad really as far as expense goes , but to do any frame changing/modding , suspension work , is going to be where the major expense lies , i was just hoping i could get it mostly done before my 91 year old mother dies , as i know she would like to see it , not only back on the road , but completed , so that was the push , but , like you mentioned , i can still do the safety and usability things like tank , and engine stuff , etc , without needing to weld anything , if it was a Chevelle or one of the Hemi Cuda's i once had , it would be easy to get it done without major modifications , you would think a truck would have plenty of room for raising and lowering without altering much of anything , i guess they did not think about stuff like this when they built these trucks .....
|
|
|
|
|
10-06-2015, 04:22 PM
|
#50 |
|
Registered User
Join Date: Nov 2010
Location: calgary alberta
Posts: 8,338
|
Re: New here , 58 under bed tank questions and more
ya, just like they didn't think about door fitment and body gaps.......
|
|
|
|
|
| Bookmarks |
|
|


 Linear Mode

