
 |
Register or Log In To remove these advertisements. |
|
|
|
|||||||
 |
|
|
Thread Tools | Display Modes |
|
|
#26 |
|
Registered User
Join Date: Oct 2015
Location: Peoria, AZ
Posts: 67
|
Re: 1969 c10 build "the grinch" (gonna be pic heavy)
|
|
|

|
|
|
#27 |
|
*************
 Join Date: Apr 2005
Location: Pensacola, FL
Posts: 17,858
|
Re: 1969 c10 build "the grinch" (gonna be pic heavy)
Sweet build!
__________________
Rob - https://www.instagram.com/hart_rod_c10 As Iron Sharpens Iron, So One Man Sharpens Another. Proverbs 27:17 FOR SALE: DBW pedal bracket - http://67-72chevytrucks.com/vboard/s...d.php?t=651123 FOR SALE: Hood Brackets http://67-72chevytrucks.com/vboard/s...d.php?t=679945 1987 Silverado SWB - 34.5K original miles http://67-72chevytrucks.com/vboard/s...d.php?t=801834 1969 SuperBurb - http://67-72chevytrucks.com/vboard/s...d.php?t=200387 1968 Farm truck - http://67-72chevytrucks.com/vboard/s...d.php?t=358692 1968 SWB - http://67-72chevytrucks.com/vboard/s...d.php?t=551258 1948 Chevy - http://67-72chevytrucks.com/vboard/s...=122164&page=3 |
|
|

|
|
|
#28 |
|
Still Learning
Join Date: Jul 2009
Location: Central Oklahoma
Posts: 10,108
|
Re: 1969 c10 build "the grinch" (gonna be pic heavy)
Killer build plans. I want to see that new chassis. Sounds like a great product. Subscribed.
|
|
|

|
|
|
#29 |
|
Registered User
Join Date: Oct 2015
Location: Peoria, AZ
Posts: 67
|
Re: 1969 c10 build "the grinch" (gonna be pic heavy)
Thanks! your hood hinge brackets worked awesome!
Thank you! Its coming up!!! Just trying to keep this thing in order of how it happened! |
|
|

|
|
|
#30 |
|
Registered User
Join Date: Oct 2015
Location: Peoria, AZ
Posts: 67
|
Re: 1969 c10 build "the grinch" (gonna be pic heavy)
Pulled the seat out to send it to my buddy to get redone... As far as the interior goes, I am going to keep the original light green but change everything that was dark green to black. (if you knew me, this is a big stretch for building anything other than a black on black vehicle)
 I was looking for a greenish plaid material to do the seats in and wanted to use one like the "highlander" pattern but couldn't find any with the right green color. and all the ones I could find were too much of an olive green color. I was researching "green plaid interior" on google and I found that in 1976 Cadillac used a green and white plaid for the calais sedan and coupe... Checked with SMS Auto Fabrics and they had some OEM material!!! they sent me a sample and it was perfect! I ordered a few yards and then went to my local Trim Store and picked up a hide in black for the rest. Here is the seat prior  And here is the OEM cadillac plaid. It has white background, with green and black stripes for the plaid. It even smells like an old Cadillac!  
|
|
|

|
|
|
#31 |
|
Registered User
Join Date: May 2016
Location: South Williamsport
Posts: 174
|
Re: 1969 c10 build "the grinch" (gonna be pic heavy)
|
|
|

|
|
|
#32 |
|
Senior Member
 Join Date: Feb 2011
Location: Papillion, Ne
Posts: 897
|
Re: 1969 c10 build "the grinch" (gonna be pic heavy)
Tuned in....
__________________
 -Doug -Doug'05 RCSB Sierra 2WD '71 Sierra 2WD Longbed '98 Silverado K1500 Xcab...sold '72 Highlander"Raymond"...sold |
|
|

|
|
|
#33 |
|
Registered User
Join Date: Oct 2015
Location: Peoria, AZ
Posts: 67
|
Re: 1969 c10 build "the grinch" (gonna be pic heavy)
A big semi-truck showed up out back with a giant crate!!!
Inside the truck, in the crate.  The crate was massive! made the forklift look tiny!  Front end  Rear end  Set in its home for the next few months...  Un-Boxed  Nice detail on the front crossmember  It took a little longer than expected with this chassis, it was March 11 2016 when it showed up. It took 17 weeks from order time to delivery. I was told 8-12 and understood there was 3 major holidays in between this time. Overall I am very pleased with the chassis. A few minor changes had to be made but all-in-all its extremely nice. Time for parts to start going on!!!! |
|
|

|
|
|
#34 |
|
*************
 Join Date: Apr 2005
Location: Pensacola, FL
Posts: 17,858
|
Re: 1969 c10 build "the grinch" (gonna be pic heavy)
Sweet! Let me know if you need any ChubTubz.
__________________
Rob - https://www.instagram.com/hart_rod_c10 As Iron Sharpens Iron, So One Man Sharpens Another. Proverbs 27:17 FOR SALE: DBW pedal bracket - http://67-72chevytrucks.com/vboard/s...d.php?t=651123 FOR SALE: Hood Brackets http://67-72chevytrucks.com/vboard/s...d.php?t=679945 1987 Silverado SWB - 34.5K original miles http://67-72chevytrucks.com/vboard/s...d.php?t=801834 1969 SuperBurb - http://67-72chevytrucks.com/vboard/s...d.php?t=200387 1968 Farm truck - http://67-72chevytrucks.com/vboard/s...d.php?t=358692 1968 SWB - http://67-72chevytrucks.com/vboard/s...d.php?t=551258 1948 Chevy - http://67-72chevytrucks.com/vboard/s...=122164&page=3 |
|
|

|
|
|
#35 |
|
Registered User
Join Date: Sep 2009
Location: ottawa,canada
Posts: 4,550
|
Re: 1969 c10 build "the grinch" (gonna be pic heavy)
OMG that is so nice..
__________________
my build threads '86 C10 http://67-72chevytrucks.com/vboard/s...d.php?t=415628 '67 C10 http://67-72chevytrucks.com/vboard/s...d.php?t=635078 '63 GMC http://67-72chevytrucks.com/vboard/s...d.php?t=674682 |
|
|

|
|
|
#36 |
|
Registered User
Join Date: Oct 2015
Location: Peoria, AZ
Posts: 67
|
Re: 1969 c10 build "the grinch" (gonna be pic heavy)
It sure is! I just sat next to it and admired it for the first night! all of the technology that went into this chassis is amazing... computer scanned to make sure nothing would interfere, laser cut rails, eccentric alignment cams, adjustable trans cross member... its definitely a work of art alone. I was trying to find someone to nickel coat the entire thing but no one had a big enough tank to do the entire chassis.
|
|
|

|
|
|
#37 |
|
Registered User
 Join Date: Jan 2003
Location: Safford,AZ
Posts: 3,625
|
Re: 1969 c10 build "the grinch" (gonna be pic heavy)
nice!
__________________
1969  307, t350 307, t3501950 Chevy Wagon 1978 Big 10 1967 C10, 250,3-OTT |
|
|

|
|
|
#38 |
|
Registered User
Join Date: Oct 2015
Location: Peoria, AZ
Posts: 67
|
Re: 1969 c10 build "the grinch" (gonna be pic heavy)
So I couldn't wait any longer and the next day I put the new front CPP big brake kit with the cross drilled and slotted rotors and drop spindles.
The only thing was Roadstershop only sells this chassis with the wilwood pro spindle so your only lug pattern option is 5 on 4.75. To them this is a common bolt pattern in the hod rod industry, to me, it is a small camaro bolt pattern. I wanted something larger and I also wanted to use the transport wheels. This left me with the dilemma of finding a spindle that worked with the chassis that was designed around a different spindle. I had been in contact with roadstershop and wilwood and both of them telling me that their part was a mustang II spindle, I figured that the CPP Mustang II Big Brake Kit and spindle option would be my only hope. They have a drop spindle and a hub assembly that uses a 6 on 5.5" bolt pattern and that is exactly what I needed. Once those were installed the front wheels and tires went on easy. Next was the ford 9" third member. I went with a 3:70 gear ratio. I have two tahoe's with basically that gearing and similar wheel/tire size and they do great all around town and on the higway. I dropped it in for now just so everything could roll around without binding. I didnt want to fill it with any gear oil or put the seals in yet because I didnt want to have to pay for the Chem-strip cleaning fee at the powder-coater! The only issue was the rear end was shipped with 5 on 4.75" axles. (I had specifically asked for axles with a 6 on 5.5" bolt pattern but hey who listens to me) Anyway with the offset of the transport wheels I decided to use an adapter to go from the small lug pattern to the big lug pattern. That way if I ever wanted to put a nice deep dish billet wheel on here all I would have to do was remove the adapter and put the old spindles back on up front. So I had to order a set of custom adapters that had to be milled to fit what I needed. as you can see in one of the pictures below, the only wheels I had laying around with that bolt pattern were a set of weld draglite skinny's, I just needed them temporarily. After it was roll-able, with the tires and wheels on, I then dropped the engine and trans in... Using new Poly mounts everywhere... Shes a roller with powertrain!!!     Next up will be taking some measurements for the drive line and finding a set of headers that will clear everything! |
|
|

|
|
|
#39 |
|
Registered User
Join Date: Oct 2015
Location: Peoria, AZ
Posts: 67
|
Re: 1969 c10 build "the grinch" (gonna be pic heavy)
I set the front and rear bumpers on, just to see where they would set. looks good to me! I did have to fabricate new front bumper supports because the ones i had were too long to fit with the new chassis.
   Also, I found a set of headers that will work. They are sanderson LS shortys, they seem to clear everything and look pretty good to me!  The new Aeromotive Phantom in-tank fuel pump showed up along with the fuel filter (not pictured) 
|
|
|

|
|
|
#40 |
|
Registered User
Join Date: Apr 2008
Location: Berne IN
Posts: 3,255
|
Re: 1969 c10 build "the grinch" (gonna be pic heavy)
Very nice! You're doing it right
|
|
|

|
|
|
#41 |
|
Registered User
 Join Date: Dec 2012
Location: Rochester, IL
Posts: 537
|
Re: 1969 c10 build "the grinch" (gonna be pic heavy)
The chassis is sweet!!
__________________
__________________ Mike 70 Med Olive build http://67-72chevytrucks.com/vboard/s...d.php?t=714804 Instagram- protouring66 |
|
|

|
|
|
#42 |
|
Registered User
Join Date: Oct 2015
Location: Peoria, AZ
Posts: 67
|
Re: 1969 c10 build "the grinch" (gonna be pic heavy)
After taking measurements from the trans to the rear end I went to the drive line shop and had placed my order. I wanted a one piece so I didnt have to worry about carrier bearings and vibrations with all of the different angles. The guy at the drive line shop explained to me that an aluminum one piece would be better because of less rotational weight at the length I needed. 2 days later It was ready...
Here it is installed. 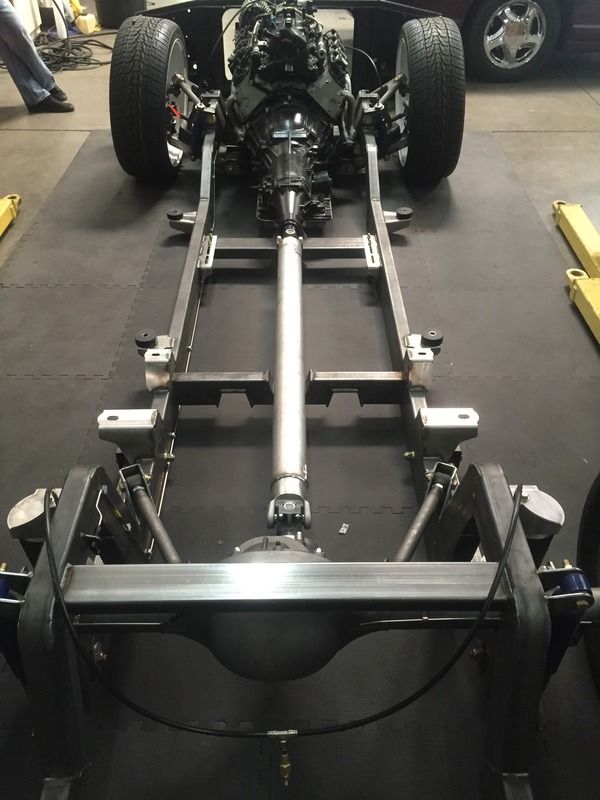 And its fully roll-able! set outside so we could pull the cab off the old chassis... Oh and the new radiator support is also installed. The old one was going to be more work than just ordering a new one. 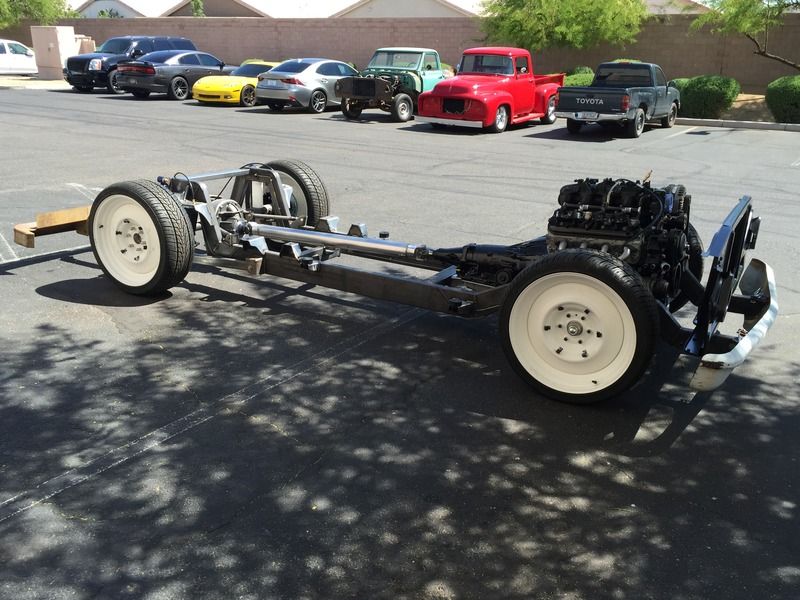 Fenders removed, wiring disconnected and body bolts out. Cab is ready to be lifted off. 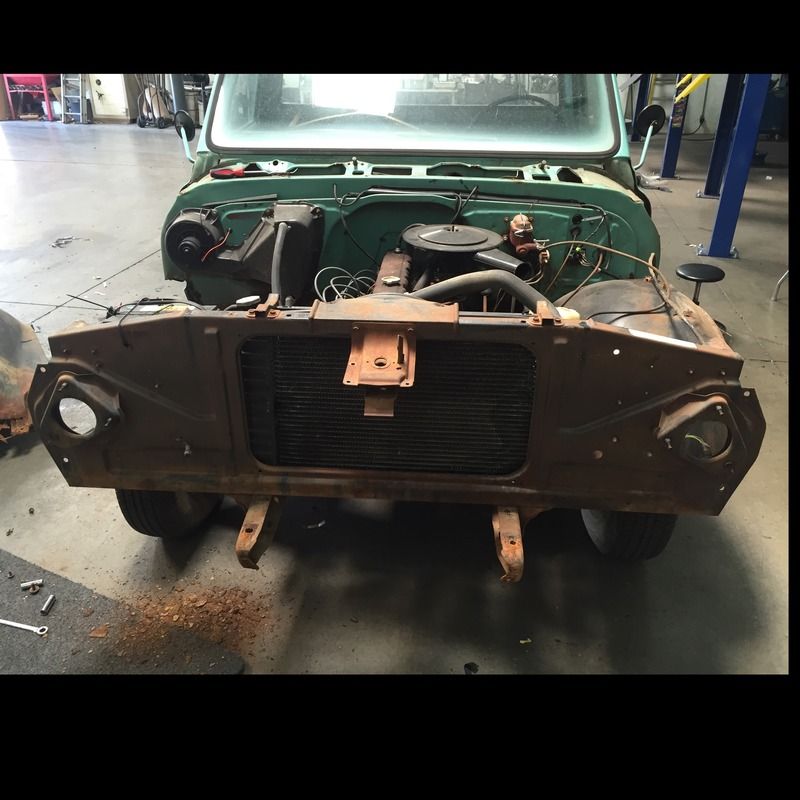 Cab is off and sitting on the lift. Here is whats left that wont be getting used. 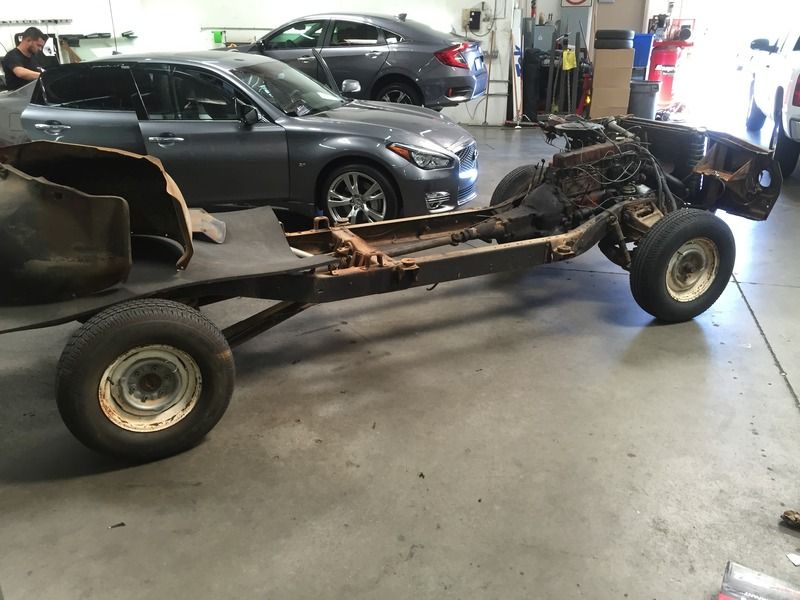 Old chassis out and new one in! 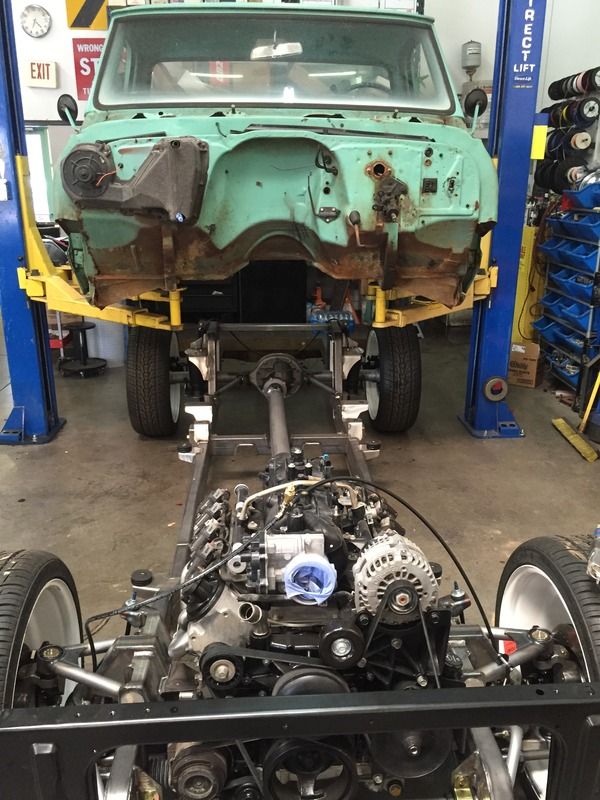 Here is the cab sitting about an inch and a half off the body mounts, the transmission is hitting on the floor board.  I found a high hump trans tunnel so I will just cut out the old one and install that one. It gave enough room for the 4l60E to fit. Here is where I started to cut.  Once the air suspension was lowered down, I had to clearance for the one piece drive line. that came up quite a bit into the floor. Here you can see what i had to cut out for that and where the trans sits. I didn't have the new trans tunnel cover at this time so i wasn't sure exactly where it covered. You can also see my ram air vent for cab cooling (rust hole) in the drivers side kick panel/floorboard. 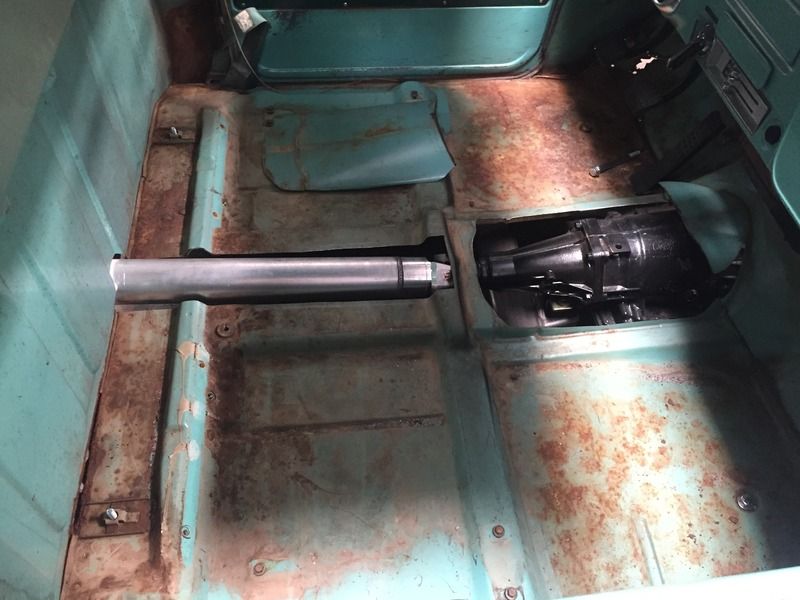 Body fully bolted to the chassis and air suspension fully aired down.  Here are some close up pictures of the chassis. Front control arms with adjustment cams  Rear axle and adjustment cams for pinion angle.  4lnk bars  Here is a front fender bolted up.  I was able to put the bed sides and header piece back together and set it on the chassis too. I still had to make some adjustments and line things up but this was just to get an idea of the finished look. 
|
|
|

|
|
|
#43 |
|
Registered User
Join Date: Apr 2016
Location: Vacherie, LA
Posts: 30
|
Re: 1969 c10 build "the grinch" (gonna be pic heavy)
Awesome progress so far. I'm following. Is the guy who shortened your bed a member here? Wonder if he'd be so kind to give up some measurements on that bed modification!
__________________
Brooks -- South Louisiana 2004 Tahoe, DD Currently on the prowl for that right C10 project https://www.facebook.com/brooks.landry.1 IG : brolandry |
|
|

|
|
|
#44 |
|
Registered User
Join Date: Sep 2009
Location: ottawa,canada
Posts: 4,550
|
Re: 1969 c10 build "the grinch" (gonna be pic heavy)
oh man that thing is looking killer already....

__________________
my build threads '86 C10 http://67-72chevytrucks.com/vboard/s...d.php?t=415628 '67 C10 http://67-72chevytrucks.com/vboard/s...d.php?t=635078 '63 GMC http://67-72chevytrucks.com/vboard/s...d.php?t=674682 |
|
|

|
|
|
#45 | |
|
Registered User
Join Date: Oct 2015
Location: Peoria, AZ
Posts: 67
|
Re: 1969 c10 build "the grinch" (gonna be pic heavy)
Quote:
Thats what I thought! I still cant wait to drive this thing, Its getting close though. |
|
|
|

|
|
|
#46 |
|
Registered User
Join Date: Jun 2014
Location: Mocksville, NC
Posts: 1,766
|
Re: 1969 c10 build "the grinch" (gonna be pic heavy)
I've been following your build on Instagram. Cool to see more details on it here. Looks like it's going to be a top notch final product. One question out of curiosity, why eliminate the rear marker light while shortening the bed sides? Do you plan on eliminating the fronts too?
__________________
Builds: Green Gus the 68 C10 | Bluey the 72 1500 | Lowly the 70 C10 - Instagram: @dr.hewitt - C10 Concept/Development Photos: Master Thread |
|
|

|
|
|
#47 |
|
Registered User
Join Date: Oct 2015
Location: Peoria, AZ
Posts: 67
|
Re: 1969 c10 build "the grinch" (gonna be pic heavy)
Next up was to make a frame to tie all of the bed sides, header and tailgate together so they could be pulled as one without the old steel bedfloor. I will be doing a raised bedfloor on this with wood inserts. This is just the lower frame. there will be another one above it.
Square tubing going in.   Bed to cab body lines, lined up...  I didnt take any pics at the time but we also sunk two stinger batteries into each of the bed corners. Here is what one of them looks like now. (after we had ran power cable) 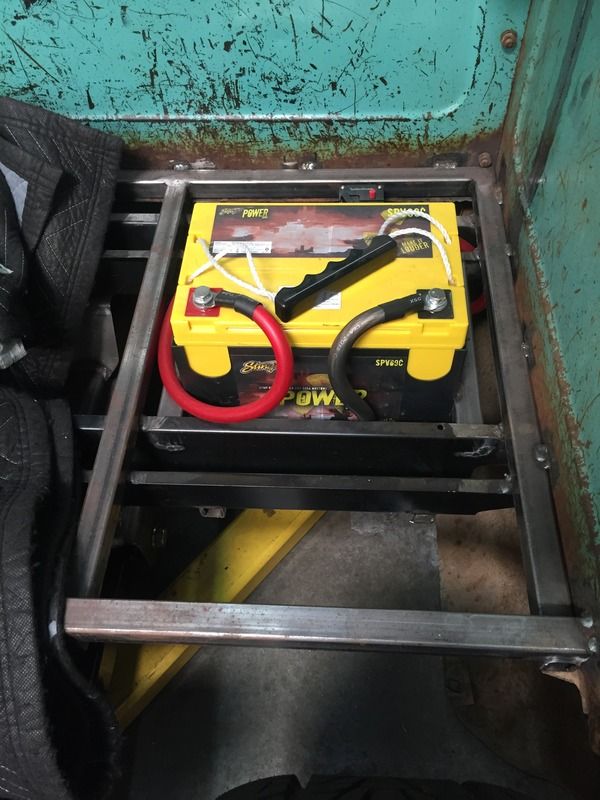 As we were working on the bed, The A/C system showed up from Vintage Air. ( I was running out of room for stuff so it sat there for a few weeks till I could get to that point)  After the bed frame was in, the next step was to do a little panel repair/replacement in the cab. the main issue was where the floor met the kickpanel on both sides and the factory seam from the floor to the firewall. I figured the best plan would be to replace both, driver and passenger floor pans and the kick panels. Drivers side before.   The passenger side looked just about the same. Here is the after shot with both floor pans and kick panels installed. I also received the new (to me) high hump trans cover. I installed that with some threaded nut inserts and bolted it down so it was still removable if needed. New black door panels, arm rests and dash pad were installed at this point as well. We also put in new power window assemblies from Electric Life and used the autoloc crank handle switches so they still retain the OEM look. All of the window rubber and felt around the main glass and the vent windows were also replaced. (I didnt get any pictures of this stage) 
|
|
|

|
|
|
#48 |
|
Registered User
Join Date: Oct 2015
Location: Peoria, AZ
Posts: 67
|
Re: 1969 c10 build "the grinch" (gonna be pic heavy)
I was trying to reuse the A/C compressor that i had received with the motor and trans but vintage air said it wouldn't work as well as the new sanden one they provide so I had to swap out the original one i had for the new one. I also wanted to keep it in the location that it was in so I didn't have to change any front drive belts or pulleys.
Here you can see the old one in place. it was very tight and i had to clearance the OEM bracket to fit with the new engine mounts.  I then got the A/C condenser mounted along with the dryer and the lines. They are ran through the radiator support but are going to be in the way of the tires when the suspension is dropped. Also the new Ron Davis aluminum radiator was delivered and installed. You can see in this picture how the A/C lines go straight back. I had already changed the bend on the smaller line. But my bender wont do the larger lines. The new compressor is really tight next to the chassis, I had to find some really tight tolerance 90* fittings. 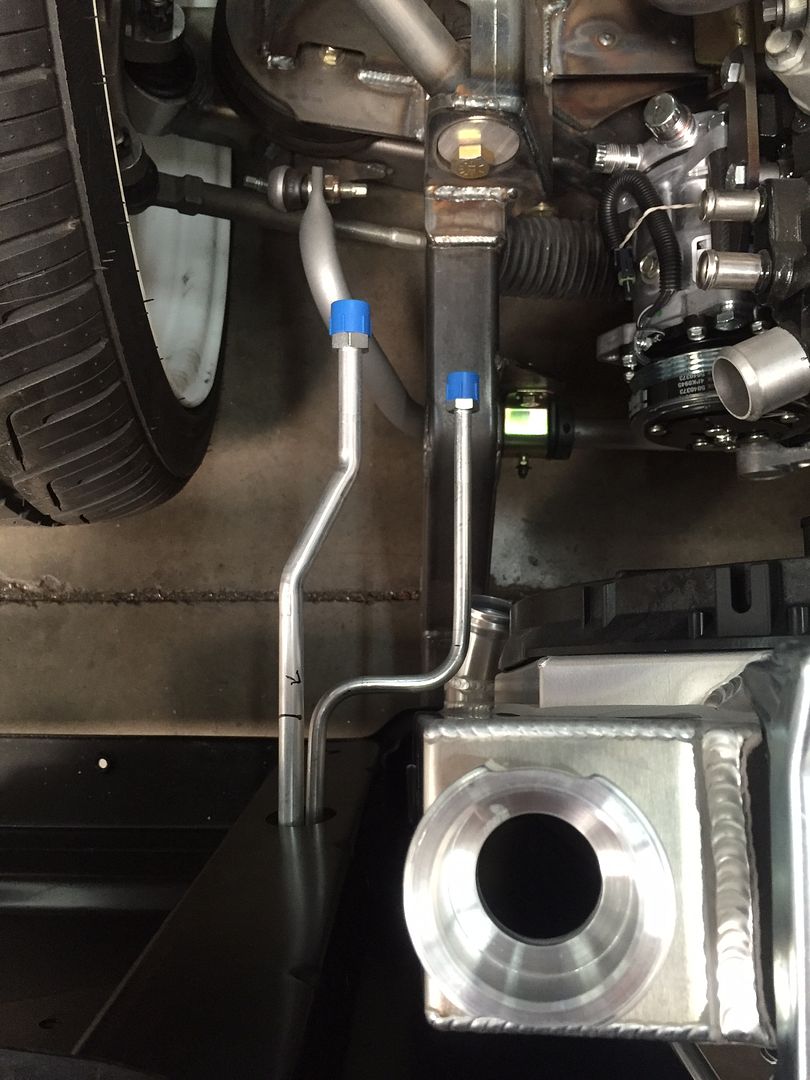 Rear view with the electric fans  My seat also showed up. I'm really happy with how it came out. 
|
|
|

|
|
|
#49 | |
|
Registered User
Join Date: Oct 2015
Location: Peoria, AZ
Posts: 67
|
Re: 1969 c10 build "the grinch" (gonna be pic heavy)
Quote:
|
|
|
|

|
|
|
#50 |
|
Registered User
Join Date: Oct 2015
Location: Peoria, AZ
Posts: 67
|
Re: 1969 c10 build "the grinch" (gonna be pic heavy)
My next step was to run 3/8 stainless fuel lines from the to the rear of the chassis where the custom fuel tank made by Boyd Welding. This was my first time working with stainless hardline and it was definitely a learning experience.
First off I drew the chassis profile on my work table so I didn't have to keep going back and forth from the chassis to the table. Here you can see where it will go along side the frame rail and up and over the rear "c notch".  And installed on the chassis  Next was to mount and tie in the aeromotive fuel filter.  Here is where the front lines start. They will have flexlines made to go to the fuel rails.  The ECU and Custom harness built from scratch showed up from Modern Vintage Systems as well. That will be the next step! 
|
|
|

|
 |
| Bookmarks |
|
|