
 |
|
|
#501 |
|
Registered User
Join Date: May 2005
Location: Beaverton, OR
Posts: 3,728
|
Re: Markeb01 Build Thread
Your build is so clean. I love it.
__________________
New Project: 1966 LWB C20 Plans: 1/2 ton conversion Dropmember front Dropmember rear Corvette discs Restored raised bed http://67-72chevytrucks.com/vboard/s....php?p=4295210 |
|
|

|
|
|
#502 |
|
Registered User
Join Date: Apr 2012
Location: Searcy, AR
Posts: 4,203
|
Re: Markeb01 Build Thread
__________________
DON Proverbs 27:17  US Air Force Retarded errr Retired My '65 Stepper Build:http://67-72chevytrucks.com/vboard/s...d.php?t=533920 My '60 Rusty Patina Build:http://67-72chevytrucks.com/vboard/s...66#post7402266 My '72 http://67-72chevytrucks.com/vboard/s...59#post7204359 SOLD |
|
|

|
|
|
#503 |
|
Senior Enthusiast
Join Date: Feb 2007
Location: Spokane Valley, WA
Posts: 8,356
|
Re: Markeb01 Build Thread
Thanks for the comments guys. For anyone interested, hereís the wiring layout I used for the electric fuel pump:
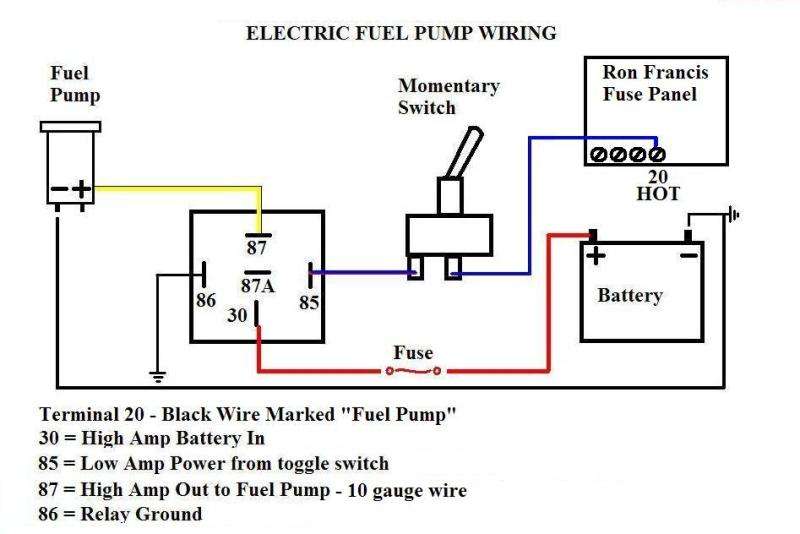 As mentioned earlier the relay was already mounted just ahead of the battery and had previously powered the fog lamps. I ran a new 10 gauge wire to the pump, replaced the off-on toggle switch with a momentary type, and ran a new feed wire to the switch from post #20 on the fuse panel (which is always hot). When the relay operated the fog lamps, the feed wire to the switch was tied in to the headlight circuit which wouldnít have been very practical for running the fuel pump. If I intended to use the pump full time, an oil pressure switch should also be included to kill the pump if the engine quits. This is a primary safety feature in case of a wreck so the pump doesnít keep running if the vehicle is crashed or upside down. As a wrap up for the year Iím also including another random topic I donít think Iíve covered anywhere else: Cruise Control Ė This was installed back in 2000 when the truck was my daily commuter. I bought this one from Summit:  http://www.summitracing.com/parts/RP...1223/?rtype=10 Surprisingly the price has only gone up $6.00 in twelve years. At first I put the control box on the driver side fender panel, but soon tired of the clutter:  Although the instructions advised against it due to noise concerns, it was remounted on the inside of the firewall next to the heater. This is viewed through the glove box opening with the liner removed:  It does make a tiny click when switched on, but my truck is so noisy it doesnít bother me a bit. The only thing visible in the engine compartment is the cable. This is about the only photo I have showing it:  I sliced off a stock turn signal arm to mount the switch:  Having done a bunch of these back in the 70ís and 80ís when they operated with a vacuum module, this is by far the easiest type Iíve ever installed, and it works as well as any new car cruise system Iíve ever used.
__________________
My Build Thread: http://67-72chevytrucks.com/vboard/s...d.php?t=444502 |
|
|

|
|
|
#504 |
|
But Found Her 25yrs Later!
Join Date: Oct 2010
Location: Oregon City, Oregon
Posts: 10,529
|
Re: Markeb01 Build Thread
Soon after My Dad and I bought my 65 in the early 80's up here in Portland, I drove it back to my hometown Woodland CA,
My dad cut me a stick to length for Cruise Control.  Posted via Mobile Device
__________________
I lost my 65 - Found it 25 years later: http://67-72chevytrucks.com/vboard/s...d.php?t=426650 66 C20 Service Truck: http://67-72chevytrucks.com/vboard/s...d.php?t=428035 |
|
|

|
|
|
#505 |
|
Senior Enthusiast
Join Date: Feb 2007
Location: Spokane Valley, WA
Posts: 8,356
|
Re: Markeb01 Build Thread
My dad had a mechanical "cruise control" back in the early 60's. It was a J.C. Whitney left foot gas pedal.
 Theory was it would give the right foot a rest. In actual driving, I remember him being distracted after using it for long drives, doing somewhat of a "pedal dance" to avoid clobbering cars ahead when slowing in traffic! 
__________________
My Build Thread: http://67-72chevytrucks.com/vboard/s...d.php?t=444502 |
|
|

|
|
|
#506 |
|
Senior Enthusiast
Join Date: Feb 2007
Location: Spokane Valley, WA
Posts: 8,356
|
Re: Markeb01 Build Thread
Another failed attempt at starting the truck last night convinced me the battery was no longer holding a decent charge. Since it was seven years old, it seemed like a good time for a new one. When the last battery was purchased it was a Consumer Reports Best Buy Ė the Walmart EverStart. Itís been replaced by the EverStart MAXX, which is probably the same battery with a different sticker:
 I no longer subscribe to CR, but other reviews on the web indicate the EverStart MAXX is still a CR Best Buy. One improvement is the carrying strap. The old battery had a fabric strap. The new battery has a plastic retractable handle which is much easier to use. One significant difference in the battery specs however is the price. Last time it was around $40. Now itís climbed to $85. YIKES! I hadnít realized how badly the old battery had deteriorated. With the new one, the engine seems to be spinning over around 600 rpms on the starter motor and fires to life almost on the first revolution like it used to. Of course it helped I also reset the accelerator pump to the lowest hole (where it belongs). When I recently tore the carb apart I set the pump link on the middle hole which provided too short a pump stroke. I think Iíll just sit back now and be happy for a while!
__________________
My Build Thread: http://67-72chevytrucks.com/vboard/s...d.php?t=444502 |
|
|

|
|
|
#507 |
|
Registered User
Join Date: Jun 2012
Location: Selkirk Ontario Canada
Posts: 1,141
|
Re: Markeb01 Build Thread
you going to add a battery kill switch to it for long sit time ?
__________________
My 63 GMC Panel Slow Build http://67-72chevytrucks.com/vboard/s...=1#post5457281 63 
|
|
|

|
|
|
#508 | |
|
Senior Enthusiast
Join Date: Feb 2007
Location: Spokane Valley, WA
Posts: 8,356
|
Re: Markeb01 Build Thread
Quote:
 http://hotronicsproducts.com/product...faabdb49d9f813 The nice feature of this setup is that no power is required to hold it in the on or off position. Once the bolt is thrown it remains in that position indefinitely until switched back the other direction. Until recently I had the clock on the hot side so it would keep running continuously, but during the winter months even the aircraft clock was enough to drain the battery after several weeks. So I wired in a clock selector switch for winter/summer, allowing the clock to run all the time, or shut off with the master during the winter. At first I added the Hotronics solenoid primarily for security, but it is really handy just for working on the car. If I want to work on the electrical system, or pull the steering wheel, or whatever – a quick flip of the switch and the entire truck is electrically dead. In winter mode even the clock is off, in summer mode only the clock remains powered. When the truck is not in use the master switch is always off so there’s no risk of battery drain, fire, or other related issues. If the weather is half way decent it still gets driven all year. When the snowy/icy roads are just too dangerous however, it has sat on occasion for weeks at a time. I’ve tried to cover all the bases so whether I want to or not the truck is always ready to go, any time of day or night.
__________________
My Build Thread: http://67-72chevytrucks.com/vboard/s...d.php?t=444502 |
|
|
|

|
|
|
#509 |
|
Registered User
 Join Date: Apr 2012
Location: Rockwall Texas
Posts: 38
|
Re: Markeb01 Build Thread
Do you still plan on the fenderwell headers? Love the build!
__________________
I have not failed. Iíve just found 10,000 ways that wonít work. |
|
|

|
|
|
#510 | |
|
Senior Enthusiast
Join Date: Feb 2007
Location: Spokane Valley, WA
Posts: 8,356
|
Re: Markeb01 Build Thread
Quote:
In the meantime Iím planning on adding sneaker plugs under the front fenders just for fun. Iíve toyed around with different exit locations and angles, and havenít yet decided on 2 or 3 bolt caps. I donít have any mock up photos of my truck yet, but Iím thinking of something along these lines: 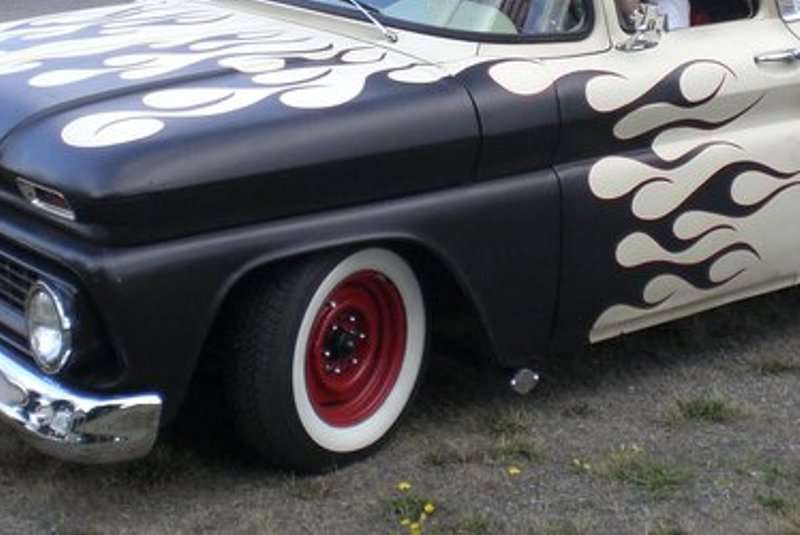  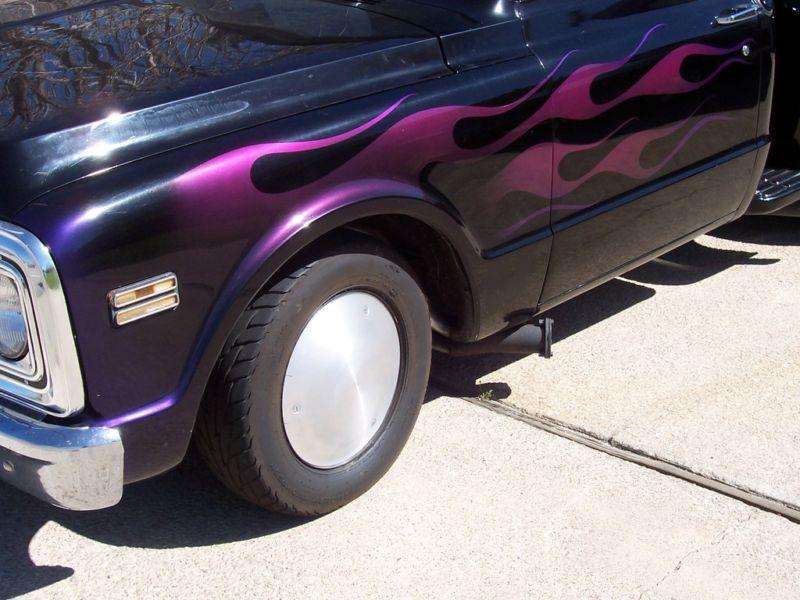 
__________________
My Build Thread: http://67-72chevytrucks.com/vboard/s...d.php?t=444502 |
|
|
|

|
|
|
#511 |
|
The 60-66 GMC/Pontiac guy....
Join Date: Oct 2010
Location: Apache Junction, Arizona
Posts: 1,306
|
Re: Markeb01 Build Thread
Hey Mark, I know they do auto swap meets in Spokane or near there anyway.
I find good deals on lots of stuff at those swap meets. A fellow 60-66er got a set of fenderwell headers for $50 at one and I was there when he got them so I know it wasn't bench racing BS. I find my best deals right at the end of the show/meet when people are getting ready to pack up... 
__________________
 Building Genuine Pontiac Firepowered cars and trucks for several decades.  Why Pontiac?? That's just me daring to be different.  Projects.. 63 C10 Short Wheel Base fleetside (The Pro-Street) currently under reconstruction. 440CID 2X4 Pontiac 
|
|
|

|
|
|
#512 |
|
Senior Enthusiast
Join Date: Feb 2007
Location: Spokane Valley, WA
Posts: 8,356
|
Re: Markeb01 Build Thread
Iíve had that experience as well. Very few people want to pack up and haul all their junk back home after a long hot weekend!
It looks like Iíll be reshuffling gauges again. After sorting all the bugs out of the fuel system improvements, I realized how nice it would be to have a fuel pressure gauge in the cab to know when the system is charged up, and also for reading idle and WOT pressures. Research indicated two options. An Autometer ďTraditional ChromeĒ mechanical fuel pressure gauge is available matching all my other gauges, or a mismatched electrical model. An electrical model would have been easier (and more expensive), but Iíd rather have all the gauges match and save quite a bit of money. So Iíll be using the Autometer 2413 Fuel Pressure gauge with a mechanical isolator. Apparently these run gas from the carb to the isolator and antifreeze from the isolator to the gauge, keeping fuel out of the passenger compartment. 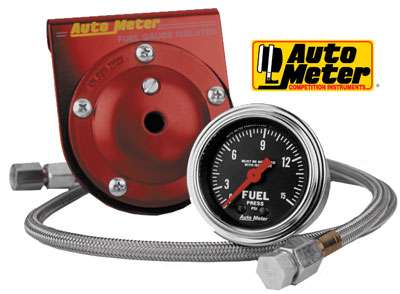  Iíve got a couple of details to sort out, like where to mount the isolator, and whether to leave the regulator on the engine or mount it next to the isolator. Then itís on to the inside. Iíll probably remove the chrome bullets up on the instrument panel and either install the fuel level and fuel pressure gauges in those holes, or I may mount the fuel pressure gauge on the accessory panel and move the gas and vacuum gauges up on the main panel. Either way Iíll need to do something with the lower accessory panel. The easiest solution would be to switch to a two gauge panel, but who knows, there might be something else creative I can do with the spare hole. 
__________________
My Build Thread: http://67-72chevytrucks.com/vboard/s...d.php?t=444502 |
|
|

|
|
|
#513 |
|
The 60-66 GMC/Pontiac guy....
Join Date: Oct 2010
Location: Apache Junction, Arizona
Posts: 1,306
|
Re: Markeb01 Build Thread
I would think keep fuel outside the cab is good but then again, if you have a stock tank, that is kind of a mute subject....
 
__________________
 Building Genuine Pontiac Firepowered cars and trucks for several decades.  Why Pontiac?? That's just me daring to be different.  Projects.. 63 C10 Short Wheel Base fleetside (The Pro-Street) currently under reconstruction. 440CID 2X4 Pontiac 
|
|
|

|
|
|
#514 |
|
Senior Enthusiast
Join Date: Feb 2007
Location: Spokane Valley, WA
Posts: 8,356
|
Re: Markeb01 Build Thread
No kidding. Thankfully mine's under the back of the bed. I remember when I was a kid some early hot rods actually had the fuel tank and hand operated pressure pump where the passenger seat would normally be!
__________________
My Build Thread: http://67-72chevytrucks.com/vboard/s...d.php?t=444502 |
|
|

|
|
|
#515 |
|
Senior Enthusiast
Join Date: Feb 2007
Location: Spokane Valley, WA
Posts: 8,356
|
Re: Markeb01 Build Thread
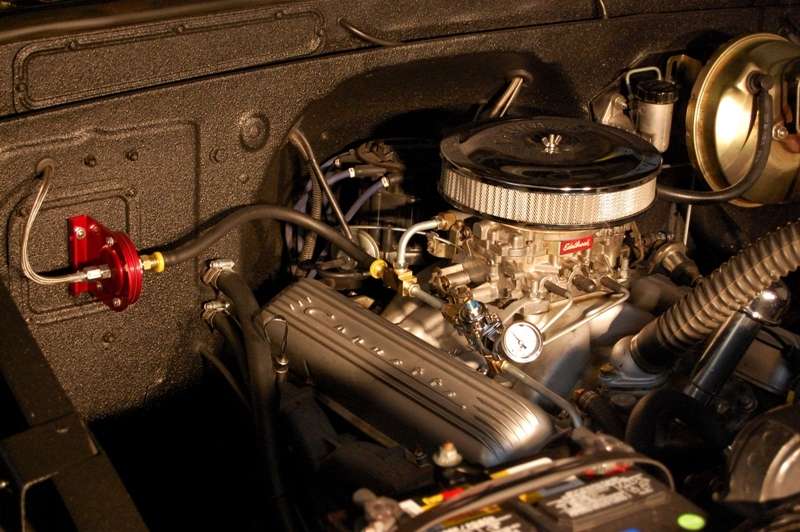
The last few days have been spent dinking around installing the fuel pressure gauge isolator and related stuff as parts showed up. The isolator installation was rather straight forward after determining best location for mounting. NHRA doesnít want it on the firewall, but there werenít a lot of options on my truck, and I wonít be racing it anyway. Hereís the finished installation:
 The only custom piece was the 300 psi hose between the T adapter and the isolator. It should hold up under the 5.5 psi in my system. It was pretty cheap at $15 and I had no other means to make the connection. I assumed the isolator would have a NPT connection, but it was 7/16x20 so I needed a custom fitting, and a full custom hose was the easiest solution. For an added bit of sparkle I thought it would be fun to polish the side of the brass T adapter. 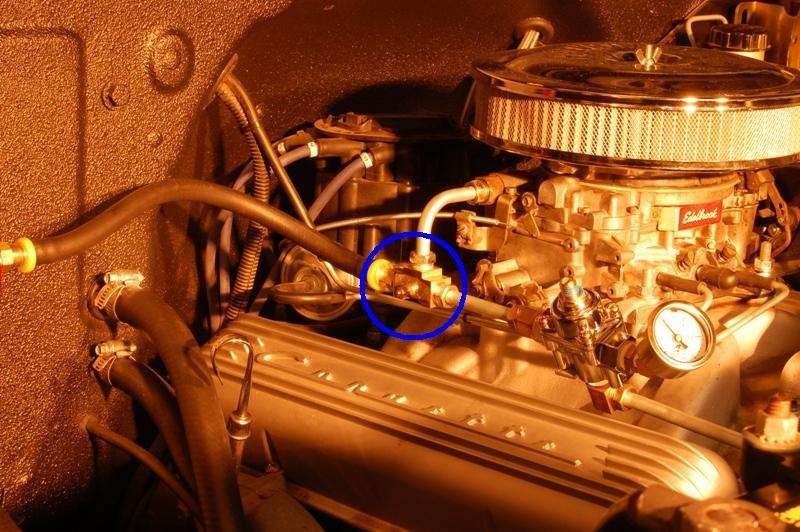 The reflection shown in close up below is an image of the hose clamp on the lower heater hose at the firewall. It will eventually dull out but I had extra time on my hands and nothing better to do: 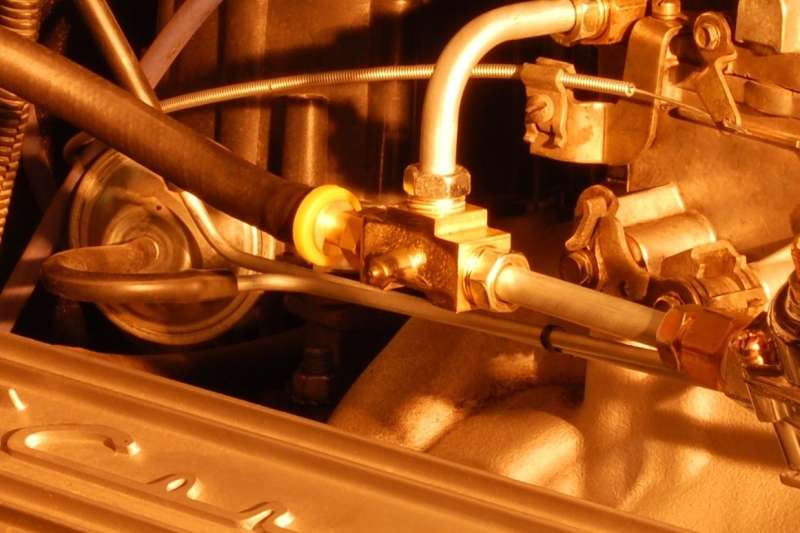 Gauges were reshuffled, moving the fuel level and vacuum gauge back to the main instrument panel, and the new fuel pressure gauge was installed on the right end of the accessory under dash panel. Now thereís a gauge for priming the engine with the electric fuel pump and also for showing pressure performance under WOT conditions. 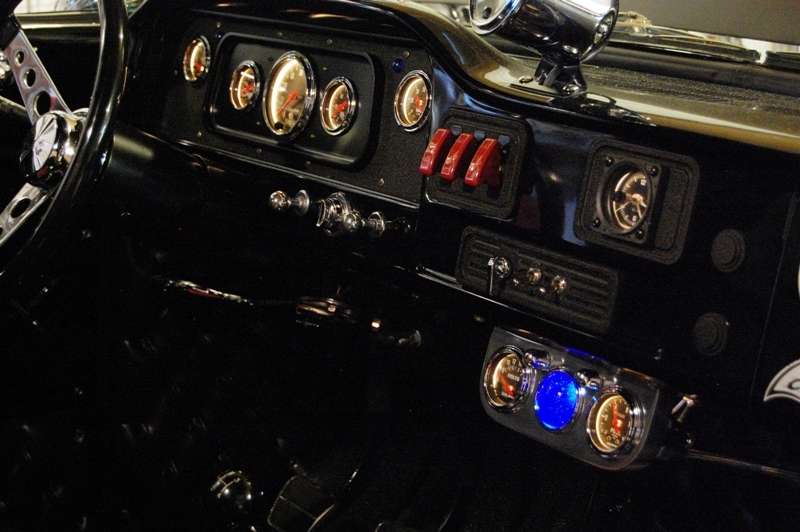 This also gave me a place to install the charge indicator for the anti-tailgating device. Itís in the prototype stage but appears very promising. The indicator itself is state of the art, filled with depleted Corbomite gas that changes color as the system is charged. When disengaged the indicator is almost black, and changes to a dark blue in idle cutoff mode: 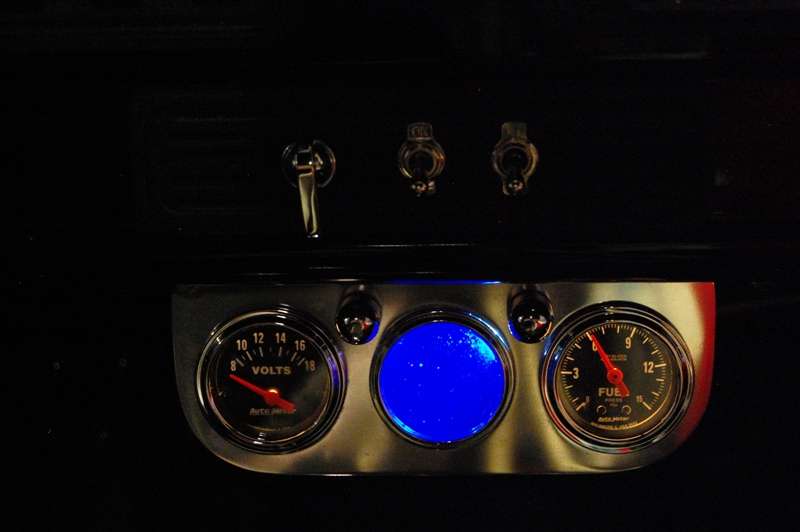 Fully charged and ready to activate it turns a bright whitish blue: 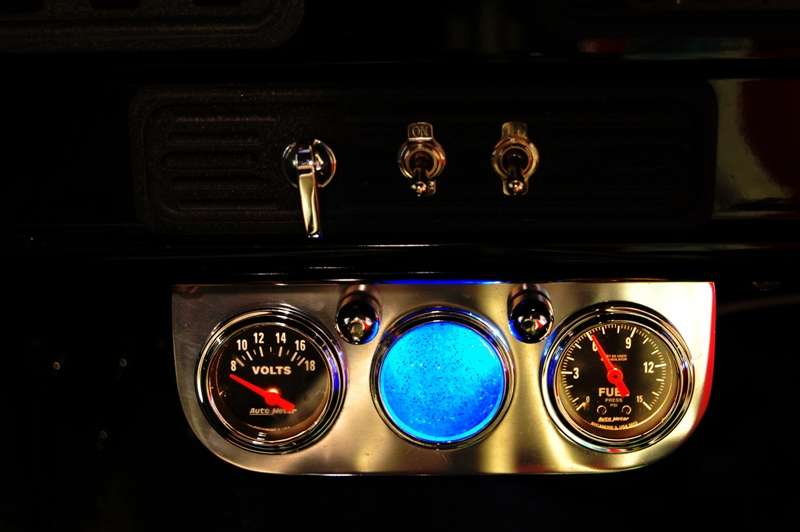 Once the indicator reaches this state itís a simple matter of throwing the 3rd switch under the red safety cover and a directed beam is emitted directly behind the truck disabling any vehicle ignition system approaching closer than 1 car length/per 10 miles an hour of my vehicle speed, eliminating the danger of tailgaters. There are still a few bugs to work out. The phaser capacitors overheat if run continuously for more than 15 minutes. Hopefully larger fans and punching louvers in the bedsides under the fenders (where they wonít show) will minimize that issue. Tapping into the cruise control speed sensor simplified connections. Before it can be offered commercially the weight will have to be greatly reduced. The current military grade 17 megawatt Class 3 plasma eclipiton velocity discharge emitter will have to be reduced from 370 lbs to something practical for passenger cars. And hiding the emitters behind my wig/wag lights is playing havoc with the beam pattern. Before certification can be obtained, the issue of shielding the ignition systems in police and emergency vehicles will have to be addressed, along with calibration of the beam emission/vehicle speed calculations. But for now Iím just happy enjoying the nice blue color!
__________________
My Build Thread: http://67-72chevytrucks.com/vboard/s...d.php?t=444502 |
|
|

|
|
|
#516 |
|
Senior Member
 Join Date: Oct 2009
Location: Fayetteville, Arkansas
Posts: 1,923
|
Re: Markeb01 Build Thread
man... the dash, the guages, that steering wheel, shifter, switches, seats... too cool. i'd crawl in that cockpit and never leave... to the bone.
|
|
|

|
|
|
#517 |
|
Registered User
Join Date: Apr 2012
Location: Searcy, AR
Posts: 4,203
|
Re: Markeb01 Build Thread
Must Echo Clem's words... As always the attention to Detail is spot-om, Great Job Mark!!!

__________________
DON Proverbs 27:17  US Air Force Retarded errr Retired My '65 Stepper Build:http://67-72chevytrucks.com/vboard/s...d.php?t=533920 My '60 Rusty Patina Build:http://67-72chevytrucks.com/vboard/s...66#post7402266 My '72 http://67-72chevytrucks.com/vboard/s...59#post7204359 SOLD |
|
|

|
|
|
#518 |
|
Registered User
Join Date: Apr 2011
Location: .
Posts: 3,104
|
Re: Markeb01 Build Thread
I will take 3. You take PayPal???

|
|
|

|
|
|
#519 |
|
Registered User
Join Date: Jun 2012
Location: Selkirk Ontario Canada
Posts: 1,141
|
Re: Markeb01 Build Thread
""Once the indicator reaches this state itís a simple matter of throwing the 3rd switch under the red safety cover and a directed beam is emitted directly behind the truck disabling any vehicle ignition system approaching closer than 1 car length/per 10 miles an hour of my vehicle speed, eliminating the danger of tailgaters.
There are still a few bugs to work out. The phaser capacitors overheat if run continuously for more than 15 minutes. Hopefully larger fans and punching louvers in the bedsides under the fenders (where they wonít show) will minimize that issue. Tapping into the cruise control speed sensor simplified connections. Before it can be offered commercially the weight will have to be greatly reduced. The current military grade 17 megawatt Class 3 plasma eclipiton velocity discharge emitter will have to be reduced from 370 lbs to something practical for passenger cars. And hiding the emitters behind my wig/wag lights is playing havoc with the beam pattern. Before certification can be obtained, the issue of shielding the ignition systems in police and emergency vehicles will have to be addressed, along with calibration of the beam emission/vehicle speed calculations."" LMFAO i'll take 2 please  
__________________
My 63 GMC Panel Slow Build http://67-72chevytrucks.com/vboard/s...=1#post5457281 63 
|
|
|

|
|
|
#520 |
|
"Where were you in '62?"
 Join Date: Jul 2004
Location: Cleveland County, North Cackalacky
Posts: 5,013
|
Armed.....
Go Baby..... Go.....  E Kit NOS switches and Go Baby Go Shifter Knobs. http://www.mustangdepot.com/OnLineCa...tro_switch.htm
__________________
PROJECT: "FULL METAL YELLOW JACKET" 1962 Chevy C-10 Stepside Shortbed Nostalgia Pro/Street Pickup Truck PROJECT: "FULL METAL YELLOW JACKET Build Thread What Are You Workin' On? - 1Bad62ChevyPickup PROJECT: "TYRANNORAMBLER REX" 1969 AMC Rambler American Nostalgia Pro/Street Youtube Channel: Father Son Projects Youtube Channel: 2TIMOTHY2FITHTEEN        "North and South Carolina Folks Click Here!" (((( ~ I have Parts For Sale & Miscellaneous Stuff ~ )))) "Well being as there's no other place around the place, I reckon this must be the place, I reckon...Nyuk Nyuk Nyuk" -Curly Howard Ph.D. |
|
|

|
|
|
#521 |
|
Senior Enthusiast
Join Date: Feb 2007
Location: Spokane Valley, WA
Posts: 8,356
|
Re: Markeb01 Build Thread
Iím afraid there may be a tiny delay before I can accept orders, after all the system is only in the prototype stage. First I have to find a source for depleted Corbomite, a reliable way to extract the gas, and then await the invention of and civilian release of the military grade 17 megawatt Class 3 plasma eclipiton velocity discharge emitter!

__________________
My Build Thread: http://67-72chevytrucks.com/vboard/s...d.php?t=444502 |
|
|

|
|
|
#522 | |
|
Active Member
 Join Date: Aug 2011
Location: Salem, Oregon
Posts: 112
|
Re: Markeb01 Build Thread
Quote:
 Too funny... Too funny...  Keep'em guessin.. Keep'em guessin..
__________________
Fleet '66 ***************** '66 C-10 SWB 350 w/3 spd OD 4:11's - driver/project...future T-5 trans upgrade '64 C-10 LWB BBW near future project - "The Wife's Ride" '58 "Apache"Stepside BBW w/'75 K-10 4x4 conversion 331 w/350TH and NP 205 transfer 3:73's - occasional driver/ show |
|
|
|

|
|
|
#523 |
|
Registered User
Join Date: Sep 2011
Location: Tacoma, WA
Posts: 2,425
|
Re: Markeb01 Build Thread
Wow...
And here I was trying to figure how to mount an aircraft landing light as a correctional feature for tailgaters! Nothing says I care about your being too close like a nicely seared retina.
__________________
Michael McMurphy My 66 Stepside My 64 Tow Truck My 66 Tempest Table Of Contents Added to Page1 |
|
|

|
|
|
#524 | |
|
Registered User
Join Date: Apr 2012
Location: Searcy, AR
Posts: 4,203
|
Re: Markeb01 Build Thread
Quote:
 
__________________
DON Proverbs 27:17  US Air Force Retarded errr Retired My '65 Stepper Build:http://67-72chevytrucks.com/vboard/s...d.php?t=533920 My '60 Rusty Patina Build:http://67-72chevytrucks.com/vboard/s...66#post7402266 My '72 http://67-72chevytrucks.com/vboard/s...59#post7204359 SOLD |
|
|
|

|
|
|
#525 |
|
Senior Enthusiast
Join Date: Feb 2007
Location: Spokane Valley, WA
Posts: 8,356
|
Re: Markeb01 Build Thread
Funny I bagged the wing landing light off a crashed C123 Provider and actually did mount it on the front of our M151 Ford ďJeepĒ in Chu Lai. It was shaped like a salad bowl and was marked ď100 wattsĒ. I was somewhat disappointed thinking it wouldnít be very bright since house hold bulbs were 100 watts.
What I hadnít considered were the amps. Iím not sure how many it drew but when I connected it to the cannon plug on the cowl it welded the Romex wire I was using to one of the 4 fingers in the terminal socket. The only way to turn it off was to yank on the cable tearing out the terminal end which was by now welded to the wire. Since there were only 4 terminal pads we were limited to only 4 uses. It was just as well. We pulled to the end of the north ramp on one of our routine night time runway checks and lit up. As we wheeled onto the main 10,000 foot main runway it illuminated the entire length and freaked out the tower, thinking it was an unaccounted aircraft. They offered a rather vigorous and emotional suggestion we not use it again, and that was that!
__________________
My Build Thread: http://67-72chevytrucks.com/vboard/s...d.php?t=444502 |
|
|

|
 |
| Bookmarks |
|
|