
|
|
|
 09-07-2009, 11:08 PM
|
#1 |
|
Registered User
Join Date: Feb 2008
Location: Houston
Posts: 970
|
Re: Glock's new project: "Fred"
I see your sticking with the electronic throttle control
__________________
2014 LTZ Z71 Silverado 82 C15 LQ4/4L80E Conversion 78 Suburban build (SOLD) 83 4x4 Suburban(SOLD) 82 C15 (my first truck) |

|

|
|
09-08-2009, 12:02 AM
|
#2 |
|
6.0 powered square
Join Date: Feb 2008
Location: Mesquite texas
Posts: 3,459
|
Re: Glock's new project: "Fred"
looking good Bob
__________________
Aaron 1980 c-10 short bed lowered, cammed 6.0, 4l80e 3600 stall, smp tune, wilwoods, and flames best time so far best et 7.86 @87 on motor 7.57 90 on a 75 shot Build http://67-72chevytrucks.com/vboard/s...d.php?t=283326 |
|
|
|
|
09-08-2009, 12:04 AM
|
#3 |
|
Registered User
Join Date: Dec 2007
Location: Palmer, Alaska
Posts: 13,821
|
Re: Glock's new project: "Fred"
very nice!!
__________________
 CHEVY ONLY CHEVY ONLY
|
|
|
|
|
09-08-2009, 08:21 AM
|
#4 |
|
Registered User
Join Date: Feb 2009
Location: Oklahoma
Posts: 7,461
|
Re: Glock's new project: "Fred"
Oh BABY that thing looks sweet sitting in there. Great progress Bob.

|
|
|
|
|
09-08-2009, 08:35 AM
|
#5 |
|
Registered User
Join Date: Jan 2009
Location: orangevale, ca
Posts: 3,626
|
Re: Glock's new project: "Fred"
wow... i keep looking at those teaser shots and keep seeing more and more done! the wirings laid out, power steering looks to be hooked up...
 where's the a/c compressor? where's the a/c compressor?great news on the plates... thanks Bob!!
__________________
"Dennis the Menace" 1978 Silverado (2wd, 1/2 ton, short bed)complete nut & bolt frame off restomod LQ9/4L80E MY LS SWAP/FRAME OFF BUILD BOOK 2006 TBSS way too much to list
|
|
|
|
|
09-08-2009, 08:52 AM
|
#6 |
|
Senior Member
 Join Date: Jul 2009
Location: Hayden, Al.
Posts: 4,147
|
Re: Glock's new project: "Fred"
Man, you are really knocking this thing out. I'm with ^^^, did you already test fit the A/C compressor...I know you did, but I have to know for sure
 ? ? Great Progress. |
|
|
|
|
09-08-2009, 10:06 AM
|
#7 |
|
Registered User
Join Date: Sep 2008
Location: Bailey, NC
Posts: 2,462
|
Re: Glock's new project: "Fred"
Wow! Nice progress. Can't wait to see more.
__________________
Jeramy '84 GMC project truck '85 Chevy 4X4 SOLD '07 Chevy Trailblazer SS 5th Annual SHPHC Car/Truck Show Pics http://67-72chevytrucks.com/vboard/s...d.php?t=543605 UPDATED PICS! CHECK 'EM OUT |
|
|
|
|
09-08-2009, 11:31 AM
|
#8 |
|
Next project: 1970 K10
Join Date: Feb 2004
Location: Fort Collins, Colo 80524
Posts: 6,685
|
Re: Glock's new project: "Fred"
OK, here we go!
Passenger side exhaust - I decided to use the truck manifolds because I like the way they look, and I am going to JetHot coat them some day. I had to notch the frame just a little bit to make room for one ear with a stud, but nothing too big. The head pipe has plenty of clearance, and it can be rotated to position the O2 sensor wherever you want it. 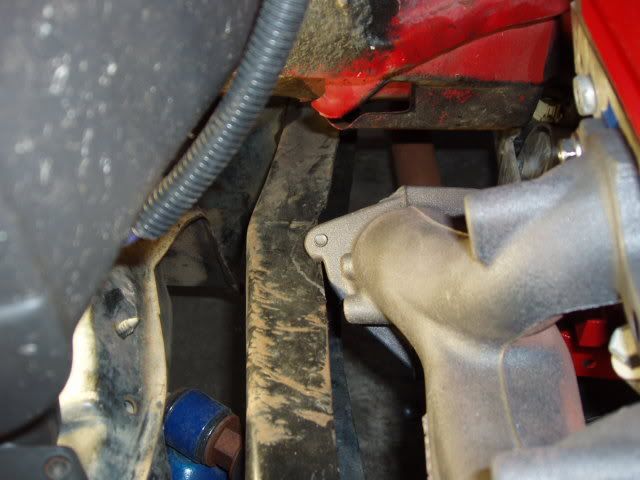 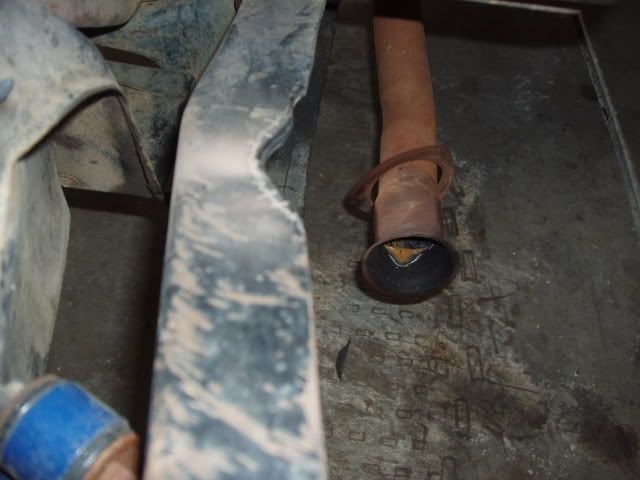 Drivers side exhaust - No clearancing necessary. The O2 sensor is about 1.5" from the flange, but the turn of the pipe runs it right into the frame rail. So I cut the head pipe off right at the flange, flipped it over, and marked it where it shot the pipe of away from the frame. Then I welded the pipe back to the flange. Now it turns away from the frame, and there is no issues with the shift linkage. O2 sensor is easy to get to also. 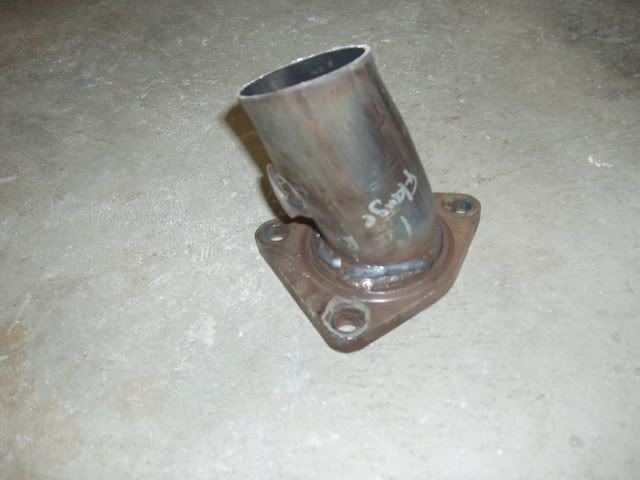 Trans crossmember - Slid it back and it lined up with two holes on the drivers side. Had to drill two holes there (one on the side and one on the bottom) Two on the pass side bottom needed redrilled too. There was 2 holes on the top pass that lined up already. Shift linkage - Lines up in the original location. Had to adjust the shift linkage rod a little, but the shifter goes into all gears, including 1st. Power steering pump - Used the 5.3's pump. I dont know what the name of the part is, but its the threaded part on the pump that the pressure hose threads in to. Remove it from the original pump, and install it into the 5.3's pump. Than reuse the original hose. The return line on the pump needed a little tweaking to clear the frame. I cut the trucks return line, and put a 90* bend in it. Works perfect. 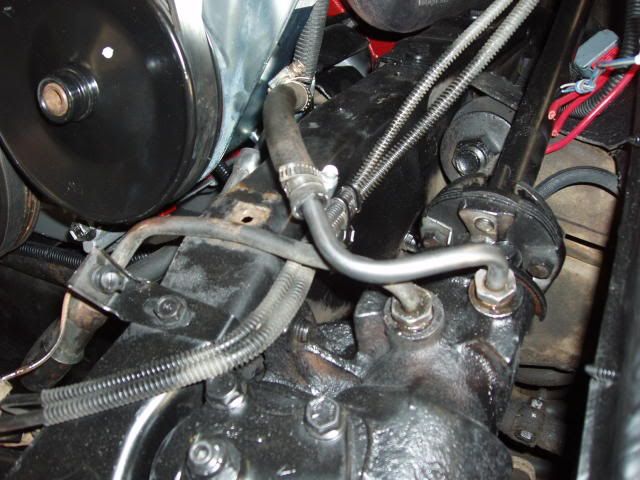 Trans cooler lines - Had to move the bracket up (the one on the engine), otherwise the lower line rubbed the cross member. Cut and bent them in front of the motor, and I will run them to the radiator with braided SS lines. 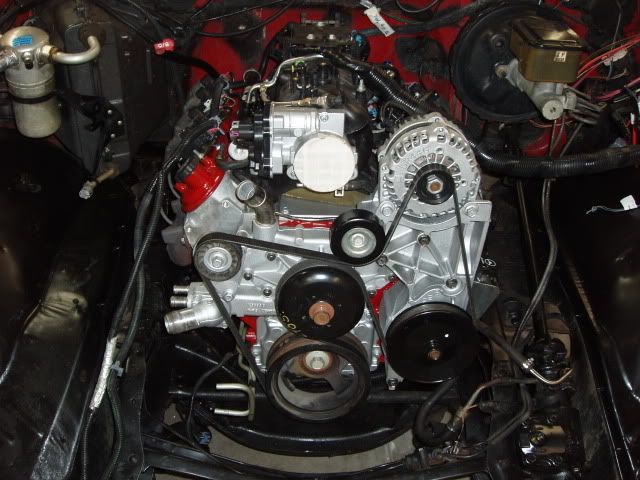 I turned the injectors 180* so that the wires to them would be out of sight. Looks much better this way!  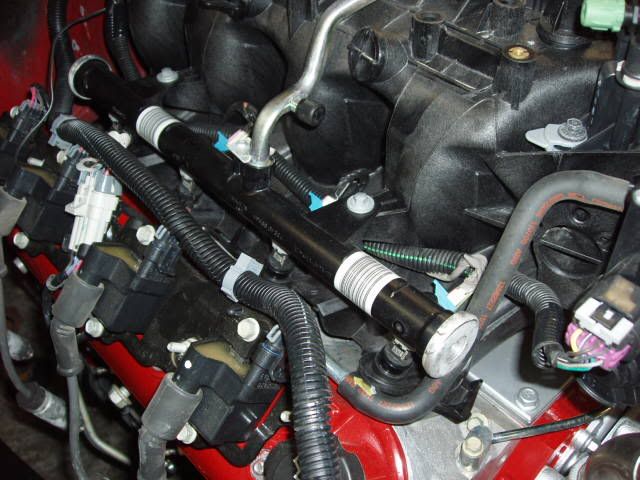 The wires for the pass O2 sensor are quite long, so I will reroute them and shorten them too. Also, the MAF sensor is on the passenger side originally. I don't want to move the battery, so my air intake will be on the drivers side. So I will have to reroute that part and probably lengthen it too. No biggie. After spending WAAAY too much time trying to remember how to put the serpentine belt back on (with no luck), my son decided to give it a try. 15 minutes later, I hear Got it daddy!
__________________
Bob 1970 Chevy K10 LWB "Goldie" 350/TH350 next project!! 1981 Chevy C10 LWB 355/TH350 - My son's truck LS SWAP FORUM! Tons of LS swap info here! PLEASE CLICK HERE TO SUPPORT THE GREATEST BOARD ON THE NET! CLICK HERE FOR THE FAQ INDEX by KRUE |
|
|
|
|
09-08-2009, 01:09 PM
|
#9 |
|
Registered User
Join Date: Feb 2008
Location: Florala, AL
Posts: 398
|
Re: Glock's new project: "Fred"
ROTFLMAO!!

|
|
|
|
|
09-08-2009, 01:17 PM
|
#10 | |
|
Next project: 1970 K10
Join Date: Feb 2004
Location: Fort Collins, Colo 80524
Posts: 6,685
|
Re: Glock's new project: "Fred"
Quote:
__________________
Bob 1970 Chevy K10 LWB "Goldie" 350/TH350 next project!! 1981 Chevy C10 LWB 355/TH350 - My son's truck LS SWAP FORUM! Tons of LS swap info here! PLEASE CLICK HERE TO SUPPORT THE GREATEST BOARD ON THE NET! CLICK HERE FOR THE FAQ INDEX by KRUE |
|
|
|
|
|
09-08-2009, 01:22 PM
|
#11 |
|
Registered User
Join Date: Feb 2008
Location: Florala, AL
Posts: 398
|
Re: Glock's new project: "Fred"
the little helper jumpin in there and getting the belt on in 15 min. Ive had the same issue before.. just wasnt holding my mouth right i suppose. lol
|
|
|
|
|
09-08-2009, 01:49 PM
|
#12 |
|
Low & Fast!
Join Date: Jan 2007
Location: Knoxville, TN
Posts: 3,110
|
Re: Glock's new project: "Fred"
You got it in sweet! like the looks of it. what all do you need so you can start it up?
__________________
|
|
|
|
|
09-08-2009, 01:13 PM
|
#13 |
|
Registered User
Join Date: Feb 2009
Location: Oklahoma
Posts: 7,461
|
Re: Glock's new project: "Fred"
Looks awesome man. It's a good thing you have such great helpers with you. I am starting to think they are the ones doing all the work on this thing, and you are just sitting back taking pictures.
|
|
|
|
|
09-08-2009, 03:16 PM
|
#14 |
|
Future: 86 on GenIV power!
Join Date: Jun 2009
Location: San Antonio, Texas
Posts: 105
|
Re: Glock's new project: "Fred"
Nice build....waiting for the list of goodies to order. I have a 6.0 going into a 86 chevy.....same color as fred..
|
|
|
|
|
09-08-2009, 06:02 PM
|
#15 |
|
Next project: 1970 K10
Join Date: Feb 2004
Location: Fort Collins, Colo 80524
Posts: 6,685
|
Re: Glock's new project: "Fred"
I had planned on installing the rear end out of my parts Burb, a 10-bolt with 3.42's, but the PO of the Burb trashed the housing. So I am picking up another Burb rear end from a board member in Colo Springs tomorrow that I believe will have 3.42's as well. If not, the ring and pinion from my Burb are in good shape, and I can swap those in to the "new" rear end.
The 27th may or may not happen, but it gives me a goal date to shoot for.
__________________
Bob 1970 Chevy K10 LWB "Goldie" 350/TH350 next project!! 1981 Chevy C10 LWB 355/TH350 - My son's truck LS SWAP FORUM! Tons of LS swap info here! PLEASE CLICK HERE TO SUPPORT THE GREATEST BOARD ON THE NET! CLICK HERE FOR THE FAQ INDEX by KRUE Last edited by glock35ipsc; 09-08-2009 at 06:03 PM. |
|
|
|
|
09-08-2009, 10:30 PM
|
#16 |
|
Next project: 1970 K10
Join Date: Feb 2004
Location: Fort Collins, Colo 80524
Posts: 6,685
|
Re: Glock's new project: "Fred"
Wasn't planning on even going in the shop tonight, but I had to for other reasons. Of course, this led me to do a few things to Fred.
 I got the oil bypass drilled and tapped for the oil pressure sending unit and got it installed on the engine. I bought a new SU since the one out of the old motor was 1/4 NPT and I needed 1/8 NPT. In the pic you can also see the revamped drivers exhaust flange and head pipe. Got new heater hoses today so I got them installed. Also found the "missing" wire that feeds the fuel pumps. In the fury of removing the unnecessary wiring I must have snipped it! Doh! So I soldered a wire on it to run to the relay. I also separated the harness in a couple spots. The harness had the MAF and the passenger O2 sensor coming out in the OEM location (you can see them draped over the tensioner in the heater hose pic). I failed to tell Jesse and Hannah that I was going to have the MAF on the drivers side, not the OEM passenger location. So I stripped that all the way back to almost the PCM plugs, then I will shorten it when I get the CAI installed. I'll also reroute the pass O2 behind the engine. Now the only wire loom you see is the large one leaving the top cover and running to the PCM. Very clean.
__________________
Bob 1970 Chevy K10 LWB "Goldie" 350/TH350 next project!! 1981 Chevy C10 LWB 355/TH350 - My son's truck LS SWAP FORUM! Tons of LS swap info here! PLEASE CLICK HERE TO SUPPORT THE GREATEST BOARD ON THE NET! CLICK HERE FOR THE FAQ INDEX by KRUE Last edited by glock35ipsc; 09-08-2009 at 10:32 PM. |
|
|
|
|
09-09-2009, 07:33 AM
|
#17 |
|
Senior Member
Join Date: Jul 2009
Location: Hayden, Al.
Posts: 4,147
|
Re: Glock's new project: "Fred"
You are making some major headway!!! It really looks like it belongs in there. I cannot wait to get started on mine!
|
|
|
|
|
09-09-2009, 09:44 AM
|
#18 |
|
Registered User
Join Date: Feb 2008
Location: Florala, AL
Posts: 398
|
Re: Glock's new project: "Fred"
man that looks fantastic glock. thats the way I like to see these done. factory looking setups. nice!
|
|
|
|
|
09-10-2009, 10:19 AM
|
#19 |
|
Next project: 1970 K10
Join Date: Feb 2004
Location: Fort Collins, Colo 80524
Posts: 6,685
|
Re: Glock's new project: "Fred"
Thanks guys!
Well, I tinkered with the AC last night. I have the compressor mounted and the belt on for testing, but I have mixed emotions about using it in this location for two reasons. 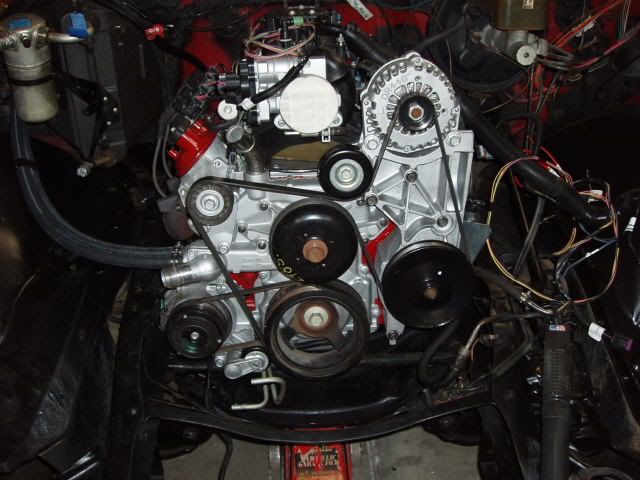 First, the trans cooler lines must be tucked up much higher and closer to the block than their OEM location because they sit on the cross member and the drag ling link if left in the OEM location/bracket. So I moved the bracket up to clear all that. But with the AC compressor bracket on, the are squeezed between it and the block. Not pinched, but rubbing. I worry that normal vibration could rub a hole in one of them. I slid on some split loom, but that doesn't ease my worries. It does look like I could pull them down and away from not only the block, but to get extra clearance to the belt/pulley, and make a bracket that I could attach them too with line clamps. 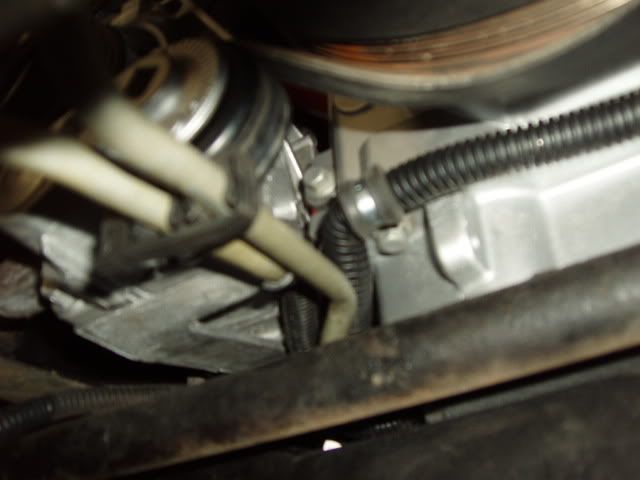 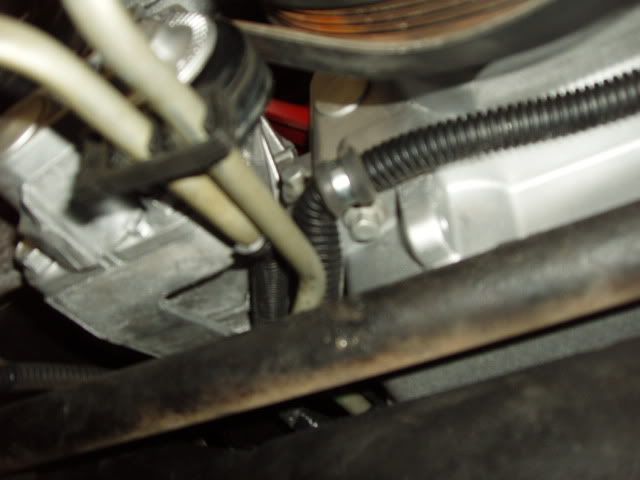 Next is the location of the outlets. It doesn't look that bad in the pics, but the smaller port, which is lower on the compressor, would come out up under the top rail of the frame. Given the size of the fittings, the top of the frame would have to be cut out, and a raised portion welded back in, similar to how folks notch are raise the rear frame for bagging. 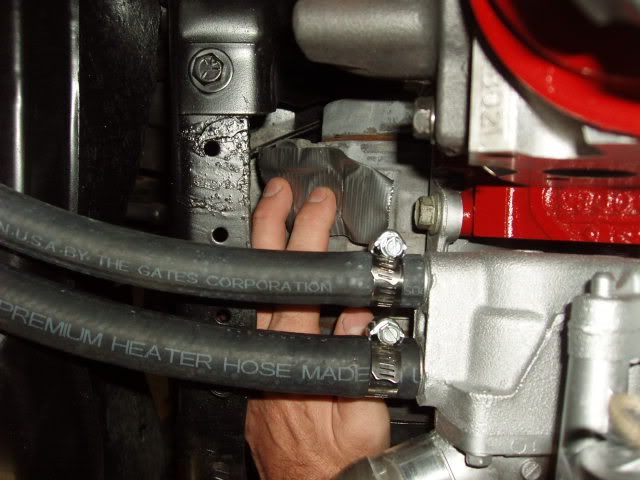  (This is a side view of the frame. The red dotted,line is what would be cut out, and the green lines are new metal to be welded back in. The side would also have new metal welded in on the outside of the frame.) 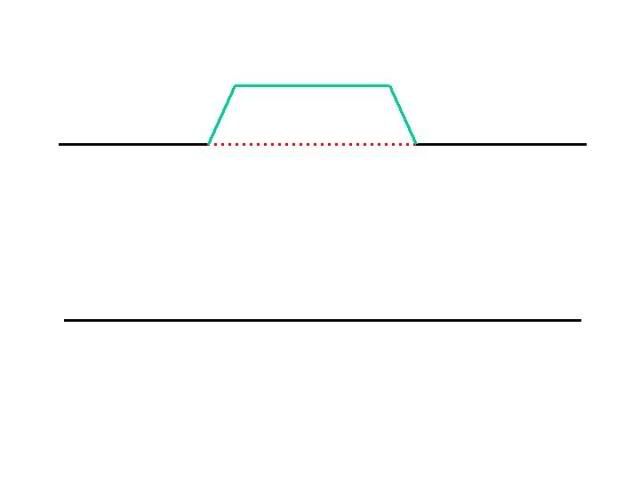 The part that gives me heart burn about doing this is the proximity of the idler arm. I am a little nervous about cutting and modifying the frame in this area, because the idler arm mounts to the frame about 2"-3" in from of where the AC fittings need to come out. It's not my welding skill that makes me nervous, it's just the location. And Fred will be no garage queen either, he will see a lot of miles on less then smooth roads. Maybe I'm worrying about it too much, because if I do my part correctly, it should be just as strong or stronger when I'm done. I have a couple other options. The compressors used on the Trailblazer SS 6.0 and a handful of other GM vehicles is not only SHORTER (thus not requiring the motor mount mod), but the outlets are further up on the housing, so they look like they would clear the frame. I might run to NAPA and see if they have one of these (top pic), and one like I have (bottom pic) so I can compare them side by side. In the bottom pic, it is the lower fitting location that is giving me the problem. 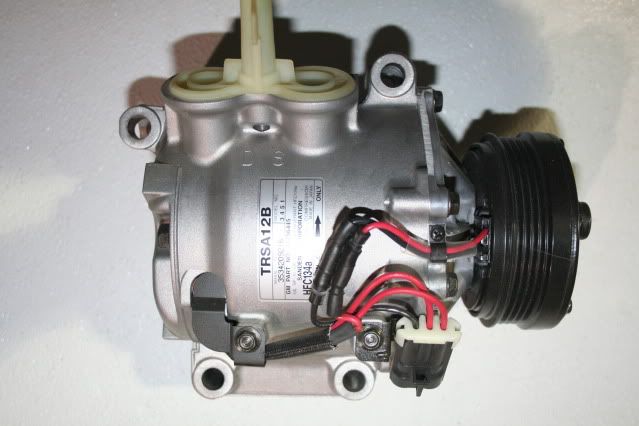 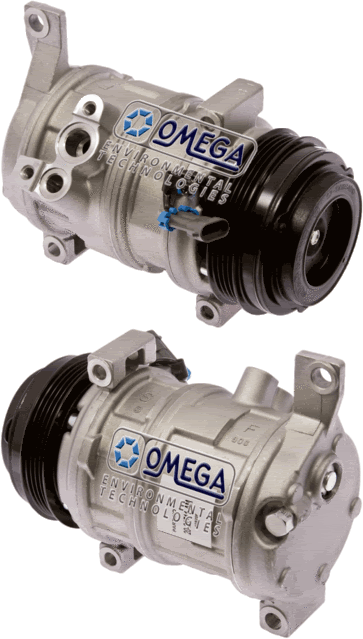 The other solution, which is light years easier, but will run about $400, is an AC compressor relocation kit I found. It is available for most all LS front end setups (Corvette, F-body, truck), locates the compressor high on the passenger side, uses a better design Sanden compressor versus the OEM, and uses the same belt as the rest of the accessories. This may be the route I eventually take. http://www.kwikperf.com/lsx_ac.html  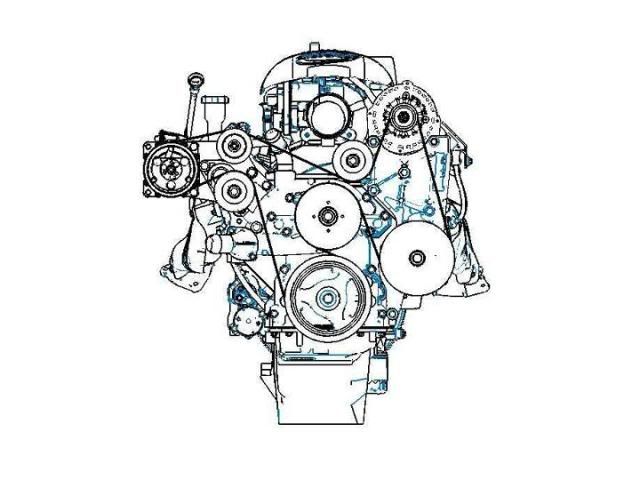 I don't mind spending the money to do it this way, but I was really hoping to keep it as OEM as possible. I guess I've got some thinking to do today.......
__________________
Bob 1970 Chevy K10 LWB "Goldie" 350/TH350 next project!! 1981 Chevy C10 LWB 355/TH350 - My son's truck LS SWAP FORUM! Tons of LS swap info here! PLEASE CLICK HERE TO SUPPORT THE GREATEST BOARD ON THE NET! CLICK HERE FOR THE FAQ INDEX by KRUE |
|
|
|
|
09-10-2009, 10:30 AM
|
#20 |
|
Registered User
Join Date: Feb 2008
Location: Houston
Posts: 970
|
Re: Glock's new project: "Fred"
The last option is the way i decided to go, but yet to do it. The cost of the kit and compressor has put that on hold. The reason i want to use the relocation kit was to keep from cutting into the frame.
__________________
2014 LTZ Z71 Silverado 82 C15 LQ4/4L80E Conversion 78 Suburban build (SOLD) 83 4x4 Suburban(SOLD) 82 C15 (my first truck) Last edited by Cherub; 09-10-2009 at 10:32 AM. |
|
|
|
|
09-10-2009, 10:37 AM
|
#21 |
|
Next project: 1970 K10
Join Date: Feb 2004
Location: Fort Collins, Colo 80524
Posts: 6,685
|
Re: Glock's new project: "Fred"
I have no problems cutting a frame, it's just that I have a problem cutting the frame in this location since the idler arm is mere inches away.
 That doesn't give me a warm fuzzy. That doesn't give me a warm fuzzy.
__________________
Bob 1970 Chevy K10 LWB "Goldie" 350/TH350 next project!! 1981 Chevy C10 LWB 355/TH350 - My son's truck LS SWAP FORUM! Tons of LS swap info here! PLEASE CLICK HERE TO SUPPORT THE GREATEST BOARD ON THE NET! CLICK HERE FOR THE FAQ INDEX by KRUE Last edited by glock35ipsc; 09-10-2009 at 10:37 AM. |
|
|
|
|
09-10-2009, 10:38 AM
|
#22 |
|
Slots go on anything!
Join Date: May 2003
Location: Richardson, TX
Posts: 5,957
|
Re: Glock's new project: "Fred"
If you have the room, I think the relocation setup is the way to go. The sanden compressor is a proven unit, and looks relatively OEM. I guess the relocation kit would be better (to me, anyhow) than modifying the frame to fit the compressor.
|
|
|
|
|
09-10-2009, 11:30 AM
|
#23 |
|
Still plays with trucks
Join Date: Jul 2009
Location: Spokane, WA
Posts: 3,556
|
Re: Glock's new project: "Fred"
Another option is to use the Astro van A/C compressor. It is a smaller more compact unit than is used on the other GM vehicles of the time that looks a lot like the Sanden unit.
You may be able to snag the mount brackets off of the Astro van and modify them to work in conjunction with the stock LS brackets to make your own high mount kit on the LS engine. I would see what they did in the $400 kit and make similar parts to use the Astro van compressor. They are inexpensive, easy to get and a factory GM part you can get over the counter anywhere in the country they sell GM parts. You can get them as R-12 or 134a compressors too so if you are doing a retrofit like yours with most of the stock R-12 system in place you could stick with the R-12 version and not deal with the conversion issues. |
|
|
|
|
09-10-2009, 01:58 PM
|
#24 |
|
Next project: 1970 K10
Join Date: Feb 2004
Location: Fort Collins, Colo 80524
Posts: 6,685
|
Re: Glock's new project: "Fred"
OK, I decided to go with the high side kit. The time I put into modifying the motor mount was all for nothing, but I'm not upset. It led me to find out that other ways do exist.
So... that means unless you really want to modify the engine stand, the adapter plate, notch the frame, and reroute the trans cooler lines.... you can simply use the adapter plates I used and have everything else literally fall into place. I'll just wait until next month to get the bracket kit and the compressor since the weather is kind of cooling off now. I ordered two new gas tanks from Rock Auto a little bit ago (1987 tanks with the baffles). I also ordered an adapter from Street & Performance to mount the coolant temp sending unit for the gauge in the rear of the passenger head. The adapter screws into the M12x1.5 hole in the head, and they come in 1/8 NPT, 1/4 NPT. 3/8 NPT and 1/2 NPT. I needed 3/8 NPT for my stock sending unit. And as I was typing this, UPS showed up with the 5/16" and 3/8" FI hose and the FI clamps. Guess I know what I am doing this weekend!!! I also drew out my fuse block setup, along with the relay wiring I'll need to do for the fuel pump and the electric fans. Easy stuff, but I like having it on paper to refer to. I'll end up with a 4-fuse block (3 ignition and 1 battery hot to the 2006 harness), along with 1 relay for the fuel pump and 2 relays for the fans (1 lo, 1 high)
__________________
Bob 1970 Chevy K10 LWB "Goldie" 350/TH350 next project!! 1981 Chevy C10 LWB 355/TH350 - My son's truck LS SWAP FORUM! Tons of LS swap info here! PLEASE CLICK HERE TO SUPPORT THE GREATEST BOARD ON THE NET! CLICK HERE FOR THE FAQ INDEX by KRUE |
|
|
|
|
09-10-2009, 08:07 PM
|
#25 |
|
Registered User
Join Date: Jan 2009
Location: orangevale, ca
Posts: 3,626
|
Re: Glock's new project: "Fred"
man... i have been waiting to post until i see the a/c set-up. so the tbss compressor wont work? what other ls combo has a high side a/c compressor?
i'm asking because as you know i havent bought mine yet... and i'm thinking if there isnt another affordable ls powerplant out there with the highside a/c this might change my mind ($$)on the swap. $400 for the pulley mount + the compressor?... your really doing it the right way by getting the '87 tanks too Bob... i have it wrote down in my notes somewhere to do the same. but its just getting pricey. iduno, this has really got me thinking... $1200 700r4 $1200 heads $200 cam $200 serp set-up $200 a/c compressor whats your thoughts? i'm going to find out what gen III has a high mount a/c... maybe 6.0's?
__________________
"Dennis the Menace" 1978 Silverado (2wd, 1/2 ton, short bed)complete nut & bolt frame off restomod LQ9/4L80E MY LS SWAP/FRAME OFF BUILD BOOK 2006 TBSS way too much to list
|
|
|
|
 |
| Bookmarks |
|
|


 Hybrid Mode
