
|
 08-28-2013, 01:44 PM
|
#501 |
|
Registered User
Join Date: Jul 2011
Location: El Campo, Tx
Posts: 1,246
|
Re: Project Goldilocks, '66 C10 SWB BBW Build
I like the way you are thinking with the intake etc! Will be anxiously waiting to see it.
__________________
72 Chevy blue LWB, 99% original Oklahoma truck, 28,000 miles 72 Chevy SWB: http://67-72chevytrucks.com/vboard/s...d.php?t=486626 (Attempt/Mistake #2) 2003 Harley Davidson Dyna Superglide with 2007 Street Bob front end 2000 Ford F350 Powerstroke 4WD CCLB, 310,000 miles running great (STOLEN St. Patricks Day 2014 AND NEVER RECOVERED) 2002 Ford F250 Powerstroke 4WD CCLB (To replace stolen one) Hook em Horns!!! |

|

|
|
08-28-2013, 02:22 PM
|
#502 | |
|
Truck and auto performance nut
Join Date: Feb 2007
Location: McKinney,Texas
Posts: 3,848
|
Re: Project Goldilocks, '66 C10 SWB BBW Build
Quote:
I guess I was looking at the wrong one then. I could see the carb's being cheaper then a efi setup...but $13k vs $2500 is a big difference. The Borla setup is almost $13k and I thought the Inglese was too. 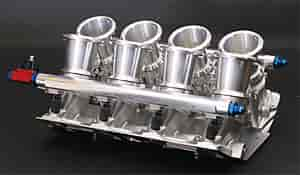
__________________
Kurt - '68 GMC short step - NIB '09 LY6 6.0L crate motor w/mods, NIB '12 crate 4L85e w/billet 3k stall Circle D, 3.73 posi 12 bolt, DynaTech f-swap headers, 3/4 drop, handling mods, etc. - my toy '72 Chevy LWB C-10 Highlander - 350/350 ps/pb/tilt/ac - not original but close '06 Chevy TrailBlazerSS - LS2/4L70e - little black hot rod SUV - my DD '18 Kia Sorento - wife's econo-driver '95 Chevy S10 - reg cab shortbed, LS, 4.3, auto... my '68's powertrain and chassis build -links broken A surprise phase - carb to efi -links broken |
|
|
|
|
|
08-28-2013, 03:13 PM
|
#503 |
|
Registered User
Join Date: Jun 2011
Location: Marion, NC
Posts: 851
|
Re: Project Goldilocks, '66 C10 SWB BBW Build
Wow...can't wait to see how that engine turns out with that intake and those carbs. Very interested in how it will perform!
|
|
|
|
|
08-28-2013, 04:36 PM
|
#504 |
|
Registered User
 Join Date: Aug 2005
Location: Hillsboro Oregon
Posts: 6,449
|
Re: Project Goldilocks, '66 C10 SWB BBW Build
IR intakes (EFI or Carb'd) are cool as hell!
|
|
|
|
|
08-29-2013, 11:52 PM
|
#505 |
|
Registered User
Join Date: Feb 2013
Location: Upstate, SC
Posts: 131
|
Re: Project Goldilocks, '66 C10 SWB BBW Build
I definitely want to see this in person! I have a No Limit rack on my 55 with the solid front axle. Their craftsmanship seems to be good, dont have the truck on the road yet, so I cant comment on how well this particular rack performs.
How far are you from the mall? I work at the old Lowes building across the street from there. (Active duty with the National Guard) Posted via Mobile Device
__________________
1955 Chevy 3200 my build thread: http://67-72chevytrucks.com/vboard/s...d.php?t=582898 
|
|
|
|
|
09-17-2013, 05:42 PM
|
#506 | |||||||
|
Registered User
Join Date: May 2011
Location: Anderson SC
Posts: 3,880
|
Re: Project Goldilocks, '66 C10 SWB BBW Build
Quote:
Quote:
Quote:
 Quote:
 Quote:
Quote:
__________________
Project Goldilocks '66 C10 Short Fleet BBW Build '65 C10 Highly Detailed Stock Restoration Thread '78 Camaro Targa Roof Build '55 International Metal/Body/Paint Work '66 F100 Full Rotisserie Restoration '40 Packard 120 Convertible Coupe Restoration How To Restore and Detail an Original Gauge Cluster How To Detail Sand Body Panels, Edges, Corners, Etc |
|||||||

|
|
|
09-17-2013, 05:49 PM
|
#507 |
|
Registered User
Join Date: May 2011
Location: Anderson SC
Posts: 3,880
|
Re: Project Goldilocks, '66 C10 SWB BBW Build
The No Limit Rack came today, looks to be a very well thought out kit. Next purchase will probably be the intake; definitely want to get my hands on one of those while they're availble. I imagine they're a pretty low production part so I'm worried about how long they'll be available.
 Also bought another cluster to restore/flip. These things are addictive!  
__________________
Project Goldilocks '66 C10 Short Fleet BBW Build '65 C10 Highly Detailed Stock Restoration Thread '78 Camaro Targa Roof Build '55 International Metal/Body/Paint Work '66 F100 Full Rotisserie Restoration '40 Packard 120 Convertible Coupe Restoration How To Restore and Detail an Original Gauge Cluster How To Detail Sand Body Panels, Edges, Corners, Etc |
|
|
|
|
09-17-2013, 08:47 PM
|
#508 |
|
Registered User
Join Date: May 2007
Location: Deale Md
Posts: 4,663
|
Re: Project Goldilocks, '66 C10 SWB BBW Build
But you make the cluster resto look easy.
__________________
James 63 GMC V6 4speed carryall 65 chevy swb bbw V8 auto 68 K20 327/4 speed, buddy buckets 2002 GMC CC Dually Duramax 64 GMC lwb 3/4 V6 4speed SOLD 66 GMC swb bbw buddy buckets SOLD IG duallyjams The only thing that stays the same is constant change! |
|
|
|
|
09-20-2013, 05:44 PM
|
#509 |
|
Registered User
Join Date: May 2011
Location: Anderson SC
Posts: 3,880
|
Re: Project Goldilocks, '66 C10 SWB BBW Build
Just threw the rack kit on to check clearances... there's not enough room to raise the crossmember 1.5" like I'd wanted to unless I can find a smaller harmonic balancer. The only other option would be to raise the engine, but that would mean swapping to a high hump floor. I really don't want to raise the engine up since that would raise the center of gravity. I can't move the engine back any farther to get the pulley behind the rack either; it's already against the firewall pretty tightly. Anyone know of a smaller diameter balancer?
I know the rack is in crooked, forgot the donut bushing to center it in the passenger side mount.     
__________________
Project Goldilocks '66 C10 Short Fleet BBW Build '65 C10 Highly Detailed Stock Restoration Thread '78 Camaro Targa Roof Build '55 International Metal/Body/Paint Work '66 F100 Full Rotisserie Restoration '40 Packard 120 Convertible Coupe Restoration How To Restore and Detail an Original Gauge Cluster How To Detail Sand Body Panels, Edges, Corners, Etc |
|
|
|
|
09-21-2013, 08:12 AM
|
#510 |
|
Registered User
Join Date: May 2007
Location: Deale Md
Posts: 4,663
|
Re: Project Goldilocks, '66 C10 SWB BBW Build
That's hot rodding, one thing leads to another, changing to smaller one going to change the ratio of all the accessories and moving the engine forward will give you unwanted nose weight. With your skills move the fire wall and move the engine back, I know you didn't plan on doing it but you can do it.
__________________
James 63 GMC V6 4speed carryall 65 chevy swb bbw V8 auto 68 K20 327/4 speed, buddy buckets 2002 GMC CC Dually Duramax 64 GMC lwb 3/4 V6 4speed SOLD 66 GMC swb bbw buddy buckets SOLD IG duallyjams The only thing that stays the same is constant change! |
|
|
|
|
09-21-2013, 11:00 AM
|
#511 |
|
Registered User
Join Date: May 2011
Location: Anderson SC
Posts: 3,880
|
Re: Project Goldilocks, '66 C10 SWB BBW Build
I did some more looking around and found a chart that shows the depth of different factory pulleys. Vette balancers only stick out from the front cover 2 1/8", that may be enough to get it behind the rack. The one that's on it now isn't seated all the way either, I'll measure and see if a Vette balancer will fit.
Posted via Mobile Device
__________________
Project Goldilocks '66 C10 Short Fleet BBW Build '65 C10 Highly Detailed Stock Restoration Thread '78 Camaro Targa Roof Build '55 International Metal/Body/Paint Work '66 F100 Full Rotisserie Restoration '40 Packard 120 Convertible Coupe Restoration How To Restore and Detail an Original Gauge Cluster How To Detail Sand Body Panels, Edges, Corners, Etc |
|
|
|
|
09-21-2013, 11:22 AM
|
#512 | |
|
Registered User
Join Date: Jun 2012
Location: Denton Texas
Posts: 407
|
Re: Project Goldilocks, '66 C10 SWB BBW Build
Quote:
Jason |
|
|
|
|
|
09-21-2013, 11:40 AM
|
#513 |
|
Registered User
Join Date: Feb 2013
Location: Upstate, SC
Posts: 131
|
Re: Project Goldilocks, '66 C10 SWB BBW Build
The hardest part of rebuilding my engine that I ran into was pulleys! But at least you have a thousand options with your engine! Look on Summit Racing, and have fun!
Posted via Mobile Device
__________________
1955 Chevy 3200 my build thread: http://67-72chevytrucks.com/vboard/s...d.php?t=582898
|
|
|
|
|
09-21-2013, 08:05 PM
|
#514 | ||
|
Registered User
Join Date: May 2011
Location: Anderson SC
Posts: 3,880
|
Re: Project Goldilocks, '66 C10 SWB BBW Build
Quote:
Quote:
__________________
Project Goldilocks '66 C10 Short Fleet BBW Build '65 C10 Highly Detailed Stock Restoration Thread '78 Camaro Targa Roof Build '55 International Metal/Body/Paint Work '66 F100 Full Rotisserie Restoration '40 Packard 120 Convertible Coupe Restoration How To Restore and Detail an Original Gauge Cluster How To Detail Sand Body Panels, Edges, Corners, Etc |
||
|
|
|
|
09-22-2013, 02:24 PM
|
#515 |
|
Registered User
Join Date: May 2011
Location: Anderson SC
Posts: 3,880
|
Re: Project Goldilocks, '66 C10 SWB BBW Build
Found a vid of a LS3 crate engine with IR EFI. They haven't tuned it yet so it won't idle, but the throttle response and sound is ridiculous!
__________________
Project Goldilocks '66 C10 Short Fleet BBW Build '65 C10 Highly Detailed Stock Restoration Thread '78 Camaro Targa Roof Build '55 International Metal/Body/Paint Work '66 F100 Full Rotisserie Restoration '40 Packard 120 Convertible Coupe Restoration How To Restore and Detail an Original Gauge Cluster How To Detail Sand Body Panels, Edges, Corners, Etc |
|
|
|
|
09-23-2013, 09:10 AM
|
#516 |
|
Registered User
Join Date: Aug 2008
Location: TN
Posts: 22
|
Re: Project Goldilocks, '66 C10 SWB BBW Build
that thing sounds nutz! can't wait to hear it in your truck!
|
|
|
|
|
09-23-2013, 12:27 PM
|
#517 |
|
Registered User
Join Date: Feb 2013
Location: Boulder City NV
Posts: 214
|
Re: Project Goldilocks, '66 C10 SWB BBW Build
I used to work at a high end engine shop. We built mostly trophy truck engines which have almost no rules engine wise, other than they have to be naturally aspirated and no nitrous.
We mostly built big, injected small blocks. Usually around 430 cubic inches and 850 horsepower. They actually had to tune some of the throttle response out of them for driveability reasons. Getting knocked around flying through the desert made it hard to ease the throttle... ironically these engines almost always made a tad more power on the dyno with a carburetor. In a drag race the injected motor would probably win though. We also built a few IR injected all aluminum FE big blocks for brand new Shelby Cobras. One was 500+cid(I think it was a 513... been a few years) with a belt driven supercharger. Posted via Mobile Device |
|
|
|
|
09-26-2013, 07:46 PM
|
#518 |
|
Registered User
Join Date: May 2011
Location: Anderson SC
Posts: 3,880
|
Re: Project Goldilocks, '66 C10 SWB BBW Build
I moved the frame into the shop after work today to get started on raising the crossmember 1.5". First order of business was to do some housekeeping.
  With the critters exiled, I layed out a rough cut line. I don't like that I'm going to lose the upper two mounting points above the upper control arm studs. Gotta find a way around that. This is with the frame flipped upside down, they're the bottom two holes. They'll be right at the upper frame flange, and there's no way to relocate the hole in the crossmember any lower. I do want to drop the upper control arm studs .5" for a better camber curve, so that may drop the holes back down into the side of the frame rails. I might be able to squeeze a couple smaller diameter bolts in there then, but it would be super close. I'm also thinking about dropping the lower rail (upper in pic) 1.5", then cutting out the whole center of the frame rail and filling it with flat plate so I can make clean mounting holes. There's no way to cut 1.5" out without butchering the holes like I have layed out here. I'd rather just section the crossmember itself, but then the R&P mount wouldn't fit. 
__________________
Project Goldilocks '66 C10 Short Fleet BBW Build '65 C10 Highly Detailed Stock Restoration Thread '78 Camaro Targa Roof Build '55 International Metal/Body/Paint Work '66 F100 Full Rotisserie Restoration '40 Packard 120 Convertible Coupe Restoration How To Restore and Detail an Original Gauge Cluster How To Detail Sand Body Panels, Edges, Corners, Etc |
|
|
|
|
09-26-2013, 07:47 PM
|
#519 | ||
|
Registered User
Join Date: May 2011
Location: Anderson SC
Posts: 3,880
|
Re: Project Goldilocks, '66 C10 SWB BBW Build
Quote:
Quote:
__________________
Project Goldilocks '66 C10 Short Fleet BBW Build '65 C10 Highly Detailed Stock Restoration Thread '78 Camaro Targa Roof Build '55 International Metal/Body/Paint Work '66 F100 Full Rotisserie Restoration '40 Packard 120 Convertible Coupe Restoration How To Restore and Detail an Original Gauge Cluster How To Detail Sand Body Panels, Edges, Corners, Etc |
||
|
|
|
|
09-27-2013, 11:26 AM
|
#520 | |
|
I'm just glad to be here!
Join Date: Jan 2008
Location: Longview, TX
Posts: 4,788
|
Re: Project Goldilocks, '66 C10 SWB BBW Build
Quote:
__________________
Karl  1965 Chevy Stepside(Grandpa's Old Blue) and (July 2015 Shop Build!)(2020, the Saga Continues) http://67-72chevytrucks.com/vboard/s...d.php?t=372424 The LST Challenge: http://67-72chevytrucks.com/vboard/s...=1#post7812257 Korbin's 1st Square: "Sunburn" http://67-72chevytrucks.com/vboard/s...d.php?t=418618 1985 GMC Sierra: "White Trash", Korbin's 2nd now... http://67-72chevytrucks.com/vboard/s...d.php?t=632305 Henry - 1984 Chevrolet, Owen's 1st Square |
|
|
|
|
|
09-30-2013, 08:08 PM
|
#521 | |
|
Registered User
Join Date: May 2011
Location: Anderson SC
Posts: 3,880
|
Re: Project Goldilocks, '66 C10 SWB BBW Build
Quote:
Thanks for the PM, that confirms what I was thinking. I didn't really want to do anything above the rail since the inner fenders don't cover that spot, but if I have to then I have to.
__________________
Project Goldilocks '66 C10 Short Fleet BBW Build '65 C10 Highly Detailed Stock Restoration Thread '78 Camaro Targa Roof Build '55 International Metal/Body/Paint Work '66 F100 Full Rotisserie Restoration '40 Packard 120 Convertible Coupe Restoration How To Restore and Detail an Original Gauge Cluster How To Detail Sand Body Panels, Edges, Corners, Etc |
|
|
|
|
|
09-30-2013, 08:38 PM
|
#522 |
|
Registered User
Join Date: May 2011
Location: Anderson SC
Posts: 3,880
|
Re: Project Goldilocks, '66 C10 SWB BBW Build
Got one side roughed in tonight. I decided to cut all the holes out and just use plate to fill in the sides. Should look cleaner when it's done that way.
Laid out more precise cut lines.  Cut out.  Welded back in place. I need to get some plate steel to fill in the hole.  I mentioned earlier that I was doing some wheel and suspension changes on the VW. Just got the thin porta-walls in today. I built the front wheels using 15x5.5 Porsche 911/912 steel rims, and welded in the VW centers. The rears will be 7" made by welding 3" bands into the original 4" wheels. Gotta get adjustable rear spring plates to lower it a little more, pick out tires, and paint the rear wheels. Need a mild rear sway bar too. If I can get it all done in time I want to take it to Goodguys Charlotte and try out the autocross track.  
__________________
Project Goldilocks '66 C10 Short Fleet BBW Build '65 C10 Highly Detailed Stock Restoration Thread '78 Camaro Targa Roof Build '55 International Metal/Body/Paint Work '66 F100 Full Rotisserie Restoration '40 Packard 120 Convertible Coupe Restoration How To Restore and Detail an Original Gauge Cluster How To Detail Sand Body Panels, Edges, Corners, Etc |
|
|
|
|
10-01-2013, 07:54 AM
|
#523 |
|
Registered User
Join Date: May 2007
Location: Deale Md
Posts: 4,663
|
Re: Project Goldilocks, '66 C10 SWB BBW Build
went to the Rodder Journal show at Pimlico
this was the only VW on the grounds there were a lot of induction of all kinds, these were the two really impressive ones
__________________
James 63 GMC V6 4speed carryall 65 chevy swb bbw V8 auto 68 K20 327/4 speed, buddy buckets 2002 GMC CC Dually Duramax 64 GMC lwb 3/4 V6 4speed SOLD 66 GMC swb bbw buddy buckets SOLD IG duallyjams The only thing that stays the same is constant change! |
|
|
|
|
10-01-2013, 09:00 AM
|
#524 | |
|
Still Learning
Join Date: Jul 2009
Location: Central Oklahoma
Posts: 10,108
|
Re: Project Goldilocks, '66 C10 SWB BBW Build
Quote:
|
|
|
|
|
|
10-01-2013, 09:37 AM
|
#525 | |
|
Daring to be Different
Join Date: Aug 2008
Location: Hesperia, Ca
Posts: 4,499
|
Re: Project Goldilocks, '66 C10 SWB BBW Build
Quote:
__________________
Dennis Check out my 65/73 Cheap Build Thread. http://www.67-72chevytrucks.com/vboa...d.php?t=327644 KUSTOM RIDES FACE BOOK PAGE: https://www.facebook.com/groups/291198124258863/ 1965 C-10 Short Bed 350/700r4 2012 Silverado 1500 Crew Cab 2016 Honda Accord w/ 18" rims 2007 Honda Goldwing Trike w/ NAVI 2001 Yamaha Roadstar Indian look alike "Life's journey is not to arrive at the grave safely in a well preserved body, but rather to skid in sideways, totally worn out, shouting "...WOW!...what an amazing ride!" Live Life Passionately!!! [/COLOR]  I AM WE TODD IT, I AM SOFA KING WE TODD IT |
|
|
|
|
 |
| Bookmarks |
|
|


 Linear Mode

