
|
 01-28-2012, 11:55 PM
|
#601 |
|
Registered User
Join Date: Jan 2012
Location: Pierre South Dakota
Posts: 48
|
Re: Lurker OrrieG Progress Pics
That is exactly what I am looking for. Appreciate the heads up. thanks again.
|

|

|
|
01-29-2012, 04:49 PM
|
#602 |
|
Registered User
Join Date: Jun 2006
Location: Idaho
Posts: 8,800
|
Re: Lurker OrrieG Progress Pics
Thanks for posting 1985-gmc, that's the bolt I was talking about. On mine someone spot welded the lock nut to the spindle and bolt, I plan on just welding a spacer on to the bolt head when I get my tires and wheels figured out.
__________________
1959 Chevy Short Fleetside w/ 74 4WD drive train (current project) OrrieG Build Thread 1964 Chevelle Malibu w/ 355-350TH (daily driver) Helpful AD and TF Manual Site Old Car Manual Project |
|
|
|
|
01-29-2012, 09:58 PM
|
#603 |
|
Chevy Enthusiast
Join Date: Jul 2009
Location: Canyon Lake Texas
Posts: 2,024
|
Re: Lurker OrrieG Progress Pics
Mine are all welded also, I think they did it at the factory once they got it adjusted to spec.
__________________
Tony 1985 GMC K2500 restoration Project: Rust, White & Blue 1989 Chevy R3500 CC Cummins & 4X4 swap some day... 1989 Burb (D60, 14BFF, 12V, NV4500, NP205, 37" tires in progress) |
|
|
|
|
01-30-2012, 11:40 AM
|
#604 | |
|
Registered User
Join Date: Jul 2010
Location: Victoria,B.C. Canada
Posts: 175
|
Re: Lurker OrrieG Progress Pics
Quote:
|
|
|
|
|
|
01-30-2012, 01:19 PM
|
#605 |
|
Registered User
Join Date: Jun 2006
Location: Idaho
Posts: 8,800
|
Re: Lurker OrrieG Progress Pics
Got the bed part done, but haven't posted the pics in this thread yet. I need to hit the wrecking yards and get some of the lower "bolts". No one sells them separately (memo to self call the Ford dealer). I need to install them and trim the inner tailgare flange for clearance and should be done. I though I was having tailgate alignment problems but noticed that one of my trunion flanges looks bent, I have extras to I will replace it during final assembly.
__________________
1959 Chevy Short Fleetside w/ 74 4WD drive train (current project) OrrieG Build Thread 1964 Chevelle Malibu w/ 355-350TH (daily driver) Helpful AD and TF Manual Site Old Car Manual Project |
|
|
|
|
01-30-2012, 01:54 PM
|
#606 |
|
Registered User
Join Date: Jun 2006
Location: Idaho
Posts: 8,800
|
Re: Lurker OrrieG Progress Pics
Here is a picture of the upper part. It is basically a 1/8" flat bar shaped to mount using the stock flange bolt locations and follow the radius of the bed flange. It is space out 3/16 - 14" flush with the bed return. The cable bolt is tapped, I am going to add a locking bolt on the back. It is metric sized. I splurged and got some chrome recessed head bolts to add a little bling.
__________________
1959 Chevy Short Fleetside w/ 74 4WD drive train (current project) OrrieG Build Thread 1964 Chevelle Malibu w/ 355-350TH (daily driver) Helpful AD and TF Manual Site Old Car Manual Project |
|
|
|
|
01-30-2012, 03:06 PM
|
#607 |
|
Registered User
Join Date: Aug 2007
Location: Corona, California
Posts: 7,998
|
Re: Lurker OrrieG Progress Pics
That looks real nice.
Kim |
|
|
|
|
02-13-2012, 01:15 AM
|
#608 |
|
Registered User
Join Date: Jun 2006
Location: Idaho
Posts: 8,800
|
Re: Lurker OrrieG Progress Pics
Got the rest of the tailgate cable done. Ended up trying three different approachs. Decided to just weld in a support on the gate and rework the upper bracket if the cables ever stretch. Here is a teaser shot, I want to clean up the welds before posting more. My welder could not get a good ground and its more blog and splatter than nice running beads!
__________________
1959 Chevy Short Fleetside w/ 74 4WD drive train (current project) OrrieG Build Thread 1964 Chevelle Malibu w/ 355-350TH (daily driver) Helpful AD and TF Manual Site Old Car Manual Project |
|
|
|
|
02-13-2012, 01:22 AM
|
#609 |
|
Registered User
Join Date: Jul 2011
Location: Las Vegas - Nev. aka Sin City
Posts: 1,835
|
Re: Lurker OrrieG Progress Pics
looks v v nice
|
|
|
|
|
02-13-2012, 01:55 AM
|
#610 |
|
Registered User
Join Date: Oct 2009
Location: Monson,MA
Posts: 503
|
Re: Lurker OrrieG Progress Pics
very nice man!!!
__________________
current project; 1950 GMC "Junk Yard Dawg" http://67-72chevytrucks.com/vboard/s...d.php?t=635960 ___________________________________________ SOLD to "ONEBADFIVEFIVE" http://67-72chevytrucks.com/vboard/s...d.php?t=436406 |
|
|
|
|
02-14-2012, 01:27 PM
|
#611 |
|
Registered User
Join Date: Jul 2010
Location: Victoria,B.C. Canada
Posts: 175
|
Re: Lurker OrrieG Progress Pics
Great work
|
|
|
|
|
02-28-2012, 06:02 AM
|
#612 |
|
Registered User
Join Date: Apr 2010
Location: Pocatello, Idaho
Posts: 7
|
I've been doing some lurking of my own on your build thread and collecting parts for my own build. I have a 56 3100 my dad gave me in high school that has 72blazer 4x4 running gear and a '69 307 v8. I now have a 56 parts truck as well. You've inspired me to begin, but I'm a bit nervous cause I don't have the level of fabrication skill you obviously have. I'm more of a "buy the kit and bolt it to the frame" type of builder. I'll have to farm out some stuff like brake lines, welding, wiring and body work. My first decision is whether to do a front spring shackle reversal with aftermarket springs vs. just rearching the stock springs and leaving the hangers stock. I have a CPP power brake kit and will be mounting the power steering box just like you did, but plan to use a 2wd box for crossover steering. I'll have about a 6in lift with 35in tires and plan to drive it daily. I'm moving the gas tank to under the bed.
I live in Pocatello and understand you might know some guys here in the hot rod building circles who might be a source of info about how and where to get things done. I hope it's ok to ask you questions on occasion as well. Thanks for posting such good pics of your build. That alone will be a great help. Thanks, Leon (72Blazerock)  Posted via Mobile Device Last edited by 72Blazerock; 02-28-2012 at 06:05 AM. Reason: P.S. If you haven't been to the Chrome in the Dome car/truck show in Poky it's a good one. |
|
|
|
|
03-06-2012, 05:43 PM
|
#613 |
|
Registered User
Join Date: Jun 2006
Location: Idaho
Posts: 8,800
|
Re: Lurker OrrieG Progress Pics
72Blazerock - Do not be afraid to learn how to weld, do brake lines, or anything else for that matter. I have an old fender that I use to tune up my body welding. Just drilled holes, cut seams and practiced. Same with the brake and fuel lines, bought an extra piece and practised. Found out I need to buy a better tube bender. Before this project I had never flared a line. Got an old Imperial kit at a garage sale and again practiced. With the lift the cross over steering will be better. You might look at using a Jeep box, they are the mirror image of a GM unit and mount on the inside of the frame in front of the crossmember, eliminate tire/box rubbing.
As far as eastern ID members look here, scroll down and you will see threads from ID guys. http://www.67-72chevytrucks.com/vboa...splay.php?f=55
__________________
1959 Chevy Short Fleetside w/ 74 4WD drive train (current project) OrrieG Build Thread 1964 Chevelle Malibu w/ 355-350TH (daily driver) Helpful AD and TF Manual Site Old Car Manual Project |
|
|
|
|
03-18-2012, 09:52 PM
|
#614 |
|
Registered User
Join Date: Jun 2006
Location: Idaho
Posts: 8,800
|
Re: Lurker OrrieG Progress Pics
Snowed and rained this weekend so I got some garage time. Got out the spare Cady column and figured out that the telescope is easy to defeat. For grins tried the stock 59 steering wheel and it fits, is even the same diameter where it meets the column (got to love GM engineers). Only problem is it is about 2.5 -3" to deep. Did some research and 48-56 truck and auto wheels are relatively flat so the search is on for a donor.
Also did some head scratching on the gas tank door. In the pic the red square is 5" x 5", green circle is 4". Any one have experience with donar vehicles with smaller gas doors? All the ones I see on cars and trucks in the parking lots look huge. Going to get one with inside remote cable lock. Finally, stripped the hood, lower front fender closure and sanded the cowl grille. Feels like some progress.
__________________
1959 Chevy Short Fleetside w/ 74 4WD drive train (current project) OrrieG Build Thread 1964 Chevelle Malibu w/ 355-350TH (daily driver) Helpful AD and TF Manual Site Old Car Manual Project |
|
|
|
|
03-19-2012, 02:55 PM
|
#615 |
|
Registered User
Join Date: Jan 2012
Location: Motown
Posts: 7,677
|
Re: Lurker OrrieG Progress Pics
orrieg
when i bought my truk trunk they opened the doors and cut through the roof and floor and gave me half of a 90 yew yorker, so the gas door was an added bonus the gas door is about 4.5'' round with remote cable entry, actually two remote cables. one for trunk entry and a long one that goes up front. metal frame and plastic inner housing the only thing i recommend is that you mount it a little higher, mine is a little slow filling due to the straight pipe thru the frame and little rise to the neck.   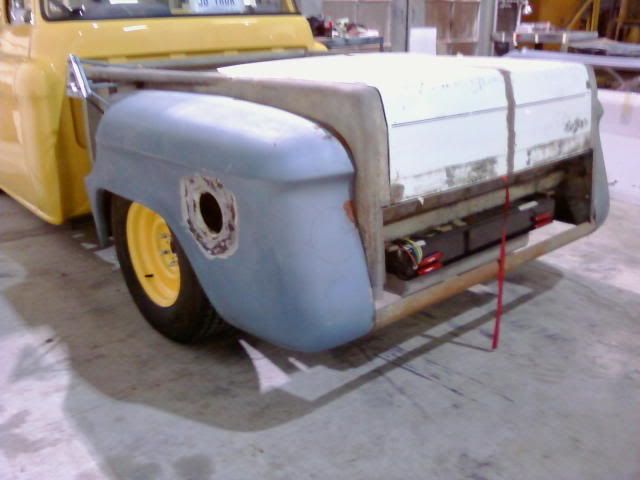
__________________
cool, an ogre smiley  Ogre's 58 Truk build Ogre's 58 Truk buildhow to put your truck year and build thread into your signature shop air compressor timer |
|
|
|
|
03-20-2012, 03:11 PM
|
#616 |
|
Registered User
Join Date: Jan 2012
Location: Motown
Posts: 7,677
|
Re: Lurker OrrieG Progress Pics
orrieg: measured the new yorker gas door. 6 inches, my bad
__________________
cool, an ogre smiley Ogre's 58 Truk buildhow to put your truck year and build thread into your signature shop air compressor timer |
|
|
|
|
03-20-2012, 06:53 PM
|
#617 |
|
Registered User
Join Date: Jun 2006
Location: Idaho
Posts: 8,800
|
Re: Lurker OrrieG Progress Pics
Thank Orge, I will have the same issue with a flat fill, the FS spear limits how high I can go. maybe I can carry a wood block to drive the rear tire up on to get some slope!
__________________
1959 Chevy Short Fleetside w/ 74 4WD drive train (current project) OrrieG Build Thread 1964 Chevelle Malibu w/ 355-350TH (daily driver) Helpful AD and TF Manual Site Old Car Manual Project |
|
|
|
|
03-21-2012, 10:37 AM
|
#618 |
|
Registered User
Join Date: Jan 2012
Location: Motown
Posts: 7,677
|
Re: Lurker OrrieG Progress Pics
i choose my gas pumps based on how the ground slopes away from the pump
sort of wish i had installed the gas door in the top of the fender, it would have fit perfectly... funny you should mention a block of wood, my 59 panel had an 2nd tank installed the filler neck was flat with the panel floor and filled on the drivers side (stock filled on pass side) i carried a 4x4 that i would drop, drive forward on to it and after filling, back up, lean out the door and pick it up my panel was almost as high as your napco, had to lean waaaay out.
__________________
cool, an ogre smiley Ogre's 58 Truk buildhow to put your truck year and build thread into your signature shop air compressor timer |
|
|
|
|
03-21-2012, 12:08 PM
|
#619 | |
|
Registered User
Join Date: Jun 2006
Location: Idaho
Posts: 8,800
|
Re: Lurker OrrieG Progress Pics
Quote:
Before this build I had a second 69 Chevelle tank in the spare tire location with the rear bumper filler, if it wasn't rusted out I would have kept it. I would always fill it last and use if first because the cap leaked on hills! My grand father used to tell me that with some old cars with the tank in the cowl if the gas was low you would have to back up hills because they were gravity feed, may the Model T's?
__________________
1959 Chevy Short Fleetside w/ 74 4WD drive train (current project) OrrieG Build Thread 1964 Chevelle Malibu w/ 355-350TH (daily driver) Helpful AD and TF Manual Site Old Car Manual Project |
|
|
|
|
|
03-21-2012, 08:56 PM
|
#620 | |
|
Registered User
Join Date: Dec 2011
Location: Mobile, Alabama
Posts: 996
|
Re: Lurker OrrieG Progress Pics
Quote:
|
|
|
|
|
|
03-21-2012, 09:51 PM
|
#621 |
|
Registered User
Join Date: Jun 2006
Location: Idaho
Posts: 8,800
|
Re: Lurker OrrieG Progress Pics
by hand. Aircraft stripper, then DA sander with 80 grit and air sander with 3M Purple Shredded wheat stripper. Some fine stuff used a small wire wheel. Dental pick for cracks. Lots of work, but I have been leary of getting stuff messed up with the wrong blasting technique, and I have more time than money.
For the hidden hard to get to rust I used POR system to convert, clean and paint. On the inside of the doors I am going use roll on bedliner/undercoat stuff and then stick on sound deadner. You probably saw that after the por under the dash and inside cab floor I painted it with Rustoleum brush applied industrial enamel paint. Makes for lots of reflection to see better and will not be see when covered. Figure it will last another 25 years then its my great grand kids problem, if one comes along interested.
__________________
1959 Chevy Short Fleetside w/ 74 4WD drive train (current project) OrrieG Build Thread 1964 Chevelle Malibu w/ 355-350TH (daily driver) Helpful AD and TF Manual Site Old Car Manual Project |
|
|
|
|
03-21-2012, 10:00 PM
|
#622 | |
|
Registered User
Join Date: Oct 2009
Location: Monson,MA
Posts: 503
|
Re: Lurker OrrieG Progress Pics
Quote:
go in and as for a 32 ford fuel pump and watch them type away at their pc... lol never gets old! haa haa
__________________
current project; 1950 GMC "Junk Yard Dawg" http://67-72chevytrucks.com/vboard/s...d.php?t=635960 ___________________________________________ SOLD to "ONEBADFIVEFIVE" http://67-72chevytrucks.com/vboard/s...d.php?t=436406 |
|
|
|
|
|
03-21-2012, 10:56 PM
|
#623 |
|
Chevy Enthusiast
Join Date: Jul 2009
Location: Canyon Lake Texas
Posts: 2,024
|
Re: Lurker OrrieG Progress Pics
Yall should like this, its footage of a 1936 car assembly line. Pretty cool!
http://www.dump.com/2011/07/15/fasci...ly-line-video/
__________________
Tony 1985 GMC K2500 restoration Project: Rust, White & Blue 1989 Chevy R3500 CC Cummins & 4X4 swap some day... 1989 Burb (D60, 14BFF, 12V, NV4500, NP205, 37" tires in progress) |
|
|
|
|
03-31-2012, 10:07 PM
|
#624 |
|
Registered User
Join Date: Jun 2006
Location: Idaho
Posts: 8,800
|
Re: Lurker OrrieG Progress Pics
Scored a 47 big truck steering wheel today. Mocked it up on the column. It is going to work, even the horn. I'm going to document in just in case anyone else wants to do the same. Here is a pic when I got it and mocked up. The HAMB guys have some good info on restoring the wheel itself.
__________________
1959 Chevy Short Fleetside w/ 74 4WD drive train (current project) OrrieG Build Thread 1964 Chevelle Malibu w/ 355-350TH (daily driver) Helpful AD and TF Manual Site Old Car Manual Project |
|
|
|
|
04-01-2012, 05:57 AM
|
#625 | |
|
Registered User
Join Date: Dec 2011
Location: Mobile, Alabama
Posts: 996
|
Re: Lurker OrrieG Progress Pics
Quote:
|
|
|
|
|
 |
| Bookmarks |
|
|


 Linear Mode

