
|
|
|
 10-26-2017, 12:51 AM
|
#1 | |
|
Registered User
Join Date: Oct 2017
Location: Roosevelt Utah
Posts: 4
|
Re: S10 Swap how to
Quote:
|
|

|

|
|
10-29-2017, 04:07 PM
|
#2 |
|
Registered User
Join Date: Oct 2017
Location: Roosevelt Utah
Posts: 4
|
Re: S10 Swap how to
Would it be of any benefit to cut s10 firewall out where pedals and master/booster mounts and weld it into the AD truck? As a note I personally want a manual trans so I'm going to need the clutch as well. Has anyone else went with a manual trans?
|
|
|
|
|
10-30-2017, 11:52 PM
|
#3 | |
|
Senior Member
 Join Date: May 2007
Location: Doodah Kansas
Posts: 7,774
|
Re: S10 Swap how to
Quote:
 IMG_6198 by Joe Doh, on Flickr IMG_6198 by Joe Doh, on FlickrI am doing a 5 spd 41 this time and I think sometime next week I will build the pedal system.
__________________
the mass of men live lives of quiet desperation if there is a problem, I can have it. new project WAYNE http://67-72chevytrucks.com/vboard/s...d.php?t=844393 |
|
|
|
|
|
10-30-2017, 07:29 PM
|
#4 |
|
Registered User
Join Date: Aug 2014
Location: Vacaville, CA
Posts: 133
|
Re: S10 Swap how to
Yea I swapped a manual in mine.
I used a 327 from my '67 camaro, ditched the powerglide and found a T-5 from an '85 camaro for cheap. I fabricated linkage to keep the original shifter and repurposed a hydraulic master cylinder/ throw out bearing from a different project that didn't happen. I used the s10 brake booster and pedal bracket. I just drilled the firewall and didn't reinforce the it. Although I attached the pedal bracket to the steering column bracket for support. I guess I should update my build thread. Last edited by Black93GT; 10-30-2017 at 07:37 PM. |
|
|
|
|
10-31-2017, 02:15 PM
|
#5 |
|
Registered User
Join Date: Aug 2017
Location: Kearney MO
Posts: 12
|
Re: S10 Swap how to
Building my radiator support, I noticed my 19x22" radiator is tight against the nuts welded on the inside of the uprights. The nuts have to stay to bolt to the fenders, right? I can spread tthe bottom a little to gain some room, but I may need to bend in the tanks a little to get it to fit without rubbing. Any other suggestions?
__________________
Jim Building my first hot rod 54 Chevy truck, S10 frame 383/700r4/373 |
|
|
|
|
11-01-2017, 12:06 AM
|
#6 |
|
Registered User
Join Date: Aug 2014
Location: Vacaville, CA
Posts: 133
|
Re: S10 Swap how to
Yes the nuts are to mount the fenders. Just use shorter bolts so they don't extend past the nuts. I may be lucky to have 1/8" between the bolts and radiator end caps. I had to center my radiator and triple check the spacing before welding my brackets to the end caps.... But it just fits.
As far as motor placement... Mine is set as low and as far forward as possible. My oil pan has about 1/2" clearance from the crossmember. I used the lower version of Sarge's cab mounts and had to adjust the rear position/height of the transmission to get it under the tunnel without modification. Last edited by Black93GT; 11-01-2017 at 06:41 AM. |
|
|
|
|
11-01-2017, 01:29 AM
|
#7 |
|
Registered User
Join Date: Aug 2017
Location: Kearney MO
Posts: 12
|
Re: S10 Swap how to
Thanks 93blackgt for the response. That does help with engine height, apparently my headers are going to have to govern that. My radiator is just a little wider. I will find a way to make it work.
__________________
Jim Building my first hot rod 54 Chevy truck, S10 frame 383/700r4/373 |
|
|
|
|
11-12-2017, 02:42 AM
|
#8 |
|
Senior Member
Join Date: May 2007
Location: Doodah Kansas
Posts: 7,774
|
Re: S10 Swap how to
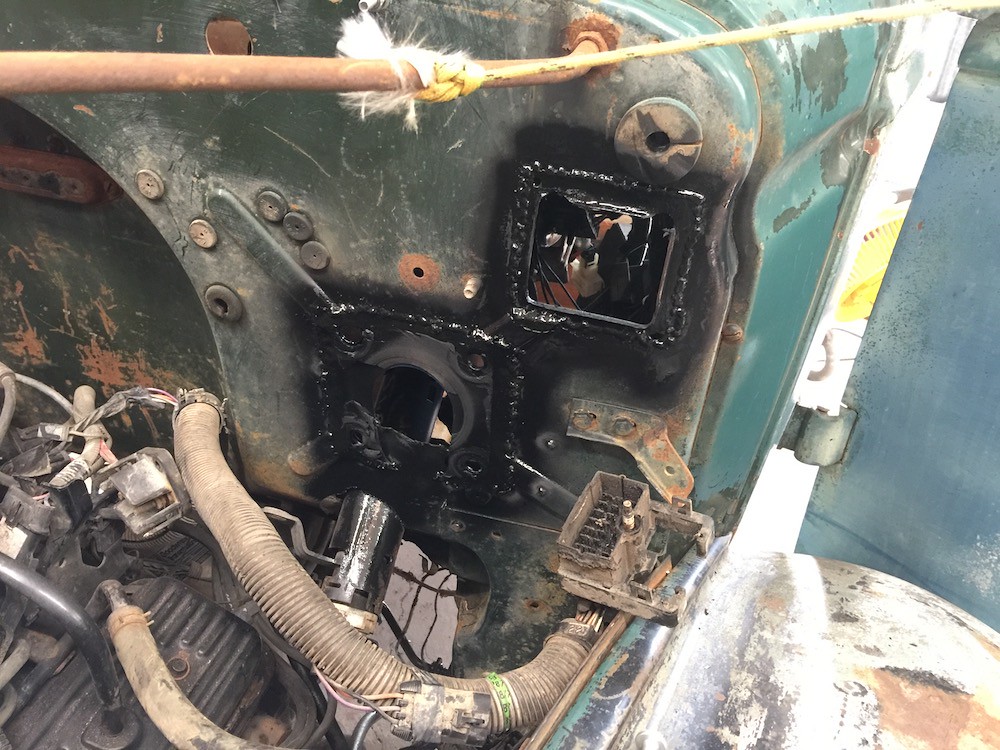
I did this on my 49. the rad is too wide to fit without modification but you can get it in exactly the right position to clear the power steering hoses and the hood. I used the s10 condenser too , but the evaporator and blower do not fit under the hood, its about 2 inches wide from fitting between the engine and the hood. instead I used a blower box from a 98 tahoe, it barely fit between the dash and the firewall and the vent distribution had to be removed (too wide) but the s10 controls controlled the fan and the blend door.
here is a couple pictures of the mods for the radiator. the s10 radiator mounts to some rings with a rubber grommet on the bottom and a simple clamp on top, you can see the rings in a couple pictures.  IMG_3555 by Joe Doh, on Flickr IMG_3555 by Joe Doh, on Flickr IMG_3556 by Joe Doh, on Flickr IMG_3556 by Joe Doh, on Flickr IMG_3767 by Joe Doh, on Flickr IMG_3767 by Joe Doh, on Flickrmake sure you rebuild the lower air director to funnel the air ONLY through the condenser/rad, otherwise it will just take the path of least resistance UNDER the condenser/rad. I used a plastic material called kydex, its very flexible but also very strong, its like a thinner, stronger ABS. Its not available everywhere, we have a surplus store that always has a couple sheets.
__________________
the mass of men live lives of quiet desperation if there is a problem, I can have it. new project WAYNE http://67-72chevytrucks.com/vboard/s...d.php?t=844393 |
|
|
|
|
11-12-2017, 11:27 AM
|
#9 |
|
Registered User
Join Date: Sep 2017
Location: Saskatoon, SK.
Posts: 19
|
Re: S10 Swap how to
Thanks for the reply and photos. Much appreciated. I will also explore what may be available to purchasing new to get into a smaller rad/condenser, but I now know this is an option. I'm sure I will have a million more questions. How about fitting the drive shaft...if the motor has to be moved back 8", does the front shaft get a section cut out? Not sure why they went with a 2 piece drive shaft on these trucks? Thanks
|
|
|
|
|
11-12-2017, 12:33 PM
|
#10 | |
|
Senior Member
Join Date: May 2007
Location: Doodah Kansas
Posts: 7,774
|
Re: S10 Swap how to
Quote:
replace it with a one piece shaft, usually you can find one that is close in length, for example a longbed driveshaft is usually 64" overall and a reg cab colorado driveshaft is 54" long. when you factor in that lowering the rear makes the driveshaft shorter (lowering an s10 you usually shorten a driveshaft 1" to keep the yoke from cramming into the trans) so 54 is almost perfect. measure your driveshaft to be sure, center of u joint to center of u joint. I dont recommend shortening the two piece because the front shaft will end up ~12" long and you will want to replace the carrier bearing while you are working on it, might as well just put that towards a one piece.
__________________
the mass of men live lives of quiet desperation if there is a problem, I can have it. new project WAYNE http://67-72chevytrucks.com/vboard/s...d.php?t=844393 |
|
|
|
|
|
11-13-2017, 08:57 PM
|
#11 |
|
Senior Member
Join Date: Sep 2016
Location: Hershey, PA
Posts: 1,004
|
Re: S10 Swap how to
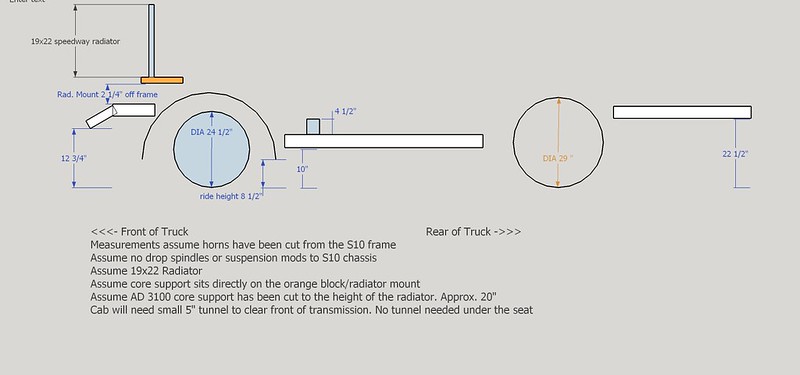
As a guide if anyone is interested in what measurements you end up with using a 4 1/2" front cab mount and how it affects ride height and all the other measurements. Measurements are without any suspension modifications. The cab mount also has a 1/2" rubber mount on top for a total of 5" from top of frame to bottom of the cab cross member that contains the mount hole.
__________________
Current Build Thread 1930 Ford Model A Modern Twist: Ford Model A Rat Rod With a Modern Twist Build Thread Phase 1 "The Swap": 1949 3100 with S10 swap. Beginner build with ambition! Build Thread Phase 2 "The Drop": Beginner Build with Ambition gets Air Ride |
|
|
|
|
11-13-2017, 11:00 PM
|
#12 |
|
Registered User
Join Date: Sep 2017
Location: Saskatoon, SK.
Posts: 19
|
Re: S10 Swap how to
Thanks for posting the measurements. Is this the typical tire sizes guys are using front and back? Not that there's a standard, but what have you found works well for wheel sizes for a lowered look?
|
|
|
|
|
11-14-2017, 10:12 AM
|
#13 | ||
|
Senior Member
Join Date: Sep 2016
Location: Hershey, PA
Posts: 1,004
|
Re: S10 Swap how to
Quote:
Tucked in with the right spacers and 2" drop spindles, 29"x8" front tires seems to be the consensus, but I haven't tried that myself yet to confirm that there is no rubbing. Borrowed from a different thread: Quote:
__________________
Current Build Thread 1930 Ford Model A Modern Twist: Ford Model A Rat Rod With a Modern Twist Build Thread Phase 1 "The Swap": 1949 3100 with S10 swap. Beginner build with ambition! Build Thread Phase 2 "The Drop": Beginner Build with Ambition gets Air Ride |
||
|
|
|
|
11-15-2017, 03:43 PM
|
#14 |
|
Registered User
Join Date: Apr 2010
Location: Warrensburg, MO
Posts: 2,690
|
Re: S10 Swap how to
i beg to differ, i have used two piece shafts and old carrier bearings many times and never had a problem i just shorten the front half, and it is NEVER anywhere near 12" long! works out nicely, cause you don't have to mess with moving the carrier bearing.
__________________
www.olesargecustoms.com email: chris@olesargecustoms.com '48 build: http://67-72chevytrucks.com/vboard/s...d.php?t=541904 '33 build: http://67-72chevytrucks.com/vboard/s...=1#post6232888 '49 build: http://67-72chevytrucks.com/vboard/s...=1#post6364475 |
|
|
|
|
11-15-2017, 05:16 PM
|
#15 | |
|
Senior Member
Join Date: May 2007
Location: Doodah Kansas
Posts: 7,774
|
Re: S10 Swap how to
Quote:
looks like you are right, 12" would be much longer than the actual measurement. my comment was actually about cost, a rcsb driveshaft is $50-60 in a salvage, shortening a two piece would be double that and you would probably replace the carrier "while you were in there"
__________________
the mass of men live lives of quiet desperation if there is a problem, I can have it. new project WAYNE http://67-72chevytrucks.com/vboard/s...d.php?t=844393 |
|
|
|
|
|
11-15-2017, 06:44 PM
|
#16 |
|
Registered User
Join Date: Nov 2017
Location: Siloam Springs, AR
Posts: 19
|
Re: S10 Swap how to
Glad to see this thread is still active. My 14 year old son and I are currently working on a swap just like this have built cab mounts very similar to the design shown only using 4" square tubing (son actually did all the welding to assemble the mounts. have moved the motor into position and made mounts and are currently working on the core support.
All the info here is great look forward to getting this truck together and running. We are using the 4.3 vortec out of the 1998 s10 we purchased and using the 4L60E that was behind it. Also had a 2001 short bed we used as a frame donor stretched it to 116" as others have previously mentioned. The short bed had no engine or tranny when we purchased but did have the old tranny cross member in the bed which I was able to rework to act as a trans support and only had to drill 2 holes in the frame. Any suggestions for brake pedal since both our s10s have the huge aluminum casting assembly and they don't look like they would be easy to remove or rework for repurposing in the 48? |
|
|
|
|
11-15-2017, 09:53 PM
|
#17 | |
|
Senior Member
Join Date: Sep 2016
Location: Hershey, PA
Posts: 1,004
|
Re: S10 Swap how to
Quote:
__________________
Current Build Thread 1930 Ford Model A Modern Twist: Ford Model A Rat Rod With a Modern Twist Build Thread Phase 1 "The Swap": 1949 3100 with S10 swap. Beginner build with ambition! Build Thread Phase 2 "The Drop": Beginner Build with Ambition gets Air Ride |
|
|
|
|
|
11-16-2017, 07:24 PM
|
#18 | |
|
Senior Member
Join Date: May 2007
Location: Doodah Kansas
Posts: 7,774
|
Re: S10 Swap how to
Quote:
If you want a simple brake pedal setup, skymangs shows how to use a 82-93 s10 pedal bracket on page 2.
__________________
the mass of men live lives of quiet desperation if there is a problem, I can have it. new project WAYNE http://67-72chevytrucks.com/vboard/s...d.php?t=844393 |
|
|
|
|
|
11-18-2017, 08:55 AM
|
#19 | |
|
Registered User
Join Date: Aug 2014
Location: Vacaville, CA
Posts: 133
|
Re: S10 Swap how to
Quote:
|
|
|
|
|
|
11-16-2017, 12:04 PM
|
#20 | |
|
Registered User
Join Date: Aug 2014
Location: Vacaville, CA
Posts: 133
|
Re: S10 Swap how to
Quote:
|
|
|
|
|
|
11-16-2017, 01:37 PM
|
#21 |
|
Registered User
Join Date: Nov 2009
Location: Gainesville Georgia
Posts: 458
|
Re: S10 Swap how to
A drive shaft from a late '90's caprice or roadmaster will work fine using a V8 and 4L60 tranny if you want to go with one piece.
|
|
|
|
|
11-16-2017, 08:44 PM
|
#22 |
|
Registered User
Join Date: Apr 2010
Location: Warrensburg, MO
Posts: 2,690
|
Re: S10 Swap how to
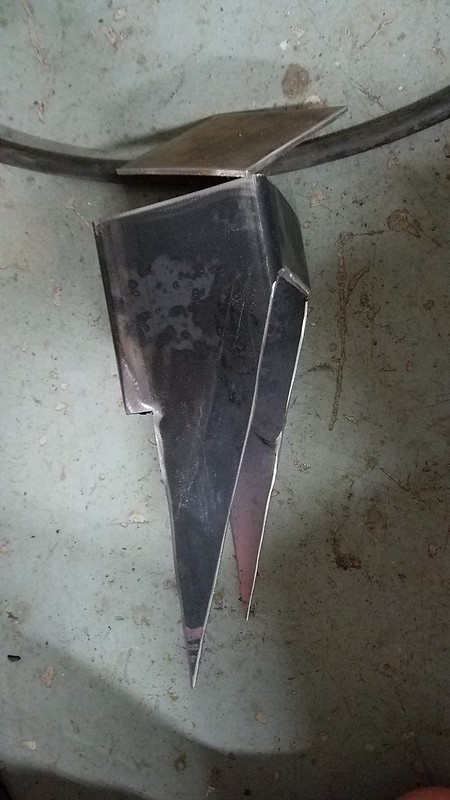
this is a shortened 2 piece driveshaft, no where near 12" long with the original carrier bearing. we have been driving it for over 4 years now, so don't tell me it can't be done! cost about $100 to have a driveshaft shortened/balanced. i don't know about you, but i don't have time to go scrounging around a j/y every build.
__________________
www.olesargecustoms.com email: chris@olesargecustoms.com '48 build: http://67-72chevytrucks.com/vboard/s...d.php?t=541904 '33 build: http://67-72chevytrucks.com/vboard/s...=1#post6232888 '49 build: http://67-72chevytrucks.com/vboard/s...=1#post6364475 |
|
|
|
|
11-16-2017, 10:04 PM
|
#23 | |
|
Senior Member
Join Date: May 2007
Location: Doodah Kansas
Posts: 7,774
|
Re: S10 Swap how to
Quote:
scrounging? I call them on the phone and say I need this driveshaft. the last one was 60 bucks and wasnt any more driving than it takes to go to the driveshaft shop, and I had it to install the same day. add to that, the 98+ longbeds came with a one piece shaft, so they dont even have a carrier bearing crossmember. I can agree to disagree, but dang if it doesnt seem like your way is the "more money more work more time" way. edit: and I am looking again, your trans is a TH350 which is shorter than the 4L60e in my picture.
__________________
the mass of men live lives of quiet desperation if there is a problem, I can have it. new project WAYNE http://67-72chevytrucks.com/vboard/s...d.php?t=844393 Last edited by joedoh; 11-16-2017 at 10:11 PM. |
|
|
|
|
|
11-19-2017, 02:51 PM
|
#24 |
|
Registered User
Join Date: Sep 2016
Location: Costa Mesa Ca
Posts: 8
|
Re: S10 Swap how to
Thanks for the diagram Gigamanx, not 100% sure what motor you are going with Speedysdad, but if 5.3 vortec, rear dump camero headers that skymangs mention is the way to go. I tried a few different option and found that those fit best with the correct outlet direction giving a lot of room to wiggle the motor to its final destination. With those headers and skymangs designed motor mounts, my one piece driveshaft did not need the center support bearing mount modified or removed. Hope this helps, can provide a picture if you need one.
|
|
|
|
|
11-19-2017, 05:45 PM
|
#25 |
|
Registered User
Join Date: Aug 2012
Location: Northeast KS
Posts: 1,779
|
Re: S10 Swap how to
Meh, I removed mine completely. My tranny x-member is pretty heavy and makes up for it though.
__________________
1999 GMC Suburban K2500 SLT, 454/4L80E 1991 Z/28, 6.0L/T56 1949 GMC 250, S10 Frame, 6.0L/4L80E Instagram @aceshighspeedshop |
|
|
|
 |
| Bookmarks |
|
|


 Hybrid Mode
