
|
|
|
 04-18-2012, 10:11 AM
|
#1 |
|
Registered User
Join Date: Aug 2010
Location: Des Moines, IA
Posts: 1,241
|
Re: Project "My Happy Mess"
I had a guy who bought parts from me tell me he and his brother bought a 454 that supposedly ran when pulled and ran great from WCC They got it home and pulled the intake and the engine had blew up so hard it broke the lifter valley. They took it right back and he said that the owner yelled at them and told them it was worthless now and that he actually threw the money they paid for the engine back in their faces. I have also heard other horror stories and will stay away.
Any how the truck is looking great. Not that it matters but I'm glad you left the striping under the hood.
__________________
Bud |

|

|
|
04-18-2012, 03:17 PM
|
#2 |
|
Registered User
Join Date: Jul 2011
Location: Des Moines, Iowa
Posts: 3,016
|
Re: Project "My Happy Mess"
Thanks Bud.
 What's everyone's take on the pinstripe under the hood? What's everyone's take on the pinstripe under the hood?We didn't get primer down today, just more sanding/prepping with 80. Tomorrow for sure Bought the primer we're going to shoot on top of the self etch. 
__________________
project: "my happy mess" |
|
|
|
|
04-18-2012, 03:23 PM
|
#3 |
|
6>8 Plugless........
 Join Date: Sep 2007
Location: Prairie City, Ia
Posts: 17,139
|
Re: Project "My Happy Mess"
Great progress. That Hancock stamping is interesting. I've seen one some where but can't remember where.
 I do plan on hitting some shows this year. Starting with Good Guys at very least! I do plan on hitting some shows this year. Starting with Good Guys at very least!As far as the striping, I say leave it too. It adds a nice touch to the era IMO.
__________________
Ryan 1972 Chevy Longhorn K30 Cheyenne Super, 359 Inline 6 cylinder, Auto Trans, Tilt, Diesel Tach/Vach, Buckets, Rare Rear 4-link and air ride option Build Thread 1972 GMC Sierra Grande Longhorn 4x4 1972 Chevy Cheyenne Super K20 Long Step side tilt, tach, tow hooks, AC, 350 4 speed 1972 C10 Suburban Custom Deluxe 1969 Chevy milk truck 1971 Camaro RS 5.3 BTR STG3 Cam Super T10 1940 Ford 354 Hemi 46RH Ford 9" on air ride huge project Tired of spark plugs? Check this out. |
|
|
|
|
04-18-2012, 04:04 PM
|
#4 |
|
Registered User
Join Date: Jul 2011
Location: Des Moines, Iowa
Posts: 3,016
|
Re: Project "My Happy Mess"
The stamp is on the hood latch or support. You probably see it every time you pop the hood. Good Guy's - ever since I got my truck I've considered joining. Especially a few years back when they allowed 71's. I've considered restoring a 69' Snapper mower and putting in the bed for show. The mower was made the same year we first went to the moon, and is named Comet.
__________________
project: "my happy mess" |
|
|
|
|
04-18-2012, 04:06 PM
|
#5 | |
|
6>8 Plugless........
Join Date: Sep 2007
Location: Prairie City, Ia
Posts: 17,139
|
Re: Project "My Happy Mess"
Quote:

__________________
Ryan 1972 Chevy Longhorn K30 Cheyenne Super, 359 Inline 6 cylinder, Auto Trans, Tilt, Diesel Tach/Vach, Buckets, Rare Rear 4-link and air ride option Build Thread 1972 GMC Sierra Grande Longhorn 4x4 1972 Chevy Cheyenne Super K20 Long Step side tilt, tach, tow hooks, AC, 350 4 speed 1972 C10 Suburban Custom Deluxe 1969 Chevy milk truck 1971 Camaro RS 5.3 BTR STG3 Cam Super T10 1940 Ford 354 Hemi 46RH Ford 9" on air ride huge project Tired of spark plugs? Check this out. |
|
|
|
|
|
04-18-2012, 08:27 PM
|
#6 |
|
Registered User
Join Date: Jul 2011
Location: Des Moines, Iowa
Posts: 3,016
|
Re: Project "My Happy Mess"
that's a lot larger than a Snapper Commet.Okay, if not the mower, then this from my childhood. I envied the kids in my neighborhood that had these! 71'-73'   
__________________
project: "my happy mess" |
|
|
|
|
04-20-2012, 01:37 AM
|
#7 |
|
Registered User
Join Date: Jul 2011
Location: Des Moines, Iowa
Posts: 3,016
|
Almost there...
Still no primer, but plenty of pics!
We've sort of concluded today that my truck was in fact painted once before. It was done so well, there's hardly any indication of this being performed, except for one area on the back side of the cab (pics below). Shown in the pictures are two shades of Bronze. I think that the color a PO painted the truck was actually darker in color - but we won't be certain until we actually paint the jams. Here are a couple shots from yesterday. Don't think you're the only one Low Elco - we had dents that needed attention too, after sanding they were more visible. They've since been sanded, and the cab is sitting waiting to be primed.  Back/top of cab.  Back/pass. side of cab.  Front/top of cab. Seriously?   Engine shot for good measure  Shots above finished sanded.  Back side of cab paint scuffed/sanded.  Masked off with plastic. $20 for the box of plastic. Plenty left over.    80 grit sandpaper used to go over all metal as last step after wire wheel.  Tag taped up.  Here are the pics showing the back side of the cab (down the middle). The two different tones of bronze, AND something that wasn't noticeable before - there is no white paint underneath to either side, left or right. White paint (meaning two layers, bronze/white) exists only in the middle area. Which would indicate they painted the entire cab white first from the factory, and then a PO stripped the paint clean (both layers) and repainted? Except for the middle area?? You can see the masking job - where the two tones of bronze are - it would have ridden right below the trim that wraps around the backside of the cab. But I have no idea why they wouldn't have stripped down the middle area. Unless I'm too tired to understand and the factory did this. (?)      Cleaning the metal of oil, finger prints, etc... Wax and grease remover I think its called. All metal wiped down good. No touching of metal after this step is performed. Etch primer goes on next.  I think this is sealer getting stirred.  Now the reason we didn't spray primer today. We spent time installing remote ventilation for the Bullard Free Air Pump. They sell an extension to run the Inlet filter at a distance, away from the work area if needed - but it's just a tube that goes straight up. So we (The Fixer) engineered our own using PVC pipe/fittings and ran it to the outside - leaving the pump on the inside. Allowing for clean fresh air to be delivered fromthe outside of the shop, away from harmful contaminants (primer/paint, etc...).       Turned on  Tomorrow AM the truck will get shot with primer 
__________________
project: "my happy mess" Last edited by litew8; 04-20-2012 at 01:54 AM. |
|
|
|
|
04-20-2012, 08:06 AM
|
#8 |
|
Registered User
Join Date: Apr 2003
Location: Indep, MO
Posts: 5,893
|
Re: Project "My Happy Mess"
Right on! Always the small stuff that trips ya up. I'm in the same position for paint on the cab inner. Maybe Sunday. Good progress, keep it Rollin!
Posted via Mobile Device
__________________
Boppa's Old Yeller Truck Build, Old Yeller's New Heart! Project Buzz Bomb Flyin' Low! |
|
|
|
|
04-20-2012, 02:08 PM
|
#9 |
|
6>8 Plugless........
Join Date: Sep 2007
Location: Prairie City, Ia
Posts: 17,139
|
Re: Project "My Happy Mess"
That fresh air pump is a good idea! Your cab is looking really nice. I bet you're righ on the cab getting a repaint too. The white are is odd like you say.
__________________
Ryan 1972 Chevy Longhorn K30 Cheyenne Super, 359 Inline 6 cylinder, Auto Trans, Tilt, Diesel Tach/Vach, Buckets, Rare Rear 4-link and air ride option Build Thread 1972 GMC Sierra Grande Longhorn 4x4 1972 Chevy Cheyenne Super K20 Long Step side tilt, tach, tow hooks, AC, 350 4 speed 1972 C10 Suburban Custom Deluxe 1969 Chevy milk truck 1971 Camaro RS 5.3 BTR STG3 Cam Super T10 1940 Ford 354 Hemi 46RH Ford 9" on air ride huge project Tired of spark plugs? Check this out. |
|
|
|
|
04-20-2012, 03:43 PM
|
#10 |
|
Registered User
Join Date: Jul 2011
Location: Des Moines, Iowa
Posts: 3,016
|
Re: Project "My Happy Mess"
Thanks man. We got her primed
Looks nice, with very, very little prep work (sanding) needed before painting the jambs. We plan to shoot (the jambs) paint possibly Monday. After that we'll work on the doors, get the jambs painted and put the doors back on. Taking a well deserved weekend off. The free air pump system worked out GREAT! The only issue he ran into was the hose curling up on him, getting tangled with the air hose (which also curls) used for the paint gun. We'll correct this by buying swivel adapters for each so that the hoses can freely turn on each end, allowing him to manage them when needed. If I am right that the cab got repainted, and a PO painted it a darker shade of bronze, then that will mean my firewall will be a darker color when all is said and done. I can live with that, but it'll be interesting to see what the 522 med. bronze looks like after he shoots the jambs. Oh, the drama/suspense. Pics up tonight.
__________________
project: "my happy mess" Last edited by litew8; 04-20-2012 at 03:53 PM. |
|
|
|
|
04-20-2012, 08:12 PM
|
#11 |
|
Registered User
Join Date: Apr 2003
Location: Indep, MO
Posts: 5,893
|
Re: Project "My Happy Mess"
Congrats ! Big steps always feel good.
Posted via Mobile Device
__________________
Boppa's Old Yeller Truck Build, Old Yeller's New Heart! Project Buzz Bomb Flyin' Low! |
|
|
|
|
04-20-2012, 10:14 PM
|
#12 |
|
Registered User
Join Date: Feb 2011
Location: Crowley TX
Posts: 979
|
Re: Project "My Happy Mess"
nice work , keep it up

|
|
|
|
|
04-21-2012, 01:53 AM
|
#13 |
|
Registered User
Join Date: Apr 2003
Location: Indep, MO
Posts: 5,893
|
Re: Project "My Happy Mess"
Oooooh, pretty! Now you get to start blocking! Bahahaha!
Posted via Mobile Device
__________________
Boppa's Old Yeller Truck Build, Old Yeller's New Heart! Project Buzz Bomb Flyin' Low! |
|
|
|
|
04-21-2012, 02:22 AM
|
#14 |
|
Registered User
Join Date: Jul 2011
Location: Des Moines, Iowa
Posts: 3,016
|
Re: Project "My Happy Mess"
Urethane primer isn't as hard to sand as Epoxy. The Fixer says with the both of us working opposite sides, we'll be finished within a 1/2 an hour. Hardly any scratches at all and it's nice and smooth.  Seriously no scratches except for 2 tiny spots where bondo was used. Seriously no scratches except for 2 tiny spots where bondo was used.P.S. For those of you still following this thread, I apologize for being wrong about the Epoxy over Etch conversation. If you haven't already noticed, we're not using Epoxy primer, we're using Urethane over Etch. If I could go back and delete all the comments, trust me I would. I think Etch would actually eat Epoxy - so I hope someone doesn't go off and do that before doing research of their own first. Oh well, we're all alive and nobody died.
__________________
project: "my happy mess" Last edited by litew8; 04-21-2012 at 02:27 AM. |
|
|
|
|
04-21-2012, 03:10 AM
|
#15 |
|
6>8 Plugless........
Join Date: Sep 2007
Location: Prairie City, Ia
Posts: 17,139
|
Re: Project "My Happy Mess"
It looks great!
__________________
Ryan 1972 Chevy Longhorn K30 Cheyenne Super, 359 Inline 6 cylinder, Auto Trans, Tilt, Diesel Tach/Vach, Buckets, Rare Rear 4-link and air ride option Build Thread 1972 GMC Sierra Grande Longhorn 4x4 1972 Chevy Cheyenne Super K20 Long Step side tilt, tach, tow hooks, AC, 350 4 speed 1972 C10 Suburban Custom Deluxe 1969 Chevy milk truck 1971 Camaro RS 5.3 BTR STG3 Cam Super T10 1940 Ford 354 Hemi 46RH Ford 9" on air ride huge project Tired of spark plugs? Check this out. |
|
|
|
|
04-21-2012, 03:31 AM
|
#16 |
|
Registered User
 Join Date: Apr 2008
Location: San Diego California
Posts: 1,316
|
Re: Project "My Happy Mess"
Looks great.
Why didn't you shoot the firewall?
__________________
I'd rather attempt something great and fail.. than try something ordinary and succeed. Norman Vincent Peale Project: Barn Raising http://67-72chevytrucks.com/vboard/s...d.php?t=414961 Project: 30 Be Low https://67-72chevytrucks.com/vboard/...d.php?t=830583 |
|
|
|
|
04-21-2012, 11:42 AM
|
#17 | |||
|
Registered User
Join Date: Jul 2011
Location: Des Moines, Iowa
Posts: 3,016
|
Re: Project "My Happy Mess"
Quote:
Quote:
Quote:
If I am wrong about the truck being repainted before, and the back of the cab is a factory fluke, that means: 1) Firewall is original factory paint. 2) It doesn't need repainted, it's in good shape. 3) I will preserve the awesome factory paint numbers behind the engine 441 smeared on with paint 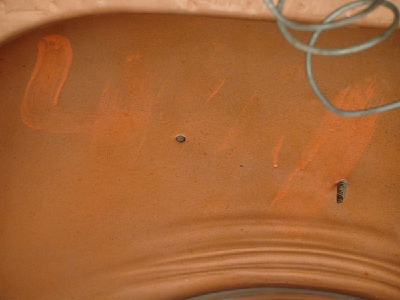 The gas tank has 441 written on it too. Front/top/right 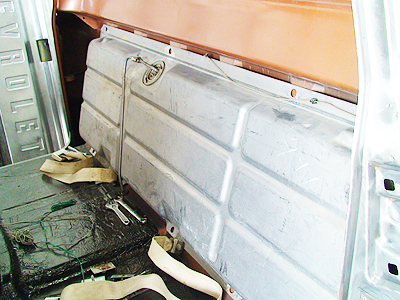 4) Retaining originality, making it a true "Custom" Deluxe C10 Similar to not repainting the underside of the hood, retaining the PO's "Custom" pinstripe.
__________________
project: "my happy mess" Last edited by litew8; 04-21-2012 at 12:08 PM. |
|||
|
|
|
|
04-21-2012, 10:30 AM
|
#18 |
|
Senior Member
Join Date: Mar 2011
Location: West Plains, Missouri
Posts: 7,559
|
Re: Project "My Happy Mess"
Cab looks great, nice job.....Jim
__________________
my build thread: http://67-72chevytrucks.com/vboard/s...d.php?t=459839 Jimbo's long bed step build:http://67-72chevytrucks.com/vboard/s...t=464626<br /> |
|
|
|
|
04-21-2012, 08:00 PM
|
#19 |
|
Registered User
Join Date: Aug 2010
Location: Des Moines, IA
Posts: 1,241
|
Re: Project "My Happy Mess"
Looking good! I can't wait to see color. I love Bronze on these trucks.
__________________
Bud |
|
|
|
|
04-22-2012, 09:33 AM
|
#20 |
|
Registered User
Join Date: Feb 2011
Location: Crowley TX
Posts: 979
|
Re: Project "My Happy Mess"
cab looking really good ,
|
|
|
|
|
04-22-2012, 11:23 AM
|
#21 |
|
Registered User
Join Date: Apr 2003
Location: Indep, MO
Posts: 5,893
|
Re: Project "My Happy Mess"
underhood one is cool, I really like the dash stripes.
__________________
Boppa's Old Yeller Truck Build, Old Yeller's New Heart! Project Buzz Bomb Flyin' Low! |
|
|
|
|
04-23-2012, 11:12 AM
|
#22 |
|
Registered User
Join Date: Apr 2009
Location: Cody, WY
Posts: 292
|
Re: Project "My Happy Mess"
I think that's pretty cool keeping all the factory paint markings. Nice progress, looking forward to seeing how it goes.
|
|
|
|
|
04-29-2012, 01:31 PM
|
#23 |
|
Registered User
Join Date: Apr 2003
Location: Indep, MO
Posts: 5,893
|
Re: Project "My Happy Mess"
Cool! Came out nicer than mine did- I chickened out and used the Eastwood brushable and worked it in. Time for color, baby! I did it -it's fun!
__________________
Boppa's Old Yeller Truck Build, Old Yeller's New Heart! Project Buzz Bomb Flyin' Low! |
|
|
|
|
04-29-2012, 03:07 PM
|
#24 |
|
Registered User
Join Date: Jul 2011
Location: Des Moines, Iowa
Posts: 3,016
|
Re: Project "My Happy Mess"
Thanks man! We have some of the brushable type (not Eastwood) sealer that we considered using on the rocker panel front corners - to give it a factory look, but decided to just go ahead and use the same all around instead. If it'd adhear proper, we may still put some of the brushable type on those corners to conceal the welds a little more and put brush marks in to make it look a little more factory. The stuff I used above was a heavy bodied seam sealer, but it was pretty fluid when applied. Smearing it was easy, but had the potential of getting messy fast if too much was applied. The tape worked out good to keep it off of areas not needing sealer, and helped a lot to keep the surrounding areas clean. It's hard to tell by the pictures because the stuff is black/shinny - but it's all pretty smooth and should cover with primer/paint nicely and not be noticeable. We didn't care so much about the areas that you won't be able to see when the truck is assembled. Like the bottom of the windshield/firewall crevice, we put alot in there and it got in the groove/corner very nice and filled in great. I remember tearing the old stuff out, it was full of putty like sealer. This new stuff is alot better looking and should last a long time. All areas where sealer was applied, were scuffed first.
__________________
project: "my happy mess" Last edited by litew8; 04-29-2012 at 03:16 PM. |
|
|
|
|
05-01-2012, 03:53 PM
|
#25 |
|
Registered User
Join Date: Jul 2011
Location: Des Moines, Iowa
Posts: 3,016
|
Re: Project "My Happy Mess"
Couple hours worth of work today, we got the drip rails sealed. Pics later.
__________________
project: "my happy mess" |
|
|
|
 |
| Bookmarks |
|
|


 Hybrid Mode
