
|
|
|
 03-07-2012, 01:55 PM
|
#1 | |
|
GEARHEAD
Join Date: Aug 2003
Location: MN
Posts: 6,122
|
Re: Junkyard Jimmy Super Low Buck Build Thread
Quote:
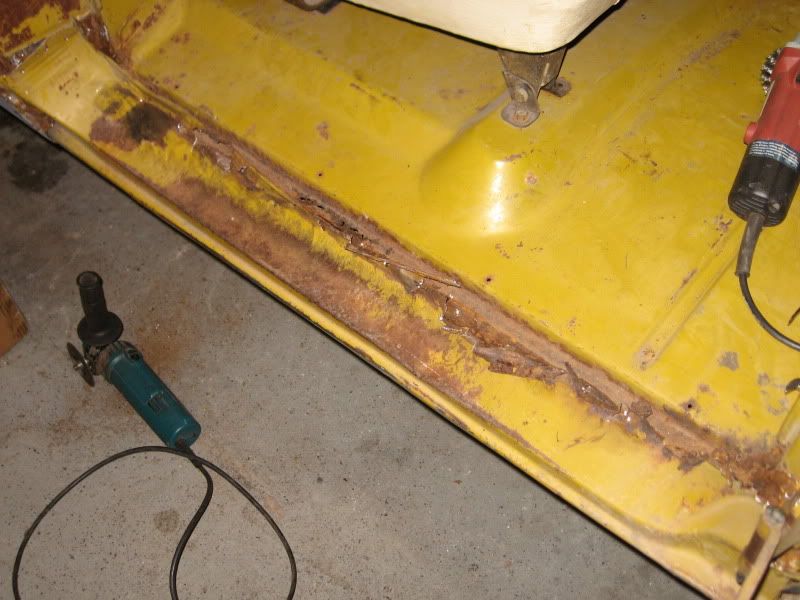
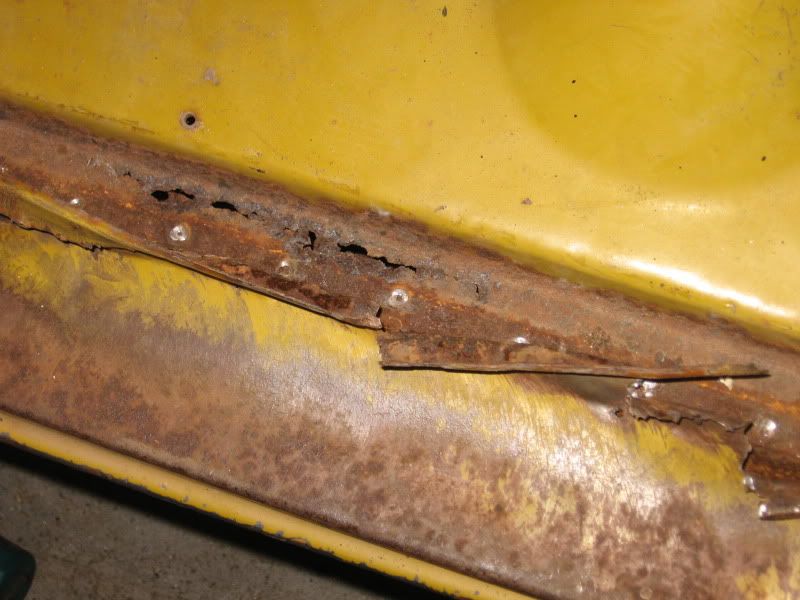
Just got a delivery from UPS for my beginning of paint supplies. Can't wait to spray some on and see how it looks. Also just took a hard look at the passenger side rocker and decided I should have just bought that part new yesterday while I was at Horkeys. It's not that bad, but it's just easier to swap out the $30 part than spend extra time patching the rust areas in what I have. Oh well, not like they are hard to get.
__________________
If no one knows what you're doing, they can't tell you you're doing it wrong HG's Dream Car Build - Shelby Cobra Kit Build your own adjustable track bar 71  Long Fleet C/10 Long Fleet C/10 72  Jimmy 4x4 (Junkyard Jimmy) Jimmy 4x4 (Junkyard Jimmy)HG's Plow Truck '78  K35 Dually K35 DuallyBigass Farm Truck HG's thread of miscellaneous stuff |
|

|

|
|
03-08-2012, 01:32 AM
|
#2 |
|
GEARHEAD
Join Date: Aug 2003
Location: MN
Posts: 6,122
|
Re: Junkyard Jimmy Super Low Buck Build Thread
Tonight I got the passenger side done for adding the lift block and getting the brakes sorted out. The rear cables for the e-brake mount up into a bracket on the inside of the frame rail. I had a hard time spotting it because my mufflers were in the way of the view. Just need to add the little spring clips on them to lock them in place and adjust the cable and my brake job is finally done.
I ordered a fan controller today because it was on sale for about $22. Might not get installed for a while, but who knows. The summit paint will not work as a tint for the Als Liner because it has binders included. They (Als Liner rep) say it will either curdle or be streaky and leave a nasty surface, so I'll have to have some color mixed up without binders. I considered using black, but with the top off it would always be dirty and hot. Mixing some color will be worth it. Knocked a few items off the list... Punch list (in no particular order, * for priority items): *finish bedside body work *Finish roll bar install *fix dent on driver side fender *finish body work on fenders *body work on hood *body work on doors *tranny o-rings and kickdown cable *change fluid in both differentials *replace windshield *finish and install gauge cluster (need bezel, paint job sux and its cracked) *make sure wire for gas gauge is hooked up to sender *lights, lights and more lights *tranny cooler lines *seat belts (have them) seat covers (got 'em, not installed) Al's liner inside of tub Find GMC tailgate mark/drill holes for single wall top in bed rails sandblast and paint front bumper electric fan install (got it, ordered controller) heater install wiper washer pump manual throttle glove box (need to buy) hammer out dents in grill door panels, dash pad, visors, etc. (have them, need paint, cleaning, etc.) stereo (have most of it) paint, well eventually (mayan gold metallic)
__________________
If no one knows what you're doing, they can't tell you you're doing it wrong HG's Dream Car Build - Shelby Cobra Kit Build your own adjustable track bar 71 Long Fleet C/10 72 Jimmy 4x4 (Junkyard Jimmy)HG's Plow Truck '78 K35 DuallyBigass Farm Truck HG's thread of miscellaneous stuff Last edited by hgs_notes; 03-08-2012 at 09:41 AM. |
|
|
|
|
03-08-2012, 02:44 AM
|
#3 |
|
VA72C10
 Join Date: Mar 2008
Location: Midlothian, VA
Posts: 25,269
|
Re: Junkyard Jimmy Super Low Buck Build Thread
I admire how you are making at least some progress every week and seems like almost every single night for a while now!
__________________
Looking for a 67-72 swb or blazer project in or around VA. 
|
|
|
|
|
03-11-2012, 09:57 AM
|
#4 | |
|
GEARHEAD
Join Date: Aug 2003
Location: MN
Posts: 6,122
|
Re: Junkyard Jimmy Super Low Buck Build Thread
Quote:
  Here's a shot of my extra parts storage, or as I like to call it, wall art. It was a little awkward getting it up there, but my walls are getting full, not a lot of space left. Need a bigger garage. 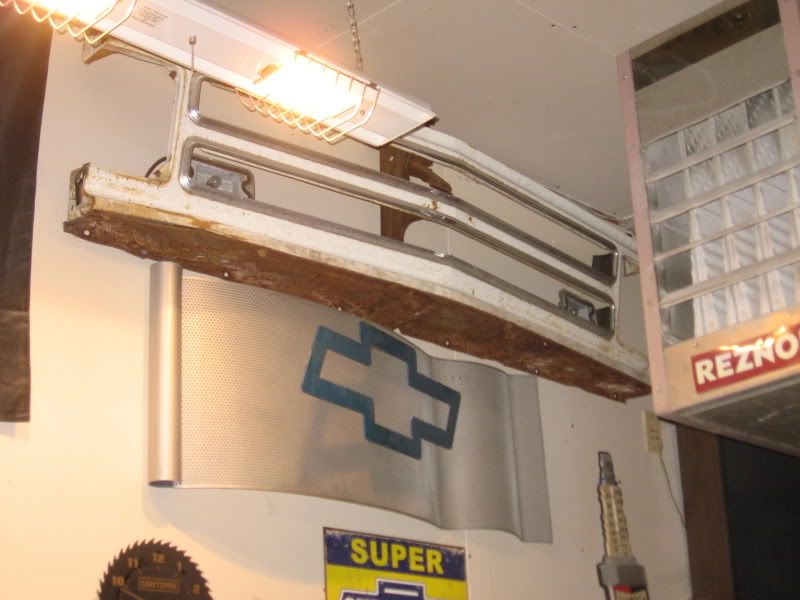
__________________
If no one knows what you're doing, they can't tell you you're doing it wrong HG's Dream Car Build - Shelby Cobra Kit Build your own adjustable track bar 71 Long Fleet C/10 72 Jimmy 4x4 (Junkyard Jimmy)HG's Plow Truck '78 K35 DuallyBigass Farm Truck HG's thread of miscellaneous stuff |
|
|
|
|
|
04-03-2012, 10:29 PM
|
#5 |
|
Senior Member
Join Date: Nov 2003
Location: Brookings, SD
Posts: 10,497
|
Re: Junkyard Jimmy Super Low Buck Build Thread
Hurry up and finish the pickup already. I want some more Blazer progress pictures!!

__________________
Some people are like slinkies, they aren't good for anything, but you can't help but smile when you see one tumble down the stairs. |
|
|
|
|
04-04-2012, 12:59 AM
|
#6 | |
|
GEARHEAD
Join Date: Aug 2003
Location: MN
Posts: 6,122
|
Re: Junkyard Jimmy Super Low Buck Build Thread
Quote:
__________________
If no one knows what you're doing, they can't tell you you're doing it wrong HG's Dream Car Build - Shelby Cobra Kit Build your own adjustable track bar 71 Long Fleet C/10 72 Jimmy 4x4 (Junkyard Jimmy)HG's Plow Truck '78 K35 DuallyBigass Farm Truck HG's thread of miscellaneous stuff |
|
|
|
|
|
04-05-2012, 12:26 AM
|
#7 |
|
GEARHEAD
Join Date: Aug 2003
Location: MN
Posts: 6,122
|
Re: Junkyard Jimmy Super Low Buck Build Thread
Heres a big thank you to motomadman132 for making the extra effort today to meet up with me so I could purchase the long sought after GMC tailgate.
 I finally caught a break and found an ad for an affordable GMC tailgate that I wasn't too late on. It was a new reproduction part that he had painted, but then decided to part out his project. This is probably the only body part I ever bought that is a scuff and spray part. Speaking of which... Before: 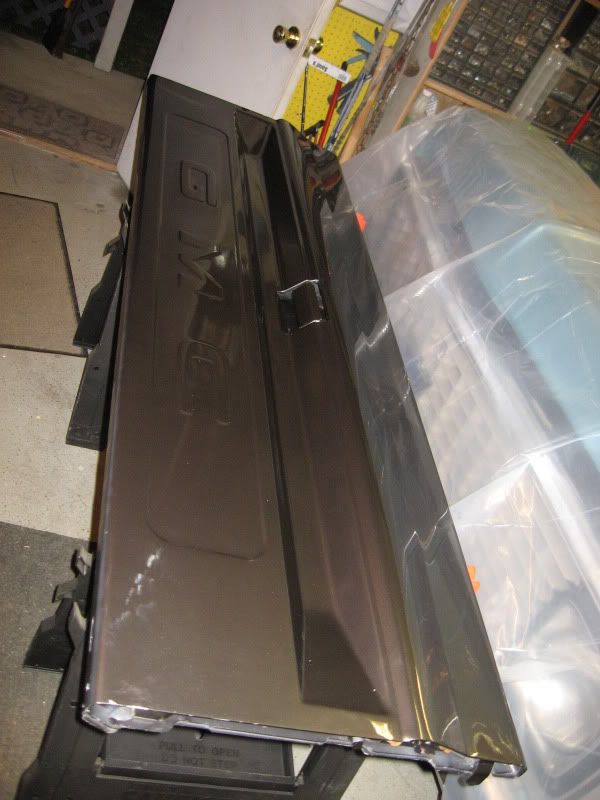 After: 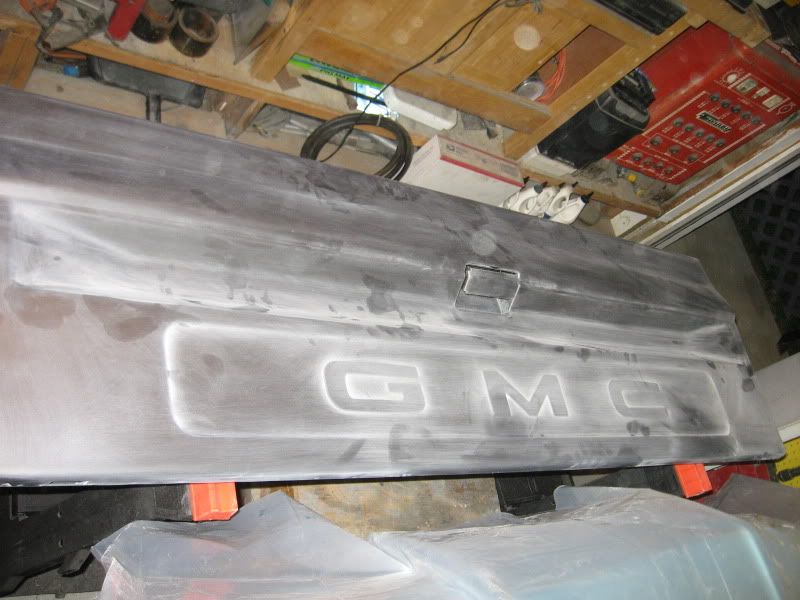 I just need to get the sides scuffed and I'll be able to try out my paint to see if I like it enough to keep it.
__________________
If no one knows what you're doing, they can't tell you you're doing it wrong HG's Dream Car Build - Shelby Cobra Kit Build your own adjustable track bar 71 Long Fleet C/10 72 Jimmy 4x4 (Junkyard Jimmy)HG's Plow Truck '78 K35 DuallyBigass Farm Truck HG's thread of miscellaneous stuff |
|
|
|
|
04-05-2012, 01:08 AM
|
#8 |
|
VA72C10
Join Date: Mar 2008
Location: Midlothian, VA
Posts: 25,269
|
Re: Junkyard Jimmy Super Low Buck Build Thread
Nice! And that thing was a score with the hardware like that!!!
__________________
Looking for a 67-72 swb or blazer project in or around VA.
|
|
|
|
|
04-05-2012, 04:01 PM
|
#9 | |
|
GEARHEAD
Join Date: Aug 2003
Location: MN
Posts: 6,122
|
Re: Junkyard Jimmy Super Low Buck Build Thread
Quote:
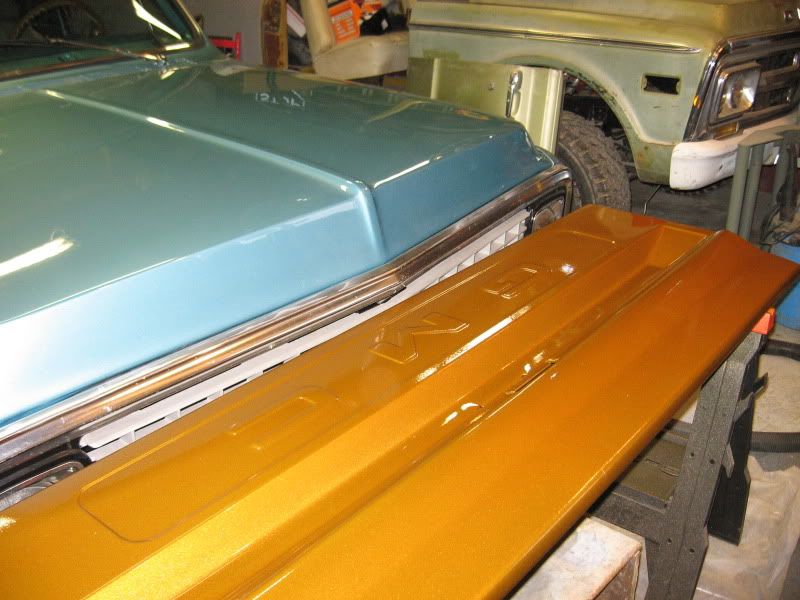
Today I tried spraying car paint for the first time. Let me just say this, not as easy as it looks. I think my technique is ok, no major runs or orange peel etc. I think the biggest problem was the harbor frieght spray gun. My first 2 coats were with just paint and activator, the can says reducer should not be needed, but can be used. It had a rough texture to it, really granular looking. So I biked over to the body shop for advice, they said it's probably the gun, but try adding reducer. I did 2 more coats after adding about 1 part reducer. It smoothed out the finish real nice, but the color pigment was not staying put. The flake seems to be holding alright, but the tint is building up in low spots and corners, etc. Bike back over to the body shop and he said I might not be waiting long enough between coats. It's a bit cool today and 5-10 minutes is probably not enough flash time. After 30 minutes it was still tacky and in the low spots where it got heavy it is just plain wet. So my plan is to just let it dry good. Then re-scuff it and then try spraying with my other gun, without reducer. If it lays down nice and smooth and even with that, then we'll call it a day. If it's grainy again I'll add a little reducer and see if that helps. And if the temperature is similar to today I'll let it flash much longer between coats. I know part of the problem is the paint itself. Yellows don't cover as well, this one has a ton of flake in it and it is somewhat like a candy or pearl also. All things that make spraying it harder from what I've been told. The body guy said that if I continue to have problems and it's all prepped, they would spray it for me, but I really want to learn how to do this myself and working through these issues will just help me out later. Anywho, here is a pic of my first try at paint. Any tips and advice will be welcomed. If I can get this paint to even out and look good it's really going to pop out in the sun. I think the color is awesome. If I have more problems I might check on getting the paint shop to match it with a camera and mix up regular base coat, which may solve many problems, but cost significantly more. 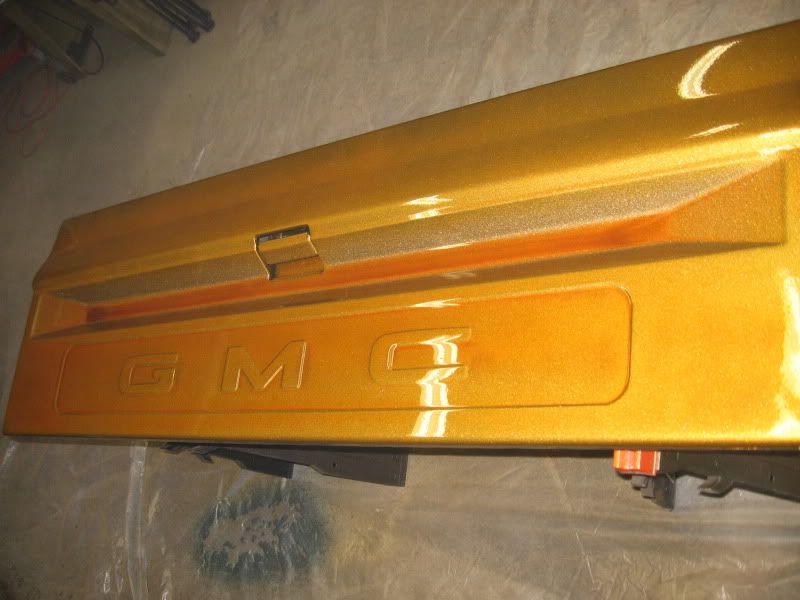
__________________
If no one knows what you're doing, they can't tell you you're doing it wrong HG's Dream Car Build - Shelby Cobra Kit Build your own adjustable track bar 71 Long Fleet C/10 72 Jimmy 4x4 (Junkyard Jimmy)HG's Plow Truck '78 K35 DuallyBigass Farm Truck HG's thread of miscellaneous stuff |
|
|
|
|
|
04-05-2012, 04:15 PM
|
#10 |
|
VA72C10
Join Date: Mar 2008
Location: Midlothian, VA
Posts: 25,269
|
Re: Junkyard Jimmy Super Low Buck Build Thread
Love the color! Yes sir...that will POP in the sun!
__________________
Looking for a 67-72 swb or blazer project in or around VA.
|
|
|
|
|
04-06-2012, 08:37 AM
|
#11 |
|
GEARHEAD
Join Date: Aug 2003
Location: MN
Posts: 6,122
|
Re: Junkyard Jimmy Super Low Buck Build Thread
Quick morning update. I got up early and went out to the garage. The paint had finally finished drying. I turned up the heat in the garage over night. I pulled out one of the other spray guns, mixed some paint and tested it on a white board. Icky. Splattery uneven mess. The gun would blow air without paint every couple seconds and I couldn't get good atomization when it did spray paint. So I got my primer gun out, which is the same gun with a bigger tip, switched out the tips and tried that. Much better. First gun went in the trash can, it wasn't the first time I had trouble with it.
Then I sprayed one coat without any reducer, kind of grainy and thin, but pretty even. I added a little reducer for the second coat, and turned up the air pressure to the gun, smoother, but still not as smooth as it should be. I have time for one last coat before I head out for work and I'm going to try a little less air and just a bit more reducer. The paint is actually nice and even now, it covered well and I'm just working to make it smoother. I might have to stop and buy a better gun today. If I can get the clear coat to lay down smooth I'll have it as good as I can do it with my beginner skill level. Wish me luck.
__________________
If no one knows what you're doing, they can't tell you you're doing it wrong HG's Dream Car Build - Shelby Cobra Kit Build your own adjustable track bar 71 Long Fleet C/10 72 Jimmy 4x4 (Junkyard Jimmy)HG's Plow Truck '78 K35 DuallyBigass Farm Truck HG's thread of miscellaneous stuff Last edited by hgs_notes; 04-07-2012 at 09:34 AM. |
|
|
|
|
04-07-2012, 09:56 AM
|
#12 |
|
GEARHEAD
Join Date: Aug 2003
Location: MN
Posts: 6,122
|
Re: Junkyard Jimmy Super Low Buck Build Thread
The last coat of paint did not smooth out as I had hoped, but the color and metalic looked nice and even, it looked like a good base coat. So I let it dry through the day and then sprayed it with clear coat last night. (The summit paint has an 18 hour recoat window for those curious.) Pretty much had the same results with the finish of the clear on the first coat. The gun just doesn't move enough liquid for a good wet coat AND atomization. If I turn up the paint flow it just sprays droplets mixed in the mist and looks terrible. So what I did was just sprayed a very heavy coat by going over it several times. Then stopped and let it dry overnight. Here is what it looks like this morning...
  The finish quality is not where it should be, but I can fix it. 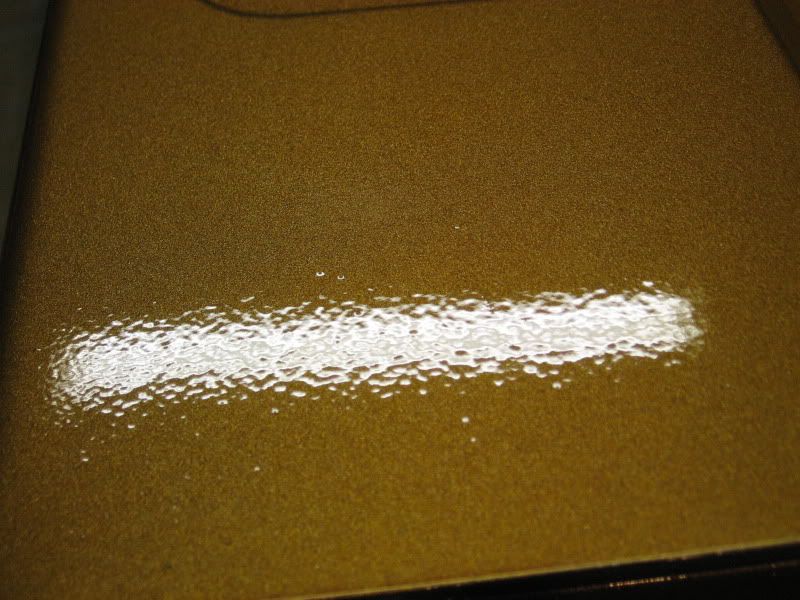 So the plan going forward is that I'll wet sand it and buff it out, see how it looks and determine if I'll have to scuff and respray the clear, or all of it for that matter. The tailgate makes a great practice panel. I did order a new set of spray guns. I bought this StartingLine kit from Devilbiss, which I've heard good things about for a step up from the super cheapo guns. I got it a little cheaper through another site called automotive tools online ($131.58 shipped). http://www.tcpglobal.com/spraygundep...mno=DEV+802343 I've learned some things though, do's and don'ts, etc. I'll get better at this with better tools and experience and guidance from the pros. I know I won't bother spraying the whole truck in my garage though. Just way too much junk floating in the air. I'll probably do the windshield frame, dash, insides of fenders and door jambs here, but all of the big areas will be done at the body shop.
__________________
If no one knows what you're doing, they can't tell you you're doing it wrong HG's Dream Car Build - Shelby Cobra Kit Build your own adjustable track bar 71 Long Fleet C/10 72 Jimmy 4x4 (Junkyard Jimmy)HG's Plow Truck '78 K35 DuallyBigass Farm Truck HG's thread of miscellaneous stuff |
|
|
|
|
04-07-2012, 10:09 AM
|
#13 |
|
Registered User
Join Date: Nov 2011
Location: Tustin, CA
Posts: 229
|
Re: Junkyard Jimmy Super Low Buck Build Thread
Man, I love the color" that is going to look great. I just started sanding on the Jimmy and going to try and do the paint myself as well, so any tips you post will be read by me for sure. Keep up the good work.
Posted via Mobile Device |
|
|
|
|
04-07-2012, 10:10 AM
|
#14 |
|
Senior Member
Join Date: Nov 2003
Location: Brookings, SD
Posts: 10,497
|
Re: Junkyard Jimmy Super Low Buck Build Thread
Looks good. Your attention to detail is impeccable, I am sure you will get the guns figured out and have a top notch paint job on the Jimmy.
__________________
Some people are like slinkies, they aren't good for anything, but you can't help but smile when you see one tumble down the stairs. |
|
|
|
|
04-07-2012, 10:45 AM
|
#15 | ||
|
GEARHEAD
Join Date: Aug 2003
Location: MN
Posts: 6,122
|
Re: Junkyard Jimmy Super Low Buck Build Thread
Quote:
http://67-72chevytrucks.com/vboard/f...splay.php?f=16 Also ask questions of the right people if you're not sure about something. I'm a regular at a local body shop and even have them stop buy and look at what I'm doing for advice. The guys at the auto parts stores that deal with paint and the local body shops are also a good source for info. I've read books on painting cars, bought a dvd that teaches the process, followed along on dozens of peoples builds and I was even in the paint booth when some parts of my C-10 were being sprayed, as well as some other customer cars. Those guys at the shop have been an incredible source of info. The worst that can happen is that you might have to sand everything off and start over, tons of work, no body wants that. Buying quality paint can be very expensive, plus the cost of activators, reducers, sealers, tape, plastic, sandpaper and the biggest cost by far is the time it takes. If something doesn't seem right, it probably isn't and you need to stop there otherwise you might just be wasting valuable materials and costing you more time to fix it. I'm getting by cheap. This is basically a rustoleum paint job but using actual automotive paint. If I can make this look acceptable and spend less than $500 in tools and paint supplies, all the better. Quote:
__________________
If no one knows what you're doing, they can't tell you you're doing it wrong HG's Dream Car Build - Shelby Cobra Kit Build your own adjustable track bar 71 Long Fleet C/10 72 Jimmy 4x4 (Junkyard Jimmy)HG's Plow Truck '78 K35 DuallyBigass Farm Truck HG's thread of miscellaneous stuff |
||
|
|
|
|
04-07-2012, 10:54 AM
|
#16 |
|
Registered User
Join Date: Nov 2011
Location: Tustin, CA
Posts: 229
|
Re: Junkyard Jimmy Super Low Buck Build Thread
Thank you for the tips. I walked into the local auto paint supply store that is about 5 miles from me and my neighbor is behind the counter! Turns out he owns it and lives 7 houses up the street. He doesn't know it, but he is going to be my biggest resource. He said is is going to let me borrow his guns and will cut me a break on materials.
As always this forum is going to be a great help as well. Thanks again. Posted via Mobile Device |
|
|
|
|
04-09-2012, 06:54 PM
|
#17 |
|
GEARHEAD
Join Date: Aug 2003
Location: MN
Posts: 6,122
|
Re: Junkyard Jimmy Super Low Buck Build Thread
I bought the als liner from their ebay store. $109 with free shipping. And if you buy other things from them that have a shipping charge, they refund it to you. Super deal.
__________________
If no one knows what you're doing, they can't tell you you're doing it wrong HG's Dream Car Build - Shelby Cobra Kit Build your own adjustable track bar 71 Long Fleet C/10 72 Jimmy 4x4 (Junkyard Jimmy)HG's Plow Truck '78 K35 DuallyBigass Farm Truck HG's thread of miscellaneous stuff |
|
|
|
|
04-09-2012, 09:39 PM
|
#18 |
|
People know me
Join Date: Jun 2007
Location: Hermiston, oregon
Posts: 840
|
Re: Junkyard Jimmy Super Low Buck Build Thread
looks good, one thing that my painter buddy told me was to make sure that I paint my body panels the way they are going to be installed on the vehicle.
We hung my tailgate from some eye bolts in the ceiling, he said the metallics will settle funny if you dont and it is very noticeable on doors and fenders if you paint them laying down. I have bought almost 25 gallons of als liner from this guy,www.xtorm4wd.com he ships quick and is great on prices. Tell him Bigbadchev84 off of pirate 4x4 sent you and he may cut you a better deal.
__________________
1972 k/5 blazer CST 4X4 Crate 350, th350/205, dana44with trac-loc/14 bolt with detroit locker, 4 wheel discs 4.56s, 8" suspension lift using 73-87springs, 1" zerorate custom front crossmember, HAD CV drivelines and driveshaft e-brake, full cage, PRP seats, Full autometer gauges, 38x14.5x16 Toyo M/Ts, 16x10 Polished aluminum rockcrusher wheels 1967 longbox 4x4, Strong 400/400/208, 44/12bolt 4.10s, 6" lift, 35" Toyo M/Ts on corvette rally wheels |
|
|
|
|
04-11-2012, 10:49 AM
|
#19 |
|
Registered User
Join Date: Apr 2003
Location: Indep, MO
Posts: 5,893
|
Re: Junkyard Jimmy Super Low Buck Build Thread
Looks great! Keep it up!
Posted via Mobile Device
__________________
Boppa's Old Yeller Truck Build, Old Yeller's New Heart! Project Buzz Bomb Flyin' Low! |
|
|
|
|
04-11-2012, 10:24 PM
|
#20 |
|
I miss this truck.
Join Date: Dec 2001
Location: Lexington, KY U.S.A.
Posts: 2,863
|
Re: Junkyard Jimmy Super Low Buck Build Thread
Good progress since last time I got on line. I don't even like yellows, but that's a great color.
__________________
'07 GMC Acadia SLT. Sweet ride. '08 Crew Cab Z-71 short bed. Really like this truck A LOT. |
|
|
|
|
04-12-2012, 08:46 AM
|
#21 | |||
|
GEARHEAD
Join Date: Aug 2003
Location: MN
Posts: 6,122
|
Re: Junkyard Jimmy Super Low Buck Build Thread
Quote:
Quote:
Quote:
__________________
If no one knows what you're doing, they can't tell you you're doing it wrong HG's Dream Car Build - Shelby Cobra Kit Build your own adjustable track bar 71 Long Fleet C/10 72 Jimmy 4x4 (Junkyard Jimmy)HG's Plow Truck '78 K35 DuallyBigass Farm Truck HG's thread of miscellaneous stuff |
|||
|
|
|
|
04-21-2012, 08:55 AM
|
#22 |
|
GEARHEAD
Join Date: Aug 2003
Location: MN
Posts: 6,122
|
Re: Junkyard Jimmy Super Low Buck Build Thread
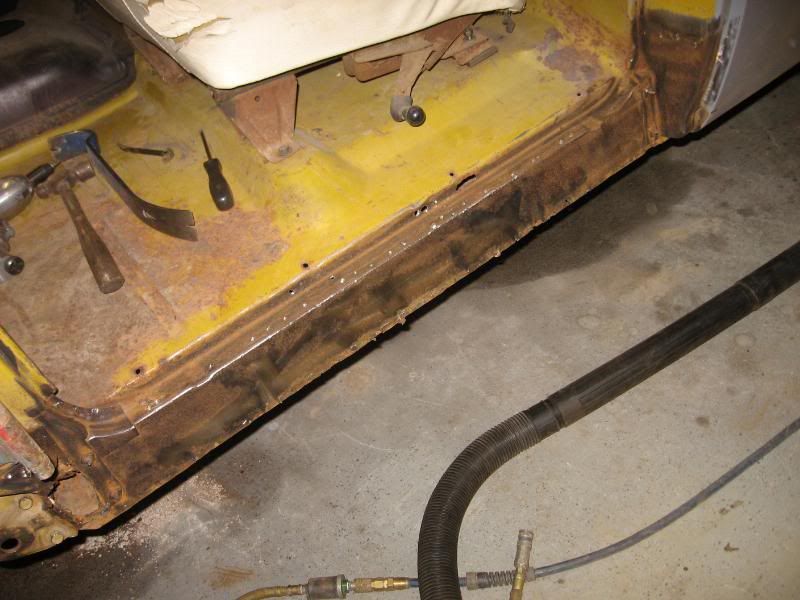
Getting back on it. I took the day off yesterday, but still only got a few hours to work on it. I started by getting the front sheetmetal off and out of the way.
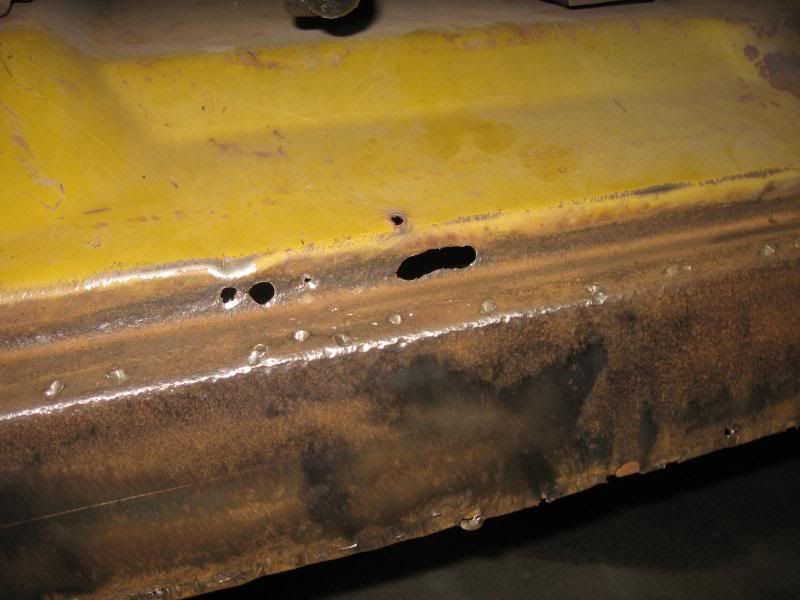
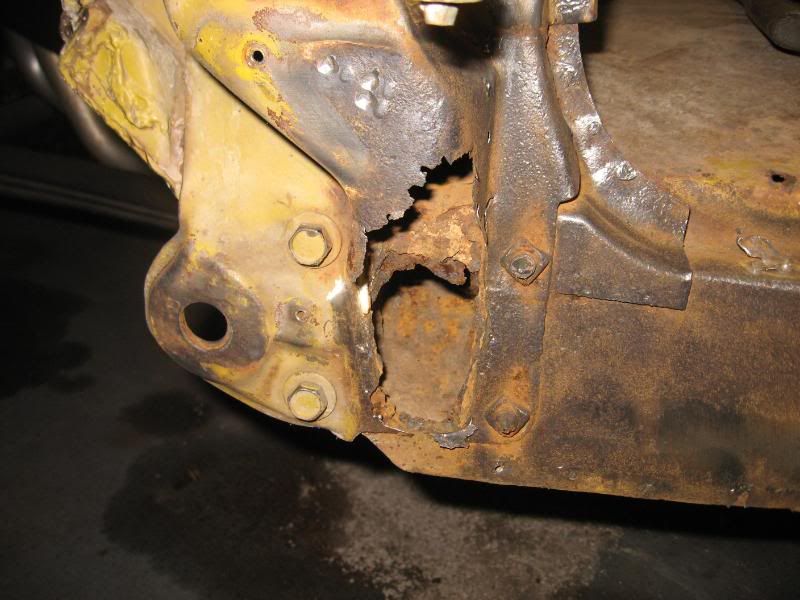
Off... 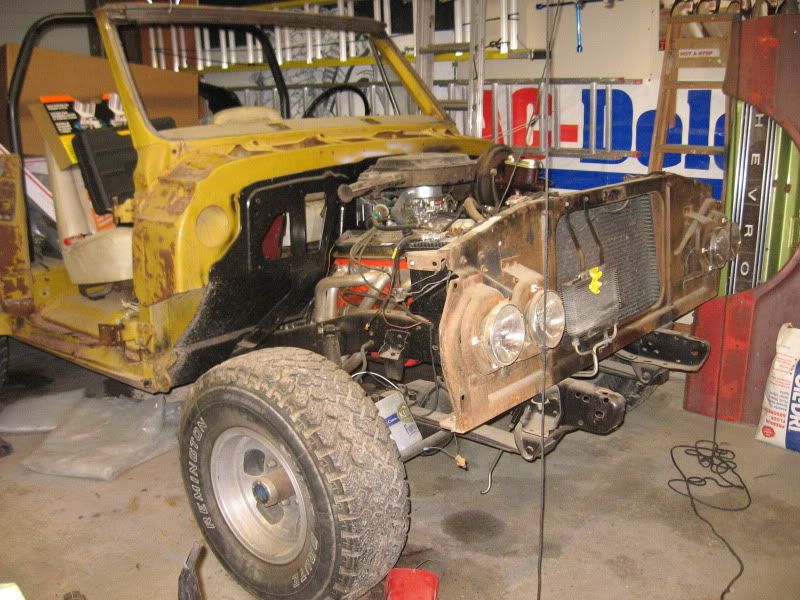 Out of the way... 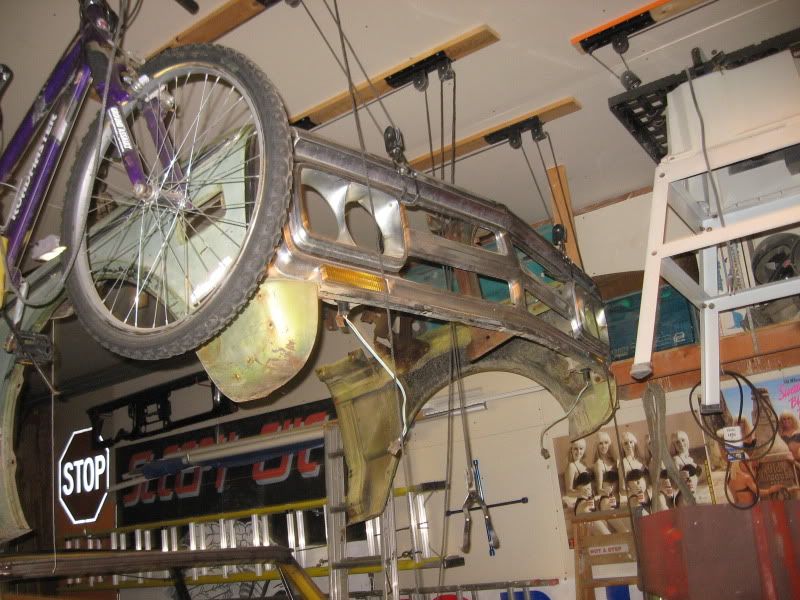 When I was unbolting everything the hooks were hanging down from where I had removed the bikes. Just seemed like a good idea. There were 2 more spot welds on the front of the rocker to the A pillar, then the spot welds along the bottom pinch weld and the old rocker was off. 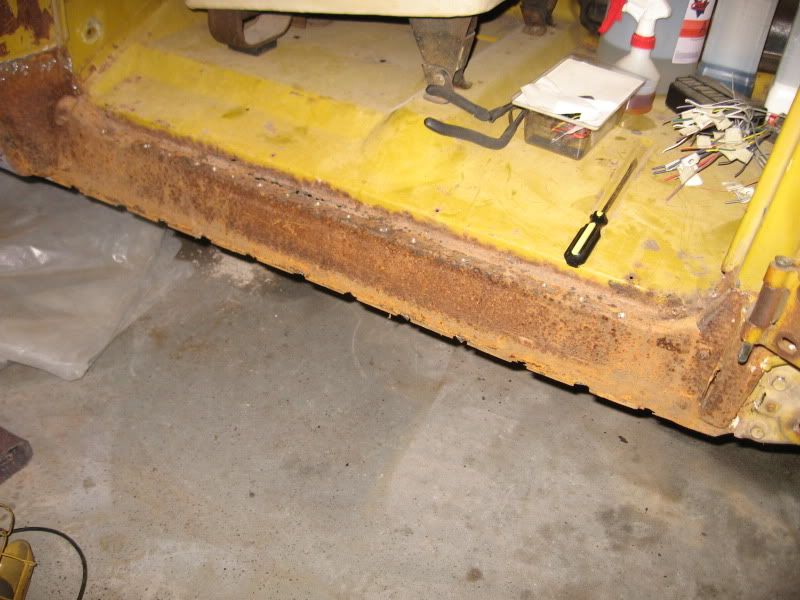 The bottom of the A pillar is rusty, and there is a hole behind it into the cab support. 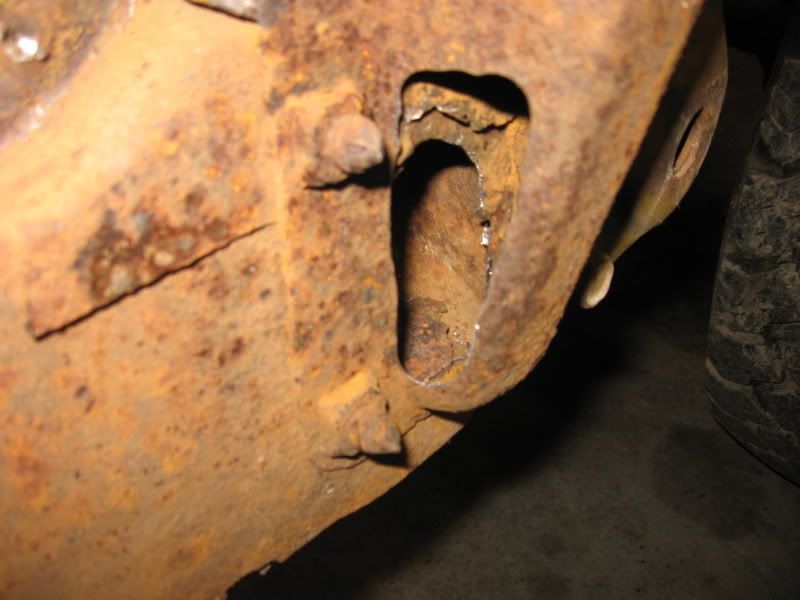 I was thinking about my options here and to do everything like a restoration would required removing a lot of good sheetmetal to fix a little bad sheetmetal. This area was a poor design from GM, the bottom fills up with all the crap from up that pillar and the windshield frame, and any moisture that gets in there runs down, and it rusts. No drainage provided. No way to clean it out. As for the hole into the cab support, I haven't decided if I should patch it or not. What I'm thinking is that I'll cut off the bottom of the pillar where it tapers down, but not the flange where it bolts to the inner rocker panel. I'll just filet weld the new piece onto the flange, that way I don't have to work from inside the torque box. I'll get a better look at the hole through the inner rocker panel, clean the cab support out with a pressure washer, rust proof it as much as possible and maybe leave it as is. There is a small gap between the bottom of the cab support and inner rocker that allows for drainage. Not much room and it clogs with dirt, etc. I've always thought there should be a bigger hole at the bottom so debris can fall out. If there is a hole through the inner rocker then everything from the A pillar, including any moisture, can fall through and into the torque box, which I'm thinking could use a couple holes also. I've had a few of these trucks, mostly rusted out parts rigs and seen where the problems are. I've seen all the build threads fixing the same stuff. Maybe because of my job and probably just my nature I've been trying to think of ways to prevent it from happening again. This is definitely one of those areas that needs a different approach. You might not agree and thats ok. Go ahead and speak up. Another perspective might result in a better idea and we'd be helping everyone out. But since this is my rig that I plan on doing some experimenting with, I'm going to give this approach a try and see how it looks a dozen years fom now. Worst case is that it doesn't help and I need to replace rockers, inners, a pillar, cab supports, etc. down the road, like everybody else. Anyway, back to the work that was done. I cleaned up the inner rocker with a wire wheel, marked all the pin holes and cut out or drilled out the rusty bits. It really wasn't that bad. I drilled a 3/8" hole through about 4 pin holes, and cut a slot about 1/2" x 6" long through the biggest rust area. I used a piece of scrap to fill that slot and welded it in. Then just filled all the holes with weld metal. I also filled the spots where I drilled out spot welds and it went into the second layer a bit. Then I ground the welds down, fixed anything else that showed up and cleaned those up. Then covered everything in the rustoleum rust converter. 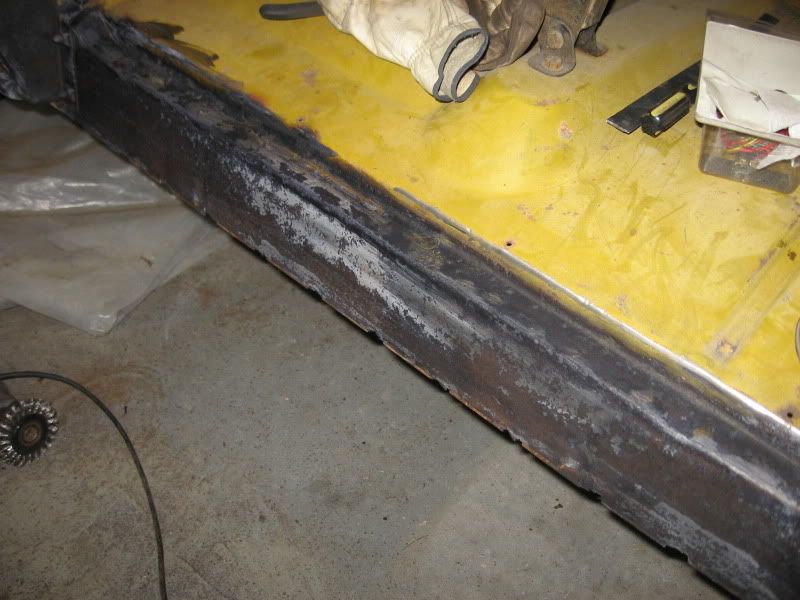 Not sure what I'll do today, but whatever it is will show up here eventually.
__________________
If no one knows what you're doing, they can't tell you you're doing it wrong HG's Dream Car Build - Shelby Cobra Kit Build your own adjustable track bar 71 Long Fleet C/10 72 Jimmy 4x4 (Junkyard Jimmy)HG's Plow Truck '78 K35 DuallyBigass Farm Truck HG's thread of miscellaneous stuff |
|
|
|
|
04-26-2012, 10:37 PM
|
#23 |
|
GEARHEAD
Join Date: Aug 2003
Location: MN
Posts: 6,122
|
Re: Junkyard Jimmy Super Low Buck Build Thread
Got back out in the garage for a bit tonight and got the driver side rocker off. Very little rust on the inner rocker, just a little up by the floor where the door seal goes. The bottom of the A pillar is toast. I drove it over to the body shop the other day for a second opinion on the holes through there. He thought my idea of cleaning, rust proofing and leaving holes for drainage made sense. So this weekend I'll clean it up and repair the rust on the inner rocker. Going to order the sheetmetal I need tonight so maybe next week/weekend I'll be able to weld this all back together.
I have pics to post up, but for some reason photobucket is not letting me upload anything right now. You'll just have to use your imagination. Close your eyes and picture the passanger side...wait. Read this first, then close your eyes and imagine the passenger side with a little less rust on the inner rocker and a little more rust on the A pillar bottom.  One more thing. I haven't run this in quite a while and it was kind of acting like it wasn't getting enough gas. The fuel filter by the carb had more air in it than fuel so I unclamped the hose and got most of the air out of the filter and hose. Started it back up and it ran like a top. The brakes feel great, the rear end is up a bit higher so it doesn't feel so nose up now, rode great. I can't wait to get this damn bodywork done so I can really beat around in it.
__________________
If no one knows what you're doing, they can't tell you you're doing it wrong HG's Dream Car Build - Shelby Cobra Kit Build your own adjustable track bar 71 Long Fleet C/10 72 Jimmy 4x4 (Junkyard Jimmy)HG's Plow Truck '78 K35 DuallyBigass Farm Truck HG's thread of miscellaneous stuff |
|
|
|
|
04-27-2012, 06:21 AM
|
#24 |
|
Just a nother gear head
Join Date: Jul 2009
Location: Barrington NH
Posts: 501
|
Re: Junkyard Jimmy Super Low Buck Build Thread
i would agree that that piller area is a poor design. needs more drainage. i think i will add a hole in the piller near the fender mount for any water that gets in there and seem seal all the other area's to keep it out.
__________________
2013 HD FLHX 2000 chevy 2500 6.0l 4x4 3dr 2000 harley fxdx 71 Jimmy 4x4- future crawler/ woods rig 71 blazer (C4 2wd conv project) http://67-72chevytrucks.com/vboard/s...d.php?t=523589 
|
|
|
|
|
04-27-2012, 08:39 PM
|
#25 |
|
GEARHEAD
Join Date: Aug 2003
Location: MN
Posts: 6,122
|
Re: Junkyard Jimmy Super Low Buck Build Thread
Found a work around for the photobucket site, pics of the rusty driver side...
   For the next week or so I'll be doing the body work on the windshield frame I repaired, stripping some paint, fixing a little rust, and prepping the dash, firewall, door jambs, etc. for paint. I should do the back end where the tailgate fits too so I can install the new gate. That way I can paint the jambs, dash, firewall, tailgate jamb and windshield frame. After that I can spray the Als Liner in the tub, then I can put the interior back together. I can almost see the light at the end of the tunnel.
__________________
If no one knows what you're doing, they can't tell you you're doing it wrong HG's Dream Car Build - Shelby Cobra Kit Build your own adjustable track bar 71 Long Fleet C/10 72 Jimmy 4x4 (Junkyard Jimmy)HG's Plow Truck '78 K35 DuallyBigass Farm Truck HG's thread of miscellaneous stuff |
|
|
|
 |
| Bookmarks |
|
|


 Hybrid Mode
