
|
|
|
 08-05-2011, 11:56 PM
|
#1 |
|
GEARHEAD
Join Date: Aug 2003
Location: MN
Posts: 6,122
|
Re: Over 25 Years Later, Finally My 71 C-10 Truck Build
It's been a week since I worked on the truck, and it's probably good to take a break once in a while. The time lets me think about what I'm doing and where to go next. This afternoon I started working on moving the wiring harness for the EFI towards the rear of the engine and really like hows it coming out. No pics yet, but I'll get some this weekend. I was using a boss on the front of the intake as a ground mount, but was able to move those to the back of the passenger side head. The engine will still need more detailing work in the future, but it's coming along.
I started working on the exhaust system also. I have the collectors to the x pipe mocked up and started working from the x pipe back. I am in the process of cutting holes throught the crossmember where the trailing arms attach for the pipes to route through behind the mufflers. I'm undecided how far back I'm going to take the exhaust. I moght dump it in front of the axle. I've been spraying the brake bleeders with pb blaster hoping to be able to crack them open and get the air out of the system. I really want to take this thing for just a little drive. I got the last bolt heads sprayed with body color from the body shop today. And I paid them. So that part is behind me now. Time to start making some more money and selling parts so I can continue with my projects. The total was $3388, which included some materials I bought through them, and upgrading to a high solids clear coat. They also finished patching up some holes in the bed and refixed a cab corner for me. Overall, I'm happy with the results and thrilled that I've taken this project to this point. I know it will be finished, and soon, with just upgrades for it in the future while I can finally enjoy it again. I think the biggest part of the build thats left will be getting the interior done the way I want it. That might not happen til next spring, but who knows. In the mean time I'll have a good condition interior that doesn't quite all match exactly. The rest of whats left is mostly just bolting things back together. For those of you that have not gotten to this point in a build yet, the challenge I've been having is finding the right bolts and screws. There are a few issues, first is that I have parted several trucks/blazers the past few years and I have stuff all over. Second is that even if I find them, they are not in the greatest condition and I'm not comfortable installing parts with rusty screws. Third, if the bolts are to be painted that means cleaning, primering and painting all the bolt heads (I'm using some peg board to hold the bolts for painting, drilled out as needed). Fourth, some just can't be found or I know they were broken in order to get things apart, like the bumper bolts, etc. which all need replaced now. Anyone know what size screws are needed to bolt the side mirror back on? Seriously. I don't think I ever had the correct ones. Things I want for the future upgrades: Newer style headlights with relay harness Rear disk brakes Tach/vac gage cluster Chrome grill LS motor and overdrive tranny Air conditioning Wheels/tires Who knows what else.
__________________
If no one knows what you're doing, they can't tell you you're doing it wrong HG's Dream Car Build - Shelby Cobra Kit Build your own adjustable track bar 71  Long Fleet C/10 Long Fleet C/10 72  Jimmy 4x4 (Junkyard Jimmy) Jimmy 4x4 (Junkyard Jimmy)HG's Plow Truck '78  K35 Dually K35 DuallyBigass Farm Truck HG's thread of miscellaneous stuff |

|

|
|
08-06-2011, 11:33 PM
|
#2 |
|
GEARHEAD
Join Date: Aug 2003
Location: MN
Posts: 6,122
|
Re: Over 25 Years Later, Finally My 71 C-10 Truck Build
I got enough time in the garage tonight to finish cutting the holes in the crossmember for the exhaust pipes. Since the crossmember is not a solid plate, but has a notch in it, about where the center of a hole would be, I made a jig to center a hole saw. Free handing it did not work.
  Nothing fancy, just a hunk of scrap plate, with the holes marked that fit the existing holes in the crossmember, then a line drawn between them and the center drilled to 1/4" for the center bit of the hole saw. It worked just fine. 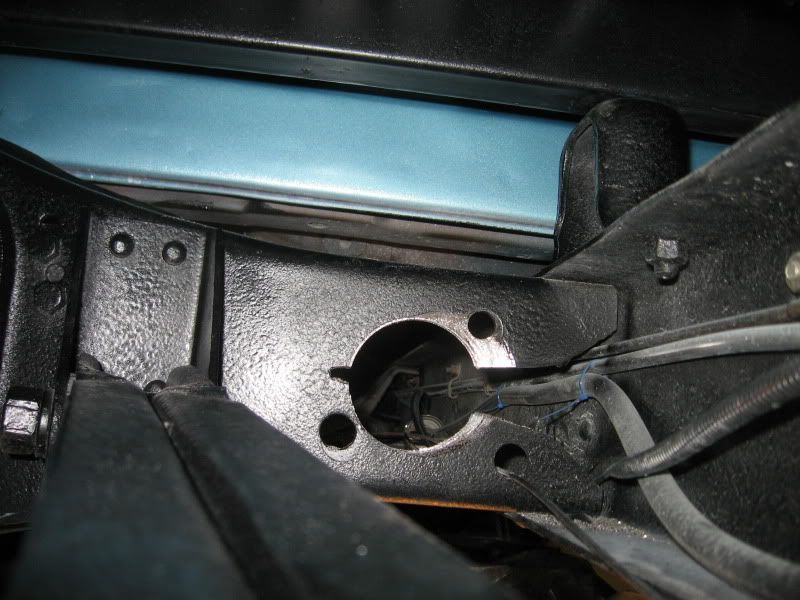 Once those were cut out I continued mocking up the exhaust. The disadvantage of a cross pipe in the exhaust is having to route it below the tranny. But in my case, the headers are hanging down there anyway and I don't have a bagged grass sweeper, so I'll probably still clear speed bumps. As you'll see in the pics, the exhaust x pipe is not quite centered. As of now the only parts tightened up are the collector adapters. I have a pipe expander and may need to use it to loosen some joints enough to get the angles I need to straighten things out. One header (driver side) points down a bit, rather than parallel with the frame like the other side. I could have paid someone to make a custom exhaust, but where's the fun in that? I think it'll turn out pretty decent when it's all done. 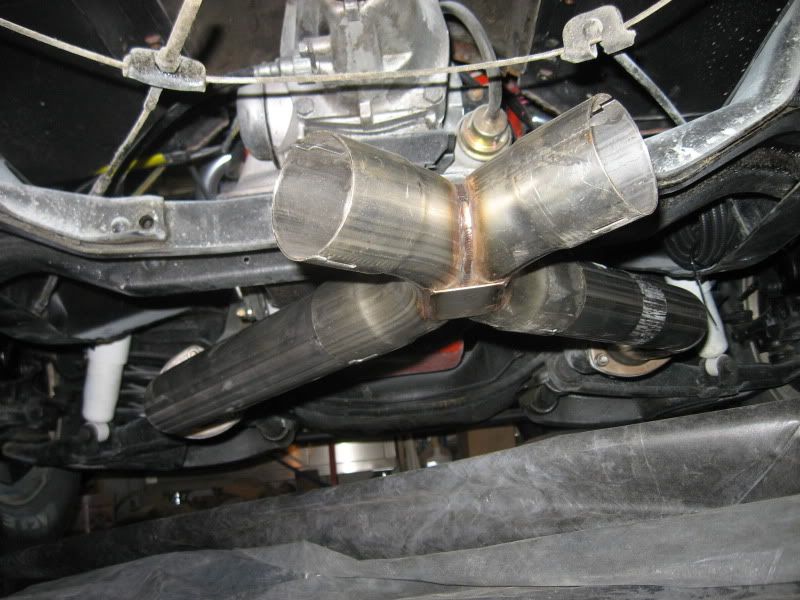 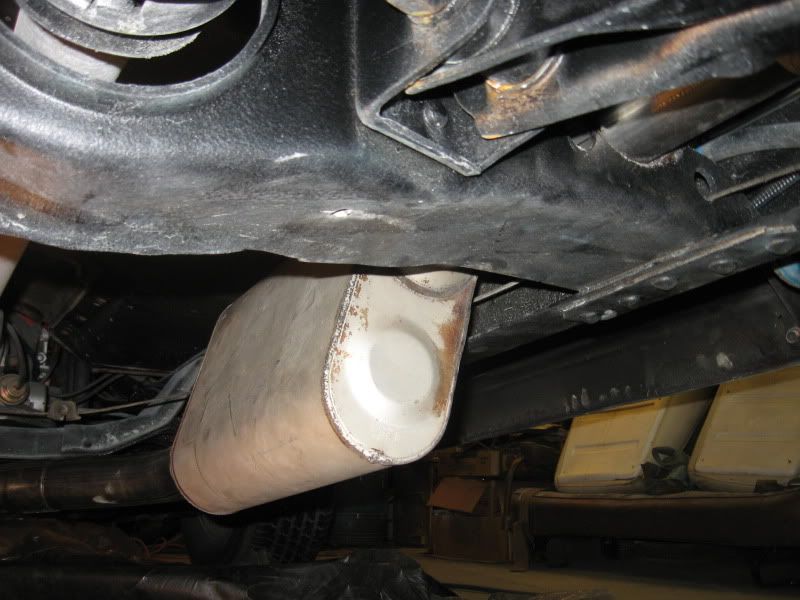 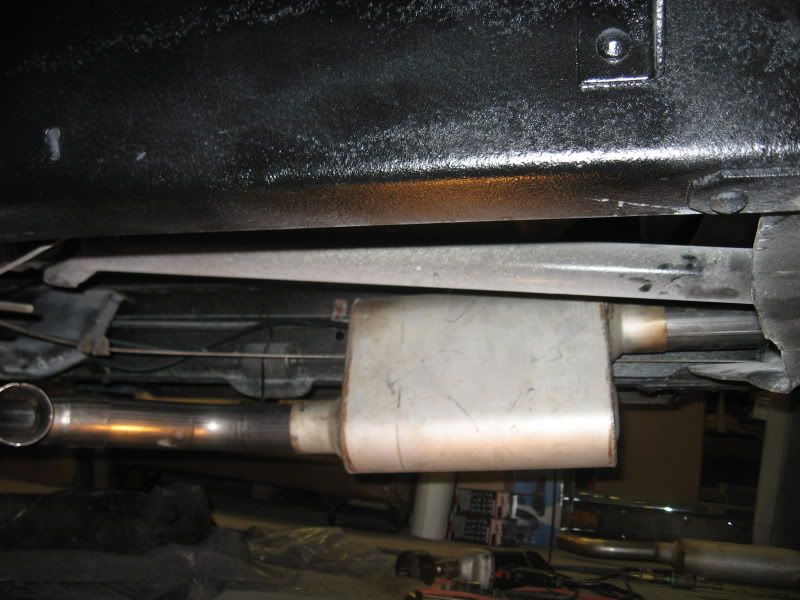 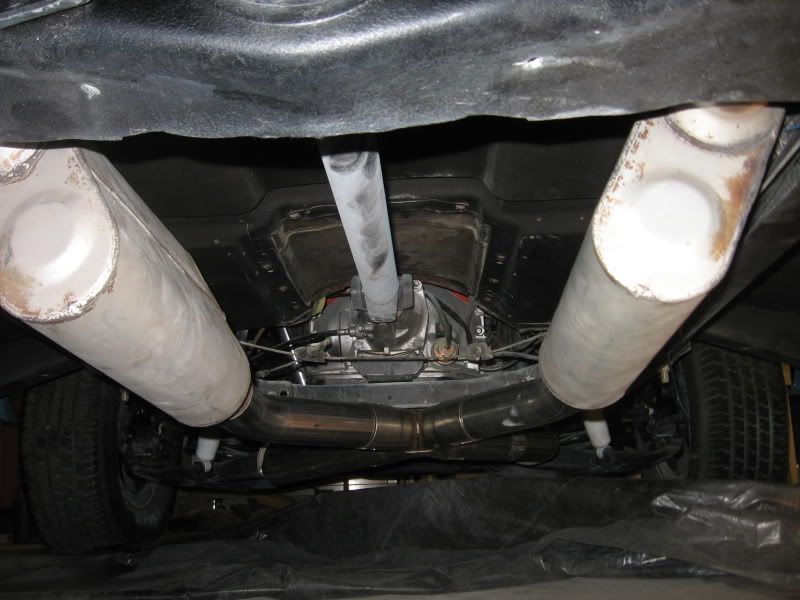 That burned up most of my shop time tonight. The only other thing I did was bolt the radiator hold down brackets in. And here are a couple pics of the engine wiring. It's coming along, but will need more work. Routing it back was a good idea though. 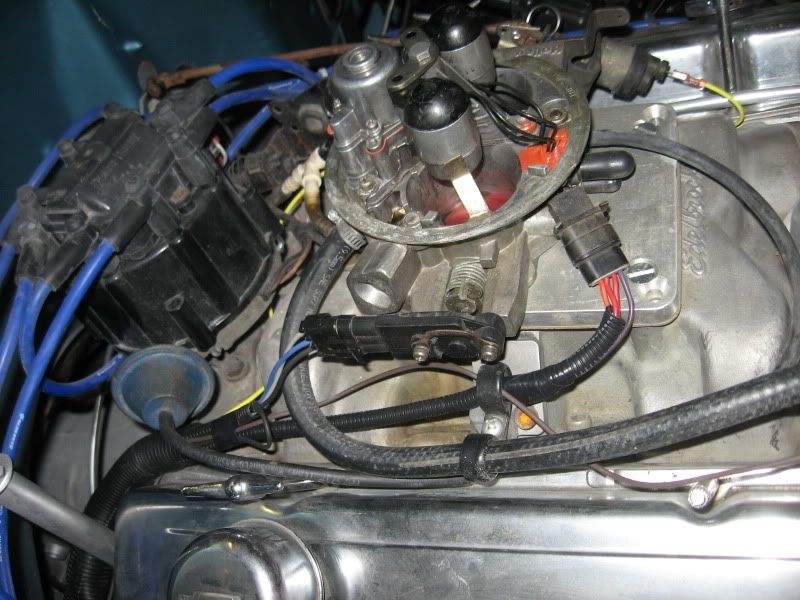 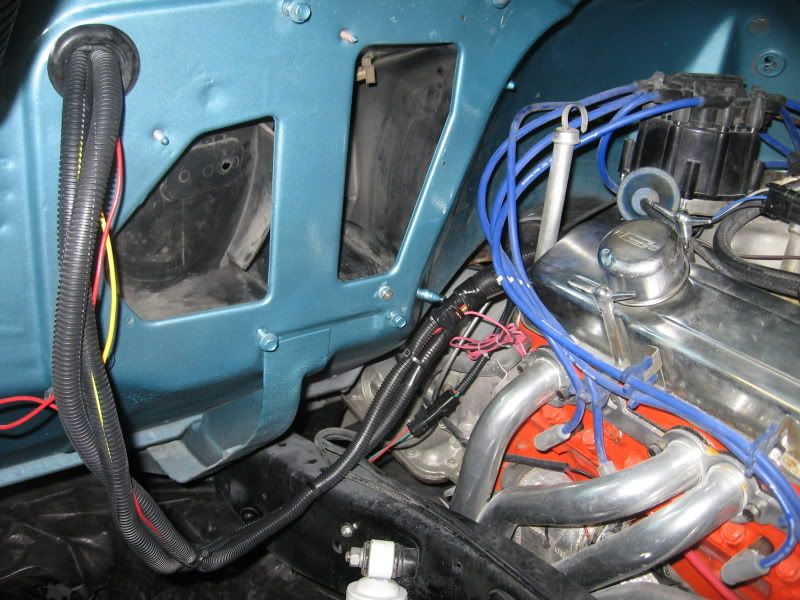
__________________
If no one knows what you're doing, they can't tell you you're doing it wrong HG's Dream Car Build - Shelby Cobra Kit Build your own adjustable track bar 71 Long Fleet C/10 72 Jimmy 4x4 (Junkyard Jimmy)HG's Plow Truck '78 K35 DuallyBigass Farm Truck HG's thread of miscellaneous stuff |
|
|
|
|
08-06-2011, 11:39 PM
|
#3 |
|
GEARHEAD
Join Date: Aug 2003
Location: MN
Posts: 6,122
|
Re: Over 25 Years Later, Finally My 71 C-10 Truck Build
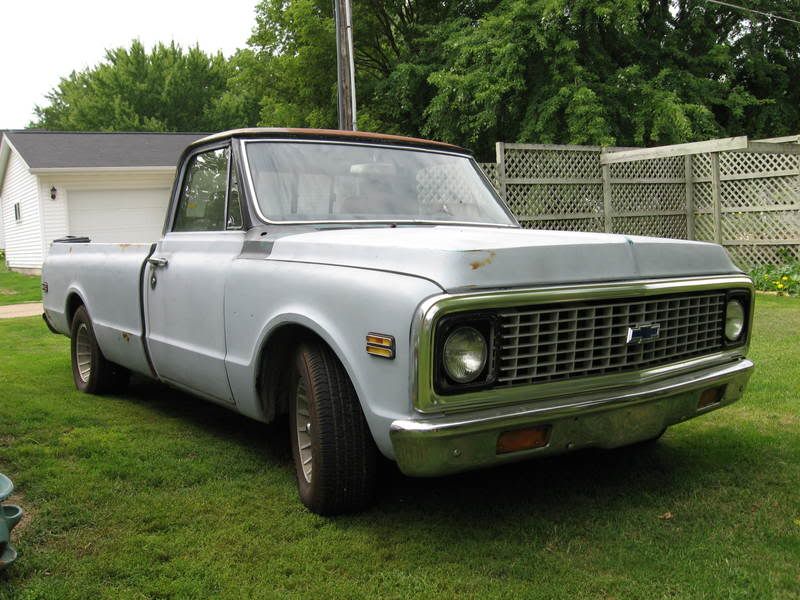
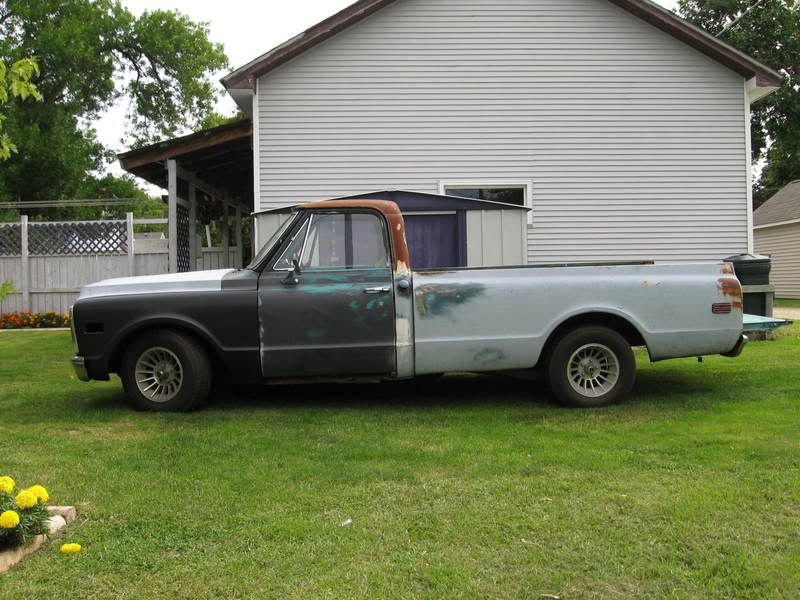
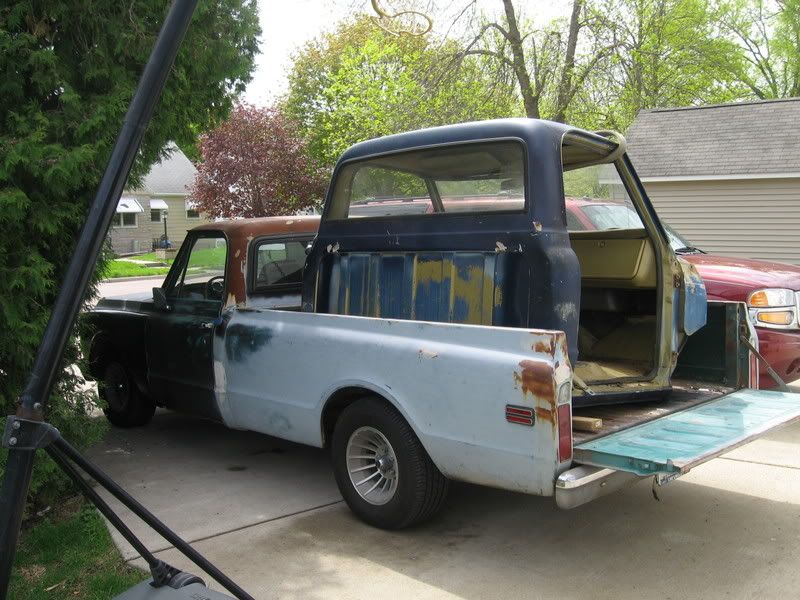
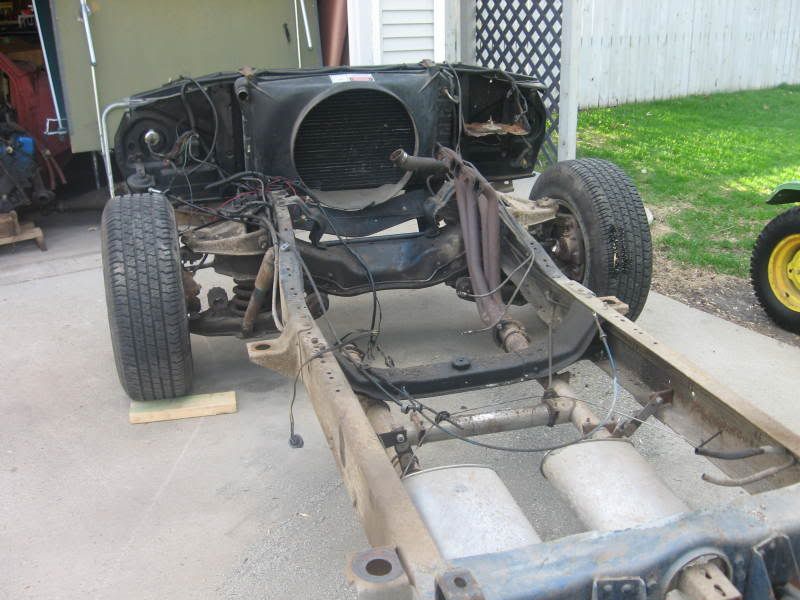
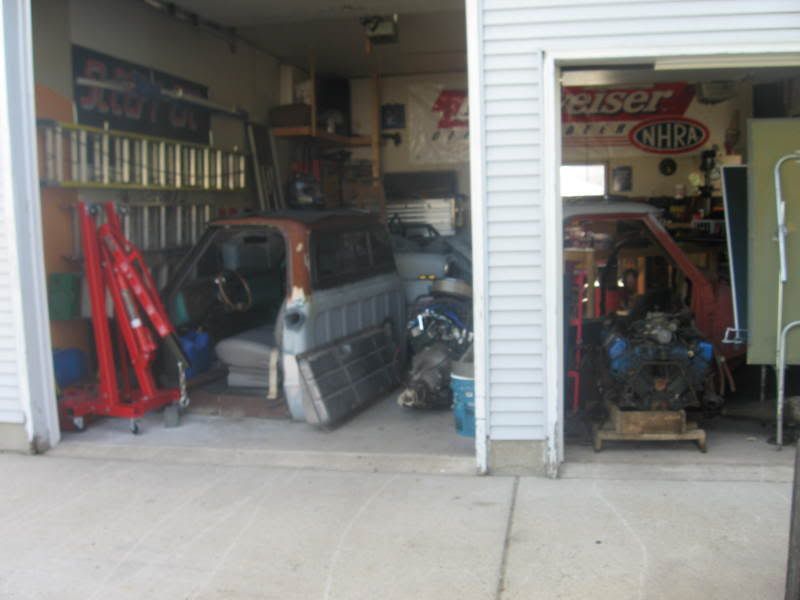
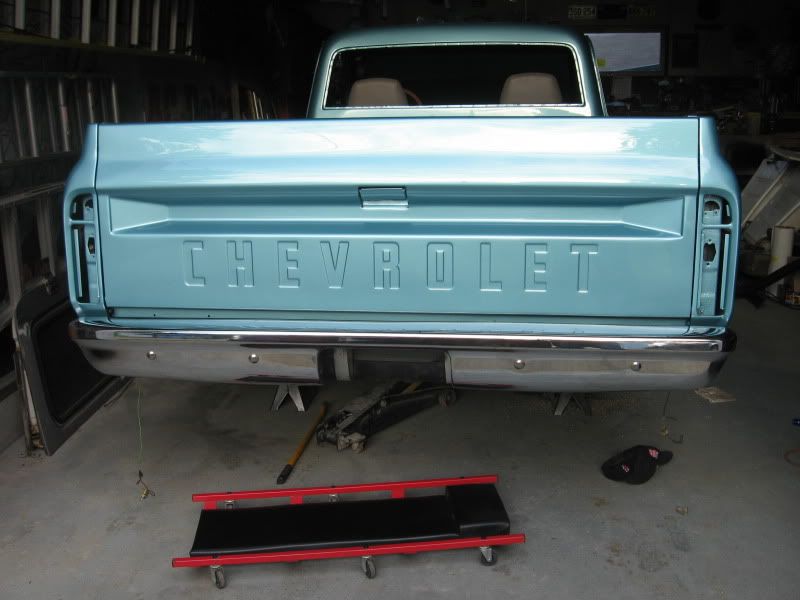
Check out where I started from...
__________________
If no one knows what you're doing, they can't tell you you're doing it wrong HG's Dream Car Build - Shelby Cobra Kit Build your own adjustable track bar 71 Long Fleet C/10 72 Jimmy 4x4 (Junkyard Jimmy)HG's Plow Truck '78 K35 DuallyBigass Farm Truck HG's thread of miscellaneous stuff |
|
|
|
|
08-07-2011, 12:03 AM
|
#4 |
|
VA72C10
 Join Date: Mar 2008
Location: Midlothian, VA
Posts: 25,269
|
Re: Over 25 Years Later, Finally My 71 C-10 Truck Build
Nice work on the exhaust! And Quite the transformation! Hope I can transform my new one like that

__________________
Looking for a 67-72 swb or blazer project in or around VA. 
|
|
|
|
|
08-07-2011, 07:06 AM
|
#5 |
|
State of Confusion!
  Join Date: Jul 2002
Location: Gulfport, MS USA
Posts: 46,761
|
Re: Over 25 Years Later, Finally My 71 C-10 Truck Build

__________________
Bill 1970 Chevy Custom/10 LWB Fleetside 2010 Toyota Tacoma PreRunner SR5 Double Cab - DD Member of Louisiana Classic Truck Club (LCTC) Bill's Gallery Life isn't tied with a bow, but it's still a gift. Live simply. Love generously. Care deeply. Speak kindly. Leave the rest to God! |
|
|
|
|
08-08-2011, 10:39 PM
|
#6 |
|
VA72C10
Join Date: Mar 2008
Location: Midlothian, VA
Posts: 25,269
|
Re: Over 25 Years Later, Finally My 71 C-10 Truck Build
On the gap...have you installed the hood to cowl seal already? If not, I'd hesitate changing any gaps until it's installed. Rubber seems to change the gaps.
40 days to the show....you can do it!!!
__________________
Looking for a 67-72 swb or blazer project in or around VA.
|
|
|
|
|
08-08-2011, 10:49 PM
|
#7 |
|
GEARHEAD
Join Date: Aug 2003
Location: MN
Posts: 6,122
|
Re: Over 25 Years Later, Finally My 71 C-10 Truck Build
The seal is in there. What do you think? Too wide or just right?
__________________
If no one knows what you're doing, they can't tell you you're doing it wrong HG's Dream Car Build - Shelby Cobra Kit Build your own adjustable track bar 71 Long Fleet C/10 72 Jimmy 4x4 (Junkyard Jimmy)HG's Plow Truck '78 K35 DuallyBigass Farm Truck HG's thread of miscellaneous stuff |
|
|
|
|
08-08-2011, 10:59 PM
|
#8 |
|
VA72C10
Join Date: Mar 2008
Location: Midlothian, VA
Posts: 25,269
|
Re: Over 25 Years Later, Finally My 71 C-10 Truck Build
I'd leave it. Fender gap at the hood looks good...almost like hood is already a millimeter behind the fender....so if you move it back more it'll make the fender/hood gap larger where they meet and a gap at the grille...
__________________
Looking for a 67-72 swb or blazer project in or around VA.
|
|
|
|
|
08-09-2011, 12:06 PM
|
#9 | |
|
GEARHEAD
Join Date: Aug 2003
Location: MN
Posts: 6,122
|
Re: Over 25 Years Later, Finally My 71 C-10 Truck Build
Quote:
After getting a small start cleaning the wheel last night, I wanted to try a couple things today. The weather outside is as good as it gets so I took advantage of working out of a home office and went outside. First I wanted to try wet sanding the machined surfaces. I tried 1500 grit first, which kind of cleaned it some but really wasn't going anywhere. Then I used some 600 grit and that worked pretty good for removing the lines created from the machining process. I tried taking some close up pics to show how the lines go across the spokes, etc. I sanded the machine grooves out of a couple spokes, got most of the center done and worked around about half the outer ring. I also used some 400 grit which worked a bit quicker than the 600. So I think I'll start with the 400, then 600 then the ultra fine stuff and polish up the machined areas. I found a couple SOS pads under the kitchen sink and scrubbed the cast areas up. It definitely cleaned better with the soap, but there are still some spots that will need more aggressive cleaning. Overall, it's not hard work, but tedious and will take at least a few hours per wheel. In the end they should look pretty good though, maybe better than new if I'm lucky. I'm also going to look up some more info on cleaning and polishing wheels. I've seen posts here on the board and I bet theres a bunch more out there. 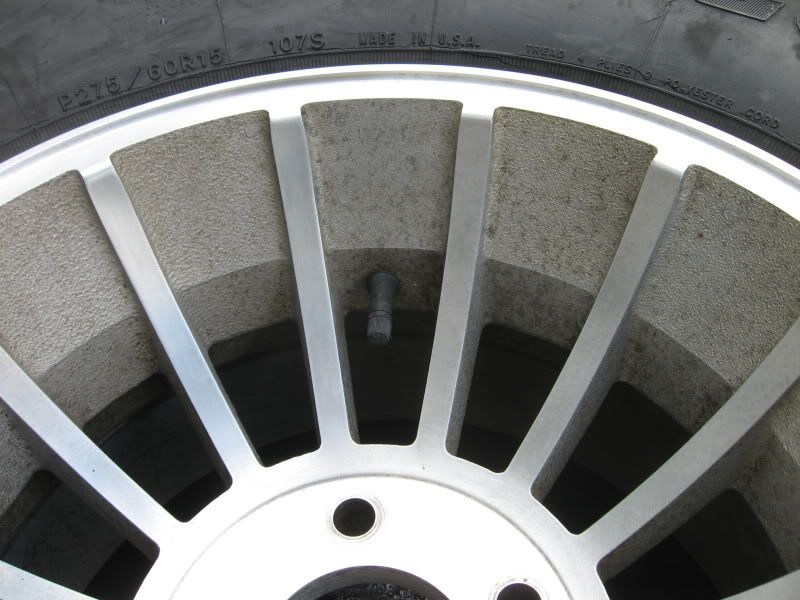 Bottom area was sanded 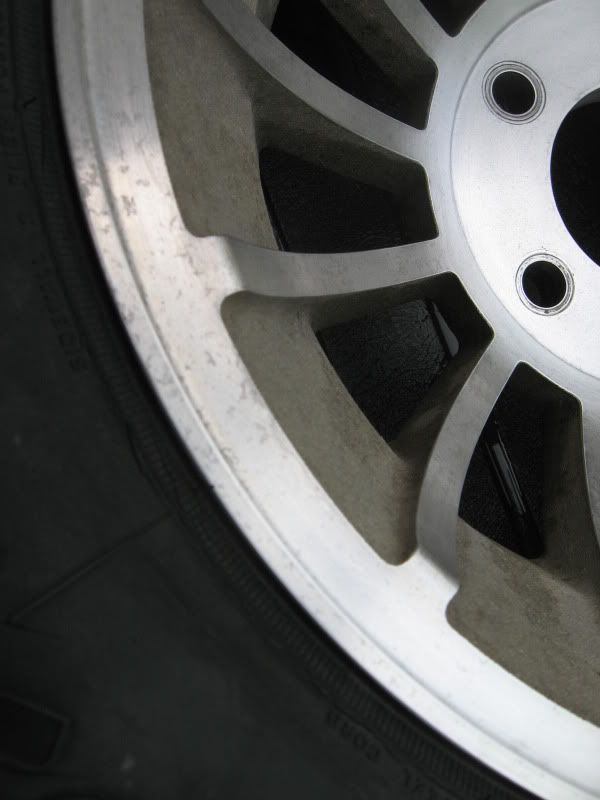 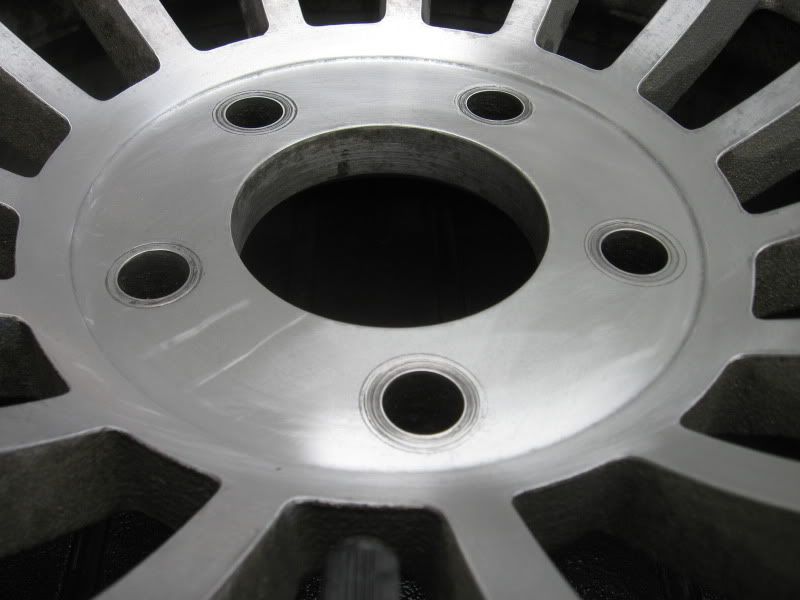 Before 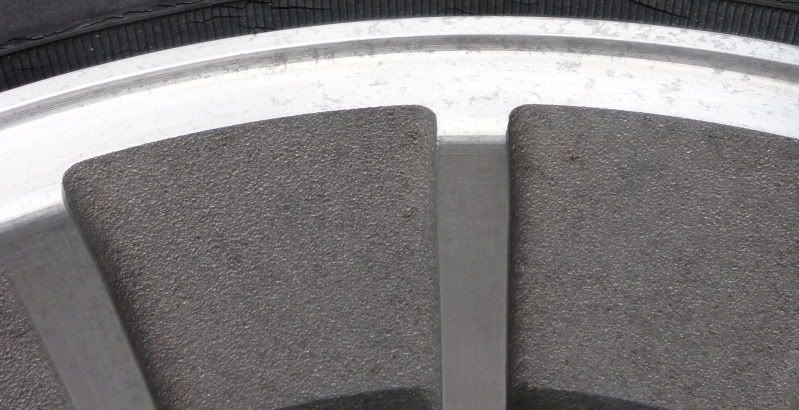 After. Right spoke was sanded, left not. 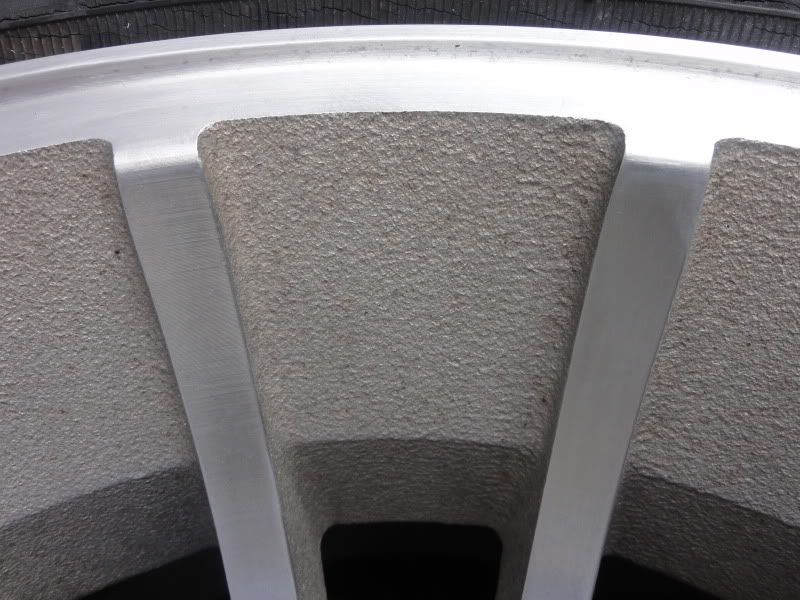 Right side sanded 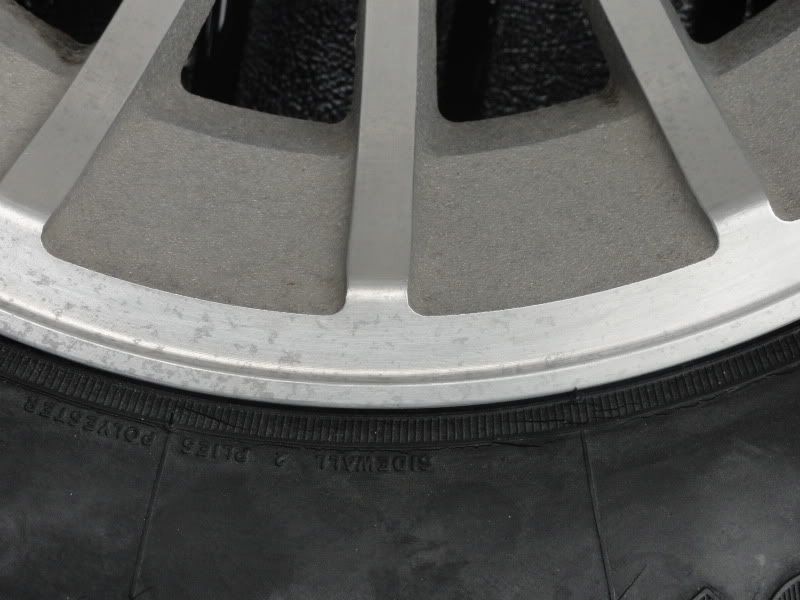 See the machine grooves in the spokes 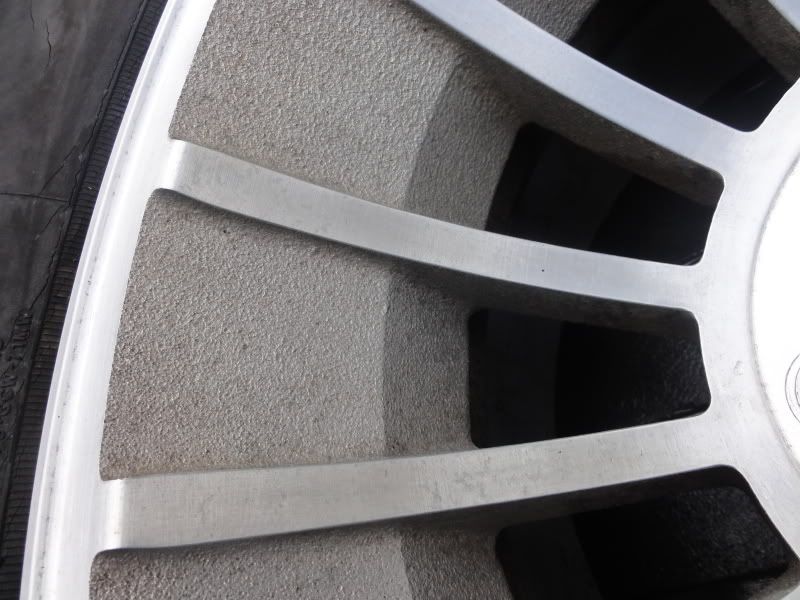
__________________
If no one knows what you're doing, they can't tell you you're doing it wrong HG's Dream Car Build - Shelby Cobra Kit Build your own adjustable track bar 71 Long Fleet C/10 72 Jimmy 4x4 (Junkyard Jimmy)HG's Plow Truck '78 K35 DuallyBigass Farm Truck HG's thread of miscellaneous stuff |
|
|
|
|
|
08-09-2011, 12:35 PM
|
#10 |
|
PITbut
Join Date: Sep 2007
Location: monroe washington
Posts: 3,042
|
Re: Over 25 Years Later, Finally My 71 C-10 Truck Build
Looks good man.
I have to install my cowl. I need to polish it first. Im NOT looking forward to this. I found out that the truck was hit on the pass. side at one time and the PO ghetto installed the cowl. So me of course never test fitted it after all the metal work, this could end up back. I may just customize the cowl to fit my gaps and repaint it... lol. Looks great btw.
__________________
New project. 1971 Twin Turbo blazer http://67-72chevytrucks.com/vboard/s...d.php?t=676047 My new YOUTUBE channel.. Videos of my truck and a current walk around. Lyrikz74 Youtube channel DONE! SOLD!  My 1971 stepside build thread My Build Thread UPDATED 6/11. DONE and sold. |
|
|
|
|
08-09-2011, 06:27 PM
|
#11 | |
|
GEARHEAD
Join Date: Aug 2003
Location: MN
Posts: 6,122
|
Re: Over 25 Years Later, Finally My 71 C-10 Truck Build
Quote:
Been researching cooling fans. I originally was going low buck with a fan from a taurus. It's a 2 speed unit that really blows air and it seems to be a fairly common mod. Several board members have used them. But I'm also looking at a set up like this. That shroud is nice, but kinda spendy. I could probably get one made here in town for less, but maybe not. http://67-72chevytrucks.com/vboard/s...d.php?t=216128
__________________
If no one knows what you're doing, they can't tell you you're doing it wrong HG's Dream Car Build - Shelby Cobra Kit Build your own adjustable track bar 71 Long Fleet C/10 72 Jimmy 4x4 (Junkyard Jimmy)HG's Plow Truck '78 K35 DuallyBigass Farm Truck HG's thread of miscellaneous stuff |
|
|
|
|
|
08-09-2011, 06:47 PM
|
#12 | |
|
PITbut
Join Date: Sep 2007
Location: monroe washington
Posts: 3,042
|
Re: Over 25 Years Later, Finally My 71 C-10 Truck Build
Quote:
__________________
New project. 1971 Twin Turbo blazer http://67-72chevytrucks.com/vboard/s...d.php?t=676047 My new YOUTUBE channel.. Videos of my truck and a current walk around. Lyrikz74 Youtube channel DONE! SOLD! My 1971 stepside build thread My Build Thread UPDATED 6/11. DONE and sold. |
|
|
|
|
|
08-10-2011, 12:49 PM
|
#13 |
|
GEARHEAD
Join Date: Aug 2003
Location: MN
Posts: 6,122
|
Re: Over 25 Years Later, Finally My 71 C-10 Truck Build
It's ALIVE! Running super rich and the timing is off, but it's running again. I pulled the battery and set it under the bed and used a couple wire leads to put power direct to the pump and after a couple tries, it started running. It was sticky I guess, probably from sitting so long. Anyway, I'm happy. It's loud as hell even with the mufflers on and a x pipe, but there's just 18" of pipe after the mufflers. Man I stink like gas and exhaust. Eau De Garage like I bathed in it. Hopefully I'll be able to get a somewhat close tune on it and take it for a short drive.
I tried to get bumper bolts locally with no luck so I ordered some from summit (kinda surprised they had them) and also ordered new lug nuts and center caps, and the steering wheel adapter and a cover to protect the truck in storage. Then I ordered a pair of 12" fans from amazon. For the time being they will be mounted direct to the radiator and then when I upgrade to an aluminum radiator I'll probably get a shroud.
__________________
If no one knows what you're doing, they can't tell you you're doing it wrong HG's Dream Car Build - Shelby Cobra Kit Build your own adjustable track bar 71 Long Fleet C/10 72 Jimmy 4x4 (Junkyard Jimmy)HG's Plow Truck '78 K35 DuallyBigass Farm Truck HG's thread of miscellaneous stuff |
|
|
|
|
08-10-2011, 01:25 PM
|
#14 |
|
Not a bad nut after all..
Join Date: Dec 2000
Location: ND
Posts: 1,756
|
Re: Over 25 Years Later, Finally My 71 C-10 Truck Build
Congrats!
My local Napa carries bumper bolts.
__________________
'05 Chevy 2500HD 4x4 '72 GMC LWB 4x2 driver '72 Chevy LWB 4x4 plow truck '71 Blazer 4x4 driver '70 GMC LWB trailer |
|
|
|
|
08-10-2011, 01:29 PM
|
#15 | |
|
GEARHEAD
Join Date: Aug 2003
Location: MN
Posts: 6,122
|
Re: Over 25 Years Later, Finally My 71 C-10 Truck Build
Quote:
__________________
If no one knows what you're doing, they can't tell you you're doing it wrong HG's Dream Car Build - Shelby Cobra Kit Build your own adjustable track bar 71 Long Fleet C/10 72 Jimmy 4x4 (Junkyard Jimmy)HG's Plow Truck '78 K35 DuallyBigass Farm Truck HG's thread of miscellaneous stuff |
|
|
|
|
|
08-10-2011, 07:21 PM
|
#16 |
|
6>8 Plugless........
 Join Date: Sep 2007
Location: Prairie City, Ia
Posts: 17,140
|
Re: Over 25 Years Later, Finally My 71 C-10 Truck Build
It's coming along very nice! One thing that works really well to clean aluminum wheels is acid. If yo have a Blue Beacon near you they can acid wash them for you. But you need to do it before you polish them because it will pull any wax or polish right out of the aluminum. And as far as polishing goes, on real nasty wheels I will start with 220 sometimes and keep working my way up to 1200 or 1500 before I polish it. It's a lot of work, but it's free.

__________________
Ryan 1972 Chevy Longhorn K30 Cheyenne Super, 359 Inline 6 cylinder, Auto Trans, Tilt, Diesel Tach/Vach, Buckets, Rare Rear 4-link and air ride option Build Thread 1972 GMC Sierra Grande Longhorn 4x4 1972 Chevy Cheyenne Super K20 Long Step side tilt, tach, tow hooks, AC, 350 4 speed 1972 C10 Suburban Custom Deluxe 1969 Chevy milk truck 1971 Camaro RS 5.3 BTR STG3 Cam Super T10 1940 Ford 354 Hemi 46RH Ford 9" on air ride huge project Tired of spark plugs? Check this out. |
|
|
|
|
08-10-2011, 11:20 PM
|
#17 |
|
Still Learning
Join Date: Jul 2009
Location: Central Oklahoma
Posts: 10,108
|
Re: Over 25 Years Later, Finally My 71 C-10 Truck Build
Very nice transformation! You sure have come a long way!
|
|
|
|
|
08-11-2011, 08:16 AM
|
#18 |
|
GEARHEAD
Join Date: Aug 2003
Location: MN
Posts: 6,122
|
Re: Over 25 Years Later, Finally My 71 C-10 Truck Build
Thanks guys and thanks for the tips.
Last night I was going to try and adjust the fuel pressure regulator but before I got started I wanted to make sure the adjuster worked. It didn't. The threads were galled or something, so I pulled the regulator cover off and sprayed some PB blaster on it. While that was soaking I started installing the new plug wire looms. They're not exactly right for my application because of how the front plug wire is routed, but they'll work. The passenger side is in, and I'll post pics tonight once the other side is on. The set screw for the regulator adjustment can be screwed in or out, either way. The problem I was having was all my allen wrenches that size were on the fold out sets and the length allowed them to twist too much. I had a socket styl, but the allen for that size was missing. I finally found a bit so it had a short shank and that prevented the twisting and gave it the torque to move. I finally got it to move inward a bit, then it had some lube on it and came out. Should be able to start tuning soon.
__________________
If no one knows what you're doing, they can't tell you you're doing it wrong HG's Dream Car Build - Shelby Cobra Kit Build your own adjustable track bar 71 Long Fleet C/10 72 Jimmy 4x4 (Junkyard Jimmy)HG's Plow Truck '78 K35 DuallyBigass Farm Truck HG's thread of miscellaneous stuff |
|
|
|
|
08-12-2011, 12:40 AM
|
#19 |
|
GEARHEAD
Join Date: Aug 2003
Location: MN
Posts: 6,122
|
Re: Over 25 Years Later, Finally My 71 C-10 Truck Build
Post #700. Wow.
So I was trying to set the fuel pressure as instructed and it wasn't working. The adjuster was out but the pressure was way to high. So for a temporary fix I hooked up my other holley pressure regulator and set that. The engine runs, but I can't get the timing right. I think my damper timing mark is wrong and I plan on testing that theory tomorrow. When the distributor was turned to where it run ok the timing mark was around the 10 o'clock position, at idle. When I tried to retard the timing it would just stall and would barely turn over, like it was fighting the ignition. Until I know the ignition timing is close it hardly pays to try and adjust the rest of it. So I'm a little disappointed, but I'll figure it out. I have to check my fuel return line also to make sure it's flowing freely back to the tank. That could be the cause of the high pressure on the inlet side. I hope all this troubleshooting is worth it in the end. I just want it to be reliable and consistant. Heres a couple pics. One showing my regulator set up (getting a 0-30# gage soon, runs at 15 psi) and the other showing the new wire loom. 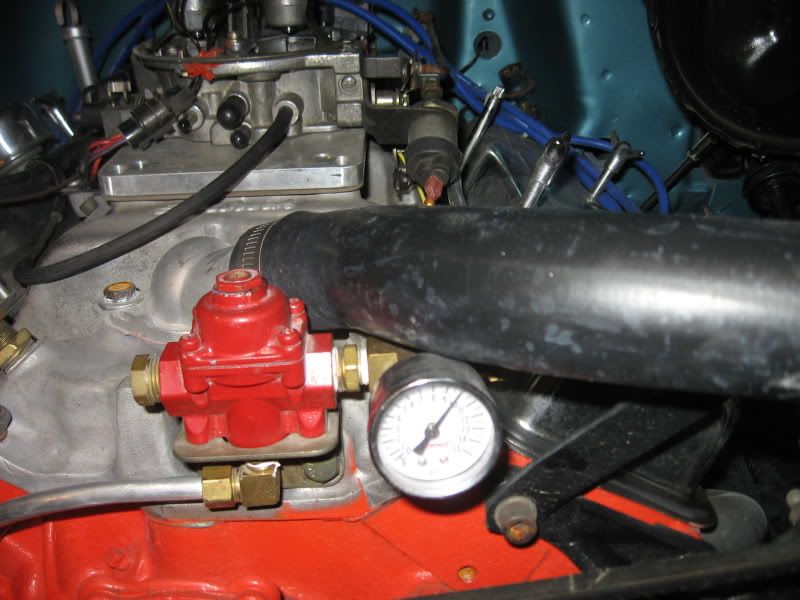 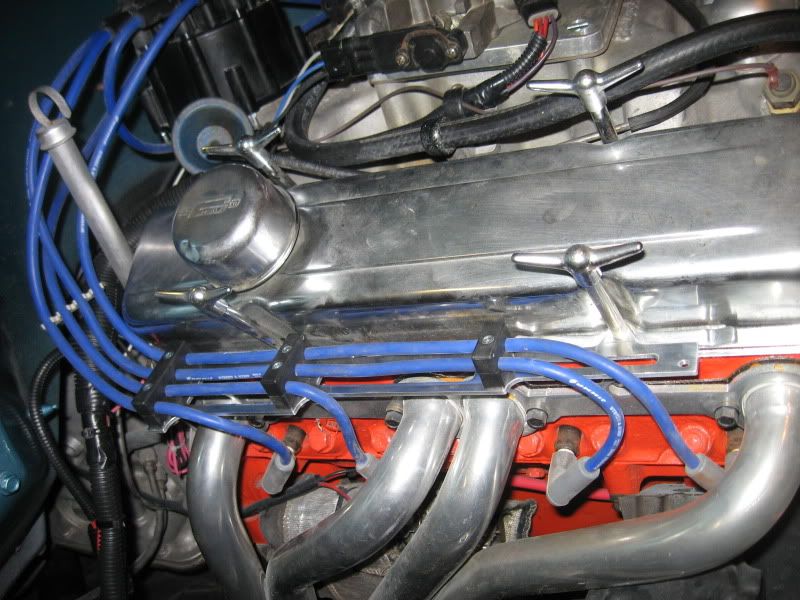
__________________
If no one knows what you're doing, they can't tell you you're doing it wrong HG's Dream Car Build - Shelby Cobra Kit Build your own adjustable track bar 71 Long Fleet C/10 72 Jimmy 4x4 (Junkyard Jimmy)HG's Plow Truck '78 K35 DuallyBigass Farm Truck HG's thread of miscellaneous stuff |
|
|
|
|
08-14-2011, 11:32 PM
|
#20 | |
|
Registered User
Join Date: Jun 2011
Location: Monroe, WA
Posts: 6
|
Re: Over 25 Years Later, Finally My 71 C-10 Truck Build
Quote:
__________________
-1972 Chevy C/20 Plans: 4wd conversion, restore, update, drive it till the wheels fall off. |
|
|
|
|
|
08-12-2011, 12:57 AM
|
#21 |
|
VA72C10
Join Date: Mar 2008
Location: Midlothian, VA
Posts: 25,269
|
Re: Over 25 Years Later, Finally My 71 C-10 Truck Build
Keep at it....getting closer!!!
__________________
Looking for a 67-72 swb or blazer project in or around VA.
|
|
|
|
|
08-12-2011, 09:31 AM
|
#22 | |
|
GEARHEAD
Join Date: Aug 2003
Location: MN
Posts: 6,122
|
Re: Over 25 Years Later, Finally My 71 C-10 Truck Build
Quote:
There is no known treatment at this time, so please send donations to the HGs_Notes OCD Therapy Institute and Research Center (my garage).
__________________
If no one knows what you're doing, they can't tell you you're doing it wrong HG's Dream Car Build - Shelby Cobra Kit Build your own adjustable track bar 71 Long Fleet C/10 72 Jimmy 4x4 (Junkyard Jimmy)HG's Plow Truck '78 K35 DuallyBigass Farm Truck HG's thread of miscellaneous stuff |
|
|
|
|
|
08-13-2011, 01:28 AM
|
#23 | |
|
VA72C10
Join Date: Mar 2008
Location: Midlothian, VA
Posts: 25,269
|
Re: Over 25 Years Later, Finally My 71 C-10 Truck Build
Quote:
You'll get it figured out....We have faith in you.... 
__________________
Looking for a 67-72 swb or blazer project in or around VA.
|
|
|
|
|
|
08-13-2011, 08:58 AM
|
#24 | |
|
GEARHEAD
Join Date: Aug 2003
Location: MN
Posts: 6,122
|
Re: Over 25 Years Later, Finally My 71 C-10 Truck Build
Quote:
 New valve covers 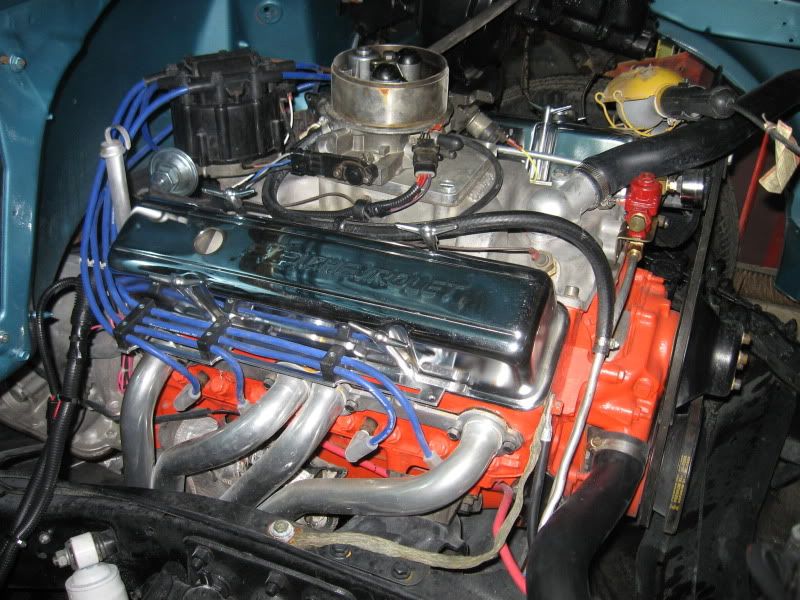 This should look better 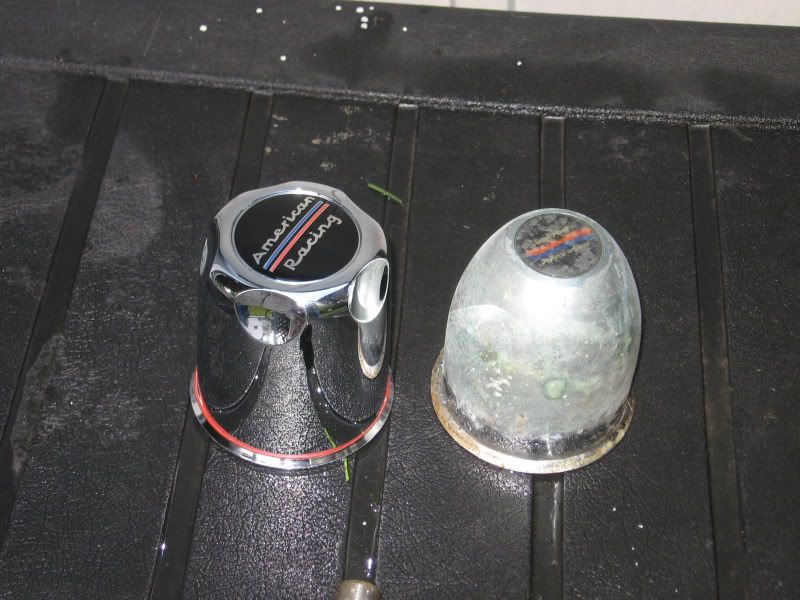 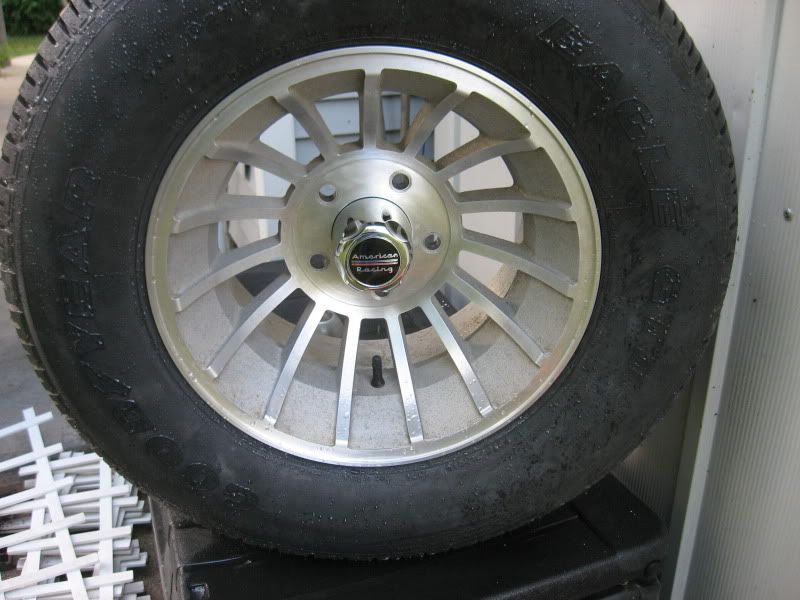
__________________
If no one knows what you're doing, they can't tell you you're doing it wrong HG's Dream Car Build - Shelby Cobra Kit Build your own adjustable track bar 71 Long Fleet C/10 72 Jimmy 4x4 (Junkyard Jimmy)HG's Plow Truck '78 K35 DuallyBigass Farm Truck HG's thread of miscellaneous stuff |
|
|
|
|
|
08-13-2011, 09:20 AM
|
#25 |
|
67cheby
 Join Date: Sep 2008
Location: siloam springs ar 72761
Posts: 17,890
|
Re: Over 25 Years Later, Finally My 71 C-10 Truck Build
NICE..looks great
|
|
|
|
 |
| Bookmarks |
|
|


 Hybrid Mode
