
|
|
|
 01-04-2018, 02:40 PM
|
#1 | |
|
Registered User
Join Date: Jan 2018
Location: Tucson AZ
Posts: 1
|
Re: S10 Swap how to
Quote:
|
|

|

|
|
12-28-2017, 02:29 PM
|
#2 |
|
Registered User
Join Date: Nov 2012
Location: Albuquerque New Mexico
Posts: 187
|
Re: S10 Swap how to
I just ordered a set of 20" Ridler 695's with a machined lip for my 54 that's on an S-10 frame. The specs are below.
Fronts: 695 - 2861g 20 x 8.5 (4.75 backspace) Rears: 695 - 2161g 20 x 10 (5.5 backspace) I have a 4wd blazer axle on the back and I wanted to check with anyone who has used this setup to see what kind of spacers will be needed if any (front and back). I have seen a few that have 2" spacers on the rear axle but it has been on 2wd axles. any info will be appreciated! Thanks |
|
|
|
|
12-28-2017, 05:13 PM
|
#3 |
|
Registered User
 Join Date: Apr 2010
Location: Warrensburg, MO
Posts: 2,690
|
Re: S10 Swap how to
you will need 2" spacers or the front and none on the back.
__________________
www.olesargecustoms.com email: chris@olesargecustoms.com '48 build: http://67-72chevytrucks.com/vboard/s...d.php?t=541904 '33 build: http://67-72chevytrucks.com/vboard/s...=1#post6232888 '49 build: http://67-72chevytrucks.com/vboard/s...=1#post6364475 |
|
|
|
|
12-28-2017, 05:45 PM
|
#4 |
|
Registered User
Join Date: Nov 2012
Location: Albuquerque New Mexico
Posts: 187
|
Re: S10 Swap how to
Thanks Chris!
|
|
|
|
|
12-28-2017, 08:37 PM
|
#5 |
|
Registered User
Join Date: Apr 2010
Location: Warrensburg, MO
Posts: 2,690
|
Re: S10 Swap how to
you bet.
__________________
www.olesargecustoms.com email: chris@olesargecustoms.com '48 build: http://67-72chevytrucks.com/vboard/s...d.php?t=541904 '33 build: http://67-72chevytrucks.com/vboard/s...=1#post6232888 '49 build: http://67-72chevytrucks.com/vboard/s...=1#post6364475 |
|
|
|
|
01-15-2018, 04:13 AM
|
#6 |
|
Senior Member
Join Date: May 2007
Location: Doodah Kansas
Posts: 7,774
|
Re: S10 Swap how to
yeah depending on what model s10 it came from there can be a lot to hide but the only really extra thing is the HVAC and radio wiring, everything else gets used.
__________________
the mass of men live lives of quiet desperation if there is a problem, I can have it. new project WAYNE http://67-72chevytrucks.com/vboard/s...d.php?t=844393 |
|
|
|
|
01-17-2018, 10:46 AM
|
#7 |
|
Registered User
Join Date: Dec 2017
Location: Neuanlage, SK
Posts: 21
|
Re: S10 Swap how to
I took every ones advice and managed to successfully shorten my extended cab short bed frame! It went smoothly and I plan on starting my own build thread soon, but for now here are some pictures.
Last edited by motorhead153; 01-17-2018 at 10:52 AM. |
|
|
|
|
01-19-2018, 01:19 PM
|
#8 |
|
Registered User
Join Date: Nov 2017
Location: Siloam Springs, AR
Posts: 19
|
Re: S10 Swap how to
Doing this swap on an S10 short wheel base which I moved the rear end back 8" on. Everything has been going as planned but just ran into a snag and hope someone else may have already solved this. The gas tank will not fit under the cab and front of the bed because the cross-member it mounts to is about 8" farther forward than it should be. Has anyone else run into this problem and is there an easy solution? Really don't want to spend $400 on a gas tank and then lose the ability to have a spare carried under the back of the bed. Thanks for any insight you guys may have.
|
|
|
|
|
01-19-2018, 01:56 PM
|
#9 | |
|
Senior Member
Join Date: May 2007
Location: Doodah Kansas
Posts: 7,774
|
Re: S10 Swap how to
Quote:
the gas tank crossmember is held in with rivets, and the front strap is bolted in. you can drill the rivets in the crossmember and slide it back in the frame, and redrill new holes for the front strap bolts. you shouldnt need 8 inches, only a couple inches to clear the top of the tank where the stepdown is. keep in mind, the further you move it back the higher it will get. I did this on my 65 which was a std cab stretched the same as yours, because the gas tank hit the floor (it was the stock s10 floor) when I moved the cab back. in the original position the floor did not hit the tank. this is also pretty common to do on bagged s10s because the gas tank hangs ever so slightly below the frame. I would double check the height of your body mounts, if you are mounting the body super low for a slammed stance, you will have this problem even with a longbed truck.
__________________
the mass of men live lives of quiet desperation if there is a problem, I can have it. new project WAYNE http://67-72chevytrucks.com/vboard/s...d.php?t=844393 |
|
|
|
|
|
01-19-2018, 02:09 PM
|
#10 | |
|
Registered User
Join Date: Nov 2017
Location: Siloam Springs, AR
Posts: 19
|
Re: S10 Swap how to
Quote:
I am not going really low so that should not be a problem. I will go look at how far back I need to go. I measured when I found the problem and the frame flattens out before you can get 8" back so cannot move the cross member back 8" but like you said may be able to go back less. Thanks Last edited by ThadandDad48; 01-19-2018 at 03:56 PM. |
|
|
|
|
|
01-23-2018, 05:38 PM
|
#11 |
|
Registered User
Join Date: Jan 2018
Location: Bismarck, ND
Posts: 31
|
Re: S10 Swap how to
skymangs,
Can you provide details on how to fit the original Steering wheel with the gearhead enterprises steering column you discussed. |
|
|
|
|
01-23-2018, 06:51 PM
|
#12 |
|
Senior Member
Join Date: May 2007
Location: Doodah Kansas
Posts: 7,774
|
Re: S10 Swap how to
I think it just looks like you might have the bed floor higher than you actually need it, I usually set it up so the floor sits on that high point of the frame over (what was) the center of the axle. its a good place for a floor if you are bagging the truck though, where you have it, because you need just the tiniest of a notch to lay out and the pumpkin will actually hit the floor where I set it up.
__________________
the mass of men live lives of quiet desperation if there is a problem, I can have it. new project WAYNE http://67-72chevytrucks.com/vboard/s...d.php?t=844393 |
|
|
|
|
01-24-2018, 06:22 PM
|
#13 |
|
Registered User
Join Date: Apr 2010
Location: Warrensburg, MO
Posts: 2,690
|
Re: S10 Swap how to
I've done that on several of my builds. check out sean s -53 Chevy, cecil. basically you gotta buy a new horn retainer, drill 2 5/16th holes in it. be sure to align one hole with the factory feed wire, put the other hole about opposite the first. then you'll need to cut a small tab of 18ga. bend it in a 90deg angle, then weld it to the lower plate in such a way as that 1 piece sticks through the second hole not touching the upper plate. when you put it on, plug the ground into your welded tab. you see on the new column is energized on the top plate and grounded through the bottom. The original column energized the lower and grounded the top. we just need to find a way to reverse it. you will have to take about a 1/2" off the back of the wheel, you can use a grinder, it's just bakelite. I've tried used retainers 3 or 4 times, they never work. clear as mud, huh
for the wheel just shave it flat. I don't have a picture... then I go to the plumbing section of my local hardware store and buy a black rubber 4" pipe cap, to cover the guts of the column. here's some pictures.
__________________
www.olesargecustoms.com email: chris@olesargecustoms.com '48 build: http://67-72chevytrucks.com/vboard/s...d.php?t=541904 '33 build: http://67-72chevytrucks.com/vboard/s...=1#post6232888 '49 build: http://67-72chevytrucks.com/vboard/s...=1#post6364475 |
|
|
|
|
01-24-2018, 06:34 PM
|
#14 |
|
Registered User
Join Date: Apr 2010
Location: Warrensburg, MO
Posts: 2,690
|
Re: S10 Swap how to
this is what I do with the steam tubes. I just hook a hose straight from the tubes to the back of the wp. I use a 1/8" tap and a 1/8" 90 degree brass elbow with 1/8 NPT threads, never cap the steam tubes, they pull condensation from the heads. they are especially important in the winter!
__________________
www.olesargecustoms.com email: chris@olesargecustoms.com '48 build: http://67-72chevytrucks.com/vboard/s...d.php?t=541904 '33 build: http://67-72chevytrucks.com/vboard/s...=1#post6232888 '49 build: http://67-72chevytrucks.com/vboard/s...=1#post6364475 |
|
|
|
|
04-02-2018, 11:19 PM
|
#15 |
|
Registered User
Join Date: Sep 2017
Location: Saskatoon, SK.
Posts: 19
|
Re: S10 Swap how to
Hi Guys, I'm exploring my options to do an S10 swap and was wondering if many have left part of the S10 cab floor, firewall, brake assembly and blended the old cab to that? I'm using the stock 4.3 motor and know its recommended to move it back, but if you could use a push fan in front and leave the motor and firewall, it would sure make for a quick swap. Thanks,
|
|
|
|
|
04-03-2018, 09:20 PM
|
#16 | |
|
Senior Member
Join Date: Sep 2016
Location: Hershey, PA
Posts: 1,004
|
Re: S10 Swap how to
Quote:
The S10 swap dimensions and mounting points revolve around the center hub of the front wheels. The front fenders need to be centered over the wheels. That then dictates where the radiator and cab are situated in relation to the fenders. Unfortunately, those requirements also mean the engine can't stay where it is. I tried, I failed. Oddly, the moving back of the engine and getting a different drive shaft isn't even the hard part of the swap. You'll find a few build threads on here, including mine, where parts of the firewall are used from the S10. The brake booster and pedal are also used to make the swap much easier. Definitely read some build threads on S10 swaps. I learned almost everything just from reading the builds here and I now have a running driving truck. Best of luck with the build!
__________________
Current Build Thread 1930 Ford Model A Modern Twist: Ford Model A Rat Rod With a Modern Twist Build Thread Phase 1 "The Swap": 1949 3100 with S10 swap. Beginner build with ambition! Build Thread Phase 2 "The Drop": Beginner Build with Ambition gets Air Ride |
|
|
|
|
|
04-03-2018, 10:46 PM
|
#17 |
|
Registered User
Join Date: Sep 2017
Location: Saskatoon, SK.
Posts: 19
|
Re: S10 Swap how to
Thanks for your reply Gigamanx! I totally understand. Is it possible, or advantageous to use all the fire wall with brake/booster,electrical parts, etc, from the S10 and fit onto old cab?
|
|
|
|
|
04-03-2018, 10:54 PM
|
#18 |
|
Senior Member
Join Date: May 2007
Location: Doodah Kansas
Posts: 7,774
|
Re: S10 Swap how to
i have done it, saves a lot of time. this is the result on the latest 41
 IMG_7071 by Joe Doh, on Flickr IMG_7071 by Joe Doh, on Flickr IMG_7798 by Joe Doh, on Flickr IMG_7798 by Joe Doh, on Flickr IMG_7808 by Joe Doh, on Flickr IMG_7808 by Joe Doh, on Flickr IMG_7810 by Joe Doh, on Flickr IMG_7810 by Joe Doh, on Flickr IMG_7831 by Joe Doh, on Flickr IMG_7831 by Joe Doh, on Flickr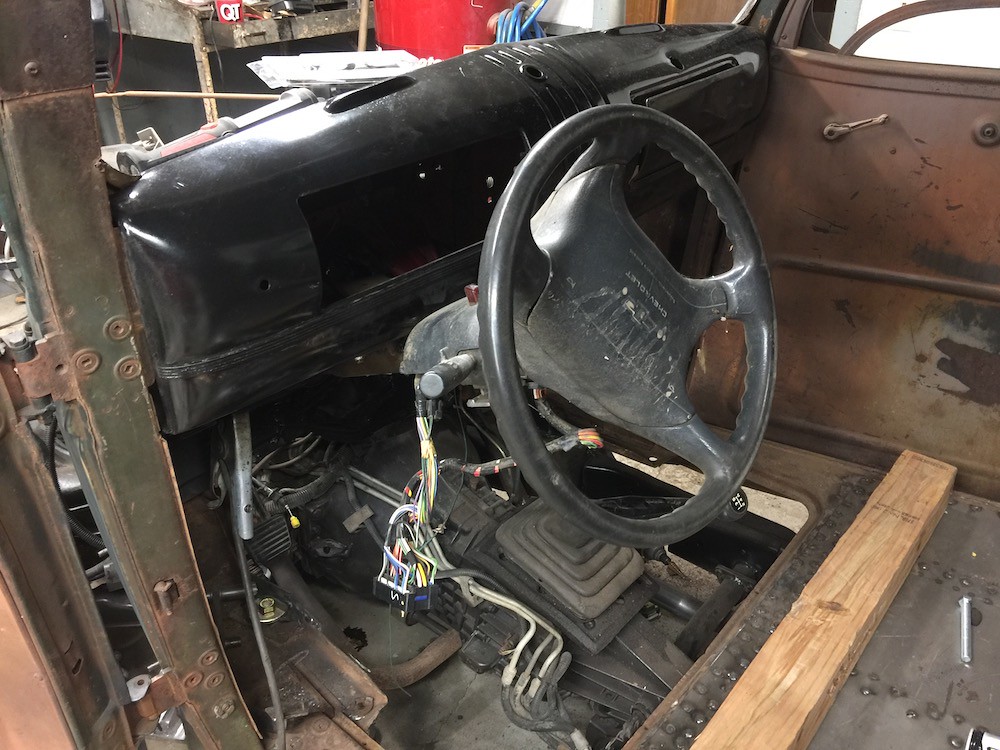 53903435651__00F3FF95-B2F2-4A50-83B6-5E7D8B59F402 by Joe Doh, on Flickr 53903435651__00F3FF95-B2F2-4A50-83B6-5E7D8B59F402 by Joe Doh, on Flickr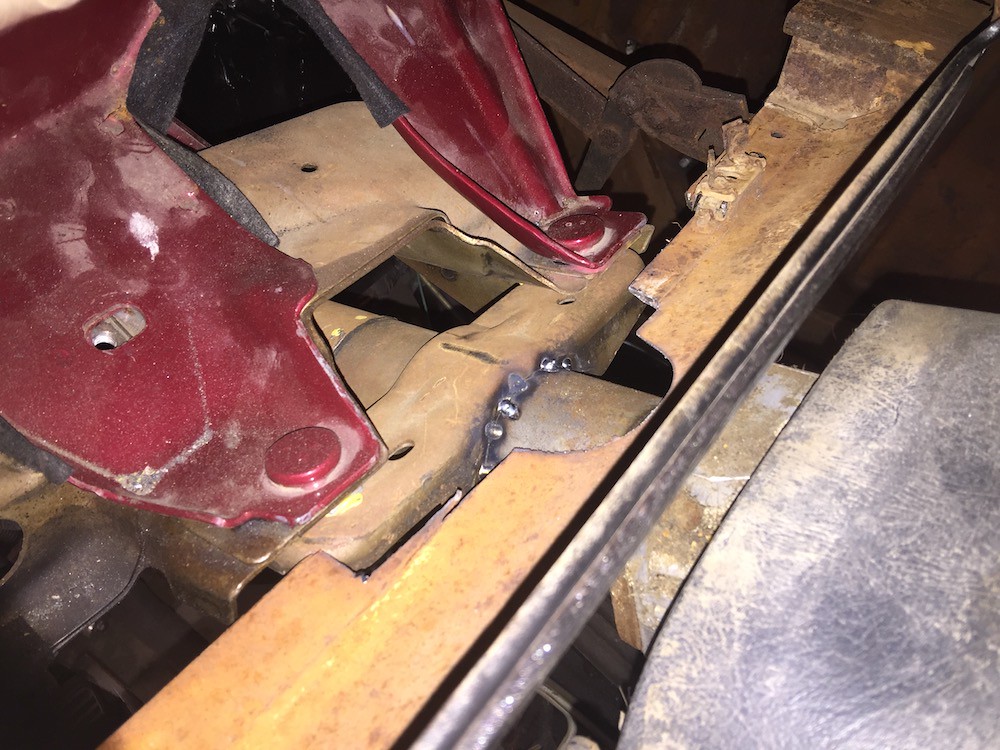 IMG_8262 by Joe Doh, on Flickr IMG_8262 by Joe Doh, on Flickr IMG_8360 by Joe Doh, on Flickr IMG_8360 by Joe Doh, on Flickr
__________________
the mass of men live lives of quiet desperation if there is a problem, I can have it. new project WAYNE http://67-72chevytrucks.com/vboard/s...d.php?t=844393 |
|
|
|
|
04-04-2018, 01:48 AM
|
#19 |
|
Registered User
Join Date: Sep 2017
Location: Saskatoon, SK.
Posts: 19
|
Re: S10 Swap how to
Great. Thanks for the photos. So really the only portion of the fire wall worth using is where the brake booster and pedal mount?
|
|
|
|
|
09-05-2018, 10:01 AM
|
#20 | |
|
Registered User
Join Date: Aug 2014
Location: Vacaville, CA
Posts: 133
|
Re: S10 Swap how to
Quote:
Fitz The rear end selection is a balancing act. Know your transmission gearing. Make a flexible decision on wheel and tire combo... Then a target cruise RPM based on your goal of acceleration vs highway speed. At that point you can calculate what rear end gearing and width you'll need. You can order a custom rear end, but for readily available junkyard parts you may have to change a few decisions. It may be sacraligeous but I'm running an explorer rear end in my truck. It's the right width for my wheels and the 3.73 ratio I needed to give me a comfortable RPM to cruise 75-80mph on the freeway. |
|
|
|
|
|
04-18-2018, 10:39 AM
|
#21 |
|
Registered User
Join Date: Apr 2010
Location: Warrensburg, MO
Posts: 2,690
|
Re: S10 Swap how to
depends if they are 5-4.75 or 5-5. 5-4.75 is the bp on all mid sized GM, `and is the most widely used bp on the market. 5-5 is what the big GM's used. that's your fullsize cars. a little more difficult to move, but still very saleable.
__________________
www.olesargecustoms.com email: chris@olesargecustoms.com '48 build: http://67-72chevytrucks.com/vboard/s...d.php?t=541904 '33 build: http://67-72chevytrucks.com/vboard/s...=1#post6232888 '49 build: http://67-72chevytrucks.com/vboard/s...=1#post6364475 |
|
|
|
|
04-18-2018, 10:57 AM
|
#22 | |
|
Registered User
Join Date: Nov 2012
Location: Albuquerque New Mexico
Posts: 187
|
Re: S10 Swap how to
Quote:
Great info thanks! That will help me when I list them. |
|
|
|
|
|
04-22-2018, 11:32 AM
|
#23 |
|
Senior Member
Join Date: Sep 2017
Location: Bryan, Texas
Posts: 2,345
|
Re: S10 Swap how to
I'm collecting parts for my build. I was wondering if this was a correct rear axle for the S10 conversion for an AD truck?
Description: Rear Axle Assembly 4.3, AUTO, 4X4 3.73 RATIO (OPT GT4), LOCKER Fits: 2000 Oldsmobile Bravada (3.73 ratio, opt GT4) Also, the S10 frame is a 85, do different years matter for the rear axle? Thanks. |
|
|
|
|
04-22-2018, 08:14 PM
|
#24 |
|
Senior Member
Join Date: May 2007
Location: Doodah Kansas
Posts: 7,774
|
Re: S10 Swap how to
the bravada axle will be 2 inches wider per side than a 2wd, so yes that will work.
year of s10 does not matter, there are only small differences over the run.
__________________
the mass of men live lives of quiet desperation if there is a problem, I can have it. new project WAYNE http://67-72chevytrucks.com/vboard/s...d.php?t=844393 |
|
|
|
|
05-24-2018, 07:30 PM
|
#25 |
|
Registered User
Join Date: Sep 2017
Location: Saskatoon, SK.
Posts: 19
|
Re: S10 Swap how to
Need advice on lowering chassis. I have set my box down onto my 2001 S10 chassis. It looks like the box needs to drop down another 6"- 8". Other than a 2" -3" block to drop the leaf spring, what else can I do to make up the rest? Would be nice to keep from having to raise the bed floor up. What is the tallest (functionally acceptable) lowering block?
|
|
|
|
 |
| Bookmarks |
|
|


 Hybrid Mode
