
|
|
|
 05-24-2018, 08:46 PM
|
#1 |
|
Senior Member
 Join Date: May 2007
Location: Doodah Kansas
Posts: 7,762
|
Re: S10 Swap how to
your bed floor location depends on how tall your cab mounts are and what bushings you use on them. if you used skymangs "short" set and stock s10 bsuhings, the bed floor will only be about an inch higher than the angle strips currently on the bed sides, plus the thickness of whatever you use for a floor. its almost an invisible amount of raise. you will not be able to use the stock cross bars that are in your bed right now. with his "tall" set, the floor does not need to be raised at all. to find out where to set your bed, clamp or use jack stands to hold your running boards and the aprons in the right position for the cab, and the apron will tell you the correct position for the bed.
for lowering the rear I like having the s10 leafs dearched at the local spring shop, 4" works nicely for me. you can buy drop leafs, alternatively, or use a 4" block. keep in mind though, with the 4" block the lower spring perch and u bolts can potentially hang lower than the rim, which can be super exciting with a flat. 4" blocks cost almost as much as the local shop charges for dearching. you will need new u bolts, and teh spring shop can make you some of those too.
__________________
the mass of men live lives of quiet desperation if there is a problem, I can have it. new project WAYNE http://67-72chevytrucks.com/vboard/s...d.php?t=844393 |

|

|
|
05-24-2018, 10:48 PM
|
#2 | |
|
Registered User
Join Date: Sep 2017
Location: Saskatoon, SK.
Posts: 19
|
Re: S10 Swap how to
Quote:
|
|
|
|
|
|
05-25-2018, 08:26 AM
|
#3 |
|
Registered User
 Join Date: Apr 2010
Location: Warrensburg, MO
Posts: 2,690
|
Re: S10 Swap how to
what joedoe said, but I like to stay with 2" blocks. the lower you go the closer the bottom of the U-bolts get to the ground. speed bumps become an issue.
__________________
www.olesargecustoms.com email: chris@olesargecustoms.com '48 build: http://67-72chevytrucks.com/vboard/s...d.php?t=541904 '33 build: http://67-72chevytrucks.com/vboard/s...=1#post6232888 '49 build: http://67-72chevytrucks.com/vboard/s...=1#post6364475 |
|
|
|
|
05-25-2018, 11:30 AM
|
#4 |
|
Registered User
Join Date: Nov 2013
Location: Los Angeles
Posts: 236
|
Re: S10 Swap how to
I started out with 4" lowering blocks. The bump stop bracket would hit the axle when I hit bumps or deep swales at speed so I cut them down to around 3". Now they are fine. Another thing to consider is your wheel size. Those look like stock size wheels (15" I presume). Larger wheels/tires will fill up the bay and make the bed look closer to wheel since there will not be as much space in between.
__________________
http://67-72chevytrucks.com/vboard/s...s10+frame+swap |
|
|
|
|
05-25-2018, 12:15 PM
|
#5 | |
|
Registered User
Join Date: Sep 2017
Location: Saskatoon, SK.
Posts: 19
|
Re: S10 Swap how to
Quote:
|
|
|
|
|
|
05-25-2018, 12:41 PM
|
#6 |
|
Registered User
Join Date: Nov 2013
Location: Los Angeles
Posts: 236
|
Re: S10 Swap how to
I know these are not the best angles, but they show how my truck sits with appx 3" lowering blocks, stock s10 bed bottom sitting on its stock rails with respect to the frame (I grafted the '54 bed sides to the S10 metal bed bottom).
Rear Wheels are 17" and I believe the rear tires are 255 50's. You are correct that the smaller wheel will bring the truck closer to the ground, but the delta off the ground is only half as much as the total difference in diameter. Both the lowering blocks and the spring rearching will allow you to drop the CG.
__________________
http://67-72chevytrucks.com/vboard/s...s10+frame+swap |
|
|
|
|
05-25-2018, 02:10 PM
|
#7 |
|
Senior Member
Join Date: May 2007
Location: Doodah Kansas
Posts: 7,762
|
Re: S10 Swap how to
tlorber did you use the short or tall cab mounts.
this is my 49 truck with the short mounts and 235/75/15 rears, which are 2" taller than a 255/50/17. I usd 3" front springs and 4" dearched leafs. bed done the same as you, the stock s10 floor grafted to the 49 bed. 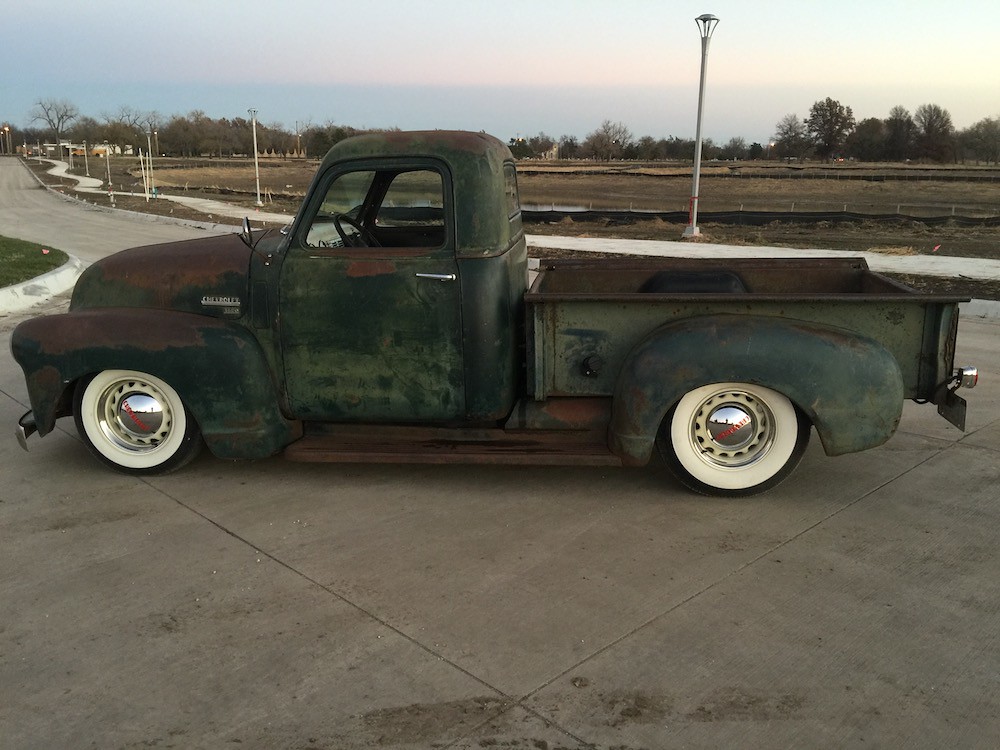 IMG_5254 by Joe Doh, on Flickr IMG_5254 by Joe Doh, on Flickr
__________________
the mass of men live lives of quiet desperation if there is a problem, I can have it. new project WAYNE http://67-72chevytrucks.com/vboard/s...d.php?t=844393 |
|
|
|
|
06-19-2018, 02:41 AM
|
#8 |
|
Registered User
Join Date: Jun 2018
Location: Santa maria california
Posts: 3
|
Re: S10 Swap how to
Skymangs
What size of the square tubing was used to make the cab mounts? |
|
|
|
|
06-19-2018, 09:06 AM
|
#9 |
|
Registered User
Join Date: Apr 2010
Location: Warrensburg, MO
Posts: 2,690
|
Re: S10 Swap how to
i don't use square tube. follow the instructions on the first page of two. they're much stronger than square tybe.
__________________
www.olesargecustoms.com email: chris@olesargecustoms.com '48 build: http://67-72chevytrucks.com/vboard/s...d.php?t=541904 '33 build: http://67-72chevytrucks.com/vboard/s...=1#post6232888 '49 build: http://67-72chevytrucks.com/vboard/s...=1#post6364475 |
|
|
|
|
06-19-2018, 11:27 AM
|
#10 |
|
Senior Member
Join Date: Sep 2017
Location: Bryan, Texas
Posts: 2,296
|
Re: S10 Swap how to
Skymangs,
With the S10 brake set up, do the old dash to firewall support rods become trash or are they still used? |
|
|
|
|
06-23-2018, 08:48 PM
|
#11 | |
|
Senior Member
Join Date: Sep 2016
Location: Hershey, PA
Posts: 1,004
|
Re: S10 Swap how to
Quote:
http://67-72chevytrucks.com/vboard/s...=726321&page=4
__________________
Current Build Thread 1930 Ford Model A Modern Twist: Ford Model A Rat Rod With a Modern Twist Build Thread Phase 1 "The Swap": 1949 3100 with S10 swap. Beginner build with ambition! Build Thread Phase 2 "The Drop": Beginner Build with Ambition gets Air Ride |
|
|
|
|
|
10-15-2018, 01:19 PM
|
#12 |
|
Registered User
Join Date: Oct 2016
Location: Hephzibah, GA
Posts: 33
|
Re: S10 Swap how to
Question for you guys. I browsed the thread for awhile and couldn't find what I was looking for.
I used SKYMANGS cab mount design and everything bolted up. I was wondering what the cab height off the frame should be both front and back. I'm not sure if it should be level or what, but if someone could provide me those measurements, I'm sure it will make putting the rest of the body together much easier. Also, let me know to what point on the cab you measure to. As we all know, pictures are worth a 1000 hours of work..... Thanks in adavnce!! |
|
|
|
|
06-19-2018, 02:32 PM
|
#13 |
|
Registered User
Join Date: Apr 2010
Location: Warrensburg, MO
Posts: 2,690
|
Re: S10 Swap how to
still used. read the early posts very carefully.
__________________
www.olesargecustoms.com email: chris@olesargecustoms.com '48 build: http://67-72chevytrucks.com/vboard/s...d.php?t=541904 '33 build: http://67-72chevytrucks.com/vboard/s...=1#post6232888 '49 build: http://67-72chevytrucks.com/vboard/s...=1#post6364475 |
|
|
|
|
06-22-2018, 04:52 PM
|
#14 |
|
Registered User
Join Date: Jun 2018
Location: Birmingham, Alabama
Posts: 1
|
Re: S10 Swap how to
[QUOTE=skymangs;6723893]I've been asked lots of questions about how I get these S10 swaps done so quickly, and how to do "x" or "y"... I want to start this thread detailing as much as I can on the nuts and bolts of S10 frame swaps, parts lists, pics, and any other frequently asked questions out there. To start this off, there are basically three options I see as easily attainable for an S10 frame swap. Keep the stock 4.3L, go small block, or go LS1. I will start off with small block parts, as these are by far the most popular conversion.
What is the part number from speedway for the headers? |
|
|
|
|
06-22-2018, 05:51 PM
|
#15 |
|
Registered User
Join Date: Apr 2010
Location: Warrensburg, MO
Posts: 2,690
|
Re: S10 Swap how to
I no longer use the conversion headers. I use early Camaro exhaust manifolds, or if you have to have headers, just get block huggers.
__________________
www.olesargecustoms.com email: chris@olesargecustoms.com '48 build: http://67-72chevytrucks.com/vboard/s...d.php?t=541904 '33 build: http://67-72chevytrucks.com/vboard/s...=1#post6232888 '49 build: http://67-72chevytrucks.com/vboard/s...=1#post6364475 |
|
|
|
|
07-10-2018, 10:35 AM
|
#16 |
|
Registered User
Join Date: Jul 2018
Location: Hartselle, AL
Posts: 5
|
Re: S10 Swap how to
So I've been going through this thread and I was wondering if you had any advice for hooking up an AC system in these trucks. Like what you need and any tips for how to do it.
I'm new to this but this whole thread was so good I just had to say thank you for it. I got a 51 with half an a frame already on it and have been trying to get everything to fit right. This was a huge help! Last edited by J_Hall; 07-10-2018 at 12:21 PM. |
|
|
|
|
07-10-2018, 09:13 PM
|
#17 |
|
Registered User
Join Date: Apr 2010
Location: Warrensburg, MO
Posts: 2,690
|
Re: S10 Swap how to
on the AC. the correct thing to do is vintage air, I use the compac and not a sure-fit. I can do it much cheaper (about $900) and customize it to the truck. not only that, that under dash plenum just looks stupid! that being said, you could go with a more budget friendly under dash unit (about $600). just remember, you get what you pay for.
you cannot re-purpose the s10 AC (it's been tried). I get all my AC parts on ebay. you want a universal 19x22 condenser (usually 80-90 bucks) and a hose kit w/drier (80-100 depending) then go to oreillys to have your hose ends crimped. I have gauges and a 20lb bottle of 134A so I do my own charging.
__________________
www.olesargecustoms.com email: chris@olesargecustoms.com '48 build: http://67-72chevytrucks.com/vboard/s...d.php?t=541904 '33 build: http://67-72chevytrucks.com/vboard/s...=1#post6232888 '49 build: http://67-72chevytrucks.com/vboard/s...=1#post6364475 |
|
|
|
|
07-11-2018, 07:59 AM
|
#18 |
|
Registered User
Join Date: Jul 2018
Location: Hartselle, AL
Posts: 5
|
Re: S10 Swap how to
Yea I don't like that under the dash system either lol. I saw a 54 in here that used a vintage air compac, how would you fit the duct work and vents ? I couldn't see any from the interior picture of that 54.
Also what do you do as far as a brace inside the front outer fenders. Usually that bolts to the radiator shroud but can you do that with the radiator in the shroud ? Last edited by J_Hall; 07-11-2018 at 01:32 PM. |
|
|
|
|
07-11-2018, 12:42 PM
|
#19 |
|
Registered User
Join Date: Jan 2010
Location: Titusville, PA
Posts: 3,585
|
Re: S10 Swap how to
100% agree, use a compac unit, not the surefit. The sure fit IMO is very unprofessional looking for the cost. Plus you can piece it all together as you go if money is an issue, and you can do it for less than buying a complete kit.
Your next issue will be compressor and bracket. dep on engine used that will change and again IMO the brackets are overpriced. but if you want to spend $125 and be done with it (for an LS bracket) then go for it, or build your own.
__________________
51' 99toLife finished 2011,355 sbc,5speed, patina, redoing whole truck, inter, bags, etc http://67-72chevytrucks.com/vboard/s...d.php?t=382481 49Hardtimes s/10 susp- bagged, vortec sbc, 5 speed, patina, sold http://67-72chevytrucks.com/vboard/s...d.php?t=594874 VIDEOS https://youtu.be/E8zHhjgS_lA https://youtu.be/E8zHhjgS_lA Geronimo 54' LS engine, static drop IFS, Client build, just about done http://67-72chevytrucks.com/vboard/s...62#post7399162 52' 3100 Slowly in progress, will be painted two toned, have 235 with a t-5, lowered OG frame Other projects, 49' farmuse 3100, killer Patina, will be slammed, LS engine, full done interior up next! www.coffeeandcustoms.com |
|
|
|
|
07-11-2018, 02:15 PM
|
#20 |
|
Registered User
Join Date: Nov 2013
Location: Los Angeles
Posts: 236
|
Re: S10 Swap how to
This it timely information for me, as I plan on putting in AC as one of the next major projects. I fully agree about the plenums. They look like they are from a mid '70's Chevy Caprice or something. They don't match the architecture of these trucks at all.
Kwik Performance makes a bracket that works with a mini compressor (I believe Sanden SD7B10) that puts the compressor in front of the passenger side head instead of to the side of it. That way you don't need to cut into the inner fender-at least not as much. I have not bought or installed it but it is probably the route I will go. Chris, do you have any pics of the plenums you have put together?
__________________
http://67-72chevytrucks.com/vboard/s...s10+frame+swap |
|
|
|
|
07-11-2018, 02:21 PM
|
#21 |
|
Registered User
Join Date: Apr 2010
Location: Warrensburg, MO
Posts: 2,690
|
Re: S10 Swap how to
J Hall: there's room for the ducting fits up there. as for vents, use vintage air round surface mount vents. mount them high on the kickpanel. so it's out of the line of sight.
as far as the core support, if you read the first few pages carefully you'll see that you can still bolt the fenders to the core support.
__________________
www.olesargecustoms.com email: chris@olesargecustoms.com '48 build: http://67-72chevytrucks.com/vboard/s...d.php?t=541904 '33 build: http://67-72chevytrucks.com/vboard/s...=1#post6232888 '49 build: http://67-72chevytrucks.com/vboard/s...=1#post6364475 |
|
|
|
|
07-11-2018, 09:10 PM
|
#22 |
|
Registered User
Join Date: Jul 2018
Location: Hartselle, AL
Posts: 5
|
Re: S10 Swap how to
Ill look into those vents. Thank you again for the responses and all this information ! Im sure Ill have more questions later on but for now I appreciate the help !
Posted via Mobile Device |
|
|
|
|
07-20-2018, 01:44 PM
|
#23 |
|
Registered User
Join Date: Jul 2018
Location: Hartselle, AL
Posts: 5
|
Re: S10 Swap how to
skymangs, I haven't had any luck with those vents. You don't happen to have a link to them or anything do you ?
|
|
|
|
|
08-12-2018, 05:28 PM
|
#24 |
|
Registered User
Join Date: Apr 2010
Location: Warrensburg, MO
Posts: 2,690
|
Re: S10 Swap how to
J Hall; This is the surface mount vent I'm talking about.https://www.ebay.com/itm/Vintage-Air...53.m1438.l2649
and you'll put it in a housing like this https://www.ebay.com/itm/VINTAGE-AIR...LH_TitleDesc=0
__________________
www.olesargecustoms.com email: chris@olesargecustoms.com '48 build: http://67-72chevytrucks.com/vboard/s...d.php?t=541904 '33 build: http://67-72chevytrucks.com/vboard/s...=1#post6232888 '49 build: http://67-72chevytrucks.com/vboard/s...=1#post6364475 |
|
|
|
|
08-14-2018, 08:10 AM
|
#25 |
|
Registered User
Join Date: Jul 2018
Location: Hartselle, AL
Posts: 5
|
Re: S10 Swap how to
Thank you skymangs! I see what you mean now
|
|
|
|
 |
| Bookmarks |
|
|


 Hybrid Mode
