
|
|
|
 08-29-2011, 04:57 PM
|
#1 |
|
Registered User
Join Date: May 2005
Location: Beaverton, OR
Posts: 3,728
|
Re: Make it handle
So I am not a NASCAR guy, but I have read and heard that NASCAR race cars run a C10 style trailing arm setup. Having never seen on before in person, I couldn't confirm nor deny this myself.
On Friday, a company in my building sponsors a NASCAR style race team and they set up in the parking lot. I went over and crawled under it to see what's what. I was a little shocked to see how similar it was to the factory truck trailing arm. 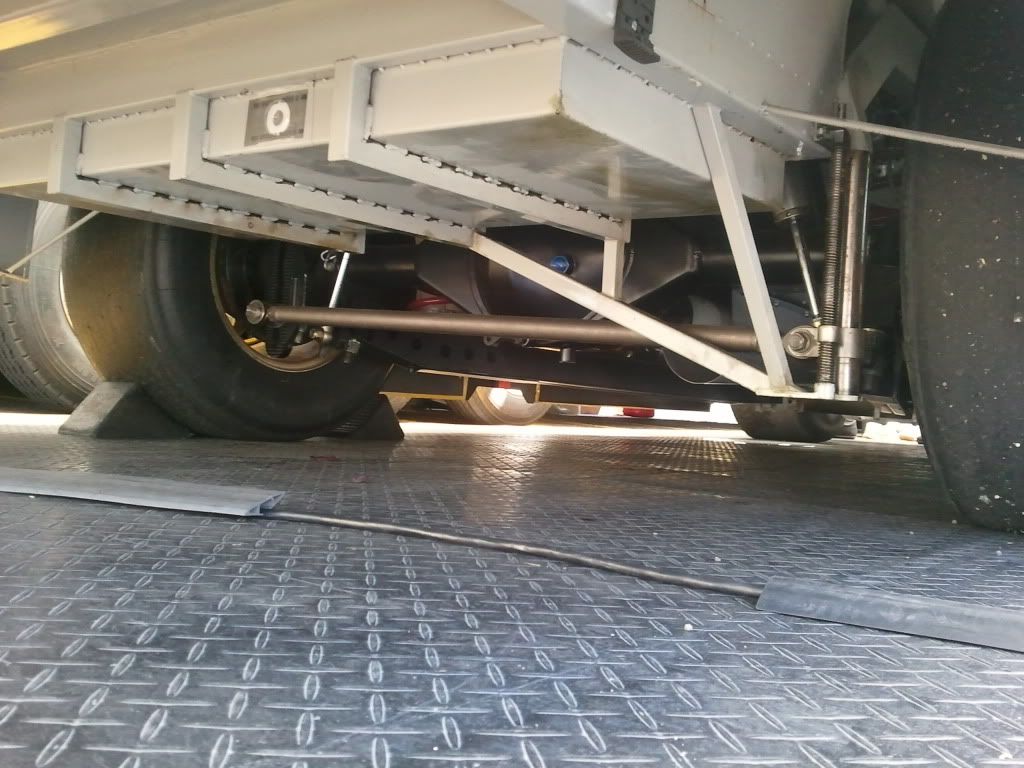 The adjustable trailing arm height and corresponding panhard bar were very cool. I'm sure this isn't new to most in this thread, but I found it interesting. 
__________________
New Project: 1966 LWB C20 Plans: 1/2 ton conversion Dropmember front Dropmember rear Corvette discs Restored raised bed http://67-72chevytrucks.com/vboard/s....php?p=4295210 |

|

|
|
09-02-2011, 01:03 PM
|
#2 |
|
Senior Member
 Join Date: Jul 2010
Location: Dandridge, Tn. USA
Posts: 2,226
|
Re: Make it handle
Thats pretty cool. I like the panhard mount. Notice it's long, low, and behind the rear axle? Hmmm, kind of like our FatBar set-up! lol, no, I don't think the Oval Boys copied us, we just know what works. Cool to see them using O E style arms.
__________________
GoodGuys 2012 Pro-Truck Champion  2012 Truckin' Throwdown Champion GoodGuys 2011 National Champion 2011 Truckin' Throwdown Champion GoodGuys 2010 National Champion Proud to put our products up against all others! |
|
|
|
|
09-11-2011, 10:49 AM
|
#3 |
|
PROJECT 7DEUCE
 Join Date: Dec 2002
Location: GRANTS PASS OR
Posts: 21,603
|
Re: Make it handle
Hey rob is there a kit out yet that has the rack and pinion and stand offs avalable yet? Or is it possible to get just the standoff by them selfs? I looked on your website and either missed them or they are not listed?
__________________
GO BIG GREEN GO DUCKSMEMBER #6377 72 k-5 daily driver 6'' lift 35'' 350-350-205 slowly getting rust free. Project "7DEUCE" check out my build http://67-72chevytrucks.com/vboard/s...d.php?t=267665 Tim Powell..R.I.P EastSideLowlife..... R.I.P.. |
|
|
|
|
09-12-2011, 03:15 PM
|
#4 |
|
Senior Member
Join Date: Jul 2010
Location: Dandridge, Tn. USA
Posts: 2,226
|
Re: Make it handle
The rack kits are ready to go, we're waiting on some cutom rubber isolators to show up. We should have them this week.
__________________
GoodGuys 2012 Pro-Truck Champion 2012 Truckin' Throwdown Champion GoodGuys 2011 National Champion 2011 Truckin' Throwdown Champion GoodGuys 2010 National Champion Proud to put our products up against all others! |
|
|
|
|
09-14-2011, 08:50 PM
|
#5 |
|
Registered User
Join Date: Nov 2010
Location: Grand Terrace, Ca.
Posts: 1,607
|
Re: Make it handle
Hey Rob, any chance the rear sway bar for 67 - 72 Chevy truck is available yet? I sure would like one like the one you have on your shop truck. I was able to see the bar on your truck...it looks to fit real well. I was able to go for a ride in your truck and the bar seems to work real well.
|
|
|
|
|
09-15-2011, 11:39 AM
|
#6 | |
|
Senior Member
Join Date: Jul 2010
Location: Dandridge, Tn. USA
Posts: 2,226
|
Re: Make it handle
Quote:
__________________
GoodGuys 2012 Pro-Truck Champion 2012 Truckin' Throwdown Champion GoodGuys 2011 National Champion 2011 Truckin' Throwdown Champion GoodGuys 2010 National Champion Proud to put our products up against all others! |
|
|
|
|
|
09-15-2011, 01:16 AM
|
#7 |
|
Registered User
Join Date: Aug 2011
Location: P.E.I Canada eh
Posts: 158
|
Re: Make it handle
I DID IT 3 DAYS 30 PAGES AND ALOT LESS HAIR!!!! what a wonderful pile of information ...now to read it all again so i can understand it... i have a 93 c1500 i was gonna lower ... but after reading this i think im going to go a completely route... new plan.. 2" drop spindles, 2" fornt drop springs ... for the rear after reading this i think converting to a trailing arm setup in the rear... would be worth while? what would you recommend for rear springs/bags maybe/coil-overs? any advise would be greatly appreciated
thanks for all the great info George |
|
|
|
|
09-15-2011, 11:49 AM
|
#8 | |
|
Senior Member
Join Date: Jul 2010
Location: Dandridge, Tn. USA
Posts: 2,226
|
Re: Make it handle
Quote:
A) flip kit, C notch, helwig bar, and bilstien shocks. simple and effective. B) Ride Tech rear 4 bar kit, C notch, your choice, bags or shocks. + no axle wrap, - no sway bar provision. C) Trailing arm swap, this will require reshaping the rear rails to get it right. Advanced fab. Honestly, it may not be worth it. D), take a look at the rear suspension on a '82 - '92 camaro. 2 link + torque arm. factory had coils, easy to bag. The rears have factory disks. Easy to fab in to that chassis, good ride and handling, use the factory camaro sway bar.
__________________
GoodGuys 2012 Pro-Truck Champion 2012 Truckin' Throwdown Champion GoodGuys 2011 National Champion 2011 Truckin' Throwdown Champion GoodGuys 2010 National Champion Proud to put our products up against all others! |
|
|
|
|
|
09-15-2011, 01:16 PM
|
#9 | |
|
Registered User
Join Date: May 2005
Location: Beaverton, OR
Posts: 3,728
|
Re: Make it handle
Quote:
__________________
New Project: 1966 LWB C20 Plans: 1/2 ton conversion Dropmember front Dropmember rear Corvette discs Restored raised bed http://67-72chevytrucks.com/vboard/s....php?p=4295210 |
|
|
|
|
|
09-15-2011, 05:17 PM
|
#10 |
|
Registered User
Join Date: Aug 2011
Location: P.E.I Canada eh
Posts: 158
|
Re: Make it handle
yeah my buddy has a 92 camaro .. they got like a 3 link long arm goes to the trans 2 short lowers out by the wheels... could i use the front leaf mounts for my lower links? then the torque arm.. that goes to the trans on the camaro.. i got a LWB truck... thats a long torque arm .. is there a length ratio i should be after... ??? then ill need somethin to center my rear axle ... have to build a panhard bar or a watts link.. advantage disadvantage of a watts link .. they look kinda complex but i get the concept keeps the rear perfectly centerd
i would keep my rear axle i think goin to a 7.5 ring grear would be goin the wrong direction... pics comin ... now you got me thinkin thanks for the info rob ur the man Last edited by gmtec93c1500; 09-15-2011 at 05:27 PM. |
|
|
|
|
09-15-2011, 06:24 PM
|
#11 |
|
Registered User
Join Date: Aug 2011
Location: P.E.I Canada eh
Posts: 158
|
Re: Make it handle
soo took some quick measurements ... took some quick pics... did some quick math.. from my trans cross-member to my rear axle housing its aprox. 84" and its aprox. 33" from axle center to front spring center thats aprox. 2.54/1 ratio on links... is there a number im aiming for here? ... second there are no mount holes on axle housing and its cast so i cant weld to it... BUT it has 3 cast points that i could bolt to and a flat rib that goes almost inline with the pinion ... thinking i could use these to fab up a mount to?? check out pic one ... also the fab of the torque arm itself.. this would fall into sprung weight right? so making it of aluminium would be better right? ... and more... i would remove the factory shocks and relocate outside the frame... thinking of going coil overs here ... and im on a budget... a little budget ..a coffee budget really ...
 ... what is my best bang the for buck... now this is still gonna be a truck that is daily driven ... i dont really haul much and theres no form of racing here of any sort (not the legal kind anyway lol) what are my options im not broke really just cheap thanks guys for all the advise im just a young guy tryin to lean the ropes and i can use all the help i can get ... ... what is my best bang the for buck... now this is still gonna be a truck that is daily driven ... i dont really haul much and theres no form of racing here of any sort (not the legal kind anyway lol) what are my options im not broke really just cheap thanks guys for all the advise im just a young guy tryin to lean the ropes and i can use all the help i can get ... George |
|
|
|
|
09-24-2011, 10:27 AM
|
#12 |
|
I'm just glad to be here!
Join Date: Jan 2008
Location: Longview, TX
Posts: 4,788
|
Re: Make it handle
FOr the pan hard bar, if the mounts are long similar to the one in the picture on post #740, would it be ideal if the bar is parrallel to the axle AND the ground at ride height?
The height of the mounts you mentioned above is from the ground, correct?
__________________
Karl  1965 Chevy Stepside(Grandpa's Old Blue) and (July 2015 Shop Build!)(2020, the Saga Continues) http://67-72chevytrucks.com/vboard/s...d.php?t=372424 The LST Challenge: http://67-72chevytrucks.com/vboard/s...=1#post7812257 Korbin's 1st Square: "Sunburn" http://67-72chevytrucks.com/vboard/s...d.php?t=418618 1985 GMC Sierra: "White Trash", Korbin's 2nd now... http://67-72chevytrucks.com/vboard/s...d.php?t=632305 Henry - 1984 Chevrolet, Owen's 1st Square |
|
|
|
|
09-24-2011, 10:43 AM
|
#13 | |
|
Registered User
Join Date: Apr 2001
Location: DALLAS,TX
Posts: 21,946
|
Re: Make it handle
Quote:
__________________
67SWB-B.B.RetroRod 64SWB-Recycle 89CCDually-Driver/Tow Truck 99CCSWB Driver All Fleetsides @rattlecankustoms in IG Building a small, high rpm engine with the perfect bore, stroke and rod ratio is very impressive. It's like a highly skilled Morrocan sword fighter with a Damascus Steel Scimitar..... Cubic inches is like Indiana Jones with a cheap pistol. |
|
|
|
|
|
09-25-2011, 02:39 PM
|
#14 | |
|
Senior Member
Join Date: Jul 2010
Location: Dandridge, Tn. USA
Posts: 2,226
|
Re: Make it handle
Quote:
__________________
GoodGuys 2012 Pro-Truck Champion 2012 Truckin' Throwdown Champion GoodGuys 2011 National Champion 2011 Truckin' Throwdown Champion GoodGuys 2010 National Champion Proud to put our products up against all others! |
|
|
|
|
|
09-15-2011, 06:25 PM
|
#15 |
|
Registered User
Join Date: Aug 2011
Location: P.E.I Canada eh
Posts: 158
|
Re: Make it handle
oups
|
|
|
|
|
09-16-2011, 11:44 AM
|
#16 |
|
Senior Member
Join Date: Jul 2010
Location: Dandridge, Tn. USA
Posts: 2,226
|
Re: Make it handle
Fabricating/mounting of a torque arm to the stock rear is really too much work/trouble. The mount locations you show in the pict aren't strong enough, and will fail. I do understant the desire to keep the 12 bolt, and not swap in the 1o bolt, but consider the application. The truck had at best 290 hp, with a big block, unloaded rear weight was 1100 lbs. the Camaro had 330 hp, and rear weight was 1280 lbs. So if your not hauling, there may not be an issue. If you want to keep the stock rear, go with option 1. The camaro torque arm swap only makes sense if your goiunt to use the new rear axle.
__________________
GoodGuys 2012 Pro-Truck Champion 2012 Truckin' Throwdown Champion GoodGuys 2011 National Champion 2011 Truckin' Throwdown Champion GoodGuys 2010 National Champion Proud to put our products up against all others! |
|
|
|
|
09-16-2011, 03:16 PM
|
#17 |
|
Senior Member
Join Date: Jul 2010
Location: Dandridge, Tn. USA
Posts: 2,226
|
Re: Make it handle
TEST QUICK QUESTION: Which frame rail design is stronger?? If you said 'B', you're right (also lighter) Gradual changes to the frame structure are stronger. So, why all the steep step notches?? You tell me. You can sell a step notch in a smaller box, maybe that's it 1. Everyone is asking how we did the rear of the J.T. Truth is, I did it so quickly, there are no pictures. But, here is How I did it Step 1 is most important. Set the chassis level all around, Front/back, Side/Side. Put jackstands under the cab mount area of the chassis and way out front (6 total). Use some square stock and clamps to support the rear of the chassis. Then check and note the height of the rear rails to the floor 2. Cut 1. - - Cut up from the bottom DO NOT CUT ALL THE WAY! Leave the top connected. The cut should be centered in the factor bend just behind the cab. I use a 1/16" cut off wheel. Jigsaw or sawzall is ok too. Make sure your cut is 90 degrees to the rail. Loosen the rear clamps and raise the rear until a 1 3/8" spacer fits in each side. Check level Side/Side, rear... and tack weld in. 3. Cut 2 - - Center the cut in the middle of the factory bend. This will be in front of the spring mount. Measure to make sure the cuts in both sides are in the same place. Loosen the rear clamps and lower the rear rails until the rear sections are level. The gap should be 1 3/8" . Tack in spacers. Double check all level areas See below....
__________________
GoodGuys 2012 Pro-Truck Champion 2012 Truckin' Throwdown Champion GoodGuys 2011 National Champion 2011 Truckin' Throwdown Champion GoodGuys 2010 National Champion Proud to put our products up against all others! |
|
|
|
|
09-16-2011, 03:22 PM
|
#18 |
|
Senior Member
Join Date: Aug 2002
Location: Plymouth, MA
Posts: 891
|
Re: Make it handle
Rob, you read my mind. I am thinking of redoing the rear of my frame and wondered exactly what you pointed out. Gradual vs steep steps. Thanx!
Posted via Mobile Device
__________________
1972 Blazer body...need to get a thread started for the rest of the story |
|
|
|
|
09-16-2011, 03:28 PM
|
#19 |
|
Senior Member
Join Date: Jul 2010
Location: Dandridge, Tn. USA
Posts: 2,226
|
Re: Make it handle
4. Cut 3 - -, AGAIN, In the Center of the factory bend down, Cuts 3 & 4 will be opened up more to get the rails back down to the original height. Make Cut # 3, loosen the clamps, and drop the rear until a 1 5/8" spacer fits in. Check your level Side/Side in the rear and tack in.
Cut 4 - -Make these two cuts, and lift the rear rails until level. Check the height to the floor. If the height is back to O.E., fit in the 1 5/8" spacers and tack in. If not, Adjust the # 3, # 4 spacers. Shorter spacers lift the rear, longer spacers lower it. The rear section should be level and at the stock height when done. Take your time....... this effects the bed, fit later. Fab fishplates (fit inside) First, I use 1/2" holes to plug weld. Then, fab and fit in side inserts. When everything is tacked, check all levels again, then weld up
__________________
GoodGuys 2012 Pro-Truck Champion 2012 Truckin' Throwdown Champion GoodGuys 2011 National Champion 2011 Truckin' Throwdown Champion GoodGuys 2010 National Champion Proud to put our products up against all others! |
|
|
|
|
09-30-2011, 08:27 PM
|
#20 | |
|
Senior Member
Join Date: Feb 2010
Location: bennington, vt
Posts: 1,609
|
Re: Make it handle
hey rob,
heres another way. i did this this spring. been sidetracked on to many other projects. just checked in for some motovation. thanks, looks great. Quote:
__________________
my build threads, 68 pro touring, auto cross c10 (mid life crisis) http://67-72chevytrucks.com/vboard/s...d.php?t=464109 website http://www.sauersgarage.com/ |
|
|
|
|
|
10-01-2011, 12:55 PM
|
#21 |
|
Registered User
Join Date: Apr 2008
Location: San Diego California
Posts: 1,316
|
Re: Make it handle
That is a very creative way to notch the frame, I like the frame jig. Being a welding instructor, I am always encouraging my students to have complete joint penetration by beveling the joints. I am a firm believer that if your welds are sound you do not need a fish plate and you can still get a good nights sleep. Although fish plates are a good idea to make it bullet proof if your not confident in your welds, but I think the frame looks so much better with out them. The 70S wire in the MIG set up is stronger than the parent metal of the frame rail, I have done many destructive bend test with both MIG and TIG single pass weld joints and the weld performs nicely with out breaking at 25 ton. Conversely I have also done many tests on students welds they claimed they knew what they were doing and then watch it break along the joint line under 3 ton of pressure.
__________________
I'd rather attempt something great and fail.. than try something ordinary and succeed. Norman Vincent Peale Project: Barn Raising http://67-72chevytrucks.com/vboard/s...d.php?t=414961 Project: 30 Be Low https://67-72chevytrucks.com/vboard/...d.php?t=830583 |
|
|
|
|
10-04-2011, 09:43 PM
|
#22 |
|
Registered User
Join Date: Nov 2010
Location: Grand Terrace, Ca.
Posts: 1,607
|
Re: Make it handle
Hey Rob, any chance the rear sway bar for 67 - 72 Chevy truck is available yet? I sure would like one like the one you have on your shop truck.
|
|
|
|
|
09-16-2011, 04:52 PM
|
#23 |
|
Senior Member
Join Date: Jul 2010
Location: Dandridge, Tn. USA
Posts: 2,226
|
Re: Make it handle
This can be done in about 8 hrs. It's actually easier if the cab/ft/eng.. is in place. The weight of these items helps to stabilize the chassis. If it's a bare chassis, tie it down (if your lucky enough to have chain hooks sunk in the floor) or wieght it down in the center. A pallet loaded with parts works well.
What do you really get? 4" of drop, with no loss of travel or axle clearance. Now, you can add a 2" block, for a 6" drop, and then a 2" spring for a net 8" drop. And, at 8", the suspesion will feel like it has a 2" spring! What else do you have to do? The panhard rod will need some attention, - but there are plenty of good adjustable ones around. The front trailing arm mounts should be raised. Nock the rivits out, flip the brackets, bolt and weld back on. You need to raise the bed floor 4". Don't chop the center out, unbolt the entire floor and re-fit it back in 4" up.
__________________
GoodGuys 2012 Pro-Truck Champion 2012 Truckin' Throwdown Champion GoodGuys 2011 National Champion 2011 Truckin' Throwdown Champion GoodGuys 2010 National Champion Proud to put our products up against all others! |
|
|
|
|
09-17-2011, 10:18 PM
|
#24 |
|
I'm just glad to be here!
Join Date: Jan 2008
Location: Longview, TX
Posts: 4,788
|
Re: Make it handle
Thanks Rob for posting that. I thought about it for a while and I have a question or two. Since it is a trailing arm set up, the wheel base do not change since the work is behind the crossmember. But, with the cuts and movement of the rails, didn't the OE spring mount move forward some? Also, didn't the overall length of the frame get shorter?
Posted via Mobile Device
__________________
Karl 1965 Chevy Stepside(Grandpa's Old Blue) and (July 2015 Shop Build!)(2020, the Saga Continues) http://67-72chevytrucks.com/vboard/s...d.php?t=372424 The LST Challenge: http://67-72chevytrucks.com/vboard/s...=1#post7812257 Korbin's 1st Square: "Sunburn" http://67-72chevytrucks.com/vboard/s...d.php?t=418618 1985 GMC Sierra: "White Trash", Korbin's 2nd now... http://67-72chevytrucks.com/vboard/s...d.php?t=632305 Henry - 1984 Chevrolet, Owen's 1st Square |
|
|
|
|
09-18-2011, 01:01 PM
|
#25 |
|
Senior Member
Join Date: Jul 2010
Location: Dandridge, Tn. USA
Posts: 2,226
|
Re: Make it handle
good point. Yes, the frame did get a little shorter, about 1/2". Most of that was from the step down after the axle, it is a steeper step. the sping mount on the chassis moved forward 1/8" - 3/16", not anything to worry about. The front bed mount stays the same, grind the hole back for the rear mount. Once the bed floor was raised, we fabbed in the four center mounts.
__________________
GoodGuys 2012 Pro-Truck Champion 2012 Truckin' Throwdown Champion GoodGuys 2011 National Champion 2011 Truckin' Throwdown Champion GoodGuys 2010 National Champion Proud to put our products up against all others! |
|
|
|
 |
| Bookmarks |
|
|


 Hybrid Mode
