
|
|
|
 05-19-2018, 08:40 AM
|
#1 |
|
Senior Member
 Join Date: Sep 2017
Location: Bryan, Texas
Posts: 2,292
|
Re: Wife's 48
I did not get the paint off of the back side. I forgot! Next time.
I'm getting the nibbler today and will see how it works on some really ugly firewall "cut out holes". Someone really hacked up where the steering column goes through. Mongo, you are right. I looked at the firewall last night and just shook my head. There are SOOO many holes. |

|

|
|
05-20-2018, 12:44 AM
|
#2 |
|
Registered User
Join Date: May 2014
Location: ID
Posts: 663
|
Re: Wife's 48
Excellent. You got this...
|
|
|
|
|
05-20-2018, 03:42 PM
|
#3 |
|
Senior Member
Join Date: Sep 2017
Location: Bryan, Texas
Posts: 2,292
|
Re: Wife's 48
I started "tuning" the mig yesterday. Slower wire speed more heat. I'm running it pretty hot, D on my settings on my little Lincoln, and the wire speed I kept slowing down because I was getting a lot of build up on the top of the weld. I'm not at about 3.5.
I know more heat can blow holes if not controlled. I just don't know if I'm doing this part right. I started cleaning up grinding dust today, and One and One-half hours later I got most of the dust up. Wow this makes a lot of dust. I went with the easy weld wire because it is supposed to leave a smaller "crown" on top of the weld. It is also supposed to be easier and quicker to grind. I can vouch that it is easier and faster to grind down, but I guess I'm not "tuned" in on the welder enough to leave those little "spots" on top of a good weld. |
|
|
|
|
05-21-2018, 03:41 AM
|
#4 |
|
Registered User
Join Date: Jul 2014
Location: Clear and Still Idaho
Posts: 509
|
Re: Wife's 48
Experiment with varying your travel speed, faster/slower to see if traveling to slow is the cause of the build up. Just a thought.
strong work! nc
__________________
Been there, wrecked that 
|
|
|
|
|
05-22-2018, 06:00 PM
|
#5 |
|
Registered User
Join Date: Oct 2014
Location: Kitchener, Ontario, Canada
Posts: 3,254
|
Re: Wife's 48
Good job your going in the right direction with your welding.
__________________
http://67-72chevytrucks.com/vboard/s...d.php?t=648459 https://67-72chevytrucks.com/vboard/...d.php?t=769441 1951 MG TD 1967 Jeep CJ5 1.9L TDI 33X13.5X15 Mud Grapplers. 1952 GMC 9700 p/u 7.3L diesel on air, dually |
|
|
|
|
06-17-2018, 05:07 PM
|
#6 |
|
Senior Member
Join Date: Sep 2017
Location: Bryan, Texas
Posts: 2,292
|
Re: Wife's 48
I had a great Father's Day weekend. I got about 10 hours of shop time and spent it on the firewall of the 48.
This is what the firewall looked like when I started, at least the driver's side.  IMG_1790 by Robert Moorman, on Flickr IMG_1790 by Robert Moorman, on FlickrNow I do have a question since I bought 2 trucks and both were completely dissembled. There are four indented holes on the top of the firewall. They are spaced to look like they go to an interior brace, actually two braces. Will I need them when I go back together? Then I started filling holes. 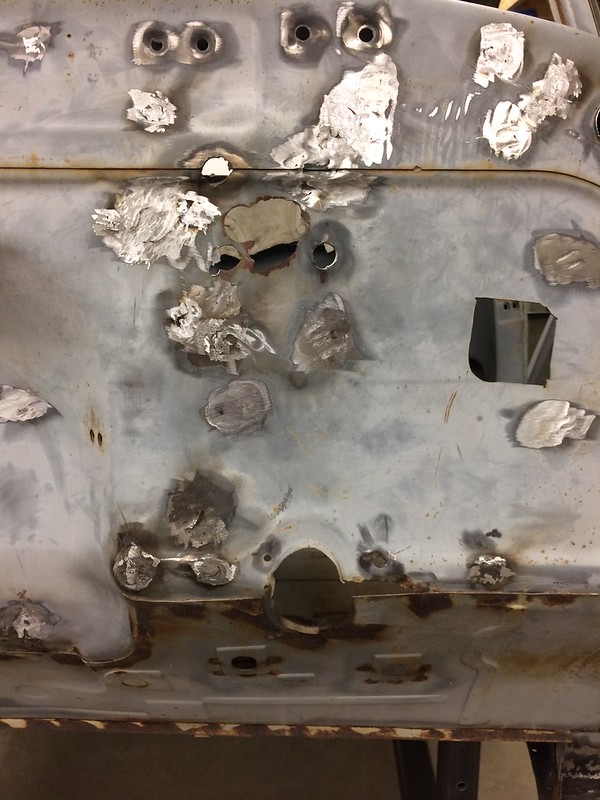 IMG_1938 by Robert Moorman, on Flickr IMG_1938 by Robert Moorman, on FlickrYou can see I left the four holes until I hear to fill them or not. Now time for some of the larger holes. 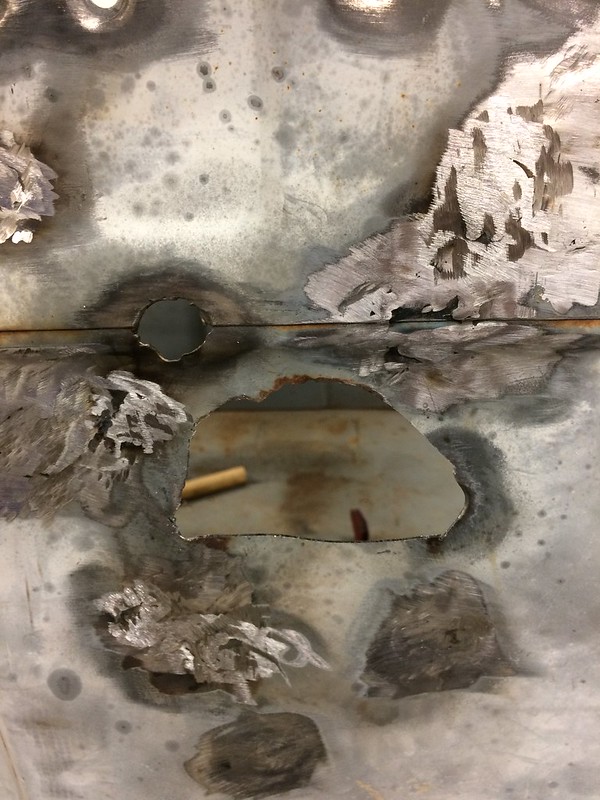 IMG_1940 by Robert Moorman, on Flickr IMG_1940 by Robert Moorman, on FlickrAnd finally  IMG_1942 by Robert Moorman, on Flickr IMG_1942 by Robert Moorman, on FlickrAnother question here. I plan to use an aftermarket steering column, so do I fill the old hole and cut a new one? End of day on the rider's side. 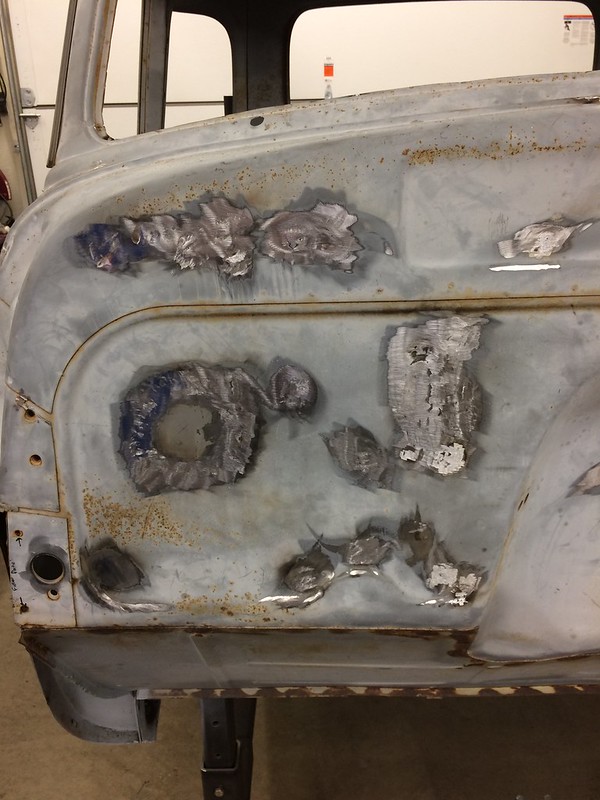 IMG_1941 by Robert Moorman, on Flickr IMG_1941 by Robert Moorman, on FlickrOne more question here, I think I saw where some have used that hole inside where the fender will mount for an AC line or something, or should I fill it too? I was thinking fill it and then put the AC/heater lines where the fit the best. NO, I am not finished touching up the finished product. I have to check for pinholes and then finish up the grinding, you can see some shadows where I have not gotten all the weld smoothed out. I'm still doing some "gorilla" welds, getting better, but not good yet. The last welds of the day were a lot better, but I just ran out of time. |
|
|
|
|
07-07-2018, 02:31 PM
|
#7 |
|
Post Whore
 Join Date: May 2015
Location: Alabama
Posts: 14,608
|
Re: Wife's 48
wish we had a place around here like that to scrounge for parts.....nice collection
some heavy metal and a big hammer will get those close.....ive got a piece of 6x6 angle that's 1/2" thick that works good when clamped to my welding table
__________________
Mongo...aka Greg RIP Dad RIP Jesse 1981 C30 LQ9 NV4500..http://67-72chevytrucks.com/vboard/s...d.php?t=753598 Mongos AD- LS3 TR6060...http://67-72chevytrucks.com/vboard/s...34#post8522334 Columbus..the 1957 IH 4x4...http://67-72chevytrucks.com/vboard/s...63#post8082563 2023 Chevy Z71..daily driver |
|
|
|
|
07-09-2018, 12:30 AM
|
#8 |
|
Senior Member
 Join Date: May 2007
Location: Doodah Kansas
Posts: 7,761
|
Re: Wife's 48
look at all those future projects hahaha
looks like a nice score of stuff
__________________
the mass of men live lives of quiet desperation if there is a problem, I can have it. new project WAYNE http://67-72chevytrucks.com/vboard/s...d.php?t=844393 |
|
|
|
|
07-09-2018, 09:13 AM
|
#9 |
|
Registered User
Join Date: Oct 2014
Location: Kitchener, Ontario, Canada
Posts: 3,254
|
Re: Wife's 48
Nice parts. I could spend all day in that place.
__________________
http://67-72chevytrucks.com/vboard/s...d.php?t=648459 https://67-72chevytrucks.com/vboard/...d.php?t=769441 1951 MG TD 1967 Jeep CJ5 1.9L TDI 33X13.5X15 Mud Grapplers. 1952 GMC 9700 p/u 7.3L diesel on air, dually |
|
|
|
|
07-15-2018, 05:44 PM
|
#10 |
|
Senior Member
Join Date: Sep 2017
Location: Bryan, Texas
Posts: 2,292
|
Re: Wife's 48
Well, beauty is in the eye of the beer holder! I started on the "new" parts this weekend.
The last thing I did this weekend was look at the best looking fender of the bunch, and it turned out to have rust issues. 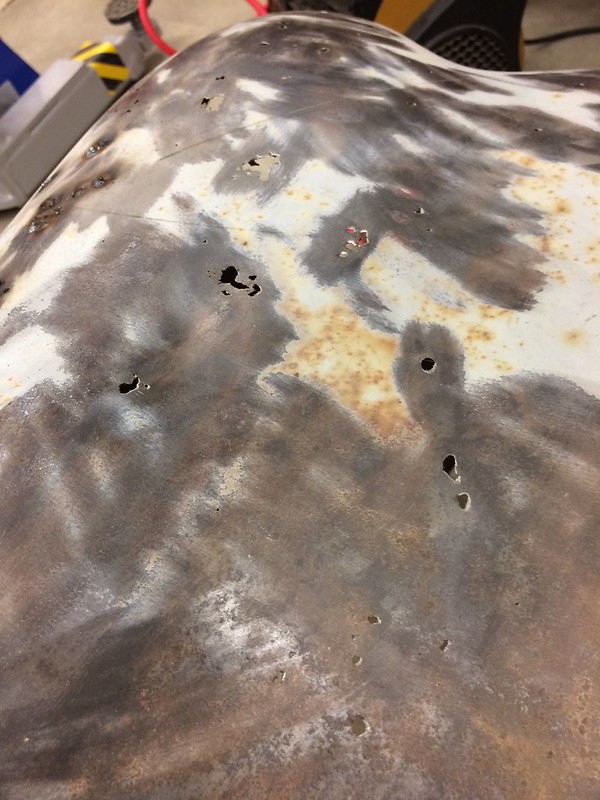 IMG_1979 by Robert Moorman, on Flickr IMG_1979 by Robert Moorman, on FlickrWhen I started looking it over closely, there was some rust on the underside, but the paint was still in tact on top. So I started messing around and found all of those little holes! It looks like someone stored it upside down and it held water. I started welding them up from the top side first. Some of them are so small that you can't stick a pin in them. I stopped at this point and will work on the welds and grinding again. The best of the rear fenders turned out to have at least a quarter inch of bondo on it. 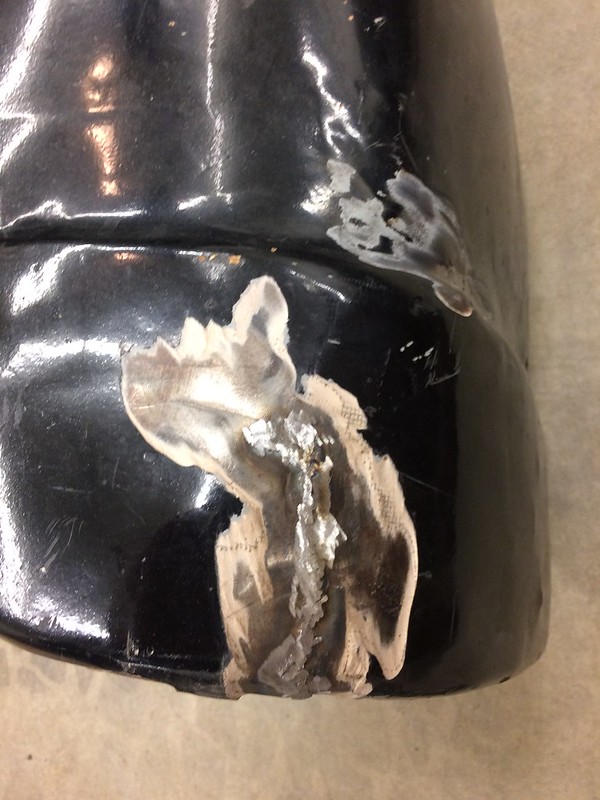 IMG_1976 by Robert Moorman, on Flickr IMG_1976 by Robert Moorman, on FlickrThe PO didn't weld up the crack/rip, just covered it with a think layer of bondo to "hold it in place", I guess. So I cleaned it up and welded the crack. When I get it blasted I'll start on the hammer and dolly on it. One of the front fenders had been hit, and the PO welded the spot up, but didn't bring it out smooth first. I worked it with a hammer and dolly a bunch before working on that gorilla weld. This is the PO's weld after I've worked on it a bit. 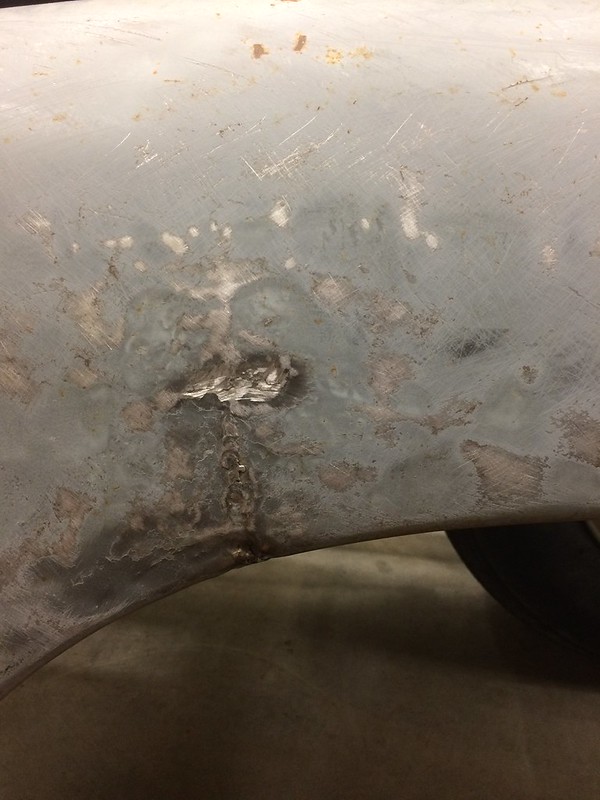 IMG_1977 by Robert Moorman, on Flickr IMG_1977 by Robert Moorman, on FlickrThere is another spot on this fender where it looks like it was hit with a small round object and it made a nice hole. The PO welded it up, but I can not figure out how to bring it out from that roll. It's the round hole on the left. 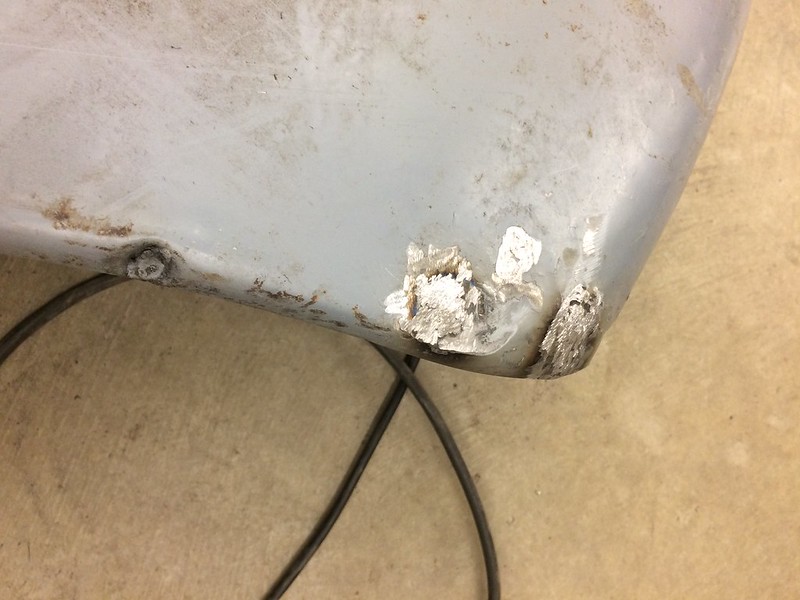 IMG_1978 by Robert Moorman, on Flickr IMG_1978 by Robert Moorman, on Flickr
|
|
|
|
|
07-16-2018, 11:47 PM
|
#11 |
|
Senior Member
Join Date: May 2007
Location: Doodah Kansas
Posts: 7,761
|
Re: Wife's 48
keep working at it!
__________________
the mass of men live lives of quiet desperation if there is a problem, I can have it. new project WAYNE http://67-72chevytrucks.com/vboard/s...d.php?t=844393 |
|
|
|
|
07-21-2018, 03:44 PM
|
#12 |
|
Registered User
Join Date: Mar 2015
Location: Castle Rock, CO
Posts: 534
|
Re: Wife's 48
Regarding those 4 indented holes in the firewall
(Now I do have a question since I bought 2 trucks and both were completely dissembled. There are four indented holes on the top of the firewall. They are spaced to look like they go to an interior brace, actually two braces. Will I need them when I go back together?) Those are for the dash brace/pedal support. I bought elevator bolts with a large flat head (got mine at Lowes) and ground the heads down until they fit down in the indent and bolted the bracket in to properly locate the bolts. Then I welded them from the firewall side and filled in the indents with a little Bondo.
__________________
Scott ______________ my '51 build: http://67-72chevytrucks.com/vboard/s...d.php?t=677979 |
|
|
|
|
07-21-2018, 04:03 PM
|
#13 | |
|
Senior Member
Join Date: May 2007
Location: Doodah Kansas
Posts: 7,761
|
Re: Wife's 48
Quote:
the two larger ones are for the dash support, the two further to the center and slightly smaller are for the cowl vent mechanism.
__________________
the mass of men live lives of quiet desperation if there is a problem, I can have it. new project WAYNE http://67-72chevytrucks.com/vboard/s...d.php?t=844393 |
|
|
|
|
|
07-24-2018, 06:52 PM
|
#14 |
|
Registered User
Join Date: Oct 2014
Location: Kitchener, Ontario, Canada
Posts: 3,254
|
Re: Wife's 48
I guess it's to be expected to some degree when working on a 70 year old truck
__________________
http://67-72chevytrucks.com/vboard/s...d.php?t=648459 https://67-72chevytrucks.com/vboard/...d.php?t=769441 1951 MG TD 1967 Jeep CJ5 1.9L TDI 33X13.5X15 Mud Grapplers. 1952 GMC 9700 p/u 7.3L diesel on air, dually |
|
|
|
|
08-11-2018, 07:12 PM
|
#15 |
|
Senior Member
Join Date: Sep 2017
Location: Bryan, Texas
Posts: 2,292
|
Re: Wife's 48
I've been working on welding up holes. I got the bottom of the doors done, no pics of that, I got the fenders welded up and beat out enough to prime and see what I have. So I've been trying to finish the cab on the 48.
I had to remove the dash, it was hacked all to heck by a po, so here it is without a dash. 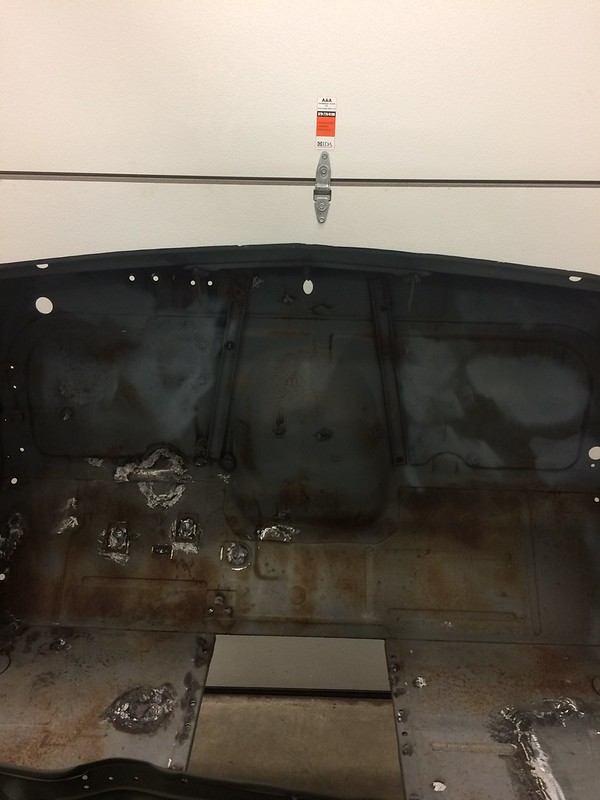 IMG_2007 by Robert Moorman, on Flickr IMG_2007 by Robert Moorman, on FlickrThis is the last time you'll see this truck without a dash. Now I have a dash that was removed including the A pillars that I took apart some time ago. I welded up the steering column indent and it was time for blasting. You will notice in the picture you can see the steering column indent, that is because it is a different steel and blasted differently. It is really smooth as is the choke hole. My buddy who is buying the truck from me didn't want to spend the extra $60/hour for soda, so he went with a sand. I have to say that prior to "sand" blasting the dash fit perfectly. After sand blasting it looked like this, here it is all primed on the inside with self etch epoxy and the little lip has weld through self etch on it, and I thought it was ready to go in. 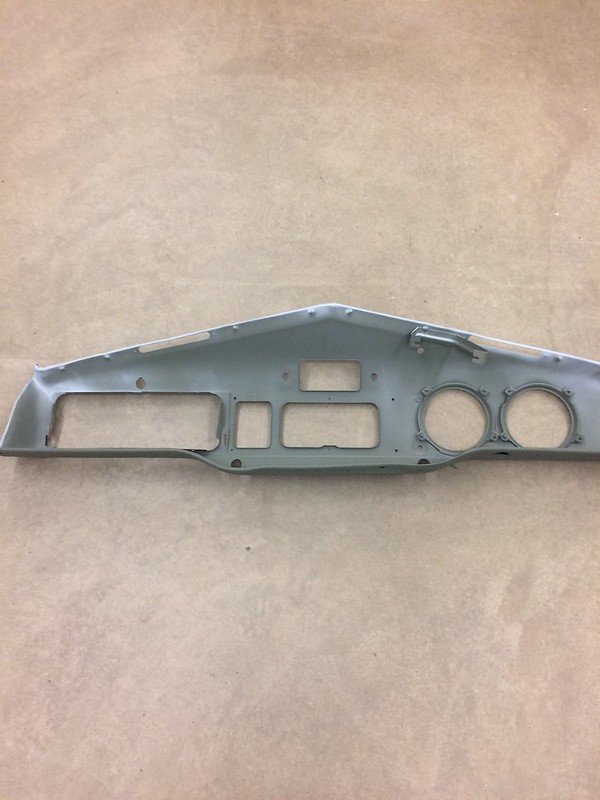 IMG_2008 by Robert Moorman, on Flickr IMG_2008 by Robert Moorman, on FlickrHere it is bolted in with the 4 bolts. 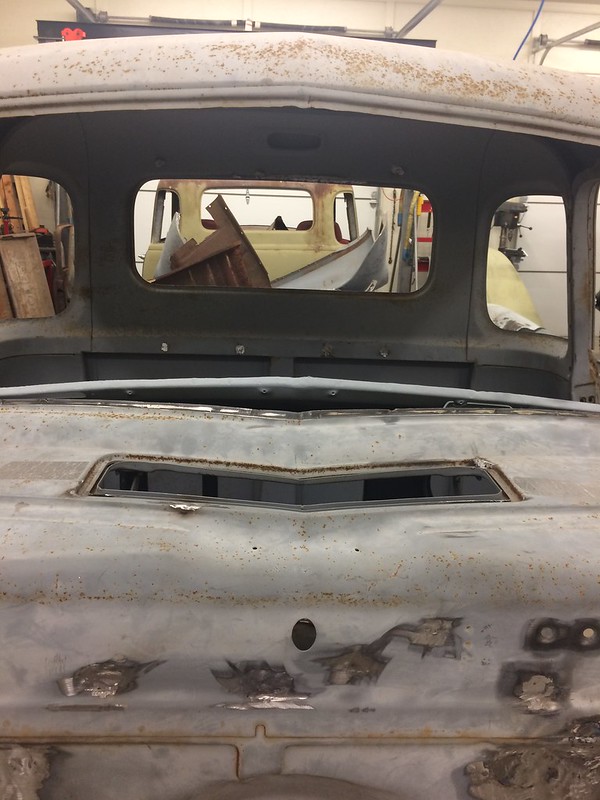 IMG_2009 by Robert Moorman, on Flickr IMG_2009 by Robert Moorman, on FlickrYes, that is it now sticking up above the front cowl. However, with a little messaging it went back into shape and fit pretty nicely. 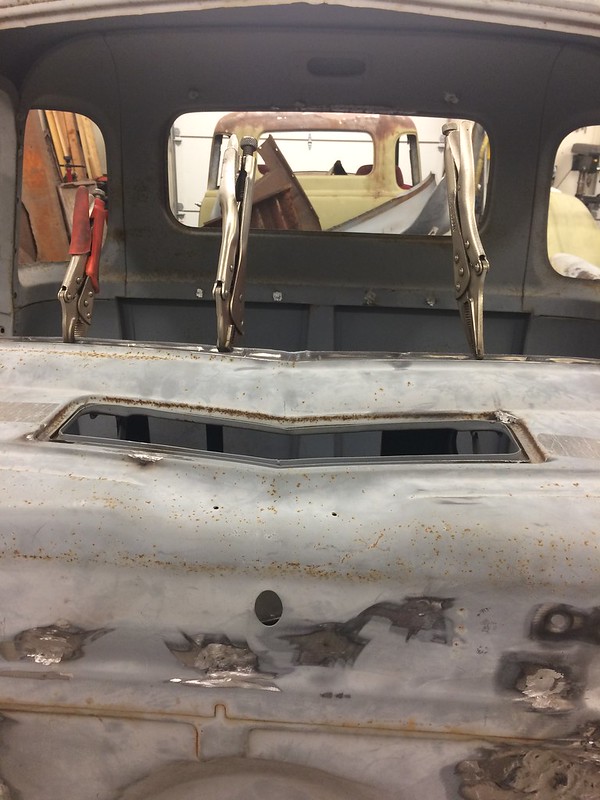 IMG_2010 by Robert Moorman, on Flickr IMG_2010 by Robert Moorman, on FlickrAnd from the inside, 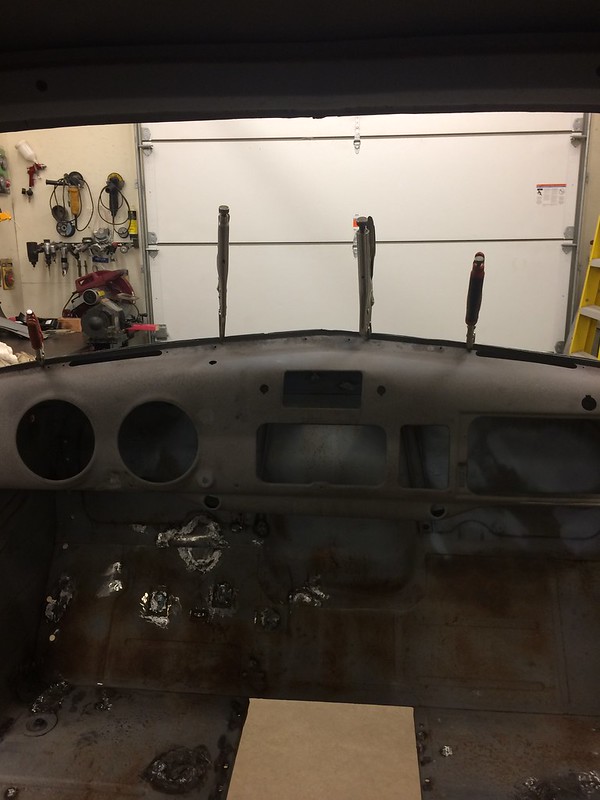 IMG_2011 by Robert Moorman, on Flickr IMG_2011 by Robert Moorman, on FlickrI have not primed this side as I am going to take the entire cab to be SODA blasted and epoxy primed. I am not going to let him take a chance on another "sand" blaster. All welded in and looking good, 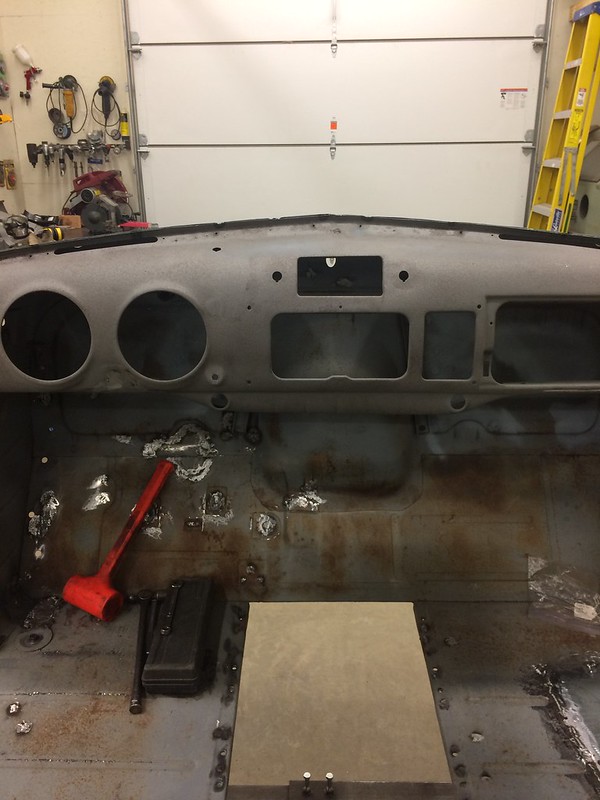 IMG_2012 by Robert Moorman, on Flickr IMG_2012 by Robert Moorman, on FlickrYou can see the steering column indent here, it is smooth, and yes, that is the persuader I used to get it to fit so I could weld it. It looks good now. At the A pillar we'll have to do a little putty, but not much. Now to get the frame cleaned up and cab stands started for this one so I can start on the cab of the 54 for the wife. Last edited by 8man; 05-04-2019 at 05:15 PM. |
|
|
|
|
08-16-2018, 10:39 PM
|
#16 |
|
Senior Member
Join Date: May 2007
Location: Doodah Kansas
Posts: 7,761
|
Re: Wife's 48
well I was just picking on you because of the thread title, but good that you are spreading it around!
__________________
the mass of men live lives of quiet desperation if there is a problem, I can have it. new project WAYNE http://67-72chevytrucks.com/vboard/s...d.php?t=844393 |
|
|
|
|
09-01-2018, 01:58 PM
|
#17 |
|
Senior Member
Join Date: May 2007
Location: Doodah Kansas
Posts: 7,761
|
Re: Wife's 48
haha tell him we ALL blow holes in sheetmetal. if there was a way to use that cold solder UV light stuff instead of welding I would buy stock in it.
__________________
the mass of men live lives of quiet desperation if there is a problem, I can have it. new project WAYNE http://67-72chevytrucks.com/vboard/s...d.php?t=844393 |
|
|
|
|
09-01-2018, 09:11 PM
|
#18 |
|
Senior Member
Join Date: Sep 2017
Location: Bryan, Texas
Posts: 2,292
|
Re: Wife's 48
Well we got to spend about 12 hours in the shop over the last two days. We got the cab mounts built, the next picture should look familiar.
 IMG_2014 by Robert Moorman, on Flickr IMG_2014 by Robert Moorman, on FlickrThanks for the diagram. So we got them built. My welding could use some improvement, but I got good penetration and I'm sure they won't come apart.  IMG_2015 by Robert Moorman, on Flickr IMG_2015 by Robert Moorman, on FlickrThen we started taking the cab off of the Camaro/54 frame. I'm going to put it on the body dolly so I can work on it. We built a wooden dolly for the 48 cab until it gets its test fit on the S10 frame. If you look on the right side of the picture you can see the back of the 48 and my body dolly under it. That is the one I can I used to do the repair panels. 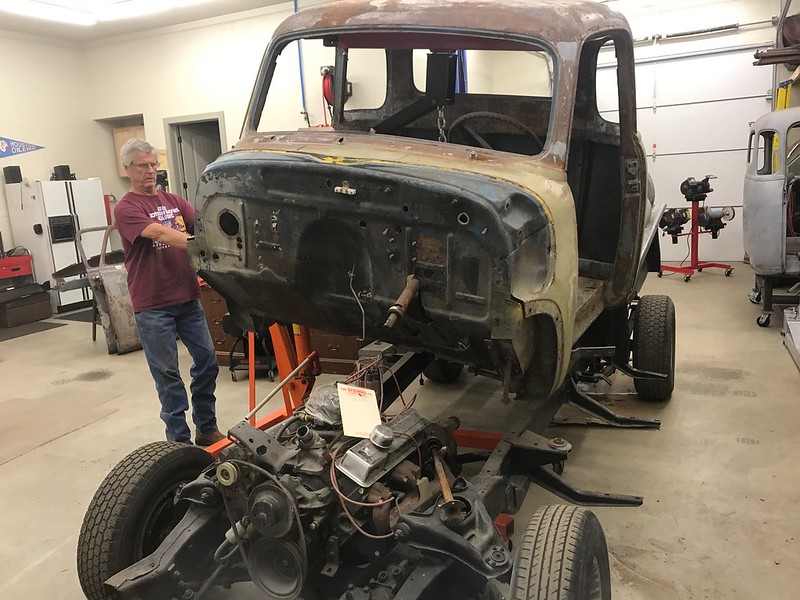 IMG_4750 by Robert Moorman, on Flickr IMG_4750 by Robert Moorman, on FlickrIf you look at the lower drivers side door hinge you will see that it is still in the cab. It is held in by something, I'm thinking it may be the hinge pin as I've read about that. The upper hinge had a hinge pin that was about 1/8" out when pulled. This lower just won't come out. Does anyone have an idea on how to get it out? Also, the wooden dolly for the 48 is in the lower left corner. 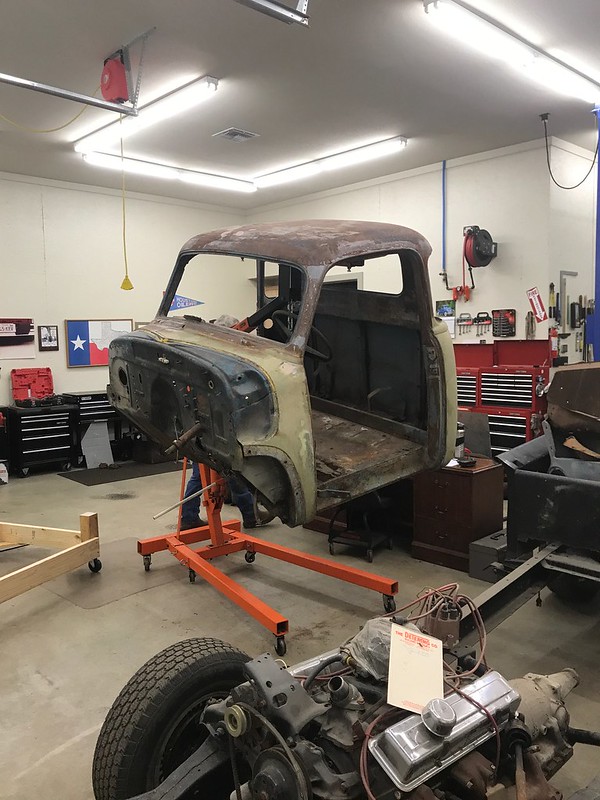 IMG_4754 by Robert Moorman, on Flickr IMG_4754 by Robert Moorman, on FlickrThis is the Camaro/54 frame with the 283 and T350 that is going into the 48. When we get the cab test fit, this is next to be fit on the S10. 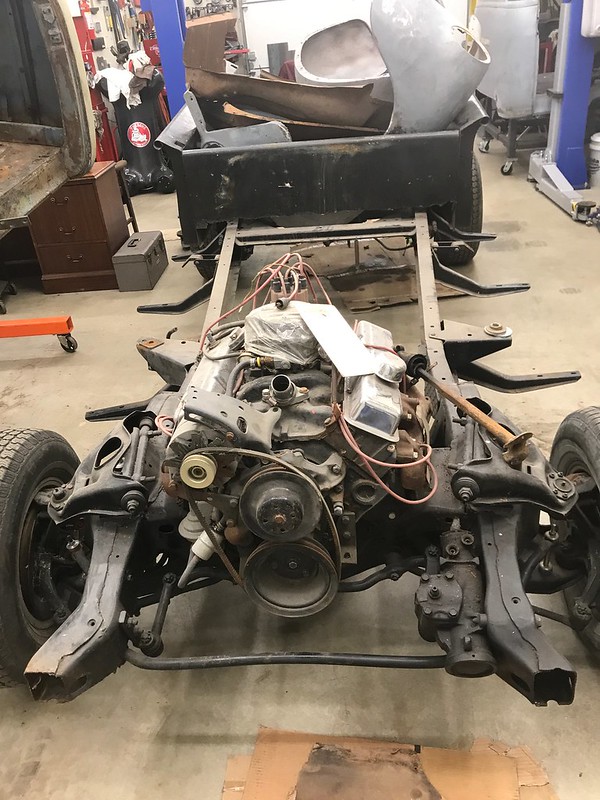 IMG_4755 by Robert Moorman, on Flickr IMG_4755 by Robert Moorman, on FlickrAnd the gratuitous shot of the 48 finally ready to be test fit - and off of my body dolly so I can start on the 54.  IMG_4756 by Robert Moorman, on Flickr IMG_4756 by Robert Moorman, on FlickrAnd here the 48 sits on the dolly so we can roll it around in the shop. The shop is FULL right now. I should post a picture. Never enough room. 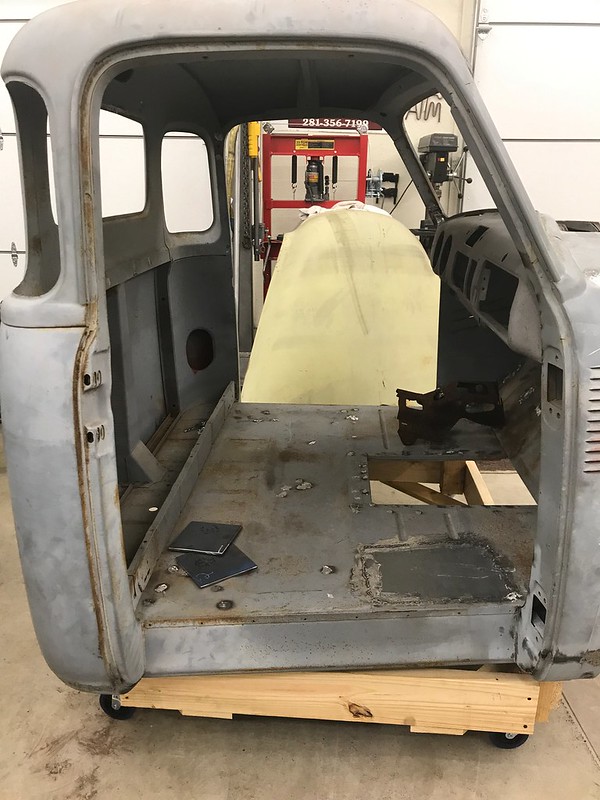 IMG_4760 by Robert Moorman, on Flickr IMG_4760 by Robert Moorman, on FlickrI hope with the long weekend we will get the 48 test fit and the frame and all of Richards parts to his house so he can start stripping and priming stuff. It's been a good Labor Day weekend so far. Last edited by 8man; 05-04-2019 at 05:17 PM. |
|
|
|
|
09-01-2018, 10:01 PM
|
#19 | |
|
Registered User
Join Date: May 2014
Location: ID
Posts: 663
|
Re: Wife's 48
Quote:
Your work is looking good. Must be nice to have the lift! 
__________________
My museum of good intentions: 1957 3100 BBW restomod -- 1970 442 W30 |
|
|
|
|
|
09-02-2018, 01:14 PM
|
#20 |
|
Senior Member
Join Date: Sep 2017
Location: Bryan, Texas
Posts: 2,292
|
Re: Wife's 48
Today is a new day, but the offending hinge was still stuck.
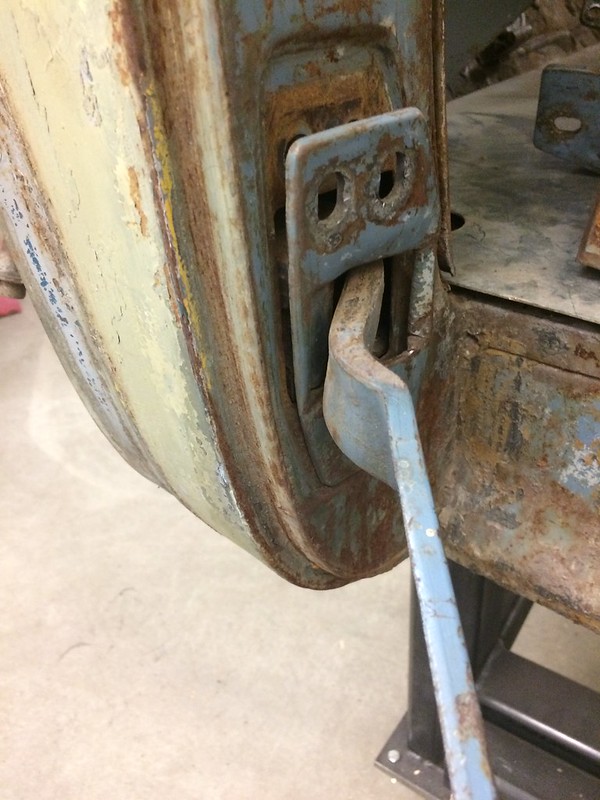 IMG_2016 (1) by Robert Moorman, on Flickr IMG_2016 (1) by Robert Moorman, on FlickrI fought with it for half an hour before I finally resigned myself to cutting it out. First I had to make some room to get a saw in to cut the pin. So I used the cut off wheel to take the top of the hinge off. 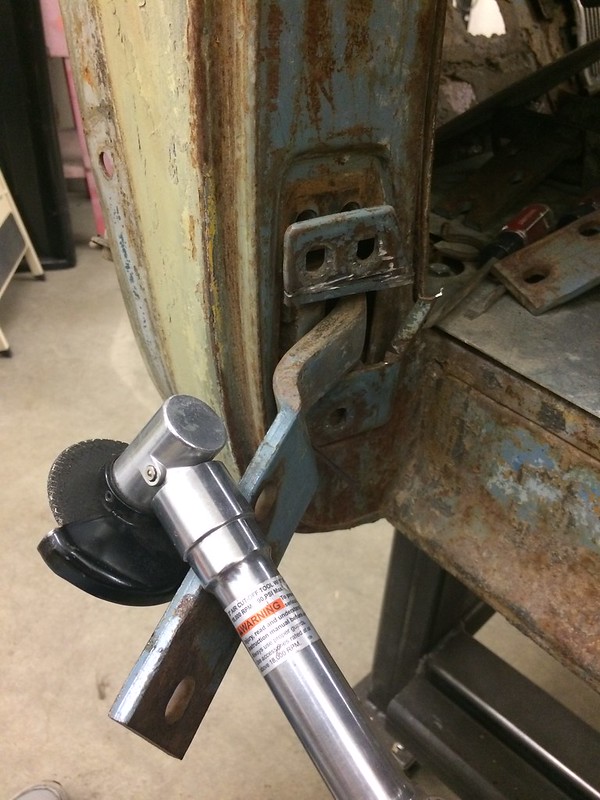 IMG_2017 (1) by Robert Moorman, on Flickr IMG_2017 (1) by Robert Moorman, on FlickrThen I started with the Sawzall. It had one long steel cutting blade, but it was old and dull. So back up plan was a hack saw blade, by hand.  IMG_2018 (1) by Robert Moorman, on Flickr IMG_2018 (1) by Robert Moorman, on FlickrSo after half an hour of cutting with one hand, the pin was cut enough that I could break it with some long needle nose pliers and get the top of the pin and the hinge out.  IMG_2019 (1) by Robert Moorman, on Flickr IMG_2019 (1) by Robert Moorman, on FlickrThe pin had backed out of the top hinge about 3/8", it backed out of the bottom hinge over 1". NOW, if I could find some willing sole to sell me two rebuildable drivers door hinges, cheap enough that I could rebuild them. Just the bottom would work if anybody has one. |
|
|
|
|
09-01-2018, 09:55 PM
|
#21 |
|
Senior Member
Join Date: May 2007
Location: Doodah Kansas
Posts: 7,761
|
Re: Wife's 48
woop woop!
__________________
the mass of men live lives of quiet desperation if there is a problem, I can have it. new project WAYNE http://67-72chevytrucks.com/vboard/s...d.php?t=844393 |
|
|
|
|
09-03-2018, 09:40 PM
|
#22 |
|
Senior Member
Join Date: May 2007
Location: Doodah Kansas
Posts: 7,761
|
Re: Wife's 48
oof that sucks, needing to cut the pin on a perfectly good hinge. why not weld the pin back together and reuse it? sure its a lot of planning to get it straight, and a lot of grinding once its welded, but you HAVE an original hinge.
I thought I needed one for mine too, I was glad it was capable of rehabilitation, aftermarket hinges are not great is what I have heard. nice work otherwise!
__________________
the mass of men live lives of quiet desperation if there is a problem, I can have it. new project WAYNE http://67-72chevytrucks.com/vboard/s...d.php?t=844393 |
|
|
|
|
09-04-2018, 10:14 AM
|
#23 |
|
Senior Member
Join Date: Sep 2017
Location: Bryan, Texas
Posts: 2,292
|
Re: Wife's 48
Joe, I would love to have saved that hinge. However, I had to cut the top part of the hinge off to get the saw blade in there to cut off the pin.
I heard the same about new hinges, so if someone will just find me a set of hinges I'll be good on door hinges. I don't mind rebuilding them, but I need at least the 2 for the drivers door. |
|
|
|
|
09-04-2018, 09:19 PM
|
#24 |
|
Registered User
Join Date: Oct 2014
Location: Kitchener, Ontario, Canada
Posts: 3,254
|
Re: Wife's 48
The simple things can be so frustrating sometimes.
__________________
http://67-72chevytrucks.com/vboard/s...d.php?t=648459 https://67-72chevytrucks.com/vboard/...d.php?t=769441 1951 MG TD 1967 Jeep CJ5 1.9L TDI 33X13.5X15 Mud Grapplers. 1952 GMC 9700 p/u 7.3L diesel on air, dually |
|
|
|
|
09-16-2018, 05:12 PM
|
#25 |
|
Senior Member
Join Date: Sep 2017
Location: Bryan, Texas
Posts: 2,292
|
Re: Wife's 48
Well, I got lucky with the hinge and it went back together just fine, it even fit back into the cab right.
 IMG_2052 by Robert Moorman, on Flickr IMG_2052 by Robert Moorman, on FlickrNorCalGal has been kind enough to make new faceplates and so I'll be using the original 54 hinges. The 48 is on the wooden dolly to be worked on when Richard is here. We cut the frame horns off the S10 and ground off the S10 body mounts to get ready to mount the Skymang version of the cab mounts for the 48. He called it a short day, so I stopped on the 48 and started on the 54. |
|
|
|
 |
| Bookmarks |
|
|


 Hybrid Mode
