
 |
|
|
|
|
#1 |
|
Registered User
Join Date: Mar 2012
Location: Hooper Ut
Posts: 466
|
Re: My own build thread
Yes sir! I've been chipping away. I sent off the hood, bed, inner fenders, core support, and some misc other parts to sand blaster last week. I got them back friday and put everything that was blasted in primer yesterday. Holy crap is the inside of the hood a pain in the ass! lol, that thing is HUGE! I also brought the truck and most of the parts over to my Dads shop because my garage is attached to my house and I don't want to have my house smell like paint.
I finished mounting the rear bags "that was a huge pain in the ass btw"... I didn't take any pictures of what I primed but I did take pictures of the truck after we got it on the trailer and also of the air tank mounted as well as the compressor and valve box installed. I also installed my new Moser rear axles because my original axles were too worn to be drilled and the machine shop wanted 200 bucks to drill them... pretty stupid when brand new 5 lug axles were 305 shipped to my house... If anyone needs axles I highly recommend Moser engineering. They were awesome, they messed up and sent me 6 lug axles by accident and I called them and the over nighted me the 5 lug axles at no cost and to top it off I got to actually speak to someone that worked there "not someone in India". Anyway, I rebuilt the whole rear end, put new seals, bearings, axles, all new brakes, drums, pads etc. Everything is starting to come together. Tonight I'm going to work on patching the inner fenders and notching the fender and inner fender so the wheels dont rub. Then I'm going to strip the firewall and prime and paint it. Then I have to figure out the steering "not looking forward to that". Anyway here are the pictures Rear bag mounts 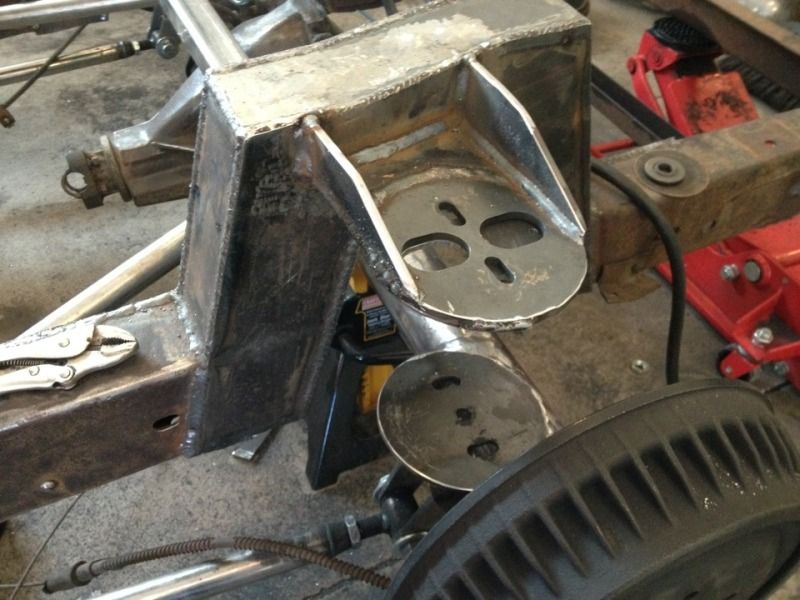 Bags installed 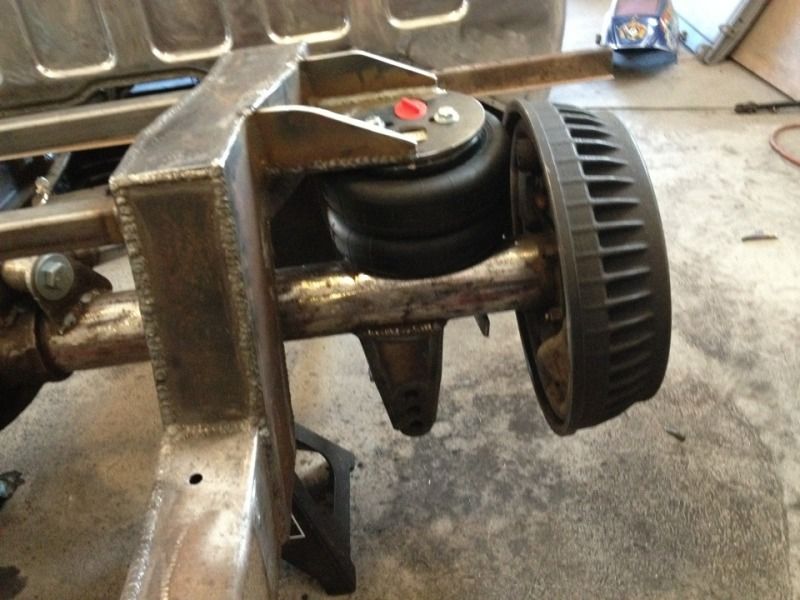 Here's the tank and valve box installed 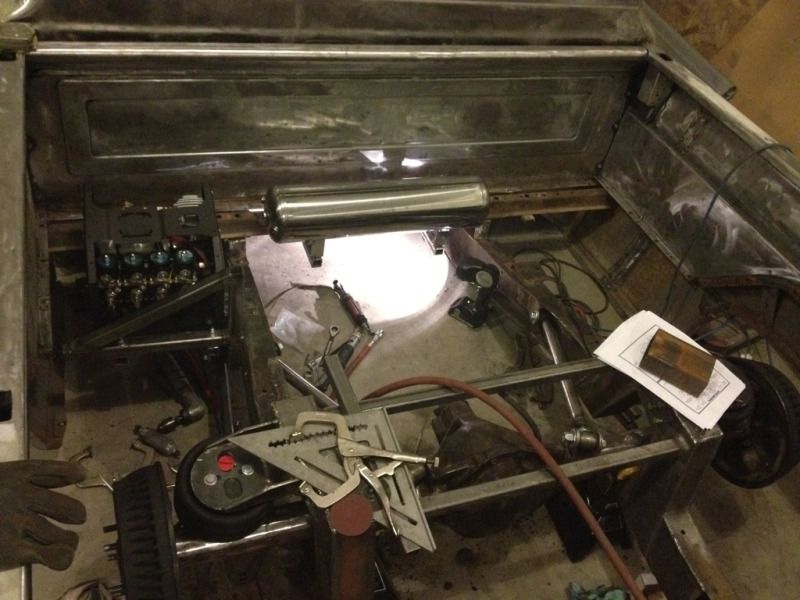 My new axles! 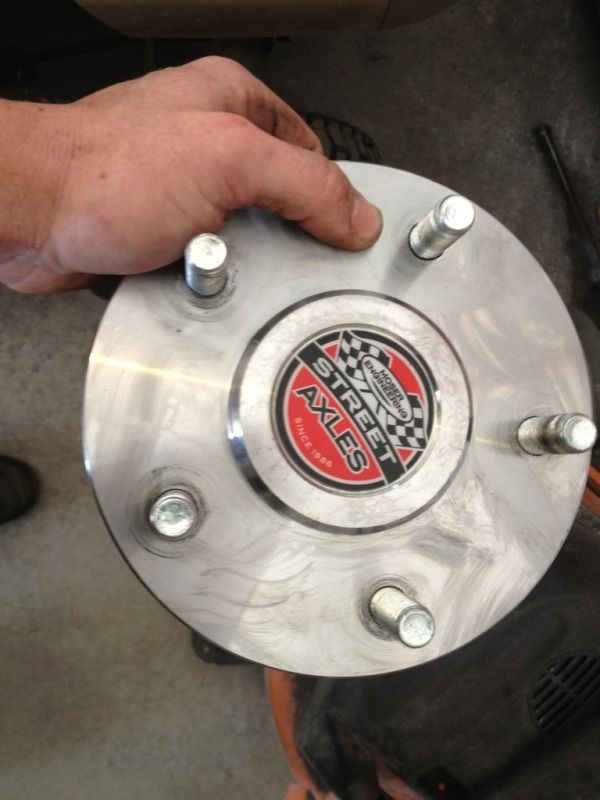 Here she is on the trailer! 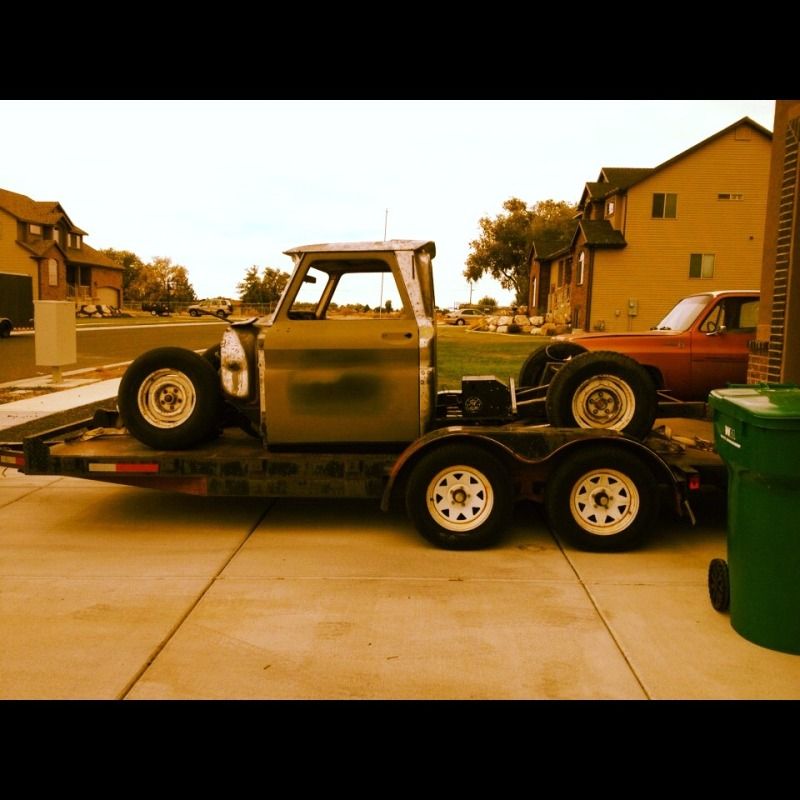
|
|
|

|
|
|
#2 |
|
Registered User
Join Date: Mar 2012
Location: Hooper Ut
Posts: 466
|
Re: My own build thread
Oh, I also ordered my gas tank last week and it should be here tomorrow so we can install it this week. I'm going to try and get the inside of the cab in paint this week but that's going to be a tall order because there is a lot to get done before that.
|
|
|

|
|
|
#3 |
|
Registered User
Join Date: Aug 2012
Location: Tooele, Utah
Posts: 327
|
Re: My own build thread
Right on man! I'm glad you are still moving along. When do you plan on spraying? Winter is knocking on the door...
__________________
1936 Chevrolet 1/2t 1964 Chevrolet C10 1964 Chevrolet C10 (sons) 1965 Chevrolet K10 Suburban 1969 Chevrolet C10 1937 Plymouth P4 |
|
|

|
|
|
#4 |
|
Registered User
Join Date: Apr 2011
Location: .
Posts: 3,104
|
Re: My own build thread
Better late than never. Almost missed this build. Watching this one.
|
|
|

|
|
|
#5 |
|
Registered User
Join Date: Mar 2012
Location: Hooper Ut
Posts: 466
|
Re: My own build thread
As soon as possible but but we have a long way to go. I'm hoping to get it painted by the end of the month but like I said, there's a lot to do.
Posted via Mobile Device |
|
|

|
|
|
#6 |
|
Registered User
Join Date: Mar 2012
Location: Hooper Ut
Posts: 466
|
Re: My own build thread
I got the core support patched up and primed. I also primed the cowl and the piece that's goes in front of the core support "not sure what its called". My old man started the body work on the bed. I'm a little pissed because the sand blaster destroyed my bed... I really hope we can get this thing straight. They dented and warped the crap out of it. I'm going to have to block this thing a lot... I can't believe they did that! O well, I won't get too upset unless we can't get it straight.
Here's the core support and other pieces I primed last night 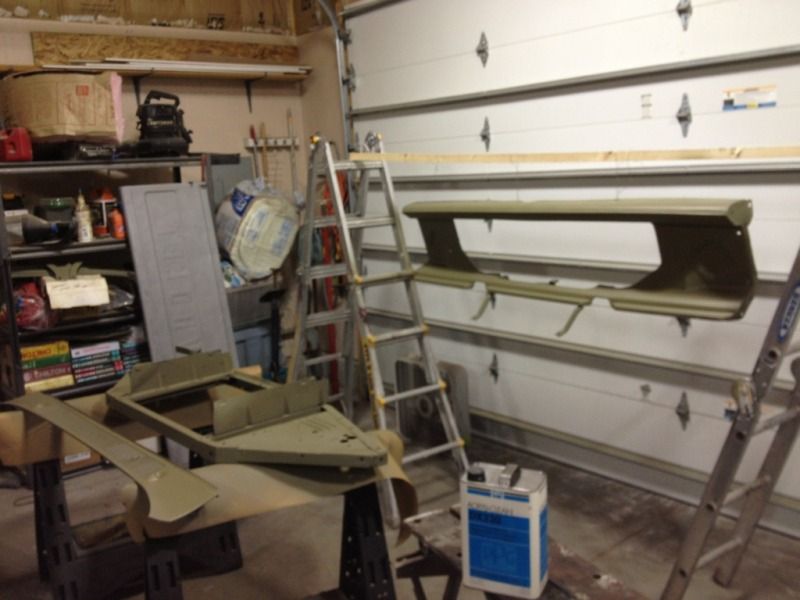 Here's the truck bed, I primed the inside of the bed and we are working on the sides and rear today. 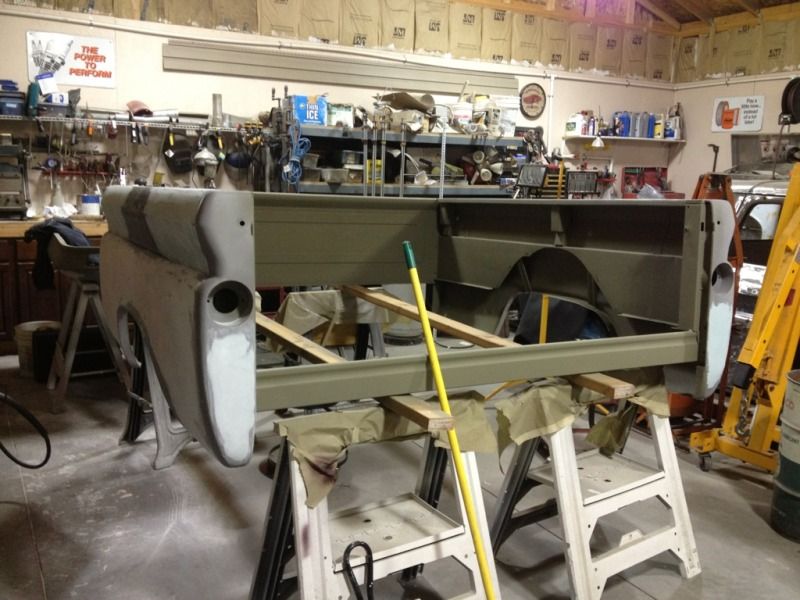
|
|
|

|
|
|
#7 |
|
60-66 Nut
  Join Date: Mar 2007
Location: Coeur d'Alene, Idaho
Posts: 23,250
|
Re: My own build thread
That's too bad the sandblaster ruined the bed. Unfortunately, it is guys like that, that make a bad rep for sandblasting body sheetmetal. Some guys know how to do it, and others don't. I hope you can get it straight enough to your satisfaction.
__________________
Power Steering Box Adapter Plates For Sale HERE Power Brake Booster Adapter Brackets For Sale '63-'66 HERE and '67-'72 HERE and '60-'62 HERE and "60-'62 with clutch HERE Rear Disc Brake Brackets For Sale. Impala SS calipers HERE Camaro Calipers HERE D52 Calipers HERE 6 Lug HERE Hydroboost Mounting Plates HERE |
|
|

|
|
|
#8 |
|
Registered User
Join Date: Mar 2012
Location: Hooper Ut
Posts: 466
|
Re: My own build thread
Ya, me too... The bad thing is the guy that owns it is a really nice guy. I think I'm going to go talk to them so they don't really mess up someone's car. They usually do big industrial stuff and they are a really new company. I just don't think they have a lot I experience.
Posted via Mobile Device |
|
|

|
|
|
#9 |
|
Registered User
Join Date: Mar 2012
Location: San Diego CA
Posts: 223
|
Re: My own build thread
Thats a bummer about your bed. Your truck is looking good.
Posted via Mobile Device |
|
|

|
|
|
#10 |
|
Registered User
Join Date: Mar 2012
Location: Hooper Ut
Posts: 466
|
Re: My own build thread
They didn't totally ruin it but it is going to be a lot more work to fix it now... My old man is pretty good at body work so we should be able to fix it "I hope". Thanks for the compliments!
Last night I started patching the inner fenders. I'm probably getting way too anal but I figured it's the first thing you see when you open the hood so I wanted it to look nice. Thank god my dad's metal brake works pretty good because this was a huge PITA, but I think it came out pretty good. lol 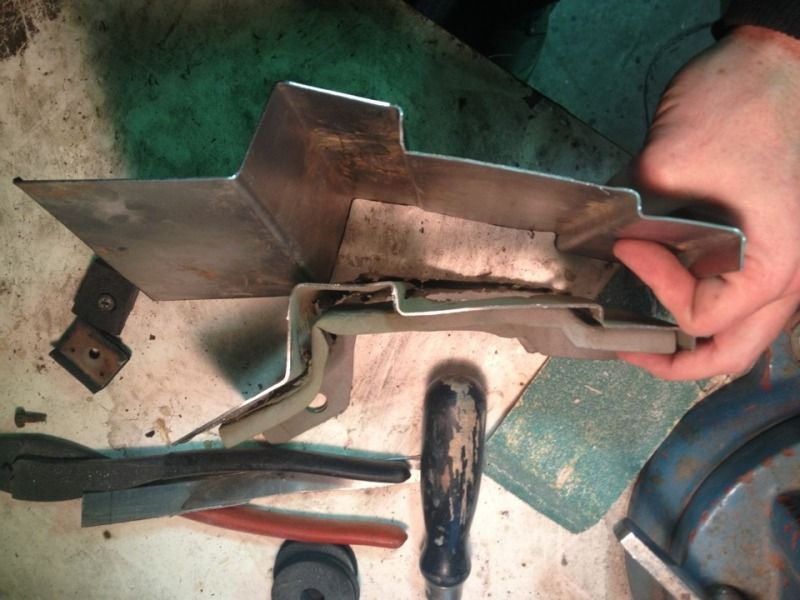 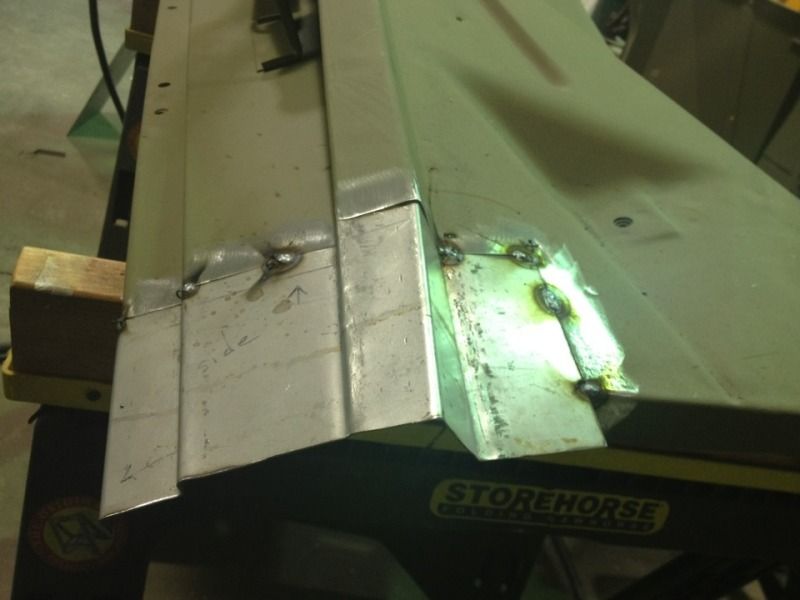 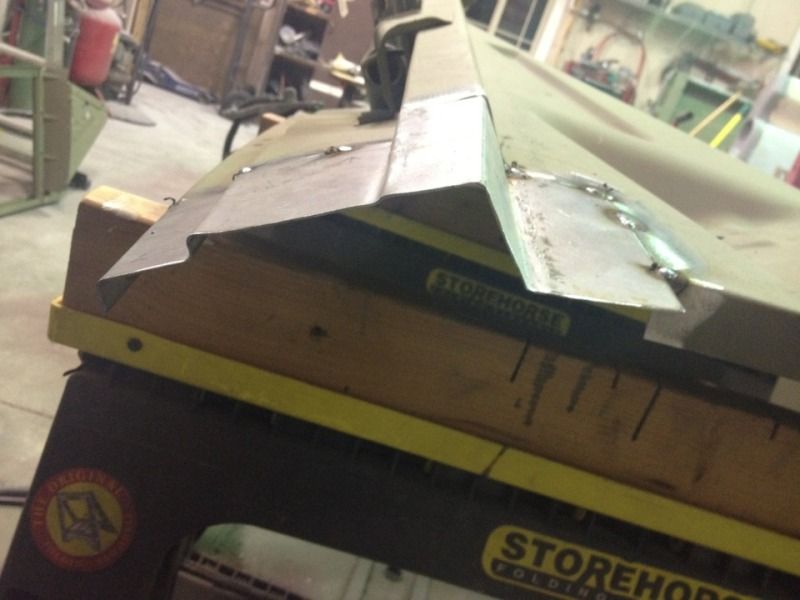 Now I just have to drill the holes. 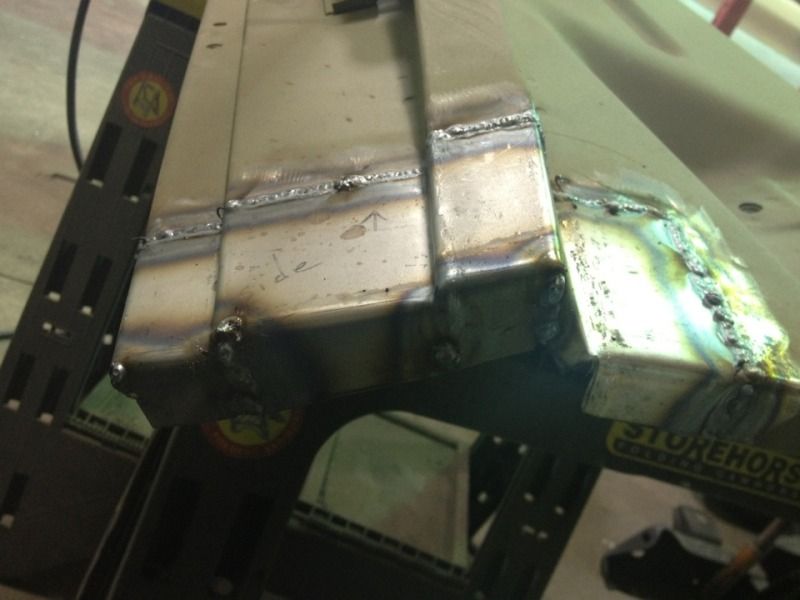
|
|
|

|
|
|
#11 |
|
Registered User
Join Date: Nov 2009
Location: Orange, CA
Posts: 525
|
Re: My own build thread
Lookin good!
Posted via Mobile Device |
|
|

|
|
|
#12 |
|
Registered User
Join Date: Sep 2011
Location: Tacoma, WA
Posts: 2,425
|
Re: My own build thread
You know I see photos like these last couple you put up and I think to myself...man I can soo do that !!!
Then I am into a repair that takes up more and more of my time on this build! And usually while I am into it, I am dreaming up other stuff I can do, so one thing always leads to another. Your fabbing looks good, and never too anal !!
__________________
Michael McMurphy My 66 Stepside My 64 Tow Truck My 66 Tempest Table Of Contents Added to Page1 |
|
|

|
|
|
#13 |
|
Registered User
Join Date: Mar 2012
Location: Hooper Ut
Posts: 466
|
Re: My own build thread
Been working a lot and not taking many pictures. I'm trying like hell to squirt some paint on this thing but I keep being too anal... Spent way too long on the inner fenders... one side is done "didn't take pictures yet" and I'm almost done with the other side. The body work is 90% done on the bed and we are getting the hood fixed up. I had to patch the hood a little but of course I didn't take any pictures...
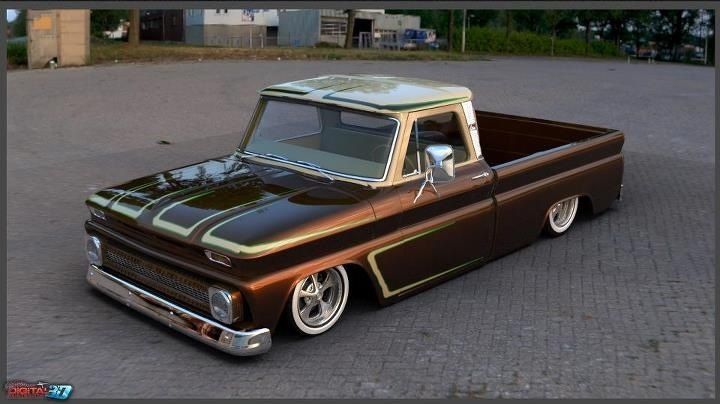
Here's part of what I did to the inner fenders. I still have a lot to do on these but this this is the general idea 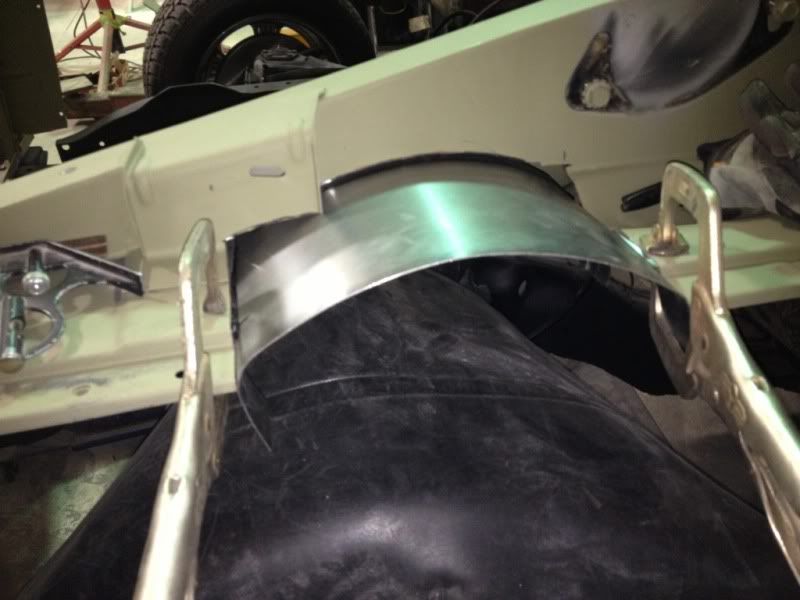 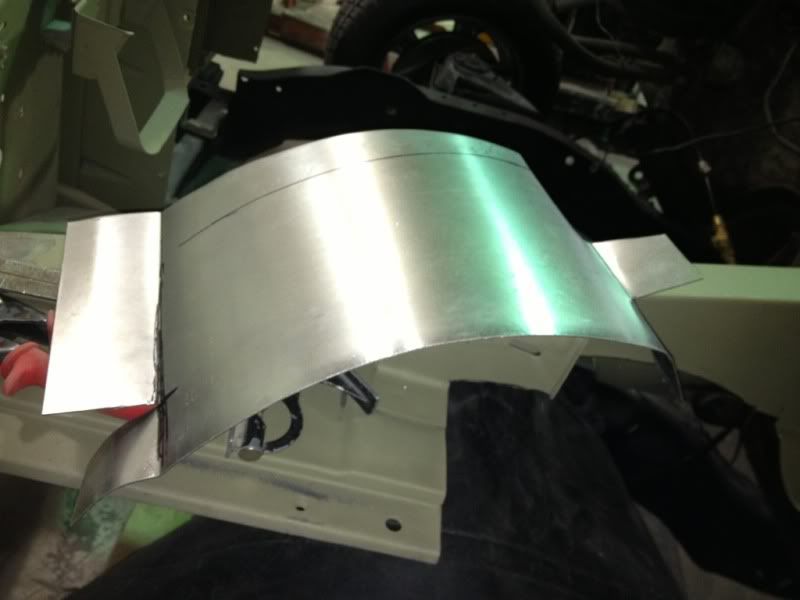 I posted this picture in another thread, these are the colors and paint scheme I'm going for. I made this using the House of Kolor 3d design tool. I made a thread explaining it, you guys should check it out. It's really easy to use and works really well, you can buy one model of car/truck for about 95 bucks or you can purchase the whole program for $500. 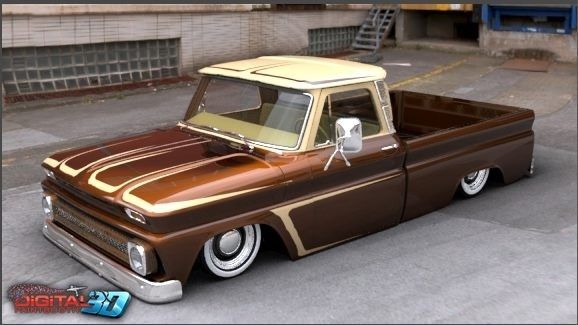
|
|
|

|
|
|
#14 |
|
Registered User
Join Date: Mar 2012
Location: San Diego CA
Posts: 223
|
Re: My own build thread
Wow thats badass! Hey its better to get all the bs done now and wait on paint. You will be happier with the final product. Keep up the good work.
Posted via Mobile Device |
|
|

|
|
|
#15 |
|
Registered User
Join Date: Mar 2012
Location: Hooper Ut
Posts: 466
|
Re: My own build thread
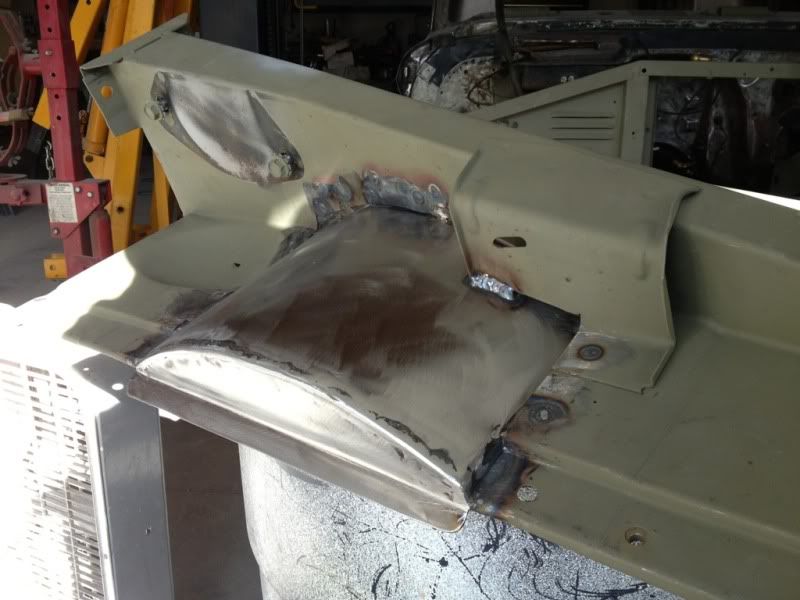
Here's the inner fender cutouts finished, just need a little filler to smooth it out. I left a tab and radioused it to match the fender to keep dirty and crap from coming up. I'm probably going to make a seal to go inbetween them.
|
|
|

|
|
|
#16 |
|
Registered User
Join Date: Aug 2012
Location: Tooele, Utah
Posts: 327
|
Re: My own build thread
Holy crap...never thought of having to modify the inner fenders to get it down that low. I'm looking forward to seeing it done.
__________________
1936 Chevrolet 1/2t 1964 Chevrolet C10 1964 Chevrolet C10 (sons) 1965 Chevrolet K10 Suburban 1969 Chevrolet C10 1937 Plymouth P4 |
|
|

|
|
|
#17 |
|
Registered User
Join Date: Mar 2012
Location: Hooper Ut
Posts: 466
|
Re: My own build thread
A lot of people just throw out the inner fenders but I'd much rather not have to clean my engine bay after ever ride. It's the little details that make cars/trucks stand out.
Posted via Mobile Device |
|
|

|
|
|
#18 |
|
Registered User
Join Date: Aug 2012
Location: Tooele, Utah
Posts: 327
|
Re: My own build thread
I agree 100%. Your 36' had many killer details. Keep at it man!
__________________
1936 Chevrolet 1/2t 1964 Chevrolet C10 1964 Chevrolet C10 (sons) 1965 Chevrolet K10 Suburban 1969 Chevrolet C10 1937 Plymouth P4 |
|
|

|
|
|
#19 |
|
Registered User
Join Date: Mar 2012
Location: Hooper Ut
Posts: 466
|
Re: My own build thread
Thanks! I do miss my 36... I will build another one day but this time I want one with fenders!
Ok, so here's the weekend update. I finished the metal work on the inner fenders. Now I just need to do a little bondo work to smooth it out. They came out pretty good I thought. I modified the hood hinge spring mounting points because they obviously won't work with the radious piece installed. I will still have to use a hood prop but the springs do help with this monsterous hood. We also mocked everything up again to make sure the body lines lined up and everything. My old man is almost finished with the body work on the hood because the PO must have walked all over this damn thing.... I also spend most of the day yesterday cleaning and power washing the power steering to find out that I can't use the original power steering "I should have done more research on that"  ... The Good thing is I have a 78 parts truck that I can take the power steering off of and use that but now I have to clean that up... Grrr! ... The Good thing is I have a 78 parts truck that I can take the power steering off of and use that but now I have to clean that up... Grrr! 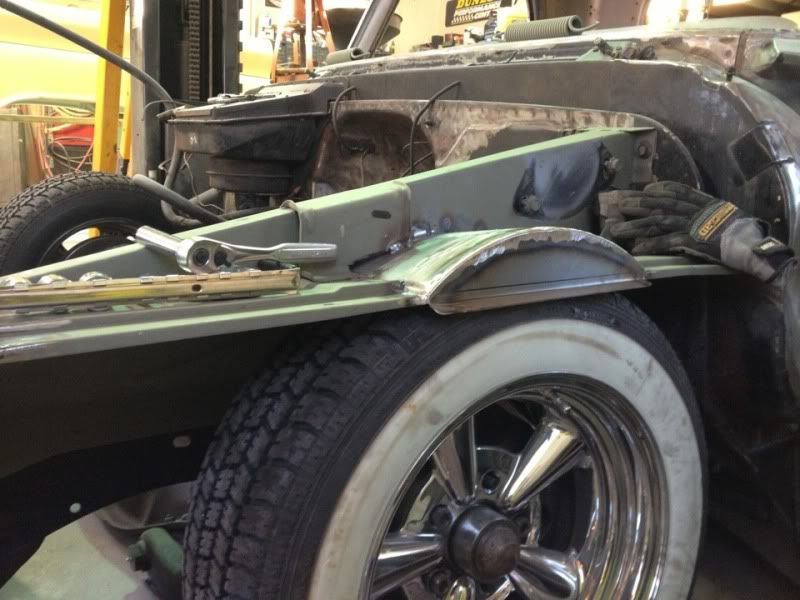 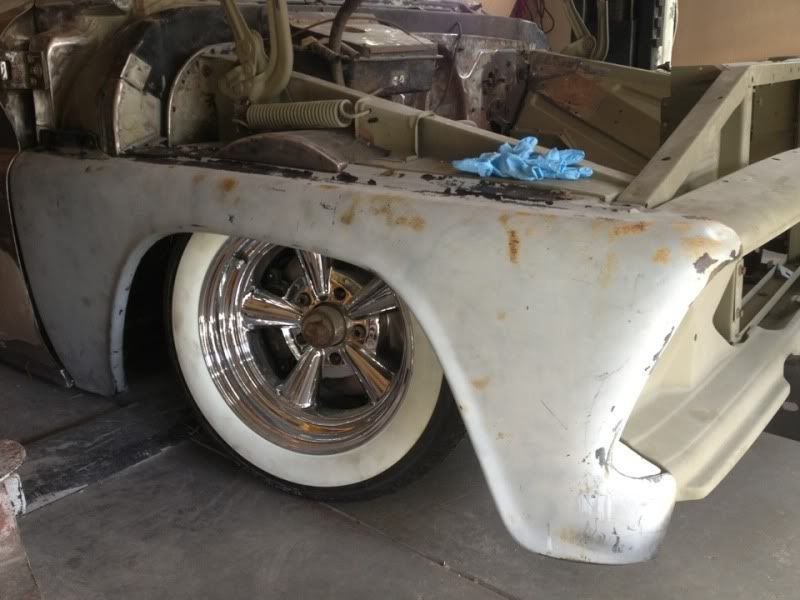 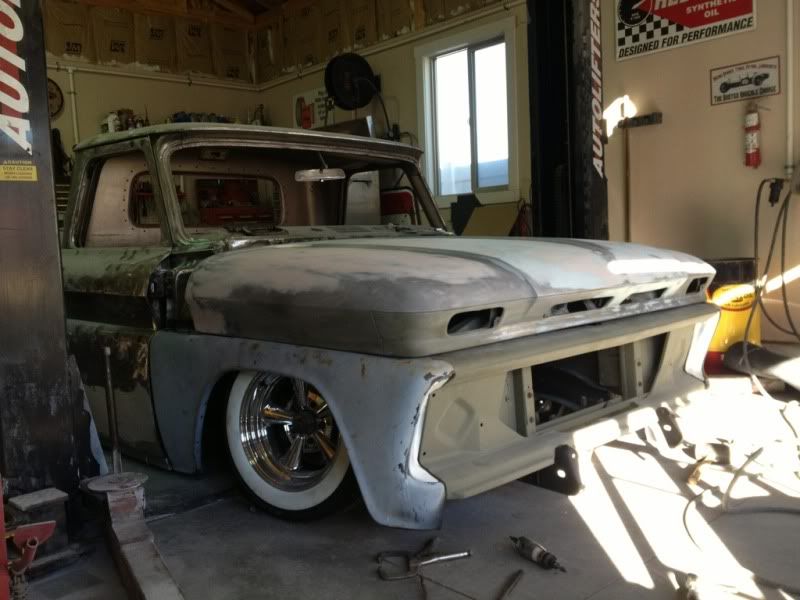
|
|
|

|
|
|
#20 |
|
Registered User
Join Date: Mar 2011
Location: Bossier City Louisiana
Posts: 312
|
Re: My own build thread
youve do some great work , I'm watching this for sure .
|
|
|

|
|
|
#21 |
|
Registered User
Join Date: Apr 2012
Location: Searcy, AR
Posts: 4,203
|
Re: My own build thread
Just found your build, gonna be watching...
__________________
DON Proverbs 27:17  US Air Force Retarded errr Retired My '65 Stepper Build:http://67-72chevytrucks.com/vboard/s...d.php?t=533920 My '60 Rusty Patina Build:http://67-72chevytrucks.com/vboard/s...66#post7402266 My '72 http://67-72chevytrucks.com/vboard/s...59#post7204359 SOLD |
|
|

|
|
|
#22 |
|
Registered User
 Join Date: Mar 2012
Location: Shallow Lake Ontario,Canada
Posts: 201
|
Re: My own build thread
Great build, lucky your talents keep up with your imagination, Keep at her I'll be watching for sure!
|
|
|

|
|
|
#23 |
|
Registered User
Join Date: Mar 2012
Location: Hooper Ut
Posts: 466
|
Re: My own build thread
Thank you for the nice comments!
Posted via Mobile Device |
|
|

|
|
|
#24 |
|
Registered User
Join Date: Sep 2011
Location: Tacoma, WA
Posts: 2,425
|
Re: My own build thread
You are looking good here sir.
Seems your speed is about the same as mine, cool work and cool ideas at a steady pace !! Cannot wait to see what you tackle next. 
__________________
Michael McMurphy My 66 Stepside My 64 Tow Truck My 66 Tempest Table Of Contents Added to Page1 |
|
|

|
|
|
#25 |
|
Registered User
Join Date: Mar 2012
Location: Hooper Ut
Posts: 466
|
Re: My own build thread
Oh, one more. Do you guys like the green pinstriping on the scallops? I really dig it! And yes I know the scallops are a little funky in spots. The way you have to make them in the program distorts them a little on curved edges for some reason. I tried to fix it for about an hour and decided to just leave it because this is the best I could make it.... It's still a super cool program.
|
|
|

|
 |
| Bookmarks |
|
|