
 |
|
|
#51 |
|
Senior Member
 Join Date: Jan 2015
Location: pembroke pines, fl
Posts: 704
|
Re: Long Time Coming......
lookin REAL good!!
|
|
|

|
|
|
#52 |
|
Registered User
Join Date: Jan 2022
Location: Conn.
Posts: 184
|
Re: Long Time Coming......
Back a while ago I posted some pictures of what my ideas were for the rolled pan. I did it in poster board before cutting and shaping metal to "see" if my vision in my head translated to reality. I have continued to pick away at it little by little. Here is the first trial fit of it. Still some welding to do but mostly done for this stage.
Of course the gas thank will be painted black so it doesn't stand out hanging below the truck. Although when on the ground and standing up I don't think much would be seen anyway. I started by shaping some round rod around the plate creating a frame, then I welded some sheet metal from behind for the plate to bolt to. I then shaped the sides and welded it to the frame as well. The plate now will sit inside the round rod when all finished. With the relief cut in the rolled pan I measured how deep I wanted the recess to be, it is just about 1.5", I then made a template and transferred that to some sheet metal I have. I shaped it and then welded it to the pan. I then cut and fit the plate box and welded it in place. Hope you like it.... Feedback?? 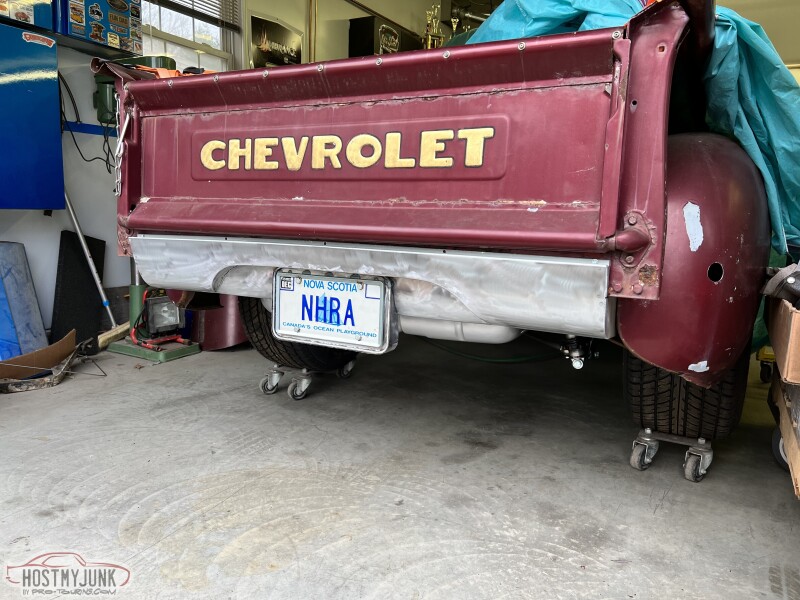 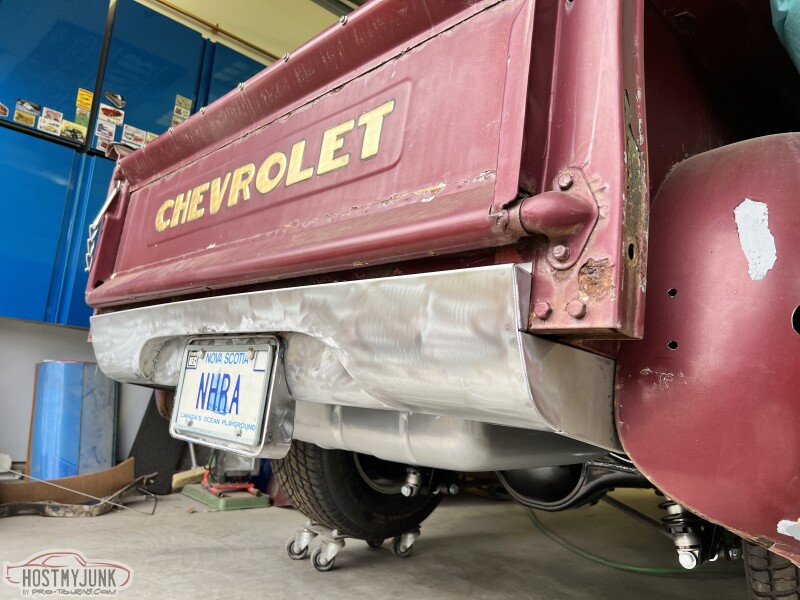 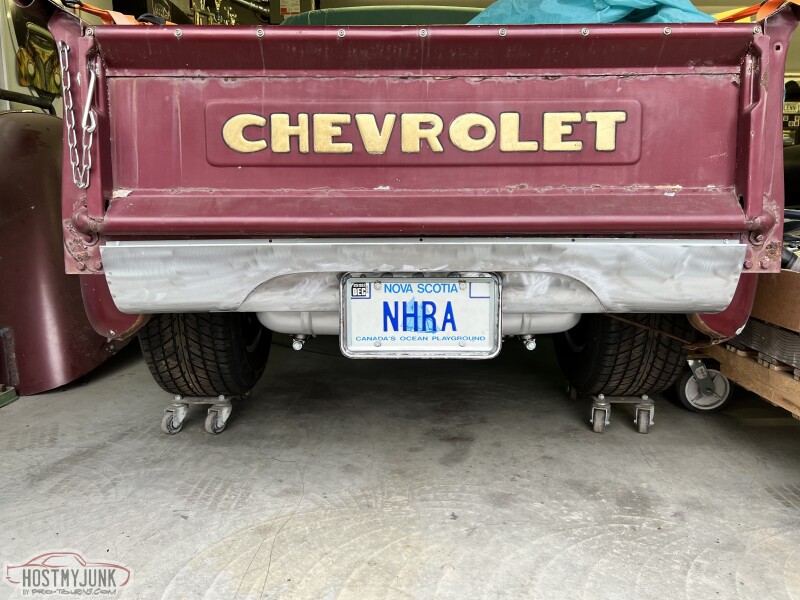 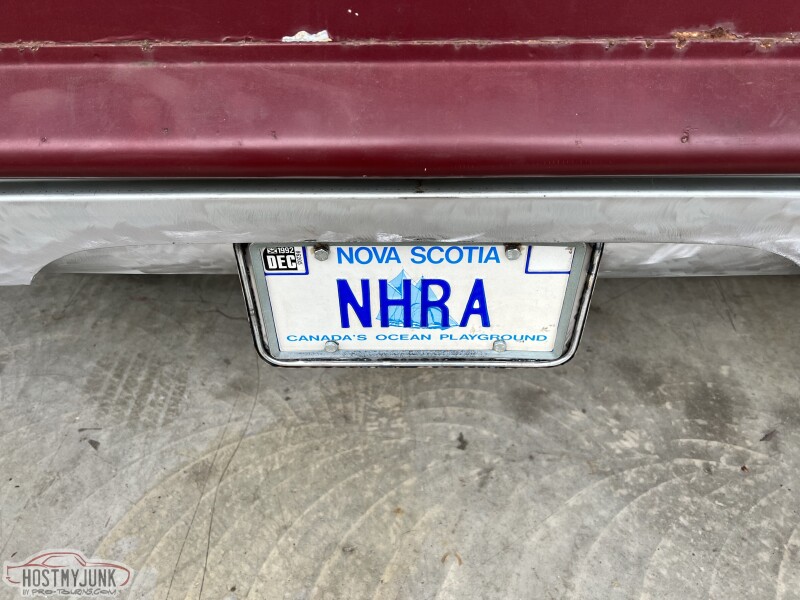 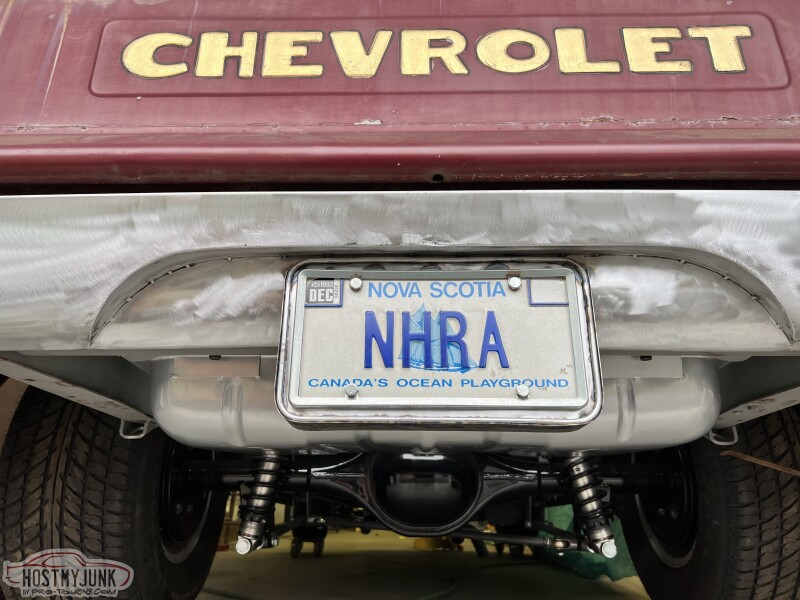
__________________
Glenn 1951 3100, Area51 1955 BelAir, 4EVER17 1987 R10, Ethel Copper Hill Rod & Custom http://67-72chevytrucks.com/vboard/s...d.php?t=829856 |
|
|

|
|
|
#53 |
|
Senior Member
 Join Date: Mar 2011
Location: West Plains, Missouri
Posts: 7,559
|
Re: Long Time Coming......
Looks great...Jim
__________________
my build thread: http://67-72chevytrucks.com/vboard/s...d.php?t=459839 Jimbo's long bed step build:http://67-72chevytrucks.com/vboard/s...t=464626<br /> |
|
|

|
|
|
#54 |
|
Registered User
 Join Date: Mar 2007
Location: Scotts, Michigan
Posts: 3,773
|
Re: Long Time Coming......
Very Nice
It is always the little details that tend to be time burglars. Marc
__________________
…………...........__________ .................. ((__|__||___\____ ..;.;;.:;:;.,;..;((_(O))____ (_(O)) 1948 Chevy Truck - Finished SOLD!! 1953 Chevy Suburban "Family Truckster" Completed: Spring of 2021 http://67-72chevytrucks.com/vboard/s...d.php?t=605484 1994 4x4 Blazer - "Field Find" https://67-72chevytrucks.com/vboard/...ferrerid=30857 |
|
|

|
|
|
#55 |
|
Registered User
Join Date: Nov 2014
Location: somewhere, PA
Posts: 1,088
|
Re: Long Time Coming......
that's hot, well played
|
|
|

|
|
|
#56 |
|
Registered User
Join Date: Jan 2022
Location: Conn.
Posts: 184
|
Re: Long Time Coming......
Thanks for the feedback on the rolled pan. Sometimes stepping outside the box can be risky. It can go really right, or really wrong. I like this and am looking forward to finishing it up.
I had to take a break from the truck while I put quarter panels and a tail pan on a friends 55 Chevy. While at it I spent far too long working the gaps to get them right. With the metal work done he picked up the car and will do body work himself, so I am now back on the truck. Once he picked it up I moved my project front and center in the shop. I pulled the cab to start the process of building an exhaust system. I've never done this and wanted to take on the project just for the sake of saying I did it myself. So with that I bought a universal mandrel exhaust kit from Summit. It comes with a bunch of straight pipes, along with four 45*, four 90* and four U bends. I also bought an X pipe kit. Luckily for me I have a metal band saw and put it to good work. This is all aluminized, once fully welded I am going to have it all Cerakoted. I need two more 45* pieces which I have just ordered. Once I have those I can finish the ends of the tailpipes, then take it all off for full welding. Hope you like it. If you have any critiques please feel free to offer it up. Having never done this I just did what I thought was right. First thing was get the truck over on my scissor lift and remove the cab. 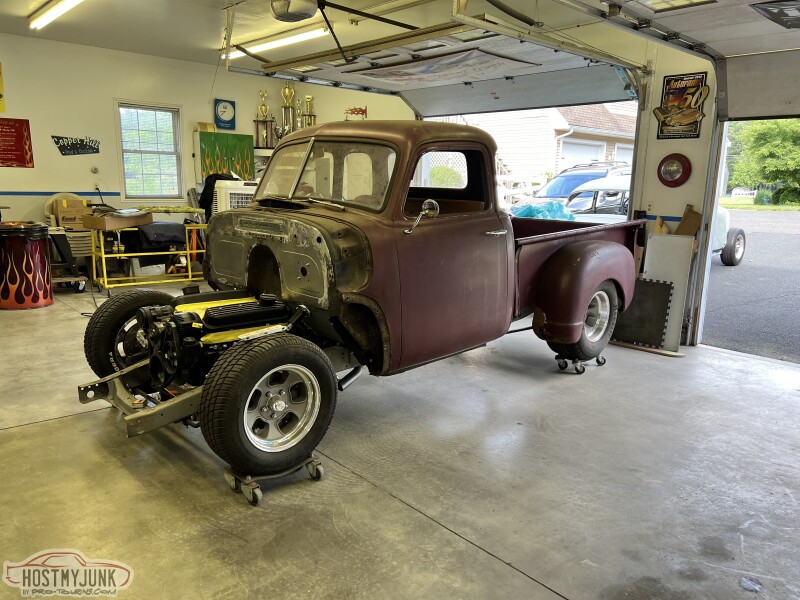 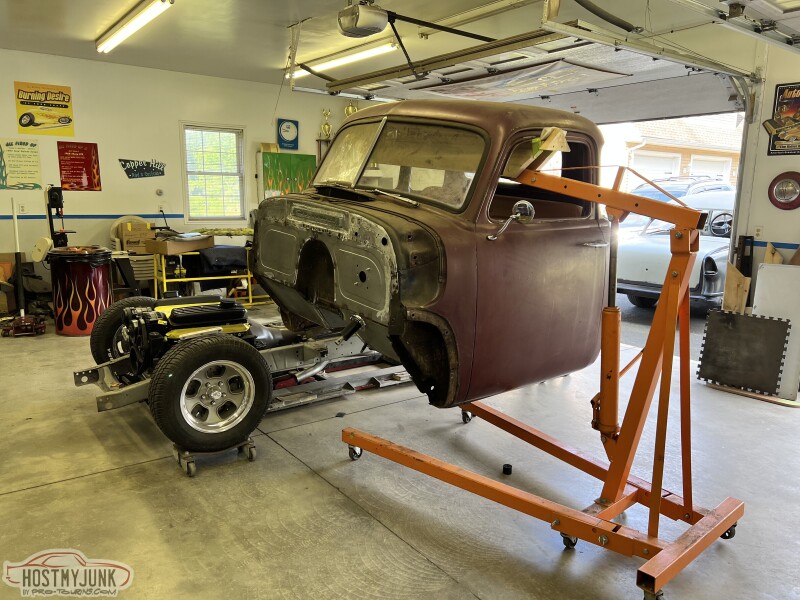 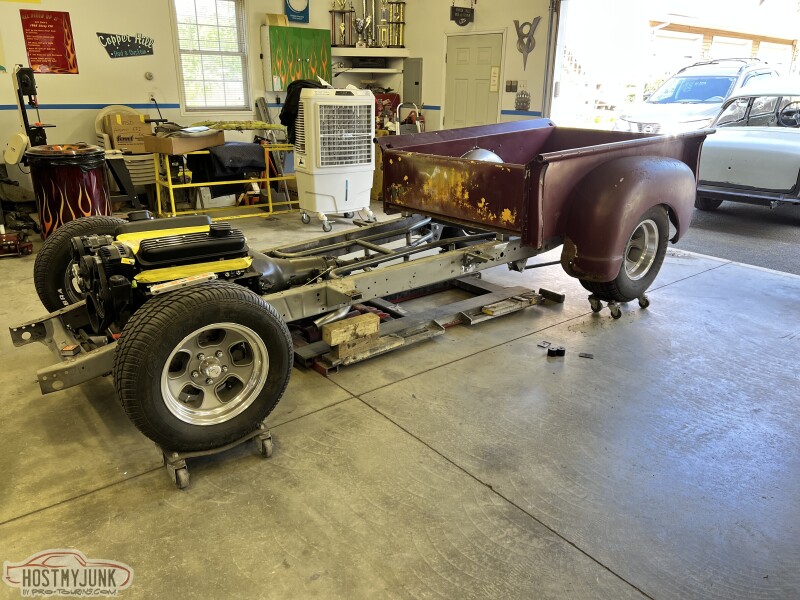 The passenger side frame rail need to be notched for clearance of the manifold and exhaust... 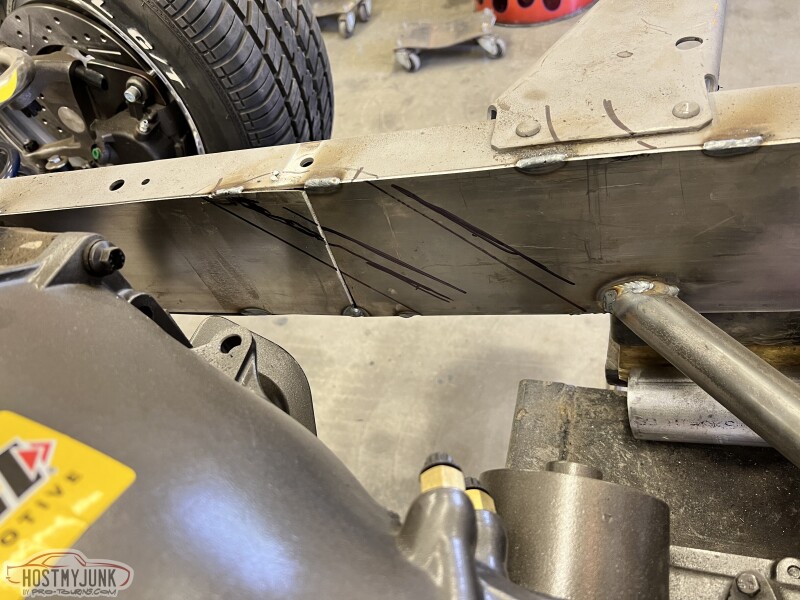 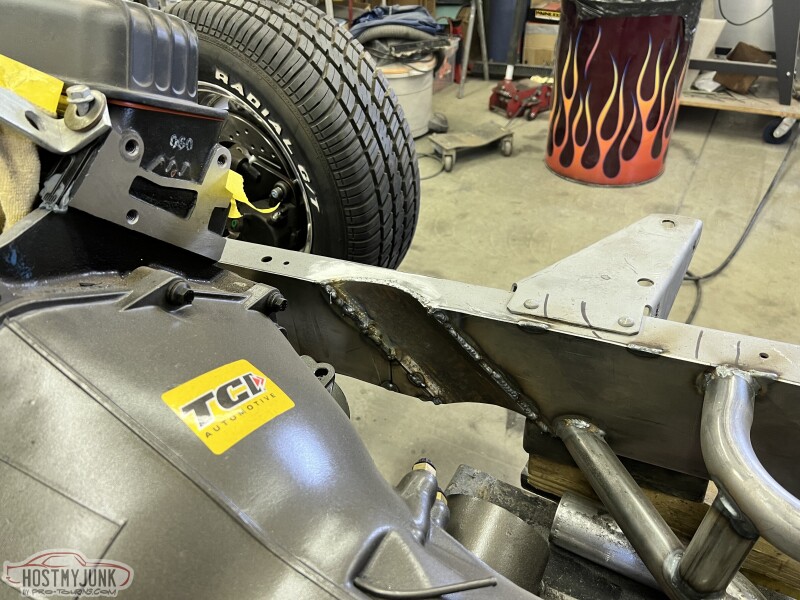 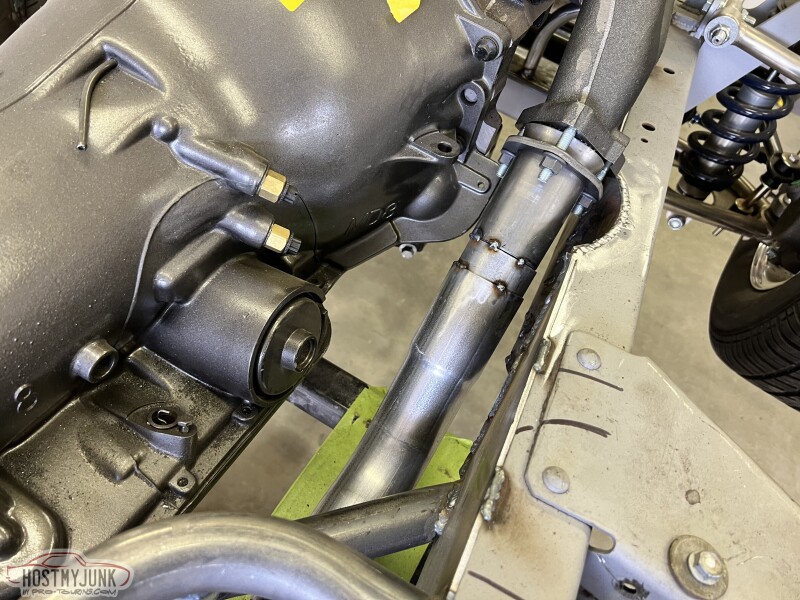 Here is the kit all laid out...these mufflers ended up not working, I needed center inlet and outlet. 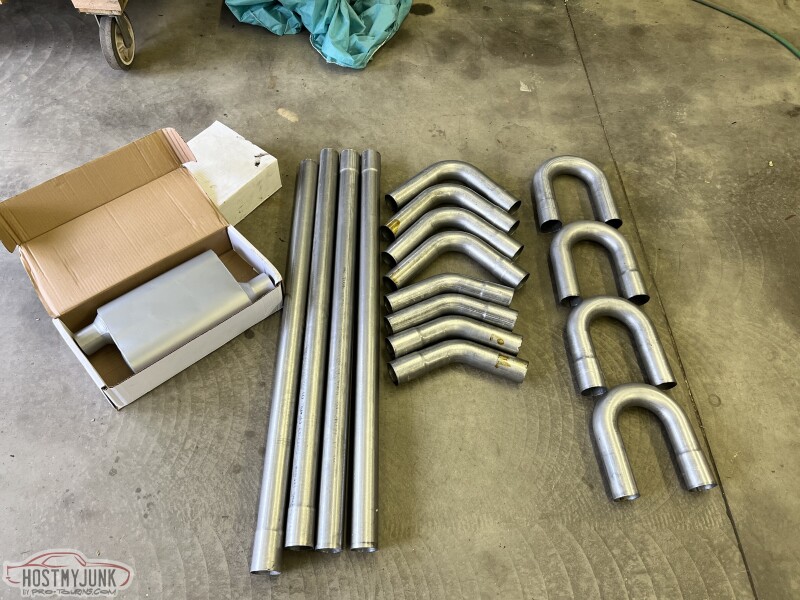 going from the manifold down to the X pipe... 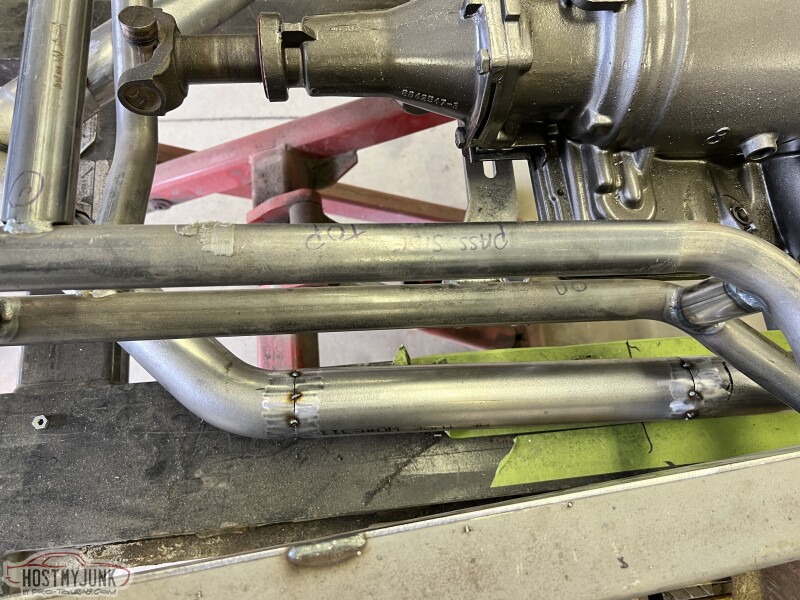 And the X pipe.... I did a bunch of reading on the X pipe and placement. Everyone says it should be as far forward as possible for performance. I struggled with this due to my Progressive Automotive X member. In order to get the X pipe where it should be optimally I would have had to have it hanging too low for my liking. Keeping in mind I am just running a 350hp crate motor and this will just be a street cruiser I don't think I will even notice the difference. 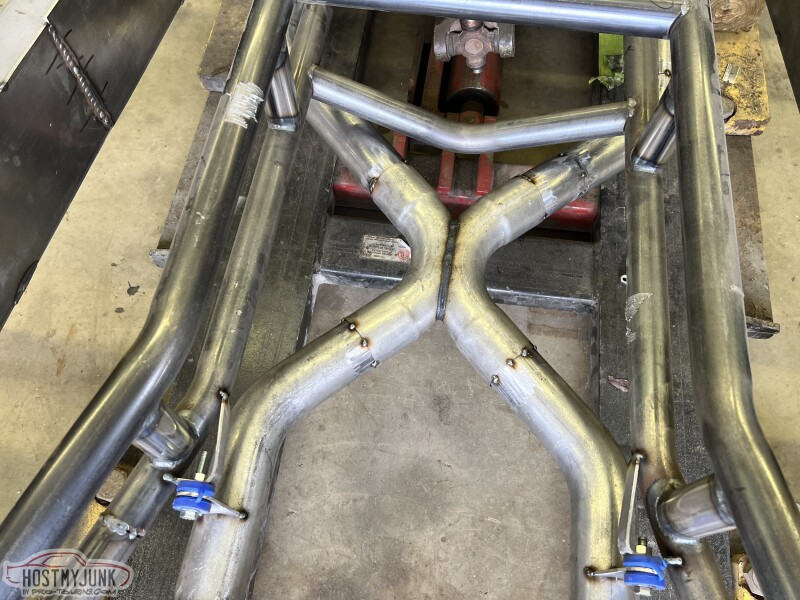 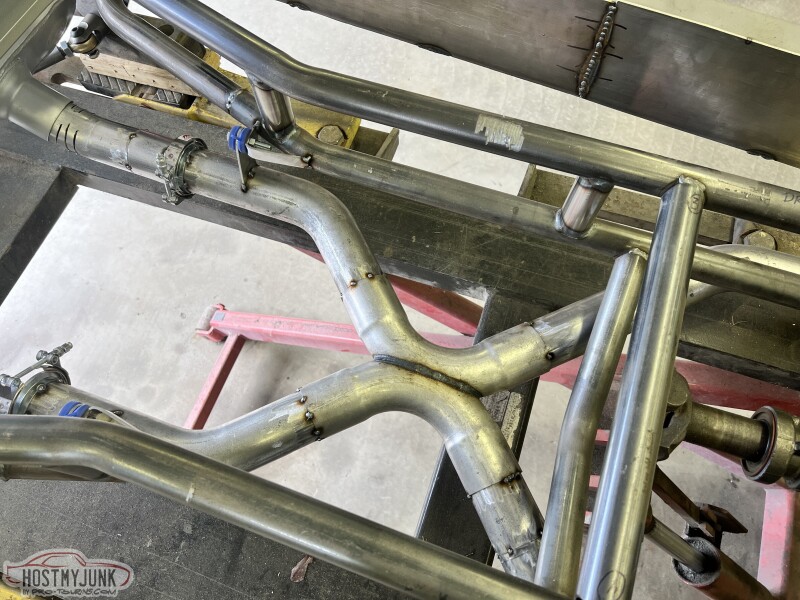 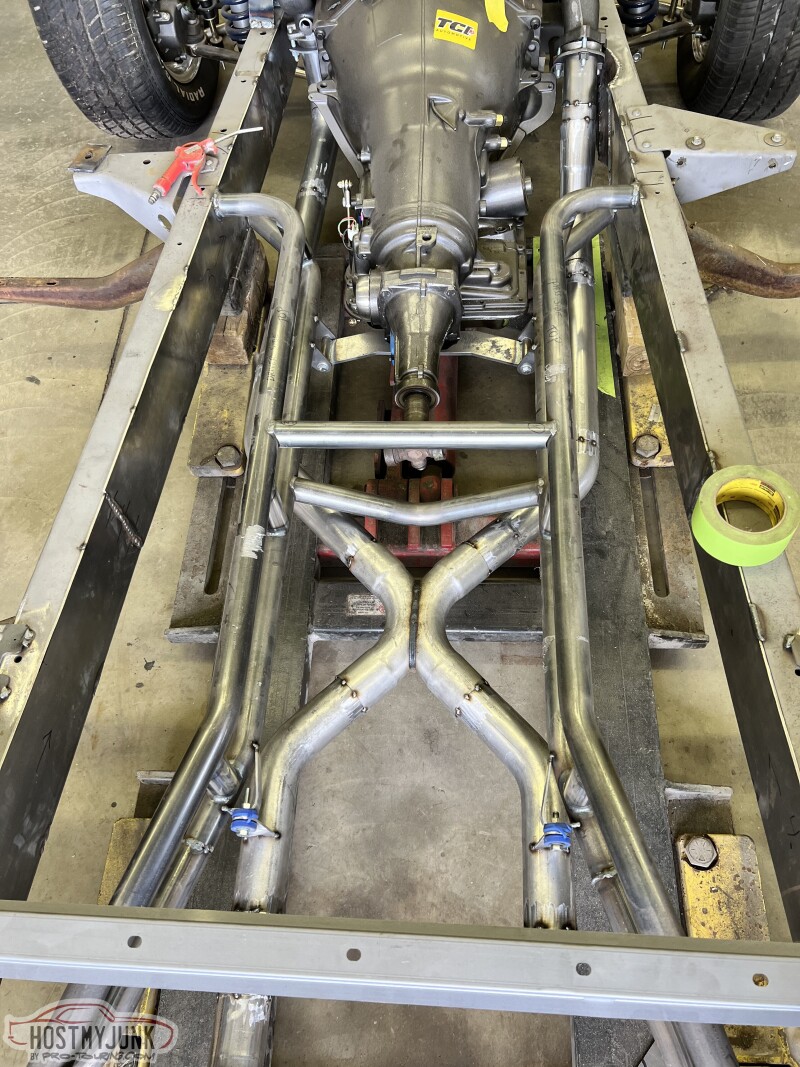
__________________
Glenn 1951 3100, Area51 1955 BelAir, 4EVER17 1987 R10, Ethel Copper Hill Rod & Custom http://67-72chevytrucks.com/vboard/s...d.php?t=829856 |
|
|

|
|
|
#57 |
|
Senior Member
 Join Date: Sep 2017
Location: Bryan, Texas
Posts: 2,345
|
Re: Long Time Coming......
Very nice work.
__________________
8man-aka Robert 1948 on a S10 Frame, small block with a carb 1954 Cab, 53 Front and Bed, 50 Doors, S10 Frame, Power TBD Build thread: "]http://67-72chevytrucks.com/vboard/showthread.php?t=746899&highlight=wife%27s+48[/URL] [/URL]http://67-72chevytrucks.com/vboard/showthread.php?t=840204 |
|
|

|
|
|
#58 |
|
Registered User
Join Date: Jan 2022
Location: Conn.
Posts: 184
|
Re: Long Time Coming......
The previous post was all last weekend. This post is from today.....
With the new mufflers I was able to place them where I wanted them. Not too low, or in the way at all. Using one of the U bends I cut it right in the middle of the bend and had two identical pieces and used those coming out of the mufflers and over the rear. You may also notice I am using weld on band clamps for the different sections of the exhaust. I really like these for good fitting and leak free connections. 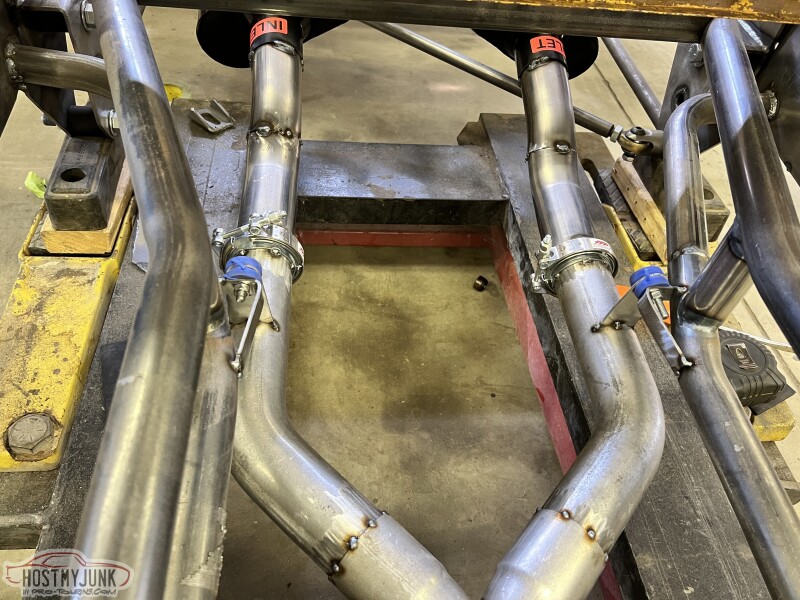 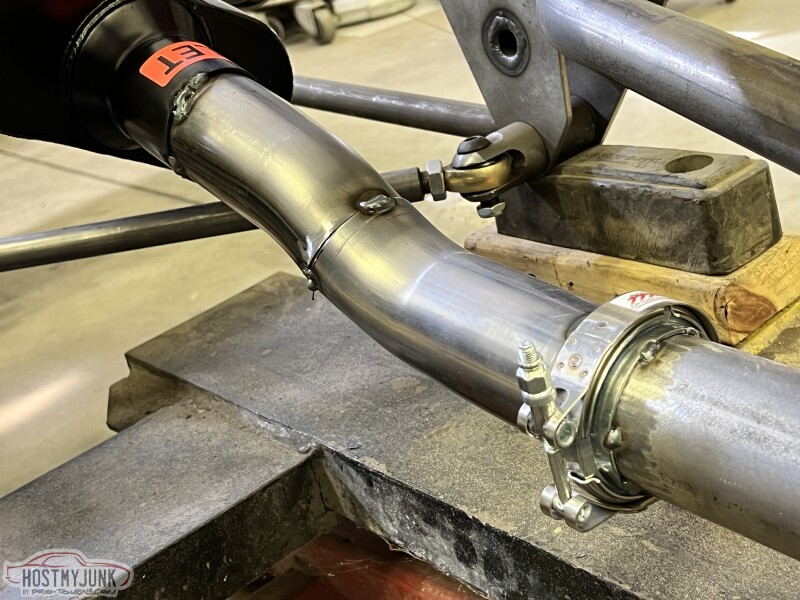 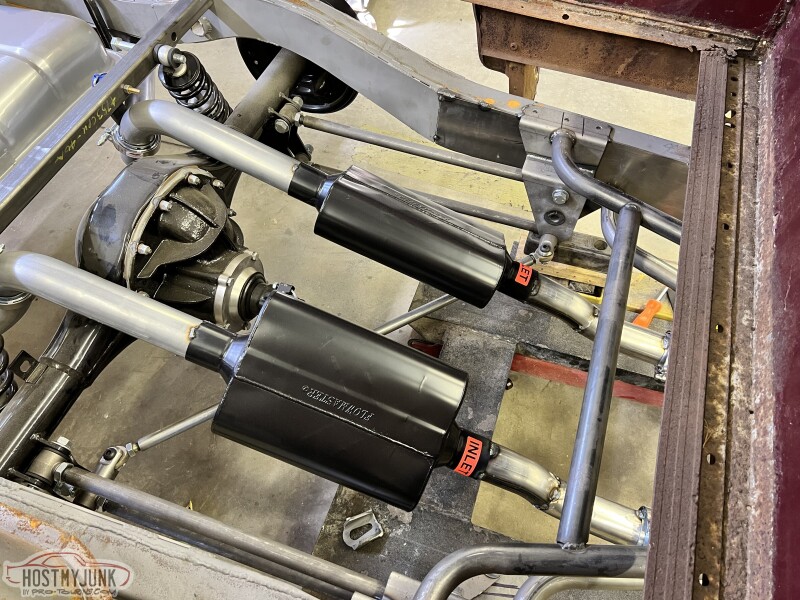 I made these tabs for all the hangers, they use an insulated rubber through bolt connection keeping everything clean and tidy. 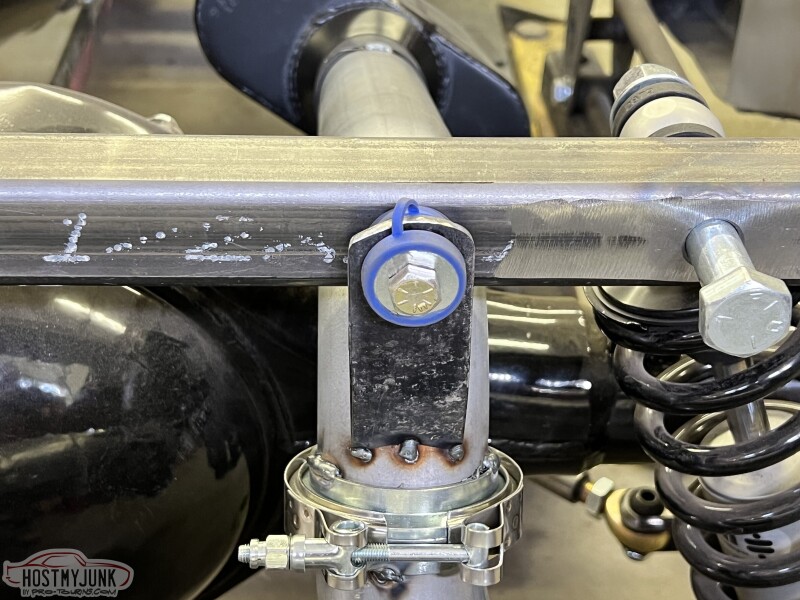 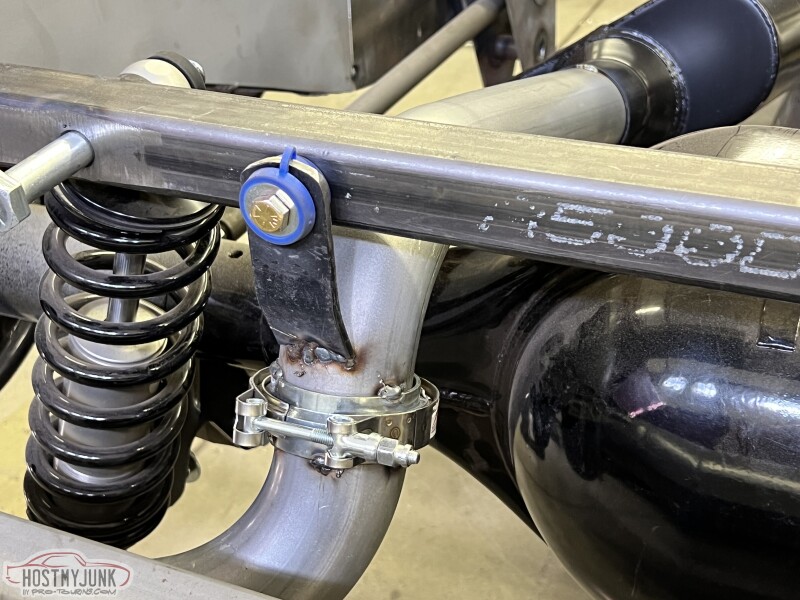 And now for the tail pipes.... for those I put the bed back on to make sure I liked where they came out. I want them to be hidden inside the rear fender with just a angled cut tip showing when done. This is where I need two more 45* pieces. 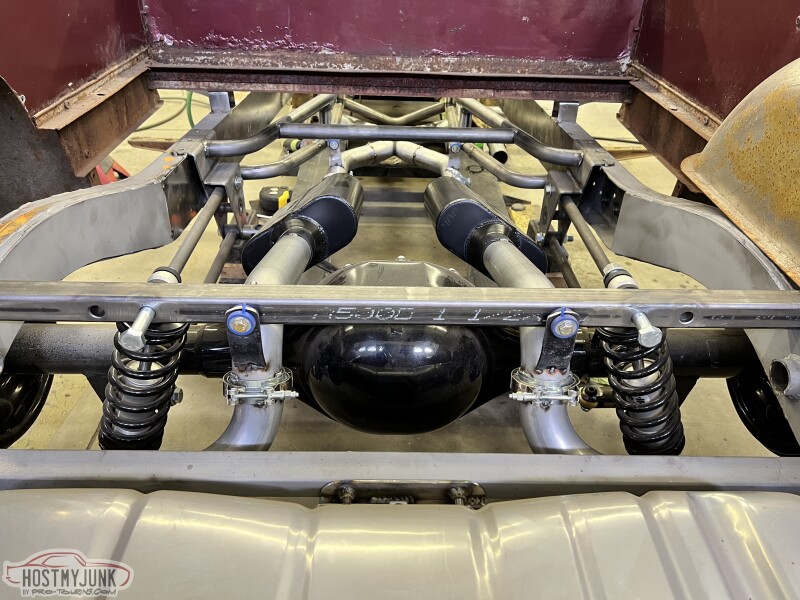 That bracket clamped to the frame is just there to make sure of placement and the two sides matching. 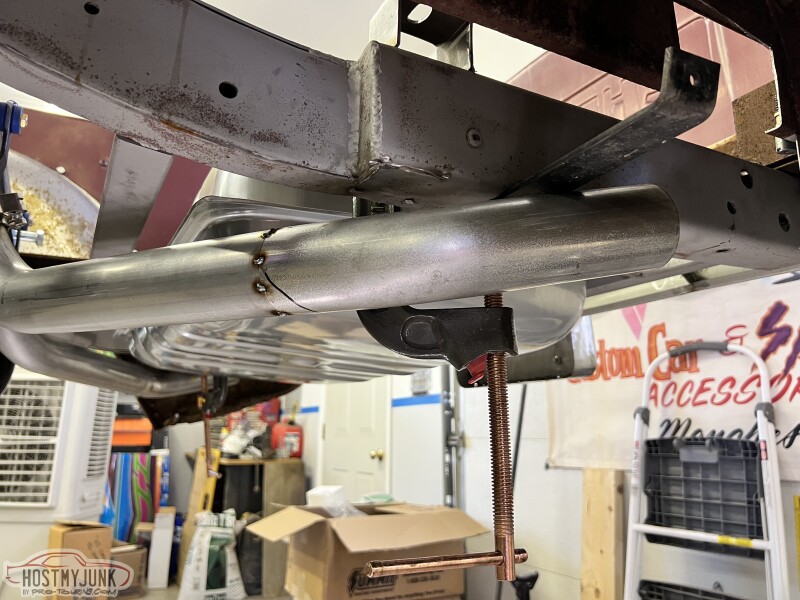
__________________
Glenn 1951 3100, Area51 1955 BelAir, 4EVER17 1987 R10, Ethel Copper Hill Rod & Custom http://67-72chevytrucks.com/vboard/s...d.php?t=829856 |
|
|

|
|
|
#59 |
|
Registered User
Join Date: Jan 2022
Location: Conn.
Posts: 184
|
Re: Long Time Coming......
__________________
Glenn 1951 3100, Area51 1955 BelAir, 4EVER17 1987 R10, Ethel Copper Hill Rod & Custom http://67-72chevytrucks.com/vboard/s...d.php?t=829856 |
|
|

|
|
|
#60 |
|
Senior Member
 Join Date: Jan 2015
Location: pembroke pines, fl
Posts: 704
|
Re: Long Time Coming......
looks fantastic!
|
|
|

|
|
|
#61 |
|
Registered User
 Join Date: Mar 2007
Location: Scotts, Michigan
Posts: 3,773
|
Re: Long Time Coming......
Nice work on the exhaust.
Marc
__________________
…………...........__________ .................. ((__|__||___\____ ..;.;;.:;:;.,;..;((_(O))____ (_(O)) 1948 Chevy Truck - Finished SOLD!! 1953 Chevy Suburban "Family Truckster" Completed: Spring of 2021 http://67-72chevytrucks.com/vboard/s...d.php?t=605484 1994 4x4 Blazer - "Field Find" https://67-72chevytrucks.com/vboard/...ferrerid=30857 |
|
|

|
|
|
#62 |
|
Senior Member
 Join Date: Mar 2011
Location: West Plains, Missouri
Posts: 7,559
|
Re: Long Time Coming......
Nice job...Jim
__________________
my build thread: http://67-72chevytrucks.com/vboard/s...d.php?t=459839 Jimbo's long bed step build:http://67-72chevytrucks.com/vboard/s...t=464626<br /> |
|
|

|
|
|
#63 |
|
Registered User
Join Date: Jan 2022
Location: Conn.
Posts: 184
|
Re: Long Time Coming......
Thanks guys. Your feedback is appreciated.
__________________
Glenn 1951 3100, Area51 1955 BelAir, 4EVER17 1987 R10, Ethel Copper Hill Rod & Custom http://67-72chevytrucks.com/vboard/s...d.php?t=829856 |
|
|

|
|
|
#64 |
|
Registered User
Join Date: Jan 2022
Location: Conn.
Posts: 184
|
Re: Long Time Coming......
So the 45* pieces I needed came in just in time for my usual Saturday workout in the shop. From my previous post you could see that's all I need to finish the project. I had hoped top have this part done quickly, but like everything else things just take time. I kept measuring and cutting one of the ends for the passenger side until it fit to the current pipe and also at the rear fender. Once that was done I cut the second 45* end I had so they matched. At first I just used masking tape to hold them in place to check for side to side clearance and make sure they looked right, and even. At that point I grabbed my trusty Sharpie and marked the ends where I wanted them to be. One last cut for each tip and I was ready to tack them in place. I whipped up another tab to weld to the frame and another to the tailpipe for support.
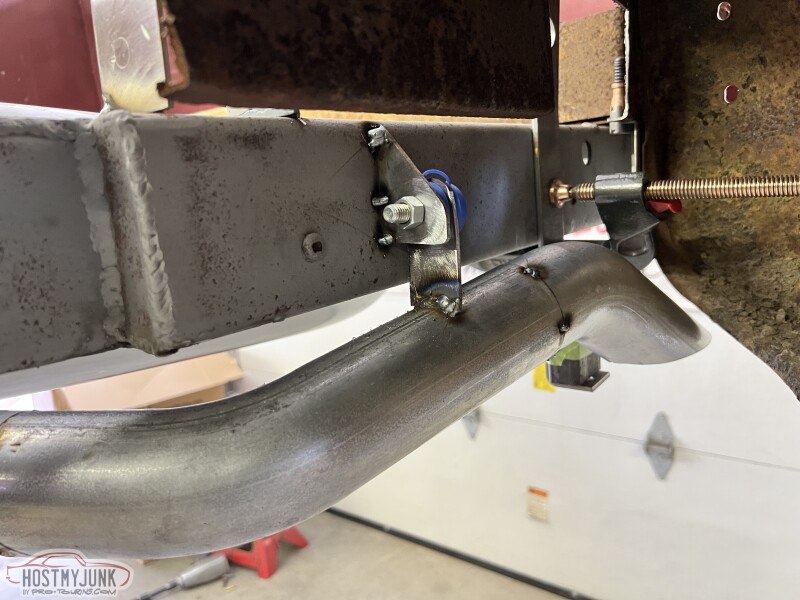 As you can see with the bologna cut the tip is now horizontal and level with the ground. The very end just sticks out. This is a picture with the truck up on my lift. 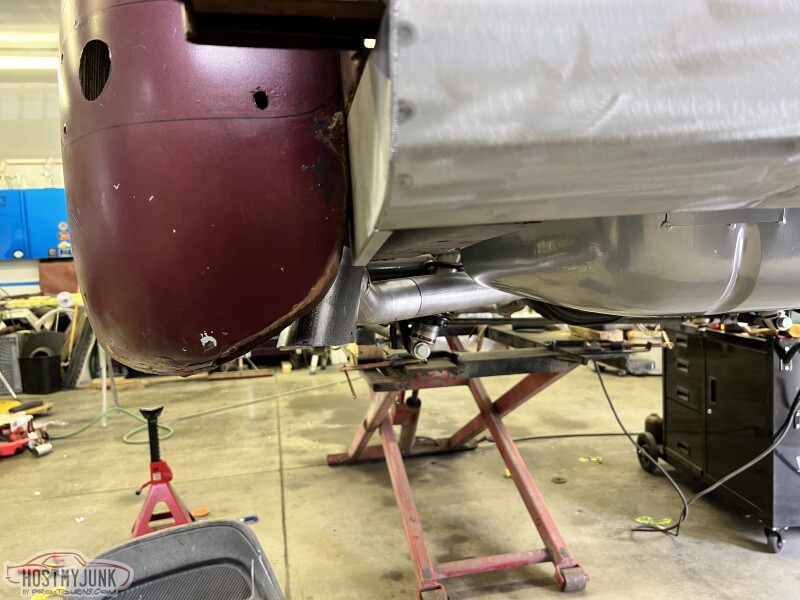 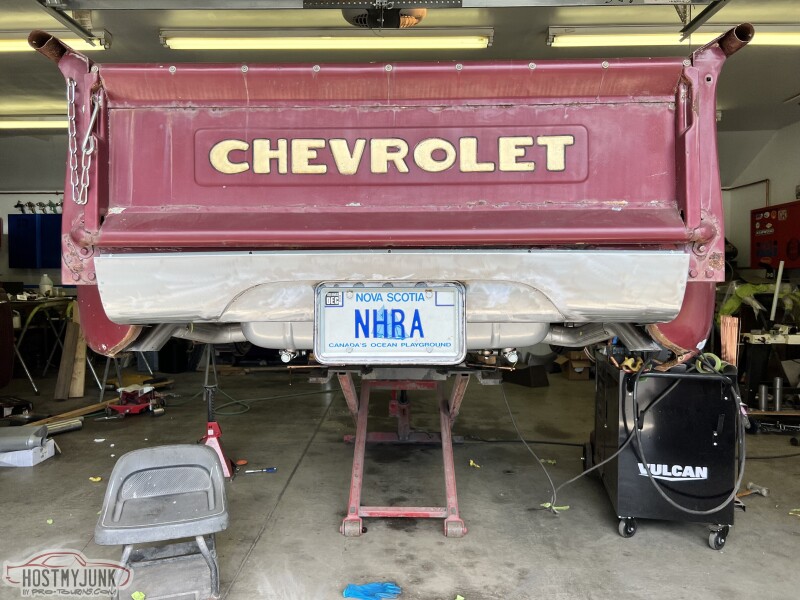 This is pretty much at ride height, maybe a little high. But as you can see the tail pipes and tips are virtually impossible to see. 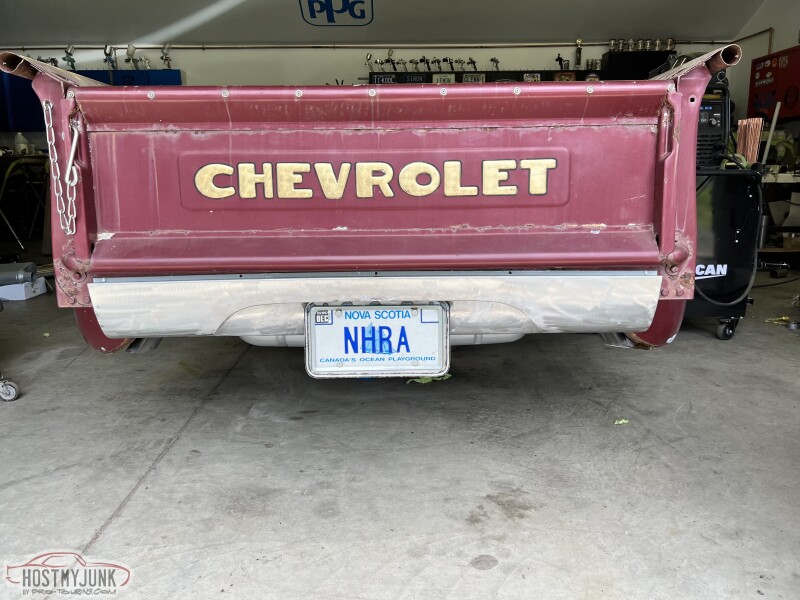 I then unbolted the entire system and fully welded it. Now I will just clean up some of the welds a little bit and off to get coated for my appointment on July 25th. 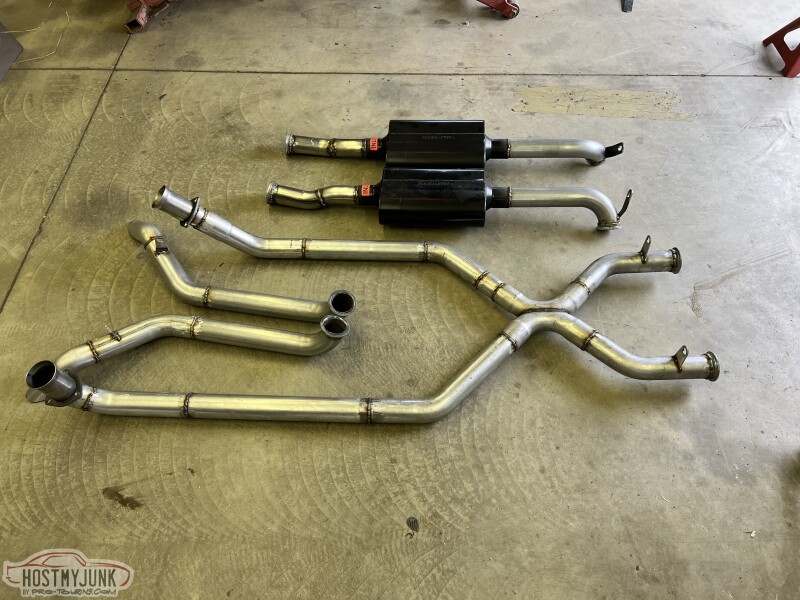 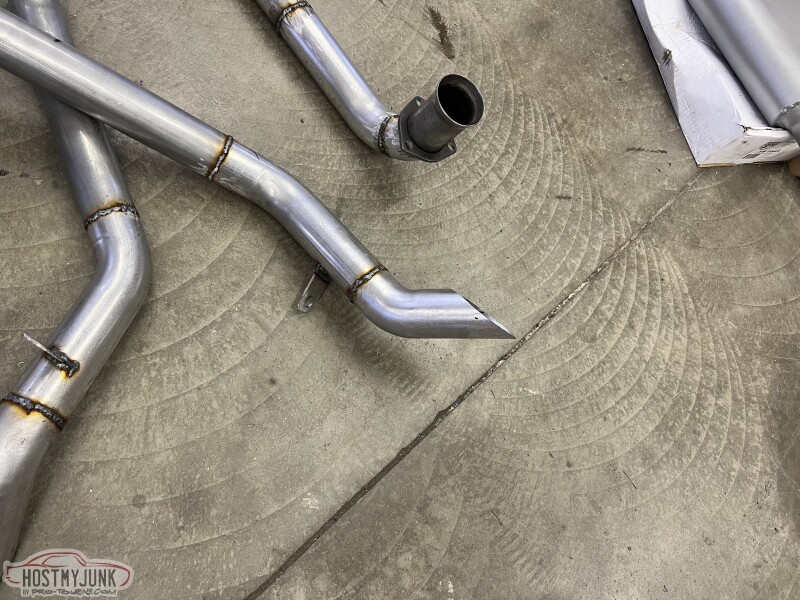 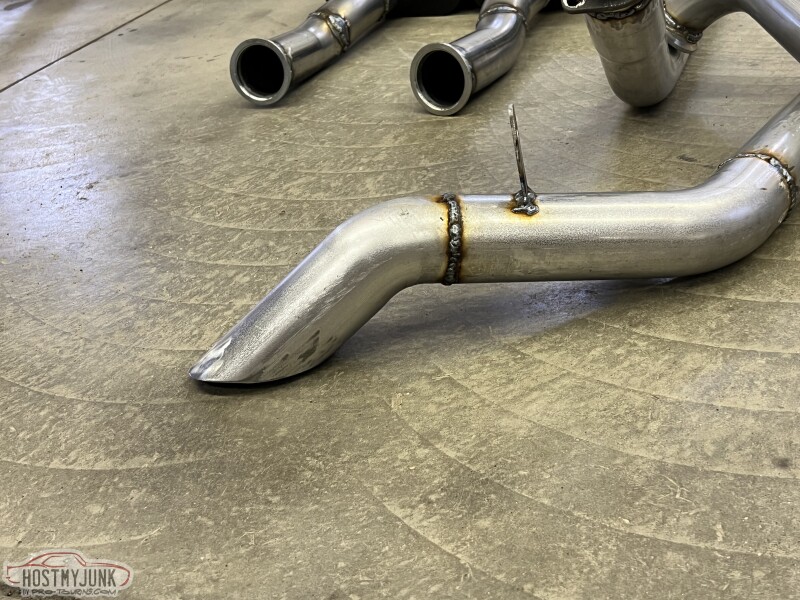 I hope you all are enjoying the build so far. I know I am having a blast doing it. I get a few comments here and there so I know some are watching. Thanks to you all.
__________________
Glenn 1951 3100, Area51 1955 BelAir, 4EVER17 1987 R10, Ethel Copper Hill Rod & Custom http://67-72chevytrucks.com/vboard/s...d.php?t=829856 |
|
|

|
|
|
#65 |
|
Registered User
 Join Date: Mar 2007
Location: Scotts, Michigan
Posts: 3,773
|
Re: Long Time Coming......
That exhaust is fantastic. Tip placement and size is often overlooked but its one of those details that really make a difference.
Looking great. Marc
__________________
…………...........__________ .................. ((__|__||___\____ ..;.;;.:;:;.,;..;((_(O))____ (_(O)) 1948 Chevy Truck - Finished SOLD!! 1953 Chevy Suburban "Family Truckster" Completed: Spring of 2021 http://67-72chevytrucks.com/vboard/s...d.php?t=605484 1994 4x4 Blazer - "Field Find" https://67-72chevytrucks.com/vboard/...ferrerid=30857 |
|
|

|
|
|
#66 |
|
Registered User
Join Date: Nov 2014
Location: somewhere, PA
Posts: 1,088
|
Re: Long Time Coming......
those little blue isolators ... you like em? they looks like an awesome execution, think they'll hold up?
|
|
|

|
|
|
#67 | |
|
Registered User
Join Date: Jan 2022
Location: Conn.
Posts: 184
|
Re: Long Time Coming......
Quote:
Honestly, I'm hopeful. I love the look and idea of them. I see a lot of them being used by builders doing full chassis so I would think they must work. But I also read a few reviews that said they melted. Time will tell right?!?!
__________________
Glenn 1951 3100, Area51 1955 BelAir, 4EVER17 1987 R10, Ethel Copper Hill Rod & Custom http://67-72chevytrucks.com/vboard/s...d.php?t=829856 |
|
|
|

|
|
|
#68 | |
|
Registered User
Join Date: Nov 2014
Location: somewhere, PA
Posts: 1,088
|
Re: Long Time Coming......
Quote:

|
|
|
|

|
|
|
#69 |
|
Registered User
Join Date: Jan 2022
Location: Conn.
Posts: 184
|
Re: Long Time Coming......
It will be a while, but I will keep everyone posted. I'ma. year away from driving this thing. I they fail I will figure something similar out. The bad reviews were just a few, so fingers crossed......
__________________
Glenn 1951 3100, Area51 1955 BelAir, 4EVER17 1987 R10, Ethel Copper Hill Rod & Custom http://67-72chevytrucks.com/vboard/s...d.php?t=829856 |
|
|

|
|
|
#70 |
|
Registered User
 Join Date: Mar 2007
Location: Scotts, Michigan
Posts: 3,773
|
Re: Long Time Coming......
I used (4) of the same insulators on my exhaust. Reaching 4,000 miles since its debut last June and no issues other than the bolts that hold the isolator getting lose due to the SS heating and cooling. It bolted mine to the trans mount which I tapped. I should have just drilled straight thru and used a nut on the backside to keep them tight. That is on me.
Marc
__________________
…………...........__________ .................. ((__|__||___\____ ..;.;;.:;:;.,;..;((_(O))____ (_(O)) 1948 Chevy Truck - Finished SOLD!! 1953 Chevy Suburban "Family Truckster" Completed: Spring of 2021 http://67-72chevytrucks.com/vboard/s...d.php?t=605484 1994 4x4 Blazer - "Field Find" https://67-72chevytrucks.com/vboard/...ferrerid=30857 |
|
|

|
|
|
#71 |
|
Registered User
 Join Date: Feb 2020
Location: Boulder, CO
Posts: 221
|
Re: Long Time Coming......
Nice work on the exhaust. Where did you get the blue isolators from? Thx
|
|
|

|
|
|
#72 | ||
|
Registered User
Join Date: Jan 2022
Location: Conn.
Posts: 184
|
Re: Long Time Coming......
Quote:
Quote:
https://www.summitracing.com/parts/stw-exgro?rrec=true
__________________
Glenn 1951 3100, Area51 1955 BelAir, 4EVER17 1987 R10, Ethel Copper Hill Rod & Custom http://67-72chevytrucks.com/vboard/s...d.php?t=829856 |
||
|
|

|
|
|
#73 |
|
Registered User
Join Date: Jan 2022
Location: Conn.
Posts: 184
|
Re: Long Time Coming......
Not a ton to report for all the hours spent in the shop today. You ever notice how some weeks it feels like there was a huge leap forward in progress, while other weeks even in though the same 6-7 hours was spent it almost looks like nothing happened? Eh, maybe its just me!
In any case, as I am winding down on the fab work for the chassis I am starting to knock off some of the smaller items that need to get done. I started this morning by facing up four stand offs for the E-Stopp electric emergency brake controller. Here they are tack welded to the frame... 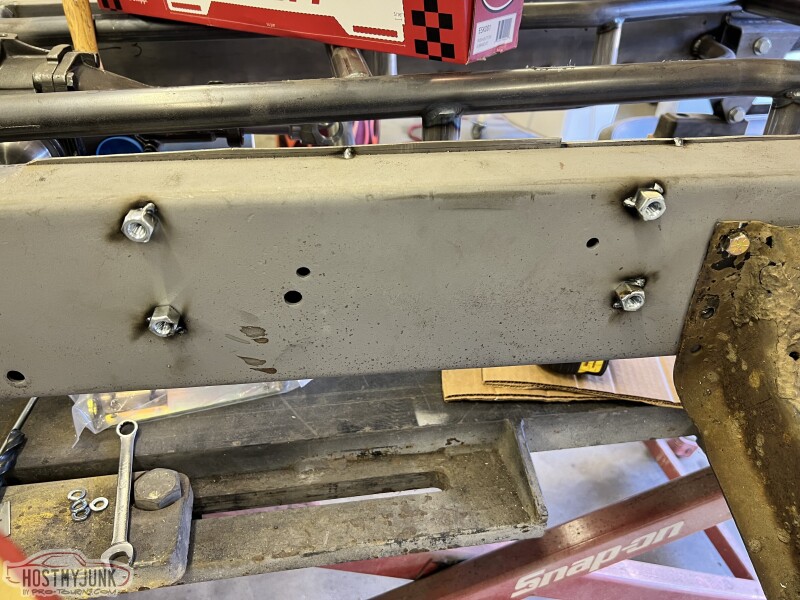 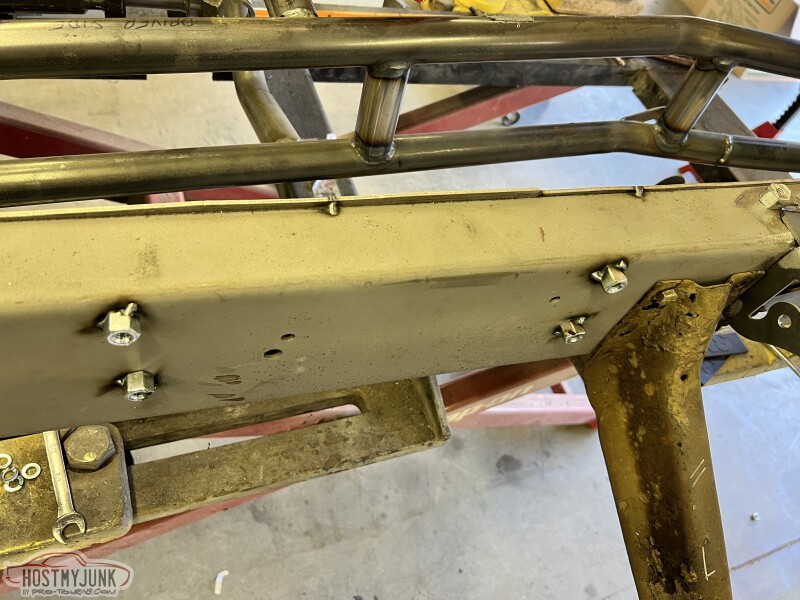 And then the E-Stopp mounted as it will be later on.... 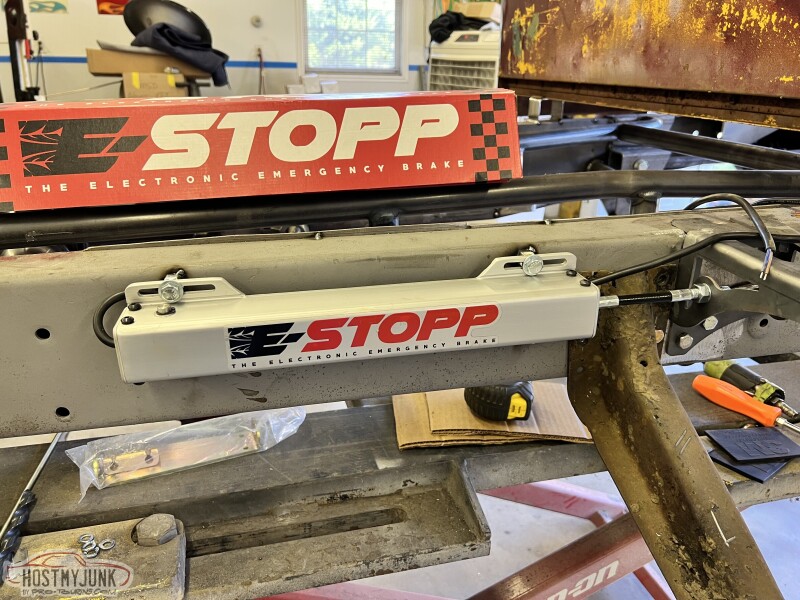 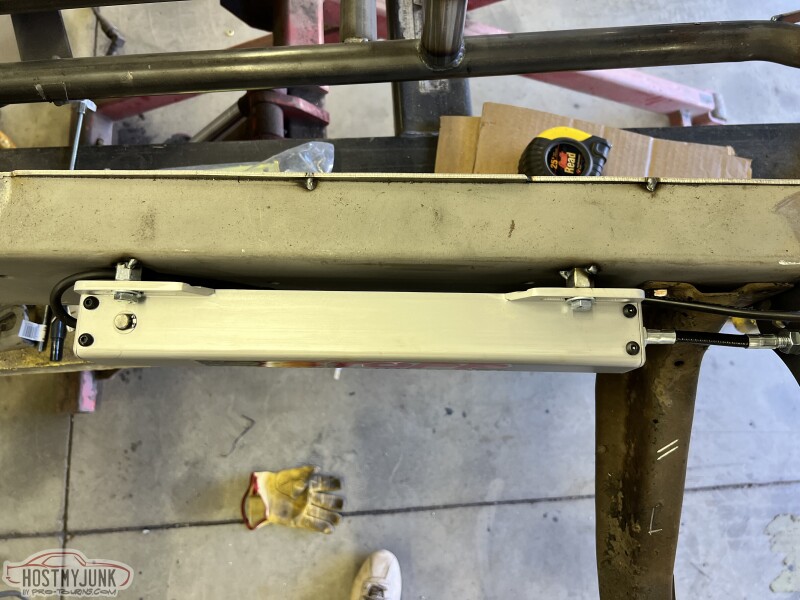 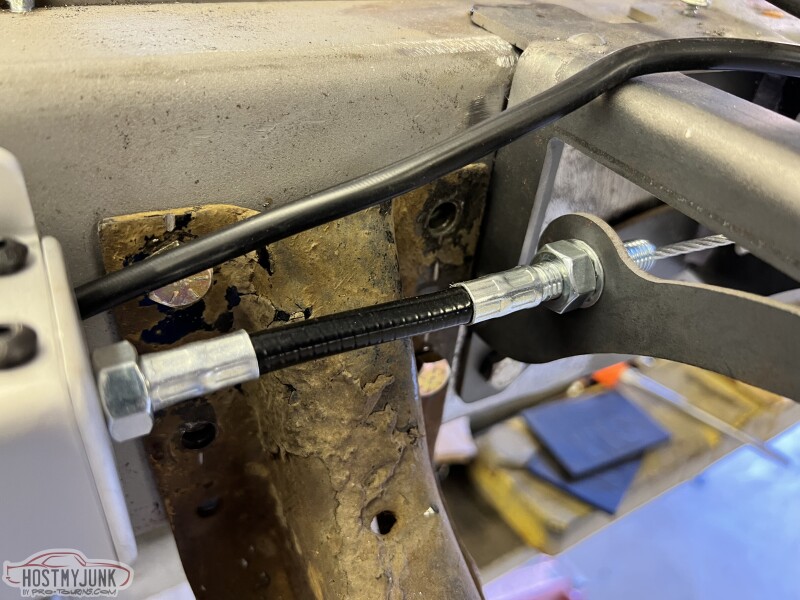 I still need to purchase the emergency brake cables and connection fittings. I am traveling next week to the Syracuse Nationals and hope to find a Show Special on them rather then find them online and pay shipping. I also got the battery box mounted. I really wish there was a better location for the battery in these trucks. But, I am hoping to need very little access to it once done. my plan is to make the obvious battery connections, but also run a second set of cable to an accessible set of jumper lugs for use with a trickle charger or jumper cables if the need should ever arise. 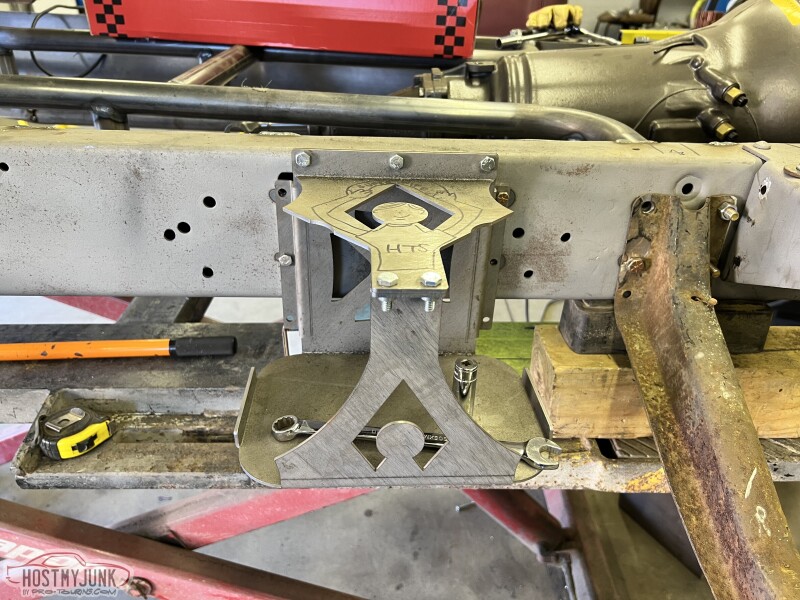 And lastly for the week, I had this cart left over from work a few years ago. I cut down a bit for height, then widened the stance for the castors. I also added a couple bars front and back. This is now drilled and ready to mount the bed to when I take it off the truck next time. With this set up as it is I will be able to bolt the bed down in the factory locations and have it stable for when I need to move it around and/or trailer it to the booth for body/paint. 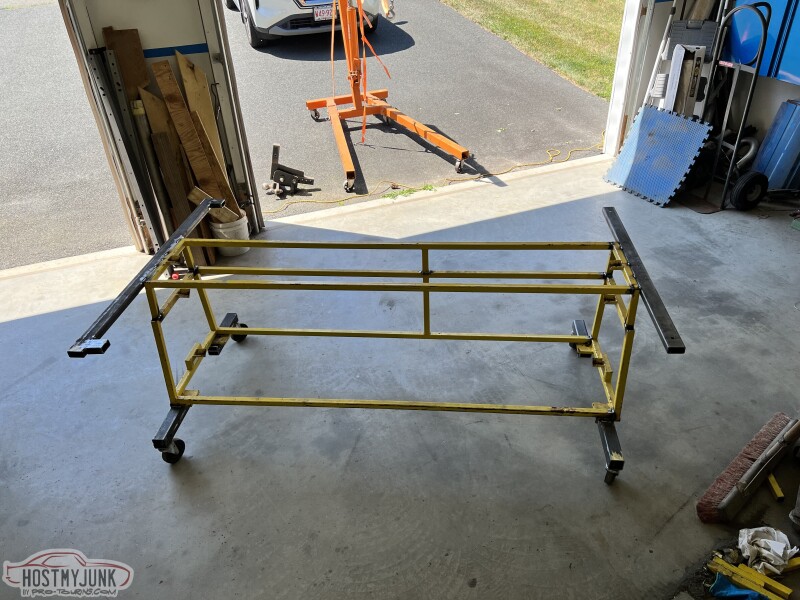 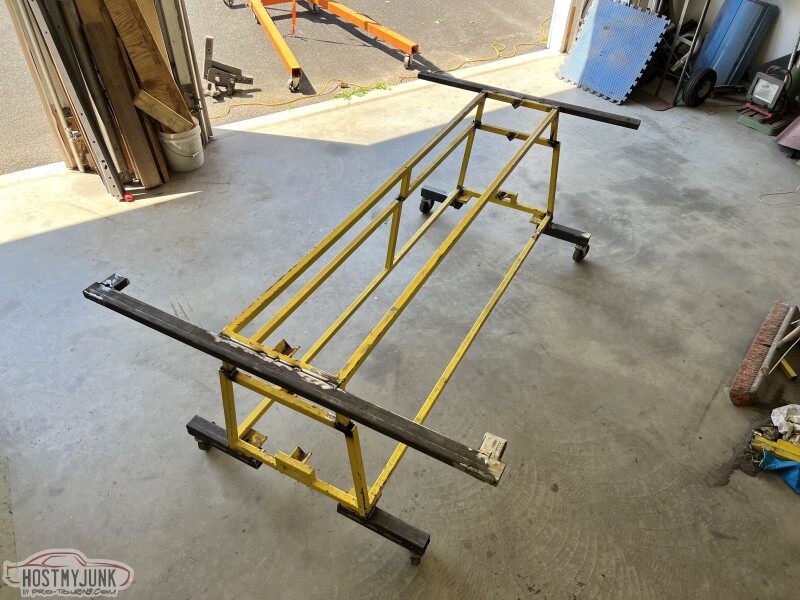
__________________
Glenn 1951 3100, Area51 1955 BelAir, 4EVER17 1987 R10, Ethel Copper Hill Rod & Custom http://67-72chevytrucks.com/vboard/s...d.php?t=829856 |
|
|

|
|
|
#74 |
|
Registered User
Join Date: Jan 2022
Location: Conn.
Posts: 184
|
Re: Long Time Coming......
The final thing to do before I remove the bed was make a fuel fill tube to connect the fill cap and the gas tank. I purchased a few pieces of 2.25" mandrel bent tubing for this.
A look up into the rear fender...... 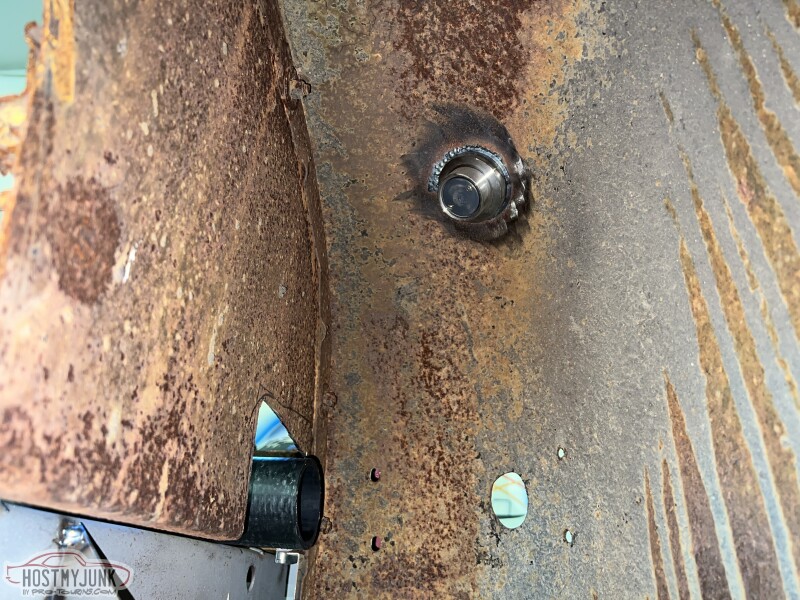 I then started with this piece of tubing..... 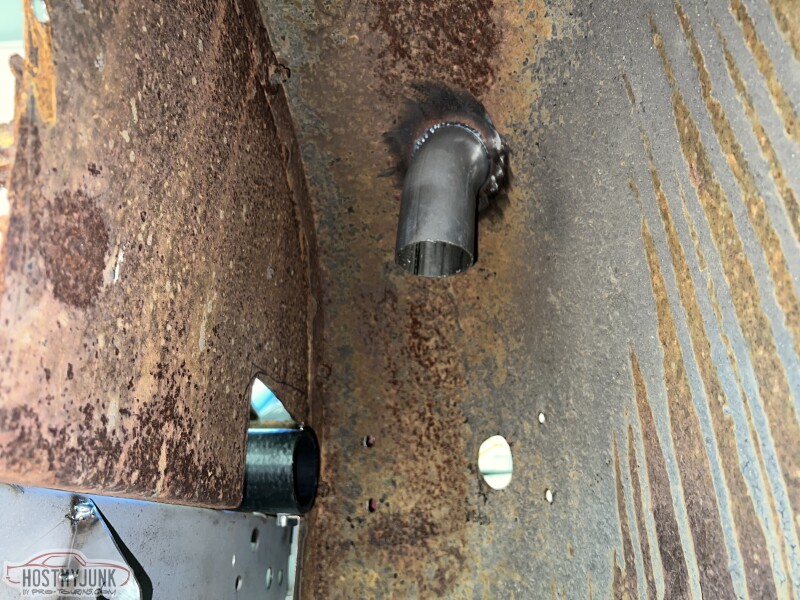 And working my way down to the rubber connection hose..... 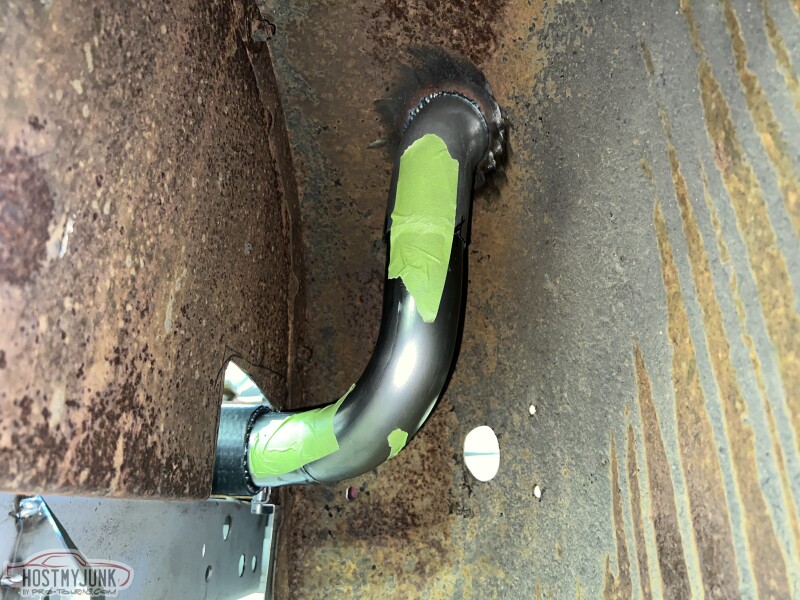 After tacking it together I pulled it out and welded it solid all the way around.... 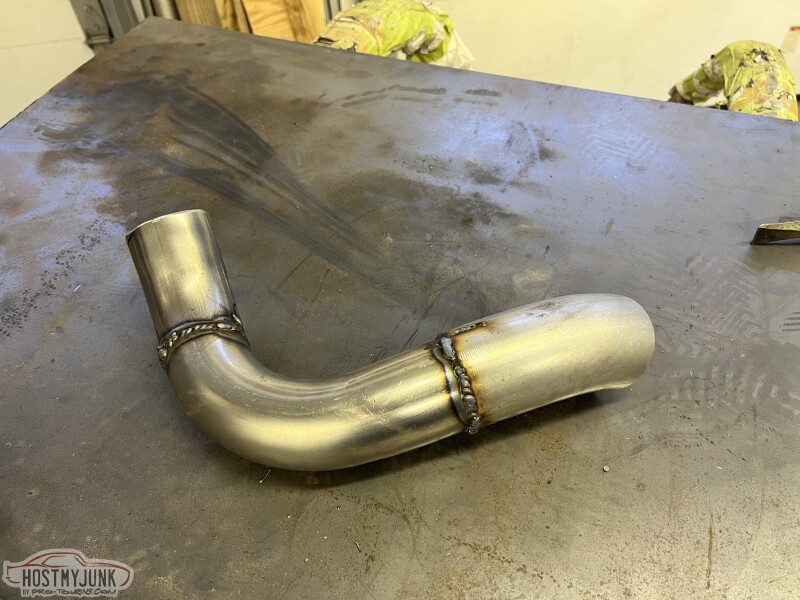 And finally for now it is installed and tacked to the filler cap base. I then made a supporting rod to help hold it and keep the weight of it from just being supported by the fill cap. 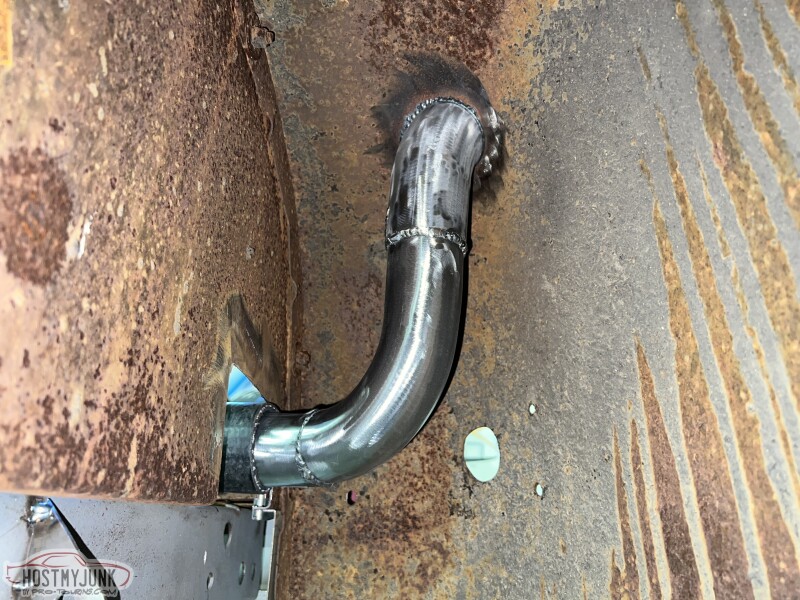 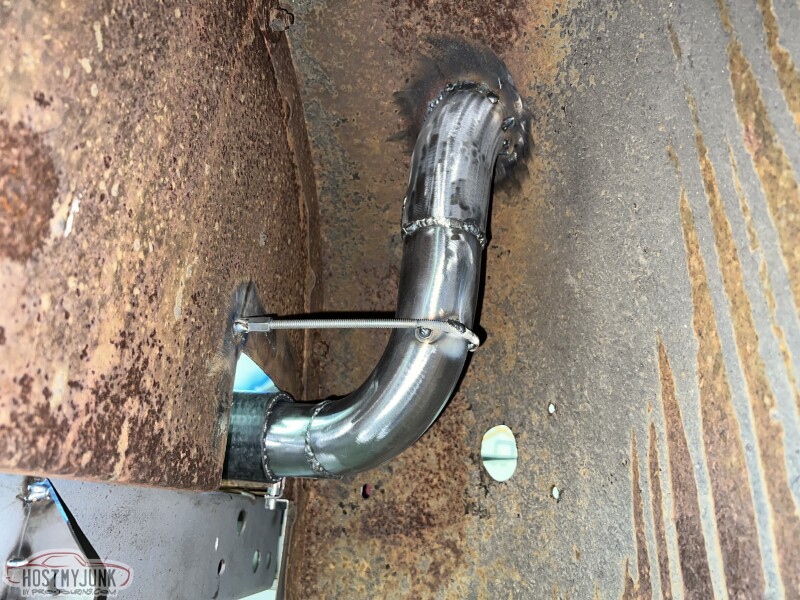
__________________
Glenn 1951 3100, Area51 1955 BelAir, 4EVER17 1987 R10, Ethel Copper Hill Rod & Custom http://67-72chevytrucks.com/vboard/s...d.php?t=829856 |
|
|

|
|
|
#75 |
|
Registered User
Join Date: Nov 2012
Location: Albuquerque New Mexico
Posts: 187
|
Re: Long Time Coming......
Very nice work! I have been following along and I admire a lot of the work you have done.
I also notice that you and I have fabricated fairly similar roll pans and we are both using the same gas tank. If you don't mind me asking, where did you pick up the filler neck cap? That is a neat sleek way of doing it. |
|
|

|
 |
| Bookmarks |
|
|