
|
|
|
 06-29-2012, 05:19 PM
|
#1 |
|
Registered User
Join Date: Jul 2011
Location: El Campo, Tx
Posts: 1,246
|
Re: '55 International Metal/Body/Paint Work
Nice man!!! How do u do it when you put another piece of metal on that you have to weld on? How do u prep the inside, do you use weld through primer or how do you keep the inner coating from burning off? Does that make any sense?
Posted via Mobile Device
__________________
72 Chevy blue LWB, 99% original Oklahoma truck, 28,000 miles 72 Chevy SWB: http://67-72chevytrucks.com/vboard/s...d.php?t=486626 (Attempt/Mistake #2) 2003 Harley Davidson Dyna Superglide with 2007 Street Bob front end 2000 Ford F350 Powerstroke 4WD CCLB, 310,000 miles running great (STOLEN St. Patricks Day 2014 AND NEVER RECOVERED) 2002 Ford F250 Powerstroke 4WD CCLB (To replace stolen one) Hook em Horns!!! |

|

|
|
06-29-2012, 08:31 PM
|
#2 |
|
Registered User
Join Date: Jan 2010
Location: columbus, ohio
Posts: 972
|
Re: '55 International Metal/Body/Paint Work
I love watching folks do what they want with some metal, and a welder.
__________________
Going through life's daily grind, I can feel the effects of this physical body's fleeting days, But with a young spirit I look toward a brighter day, knowing that in the eyes of eternity, I am but a babe in the arms of my Lord......... |
|
|
|
|
07-01-2012, 12:46 PM
|
#3 |
|
Registered User
 Join Date: Mar 2005
Location: apple valley, ca
Posts: 2,670
|
Re: '55 International Metal/Body/Paint Work
If I ever win the lottery, I'll keep you busy for years!!!
Nice work, John!
__________________
Check out my latest endeavor: https://roundsixpod.com My build threads: '55 Chevy: http://67-72chevytrucks.com/vboard/s...d.php?t=247512 '64 C-20: http://67-72chevytrucks.com/vboard/s...d.php?t=446527 |
|
|
|
|
07-06-2012, 08:53 PM
|
#4 | |||
|
Registered User
Join Date: May 2011
Location: Anderson SC
Posts: 3,881
|
Re: '55 International Metal/Body/Paint Work
Quote:
Quote:
Quote:

__________________
Project Goldilocks '66 C10 Short Fleet BBW Build '65 C10 Highly Detailed Stock Restoration Thread '78 Camaro Targa Roof Build '55 International Metal/Body/Paint Work '66 F100 Full Rotisserie Restoration '40 Packard 120 Convertible Coupe Restoration How To Restore and Detail an Original Gauge Cluster How To Detail Sand Body Panels, Edges, Corners, Etc |
|||
|
|
|
|
07-08-2012, 04:18 PM
|
#5 |
|
Registered User
Join Date: Jul 2011
Location: El Campo, Tx
Posts: 1,246
|
Re: '55 International Metal/Body/Paint Work
Astro I feel like you are holding out on pics of paint! I have been drooling over that red paint in those little teaser pics on the "cut and buff" thread. Now we just need some visual relief in the form of some big pictures of this truck!
__________________
72 Chevy blue LWB, 99% original Oklahoma truck, 28,000 miles 72 Chevy SWB: http://67-72chevytrucks.com/vboard/s...d.php?t=486626 (Attempt/Mistake #2) 2003 Harley Davidson Dyna Superglide with 2007 Street Bob front end 2000 Ford F350 Powerstroke 4WD CCLB, 310,000 miles running great (STOLEN St. Patricks Day 2014 AND NEVER RECOVERED) 2002 Ford F250 Powerstroke 4WD CCLB (To replace stolen one) Hook em Horns!!! |
|
|
|
|
07-31-2012, 03:58 PM
|
#6 |
|
Registered User
Join Date: Jul 2012
Location: South Jersey, NJ
Posts: 4
|
Re: '55 International Metal/Body/Paint Work
I have a 49 international, im glad the body work was done when I bought it, just had to do the rest! haha I wish i knew body work...
|
|
|
|
|
08-14-2012, 09:31 AM
|
#7 | ||
|
Registered User
Join Date: May 2011
Location: Anderson SC
Posts: 3,881
|
Re: '55 International Metal/Body/Paint Work
Quote:
Quote:
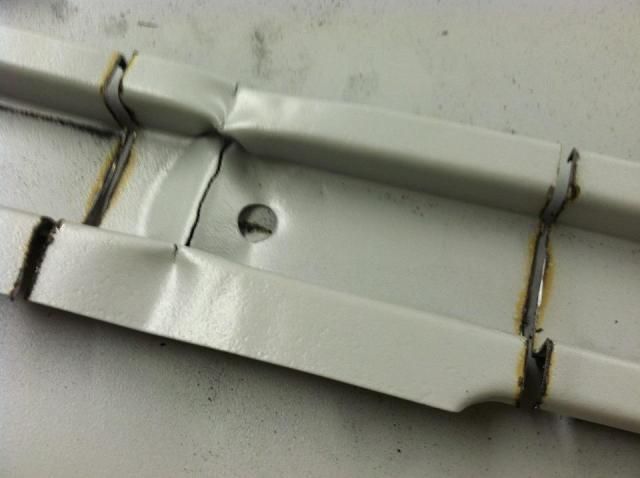
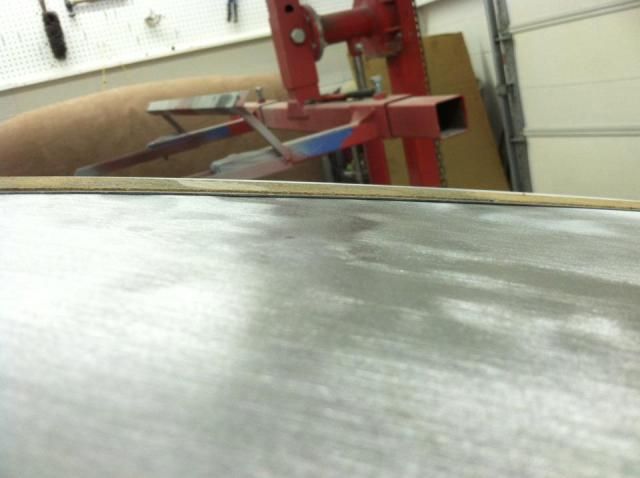
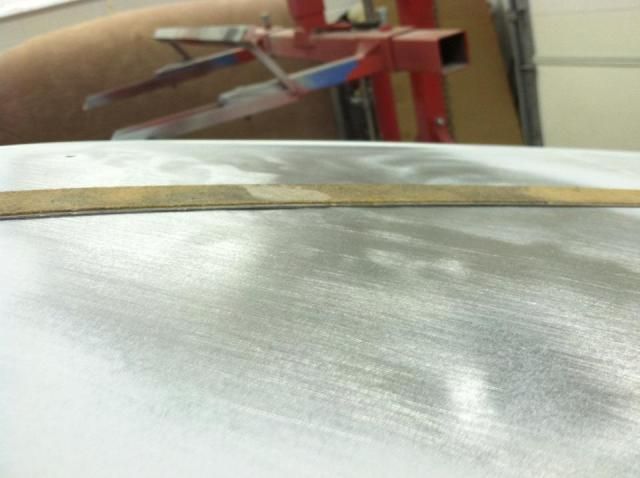
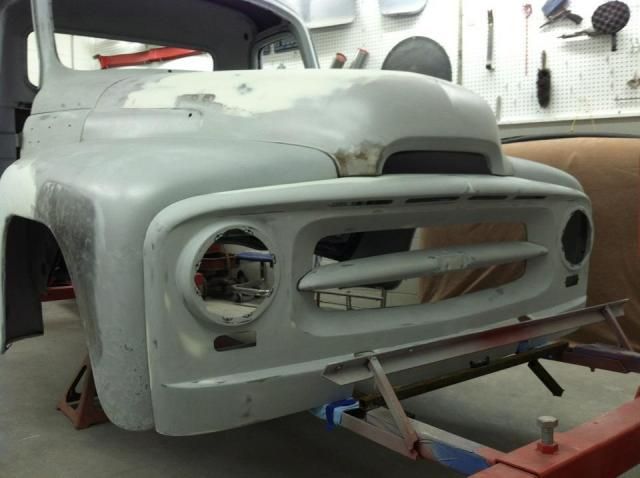
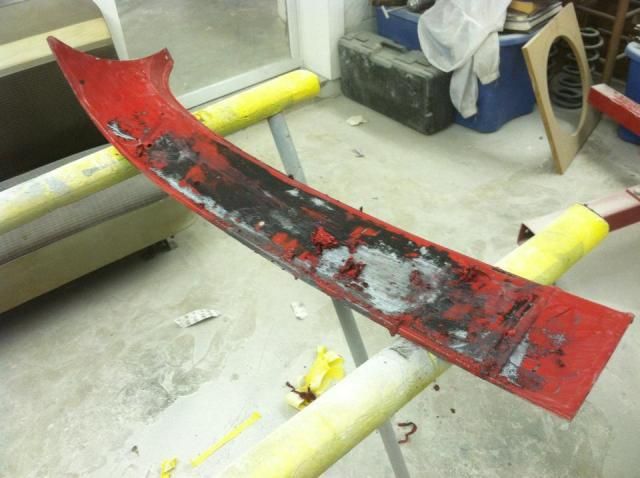
Here's pics of the hood. The inner brace was bent and broken, there was large dents and creases, and a small spot of rust in the nose. Fixing the rust. 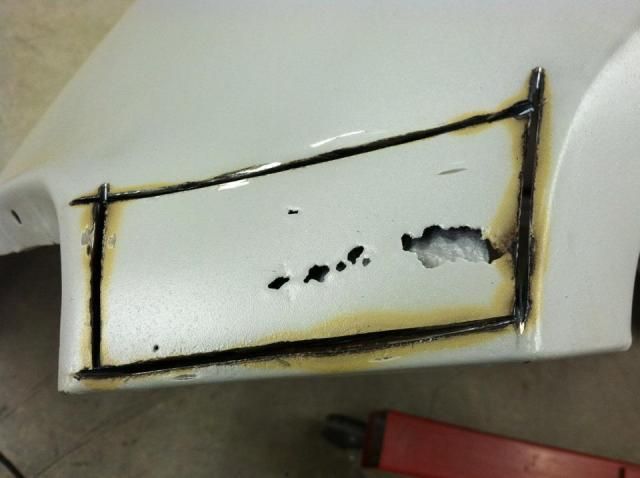 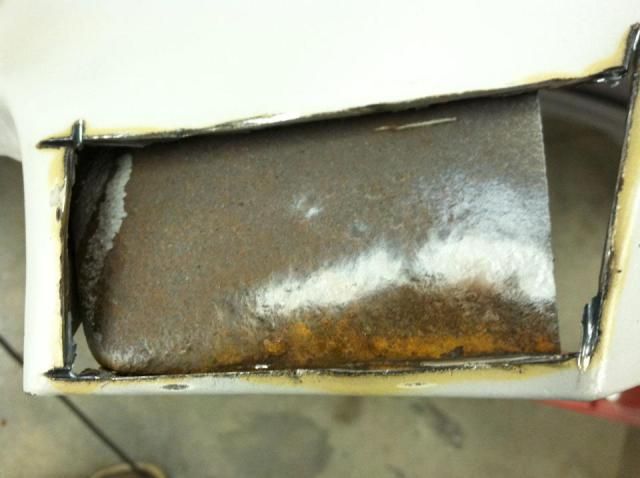 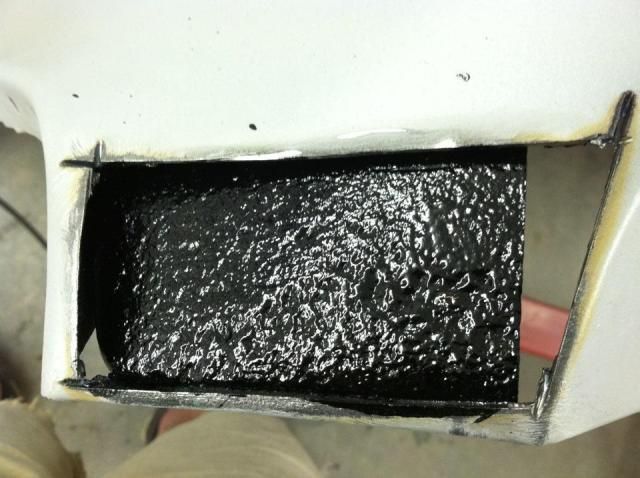 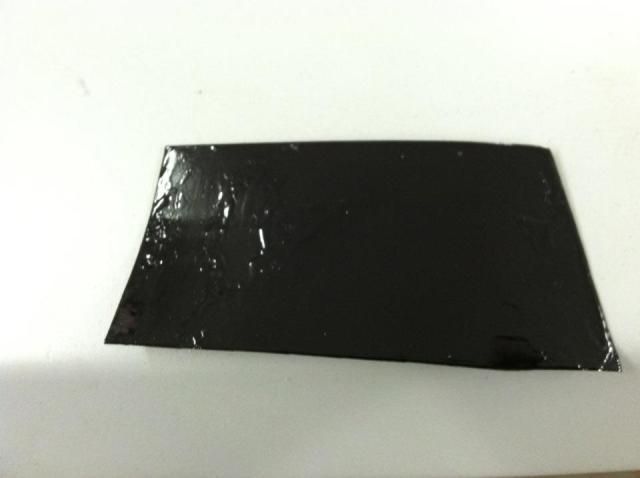 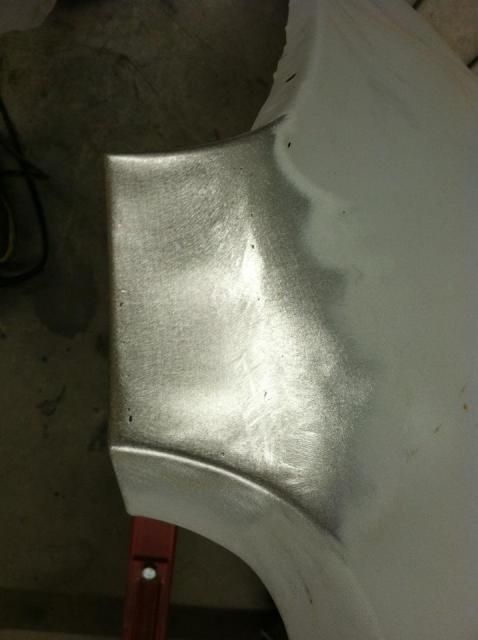 Busted inner brace. 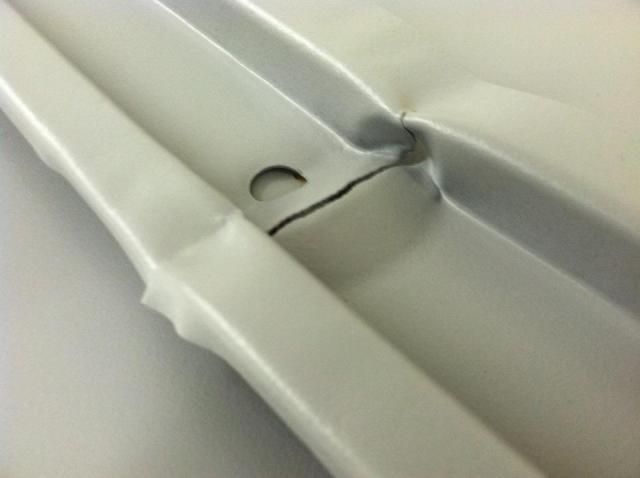 Large creases and low spots on the front of the hood top. 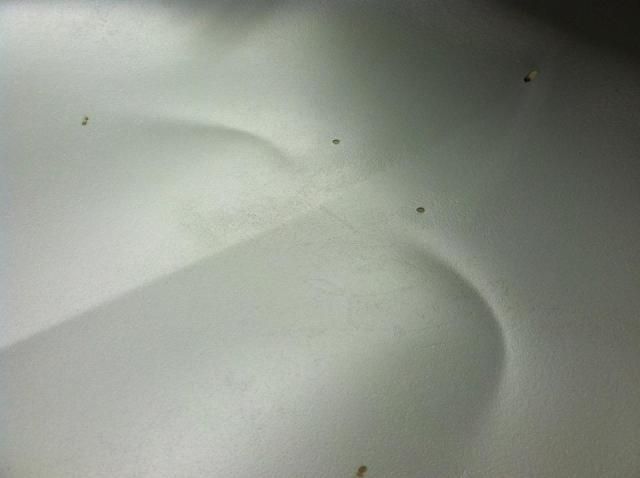 Crease at the rear edge. 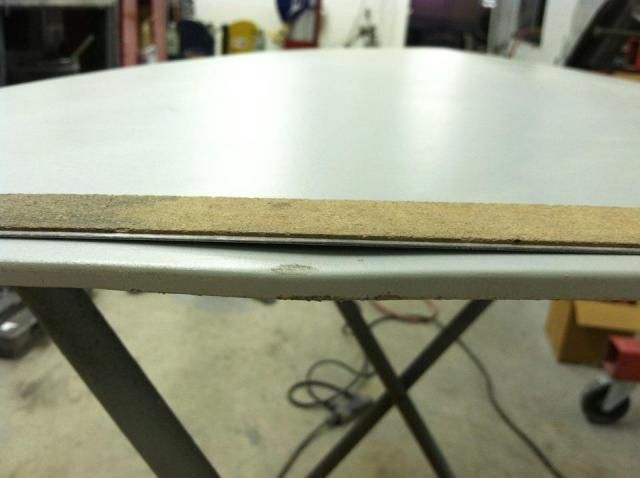 Good size dent and crease on the side of the hood. 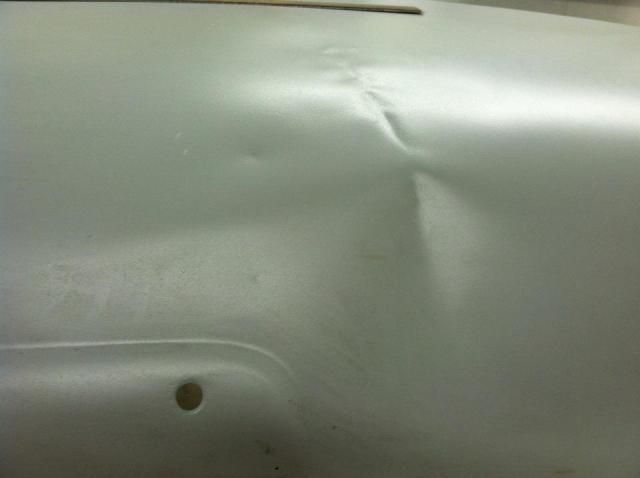
__________________
Project Goldilocks '66 C10 Short Fleet BBW Build '65 C10 Highly Detailed Stock Restoration Thread '78 Camaro Targa Roof Build '55 International Metal/Body/Paint Work '66 F100 Full Rotisserie Restoration '40 Packard 120 Convertible Coupe Restoration How To Restore and Detail an Original Gauge Cluster How To Detail Sand Body Panels, Edges, Corners, Etc Last edited by theastronaut; 08-14-2012 at 09:42 AM. Reason: Added wrong pics |
||
|
|
|
|
08-14-2012, 09:45 AM
|
#8 |
|
Registered User
Join Date: May 2011
Location: Anderson SC
Posts: 3,881
|
Re: '55 International Metal/Body/Paint Work
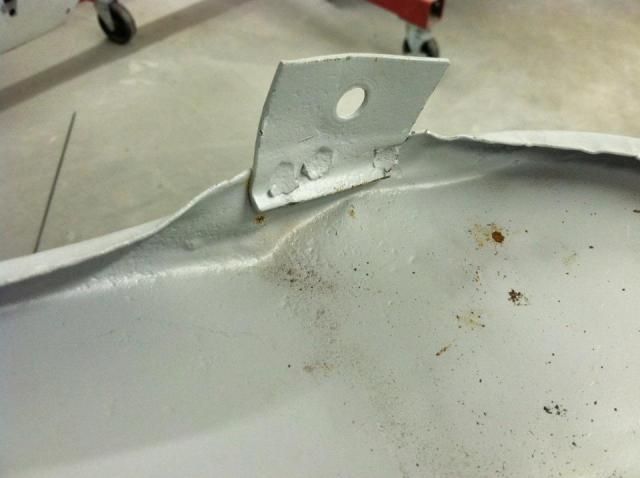
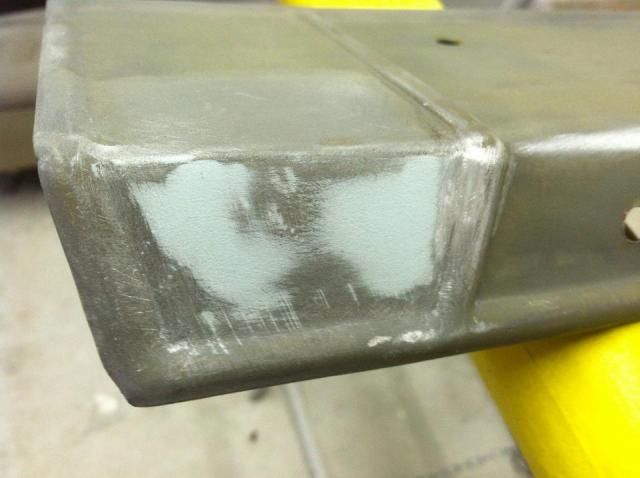
Fixing the inner brace. I cut the damages spot out to repair it, then welded it back in.
  Cut it through the cracked area to fix the bent edges. 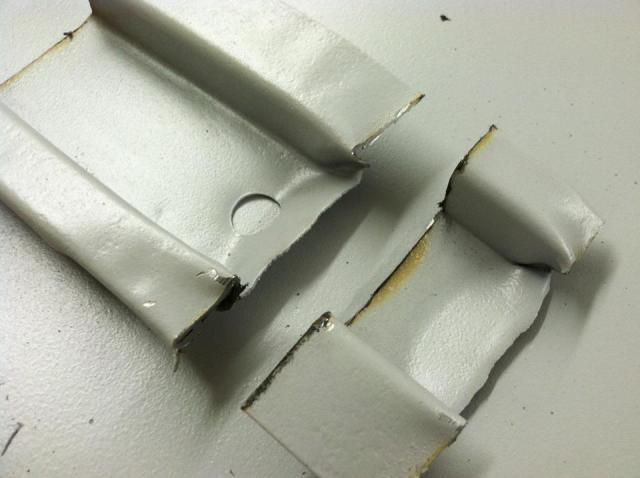 Straightened and welded back in. 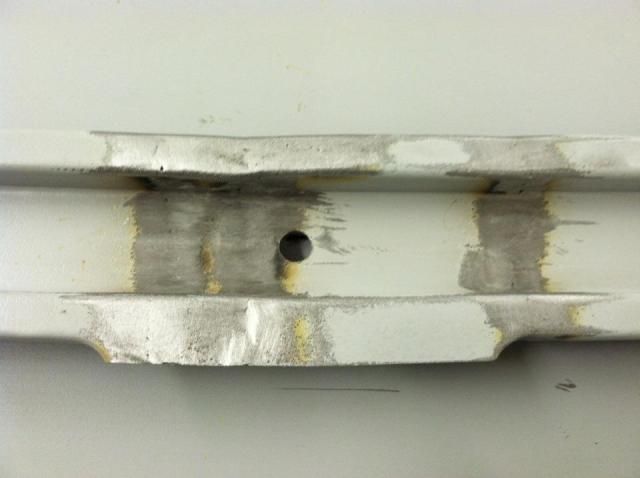 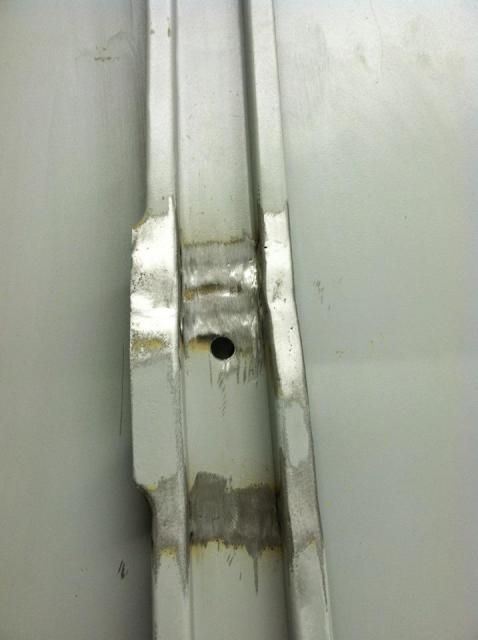
__________________
Project Goldilocks '66 C10 Short Fleet BBW Build '65 C10 Highly Detailed Stock Restoration Thread '78 Camaro Targa Roof Build '55 International Metal/Body/Paint Work '66 F100 Full Rotisserie Restoration '40 Packard 120 Convertible Coupe Restoration How To Restore and Detail an Original Gauge Cluster How To Detail Sand Body Panels, Edges, Corners, Etc |
|
|
|
|
08-14-2012, 09:48 AM
|
#9 |
|
Registered User
Join Date: May 2011
Location: Anderson SC
Posts: 3,881
|
Re: '55 International Metal/Body/Paint Work
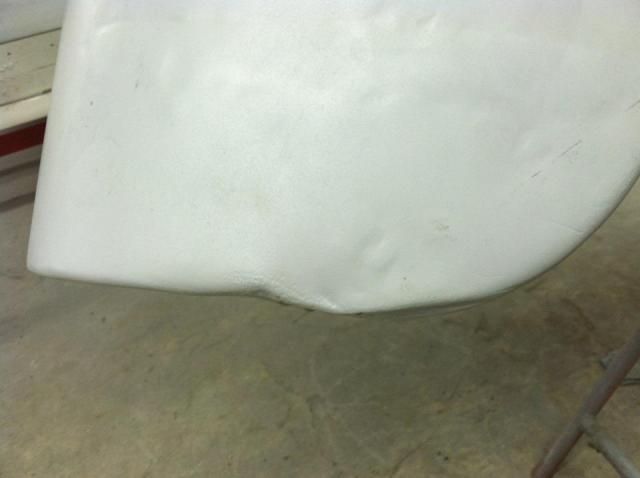
Fixing the dent on the side of the hood.
Roughly beat back into shape. 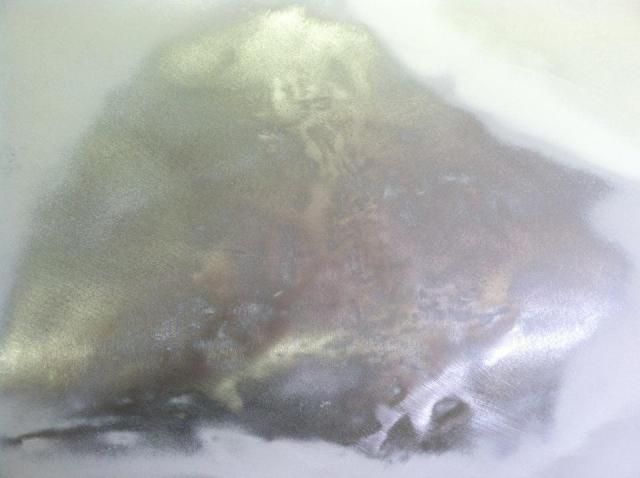 Sanded with a long block to show the high/low spots. 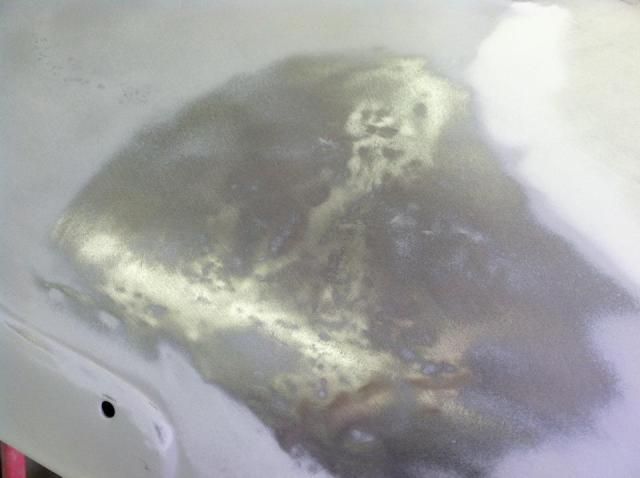 First round of hammer/dolly work to raise/lower the high/low spots. 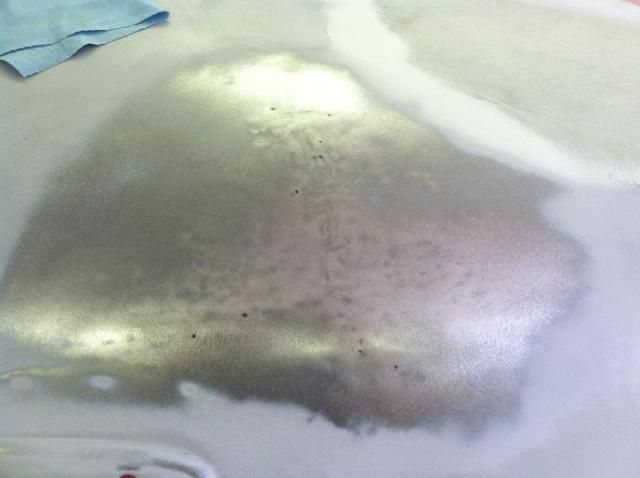 After another round of hammer/dolly work.   
__________________
Project Goldilocks '66 C10 Short Fleet BBW Build '65 C10 Highly Detailed Stock Restoration Thread '78 Camaro Targa Roof Build '55 International Metal/Body/Paint Work '66 F100 Full Rotisserie Restoration '40 Packard 120 Convertible Coupe Restoration How To Restore and Detail an Original Gauge Cluster How To Detail Sand Body Panels, Edges, Corners, Etc |
|
|
|
|
08-14-2012, 10:14 AM
|
#10 |
|
Registered User
Join Date: May 2011
Location: Anderson SC
Posts: 3,881
|
Re: '55 International Metal/Body/Paint Work
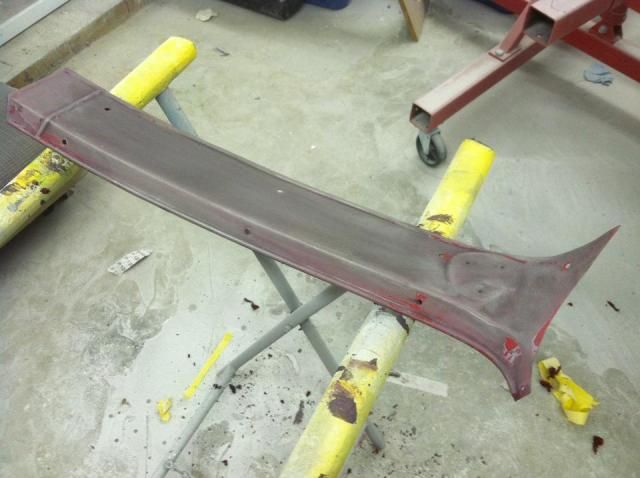
The rest of the hood was straightened with the same process at the dent on the side.
   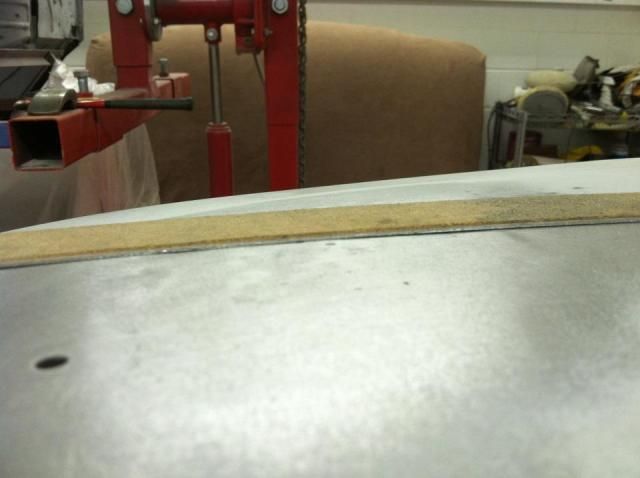  After the hood was straightened, I wanted to check the fit of the hood against the cab. I leveled the cab and used half of the rotisserie to hold the front of the hood. 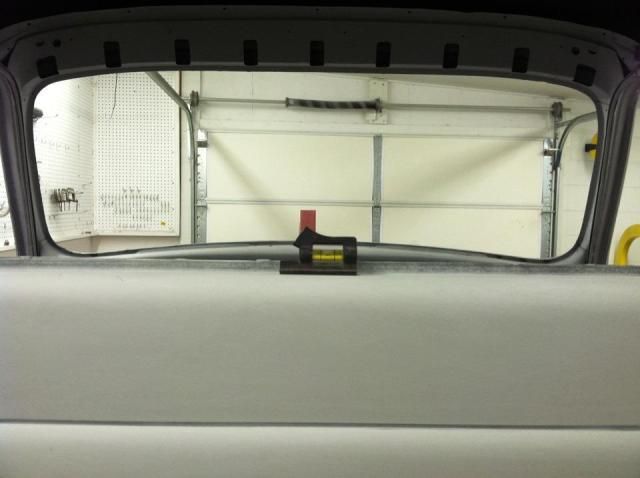 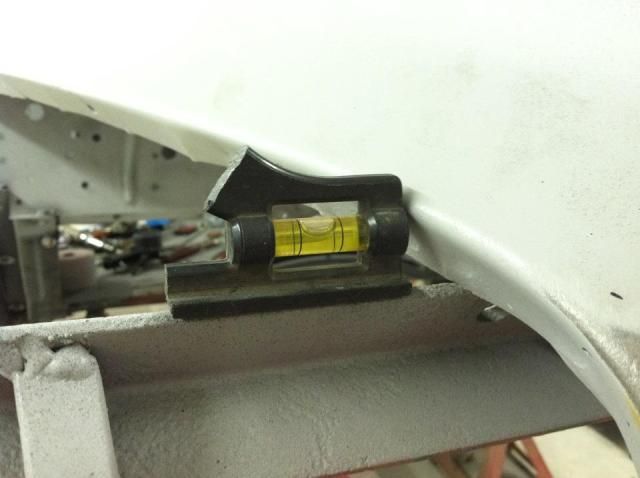
__________________
Project Goldilocks '66 C10 Short Fleet BBW Build '65 C10 Highly Detailed Stock Restoration Thread '78 Camaro Targa Roof Build '55 International Metal/Body/Paint Work '66 F100 Full Rotisserie Restoration '40 Packard 120 Convertible Coupe Restoration How To Restore and Detail an Original Gauge Cluster How To Detail Sand Body Panels, Edges, Corners, Etc |
|
|
|
|
08-14-2012, 10:19 AM
|
#11 |
|
Registered User
Join Date: May 2011
Location: Anderson SC
Posts: 3,881
|
Re: '55 International Metal/Body/Paint Work
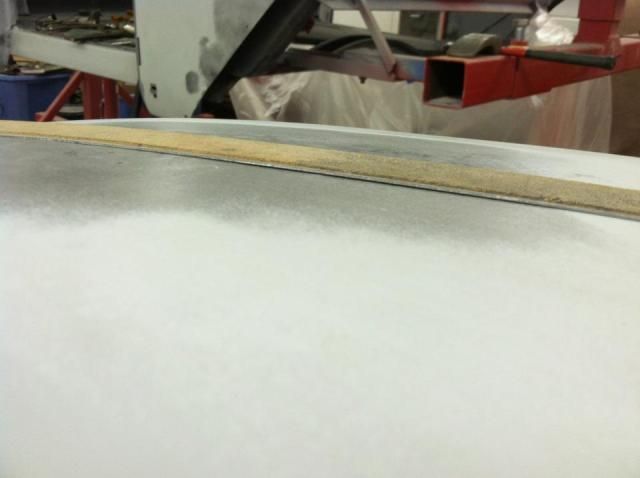
The left side of the hood line up great with the cowl, but the right side was bent out 1 7/16".
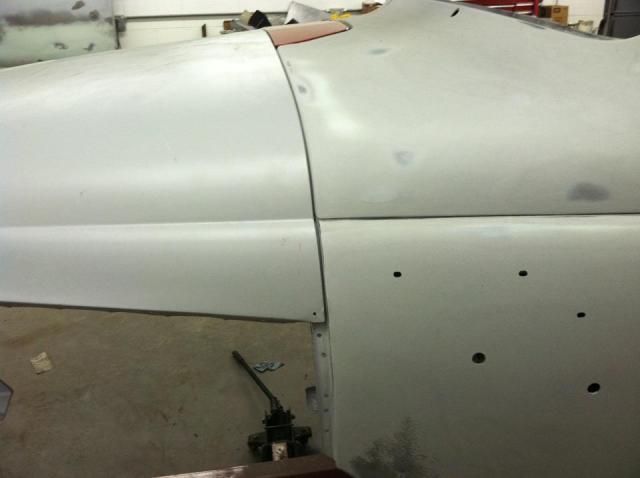 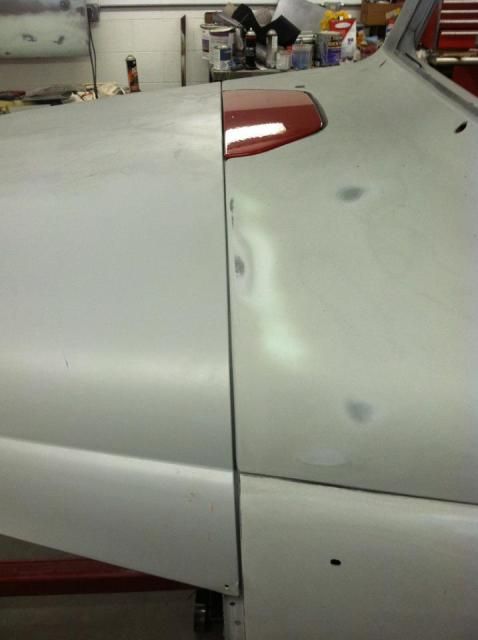 1 7/16" gap on the driver side. 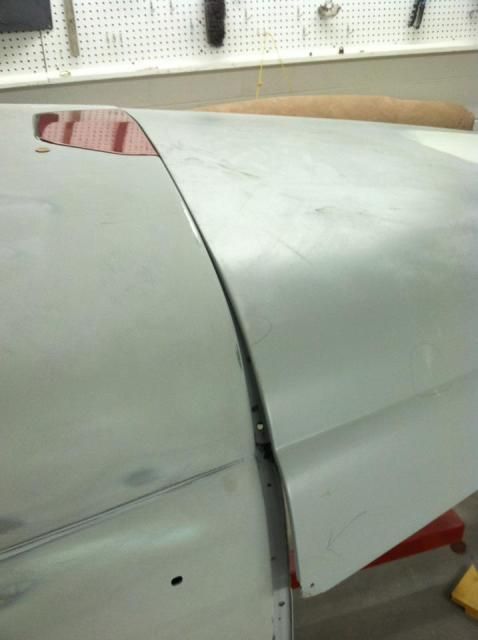 I cut three slices in the inner brace while it was on the truck, pulled the hood into shape, then tack welded the brace back together. This pulled the hood edge back into place against the cowl. The cuts were fully welded up and the weld beads smoothed down. 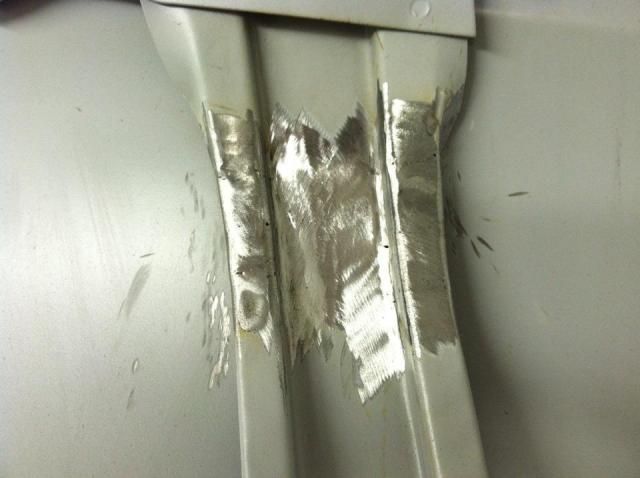 After cutting and reshaping the brace, much better fit. 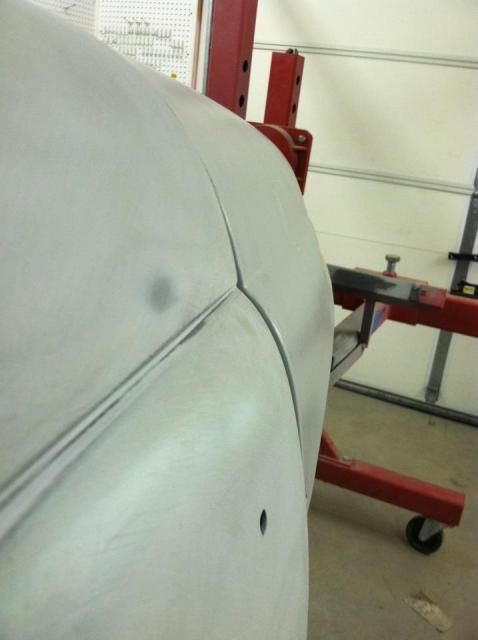 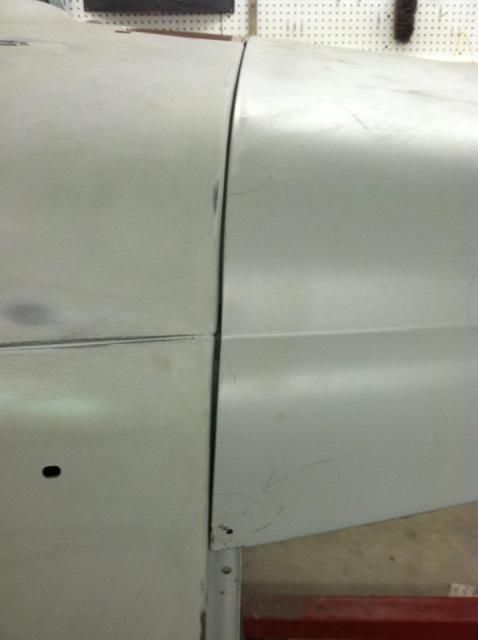 Left side still looks good after reshaping the right side. 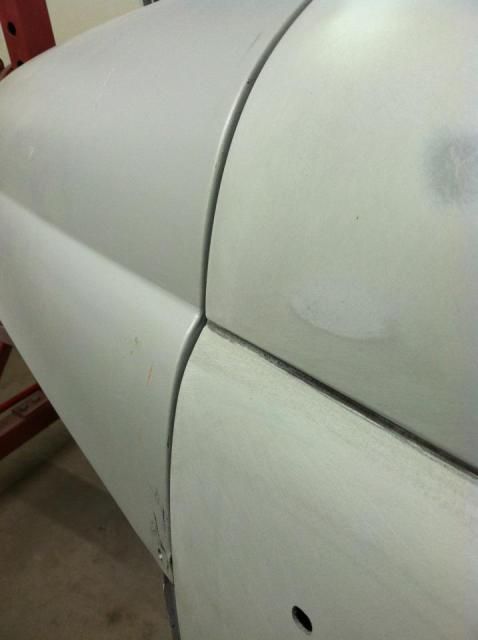
__________________
Project Goldilocks '66 C10 Short Fleet BBW Build '65 C10 Highly Detailed Stock Restoration Thread '78 Camaro Targa Roof Build '55 International Metal/Body/Paint Work '66 F100 Full Rotisserie Restoration '40 Packard 120 Convertible Coupe Restoration How To Restore and Detail an Original Gauge Cluster How To Detail Sand Body Panels, Edges, Corners, Etc |
|
|
|
|
08-14-2012, 10:24 AM
|
#12 |
|
Registered User
Join Date: May 2011
Location: Anderson SC
Posts: 3,881
|
Re: '55 International Metal/Body/Paint Work
The hood latches had surface rust so I bead blasted and painted them. Glass beads are great for latches since they are easy to get out of the latch mechanism- no gritty residue left over.
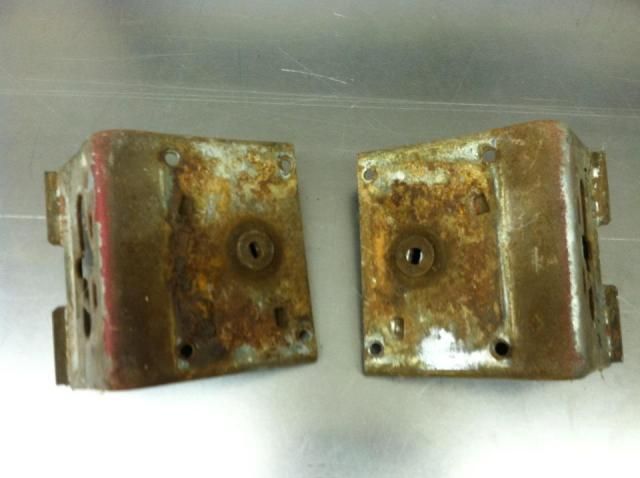 Stamping L&R to keep them from getting mixed up after blasting. Marking them with a marker only works if the part isn't getting stripped and repainted.  Bead blasted. 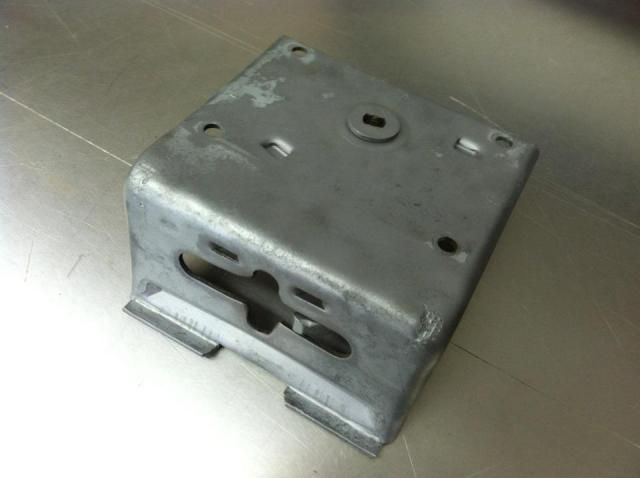 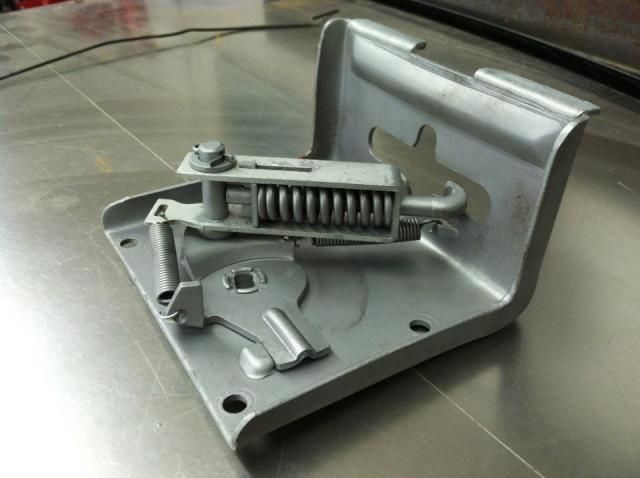 And painted. 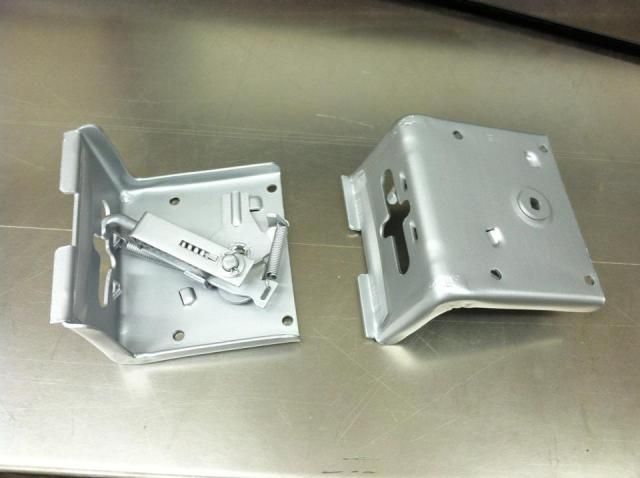
__________________
Project Goldilocks '66 C10 Short Fleet BBW Build '65 C10 Highly Detailed Stock Restoration Thread '78 Camaro Targa Roof Build '55 International Metal/Body/Paint Work '66 F100 Full Rotisserie Restoration '40 Packard 120 Convertible Coupe Restoration How To Restore and Detail an Original Gauge Cluster How To Detail Sand Body Panels, Edges, Corners, Etc |
|
|
|
|
08-14-2012, 10:51 AM
|
#13 |
|
Registered User
Join Date: May 2011
Location: Anderson SC
Posts: 3,881
|
Re: '55 International Metal/Body/Paint Work
The fenders were a nightmare!! The tops were fairly straight but everywhere else had major damage!
This is the passenger front fender, with a huge dent on the wheel opening lip. The lip was severely pushed back into the fender, creating a large bulge around the dent. 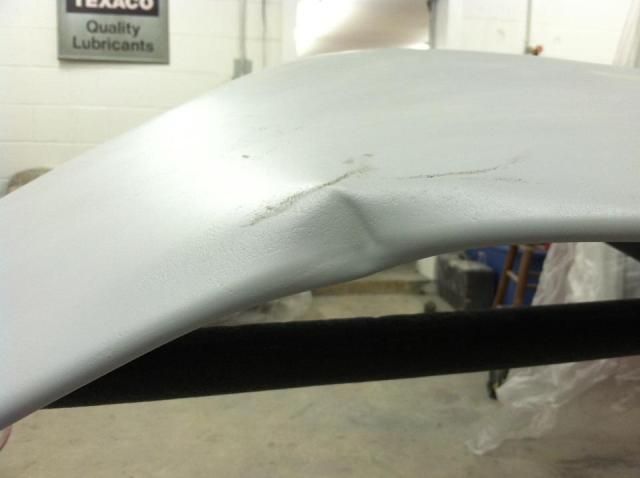 Crumpled front lower area. 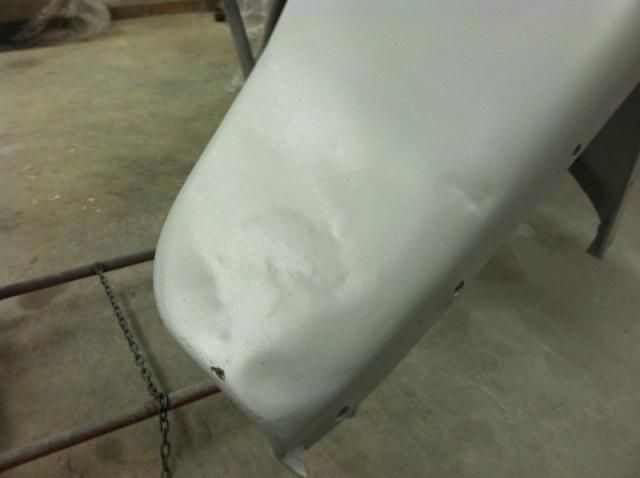 Rear bottom area had been crease and halfway repaired. 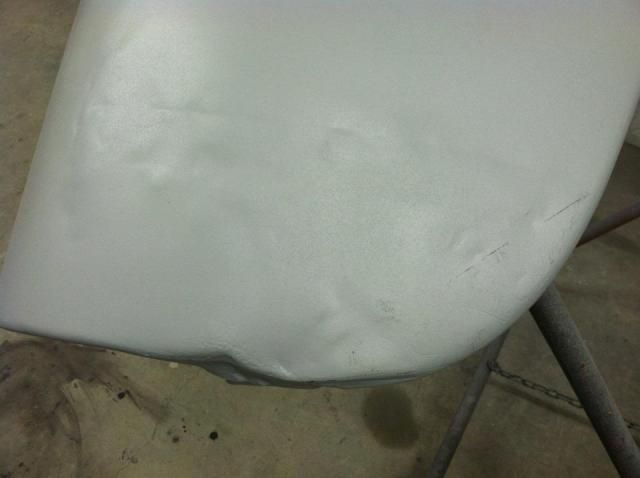 Large area of damage on the rear section. 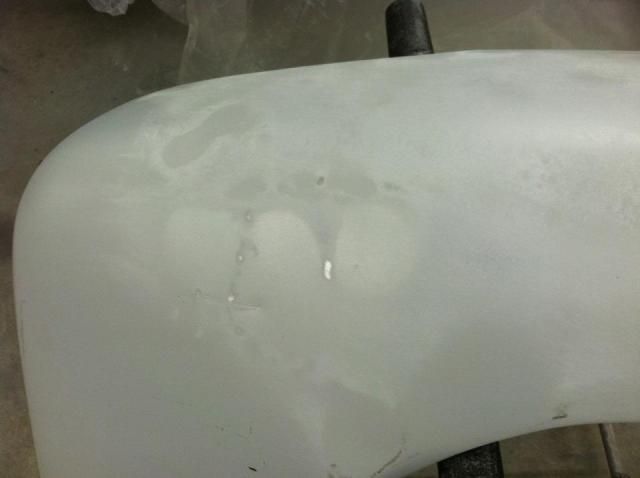 More dents on the front, and the wheel opening lip was cracked. 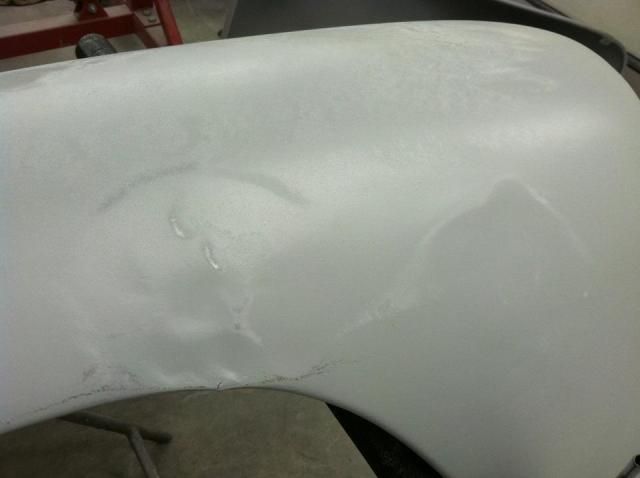
__________________
Project Goldilocks '66 C10 Short Fleet BBW Build '65 C10 Highly Detailed Stock Restoration Thread '78 Camaro Targa Roof Build '55 International Metal/Body/Paint Work '66 F100 Full Rotisserie Restoration '40 Packard 120 Convertible Coupe Restoration How To Restore and Detail an Original Gauge Cluster How To Detail Sand Body Panels, Edges, Corners, Etc |
|
|
|
|
08-14-2012, 10:57 AM
|
#14 |
|
Registered User
Join Date: May 2011
Location: Anderson SC
Posts: 3,881
|
Re: '55 International Metal/Body/Paint Work
Fixing the large dent on the wheel opening lip.
Before. Beginning to work the metal back into shape. This shows just how much the metal had been pushed around. 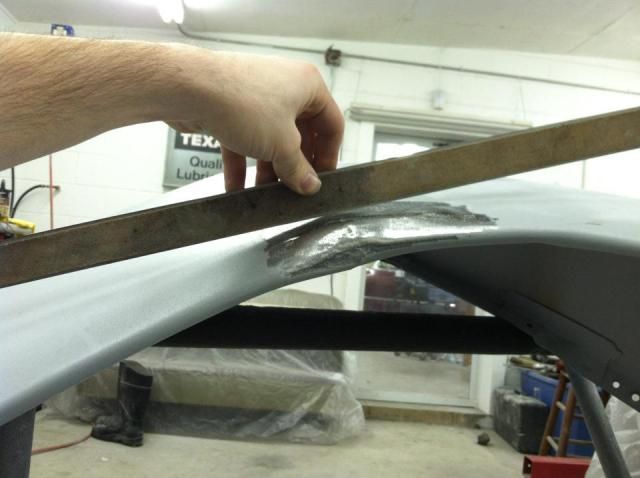 Shrinking, and hammer/dolly work to bring the raised area down. 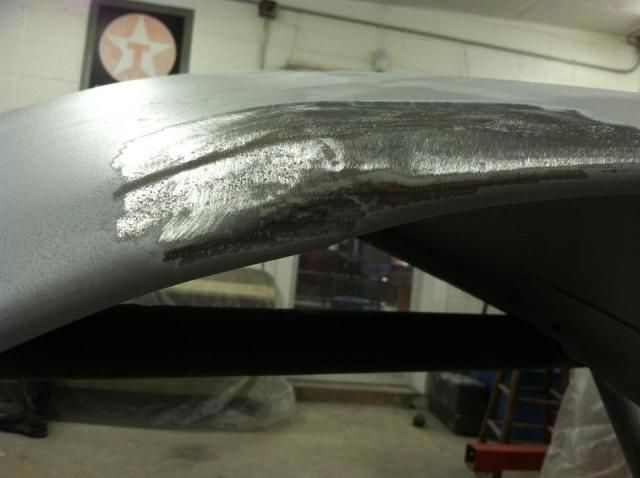 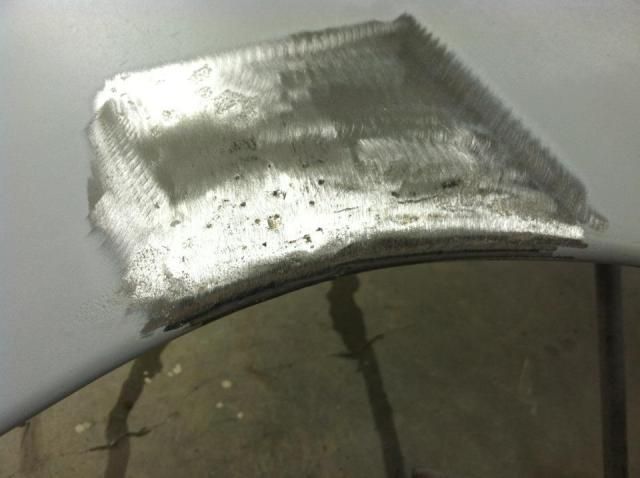 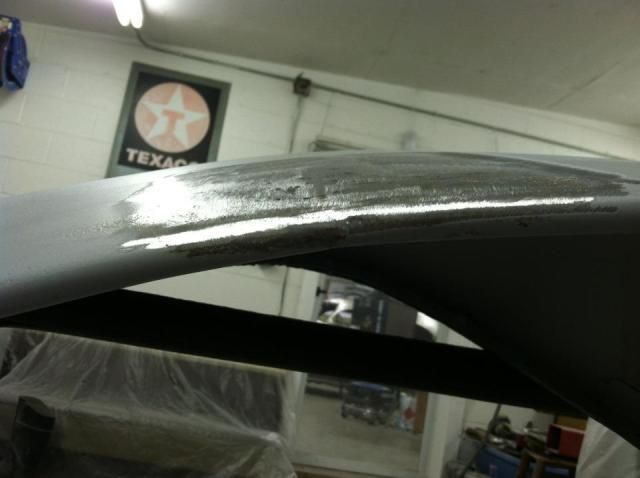 Checking the opening edge shape with a long, flexible ruler. 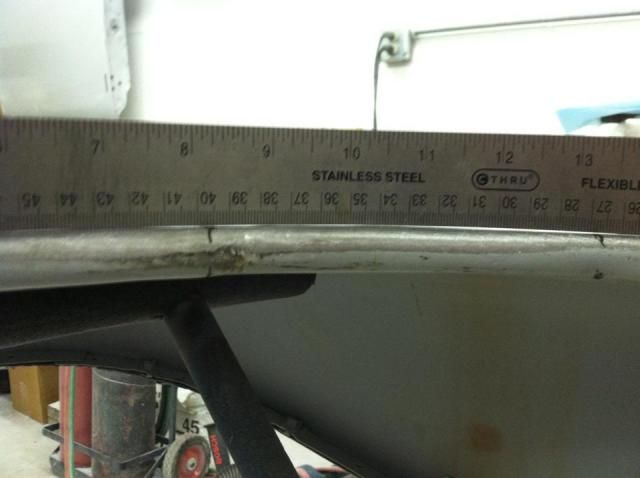 After more shrinking and H/D work. 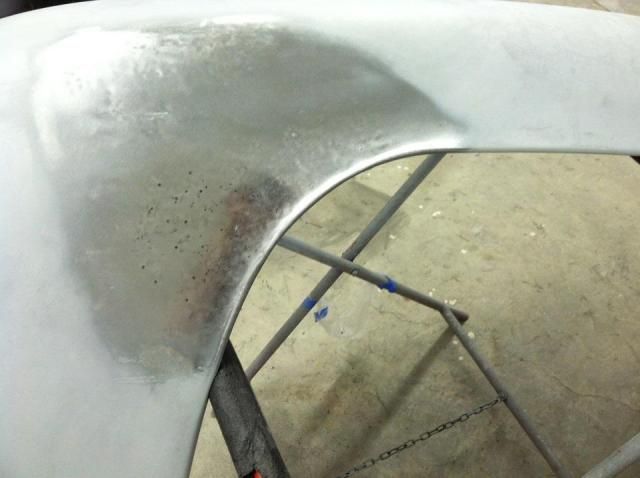 Finished up, the ruler edge would lay down flat all along the opening. 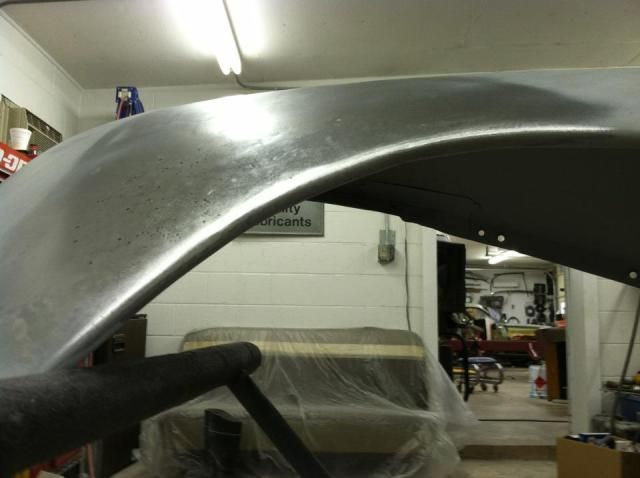
__________________
Project Goldilocks '66 C10 Short Fleet BBW Build '65 C10 Highly Detailed Stock Restoration Thread '78 Camaro Targa Roof Build '55 International Metal/Body/Paint Work '66 F100 Full Rotisserie Restoration '40 Packard 120 Convertible Coupe Restoration How To Restore and Detail an Original Gauge Cluster How To Detail Sand Body Panels, Edges, Corners, Etc |
|
|
|
|
08-14-2012, 11:05 AM
|
#15 |
|
Registered User
Join Date: May 2011
Location: Anderson SC
Posts: 3,881
|
Re: '55 International Metal/Body/Paint Work
The bottom edge was pushed in, and there was a fender brace bracket that was bent out of shape.
  Bottom edge straightened, and the bracket area back in shape. 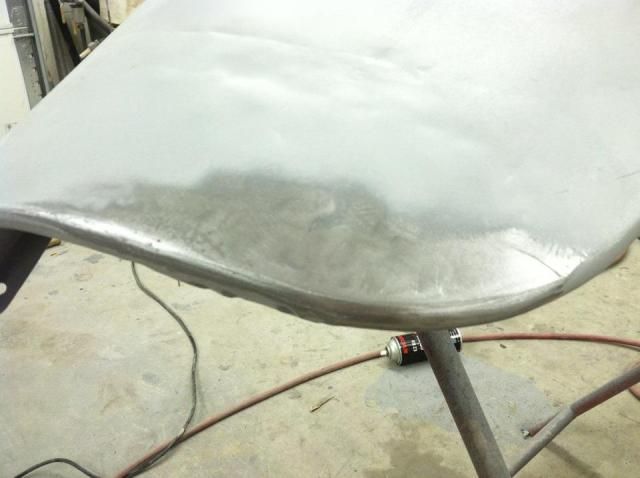 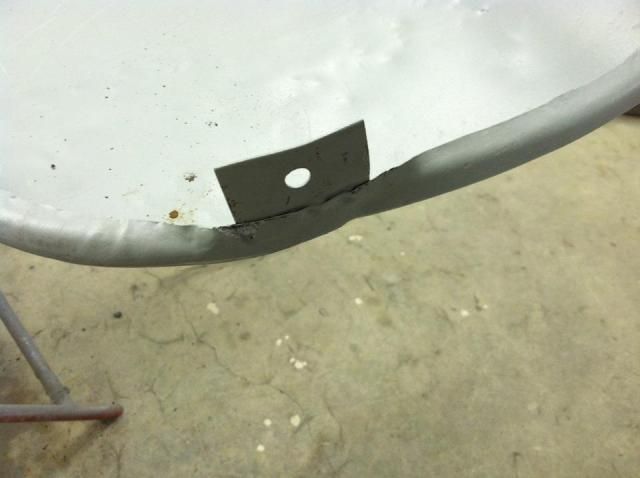 Heat shrinking with a torch to get the creased area back flat. 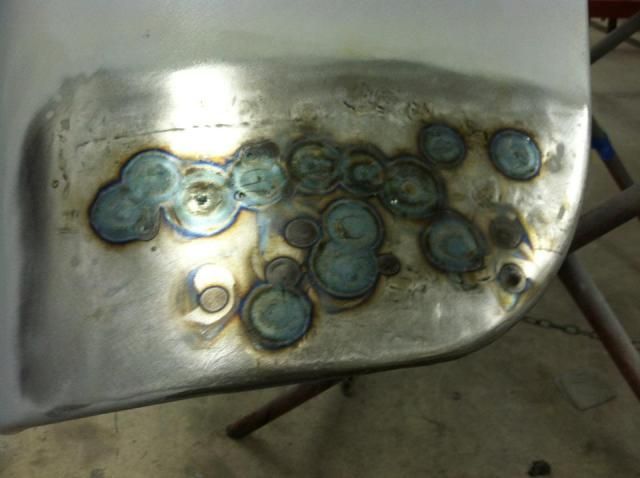 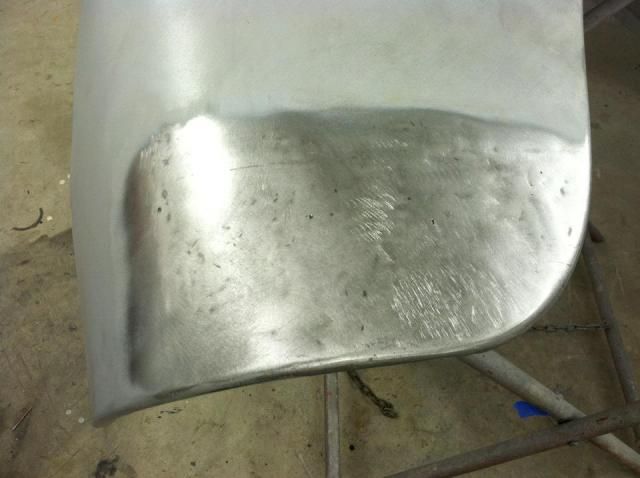 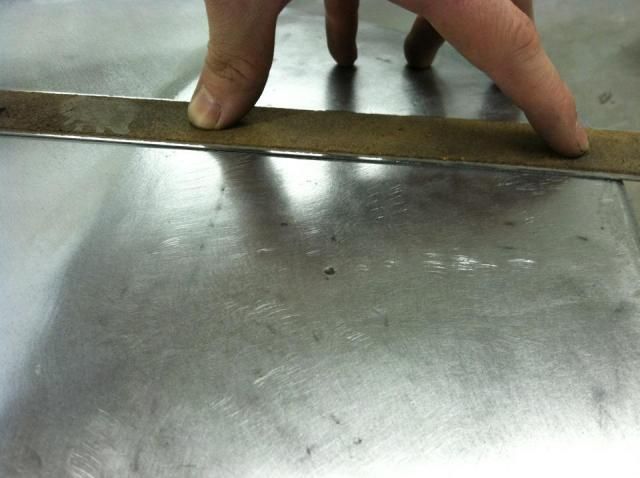
__________________
Project Goldilocks '66 C10 Short Fleet BBW Build '65 C10 Highly Detailed Stock Restoration Thread '78 Camaro Targa Roof Build '55 International Metal/Body/Paint Work '66 F100 Full Rotisserie Restoration '40 Packard 120 Convertible Coupe Restoration How To Restore and Detail an Original Gauge Cluster How To Detail Sand Body Panels, Edges, Corners, Etc |
|
|
|
|
08-14-2012, 11:13 AM
|
#16 |
|
Registered User
Join Date: May 2011
Location: Anderson SC
Posts: 3,881
|
Re: '55 International Metal/Body/Paint Work
Forgot to mention that I did all of the repair work on the fenders with the front clip assembled to hold everything in shape. Fixing the fenders on a bench or stand would let them flex abnormally, and the repaired areas would have the wrong shapes/contours when bolted up.
 Front bottom edge was crumpled. 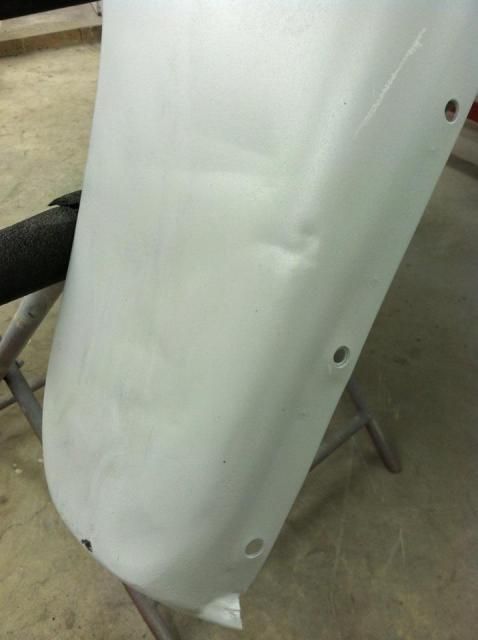 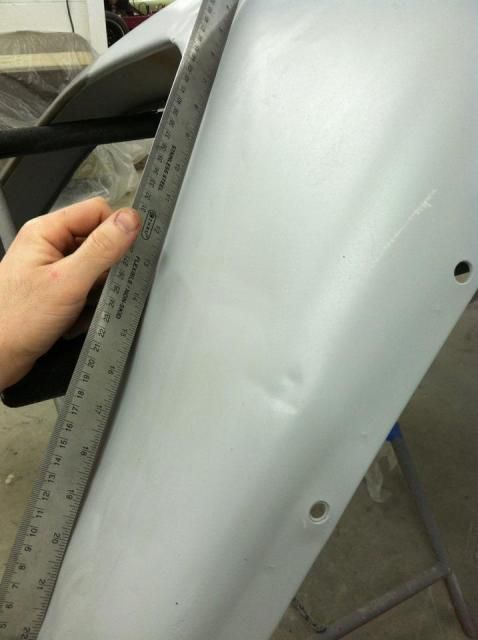 Gap between the fender and grill straightened out. 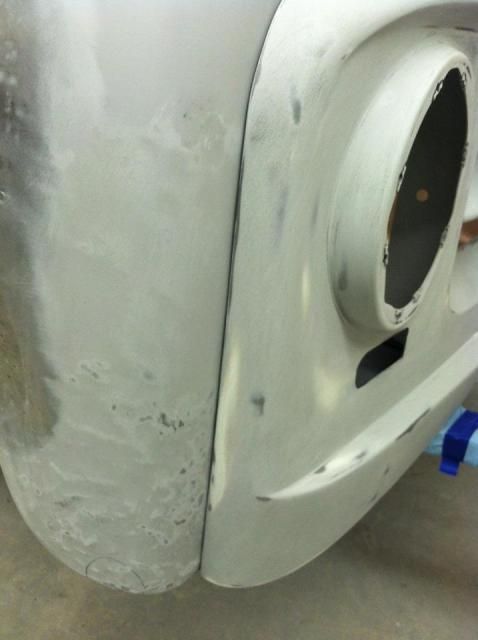 Metalshaping finished.  Inside bottom edge was chewed up pretty good. I opened it up to straighten the kinks out, then re-rolled it. 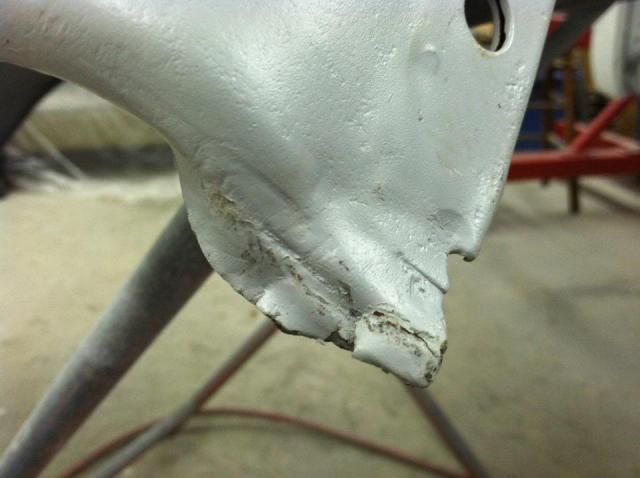 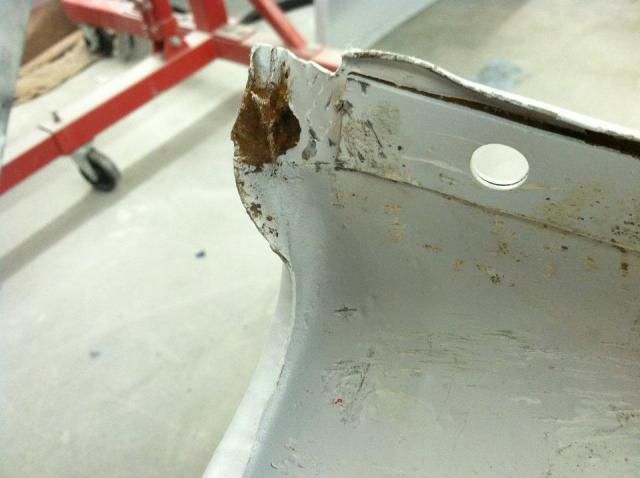 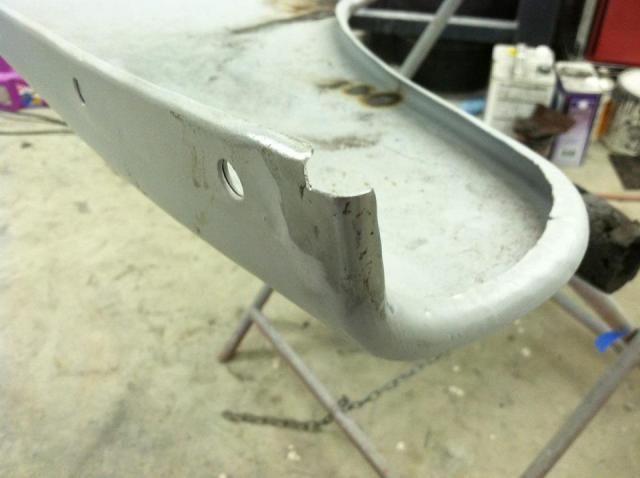 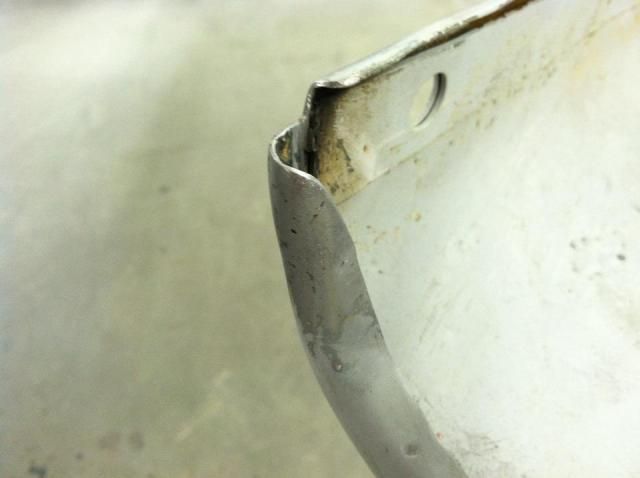
__________________
Project Goldilocks '66 C10 Short Fleet BBW Build '65 C10 Highly Detailed Stock Restoration Thread '78 Camaro Targa Roof Build '55 International Metal/Body/Paint Work '66 F100 Full Rotisserie Restoration '40 Packard 120 Convertible Coupe Restoration How To Restore and Detail an Original Gauge Cluster How To Detail Sand Body Panels, Edges, Corners, Etc |
|
|
|
|
09-01-2012, 02:32 PM
|
#17 |
|
Registered User
Join Date: Apr 2012
Location: Beaver, Pa.
Posts: 197
|
Re: '55 International Metal/Body/Paint Work
Just found and read this thread from the beginning, amazing work. I have to echo what the others have said, it's great to see an oddball truck like this get saved! It's the unusual stuff at the shows that catches my eye.
|
|
|
|
|
09-01-2012, 07:53 PM
|
#18 | |
|
Registered User
Join Date: May 2011
Location: Anderson SC
Posts: 3,881
|
Re: '55 International Metal/Body/Paint Work
Quote:
The driver side fender wasn't anywhere near as bad as the passenger side. It had a spot of rust from moisture trapped between an inner brace, and around the front of the wheel opening lip had some damage. Heat shinking the damaged area after roughing out the shape. 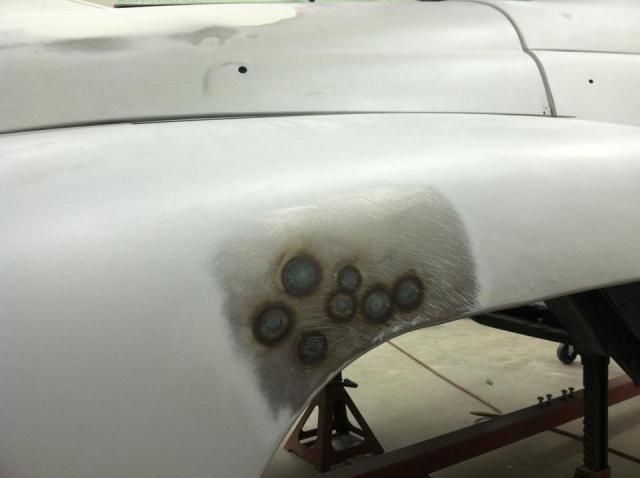 After heatshrinking and sanding with a DA to smooth the surface, I blocked the damaged area to find the high/low spots. 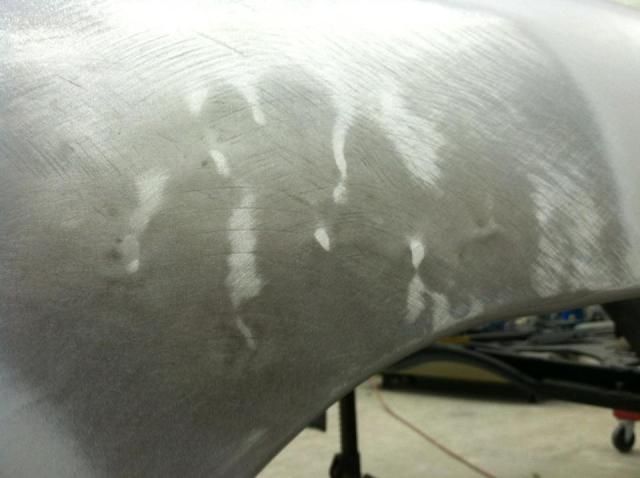 After a few rounds of hammer/dolly work and block sanding to pinpoint the high/low spots and work them flat. 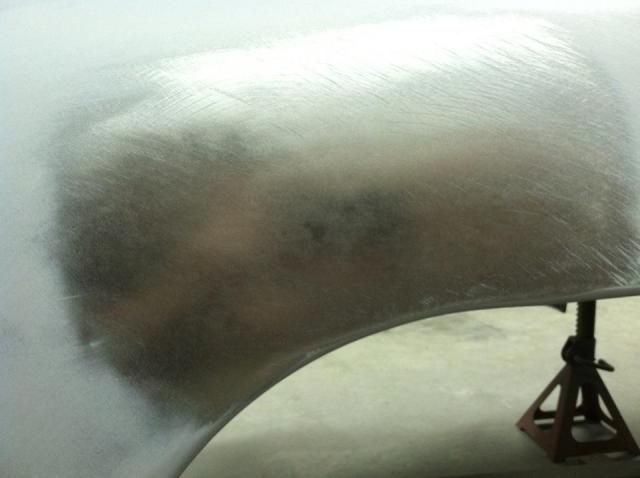 The front edge was bent where it bolted to the grill panel, so I straightened that out. 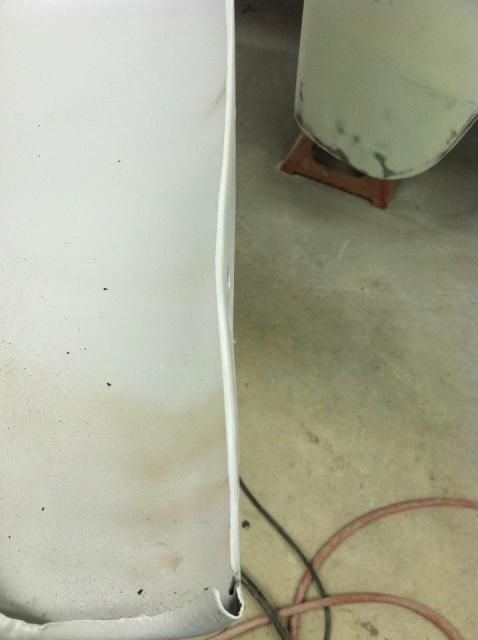 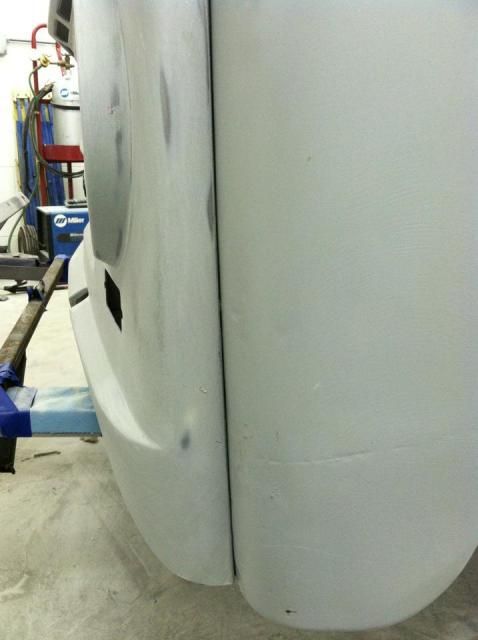 More damage around the wheel opening, it got the same heatshrink/block/hammer and dolly treatment. 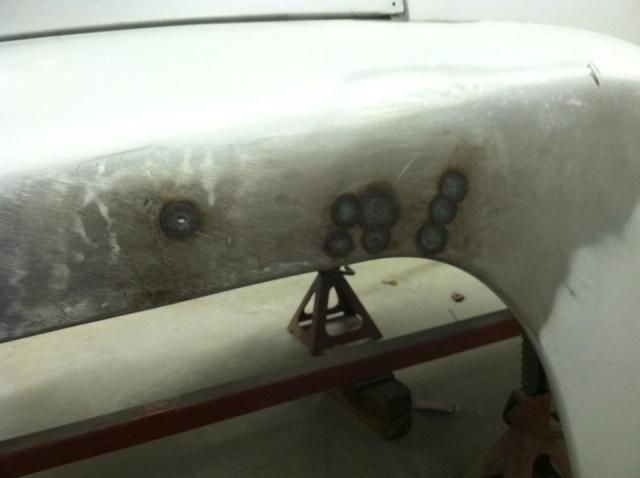 The upper edge of the fender lip was uneven, so I made relief cuts to straighten the edge. 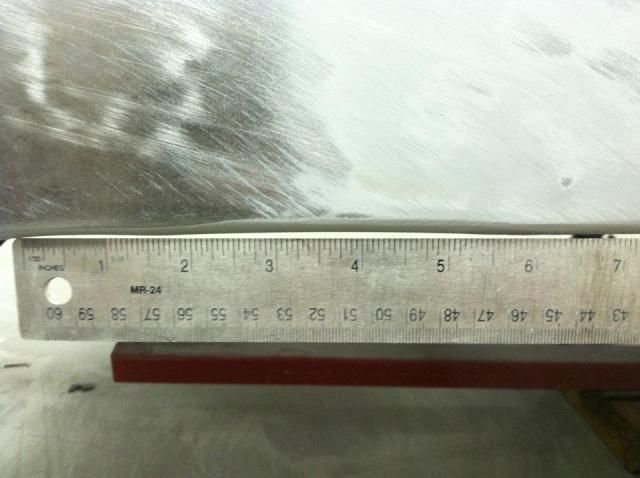 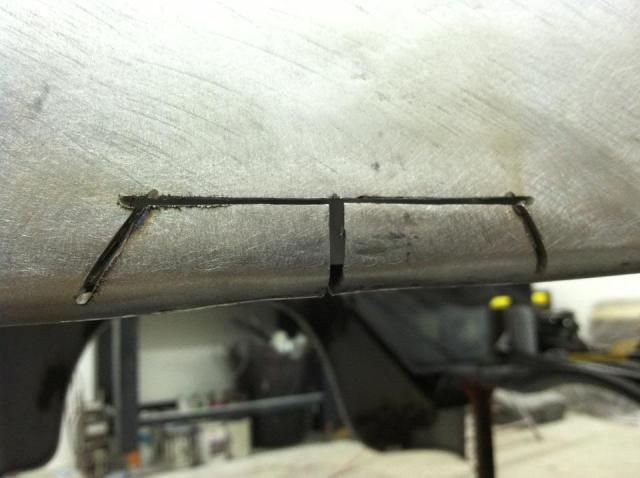 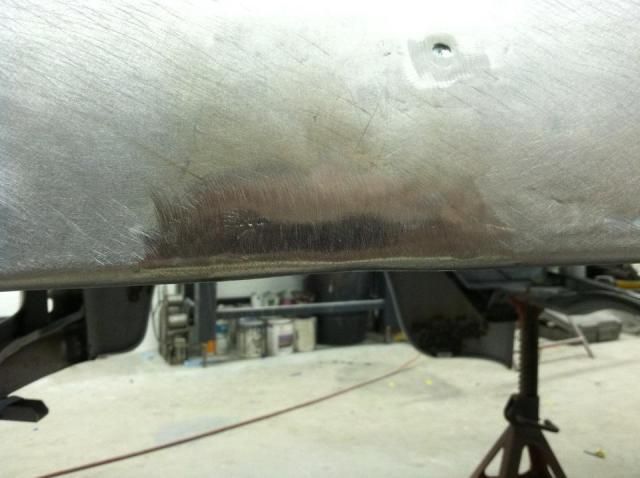
__________________
Project Goldilocks '66 C10 Short Fleet BBW Build '65 C10 Highly Detailed Stock Restoration Thread '78 Camaro Targa Roof Build '55 International Metal/Body/Paint Work '66 F100 Full Rotisserie Restoration '40 Packard 120 Convertible Coupe Restoration How To Restore and Detail an Original Gauge Cluster How To Detail Sand Body Panels, Edges, Corners, Etc |
|
|
|
|
|
09-01-2012, 08:00 PM
|
#19 |
|
Registered User
Join Date: May 2011
Location: Anderson SC
Posts: 3,881
|
Re: '55 International Metal/Body/Paint Work
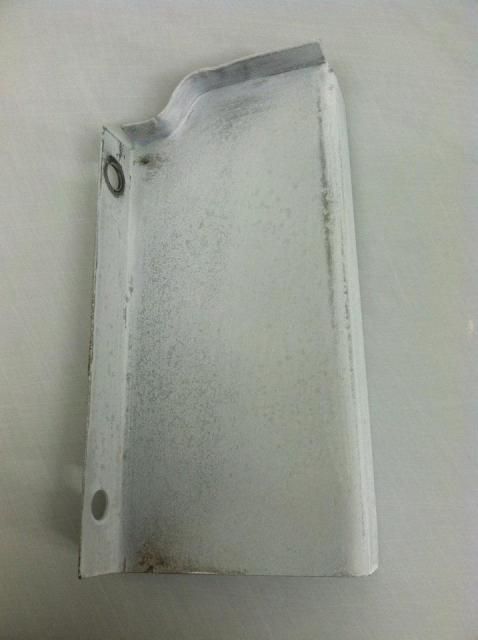
Fixing the rust on the top of the fender required removing the inner brace that caused the rust to begin with. You can see where someone tried to fix the rust hole in the past by packing it with filler.
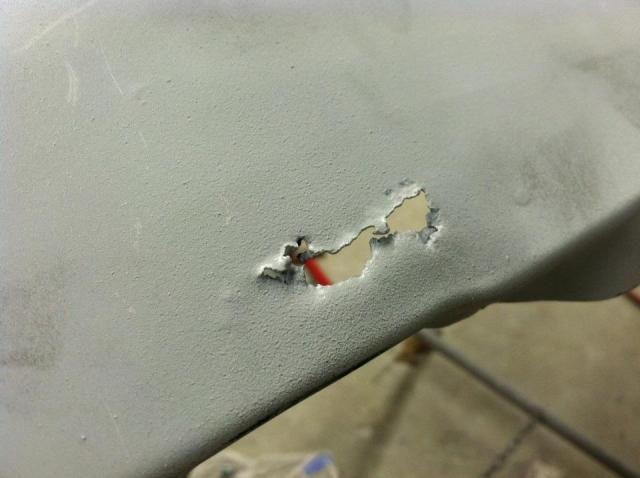 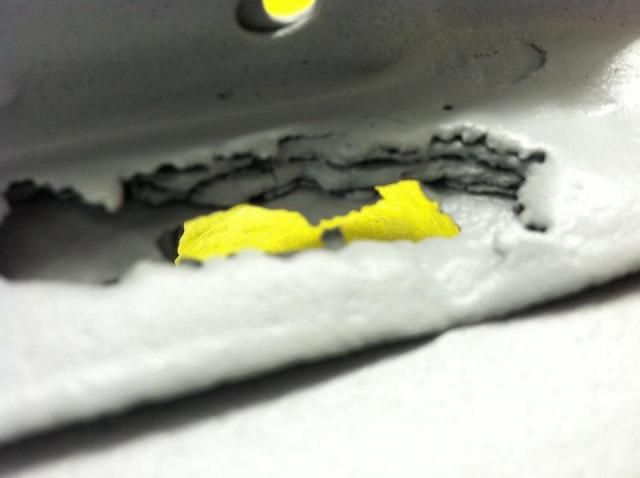 Inner brace removed. You can see just how much rust was hiding in there, and how much was dislodged just by removing it. 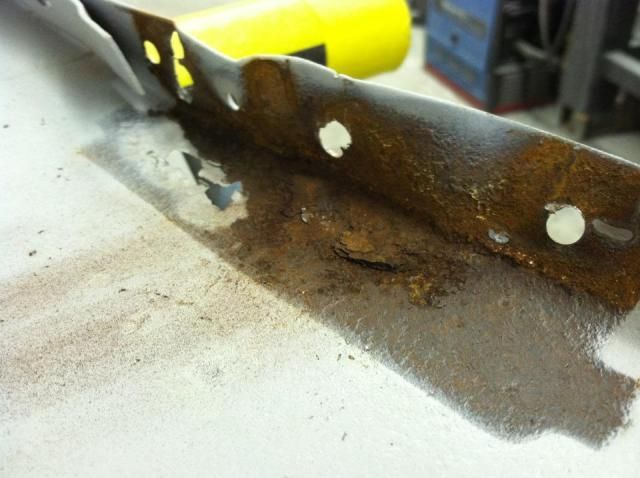 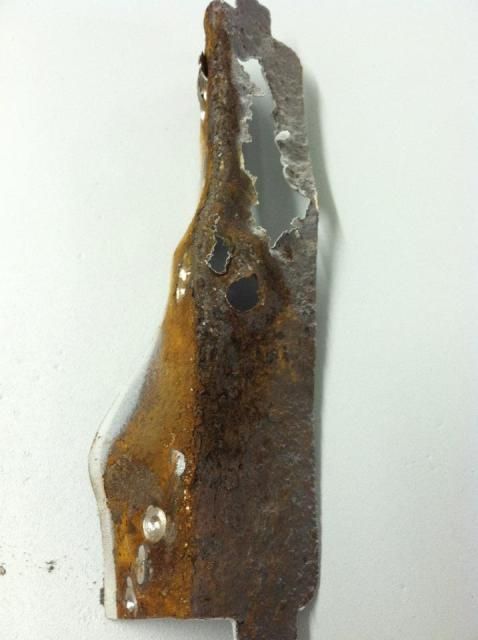 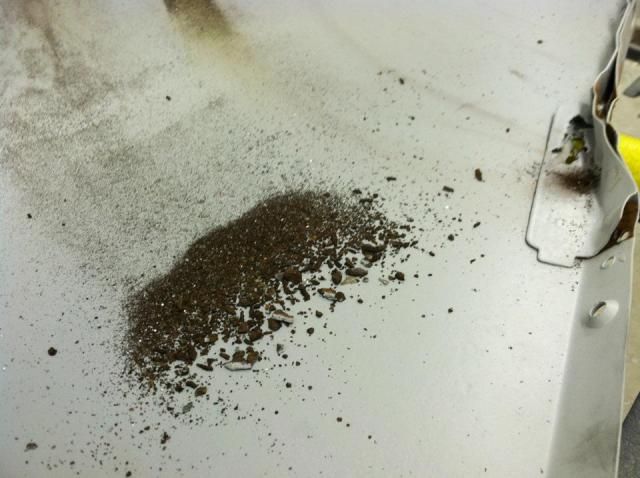 Inner brace sandblasted. 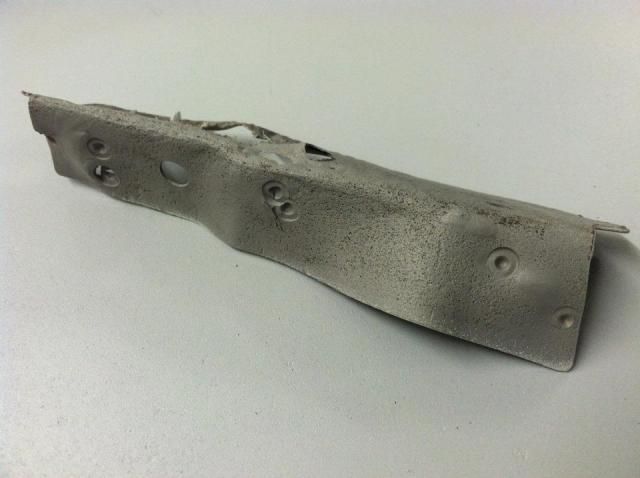 Making a new side for the inner brace. 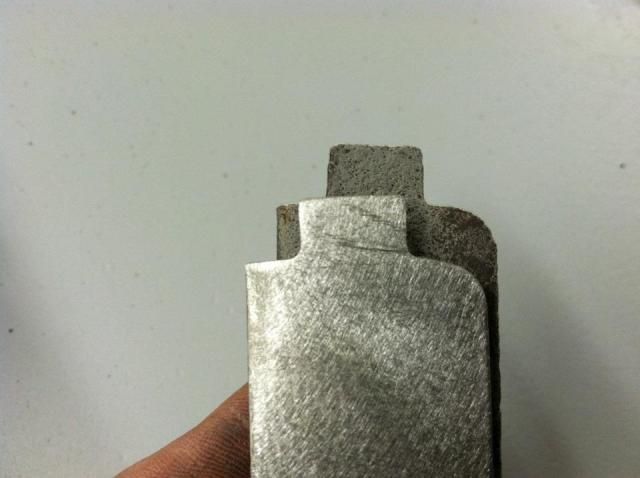  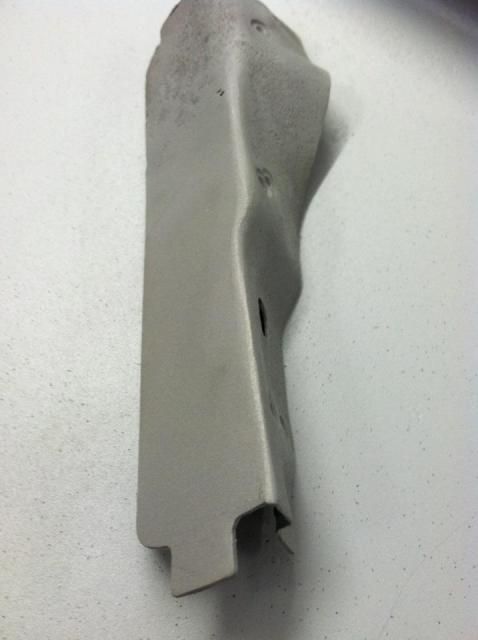 Rusted area of the sheetmetal cut out and new metal welded in. The area that was underneath the brace was sandblasted as well. 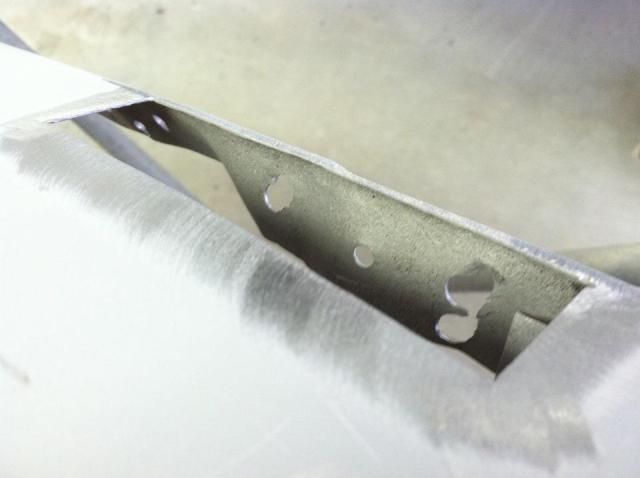 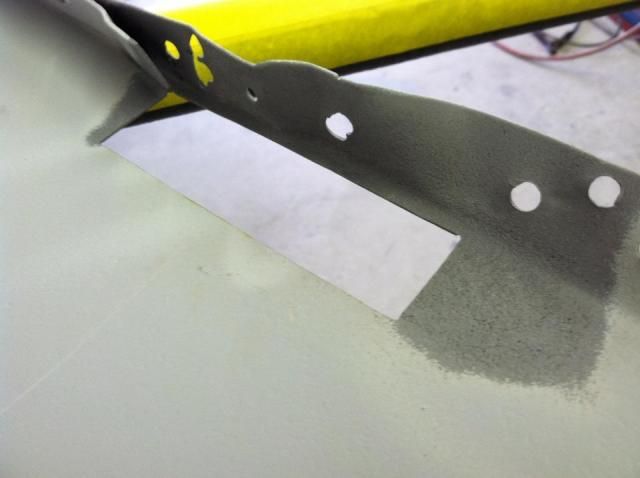 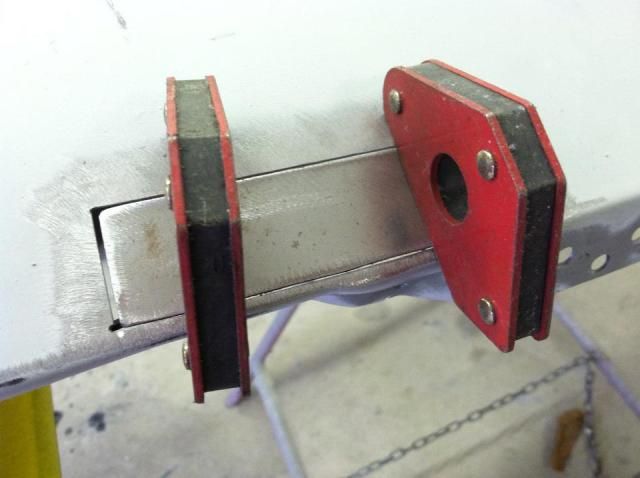 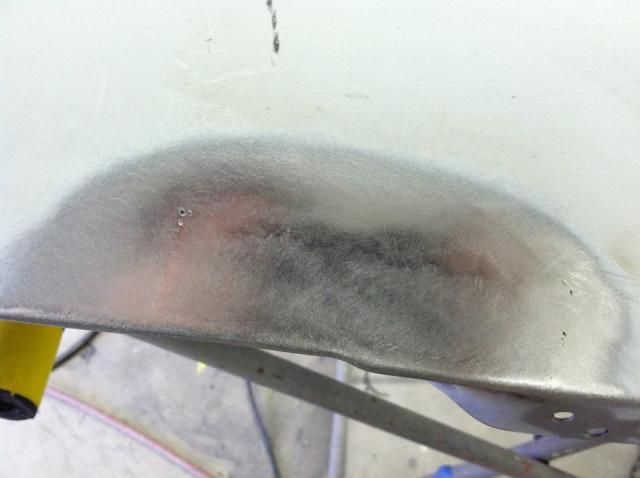 The backside of the brace and the fender were coated with etching primer before welding the brace back in. This will keep rust from forming under the brace again. 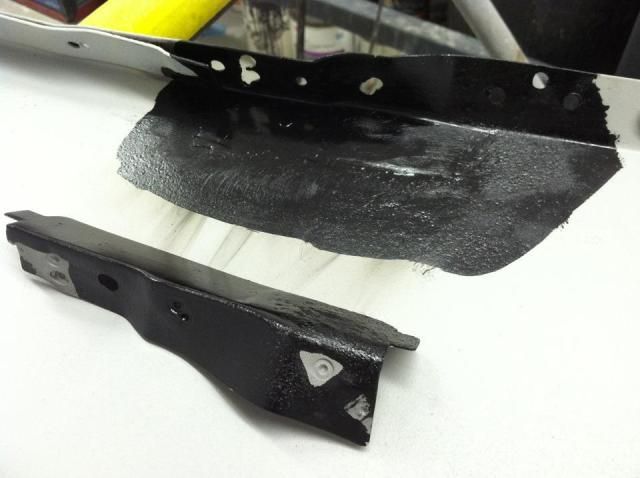
__________________
Project Goldilocks '66 C10 Short Fleet BBW Build '65 C10 Highly Detailed Stock Restoration Thread '78 Camaro Targa Roof Build '55 International Metal/Body/Paint Work '66 F100 Full Rotisserie Restoration '40 Packard 120 Convertible Coupe Restoration How To Restore and Detail an Original Gauge Cluster How To Detail Sand Body Panels, Edges, Corners, Etc |
|
|
|
|
09-01-2012, 08:14 PM
|
#20 |
|
Registered User
Join Date: May 2011
Location: Anderson SC
Posts: 3,881
|
Re: '55 International Metal/Body/Paint Work
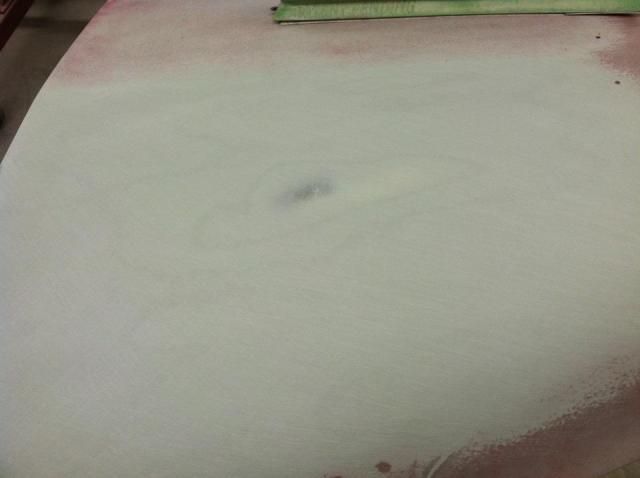
Some details of blocking the Slick Sand. I block the primer down until I hit bare metal. This way the primer is as thin as possible and doesn't have to thick of a build to become unstable if the panel has any flexing- preventing cracks. You can see the different coats of primer being blocked off around the high spots.
 On body lines and details, I sand the flat section first, cutting into the body line with the edge of the block until I hit bare metal. This cuts the body line straight and keeps the primer build up in the line to a minimum. 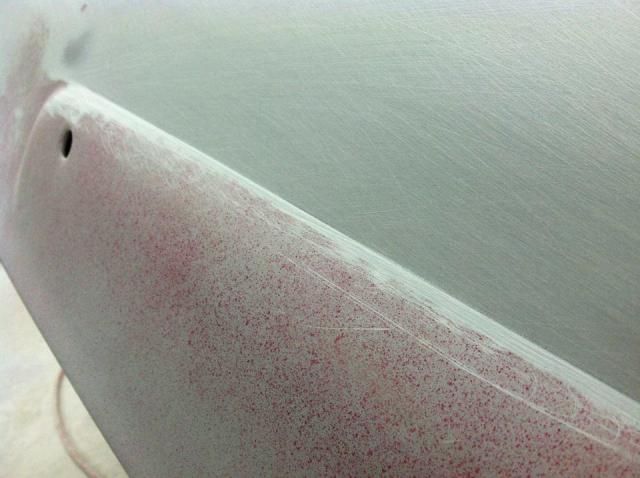 With the upper edge cut and leveled, it gets taped up so blocking the bottom half doesn't damage the upper part that's already straight. 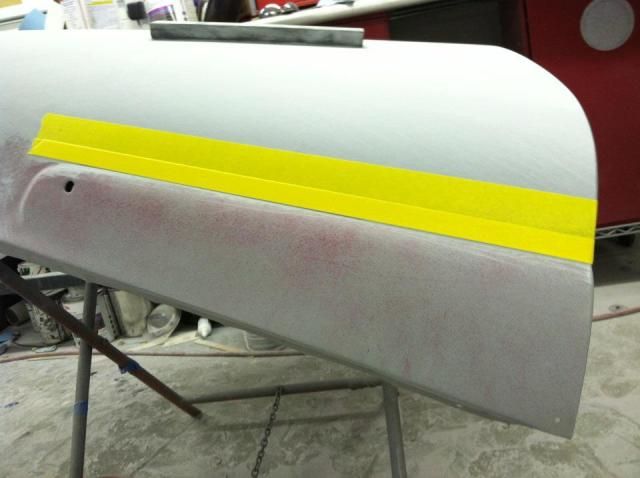 Both sides blocked, keeping the body lines straight and well defined. This will really make the paint stand out in these areas after cutting and buffing. 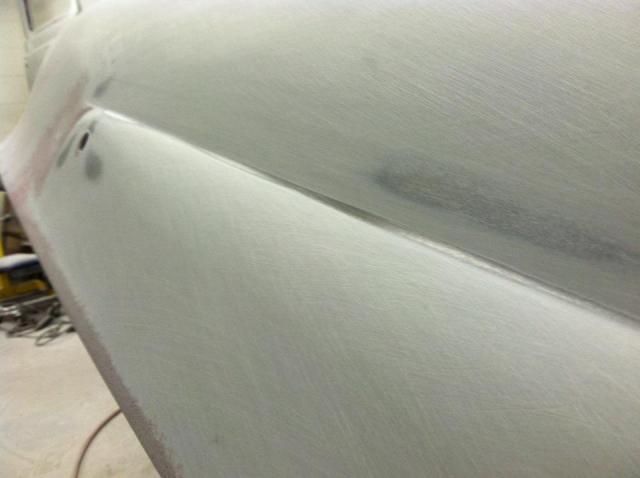 Same treatment on the front edge of the raised stamping. 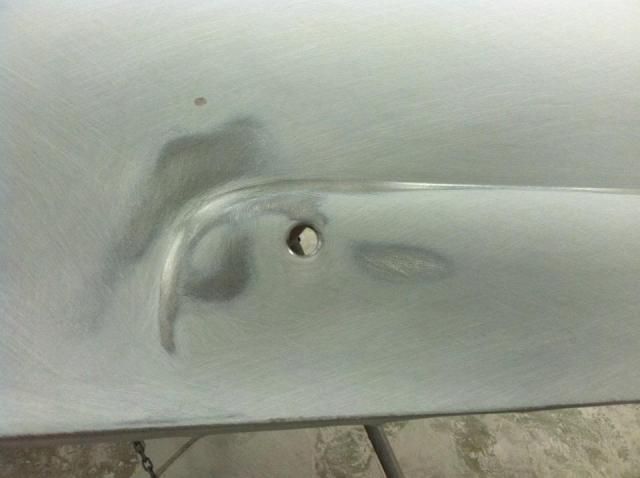 Minor low spots are touched up with filler and blocked down. If the metalwork and skimcoat/blocking was done correctly, there are very few areas to rework after priming and blocking with Slick Sand. 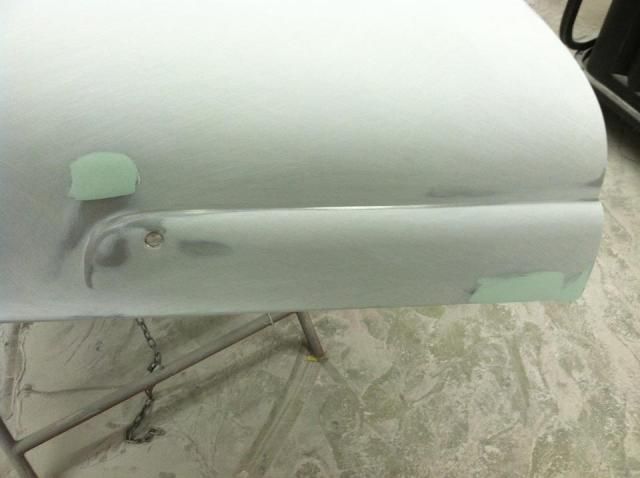 The flat areas of the fenders were blocked first, then a flexible sanding pad was used to sand the wheel opening lip, making sure to keep an even radius around the lip. 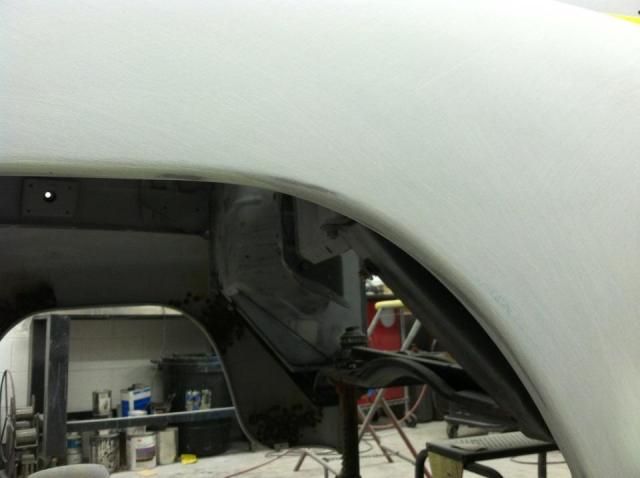 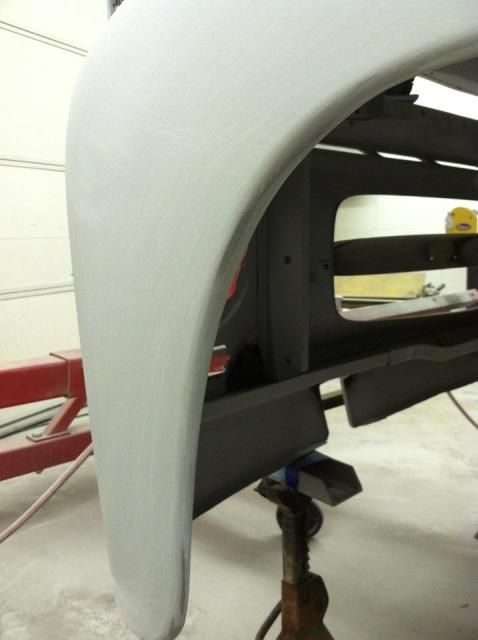
__________________
Project Goldilocks '66 C10 Short Fleet BBW Build '65 C10 Highly Detailed Stock Restoration Thread '78 Camaro Targa Roof Build '55 International Metal/Body/Paint Work '66 F100 Full Rotisserie Restoration '40 Packard 120 Convertible Coupe Restoration How To Restore and Detail an Original Gauge Cluster How To Detail Sand Body Panels, Edges, Corners, Etc |
|
|
|
|
09-01-2012, 08:17 PM
|
#21 |
|
Registered User
Join Date: May 2011
Location: Anderson SC
Posts: 3,881
|
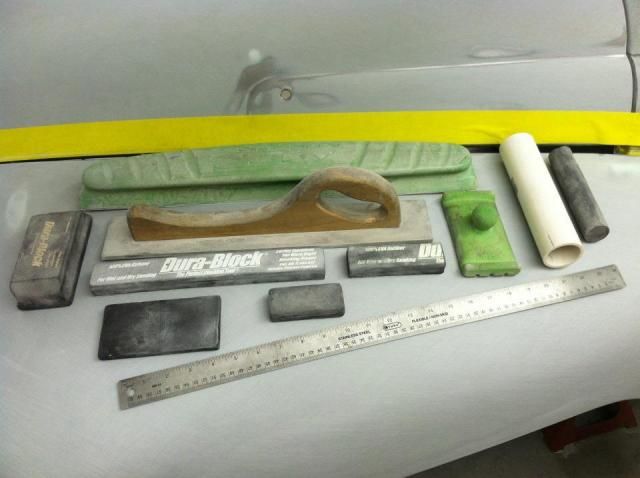
Re: '55 International Metal/Body/Paint Work
Here's a shot of my sanding blocks. The white tube is PVC for blocking concave surfaces. The long/skinny Durablocks are great to cut down shorter for smaller areas.
__________________
Project Goldilocks '66 C10 Short Fleet BBW Build '65 C10 Highly Detailed Stock Restoration Thread '78 Camaro Targa Roof Build '55 International Metal/Body/Paint Work '66 F100 Full Rotisserie Restoration '40 Packard 120 Convertible Coupe Restoration How To Restore and Detail an Original Gauge Cluster How To Detail Sand Body Panels, Edges, Corners, Etc |
|
|
|
|
09-01-2012, 08:23 PM
|
#22 |
|
Registered User
Join Date: May 2011
Location: Anderson SC
Posts: 3,881
|
Re: '55 International Metal/Body/Paint Work
There were a couple of filler panels that mount to the fender bottoms that needed straightening.
 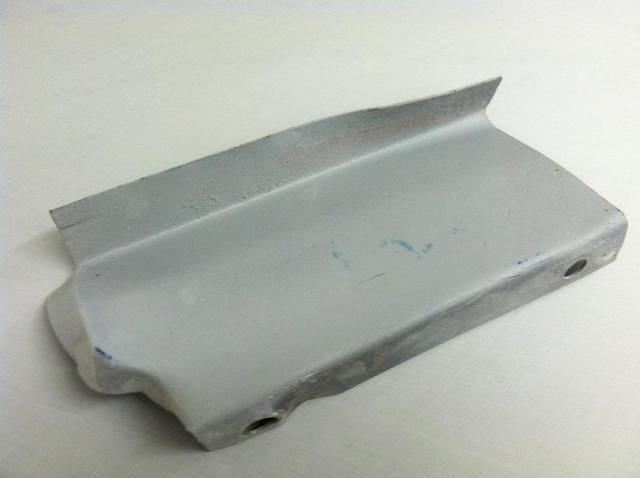 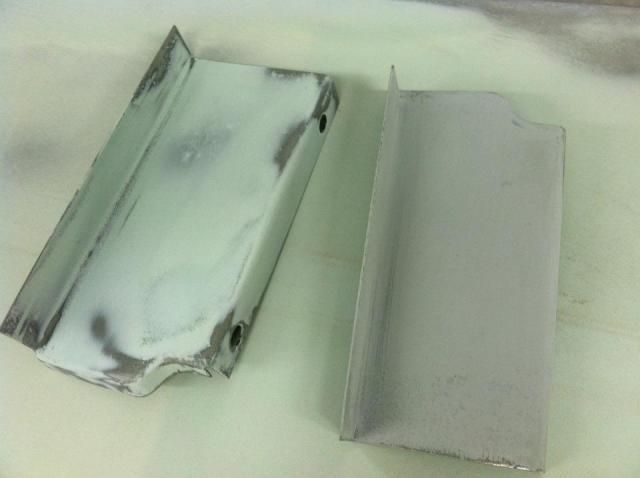 The cowl vent rain tray had what looked like hammer marks that needed to be shrunk and straightened. It has already been blasted but had rattle can primer on it that needed to be stripped. It was sandblasted before skimcoating and repriming. 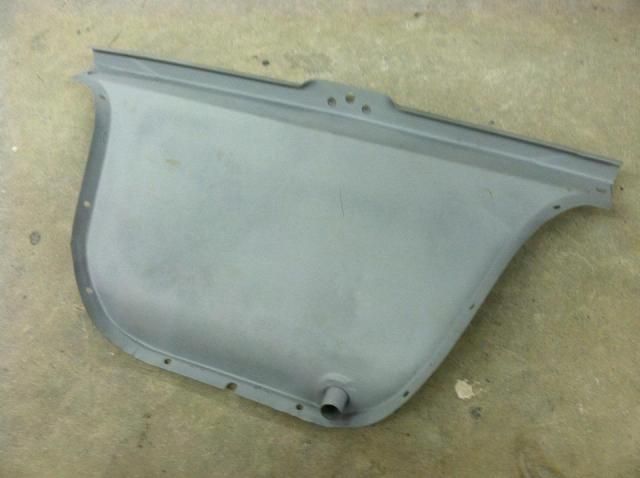  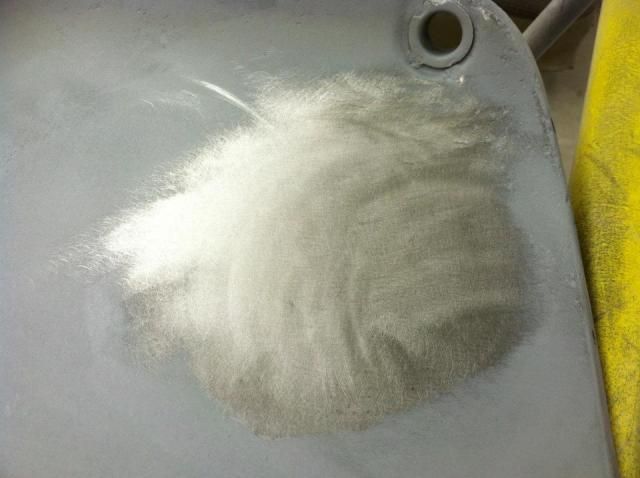 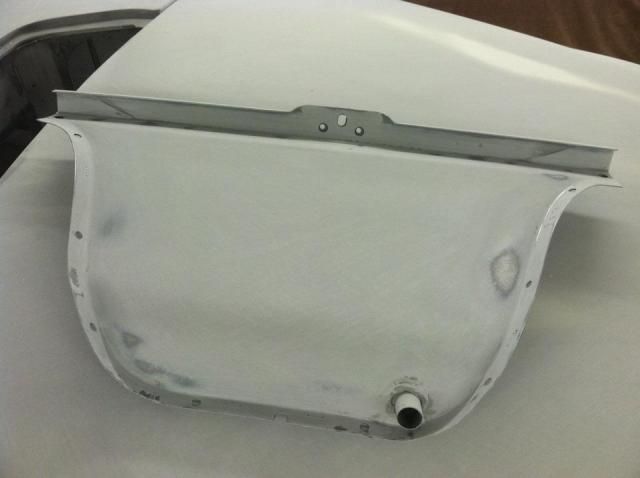 The glovebox door was sandblasted and prepped for primer. 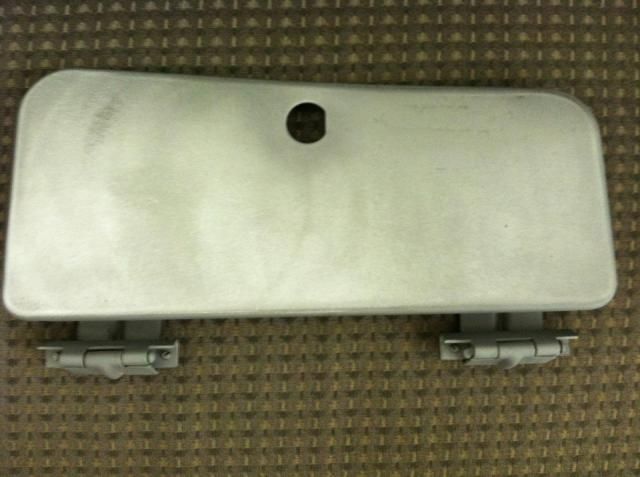 Primed with Slick Sand and blocked flat, ready for tinted K93. 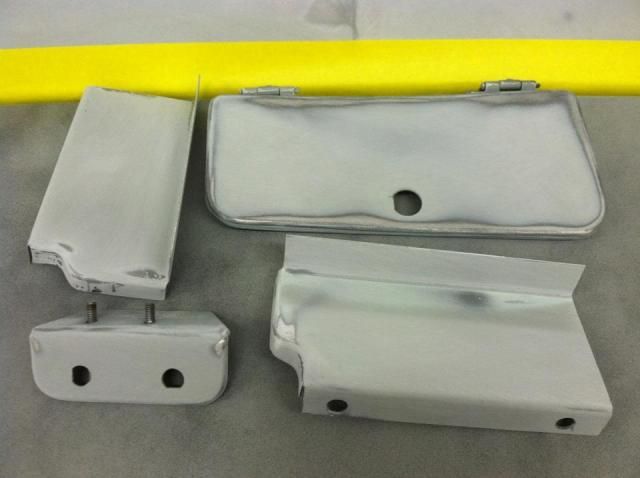
__________________
Project Goldilocks '66 C10 Short Fleet BBW Build '65 C10 Highly Detailed Stock Restoration Thread '78 Camaro Targa Roof Build '55 International Metal/Body/Paint Work '66 F100 Full Rotisserie Restoration '40 Packard 120 Convertible Coupe Restoration How To Restore and Detail an Original Gauge Cluster How To Detail Sand Body Panels, Edges, Corners, Etc |
|
|
|
|
09-01-2012, 08:31 PM
|
#23 |
|
Registered User
Join Date: May 2011
Location: Anderson SC
Posts: 3,881
|
Re: '55 International Metal/Body/Paint Work
The windshield trim panels needed stripping repair. They were treated with PPG DX series Metal Cleaner and Metal Conditioner before being primed with DP90.
    The dash panel needed stripping so I covered it with rags soaked in lacquer thinner, then covered that with tinfoil until the thinner softened the paint enough to scrape it off. 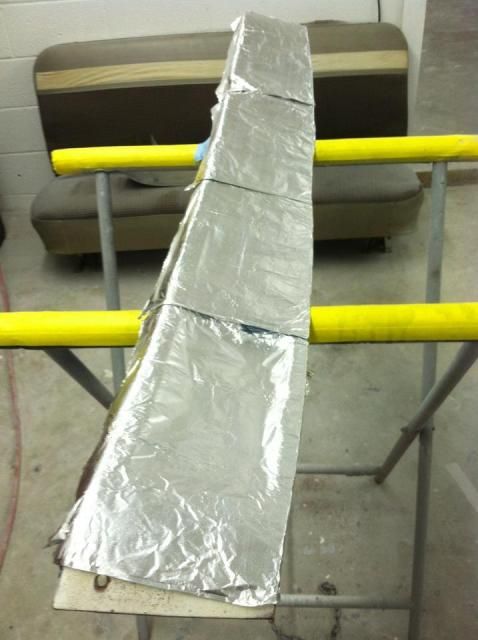 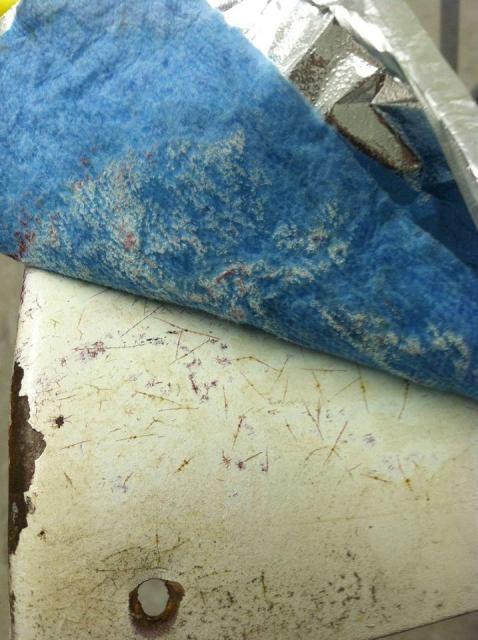 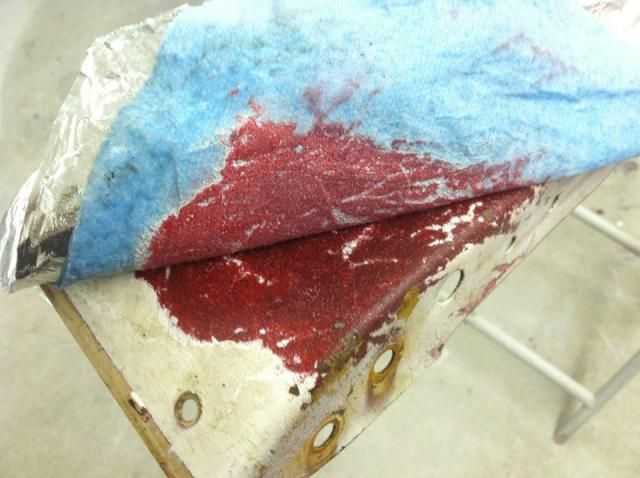 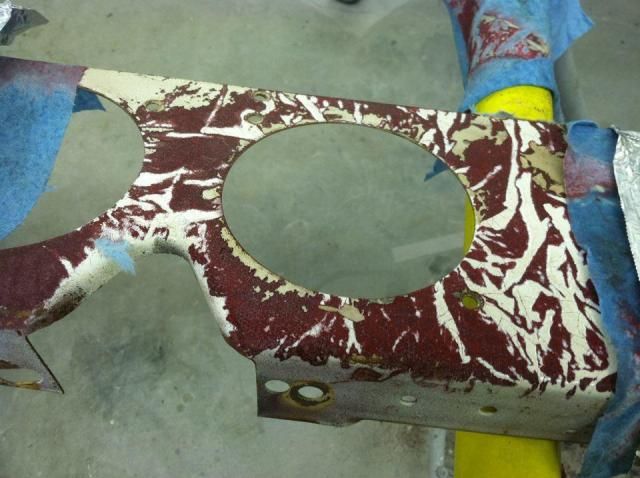 After scraping off the majority of the old paint, I sandblasted the dash panel. I didn't want to just blast the paint off and take a chance of warping the metal since it was thin and didn't have any shape to strengthen it. 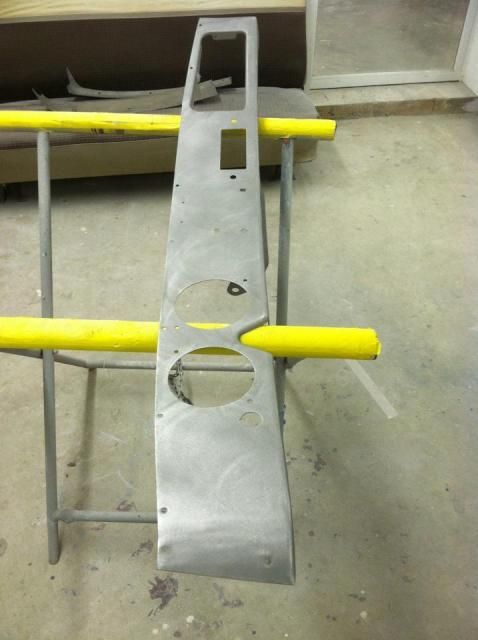 Treated with PPG Metal Cleaner/Conditioner. 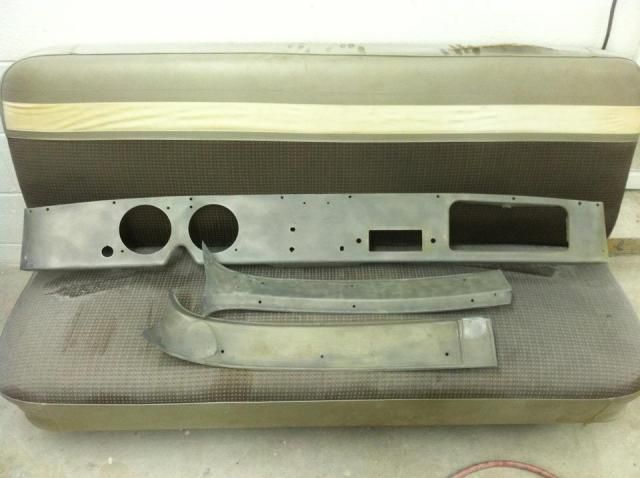 Primed with DP90 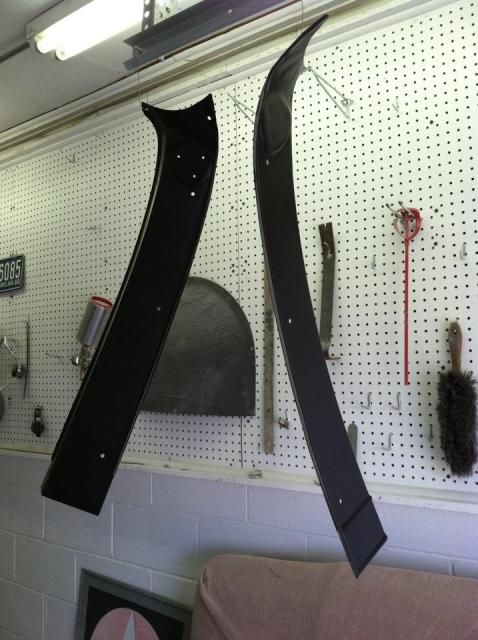 And three coats of tinted K36. 
__________________
Project Goldilocks '66 C10 Short Fleet BBW Build '65 C10 Highly Detailed Stock Restoration Thread '78 Camaro Targa Roof Build '55 International Metal/Body/Paint Work '66 F100 Full Rotisserie Restoration '40 Packard 120 Convertible Coupe Restoration How To Restore and Detail an Original Gauge Cluster How To Detail Sand Body Panels, Edges, Corners, Etc |
|
|
|
|
09-01-2012, 08:37 PM
|
#24 |
|
Registered User
Join Date: May 2011
Location: Anderson SC
Posts: 3,881
|
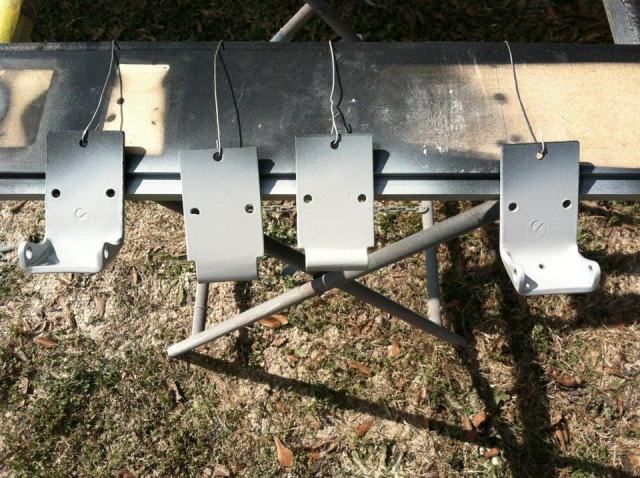
Re: '55 International Metal/Body/Paint Work
The hinges were primed with DP90, then scuffed and shot with Slick Sand the next day.
 After block sanding, ready for K36. 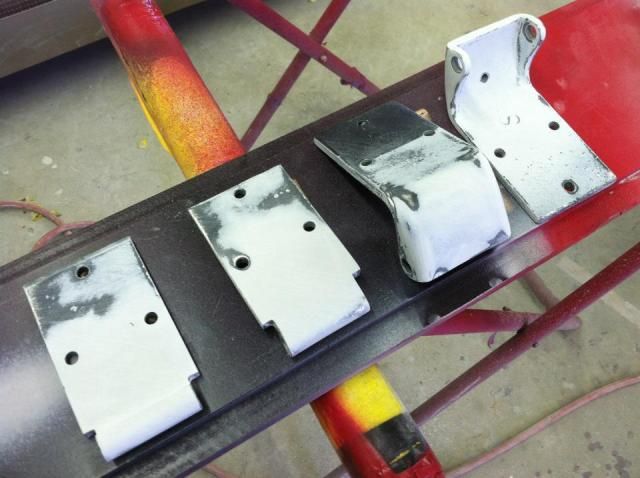 The floor/firewall panel was blasted, primed with DP90, and seam sealed before being sprayed with three coats of homemade Lizard Skin type sound deadener/heat insulation. 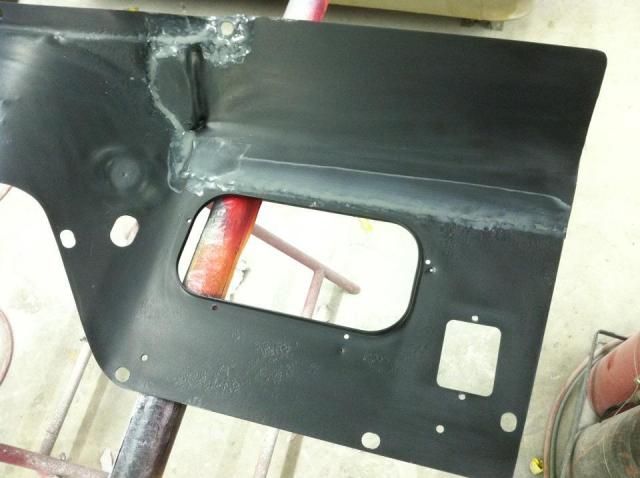 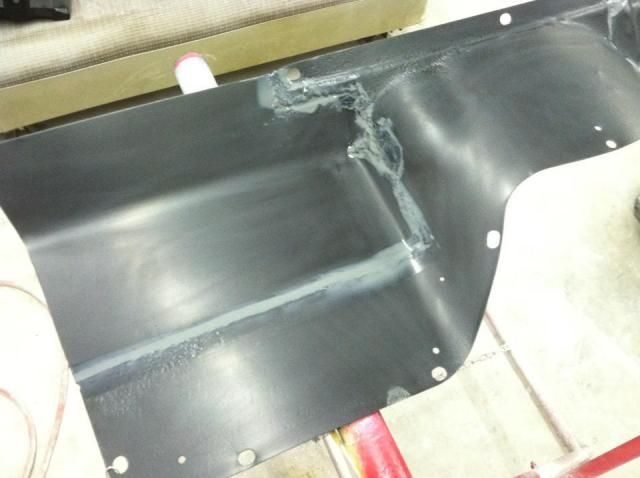 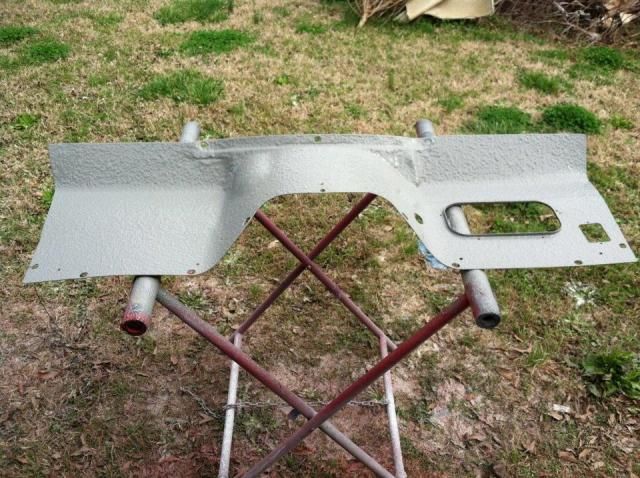 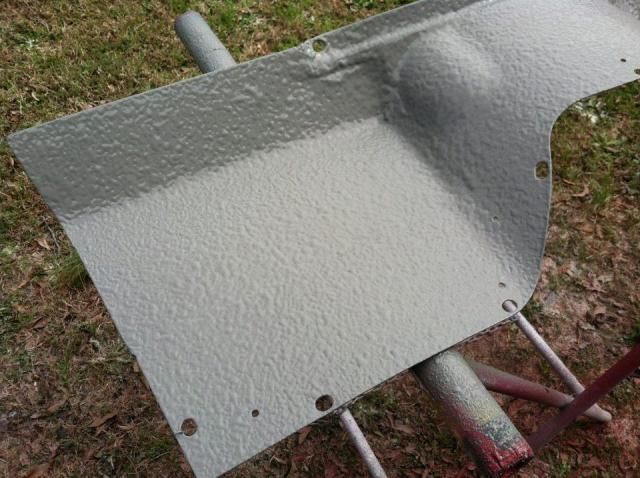 Dash panel sprayed with Slick Sand and block sanded. 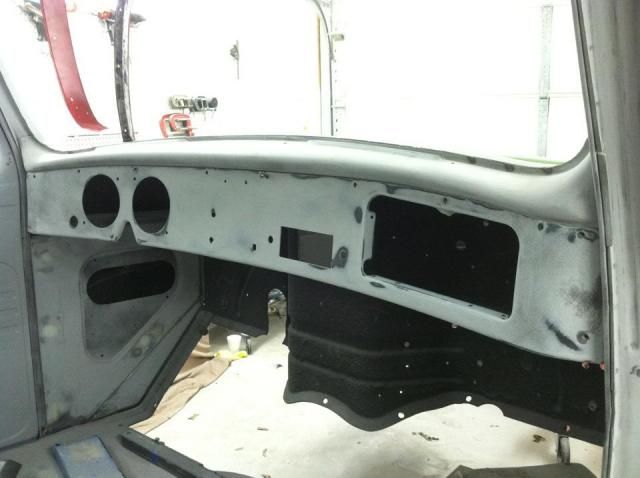
__________________
Project Goldilocks '66 C10 Short Fleet BBW Build '65 C10 Highly Detailed Stock Restoration Thread '78 Camaro Targa Roof Build '55 International Metal/Body/Paint Work '66 F100 Full Rotisserie Restoration '40 Packard 120 Convertible Coupe Restoration How To Restore and Detail an Original Gauge Cluster How To Detail Sand Body Panels, Edges, Corners, Etc |
|
|
|
|
09-02-2012, 12:38 PM
|
#25 |
|
Registered User
Join Date: Mar 2005
Location: apple valley, ca
Posts: 2,670
|
Re: '55 International Metal/Body/Paint Work
Amazing work, John. Most people don't have a clue at the effort and time that it takes to get a body to that level. That International looks especially daunting because you don't have the luxury of a separate, floating grill or chrome pieces that you can hide mismatches underneath. That whole front group is out in the open, with miles of panel gaps to address.
A Master at work...............love this thread!
__________________
Check out my latest endeavor: https://roundsixpod.com My build threads: '55 Chevy: http://67-72chevytrucks.com/vboard/s...d.php?t=247512 '64 C-20: http://67-72chevytrucks.com/vboard/s...d.php?t=446527 |
|
|
|
 |
| Bookmarks |
|
|


 Hybrid Mode
