
|
 04-01-2014, 03:32 PM
|
#51 | |
|
Registered User
Join Date: Jun 2012
Location: Portland
Posts: 1,330
|
Re: Project "Second Chance" - Hot Rod 66' GMC
Quote:
My setup should flow similar to the AFR 190 heads (maybe a bit less), but I have also read a few articles where people picked up 20+ hp moving to COP setups. So conservatively I think the sequential fuel and COP spark should make up for the differences perhaps lost by AFR's heads being superior to my trickflow heads, meaning I'd anticipate around 340 RWHP, meaning it should be around 374-408 HP depending on drivetrain losses between 10-20%. If I could get a roller cam in there I'd expect another 15-20hp and perhaps another mpg all else being equal. Plus I'm just hoping I'm a better tuner now than I was in highschool  . Having a wideband sensor, along with Megasquirt's autotuning capabilities should help me in the MPG department I hope. And fixing the converter lockup should help as well. . Having a wideband sensor, along with Megasquirt's autotuning capabilities should help me in the MPG department I hope. And fixing the converter lockup should help as well.My biggest concern really, after 7 years of not having this car in my possession, is that the engine and tranny are still solid. Everything looks okay, but I won't really know until I get it moving. |
|

|

|
|
04-06-2014, 11:33 PM
|
#52 |
|
Registered User
Join Date: Jun 2012
Location: Portland
Posts: 1,330
|
Re: Project "Second Chance" - Hot Rod 66' GMC
4-6-14 - Transmission back at home
Quick update: Finished painting the transmission and put it back in the frame. Still need to mate the converter and flywheel. Will do that tomorrow evening after work. Yellow is much brighter than the engine, but I guess you won't really see the transmission once the truck is actually together. I also ordered new headers. Got my old ones coated, but they won't fit with the CPP mounts. Doh! Also go the oil spill finally cleaned up .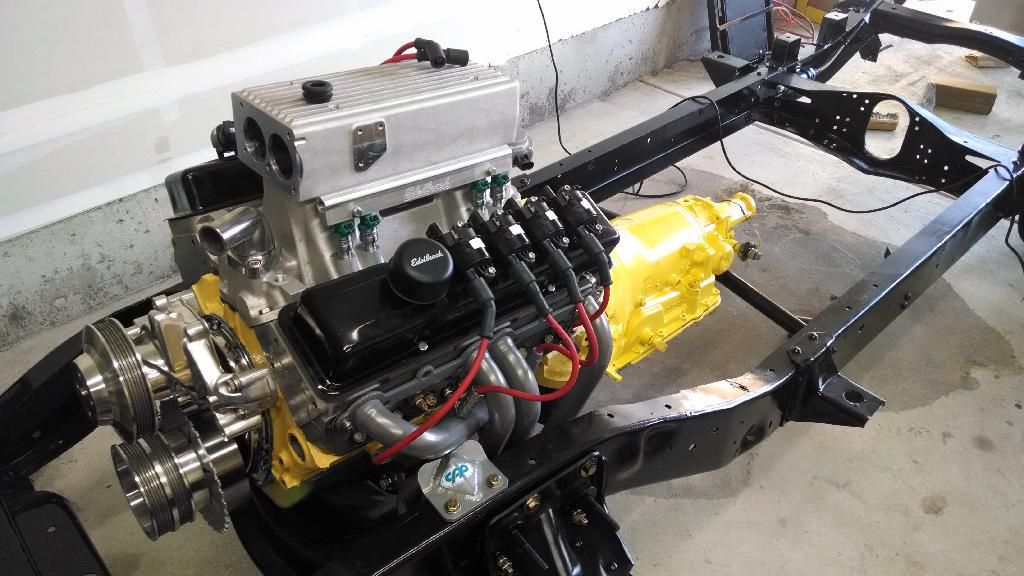 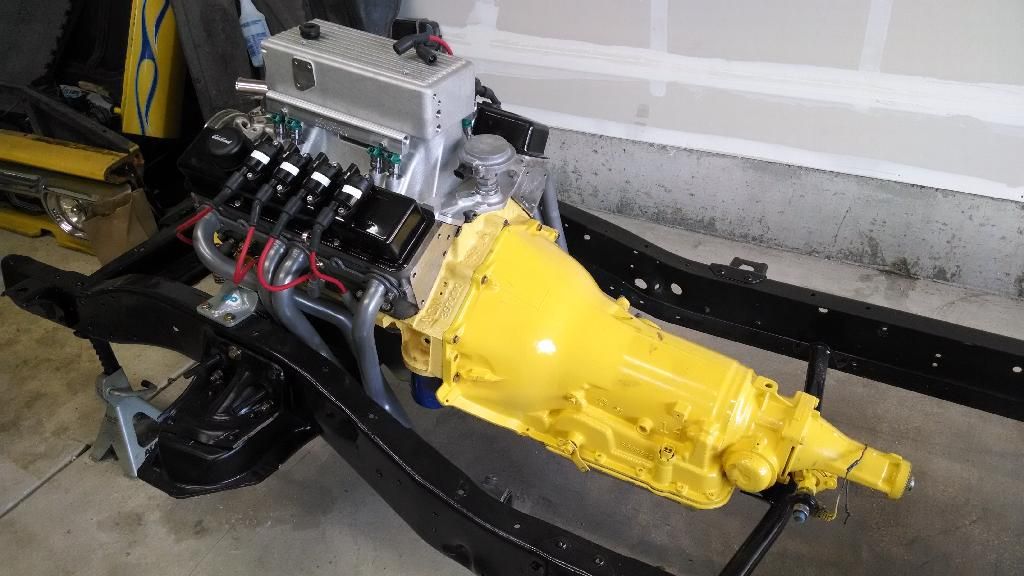
|
|
|
|
|
04-09-2014, 12:46 PM
|
#53 |
|
Registered User
Join Date: Jun 2012
Location: Portland
Posts: 1,330
|
Re: Project "Second Chance" - Hot Rod 66' GMC
4/8/13 - New Headers
Received my new headers. They fit really well! Clear the mounts and the spark plugs better. The only drawback is I think I need some straight fit boots for a few spark plug wires, as there is no way to have the 90 degree boot and not have a wire rest on a header. I also went to a ball-style collector/header, rather than a gasket/flange. I ordered two hedman collectors with an O2 bung pre-welded. Put one on and the O2 sensor wouldn't thread in, and neither would my bung plug from my old headers. My first thought was "oh . . . a wideband must be larger." But upon further reading online it seems almost all O2s share an 18mm thread size (except the 12mm version for power sports). I checked the other collector, which was a year newer according to the sticker and less beat up, and the O2 fit fine. Appears I received a previously used collector, or one that just had the threads messed up. Summit is sending a new one out thankfully. Going to start mocking up the exhaust soon, however need to locate a 12-bolt rear and install it before I can fully the exhaust. 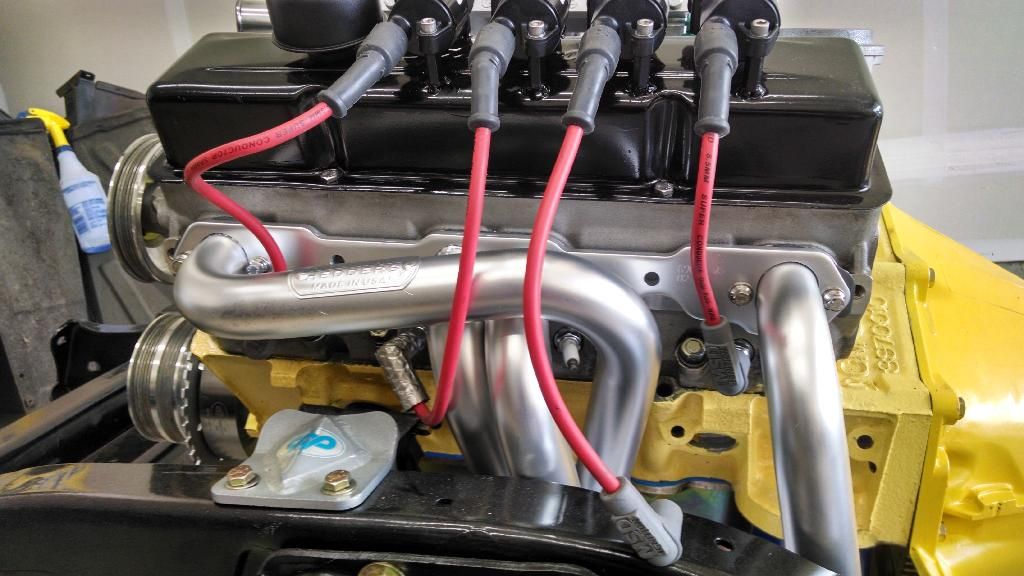 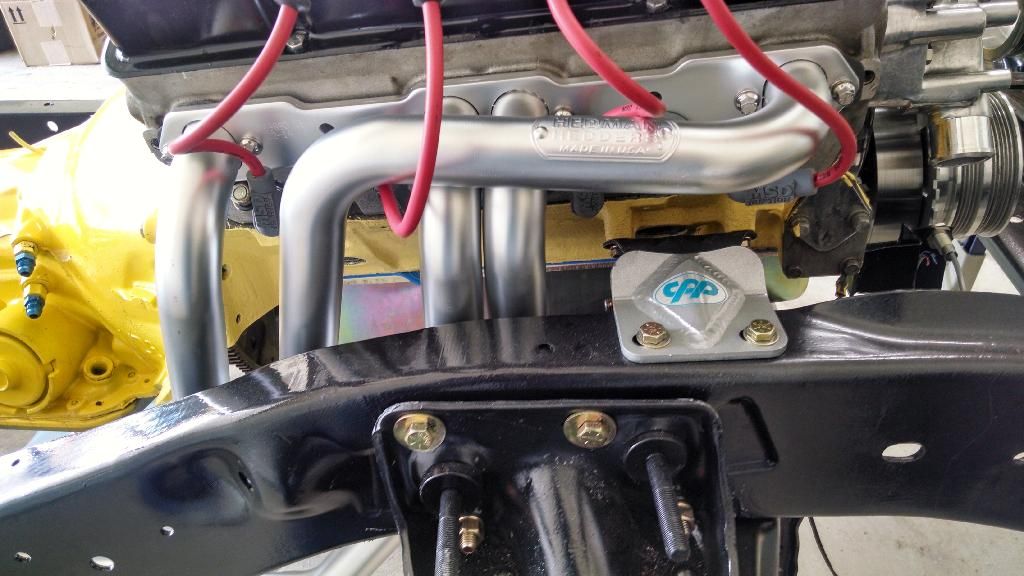
|
|
|
|
|
04-10-2014, 01:51 PM
|
#54 |
|
Registered User
Join Date: Jun 2012
Location: Portland
Posts: 1,330
|
Re: Project "Second Chance" - Hot Rod 66' GMC
4/9/14 - TB Completed
When I sold my old TPI I sold it with the Throttle body, meaning I'd need a new one. I was about to buy one off summit when I remembered my buddy still has a oversized (58mm vs. 52) one from his TPI setup. I was covered in sand from years of sitting, so I took it up to the machine shop and had it washed for a fiver. Then I threw some primer and aluminum paint on it, and some black on the accents. I went to put it on and it wouldn't clear the thermostat housing. That style TB used a coolant crossover on the bottom to warm up the TB. A popular mod on the F-bodies and Vettes was to remove this and cool the intake charge. As I wasn't going to use it, I cut it off, and walla, it cleared my housing! 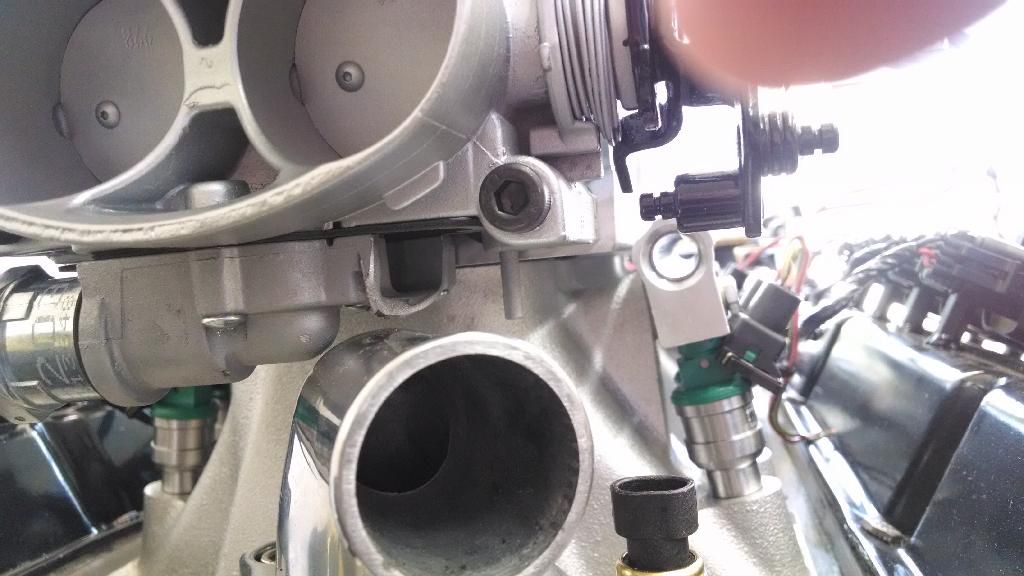 A few distance shots of it:  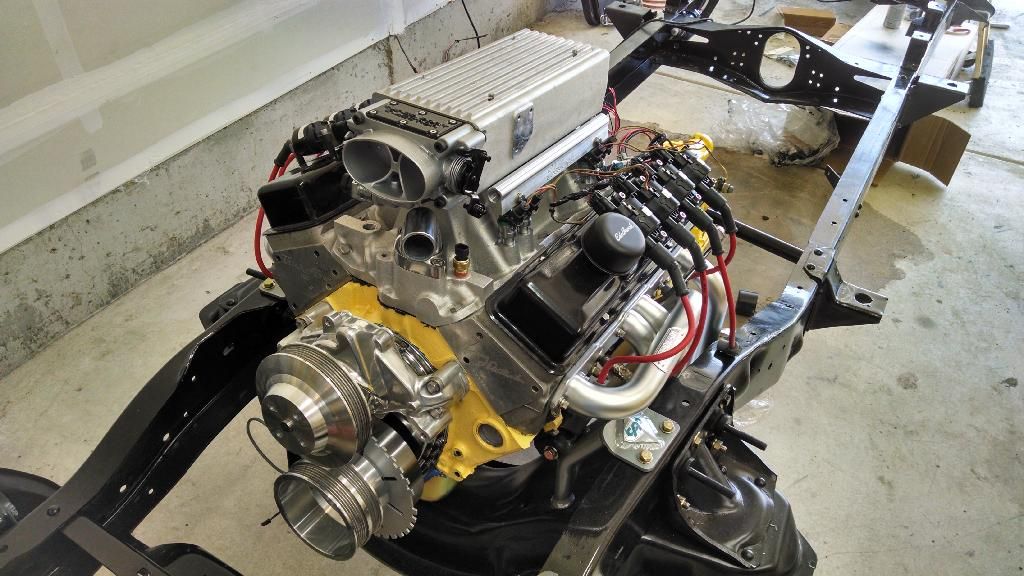
|
|
|
|
|
04-10-2014, 03:11 PM
|
#55 |
|
Registered User
Join Date: Nov 2011
Location: fayetteville nc
Posts: 10,338
|
Re: Project "Second Chance" - Hot Rod 66' GMC
glad you got the headers and mounts done. Engine & trans looking great
__________________
1963 Short bed step side SBW 427 big block and borg warner T-16 HD 3 speed manual http://67-72chevytrucks.com/vboard/s...d.php?t=519869 1963 Short bed fleetside BBW 348 1st gen big block w/Powerglide http://67-72chevytrucks.com/vboard/s...d.php?t=619024 1964 Short bed trailer |
|
|
|
|
04-10-2014, 10:01 PM
|
#56 |
|
Registered User
Join Date: Apr 2011
Location: .
Posts: 3,104
|
Re: Project "Second Chance" - Hot Rod 66' GMC
That motor and tranny really pop on that frame. Dig your headers too.
|
|
|
|
|
04-12-2014, 06:47 AM
|
#57 |
|
Registered User
Join Date: Sep 2012
Location: Leander, TX
Posts: 969
|
Re: Project "Second Chance" - Hot Rod 66' GMC
Engine and Trans look good man. I painted one of my engines Yellow once. It seemed like a good idea at the time.
 Bret
__________________
64' Build Thread http://67-72chevytrucks.com/vboard/s...d.php?t=586955 |
|
|
|
|
04-13-2014, 02:15 PM
|
#58 |
|
Registered User
Join Date: Jun 2012
Location: Portland
Posts: 1,330
|
Re: Project "Second Chance" - Hot Rod 66' GMC
Was it a bad idea in hindsight?
|
|
|
|
|
04-13-2014, 06:55 PM
|
#59 |
|
Registered User
Join Date: Sep 2012
Location: Leander, TX
Posts: 969
|
Re: Project "Second Chance" - Hot Rod 66' GMC
Well for me it was because not only did I paint the engine Yellow, but everything else under the hood. I ordered 15 cans of VHT Engine paint from Summit and went to town. It looked real good at first, but the car was a daily driver and I soon learned that dirt and oil showed up real easy and it started looking like crap.
 I spilled some fluid out of the master cylinder and it made a mess of the paint.  Bret
__________________
64' Build Thread http://67-72chevytrucks.com/vboard/s...d.php?t=586955 |
|
|
|
|
04-14-2014, 05:55 PM
|
#60 |
|
Registered User
Join Date: Apr 2014
Location: Oceanside, California
Posts: 2
|
Re: Project "Second Chance" - Hot Rod 66' GMC
In the pic of the bed from the back, it looks like you have removed the tail light panel. How did you do that? I want to R/R mine but don't know how you take it off. I don't want to tear up the rear of the bed. I figure I have to remove the tail gate and the dock bumper, do you cut it off? Thanks for any help you can give me.
|
|
|
|
|
04-14-2014, 06:15 PM
|
#61 |
|
Registered User
Join Date: Jun 2012
Location: Portland
Posts: 1,330
|
Re: Project "Second Chance" - Hot Rod 66' GMC
I haven't removed the tail light panel. I think the pics you're seeing that look like that are of the inside of the bed, the piece that faces the back side of the cab. Bed is still all intact at the moment.
Yeah, I can see yellow being hard to maintain . I'll probably stick with black in the engine bay, aside from some colorful highlights.
|
|
|
|
|
05-05-2014, 12:58 AM
|
#62 |
|
Registered User
Join Date: Jun 2012
Location: Portland
Posts: 1,330
|
Re: Project "Second Chance" - Hot Rod 66' GMC
5/4/2013 - Suspension going in
After much work, I was able to start putting in the front suspension. Long story short, the LCAs from the 85 wouldn't clear my new headers in their stock position. So based on some advice I redrilled the LCA shafts to move the whole LCA forward .5". Some people have done it .75", and others 1", but looked like I could only do .5" without major grinding of the cross member and u-bolt bracket housing. The next pain in the butt was getting the spring in there since the truck has little weight on the frame. It took me and a buddy standing on the spindle/frame to keep the whole thing from lifting rather than compressing the spring. Eventually we got it in, and I started to put the backing plate and rotor/hub on. Will work on the other side tomorrow. 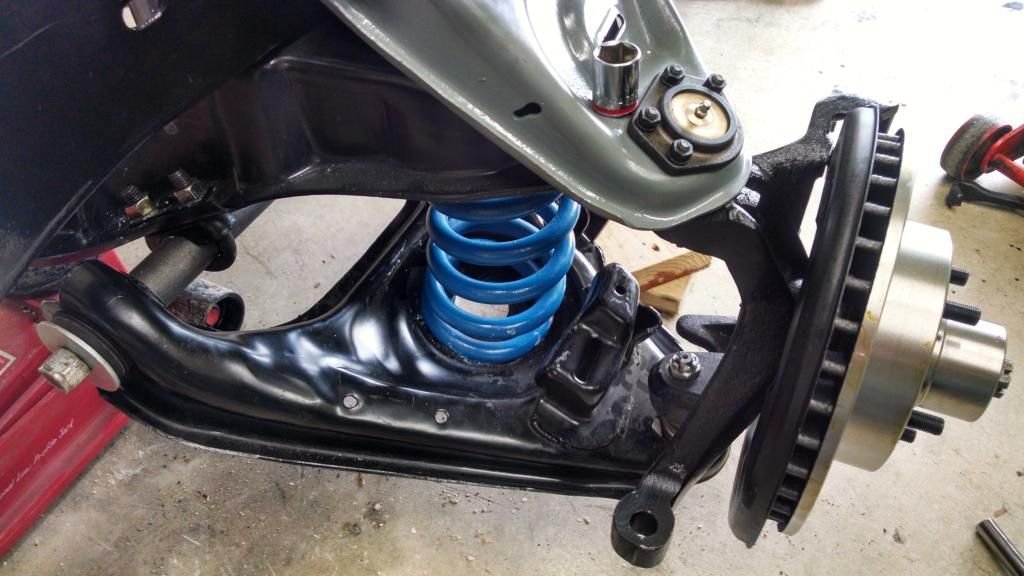 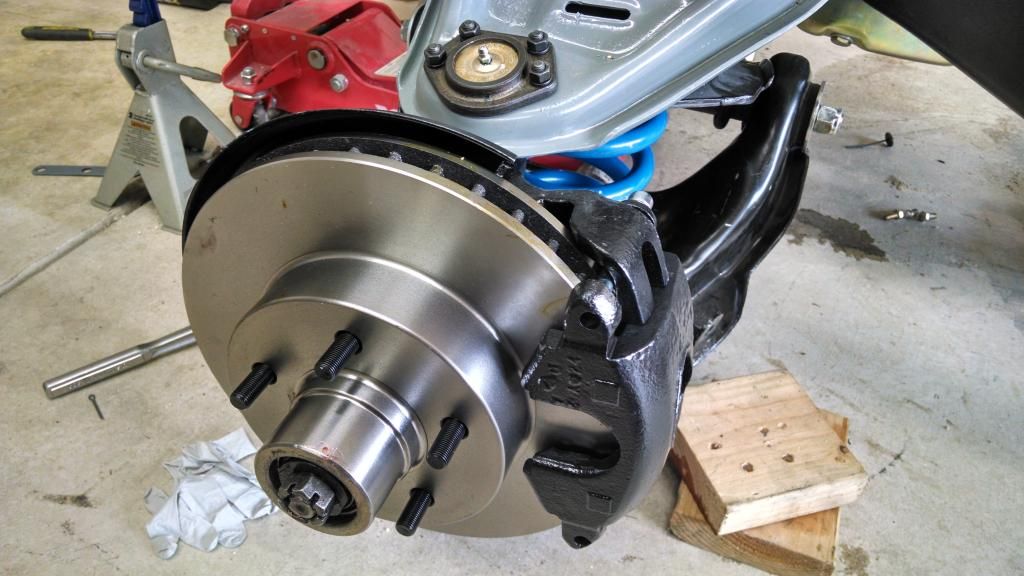 Also picked up a 12'bolt that I was told was from a 69 suburban. Looks like the leaf spring perches are 2" too far inward on each side, so those and the shock mounts will need to be relocated. I may just measure it out and have a shop do it, and go through and replace bearings and seals while they're at it. Its about 63" wide overall, and appeared to be the same total width as the Dana wheel to wheel. Backing plate to backing plate was different though. Speaking of, can anyone recommend a diff. shop in the Portland area? 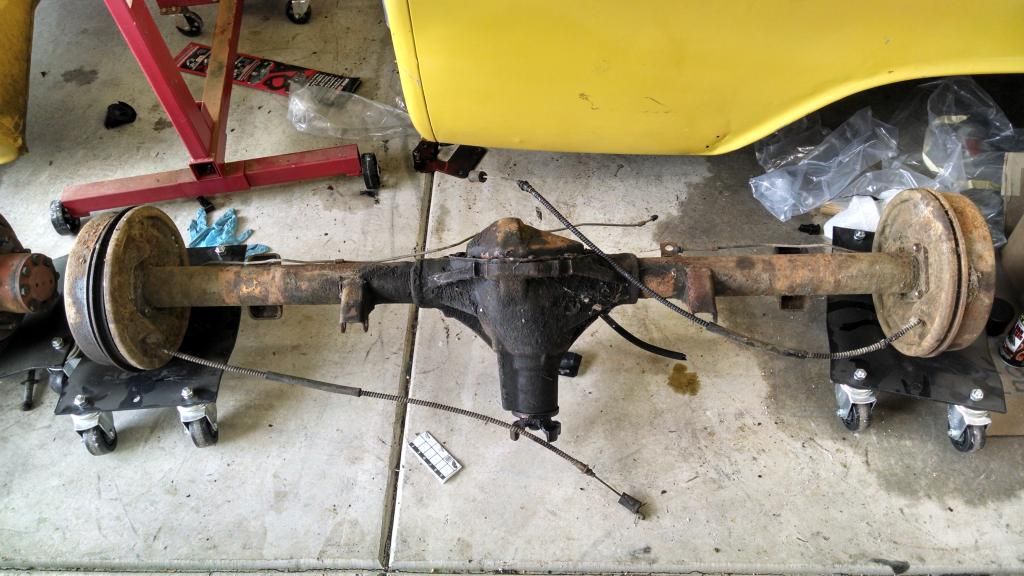 That's all for now! Cheers all. Last edited by siggyfreud; 05-05-2014 at 01:04 AM. |
|
|
|
|
05-06-2014, 12:41 AM
|
#63 |
|
Registered User
Join Date: Jun 2012
Location: Portland
Posts: 1,330
|
Re: Project "Second Chance" - Hot Rod 66' GMC
5/5/2014 - Other side mounted
My buddy came back over this evening and we got the other side on. Took about 1/4 as long to do. Didn't even need the compressor. Just lifted the frame, jacked up the LCA, and stood on the spindle and frame to add weight. I need to add the bump-stops, as the UCA hangs low enough without it it's bottoming out and won't let me turn the spindle, as it's resting on it. Starting to look like a vehicle again! 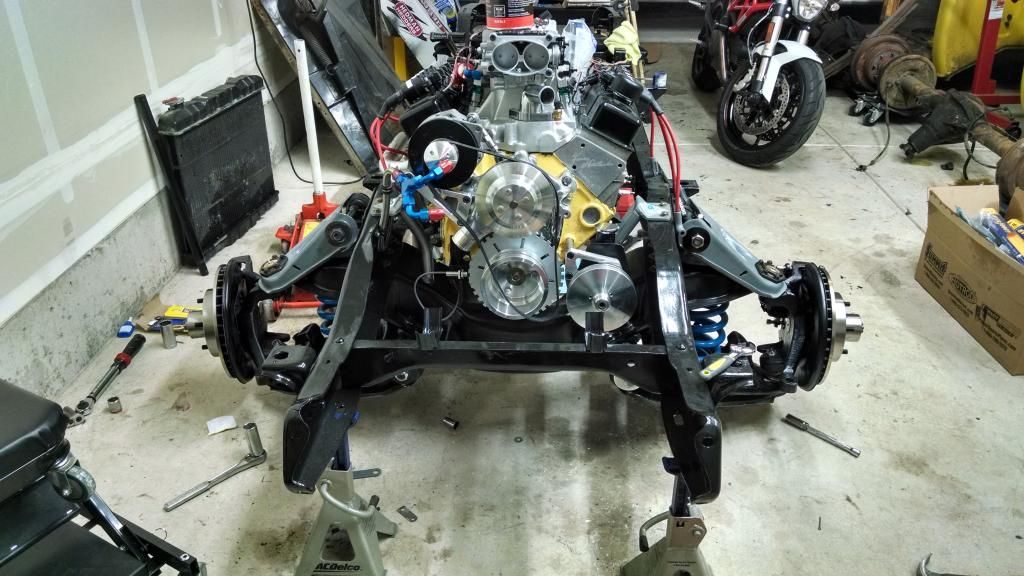
|
|
|
|
|
05-06-2014, 08:46 AM
|
#64 |
|
Registered User
Join Date: Jun 2007
Location: North Plains Oregon
Posts: 684
|
Re: Project "Second Chance" - Hot Rod 66' GMC
I just read your thread. Looks like your going to have a lot of motor for that Jimmy. Keep up the good work.
|
|
|
|
|
05-06-2014, 09:29 AM
|
#65 |
|
Registered User
Join Date: Apr 2014
Location: Worcester, MA
Posts: 42
|
Re: Project "Second Chance" - Hot Rod 66' GMC
Seems like a lot of work you are putting into an engine that you are going to swap out for "phase 2"
__________________
Daily Driver: Dodge Caliber SRT4
Sunday Cruiser: '69 Camaro Convertible Project Car: '62 Panel Build Thread |
|
|
|
|
05-06-2014, 10:03 AM
|
#66 | |
|
Registered User
Join Date: Jun 2012
Location: Portland
Posts: 1,330
|
Re: Project "Second Chance" - Hot Rod 66' GMC
Quote:
|
|
|
|
|
|
05-13-2014, 11:10 PM
|
#67 |
|
Registered User
Join Date: Jun 2012
Location: Portland
Posts: 1,330
|
Re: Project "Second Chance" - Hot Rod 66' GMC
5/13/14 - Brakes, Suspension, Fuel
Hey all, So I finally *almost* finished my front suspension. As I was finishing the first time one head of the u-bolt for the LCA stripped, so at that point I ordered all new ones. My buddies who work night shift jobs came over Saturday night and we were up until 3am replacing them. Springs are a ***** to work with when the weight of the vehicle isn't there. One castle nut simply stripped. Thankfully I had a spare new balljoint, as the castle for the spare joint was a slightly different thread pitch, so simply using a new castle nut was out of the question. Front rotors and brakes are mostly done, aside from final rotor torquing. 12 ft.lbs for that castle is imperceptible on my big wrench, so I need to get a socket so I can use the inch. lbs. I also noticed that I have a UCA shaft with the wrong side facing the frame. I thought they were the same, but one side has divets and the other is flat. Lastly, I nearly completed my fuel setup. My inlet comes up the passenger side. I have a bracket that holds it away from the frame and header to prevent rubbing. As you can see, I'm not concerned with hiding anything. It's not a show truck so I don't need to run wires and lines covertly. On the contrary, I like exposing the inner workings of it all. I think certain people will appreciate it more seeing all the systems. That said, all the wiring will be wrapped in the factory-style black fabric mesh. I could have done it cleaner perhaps (as in less junctions), but this works and should fuel each rail more equally than if a consecutive layout. It splits at a Y, and goes to the left rail, and eventually under the throttle body to the right rail: 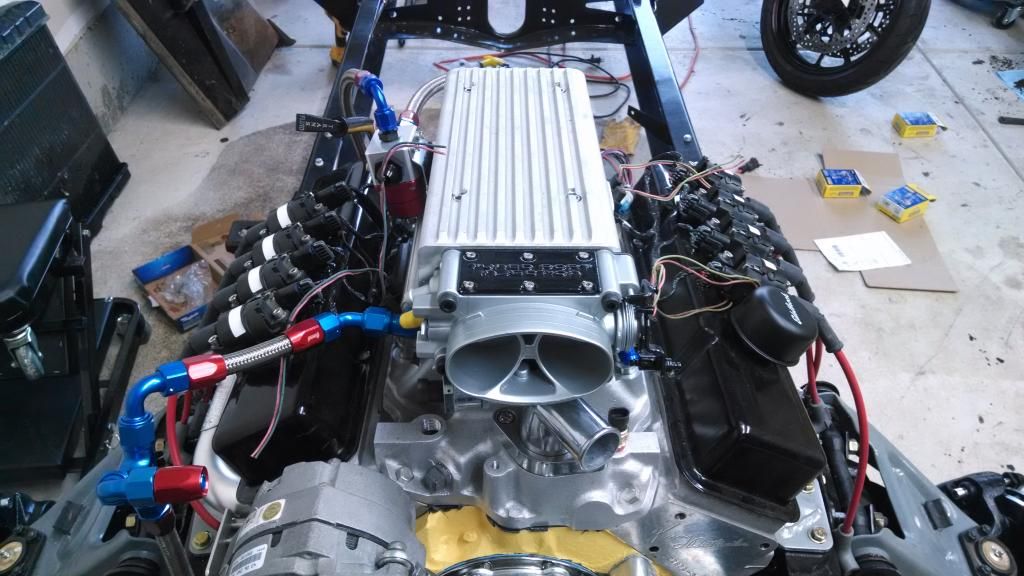 I need to change the right rail to a 90 instead of a 45 to make it work in the tight space. 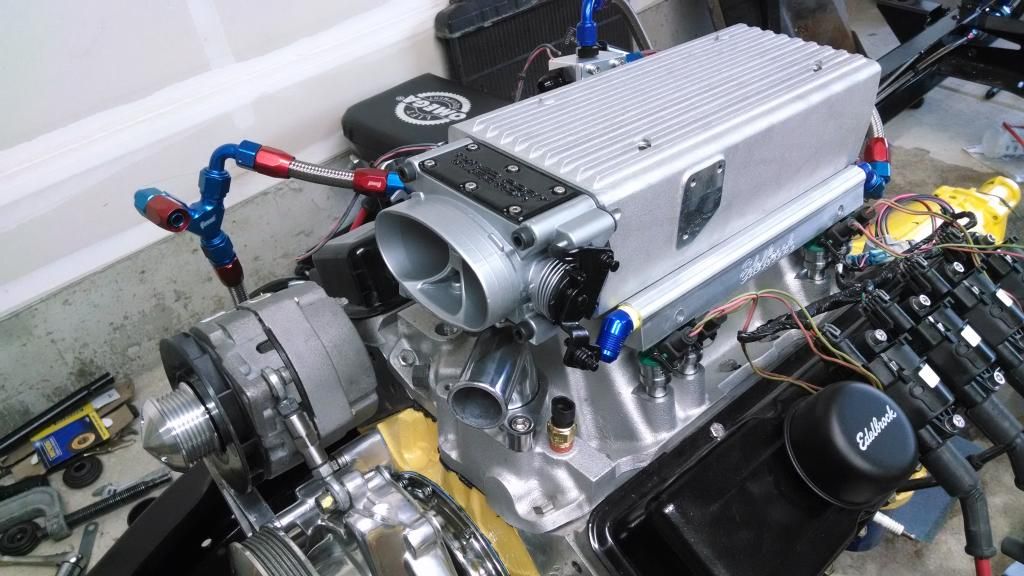 The back side exits and goes to the FPR which is currently velcrod to the manifold, but eventually I'll drill and tap the manifold to hold the FPR on. This is the easiest location for it that works. I didn't want to firewall mount it, or fender mount it. It's also facing such that I can put a fuel pressure gauge right on it during tuning. 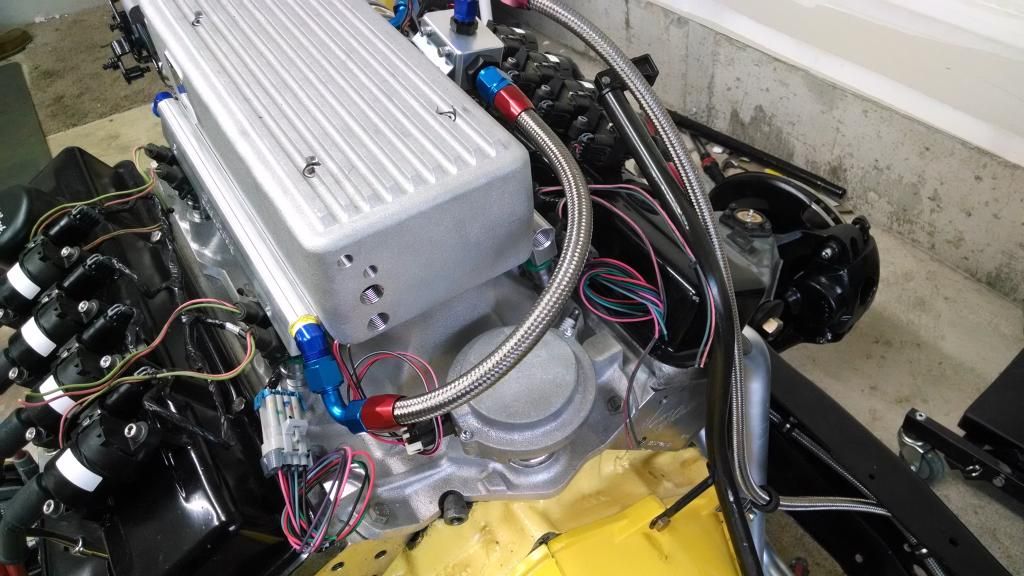 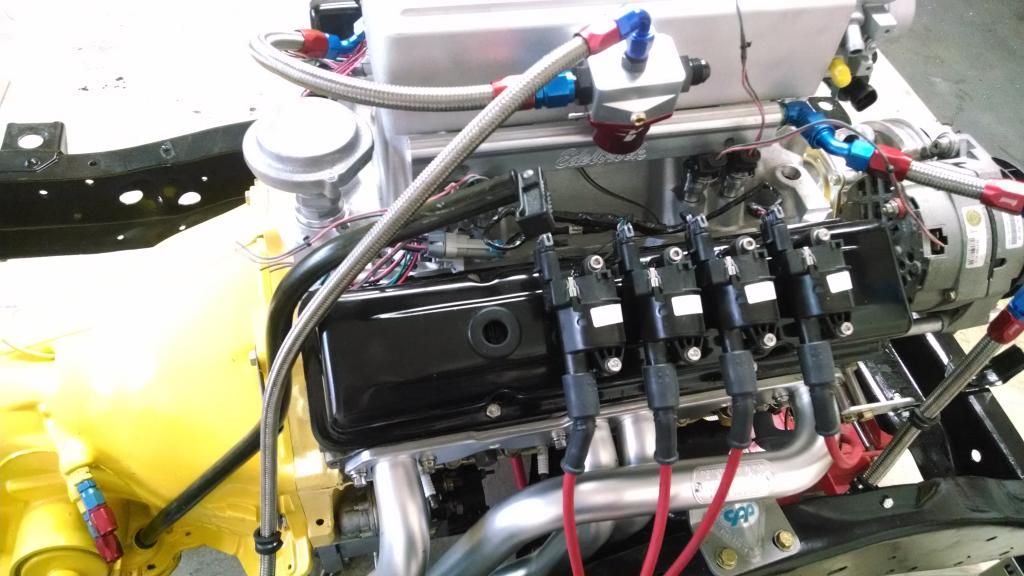 The fuel return comes from the top, and back down to another bracket holding it off the frame and header, and along the frame rail back to the tank. 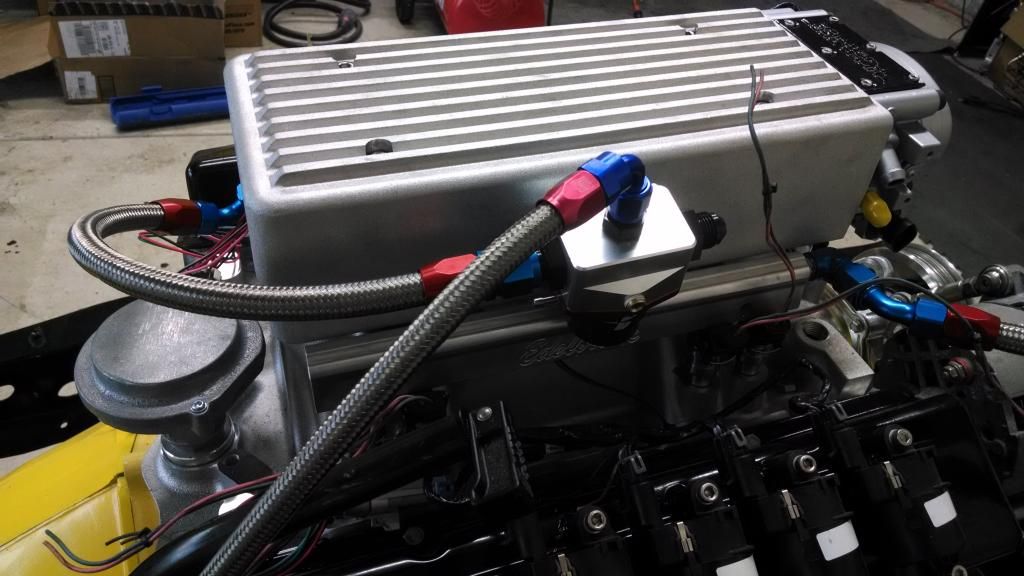 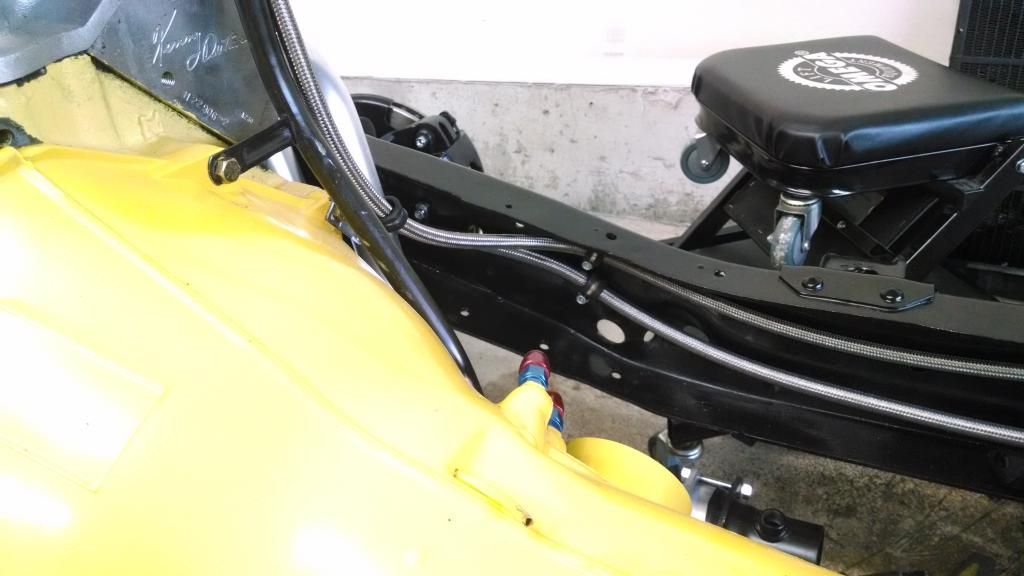  I'm contemplating adding a junction for the feed line right after it passes through the first crossmember. I made the tank super easy to drop for servicing, and having a good way to disconnect the fuel line before dropping the tank would make it even easier. I ordered the parts to do it, so I'll probably move ahead with the modification. 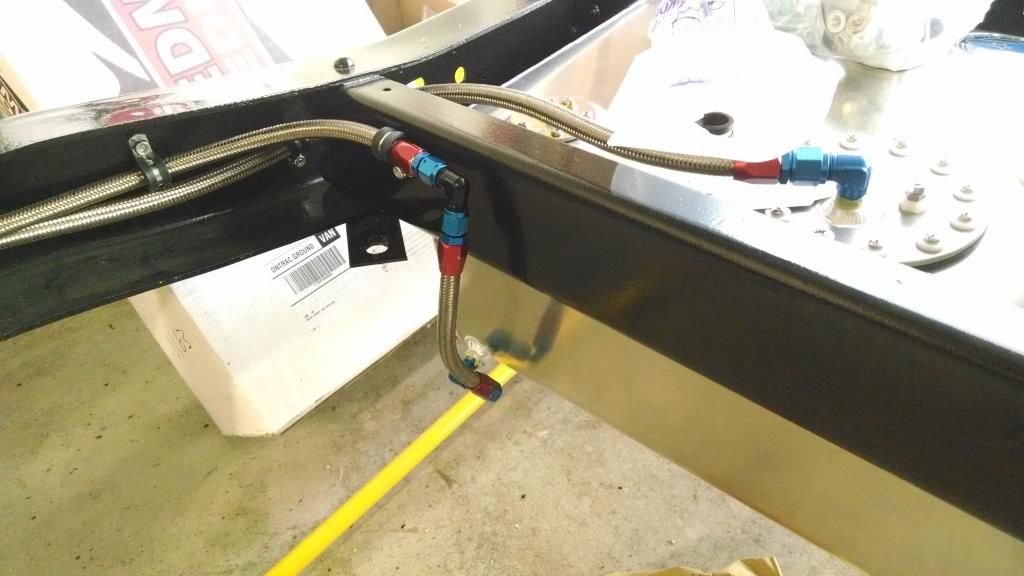 I still need to wrap up one inlet, and one outlet, and then fill it with fuel, flush the system in pieces, and then lock it down and test it for leaks. Next up I'll be disassembling the 12 bolt I picked up and getting it ready for blasting and new bearings/seals/axles. Cheers all! Last edited by siggyfreud; 05-13-2014 at 11:17 PM. |
|
|
|
|
05-13-2014, 11:24 PM
|
#68 |
|
Registered User
Join Date: Apr 2012
Location: Searcy, AR
Posts: 4,203
|
Re: Project "Second Chance" - Hot Rod 66' GMC
Too Sweet!

__________________
DON Proverbs 27:17  US Air Force Retarded errr Retired My '65 Stepper Build:http://67-72chevytrucks.com/vboard/s...d.php?t=533920 My '60 Rusty Patina Build:http://67-72chevytrucks.com/vboard/s...66#post7402266 My '72 http://67-72chevytrucks.com/vboard/s...59#post7204359 SOLD |
|
|
|
|
05-14-2014, 12:18 AM
|
#69 |
|
Registered User
Join Date: Apr 2012
Location: Cambridge, Ontario, Canada
Posts: 1,771
|
Re: Project "Second Chance" - Hot Rod 66' GMC
Great looking build, looks like you are having some fun with it, cheers
__________________
Craigerrr My build thread, CRGRS 66 Winter Build: http://67-72chevytrucks.com/vboard/s...09#post5638709 |
|
|
|
|
05-14-2014, 01:05 AM
|
#70 |
|
60-66 Nut
  Join Date: Mar 2007
Location: Coeur d'Alene, Idaho
Posts: 23,246
|
Re: Project "Second Chance" - Hot Rod 66' GMC
I thought I posted here in your build before but I guess not. I really like what you're doing and it looks very nice. I'm surprised that the Edelbrock fuel rails bolted up to the SR. Is your COP conversion from EFI Connection?
__________________
Power Steering Box Adapter Plates For Sale HERE Power Brake Booster Adapter Brackets For Sale '63-'66 HERE and '67-'72 HERE and '60-'62 HERE and "60-'62 with clutch HERE Rear Disc Brake Brackets For Sale. Impala SS calipers HERE Camaro Calipers HERE D52 Calipers HERE 6 Lug HERE Hydroboost Mounting Plates HERE |
|
|
|
|
05-14-2014, 01:41 AM
|
#71 |
|
Registered User
Join Date: Jun 2012
Location: Portland
Posts: 1,330
|
Re: Project "Second Chance" - Hot Rod 66' GMC
Thanks captain and thanks for all the help. The edelbrock rails didn't bolt up without modification. I had to bore out the holes and use some plastic spacers on the inside. I didn't want to use the holley rails with the integrated fuel pressure regulator.
The distributor is from efi connection. Everything else I put together from eBay, DIYAutoTune.com, or made. The efi connection kits look nice but are so expensive. |
|
|
|
|
05-15-2014, 12:59 AM
|
#72 |
|
60-66 Nut
Join Date: Mar 2007
Location: Coeur d'Alene, Idaho
Posts: 23,246
|
Re: Project "Second Chance" - Hot Rod 66' GMC
After I posted, I found your post where you described what you did to make the Edelbrock rails fit.
Looking at that 'distributor' some more, I wonder if it is simply an aftermarket aluminum '96-'02 Vortec distributor with a cast aluminum cover?
__________________
Power Steering Box Adapter Plates For Sale HERE Power Brake Booster Adapter Brackets For Sale '63-'66 HERE and '67-'72 HERE and '60-'62 HERE and "60-'62 with clutch HERE Rear Disc Brake Brackets For Sale. Impala SS calipers HERE Camaro Calipers HERE D52 Calipers HERE 6 Lug HERE Hydroboost Mounting Plates HERE |
|
|
|
|
05-15-2014, 01:28 AM
|
#73 |
|
Registered User
Join Date: Jun 2012
Location: Portland
Posts: 1,330
|
Re: Project "Second Chance" - Hot Rod 66' GMC
Possibly. I know a lot of the megasquirt guys poach vortec parts to get cam and crank signals. I've never worked with a vortec motor though so I'm not sure.
Finished the fueling up today aside from hard mounting the regulator.  
|
|
|
|
|
05-20-2014, 12:20 AM
|
#74 |
|
Registered User
Join Date: Jun 2012
Location: Portland
Posts: 1,330
|
Re: Project "Second Chance" - Hot Rod 66' GMC
5/18/14 - Regulator mounted and Exhaust started
Hey all, Made some good progress over the weekend. First I was able to make a quick bracket for the fuel pressure regulator. Just bent up some aluminum. Then I drilled and tapped the intake to mount it. Used some teflon tape to hopefully seal the threads and not get any vacuum leaks. If I do I'll use a better sealer or come up with a better gasketed surface. The bracket isn't the prettiest, but once it's all ready I'll pull it, square it a bit more, and paint it. For now I wanted to finish the proof of concept. 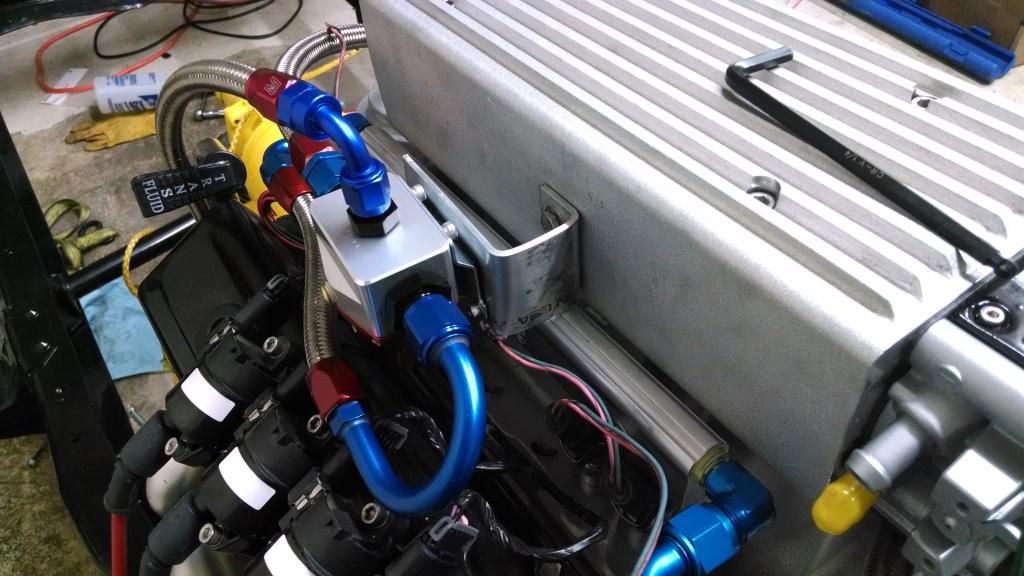 Next I started on the exhaust. Here are my parts: Headers and collectors w/o2 bungs 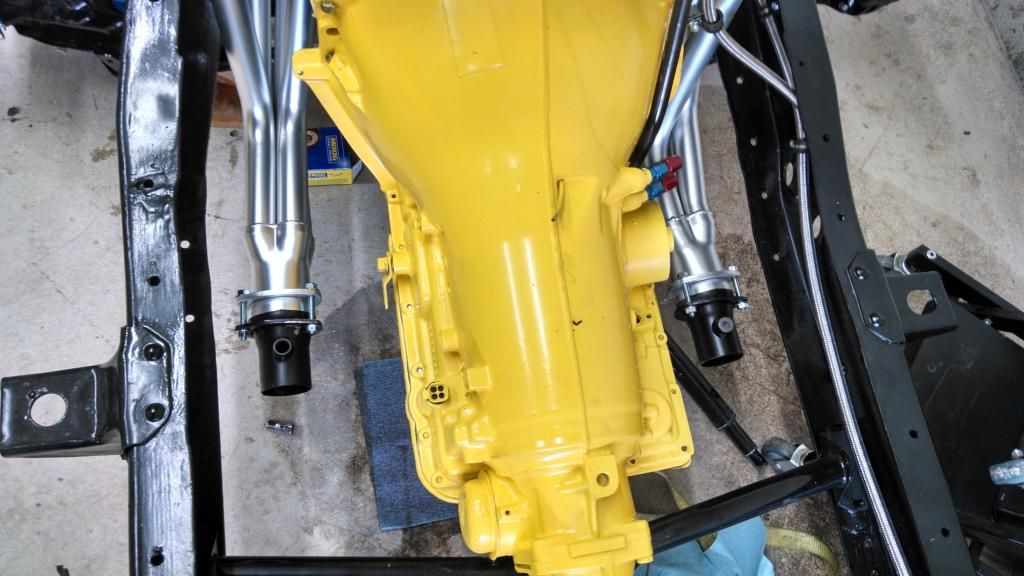 X-pipe kit: 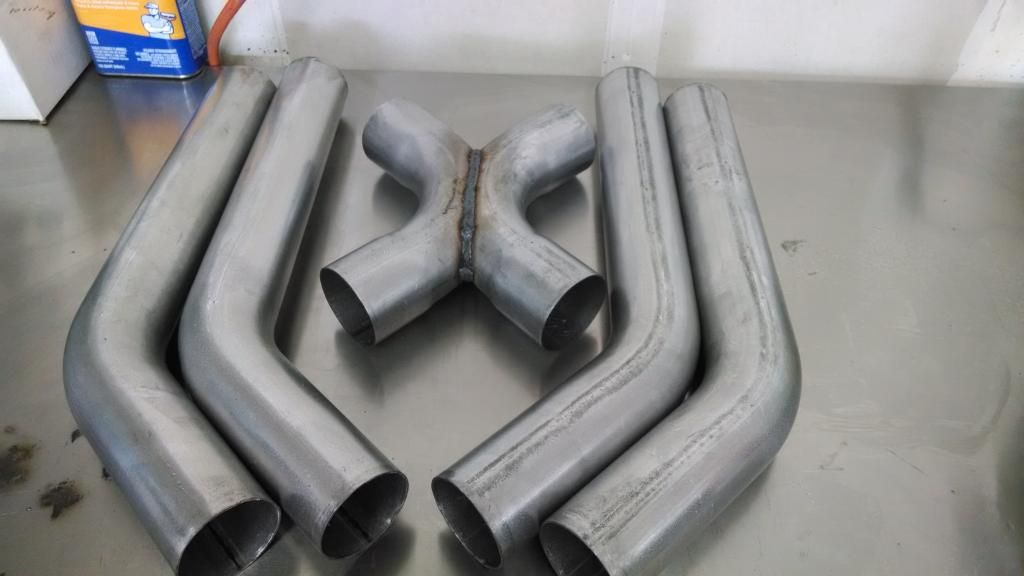 Assortment of mandrel bent pipe: 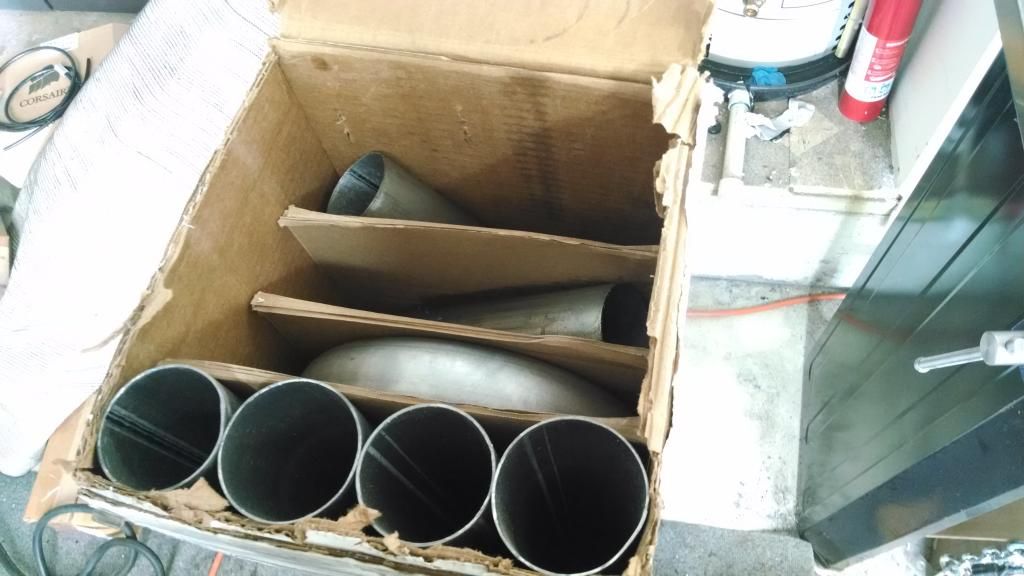 Flex pieces to limit stress on headers: 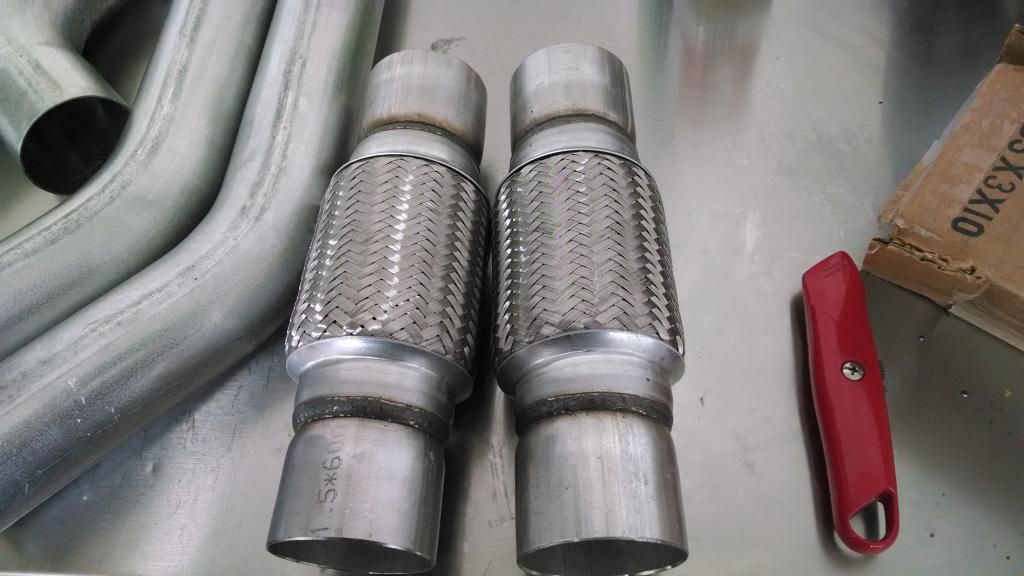 Tips: 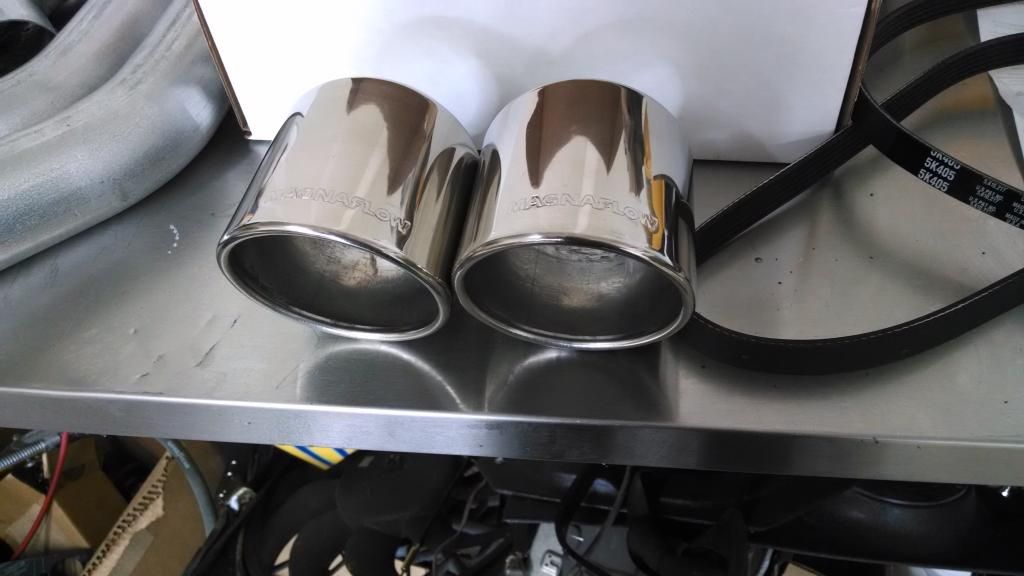 Now for the routing, my plan is to flip the bumper over, so the license plate space is on the bottom, and instead of the plate I'll have to two tips side by side in the cutout area. Somewhat like a Corvette I suppose. Here is a diagram of the proposed routing. I'll need to go wide around the gas tank, and then do some 90's to get the exhaust centered under the bumper. Not the ideal setup for maximum flow, but should be plenty and I imagine flow better still than standard pipe with kinks. 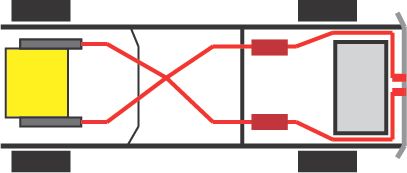 Didn't nab a photo of the mufflers, but I'll be using the Borla ProXS mufflers I previously had on the truck. I'll cut them out of the old system, clean them up, and add them. After I cleaned all the pipe and took a wire wheel to the all the ends I began with the Xpipe attachment to the collectors. Mocked it up with a jack and magnets and then tacked it together lightly. 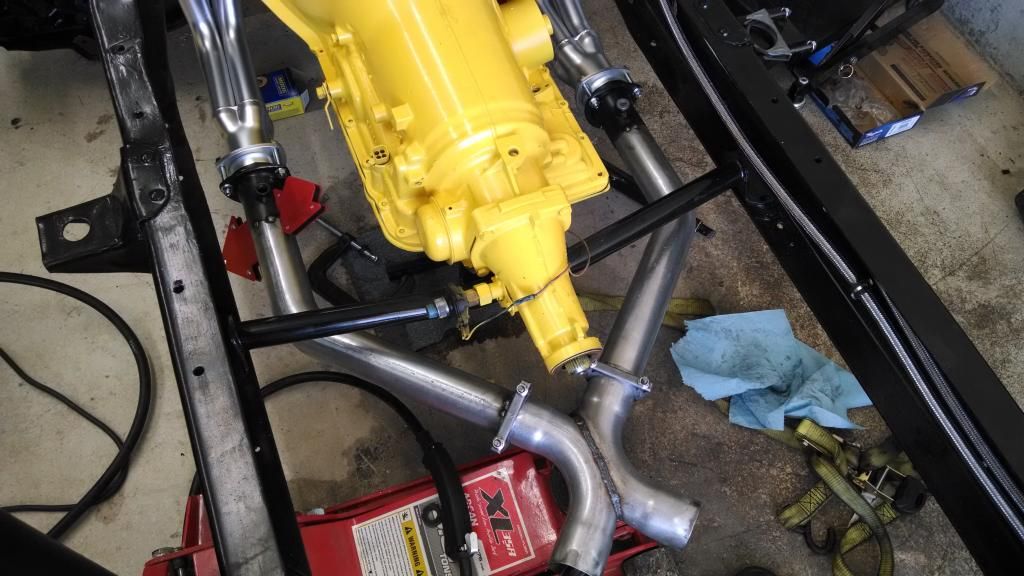 Took it off the truck to bind it more and my welder ran out of gas. So that's all until tomorrow when my dearest wife will grab me more welding gas .Question: What do you all do to protect your exhaust system? High-temp paint? I'd like to ceramic coat the whole thing if it turns out nice, but that could be big $$$. I bet I could spend $1,000 just in that. Probably not worth it with my fab skills lol. Cheers all! |
|
|
|
|
05-20-2014, 12:31 AM
|
#75 |
|
60-66 Nut
Join Date: Mar 2007
Location: Coeur d'Alene, Idaho
Posts: 23,246
|
Re: Project "Second Chance" - Hot Rod 66' GMC
I've always used high temp paint, which will hold up for a long time if the tube is prepped well. I prefer abrasive blasting. For the paint, having worked in the wood and pellet stove industry for many years, I use Stove Bright paint made by Forest Paint in Eugene. It comes in many colors too. They now have a primer as well.
__________________
Power Steering Box Adapter Plates For Sale HERE Power Brake Booster Adapter Brackets For Sale '63-'66 HERE and '67-'72 HERE and '60-'62 HERE and "60-'62 with clutch HERE Rear Disc Brake Brackets For Sale. Impala SS calipers HERE Camaro Calipers HERE D52 Calipers HERE 6 Lug HERE Hydroboost Mounting Plates HERE |
|
|
|
 |
| Bookmarks |
|
|


 Linear Mode

