
|
Register or Log In To remove these advertisements. |
|
|
|
|||||||
 |
|
|
Thread Tools | Display Modes |
|
|
 06-26-2012, 09:48 PM
|
#1 |
|
Registered User
Join Date: Dec 2010
Location: Elbert county, CO
Posts: 249
|
68 C10/international L110 Mut
I'm kinda cheating here. The chassis is a slightly modified 68 c10 holding together a 1950 international pickup.
I spent a lot of time on this board as half the truck is factory and will be utilizing aftermarket parts for performance a little later. I guess I could start a build thread if amajorityof you find the truck appropriate for that   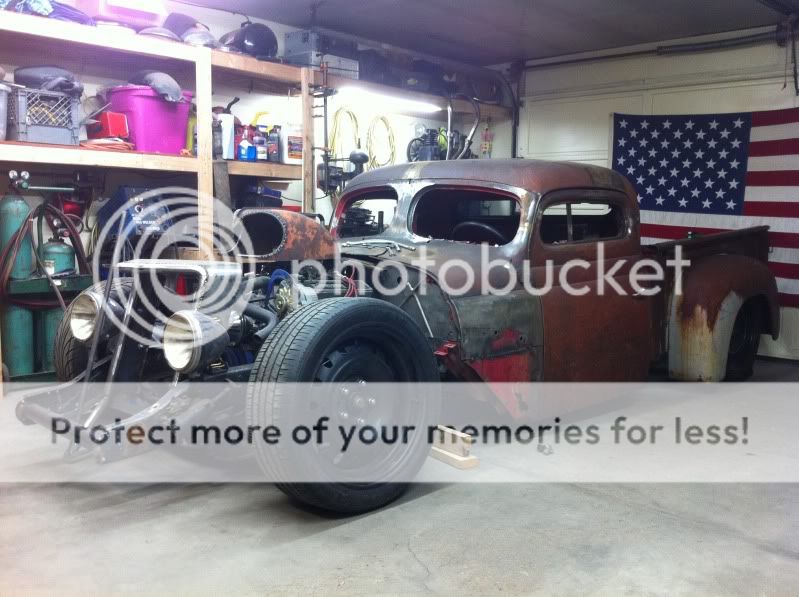 Posted via Mobile Device Last edited by jmlcolorado; 06-26-2012 at 09:55 PM. |

|

|
|
06-26-2012, 11:06 PM
|
#2 |
|
Registered User
Join Date: Jun 2012
Location: Fargo, North Dakota
Posts: 141
|
Re: 68 C10/international L110 Mut
I like it! Sorta got that Rob Zombie look to it.

|
|
|
|
|
06-27-2012, 02:29 AM
|
#3 |
|
Registered User
Join Date: Mar 2010
Location: a t w a t e r cali 95301
Posts: 10,713
|
Re: 68 C10/international L110 Mut
It's got Chevy for its foundation, this is the best chevy site on the net so I can't think of a better place for you to get help. Welcome abord
Posted via Mobile Device |
|
|
|
|
06-30-2012, 01:35 AM
|
#4 | |
|
Registered User
Join Date: Dec 2010
Location: Elbert county, CO
Posts: 249
|
Re: 68 C10/international L110 Mut
Quote:
Luckaly, 90% of my questions are answered if I utilize the search bar. Funny how that works Posted via Mobile Device |
|
|
|
|
|
06-30-2012, 08:02 AM
|
#5 |
|
English Chevy Owner
Join Date: May 2002
Location: Shropshire, UK/ Lot, France
Posts: 1,848
|
Re: 68 C10/international L110 Mut
Now that I like, pretty evil looking.
__________________
Phil '67 C10 long fleet. 350/TH350, 4 bbl Carter, K&N, Dual exhaust, loads of stuff coming soon 2001 S10 Blazer Daily Driver, bone stock 4 door 4x4 with manual transmission |
|
|
|
|
07-01-2012, 04:09 PM
|
#6 |
|
#16876
Join Date: Apr 2005
Location: Auburn WA
Posts: 12,267
|
Re: 68 C10/international L110 Mut
Yes please do a build thread. That's pretty cool and I'm really digging the windshield openings.
__________________
Posted via Stationary Device '71 Custom Deluxe C-20 402. '67 Buick Special 455. '49 Plymouth Special Deluxe. "I love that old car smell"  Some people are like Slinkies... not really good for anything, but they still bring a smile to your face when you push them down a flight of stairs. |
|
|
|
|
07-01-2012, 10:10 PM
|
#7 |
|
Registered User
Join Date: Dec 2010
Location: Elbert county, CO
Posts: 249
|
Build thread sharts here:
This'll be a short version of the full length version, which is about 40 pages to date, and i don't want to bore you all with the gory details, unless you really want them
Here goes: Got this 1950 International L110 from a close friend that didnt have the time or room for it. Ive never done anything like this (except for a motorcycle i built) and he thought i could handle something like this. So i went for it. First day, picking it up    First things first, to chop the top.      
|
|
|
|
|
07-01-2012, 10:19 PM
|
#8 |
|
Registered User
Join Date: Dec 2010
Location: Elbert county, CO
Posts: 249
|
Re: 68 C10/international L110 Mut
Looking at 6" of chop all the way around.
This truck is done on a budget........as little as possible so you'll find me doing things on the cheap. Hense the rebar bracing.    Youll also notive i out it together and take it apart about a billion times, mostly since i dont know what im doing, and secondly, to assure it looks right. Factory bed in place, with no frame. This will help me decide where to go with the next step.  Time to shorten the bed.  I shortened it to an ironic legnth, 5'10", cause thats how tall i am and thought that would be fun.  I jept the factory stamped lined in the bed so it all flows well.  Filling in the doors  Picked up a 350 on C/L for the powerplant.  I wanted 20" wheels, cause i want to install some noce rims sometime in the future. 
|
|
|
|
|
07-01-2012, 10:24 PM
|
#9 |
|
Registered User
Join Date: Dec 2010
Location: Elbert county, CO
Posts: 249
|
Re: 68 C10/international L110 Mut
This is where it gets fun. Picked up a complete roller 68 C10 for a song on C/L.
 i HAD to set the cab and bed on it to see where it is. Obviously, some modifications needed.    With the factory spring out, had to see how low it would go. Not low enough.  Since this is going to be a "rod" and since its IFS, i gotta make it look right. Rods usually have the front axle way out in front, and since i cant move the crossmember forward, i moved the cab back for the illusion.  Now to remove the cab, and do some cave man style lowering.  Chop chop cut cut     
|
|
|
|
|
07-01-2012, 10:31 PM
|
#10 |
|
Registered User
Join Date: Dec 2010
Location: Elbert county, CO
Posts: 249
|
Re: 68 C10/international L110 Mut
Cab back on to see how it looks.
   The rear crossmember hits now, gonna have to fix that I also zeed the rear of the frame too, but im not sure where those pictures went. Here it is with the frame zeed, cab and bed in place, and some 2000 dodge ram 1500 spare wheels in place.  Proportions arent right looking at it here. Not quite the look im going for. Time to take another 3" out of the cab. Section time!      I also sectioned the doors 3"s. I pealed the skins back, then cut the inner frame, then reinstalled the skins.      Putting the cab back together. I used the 3" cut off sections as weld backer inside the cab walls.  
|
|
|
|
|
07-02-2012, 12:37 AM
|
#11 |
|
Registered User
Join Date: Jun 2012
Location: St. Robert, MO
Posts: 160
|
Re: 68 C10/international L110 Mut
That is AMAZING!!!
 I am blown away by your work! Cannot wait to see more 
__________________
Boys aren't the only ones that like to get their hands dirty! \m/(@o@)\m/ 1950 Army Chevy 3100 build: The Chester Chronicles Proud Army Wife! 
|
|
|
|
|
07-02-2012, 12:47 AM
|
#12 | |
|
Registered User
Join Date: Dec 2010
Location: Elbert county, CO
Posts: 249
|
Re: 68 C10/international L110 Mut
Quote:
You got yourself a pretty sweet project yourself (despite the random snail invasions). I see you found some neat documents in your rig! I found an old keychain with a church key and a pill case type thing with a bank check dated in the 50's with some directions on it! It was somehow in between the inner and outter walls of the cab, buried in years and years of old farm dust! Gotta love what these old classics keep hidden for us to find! Posted via Mobile Device |
|
|
|
|
|
07-02-2012, 02:45 PM
|
#13 |
|
Registered User
Join Date: Feb 2010
Location: Fallbrook, CA
Posts: 910
|
Re: 68 C10/international L110 Mut
I love it!
Will be reading the big build thread this weekend. Thanks for posting in the Tinkle.. I mean the Tinkering section!
|
|
|
|
|
07-03-2012, 02:16 PM
|
#14 |
|
Registered User
Join Date: May 2011
Location: Anderson SC
Posts: 4,049
|
Re: 68 C10/international L110 Mut
Whoa!! I was wondering how on earth I missed this, but I then looked at the dates and it's only been on here a few days. That's a ton of nice work you've done, and I'm diggin the split windshield! Great idea on finding a suitable glass for the windshield too, I like that alot and will have to use it if I ever chop something. We like "gory details", can't wait to see more!!
__________________
Project Goldilocks '66 C10 Short Fleet BBW Build '65 C10 Highly Detailed Stock Restoration Thread '78 Camaro Targa Roof Build '55 International Metal/Body/Paint Work '66 F100 Full Rotisserie Restoration '40 Packard 120 Convertible Coupe Restoration How To Restore and Detail an Original Gauge Cluster How To Detail Sand Body Panels, Edges, Corners, Etc |

|
|
|
07-03-2012, 02:50 PM
|
#15 | |
|
Registered User
Join Date: Dec 2010
Location: Elbert county, CO
Posts: 249
|
Re: 68 C10/international L110 Mut
Quote:
This has been a slow build (a little over a year and a half, and counting) but in reality, that's a positive since that gives me tons of time to set something up, then stare at it for a while till i get a nice final design in my head. Like i said, ill start to keep this thread updated on my progress. As you can see, i take tons of pictures, mostly to get other guys eyes on it to make sure im on the right track. I was laying in bed last night and got a sweet idea for my exhaust, so ill be starting that tonight hopefully, so you can expect more pictures later tonight 
|
|
|
|
|
|
07-06-2012, 08:05 PM
|
#16 | |
|
Registered User
Join Date: Jun 2012
Location: St. Robert, MO
Posts: 160
|
Re: 68 C10/international L110 Mut
Quote:
Have any photos of it? Yu going to keep it at all? I am hoping that as we continue along, we will find more and more things Found a pair of rusted solid pliers under all the debris in the smashed in grill that we pulled off on wednesday! I wish I could say how old they are, but it is very cool non the less I have to say, I like the machine gun barrel shroud idea, and I don't think you can go over the top with this beast that you are constructing! I say go with it, and if you don't like it later, I know you will be able to fix it up to how you like it!
__________________
Boys aren't the only ones that like to get their hands dirty! \m/(@o@)\m/ 1950 Army Chevy 3100 build: The Chester Chronicles Proud Army Wife!
|
|
|
|
|
|
01-05-2013, 07:34 PM
|
#17 |
|
Registered User
Join Date: Sep 2004
Location: Cheney, KS
Posts: 462
|
Re: 68 C10/international L110 Mut
Looking good! I have a 50 international waiting to be worked on someday
Posted via Mobile Device
__________________
Where to start? |
|
|
|
|
01-06-2013, 02:11 PM
|
#18 |
|
Registered User
Join Date: Feb 2007
Location: Marana, Arizona
Posts: 3,479
|
Re: 68 C10/international L110 Mut
Wow, how did I miss this? Not sure how many lifetimes it would take me on just the welding you have on this thing.
Cool stuff!
__________________
"I feel the need for speed!"... as soon as I am done with my nap. |
|
|
|
|
07-03-2012, 02:56 PM
|
#19 |
|
Registered User
Join Date: Nov 2011
Location: Nashville TN
Posts: 3,595
|
Re: 68 C10/international L110 Mut
wow, this is crazy!!
__________________
PLEASE HELP WITH PROJECT UNDERHAULIN http://67-72chevytrucks.com/vboard/showthread.php?t=306320 Gemini - 1978 GMC C15 High Sierra - 305 c/e - Given to Mother Electra - 1967 Mustang Coupe - 302/w 3 speed Build Chyna - 1968 Chevy C20 Long Stepper
|
|
|
|
|
07-03-2012, 09:09 PM
|
#20 |
|
Registered User
Join Date: Dec 2010
Location: Elbert county, CO
Posts: 249
|
Re: 68 C10/international L110 Mut
Boy, I dunno.......
I started playing with the exhaust tonight. I had just a straight piece of two inch that I was thinking of wrapping with a shorter section of 3" with 1/2" holes drilled all through it, to make it look like A machine gun barrel shroud. But then I got the idea of splitting the pipe, then adding another plate on top with holes drilled in it. Maybe carry the brass machine screw theme to hold on the "shield" This is what I've come up with so far, but I'm just not sure about it. Maybe it's too fresh and I'm not used to looking at it. What do you guys think? What would you change? Here's the origonal thought.  Before I cut it all up:     Posted via Mobile Device |
|
|
|
|
07-03-2012, 09:15 PM
|
#21 |
|
Registered User
Join Date: Dec 2010
Location: Elbert county, CO
Posts: 249
|
Re: 68 C10/international L110 Mut
I really am kinda a conservative taste kinda guy. Not big into big, loud things. (what the hell am I doing building this then
) so I'm not sure if this is just getting too over the top or not.Posted via Mobile Device |
|
|
|
|
07-06-2012, 11:20 PM
|
#22 |
|
Registered User
 Join Date: Aug 2010
Location: NH
Posts: 368
|
Re: 68 C10/international L110 Mut
Awsome build! The split windshield and the grille really make the truck, for me at least
__________________
- 2010 Silverado - 1984 Chevy M1028 (K-30) - 1969 Chevy C-30 - 1933 Ford Stock Car |
|
|
|
|
07-06-2012, 11:40 PM
|
#23 | |
|
Registered User
Join Date: Dec 2010
Location: Elbert county, CO
Posts: 249
|
Re: 68 C10/international L110 Mut
Quote:
It was tough waiting for that first page to load all those photos Thanks! It's taken some time, and each step, the split windshield included, gets formed up, then it sits forever while I look at it day after day to see if it really fits the truck. I'm pretty excited about getting this thing on the road! It should drive pretty nice and should get tons of attention Posted via Mobile Device |
|
|
|
|
|
07-14-2012, 07:43 AM
|
#24 |
|
State of Confusion!
 Join Date: Jul 2002
Location: Gulfport, MS USA
Posts: 48,486
|
Re: 68 C10/international L110 Mut
Great looking metal work. This is going to be a fun build to watch.
__________________
Bill 1970 Chevy Custom/10 LWB Fleetside 2010 Toyota Tacoma PreRunner SR5 Double Cab - DD Member of Louisiana Classic Truck Club (LCTC) Bill's Gallery Life isn't tied with a bow, but it's still a gift. Live simply. Love generously. Care deeply. Speak kindly. Leave the rest to God! |
|
|
|
|
08-05-2012, 11:50 PM
|
#25 |
|
Registered User
Join Date: Jun 2012
Location: Fargo, North Dakota
Posts: 141
|
Re: 68 C10/international L110 Mut
Not to be a pest but, how are things going with the Truckenstein?
__________________
"I taste Rust" I wish I had the money my truck thinks I do I taste "Patina" |
|
|
|
|
| Bookmarks |
|
|


 Hybrid Mode
