
|
Register or Log In To remove these advertisements. |
|
|
|
|||||||
 |
|
|
Thread Tools | Display Modes |
 09-16-2013, 09:21 PM
|
#51 |
|
Registered User
Join Date: Jun 2009
Location: san francisco, ca (east bay)
Posts: 674
|
Re: Welcome Home, Gentleman Jim
Izzy! Man everyone is happy when you show up! Don't worry.
It's the people who tow out of ditches the WRONG way that these guys were talking 'bout! The 'Gent was only made one year (1975) and it seems that there were only about 1000 of them made. Rare, yes. Valuable? maybe not that much? Beau James, I believe came after the 'Gent, and they made a LOT more of them (four times). similar idea. I can't tell if they are awesome classics or oddball wonders! Here's what I have found out: What is a Gentleman Jim? Essentially it was a marketing idea to present GMC trucks as more luxurious than a "farm truck". From brouchers I have read the Beau James (similar promotion package) came after '75 and had production of 4000 units. Not verified that though. * Promotional Package RPO * 1975 Only * Standard Options looked like this: * Black Paint with gold inserts * Gold Cab top * Gold Grill insert * Camel interior * Bucket Seats * Console storage between seats * "Gentleman Jim" decal on the rear sides of bed * 1/2 Ton * Sierra Classic * AM/FM 8-track stereo * AC * Power brakes and steering * Tach * Tilt * Sway bar * Custom Floor mats * 350c.i. 4bbl / Th350 * Long bed And I believe you could also get: * bedrail * fog lights * bed cover 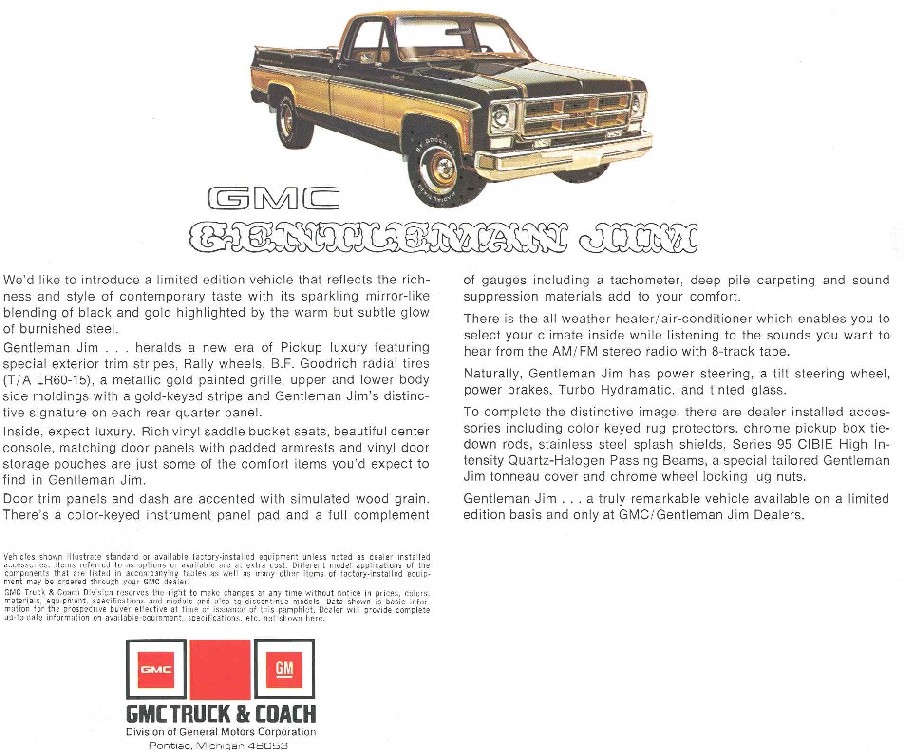
|

|

|
|
09-20-2013, 04:18 AM
|
#52 |
|
Registered User
Join Date: Jun 2009
Location: san francisco, ca (east bay)
Posts: 674
|
Re: Welcome Home, Gentleman Jim
Going to get the frame welded tomorrow.
Did a little cleanup, and no wonder this front end needs love: Before:  Before:  After:  Only trying to get some grease in there for now. Finally found my grease gun but it was empty!   Here's the crack. There is a weld repair right at the Steering Gear, but I think it's ok. This one is not:  Hard to get a good shot, but the frame is cracked in half from the Brake line hole down.  Kind feel like maybe not not get driven like that? |
|
|
|
|
09-20-2013, 08:31 PM
|
#53 |
|
Registered User
Join Date: Jun 2009
Location: san francisco, ca (east bay)
Posts: 674
|
Re: Welcome Home, Gentleman Jim
WOW what a difference!
The welder took care of the "spidering" around the brake line hole. He then mounted the ORD bracket I got, and torqued everything down. The difference is night and day. Front end still probably needs a rebuild, but there is now no slop in the steering. Much better. I gotta go road trip to pick up an Alaskan Camper. Pics when I get back. |
|
|
|
|
09-20-2013, 10:48 PM
|
#54 |
|
72 BB C30 Super LongHorn
 Join Date: Nov 2002
Location: Chavez Ravine
Posts: 1,606
|
Re: Welcome Home, Gentleman Jim
Replying to swissarmychainsaw ,
It always seems to me that when GM wants to really make a bold impression with their vehicles, that BLACK most often is the base color, I tend to refer back to early Corvettes, a particular Camaro in 69 that they only made 2 of in this same color combo, the Grand National, the Intimidator Monte Carlo, just to name a few. It's always been their mark. I remember seeing these in SoCal back then. They were cool looking. Enjoy that GJ. I'll be following along with your updates. Posted via Mobile Device
__________________
72 BB C/30 Longhorn Super HO72 No-Spin, #'s matching, Tilt, Tach, AC, AM/FM HO72 build : http://67-72chevytrucks.com/vboard/s...d.php?t=714492 2017 SS 
|
|
|
|
|
09-23-2013, 05:10 PM
|
#55 |
|
Registered User
Join Date: Jun 2009
Location: san francisco, ca (east bay)
Posts: 674
|
Big Time
So the Front end is remarkably better. Here's what the Kim Williams in Alameda CA did. Nice guy too.
* Welded the Frame at the brake line "pass though" hole. The frame was really spidered there, and the lower part was cracked in half. * Welded the front cross member to the frame on the gearbox side (this was a repair of a *previous repair job) * Removed the Sway bar brackets (these are riveted from the factory and one was also welded in place. I let the guy with the torches do this job). * Installed the ORD Gear Box Brace Here are some pics. The Off Road Designs Steering Gear Box Brace. It seems to work great, but I'm disappointed in the instructions and in the fact that my email to them went unanswered as to how to install it. Let me give you an example of what I mean: The instructions (which are for the 4x4 model) say to install it on the back (toward rear of vehicle) side of the frame cross member. You can see here that the 2wd one goes IN FRONT of the cross member and is visible right behind the front bumper:   The welder also removed the Sway bar brackets which you can see dangling in the pics. The Weld:    Oh, and then I had a "moment" and drove the truck 6 hours one way to get this:   13 MPG on the way up and about 9 on the way back. It rained on me the whole time, real glad the wipers worked! The 'Gent was a real trooper and made the trip without a complaint. The Camper pretty much is overwhelming the suspension though. 3/4 Ton is what is needed here I think! More projects! --Nick |
|
|
|
|
11-21-2013, 02:59 PM
|
#56 |
|
Registered User
Join Date: Jul 2013
Location: Canton, TX
Posts: 245
|
Re: Welcome Home, Gentleman Jim
Any news on the truck lately? How's it running now?
__________________
1980 Chevy K10 Silverado --> Build Page My wife told me I spent too much time on Facebook. So I bought an old truck. Now she wishes I was on Facebook, it was cheaper.
|
|
|
|
|
11-26-2013, 12:10 AM
|
#57 |
|
Registered User
Join Date: Jun 2009
Location: san francisco, ca (east bay)
Posts: 674
|
Re: Welcome Home, Gentleman Jim
Well, I bailed out on the camper. No place to put it, and the neighbors didn't like it very much...
So it went to a new home, good deal for everyone. The guy was a cabinet maker, so I think it will come out better on the other end. I'm driving the truck every day to work, but have not done too much to it yet. Maybe this holiday I'll get some traction. I'll post pics and keep you posted. Nick |
|
|
|
|
12-07-2013, 10:53 PM
|
#58 |
|
Registered User
Join Date: Jun 2009
Location: san francisco, ca (east bay)
Posts: 674
|
Re: Welcome Home, Gentleman Jim
Driving "The Gent" daily. Here we are at the hardware store.
So far it's as reliable as a rock. Drive it to work every day (20 miles) and other than the gas mileage, and no heat, I love it!  
|
|
|
|
|
12-07-2013, 11:23 PM
|
#59 | |
|
Registered User
Join Date: Nov 2009
Location: Parachute, CO
Posts: 183
|
Re: Big Time
Quote:
__________________
1984 1ton 4x4 crew cab dually 6.2 diesel,465,205,D60,D70,1987 3/4ton 4x4 suburban 5.7 FI350,TH400,208,1985 CJ-7 FI406,465,205,D60,FF14, 1970 Jeepster 350,465,205,D44,FF14, Last edited by cheepin; 12-07-2013 at 11:28 PM. |
|
|
|
|
|
12-08-2013, 12:34 AM
|
#60 |
|
Registered User
Join Date: Jun 2009
Location: san francisco, ca (east bay)
Posts: 674
|
Re: Welcome Home, Gentleman Jim
If you read the thread you can see that I *did* get the ORD brace.
The 2wd version is not a weld in, that's only the 4x4 version. And yes the guy was a pro, and did a good job, even if you don't like it. 
|
|
|
|
|
12-08-2013, 03:16 PM
|
#61 |
|
Registered User
Join Date: Nov 2009
Location: Parachute, CO
Posts: 183
|
Re: Welcome Home, Gentleman Jim
The frames are the same 2x4 vs. 4x4. The weld on plate goes under the steering box. I don't see anything that would be in the way of it. It will strengthen where your frame was already welded by someone else before you got it.
__________________
1984 1ton 4x4 crew cab dually 6.2 diesel,465,205,D60,D70,1987 3/4ton 4x4 suburban 5.7 FI350,TH400,208,1985 CJ-7 FI406,465,205,D60,FF14, 1970 Jeepster 350,465,205,D44,FF14, |
|
|
|
|
12-09-2013, 12:41 AM
|
#62 |
|
Registered User
Join Date: Jun 2009
Location: san francisco, ca (east bay)
Posts: 674
|
Re: Welcome Home, Gentleman Jim
In theory I totally agree that they are the same.
http://offroaddesign.com/catalog/steeringkit.htm That shows there is a 2wd version and a 4wd version, and since mine is 2wd that's what I ordered. The ORD products are good but trying to find the difference between what parts they sell was not easy. I emailed to ask them this and never got a response. The instructions, I as I mention are also poor. This worked well, though. N |
|
|
|
|
12-09-2013, 01:15 AM
|
#63 |
|
Registered User
Join Date: Jul 2009
Location: washington
Posts: 4,178
|
Re: Welcome Home, Gentleman Jim
Yah. Those welds look sketchy to me man. It's better than it was before but I would get a second opinion from a professional
__________________
377 sbc thumpr cam autogear m23 muncie 3:73 Detroit trutrac 3''spintech prostreet mufflers xpipe 1 3/4 headers build thread !http://67-72chevytrucks.com/vboard/s...d.php?t=577217 Iroc gauge threadhttp://67-72chevytrucks.com/vboard/s...d.php?t=554511 |
|
|
|
|
12-26-2013, 11:39 AM
|
#64 |
|
Registered User
Join Date: Jun 2009
Location: san francisco, ca (east bay)
Posts: 674
|
Wet Sanding
The paint on the Gent was looking pretty bad and so I decided to try something I have seen people do to try and bring back some of the luster to the paint: Wet Sanding.
It's a bit intimidating to put sandpaper on your paint if you have never done it before. Requires some faith! I figured with this paint, there was not much harm that could be done.  Here are some "before" shots:    Fender: I started with this one, just in case.   I started with about three passes of each grit, using just the sanding sponge you see in the first picture: 600, 1000, 1500, 2000 Then I went over it several times with off the shelf "polishing compound":  Here you can see on the left is the dull wet-sanded paint vs. the right side that is getting polished, it's working!   The shiny paint was hard to photograph, but here you can see lots of reflection is my beat up fender!   After much polishing, it was really starting to shine up 
|
|
|
|
|
12-26-2013, 11:47 AM
|
#65 |
|
Registered User
Join Date: Jun 2009
Location: san francisco, ca (east bay)
Posts: 674
|
Wet Sanding
Here is what I ended up using (followed by a gel wax):
 Next time I think I might start with a rubbing compound or something more aggressive than the polishing compound. The green can did not work nearly as well as the black bottle of Turtle Polishing compound. Scratch out is nice for that last polish. I went ahead and did the top of the Tailgate, but I think it might be time to invest in a polisher/buffer. I spent about two hours all told (on Christmas!), it was fun and turned out great! BEFORE:  AFTER:   Here you can see the other fender and how bad the paint is:  I'm honestly pretty amazed by the results and am really inspired to do the whole truck. It won't make it perfect, but a whole lot nicer. I'm tempted to take off the trim as I think it would be much easier to work without having to work around the trim all the time. Not sure how hard it is to get off (and back on!). The sticky things that hold the trim on are failing, so it would probably be a good idea to replace them anyway! |
|
|
|
|
12-26-2013, 12:06 PM
|
#66 |
|
Happy to be here
 Join Date: Mar 2000
Location: Cypress, TX
Posts: 39,021
|
Re: Welcome Home, Gentleman Jim
Nice progress. Do yourself a favor and put a sway bar back on it. You will love the difference it makes.
__________________
Follow me on Facebook and Instagram @N2trux.com Articles- "Jake" the 84 to 74 crewcab "Elwood" the77_Remix 85 GMC Sierra "Scarlett" "Refining Sierra" |
|
|
|
|
12-26-2013, 12:49 PM
|
#67 | |
|
Registered User
Join Date: Jun 2009
Location: san francisco, ca (east bay)
Posts: 674
|
Re: Welcome Home, Gentleman Jim
Quote:
|
|
|
|
|
|
12-26-2013, 02:37 PM
|
#68 |
|
Ephesians 2:8
Join Date: Mar 2008
Location: Delavan, IL
Posts: 677
|
Re: Welcome Home, Gentleman Jim
Trick for popping the bed dent out. IF you can get it in there, deflate an old basket ball or soccar ball and shove it in behind that area with the fill plug down, air it up and the dent will pop out. Won't be perfect but may do better than you think.
Sweet old truck, love seeing these old trucks getting used! Enjoy it!
__________________
72 Suburban making it mine My 79 C10 story 79 C10 LS swap 94 LS swapped Daily Driver Tahoe Limited Instagram - @piersonclassics 83 K20 Farm Truck Build |
|
|
|
|
12-27-2013, 10:05 PM
|
#69 |
|
Registered User
Join Date: Jun 2009
Location: san francisco, ca (east bay)
Posts: 674
|
Paint
Well, Santa came again! Don't tell Mom!

|
|
|
|
|
12-27-2013, 10:52 PM
|
#70 |
|
Registered User
Join Date: Jun 2009
Location: san francisco, ca (east bay)
Posts: 674
|
Re: Welcome Home, Gentleman Jim
The guy at the paint shop told me not to wet sand the old paint, that using a clay bar and wool wheel would take off all the oxidation.
The paint is orange peeled pretty good so I don't see what harm the wet sanding will do (based on my test). I'm considering removing the trim for the full buff. Most of it is barely held on as the sticky stuff has failed in many spots. From what I can tell most of the trim is clipped in on the ends then has either a sticky clip or double sided tape like stuff that holds the middles on. Seems like the back of the clips might be hard to get to. |
|
|
|
|
12-27-2013, 11:44 PM
|
#71 |
|
Registered User
Join Date: Dec 2013
Location: victoria
Posts: 32
|
Re: Welcome Home, Gentleman Jim
Nice truck! I wanna put some buckets and console in the front of my truck

|
|
|
|
|
12-28-2013, 09:51 PM
|
#72 |
|
Registered User
Join Date: Jun 2009
Location: san francisco, ca (east bay)
Posts: 674
|
Re: Welcome Home, Gentleman Jim
So for the record, if you have orange peel, you have to sand it to get it out.
(I'm not expert though).  Removed the trim so I won't buff it up:   First Pass of Wet sanding: (1000, 1500, 2000)   This is 1500 done:   Wool Pad with Rubbing Compound (3M), one pass:   After two passes with yellow pad and "Machine compound" (3M):  Then, after all that, the paint was still pretty wobbley. So I bit the bullet and re-sanded the rear panel (top). Started back at 1000, then 1500 and finally 2000. Then I used Rubbing compound on the wool wheel, then Machine Polish on a Yellow spongey wheel, and then Machine Polish on a Black sponge wheel. (3M compounds). BEFORE:  AFTER:   By no means perfect, but huge improvement!  Here you can see it against the cab. The rear fender looks wet!  What I learned: It's intimidating to take sandpaper to your paint, but man it works! Take your time and if you have to do a section more than once to get it good looking, then so be it. If you're in a hurry, go for a run. I was tempted to use a grinder instead of buying a buffer, but I'm glad I did. I kept the speed really low, and the one time I bumped it up, I got a small burn. I buffed between 600 and 900 RPM. So be sure to use a variable speed buffer that you can turn the RPMs way down on (like 600). To get the finish I wanted, I ended up sanding a very small section at a time. I would squeegee it off, then blow it dry with air and inspect it closely. This seems to work the best. Then move on to the next section. Repeat for each grit of sanding. I still have a lot to do, but it feels great to make this truck look a little better! |
|
|
|
|
12-29-2013, 12:26 AM
|
#73 |
|
Registered User
Join Date: May 2011
Location: Silex Mo
Posts: 180
|
Re: Welcome Home, Gentleman Jim
Man its looking great. I love when hard work pays off.
|
|
|
|
|
01-02-2014, 12:17 PM
|
#74 |
|
Registered User
Join Date: Jun 2009
Location: san francisco, ca (east bay)
Posts: 674
|
Re: Welcome Home, Gentleman Jim
Did some more sanding and buffing on the New Years Holiday.
Same process: Wet sand 1000, 1500, 2000 then Wool rubbing compound, Yellow pad Machine polish, and then Black Machine Polish. Finished it off with a wax. This time I did the Drivers door and front fender. I'm still amazed at how this works! Don't get me wrong, it's LABOR, not magic! Before:  After:   I also attempted to straighten out the hood. It had about a 1/2" bend in it right where these things like to bend. It helped a lot but is not perfect. I simply put a 2x4 under the front of the hood, and a small block at the rear and pushed the bend down. Did it about 4 passes and got most of it out. Here's a link to the pics of you want to browse it: |
|
|
|
|
01-04-2014, 02:09 PM
|
#75 |
|
Registered User
Join Date: Jun 2009
Location: san francisco, ca (east bay)
Posts: 674
|
Re: Welcome Home, Gentleman Jim
Removing the Steering stuff:
 Painting the new and old parts:   
|
|
|
|
|
| Bookmarks |
|
|


 Linear Mode

