
|
|
|
 03-26-2013, 09:54 PM
|
#1 | |
|
Registered User
Join Date: Feb 2013
Location: Mandan
Posts: 80
|
Re: Tbi swap build thread
Quote:
|
|

|

|
|
03-26-2013, 11:12 PM
|
#2 | |
|
Registered User
Join Date: Oct 2003
Location: OC CA
Posts: 1,374
|
Re: Tbi swap build thread
Quote:
Take a look at your CS-130 plug. 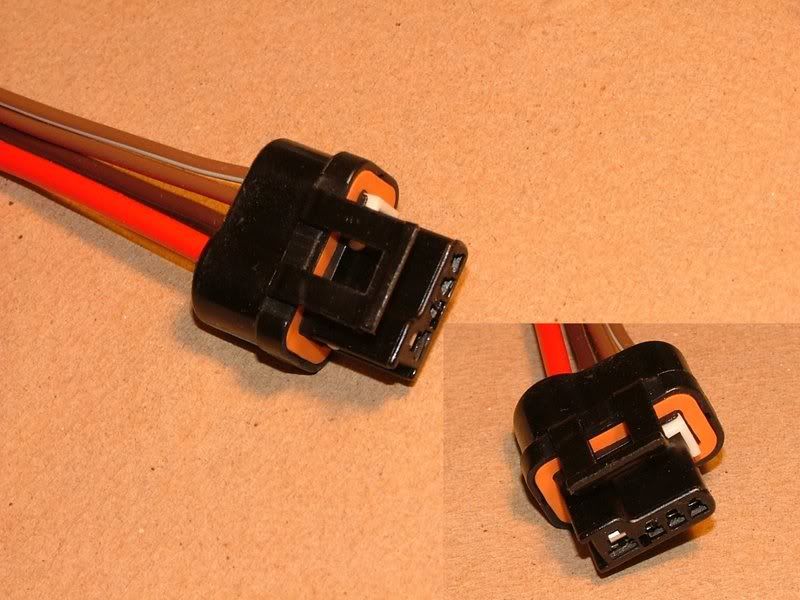 In most case it will have only two wires populated - Large red and smaller gauge brown. The red goes to terminal labeled 'S' and brown goes to 'L'. Terminal letters are hard to see but they are part of plug body!!! Disconnect plug from OE '72 external voltage regulator shown in the photo below...  extend wire from CS-130 plug 'L' terminal to reach terminal #4 of the OE '72 external voltage regulator. //RF
__________________
"The Beast" 1975 Chevrolet C20 longbed 350/700R4! with 3inch body lift Dual Flowmasters Super 40's! TBI retrofit completed (2007-07-29)  New 383CID (+030) 08-304-8 9.5:1CR x36,005 (2012-12-17) |
|
|
|
|
|
03-26-2013, 11:08 AM
|
#3 |
|
Registered User
Join Date: Oct 2003
Location: OC CA
Posts: 1,374
|
Re: Tbi swap build thread
Oh wow - it is nice to have a power lift -> CAT!
With VSS you have a small problem. The 90 burban uses electronic speedometer, while '72 truck is a classic mechanical unit. 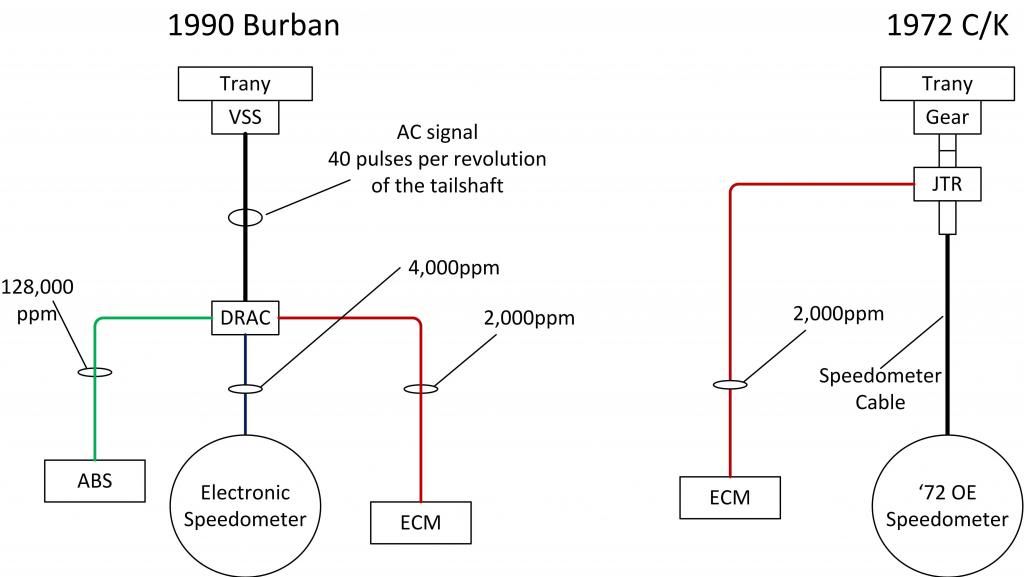 To solve this you'll need to find a mechanical speedometer gear cable unit from an earlier 700R4 and add an inline 2000 ppm VSS unit from JTR.com. For example AC-Delco 25512339. But first you need to figure out which speedometer gears to use before ordering. 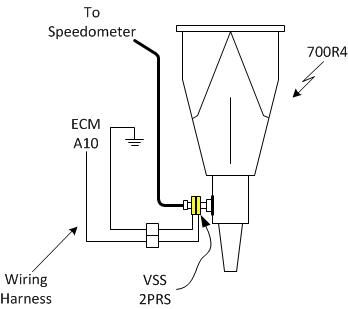 Also complicating conversion is that you have a 4x4 burban and VSS may have been installed in a transfer case (I simply do not know). //RF
__________________
"The Beast" 1975 Chevrolet C20 longbed 350/700R4! with 3inch body lift Dual Flowmasters Super 40's! TBI retrofit completed (2007-07-29) New 383CID (+030) 08-304-8 9.5:1CR x36,005 (2012-12-17) |
|
|
|
|
03-26-2013, 09:21 PM
|
#4 | |
|
Registered User
Join Date: Feb 2013
Location: Mandan
Posts: 80
|
Re: Tbi swap build thread
Quote:
|
|
|
|
|
|
03-31-2013, 01:31 PM
|
#5 | |
|
Registered User
Join Date: Feb 2013
Location: Mandan
Posts: 80
|
Re: Tbi swap build thread
Quote:
|
|
|
|
|
|
03-29-2013, 08:21 PM
|
#6 |
|
Registered User
Join Date: Oct 2003
Location: OC CA
Posts: 1,374
|
Re: Tbi swap build thread
__________________
"The Beast" 1975 Chevrolet C20 longbed 350/700R4! with 3inch body lift Dual Flowmasters Super 40's! TBI retrofit completed (2007-07-29) New 383CID (+030) 08-304-8 9.5:1CR x36,005 (2012-12-17) |
|
|
|
|
03-30-2013, 11:12 AM
|
#7 |
|
not enough hours in the day
Join Date: Jan 2009
Location: Axtell, NE
Posts: 550
|
Re: Tbi swap build thread
I wired B8 for the AC signal into the dark green lead to the compressor. Now with the compressor pluged in there is continuity between B8 and B1 which is a 12v battery wire hooked to a junction block and also between B8 and B3 the black/red wire to the distributor plug. Is this normal?
It makes me think the AC would always be engaged. The compressor that is on the engine now is locked up and will be replaced, could this be the cause?
__________________
65 K-10 Short Step 68 C-50 70 K-5 85 K-10 & piles of spare parts |
|
|
|
|
03-30-2013, 03:03 PM
|
#8 | |
|
Registered User
Join Date: Oct 2003
Location: OC CA
Posts: 1,374
|
Re: Tbi swap build thread
Quote:
 It is an input signal to ECM indicating that compressor clutch has been engaged. Move AC control selector and see if this voltage goes away when move AC to heater position (no AC). //RF
__________________
"The Beast" 1975 Chevrolet C20 longbed 350/700R4! with 3inch body lift Dual Flowmasters Super 40's! TBI retrofit completed (2007-07-29) New 383CID (+030) 08-304-8 9.5:1CR x36,005 (2012-12-17) |
|
|
|
|
|
04-04-2013, 08:05 PM
|
#9 |
|
Registered User
Join Date: Oct 2003
Location: OC CA
Posts: 1,374
|
Re: Tbi swap build thread
OK - yes, you'll need to get IAC replaced.
When you go through the IAC reset the plunger should extend fully and close off air bypass passage. You should hear a clicking noise while ALDL pins A & B are tied together and IAC is plugged into the harness. SES light should be on as well. Your assumption about how IAC operates are correct. Lets address IAC operation first before moving any further. I assume that EGR valve is installed, but vacuum hose is disconnected??? The other items to be aware of - make sure that all harness ground connections are tied to their respective grounds. There are two main ones - in front by the thermostat housing and one in the back of the passenger cylinder head. Loose grounds will drive ECM nuts!!! //RF
__________________
"The Beast" 1975 Chevrolet C20 longbed 350/700R4! with 3inch body lift Dual Flowmasters Super 40's! TBI retrofit completed (2007-07-29) New 383CID (+030) 08-304-8 9.5:1CR x36,005 (2012-12-17) |
|
|
|
|
04-04-2013, 08:23 PM
|
#10 | |
|
not enough hours in the day
Join Date: Jan 2009
Location: Axtell, NE
Posts: 550
|
Re: Tbi swap build thread
Quote:
The EGR valve is installed and the vacuum hose is connected. Should it be disconnected for this? I will double check grounds at the ecm plug.
__________________
65 K-10 Short Step 68 C-50 70 K-5 85 K-10 & piles of spare parts |
|
|
|
|
|
04-04-2013, 10:50 PM
|
#11 | |
|
Registered User
Join Date: Oct 2003
Location: OC CA
Posts: 1,374
|
Re: Tbi swap build thread
Quote:
There are no grounds at ECM - there are two multi pin plugs that plug into dual row connectors. The grounds that I referring are harness grounds - 3/8 ID lugs in the engine bay. //RF
__________________
"The Beast" 1975 Chevrolet C20 longbed 350/700R4! with 3inch body lift Dual Flowmasters Super 40's! TBI retrofit completed (2007-07-29) New 383CID (+030) 08-304-8 9.5:1CR x36,005 (2012-12-17) |
|
|
|
|
|
04-04-2013, 08:41 PM
|
#12 |
|
not enough hours in the day
Join Date: Jan 2009
Location: Axtell, NE
Posts: 550
|
Re: Tbi swap build thread
I have ground at the following plugs.
A12- blk/wht- System ground B3- blk/red- Distributor plug B10-orange/blk- park neutral switch wire D1- brn/wht- system ground D6- Tan- O2 sensor ground to engine
__________________
65 K-10 Short Step 68 C-50 70 K-5 85 K-10 & piles of spare parts |
|
|
|
|
04-04-2013, 10:38 PM
|
#13 |
|
not enough hours in the day
Join Date: Jan 2009
Location: Axtell, NE
Posts: 550
|
Re: Tbi swap build thread
Installed the new IAC valve and did the reset procedure. Now it idles at 2,500rpm.
I'm at a loss. It's hard to search for a vacuum leak when you don't want to let the motor run. Just a thought, but could too much fuel pressure cause this? The fuel pump is rated at 29 GPH @ 12 PSI which should be right. Would a blocked return line boost the pressure? I ran into that on an 87 Dodge pickup once, but the increased fuel pressure caused it to shut down after a couple seconds, not run fast. Any ideas? I appreciate it.
__________________
65 K-10 Short Step 68 C-50 70 K-5 85 K-10 & piles of spare parts |
|
|
|
|
04-05-2013, 12:23 PM
|
#14 |
|
not enough hours in the day
Join Date: Jan 2009
Location: Axtell, NE
Posts: 550
|
Re: Tbi swap build thread
Having run out of ideas and remembering late last night that a friends 87 body swap project was in one of my storage units I swaped throttle bodys. It now idles like it should. I must have gotten something messed up when I put the kit in my throttle body. I'll have to go throught it again.
Thanks for the help RF.
__________________
65 K-10 Short Step 68 C-50 70 K-5 85 K-10 & piles of spare parts |
|
|
|
|
04-06-2013, 08:38 AM
|
#15 |
|
Registered User
Join Date: Feb 2013
Location: Mandan
Posts: 80
|
Re: Tbi swap build thread
all i got left is my drac to wire up . has any body got info on were to wire each wire to, 90 suburban 350
|
|
|
|
|
04-11-2013, 09:17 AM
|
#16 |
|
Slots go on anything!
Join Date: May 2003
Location: Richardson, TX
Posts: 5,957
|
Re: Tbi swap build thread
Just a quick fuel question, for a swap into an older vehicle. I am getting ready to help a friend do a TBI swap into a '74 Blazer, but it does not have a return line. What is the best way to do one? Should I use rubber line going back to the tank, (and does the return need to be FI rated?), or does it need to be hard line. I am planning on using an inline fuel pump and using the original feed line. Also, where are you guys putting the fuel filter when doing an inline pump?
|
|
|
|
|
04-11-2013, 11:05 AM
|
#17 | |
|
Registered User
Join Date: Oct 2003
Location: OC CA
Posts: 1,374
|
Re: Tbi swap build thread
Quote:
2) If you have a baffled tank - use in tank fuel pump. In case of conventional tank use largest fuel filter you can find before inline FP inlet port. Large fuel filter will act as a mini surge tank and prevent fuel starvation when fuel sock gets uncovered. It is not a perfect solution, but it is as close as you can get away with without building a full surge tank system and lift pump. //RF
__________________
"The Beast" 1975 Chevrolet C20 longbed 350/700R4! with 3inch body lift Dual Flowmasters Super 40's! TBI retrofit completed (2007-07-29) New 383CID (+030) 08-304-8 9.5:1CR x36,005 (2012-12-17) |
|
|
|
|
|
04-11-2013, 11:10 AM
|
#18 |
|
Slots go on anything!
Join Date: May 2003
Location: Richardson, TX
Posts: 5,957
|
Re: Tbi swap build thread
Wow. I would have thought that the feed line would have been 3/8 already. Guess that's what I get for trying to engineer a TBI swap from 250 miles away. Thanks for the heads up.
|
|
|
|
|
04-11-2013, 01:05 PM
|
#19 | |
|
Registered User
Join Date: Oct 2003
Location: OC CA
Posts: 1,374
|
Re: Tbi swap build thread
Quote:
//RF
__________________
"The Beast" 1975 Chevrolet C20 longbed 350/700R4! with 3inch body lift Dual Flowmasters Super 40's! TBI retrofit completed (2007-07-29) New 383CID (+030) 08-304-8 9.5:1CR x36,005 (2012-12-17) |
|
|
|
|
|
09-03-2013, 09:43 PM
|
#20 |
|
Registered User
Join Date: Apr 2011
Location: bowling green, ky
Posts: 439
|
Re: Tbi swap build thread
So what is the least about of componits you need for the engine to fire up. ....
Posted via Mobile Device |
|
|
|
|
09-09-2013, 01:00 PM
|
#21 |
|
Registered User
Join Date: Oct 2003
Location: OC CA
Posts: 1,374
|
Re: Tbi swap build thread
The thread has been quiet for a while! For those who are looking to upgrade TBI harness from JY pulled rat nest or contemplating clean carb to TBI swap Northern Autoparts has a special on Painless EFI TBI swap harness #60101 this week:
http://www.northernautoparts.com/Pro...ProductId=1468 //RF
__________________
"The Beast" 1975 Chevrolet C20 longbed 350/700R4! with 3inch body lift Dual Flowmasters Super 40's! TBI retrofit completed (2007-07-29) New 383CID (+030) 08-304-8 9.5:1CR x36,005 (2012-12-17) |
|
|
|
|
09-23-2013, 09:36 PM
|
#22 |
|
Registered User
Join Date: Apr 2011
Location: bowling green, ky
Posts: 439
|
Re: Tbi swap build thread
Any of you guys put a. obd-11 in your truck. .. I'm taken engine and trans out my old 93 roadmaster wagon..
Posted via Mobile Device |
|
|
|
|
09-23-2013, 11:03 PM
|
#23 | |
|
Registered User
Join Date: Oct 2003
Location: OC CA
Posts: 1,374
|
Re: Tbi swap build thread
Quote:
What is your question regarding TBI - OBD-1 (yes we run it in our trucks) ??
__________________
"The Beast" 1975 Chevrolet C20 longbed 350/700R4! with 3inch body lift Dual Flowmasters Super 40's! TBI retrofit completed (2007-07-29) New 383CID (+030) 08-304-8 9.5:1CR x36,005 (2012-12-17) |
|
|
|
|
|
09-24-2013, 12:32 AM
|
#24 |
|
Registered User
Join Date: Apr 2011
Location: bowling green, ky
Posts: 439
|
Re: Tbi swap build thread
Obd-1 plug does it just run to the pcm or its it more to it than that. .
Posted via Mobile Device |
|
|
|
|
09-24-2013, 12:47 AM
|
#25 | |
|
Registered User
Join Date: Oct 2003
Location: OC CA
Posts: 1,374
|
Re: Tbi swap build thread
Quote:
2) OBD-1 plug was wired to a number other modules - anti lock computer, Air pump solenoid. In early OBD-1 prior to 92 model year plug provided interface to ECM
__________________
"The Beast" 1975 Chevrolet C20 longbed 350/700R4! with 3inch body lift Dual Flowmasters Super 40's! TBI retrofit completed (2007-07-29) New 383CID (+030) 08-304-8 9.5:1CR x36,005 (2012-12-17) |
|
|
|
|
 |
| Bookmarks |
|
|


 Hybrid Mode
