
 |
|
|
#726 |
|
Senior Enthusiast
Join Date: Feb 2007
Location: Spokane Valley, WA
Posts: 8,356
|
Re: Markeb01 Build Thread
I like your military history observations Mike. Iíve been an amateur student of WWII history and hardware since I was about 8 years old. All of my elders served either in WWII or Korea, and most of them were Marines, so I grew up around a lot of interesting information. Over the years, I came to understand I had a much more comprehensive understanding of the period than my dad, just like my younger son knows more about Vietnam that I do. Heís always had an interest because I was there, and heís met and talked with a lot of vets. His interest/research has broadened my own understanding.
Hanging on our ďMilitary WallĒ downstairs along with photos of all the family members that have served, is a signed lithograph of the Memphis Belle. And one of our hobbies is having my wife read historical military biographies for our mutual enjoyment. So when I hear the roar of those 4 engine heavies, Iím the first guy out the door! Iíve wanted a direct overhead shot of a flying B17 for several years, ever since I missed my first chance when my wife took the camera on a road trip! I just think itís cool because how many people ever get the chance to see one from that perspective, let alone capture the image. After a bit of adjustment on the timing, the new engine was up and running this afternoon! Initially it wanted to overheat because the main power wire to the electric fan became disconnected. I quickly reconnected the fan and hosed down the radiator and kept the engine running. It quickly dropped back down to 185 and the rest of the break in period was uneventful. Sorry no pictures today. There wasnít anything interesting happening worth shooting. I even got the hood back on using the same technique that removed it. I took my squeeze to work in the truck tonight and man, what a blast. The idle has a nice burble to it and the engine revs very quick and easy. The new clutch is much smoother than the old one, and setting the gear drive clearance specs in the new engine made it distinctly louder. It was the first thing my wife noticed. She really loves the gear drive and the new exhaust note. Itís kind of funny that prior to the crossover pipe being added to the exhaust system, the mufflers had a real ďbarkĒ to them under sharp acceleration. That went away when the balance tube went in. With the new engine itís back! This thing can really put out an exhaust blast now that wasnít there with the old engine. The hot weather weíve been enjoying for several days is gone, and tomorrow is forecast for thunderstorms. Depending on how lousy the weather gets, Iíll get some additional video posted in the next couple of days. I should probably wait a few hundred miles before beating it up anyway, but Iíll at least get something demonstrating the sound effects. Thanks to everyone that has had interest and followed along with this project.
__________________
My Build Thread: http://67-72chevytrucks.com/vboard/s...d.php?t=444502 |
|
|

|
|
|
#727 |
|
Registered User
Join Date: Apr 2011
Location: .
Posts: 3,104
|
Re: Markeb01 Build Thread
Congrats on one of the smooothest and cleanest engine swaps I've ever witnessed. (well, following along on the net).
Definitely learned a bunch of tips and tricks. Thanks, thanks a ton. |
|
|

|
|
|
#728 |
|
Registered User
Join Date: Jul 2006
Location: Willis, Texas
Posts: 754
|
Re: Markeb01 Build Threa
As always your posts make us feel like we are there handing you a wrench or screw driver. Glad everything went smooth for you!
Posted via Mobile Device
__________________
65Gregg Blue long bed White TBSS 61 Impala ďThe two most important days in your life are the day you are born and the day you find out why.Ē Mark Twain |
|
|

|
|
|
#729 |
|
Senior Enthusiast
Join Date: Feb 2007
Location: Spokane Valley, WA
Posts: 8,356
|
Re: Markeb01 Build Thread
Thanks for the comments guys. Hereís a quick video just to share what the new cam/idle sounds like. It sounds very cool in real life and is incredibly fun to drive! Iíll get some better footage once the engine has a few more miles on it.
http://www.youtube.com/watch?v=V_xSu...ature=youtu.be
__________________
My Build Thread: http://67-72chevytrucks.com/vboard/s...d.php?t=444502 |
|
|

|
|
|
#730 |
|
Registered User
Join Date: Apr 2012
Location: Cambridge, Ontario, Canada
Posts: 1,771
|
Re: Markeb01 Build Thread
Sounds awesome

__________________
Craigerrr My build thread, CRGRS 66 Winter Build: http://67-72chevytrucks.com/vboard/s...09#post5638709 |
|
|

|
|
|
#731 |
|
Rollin' Old Skool
Join Date: Jun 2007
Location: Hattiesburg, MS
Posts: 5,371
|
Re: Markeb01 Build Thread
Man, that sounds great Mark. Love that loping idle! Sounds like a real hot rod.
 Awesome job all around, & I hope you get to enjoy it trouble-free for many years to come. Can't wait to see/hear more video! Awesome job all around, & I hope you get to enjoy it trouble-free for many years to come. Can't wait to see/hear more video! 
__________________
_____________________________________________ Phillip My Build threads: 1966 Chevy C-10 "Black Betty" shortbed, fleetside, BBW, 327 V8/ Powerglide (under construction) http://67-72chevytrucks.com/vboard/s...ighlight=betty 1997 Chevy Tahoe, 2dr/2wd, mild custom (Daily driver) http://67-72chevytrucks.com/vboard/s...d.php?t=601142 Pics: '66 C-10 https://flic.kr/s/aHsjHWD4h9 '97 Tahoe https://flic.kr/s/aHsjGZ7wKP '93 C-1500 https://flic.kr/s/aHskxdpdnQ '88 S-10 Blazer https://flic.kr/s/aHsjYGx4Md Previous Rides: 1993 Chevy S-10 ext. cab, 4.3L, 4/5 drop (Sold) 1993 Chevy C-1500 short/step Retro-Rod (Sold) 1988 S-10 Blazer 2dr/2wd mild custom (Sold) |
|
|

|
|
|
#732 |
|
Registered User
Join Date: Nov 2011
Location: fayetteville nc
Posts: 10,338
|
Re: Markeb01 Build Thread
Sounds great. Congrats on the successful swap and new engine.
__________________
1963 Short bed step side SBW 427 big block and borg warner T-16 HD 3 speed manual http://67-72chevytrucks.com/vboard/s...d.php?t=519869 1963 Short bed fleetside BBW 348 1st gen big block w/Powerglide http://67-72chevytrucks.com/vboard/s...d.php?t=619024 1964 Short bed trailer |
|
|

|
|
|
#733 |
|
Registered User
Join Date: Feb 2013
Location: Genoa, IL
Posts: 387
|
Re: Markeb01 Build Thread
Love the lope! After hearing that I wish I was not months away from firing mine up
 Posted via Mobile Device
__________________
Jeff Simplify Life! My build thread: http://67-72chevytrucks.com/vboard/s...d.php?t=566533 |
|
|

|
|
|
#734 |
|
Registered User
Join Date: Apr 2012
Location: Searcy, AR
Posts: 4,203
|
Re: Markeb01 Build Thread
Love the Sound!
 Quick turnaround time too!!! Great Job Mark! 
__________________
DON Proverbs 27:17  US Air Force Retarded errr Retired My '65 Stepper Build:http://67-72chevytrucks.com/vboard/s...d.php?t=533920 My '60 Rusty Patina Build:http://67-72chevytrucks.com/vboard/s...66#post7402266 My '72 http://67-72chevytrucks.com/vboard/s...59#post7204359 SOLD |
|
|

|
|
|
#735 |
|
Registered User
Join Date: Apr 2011
Location: .
Posts: 3,104
|
Re: Markeb01 Build Thread
Nice lope and whine from the gear drive. Very responsive when you gun it.

|
|
|

|
|
|
#736 |
|
"Where were you in '62?"
 Join Date: Jul 2004
Location: Cleveland County, North Cackalacky
Posts: 5,013
|
She sounds sweet!!!!!!
Congratulations Mark!  I always liked your truck! https://www.youtube.com/watch?v=V_xSu45o6kA Posted via Mobile Device
__________________
PROJECT: "FULL METAL YELLOW JACKET" 1962 Chevy C-10 Stepside Shortbed Nostalgia Pro/Street Pickup Truck PROJECT: "FULL METAL YELLOW JACKET Build Thread What Are You Workin' On? - 1Bad62ChevyPickup PROJECT: "TYRANNORAMBLER REX" 1969 AMC Rambler American Nostalgia Pro/Street Youtube Channel: Father Son Projects Youtube Channel: 2TIMOTHY2FITHTEEN        "North and South Carolina Folks Click Here!" (((( ~ I have Parts For Sale & Miscellaneous Stuff ~ )))) "Well being as there's no other place around the place, I reckon this must be the place, I reckon...Nyuk Nyuk Nyuk" -Curly Howard Ph.D. |
|
|

|
|
|
#737 |
|
Senior Enthusiast
Join Date: Feb 2007
Location: Spokane Valley, WA
Posts: 8,356
|
Re: Markeb01 Build Thread
Per Comp Cams recommendation did the post-break-in oil change. They suggest that getting all of the break-in lube out of the engine is very important. I think they might be right, as the oil was very black which was somewhat surprising on a brand new engine.
Zeroed the trip odometer so I'll know when to do the next oil change at 1,000 miles. Discovered my right inboard tail light burned out so that was replaced. Oddly it appeared to have burned out making the lens look marbleized:  I checked the wiring and there wasnít anything wrong that would have caused a problem. Also discovered the right parking light wasn't working. It turned out one of the terminals popped out of the connector that joins the hood harness to the firewall. The locking retainer was pulled up for a better grip, some dielectric grease was added and now everything is up and functioning again. Now matter how much love and effort is invested in an old truck, there will always be something else demanding attention! 
__________________
My Build Thread: http://67-72chevytrucks.com/vboard/s...d.php?t=444502 |
|
|

|
|
|
#738 |
|
Senior Enthusiast
Join Date: Feb 2007
Location: Spokane Valley, WA
Posts: 8,356
|
Re: Markeb01 Build Thread
It seems I am incapable of leaving well enough alone. The appearance of the fuel pressure regulator near the carburetor has been bothering me ever since it was first installed. It simply detracts from the vintage 327 appearance of the engine. So today I relocated it just in front of and above the fuel pump.
Hereís what it looked like this morning: 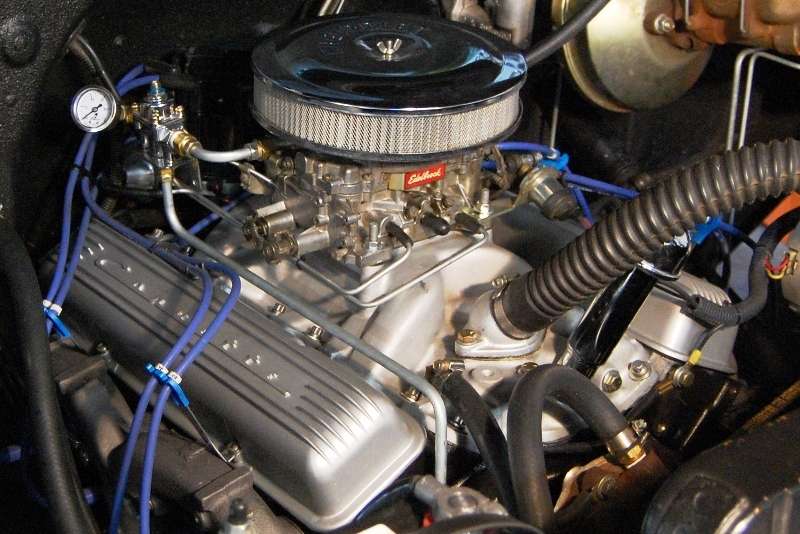 And hereís what it looks like now: 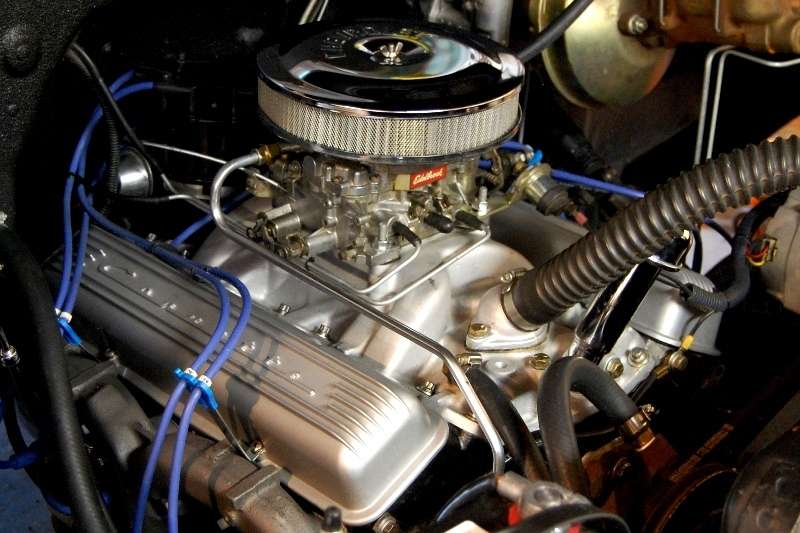 And this is the new location that wonít be seen by the casual observer: 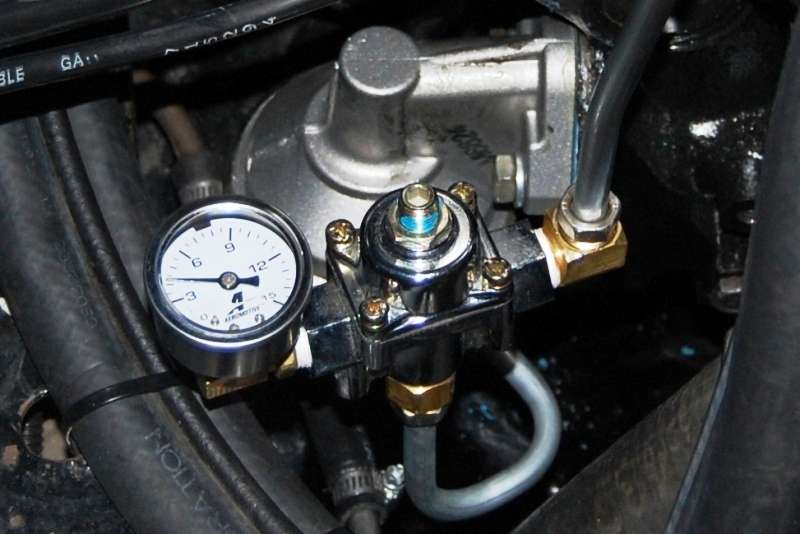
__________________
My Build Thread: http://67-72chevytrucks.com/vboard/s...d.php?t=444502 |
|
|

|
|
|
#739 | |
|
Rollin' Old Skool
Join Date: Jun 2007
Location: Hattiesburg, MS
Posts: 5,371
|
Re: Markeb01 Build Thread
Quote:
__________________
_____________________________________________ Phillip My Build threads: 1966 Chevy C-10 "Black Betty" shortbed, fleetside, BBW, 327 V8/ Powerglide (under construction) http://67-72chevytrucks.com/vboard/s...ighlight=betty 1997 Chevy Tahoe, 2dr/2wd, mild custom (Daily driver) http://67-72chevytrucks.com/vboard/s...d.php?t=601142 Pics: '66 C-10 https://flic.kr/s/aHsjHWD4h9 '97 Tahoe https://flic.kr/s/aHsjGZ7wKP '93 C-1500 https://flic.kr/s/aHskxdpdnQ '88 S-10 Blazer https://flic.kr/s/aHsjYGx4Md Previous Rides: 1993 Chevy S-10 ext. cab, 4.3L, 4/5 drop (Sold) 1993 Chevy C-1500 short/step Retro-Rod (Sold) 1988 S-10 Blazer 2dr/2wd mild custom (Sold) |
|
|
|

|
|
|
#740 |
|
Registered User
Join Date: Apr 2012
Location: Searcy, AR
Posts: 4,203
|
Re: Markeb01 Build Thread

__________________
DON Proverbs 27:17  US Air Force Retarded errr Retired My '65 Stepper Build:http://67-72chevytrucks.com/vboard/s...d.php?t=533920 My '60 Rusty Patina Build:http://67-72chevytrucks.com/vboard/s...66#post7402266 My '72 http://67-72chevytrucks.com/vboard/s...59#post7204359 SOLD |
|
|

|
|
|
#741 |
|
Registered User
Join Date: Nov 2011
Location: fayetteville nc
Posts: 10,338
|
Re: Markeb01 Build Thread
Looks much better lower. Great looking engine bay.
__________________
1963 Short bed step side SBW 427 big block and borg warner T-16 HD 3 speed manual http://67-72chevytrucks.com/vboard/s...d.php?t=519869 1963 Short bed fleetside BBW 348 1st gen big block w/Powerglide http://67-72chevytrucks.com/vboard/s...d.php?t=619024 1964 Short bed trailer |
|
|

|
|
|
#742 |
|
Registered User
Join Date: Apr 2012
Location: Cambridge, Ontario, Canada
Posts: 1,771
|
Re: Markeb01 Build Thread
Tube bending is a bit of a art, and you are a bit of an artist!
It is the little things... is it not?
__________________
Craigerrr My build thread, CRGRS 66 Winter Build: http://67-72chevytrucks.com/vboard/s...09#post5638709 |
|
|

|
|
|
#743 |
|
Senior Enthusiast
Join Date: Feb 2007
Location: Spokane Valley, WA
Posts: 8,356
|
Re: Markeb01 Build Thread
I agree it is the little things that add up to the big differences, and I love bending tube. The first time I bent one I had no idea what I was doing, nor what would look good. I took my time and gently bent a new fuel line over my knee. It had big huge curves and looked nice and smooth. It had no kinks and I was somewhat pleased with myself - at first. Then I saw what somebody else did with some quality tools, sharp corners, and a plan. I've used up a lot of tube since then, but each exercise produced better results than the last.
__________________
My Build Thread: http://67-72chevytrucks.com/vboard/s...d.php?t=444502 |
|
|

|
|
|
#744 |
|
Registered User
 Join Date: Sep 2009
Location: menifee california
Posts: 788
|
Re: Markeb01 Build Thread
is the regulator mounted some where or is it just done with the tubing ? thanks
|
|
|

|
|
|
#745 |
|
Senior Enthusiast
Join Date: Feb 2007
Location: Spokane Valley, WA
Posts: 8,356
|
Re: Markeb01 Build Thread
In post number 739 above, the regulator is the chrome object with the white face pressure gauge near the carburetor inlet. In the 3rd photo, I relocated it down in front of the fuel pump.
Unfortunately, for the first time in nearly 50 years of doing hard lines, I had to completely redesign the fuel pump to carb layout I just fabricated. I simply could not get the setup to stop leaking. Gasoline kept dripping off the bottom of the pump, and I could not determine where it was coming from. Checking the bottom of each line with a piece of paper towel - none had any gas on it, but gas kept dripping off the bottom of the pump. I redid every tubing flare, and every brass fitting, and the pump continued to drip. So I pulled the new pump and replaced it as well. I thought maybe I cracked the outlet housing. The new pump leaked exactly as the other one did! So I threw in the towel, pulled everything off today and made a much more simplified arrangement mounting the regulator at the top of the vertical line coming off the pump. I also added an inconspicuous bracket to the cylinder head, eliminating any vibration at the pressure regulator, and routed the upper line straight forward from the carb inlet before dropping to line up with the regulator output. This provides more working clearance for the choke connections and wrenching on the distributor hold down. Everything works perfectly now, although I still have no idea why it leaked in the first place. 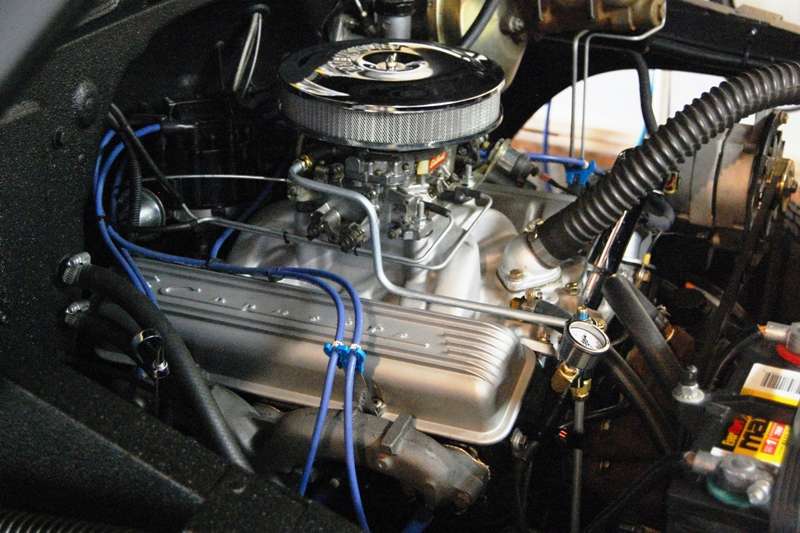  I’m hoping this is it for a while as I’m getting pretty burned out doing the same thing over and over. I also lost my Moon Equipped decal on the back window. It was added to somewhat conceal the camera mount on the back window. I was washing the truck the other night and when I started rinsing off the back window, I realized the top half of the Moon eyes were gone. Within minutes the rest had blown off as well. I found this surprising as I had the same decals on the front fenders for a couple of years and they held up great to repeated washings. Perhaps they just don’t stick to glass as well as they do to paint. Being an old Jarhead I’m thinking of replacing the lost decal with a gold foil USMC sticker instead. They’re actually a very thin metal, are impervious to just about anything, and I like the way they look. This is an old wrinkled sticker and the photo doesn’t do it justice. Everything except the white is highly reflective: 
__________________
My Build Thread: http://67-72chevytrucks.com/vboard/s...d.php?t=444502 |
|
|

|
|
|
#746 | |
|
Rollin' Old Skool
Join Date: Jun 2007
Location: Hattiesburg, MS
Posts: 5,371
|
Re: Markeb01 Build Thread
Quote:
__________________
_____________________________________________ Phillip My Build threads: 1966 Chevy C-10 "Black Betty" shortbed, fleetside, BBW, 327 V8/ Powerglide (under construction) http://67-72chevytrucks.com/vboard/s...ighlight=betty 1997 Chevy Tahoe, 2dr/2wd, mild custom (Daily driver) http://67-72chevytrucks.com/vboard/s...d.php?t=601142 Pics: '66 C-10 https://flic.kr/s/aHsjHWD4h9 '97 Tahoe https://flic.kr/s/aHsjGZ7wKP '93 C-1500 https://flic.kr/s/aHskxdpdnQ '88 S-10 Blazer https://flic.kr/s/aHsjYGx4Md Previous Rides: 1993 Chevy S-10 ext. cab, 4.3L, 4/5 drop (Sold) 1993 Chevy C-1500 short/step Retro-Rod (Sold) 1988 S-10 Blazer 2dr/2wd mild custom (Sold) |
|
|
|

|
|
|
#747 |
|
Senior Enthusiast
Join Date: Feb 2007
Location: Spokane Valley, WA
Posts: 8,356
|
Re: Markeb01 Build Thread
Thanks so much for the kind offer. I still have one more pair of the same Moon Equipped decals. I also bought 2 sets several years ago. I may just clean the window real good and put another one of those back on and see if holds up better.
Although I'm proud of being a Marine, historically I've avoided slapping any USMC advertising on any of my vehicles. I'd rather be known for what I contribute or represent today than for the deeds of my youth 40+ years ago. So even though I've ordered the stickers, they may or may not make it on the truck. Either way, your consideration is greatly appreciated.
__________________
My Build Thread: http://67-72chevytrucks.com/vboard/s...d.php?t=444502 |
|
|

|
|
|
#748 |
|
Registered User
Join Date: Apr 2012
Location: Searcy, AR
Posts: 4,203
|
Re: Markeb01 Build Thread
New location for Regulator is Clean... As always, I enjoy popping in to see what you've been up to. Great work, Keep it up!
__________________
DON Proverbs 27:17  US Air Force Retarded errr Retired My '65 Stepper Build:http://67-72chevytrucks.com/vboard/s...d.php?t=533920 My '60 Rusty Patina Build:http://67-72chevytrucks.com/vboard/s...66#post7402266 My '72 http://67-72chevytrucks.com/vboard/s...59#post7204359 SOLD |
|
|

|
|
|
#749 |
|
Senior Enthusiast
Join Date: Feb 2007
Location: Spokane Valley, WA
Posts: 8,356
|
Re: Markeb01 Build Thread
It was a beautiful morning as I escorted my bride to the refuse site so we could offload the nuisance tree I cut down yesterday. The temperatures at noon were in the low 70ís, so I decided while she and our daughter did yard work, it would be a great day to install the chrome rear window bead lock I picked up last winter.
I told her, if it goes as well as when I put the black bead lock in, it shouldnít take more than 10 minutes. First order of business was detaching the bed cover and pulling it back a few feet for working clearance: 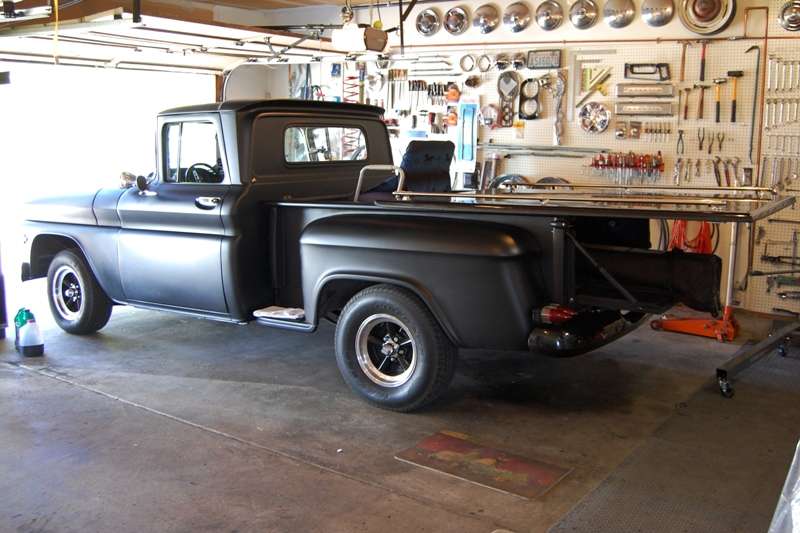 It took about 3 seconds to probe the seam and pull out the black bead lock in perfect condition. I started on the chrome version using the aftermarket accessory tool and Windex for lubrication. After 30 minutes and having only turned one corner, I realized the Windex wasnít working and switched to Armoral. That worked much better, but the tool was virtually no help at all. I gave up on that and started using a smaller version of the hook tool I used to install the windshield. That went much faster, and the entire bead lock was installed within another 30 minutes. I stood back about 10 feet and admired the sharp appearance of the chrome stripe around the window. The seam at the bottom was undetectable, and all the corners were flat and wrinkle free. I decided to wait on taking pictures until after my wife had removed all the wrinkled clear tape left over on several random inches of the chrome area. I ďassumedĒ it was some form of clear carrier tape that held the protective blue film in place. It wasnít. It was actually wrinkled up chrome surface finish. It was very strange, because it didnít look like chrome, it looked like transparent tape. Attempting to remove the wrinkled film with tweezers saw the chrome finish go away right along with the wrinkles. Seeing the results of the first area, it was concluded the project was a failure and there wasnít any point in removing the rest of the damage. Hereís what it looked like from a few feet away. Note the blotch at the left side:  And hereís what it looked like close up. I was trying to capture an image of the wrinkled clear material, but it doesnít show up in any of the photos: 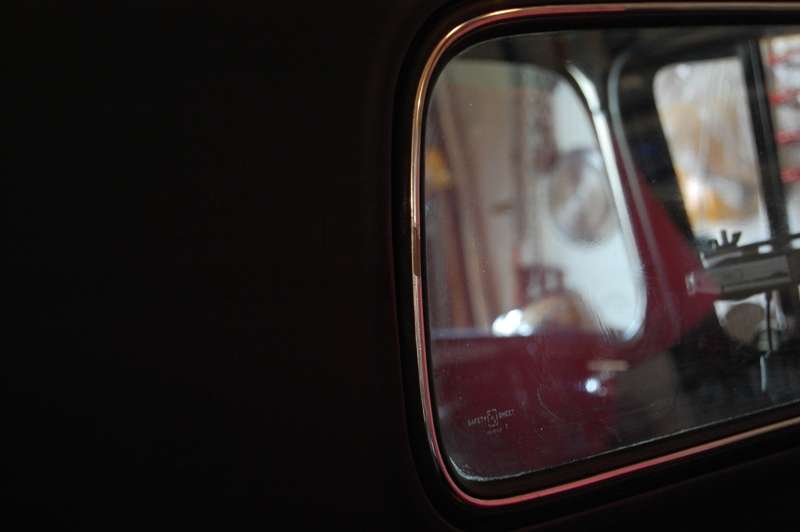 So it was unceremoniously ripped back out, and the old black lock bead reinstalled. The old one did indeed go back in without any effort, using the bead lock tool. So as I told my wife in the beginning, the black bead lock took no time at all. It probably didnít even take 60 seconds. It ended up being a little over 2 inches too long, so rather than cutting it off I joined the two ends and then spent a few minutes working all the excess back into the groove. It should remain nice and tight, just like it was before. So there you have it. At one brief point in history my truck actually had chrome rear window trim!  All that remains now is the Armoral and Windex drippings all over the back of the cab. Iíll wash it up either tonight or tomorrow depending on weather. All that remains now is the Armoral and Windex drippings all over the back of the cab. Iíll wash it up either tonight or tomorrow depending on weather.This was certainly a disappointing adventure. I could have invested all that time doing something that resulted in a productive outcome, but I couldnít know that in advance. I really like the way the trim looked, but it is very hard on the hands (not good for me) and having it turn out ruined does not inspire me to make another attempt. Come to think of it I really like the look of the black gasket! Ya, thatís the ticket! For anyone else doing the chrome bead lock install on their truck I have a few suggestions. Use a better lubricant than Windex to start with. Armoral worked okay, but something like Dove dish detergent in a squeeze bottle would probably work just as well, and be easier to clean up. I recommend not using the aftermarket bead lock installation tool. It runs the black bead lock into the groove in nothing flat without problems. But the chrome bead lock version is so stiff, Iím reasonably certain the tool is what damaged the chrome surface causing the wrinkling. In addition, it just didnít help insert the lock into the seal cavity. What worked better was pushing either half of the lock into the groove, and then lifting the opposite flap over the bead with the hook tool. This went much faster and had very little of the lock popping out after insertion. When going around corners, tuck into the inside of the corner first, and then work the outside flap of the window seal over the lock bead. Having a third hand to apply firm pressure to the face of the lock when going around corners is much easier and more productive.
__________________
My Build Thread: http://67-72chevytrucks.com/vboard/s...d.php?t=444502 |
|
|

|
|
|
#750 |
|
Registered User
Join Date: Apr 2012
Location: Searcy, AR
Posts: 4,203
|
Re: Markeb01 Build Thread
Gotta admit, I like the chrome bead, but after reading about your "fun" I think the black is the way to go... Always fun checing in on ya no matter what the outcome. Keep up the Great Work!
Posted via Mobile Device
__________________
DON Proverbs 27:17  US Air Force Retarded errr Retired My '65 Stepper Build:http://67-72chevytrucks.com/vboard/s...d.php?t=533920 My '60 Rusty Patina Build:http://67-72chevytrucks.com/vboard/s...66#post7402266 My '72 http://67-72chevytrucks.com/vboard/s...59#post7204359 SOLD |
|
|

|
 |
| Bookmarks |
|
|