
|
 08-20-2011, 02:33 PM
|
#726 | |
|
Registered User
Join Date: Jul 2011
Location: Des Moines, Iowa
Posts: 3,016
|
Re: Over 25 Years Later, Finally My 71 C-10 Truck Build
Quote:
__________________
project: "my happy mess" |
|

|

|
|
08-21-2011, 04:15 PM
|
#727 |
|
GEARHEAD
Join Date: Aug 2003
Location: MN
Posts: 6,126
|
Re: Over 25 Years Later, Finally My 71 C-10 Truck Build
The goal for this weekend was to make it run well enough for a test drive. Mission accomplished.
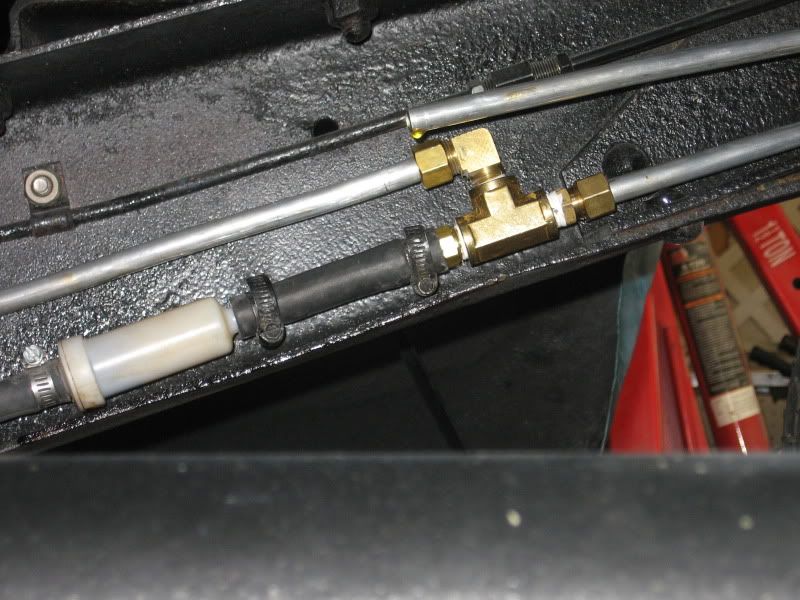
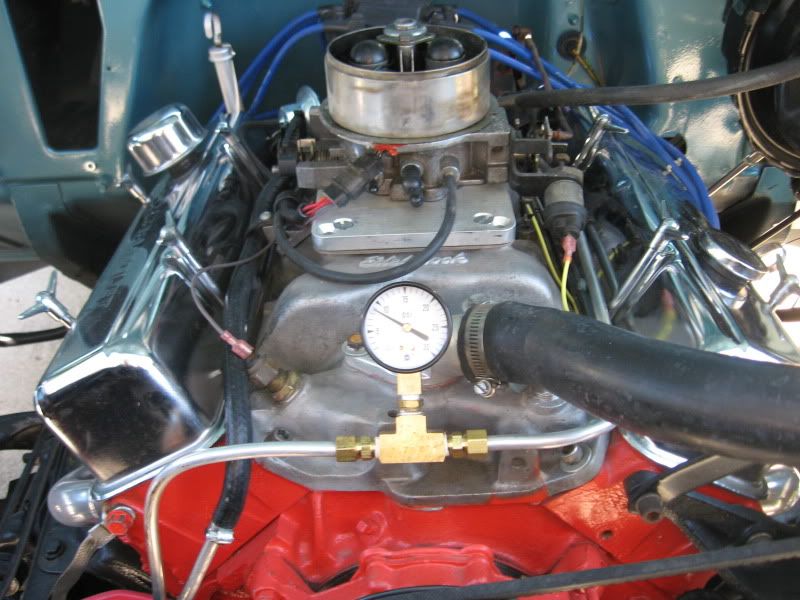
 As expected, it wasn't great, several small issues presented themselves and it has a ways to go, but dammit, I drove it for the first time in over 2 years and even with all the little problems, I smiled.  I started by trying to eliminate installation problems with the EFI. The only thing I failed to test was the fuel return line. Turns out it would not flow back to the tank. It's either just the wrong tube out of the sending unit, or a blockage in that tube of some kind. Unfortunately, the bed is on and bolted in and I wanted to avoid lifting that for access or dropping the tank. The solution is an idea based on many piping systems I've worked with over the years and instead of routing the return all the way to the tank, I tapped into the return line just before the inlet to the first fuel filter, which is before the pump. I used a 1/4" brass tee with a compression fitting to the fuel line from the tank, and a barbed fitting for the hose to the filter. The 3rd line got an elbow compression fitting to the return fuel line. In a way, this helps the suction pressure to the fuel pump as long as there is fuel in the system. The only drawback I can think of is that the fuel will be slightly warmed from the circuit and won't go back to the tank for mixing and cooling. With that corrected I removed my temporary pressure regulator and replaced it with a new 0-30 psi gage for the fuel, new compression fittings and set the regulator the way it was intended. With that done, I began the start up process, which basically was start, die, adjust, start die adjust until I could find a setting that would sustain a running engine. Basically it would start right up and die after about 3 seconds until I turned up the "main" adjuster to high, then the "idle" and "choke" could be tuned down some. The timing is still off some, but the backfiring is mostly gone. I think I fried my timing light. Restart is hard, but I think it's either the starter getting hot or the timing. It'll start as soon as it turns over a bit. So where am I at? I need to check the vacuum, set the timing again, continue to adjust the settings on the ECU, make it roar.  One of the tranny cooler lines is cross threaded and dripping, the tranny fluid was super low, added 4 qts so far. The power steering pump was very low, had to tighten most of the lines up, haven't tested it yet for improvement because I'm letting it cool down. Added at least a pint of fluid so far. There is no cooling fans yet, need to get those installed. No temp gage sending unit, no tach. I'll need to make a splitter for the tach wire from the dizzy because it's connected to the ECU right now. There is a temp sensor for the EFI and I wonder if the output would work for the stock temp gage? It would be nice not to have to add another. Need to check the rear diff fluid also before I drive further than around the block. The brakes worked fine. I only got fast enough for the tranny to upshift once, but it was successful. No major water or fuel leaks.
__________________
If no one knows what you're doing, they can't tell you you're doing it wrong HG's Dream Car Build - Shelby Cobra Kit Build your own adjustable track bar 71  Long Fleet C/10 Long Fleet C/10 72  Jimmy 4x4 (Junkyard Jimmy) Jimmy 4x4 (Junkyard Jimmy)HG's Plow Truck '78  K35 Dually K35 DuallyBigass Farm Truck HG's thread of miscellaneous stuff |
|
|
|
|
08-21-2011, 05:08 PM
|
#728 |
|
VA72C10
 Join Date: Mar 2008
Location: Midlothian, VA
Posts: 25,267
|
Re: Over 25 Years Later, Finally My 71 C-10 Truck Build
congrats!!!
__________________
Looking for a 67-72 swb or blazer project in or around VA.
|
|
|
|
|
08-21-2011, 06:13 PM
|
#729 |
|
GEARHEAD
Join Date: Aug 2003
Location: MN
Posts: 6,126
|
Re: Over 25 Years Later, Finally My 71 C-10 Truck Build
Did a vacuum test and saw what I feared and was planning on doing a valve adjustment, etc. I tested every port on that throttle body and it was next to nothing for vacuum. But I was thinking that can't be right. There's no way it would be running or drivable if it was that weak. The cam would have had to change position with a timing chain slip, which I was pretty sure didn't happen. So as I started it up to put it back in the garage I decided to check the manifold vacuum behind the throttle body and it was great. I turned the distributor for max vacuum and let it be. Then tested the port for the dizzy vac advance and it was near atmospheric. Something there isn't right. Everytime I run it though it seems to get smoother and run better. The lack of power when driving is probably because there was no vac advance signal. I'll work on it some more this week.
__________________
If no one knows what you're doing, they can't tell you you're doing it wrong HG's Dream Car Build - Shelby Cobra Kit Build your own adjustable track bar 71 Long Fleet C/10 72 Jimmy 4x4 (Junkyard Jimmy)HG's Plow Truck '78 K35 DuallyBigass Farm Truck HG's thread of miscellaneous stuff Last edited by hgs_notes; 08-26-2011 at 07:53 AM. |
|
|
|
|
08-23-2011, 08:15 PM
|
#730 |
|
GEARHEAD
Join Date: Aug 2003
Location: MN
Posts: 6,126
|
Re: Over 25 Years Later, Finally My 71 C-10 Truck Build
Yesterday I made achange on the vacuum lines behind the throttle body and tried running the dizzy from that point. The truck starts well, but still no power under load, still running too rich. I need to turn down the adjustments somemore and see if I can get it better. Here's a couple pics from the progress this weekend with the fuel lines.
  Drove it around the block yesterday again and stopped by the body shop mostly to prove that yes, it does run. And partly to show off my progress. They are all glad to see it on the road under its own powere after pushing it back and forth between the shop and my garage a couple of times. Today I had some free time in a part of the state that has one of my favorite junkyards, so I made a stop. I found a good arm rest, another manual throttle set up (very nice one), some pretty good door handles, a tranny cooler that should fit real nice with just a couple mods to the original brackets, and some relay set ups from a 90's taurus. I took those with part of the harness and plan on using it as is and hiding it under the hood somewhere. There are enough relays to run the headlights, both fans, and a couple spares I think for future loads. Also found some nice door locks with a key, and a radio delete for an early 60's chevy truck. And in some old ford futura convertible I found a pair of welder leather sleeves and a couple pieces of new threaded pipe. My total for all of it was just $20. A very good day at the yard. 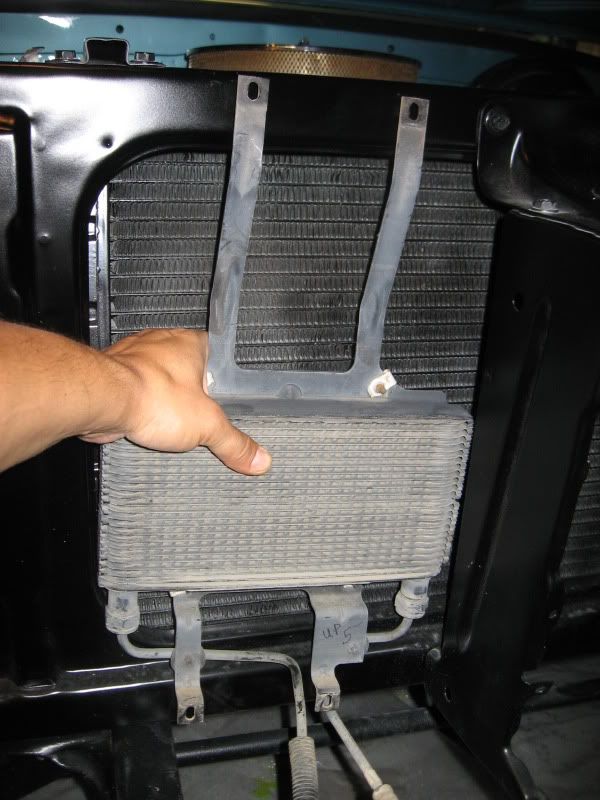 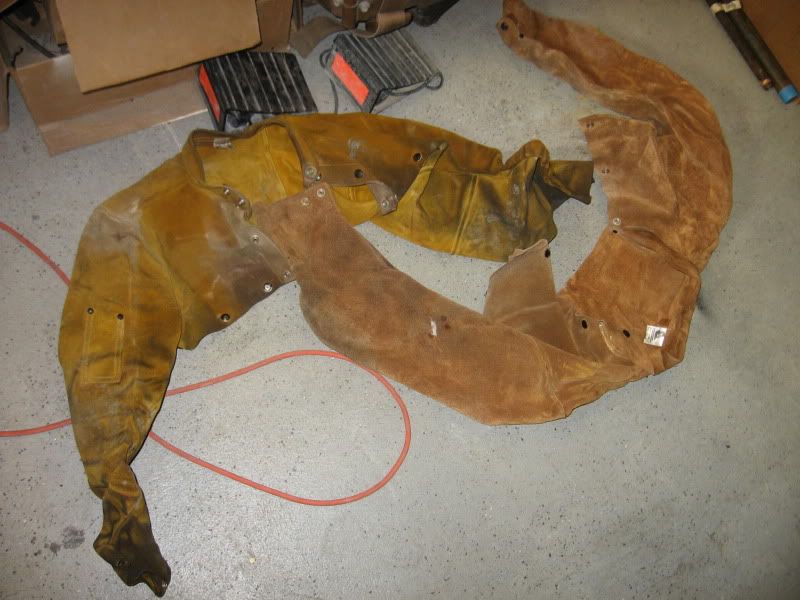 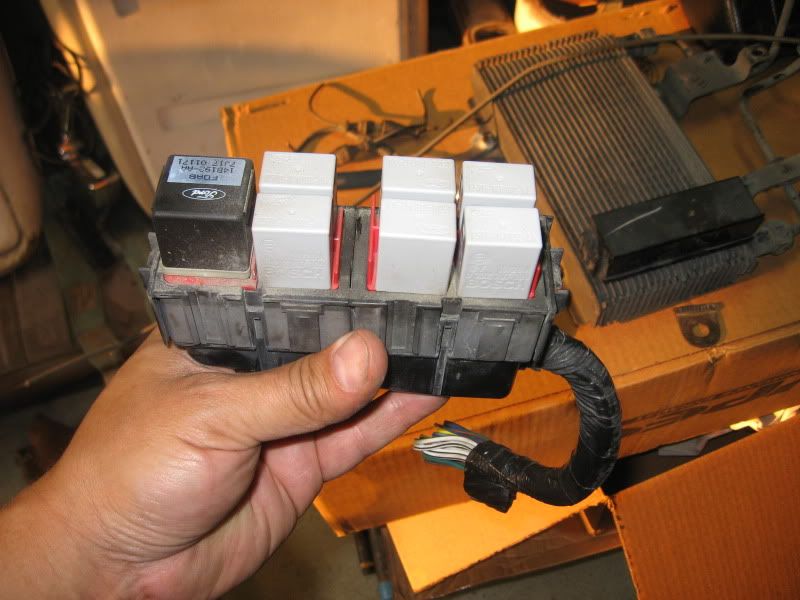 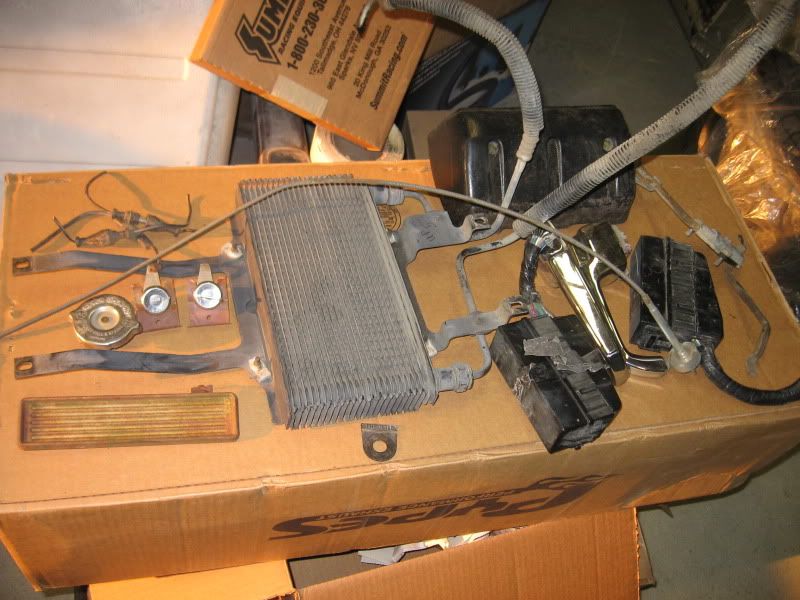
__________________
If no one knows what you're doing, they can't tell you you're doing it wrong HG's Dream Car Build - Shelby Cobra Kit Build your own adjustable track bar 71 Long Fleet C/10 72 Jimmy 4x4 (Junkyard Jimmy)HG's Plow Truck '78 K35 DuallyBigass Farm Truck HG's thread of miscellaneous stuff |
|
|
|
|
08-23-2011, 10:57 PM
|
#731 |
|
GEARHEAD
Join Date: Aug 2003
Location: MN
Posts: 6,126
|
Re: Over 25 Years Later, Finally My 71 C-10 Truck Build
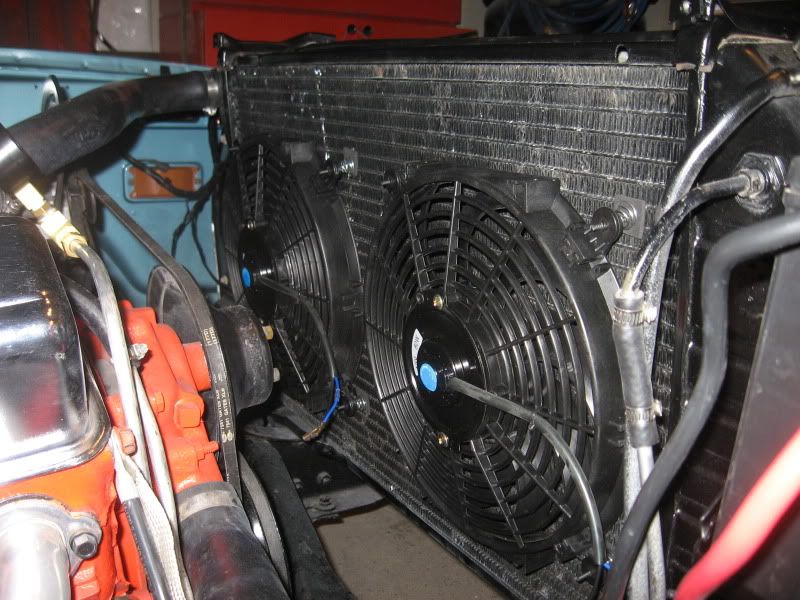
I got a little shop time tonight so I mounted up a couple things. First off, the fans, which I put on the engine side mostly so they were hidden from the front and because I'm putting the tranny cooler up front, which you'll see later. I just used the cheapo mounts that they came with. The plan is to upgrade the radiator to an aluminum one later, so I'll live with this for now.
 The tranny cooler came from some 90's era chevy truck. Not sure what year and this style cooler was the only one like it I came across. The others were more like the regular finned tube style. This one just seems way more sturdy and the best part is all I had to do was drill some holes and it bolted right on. The mount points were the perfect hieght for our radiator supports. I took it off with the attached hoses and they fit snugly right under the support. All I have to do is route new hoses and I'm all set. It cost me $5 and came with the mounting bolts. 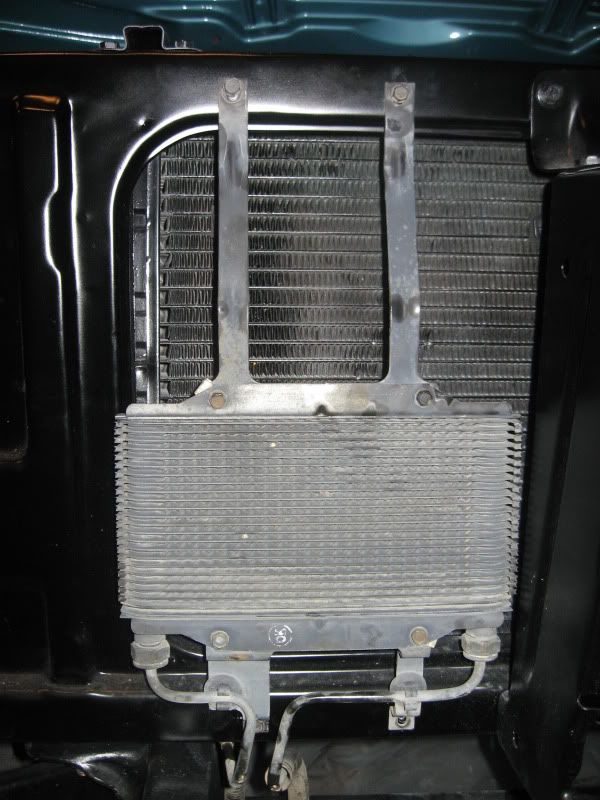 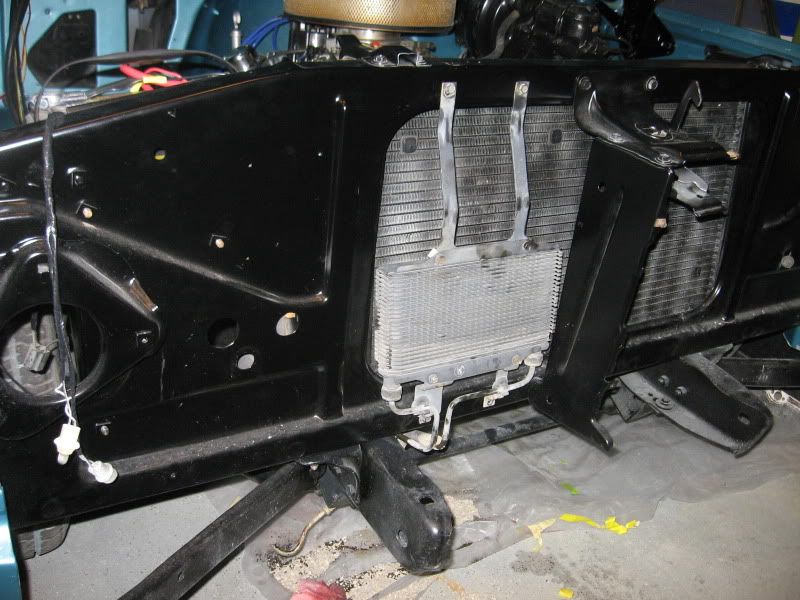
__________________
If no one knows what you're doing, they can't tell you you're doing it wrong HG's Dream Car Build - Shelby Cobra Kit Build your own adjustable track bar 71 Long Fleet C/10 72 Jimmy 4x4 (Junkyard Jimmy)HG's Plow Truck '78 K35 DuallyBigass Farm Truck HG's thread of miscellaneous stuff |
|
|
|
|
08-24-2011, 12:02 AM
|
#732 |
|
VA72C10
Join Date: Mar 2008
Location: Midlothian, VA
Posts: 25,267
|
Re: Over 25 Years Later, Finally My 71 C-10 Truck Build
Nice scores! And good to see progress!!!
Oh.....and.....Please paint the tranny cooler 
__________________
Looking for a 67-72 swb or blazer project in or around VA.
|
|
|
|
|
08-24-2011, 07:57 AM
|
#733 |
|
GEARHEAD
Join Date: Aug 2003
Location: MN
Posts: 6,126
|
Re: Over 25 Years Later, Finally My 71 C-10 Truck Build
What? Don't like the factory faded grey?
__________________
If no one knows what you're doing, they can't tell you you're doing it wrong HG's Dream Car Build - Shelby Cobra Kit Build your own adjustable track bar 71 Long Fleet C/10 72 Jimmy 4x4 (Junkyard Jimmy)HG's Plow Truck '78 K35 DuallyBigass Farm Truck HG's thread of miscellaneous stuff |
|
|
|
|
08-27-2011, 06:25 PM
|
#734 |
|
GEARHEAD
Join Date: Aug 2003
Location: MN
Posts: 6,126
|
Re: Over 25 Years Later, Finally My 71 C-10 Truck Build
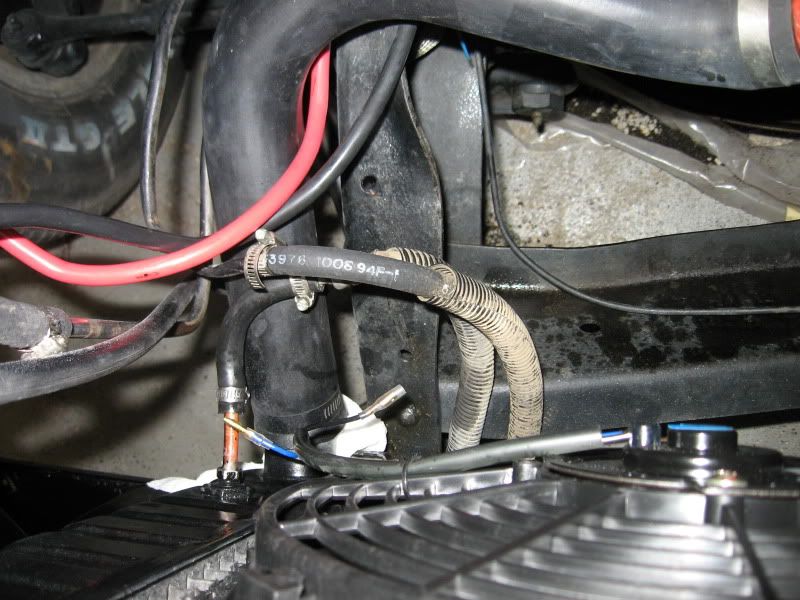
I got the tranny cooler hooked up to the lines and I think I have the leak fixed. I re-did the flare on the line, it may have been slightly out of round. Anyway, no leak as of now. Still need to paint it yet.
 Looks like it was made for it. 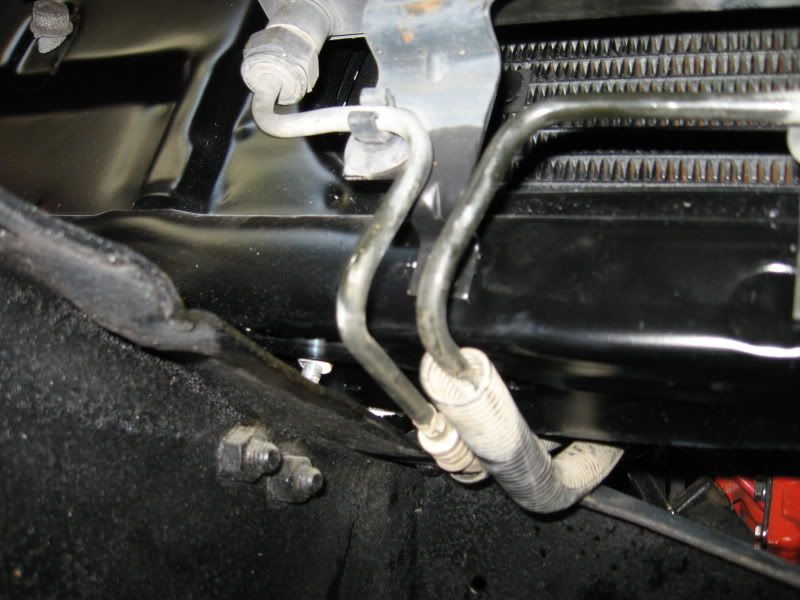 I keep tweaking the ECU adjustments and it keeps getting better. Finally got a burnout and wasn't even really trying, just happened.  Now I just need to get the fans hooked up and continue tweaking it and it'll be running strong. Just about time to order a windshield.
__________________
If no one knows what you're doing, they can't tell you you're doing it wrong HG's Dream Car Build - Shelby Cobra Kit Build your own adjustable track bar 71 Long Fleet C/10 72 Jimmy 4x4 (Junkyard Jimmy)HG's Plow Truck '78 K35 DuallyBigass Farm Truck HG's thread of miscellaneous stuff |
|
|
|
|
08-27-2011, 08:09 PM
|
#735 |
|
VA72C10
Join Date: Mar 2008
Location: Midlothian, VA
Posts: 25,267
|
Re: Over 25 Years Later, Finally My 71 C-10 Truck Build
cool deal!
...and yes....you still need to paint that cooler 
__________________
Looking for a 67-72 swb or blazer project in or around VA.
|
|
|
|
|
08-31-2011, 07:37 PM
|
#736 |
|
GEARHEAD
Join Date: Aug 2003
Location: MN
Posts: 6,126
|
Re: Over 25 Years Later, Finally My 71 C-10 Truck Build
It's been a few days since I did much with the truck. Monday I started working on the fan wiring, didn't finish but knew what needed done. Today I had a conference call with my boss (I have a home office) for my mid year performance review (No worries, I'm above average
). Right after I get off the phone, I lose internet service, which is required for virtually all I do in the office. Looks like an excuse to head out to the garage.Started with the wiring to the fan controller and had no juice. Oooooops, seems I left the key on for a few days. Battery completely done. It was taking a charge though, so with power from the charger I was able to hook everything up and test it. Works fine, but I need to attach the temp sensor to the radiator somehow. Thinking about bonding it on the tank by the battery with some kind of epoxy or JB weld. I'll need to route/shorten/tie off the wires yet, but essentially it's ready to go. Later on I'm going to change the fan controller to a dual fan set up that stages them at different temps and do a better job hiding everything. 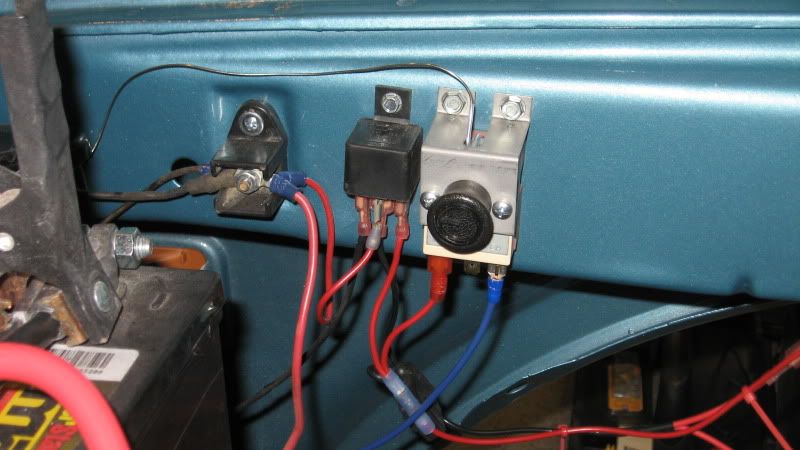 Since that was done and the battery was still charging, I decided to hook up the tail lights. I got the light assemblies in the other day. Hooked up the harness and had a couple working lights. But I knew the grounds weren't connected yet, so I pulled the sidemarkers and hooked up the grounds. A while back I had already cleaned up and painted the light assemblies. At that time I added ground wires to each assembly, which also just bolts on to the bed with the sidemarker ground wire. Works great and very easy to do. Anyway, the tailights all work great, except the reverse lights. I'll have to figure out where the switch is and fix that. Blinkers work also, at least out back, as does the license plate light. Picked out the best of the lenses I had, cleaned them up, put in the new gaskets and screwed everything down. Looking good. 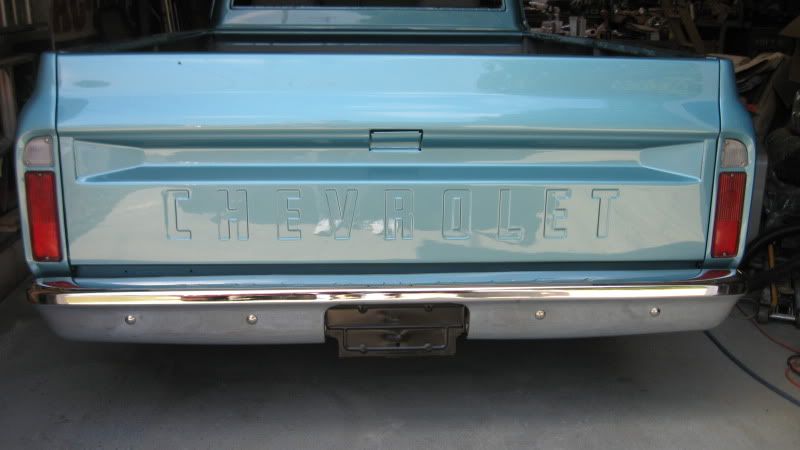 Notice the license plate bracket is installed on the bumper. Can't hardly see my gas tank now. That's one advantage of the shallower square 73 and up blazer tank. The disadvantage is that I think the signal for the guage is wrong. Mine pegs high and I know it has a good ground. Something else to fix. Oh, and at least some of my dash lights work. I'll wait til dark to check it again so I know which bulbs need replaced. Punch list is getting shorter. Punch list: Front bumper top brackets Polish other wheels vent windows door glass, felts and chanels heater box fat mat seat bolting plates adjust e-brake cable wire tie wiring on frame headlight buckets, clean and paint, adjusters? seat belts tailgate letters rearview mirror and visors door panel upper trim and panel screws (need to order) kick panel vents, paint and mount rear window and windshield wiper/washer test (will probably need new pump) horn inner fenders (need new nuts, paint bolts) gas gage reads high manual throttle
__________________
If no one knows what you're doing, they can't tell you you're doing it wrong HG's Dream Car Build - Shelby Cobra Kit Build your own adjustable track bar 71 Long Fleet C/10 72 Jimmy 4x4 (Junkyard Jimmy)HG's Plow Truck '78 K35 DuallyBigass Farm Truck HG's thread of miscellaneous stuff Last edited by hgs_notes; 09-04-2011 at 12:08 AM. |
|
|
|
|
08-31-2011, 09:39 PM
|
#737 |
|
VA72C10
Join Date: Mar 2008
Location: Midlothian, VA
Posts: 25,267
|
Re: Over 25 Years Later, Finally My 71 C-10 Truck Build
Looking very good!!! You're on the downhill side now
__________________
Looking for a 67-72 swb or blazer project in or around VA.
|
|
|
|
|
08-31-2011, 10:05 PM
|
#738 | |
|
GEARHEAD
Join Date: Aug 2003
Location: MN
Posts: 6,126
|
Re: Over 25 Years Later, Finally My 71 C-10 Truck Build
Quote:
__________________
If no one knows what you're doing, they can't tell you you're doing it wrong HG's Dream Car Build - Shelby Cobra Kit Build your own adjustable track bar 71 Long Fleet C/10 72 Jimmy 4x4 (Junkyard Jimmy)HG's Plow Truck '78 K35 DuallyBigass Farm Truck HG's thread of miscellaneous stuff |
|
|
|
|
|
09-02-2011, 07:38 PM
|
#739 |
|
GEARHEAD
Join Date: Aug 2003
Location: MN
Posts: 6,126
|
Re: Over 25 Years Later, Finally My 71 C-10 Truck Build
Today I just worked on wiring and some tuning. Finished up the fan wiring, made a junction block from scrap aluminum for the ground wires, bought and installed a new underhood fuse block.
First the ground block. Paid a buck to a local machinist for some 1/4" x 2" x 4" hunk of aluminum. Drilled a 5/16" hole in the middle for the main mount bolt to the radiator support. Drilled 7 #7 bit holes around the edge and then tapped them to 1/4" thread. Got some nice 1/2" long 1/4" pan head screws and some lock washers and called it done. I have a few washers between the block and the radiator support just as a spacer. A thicker block wouldn't need them. 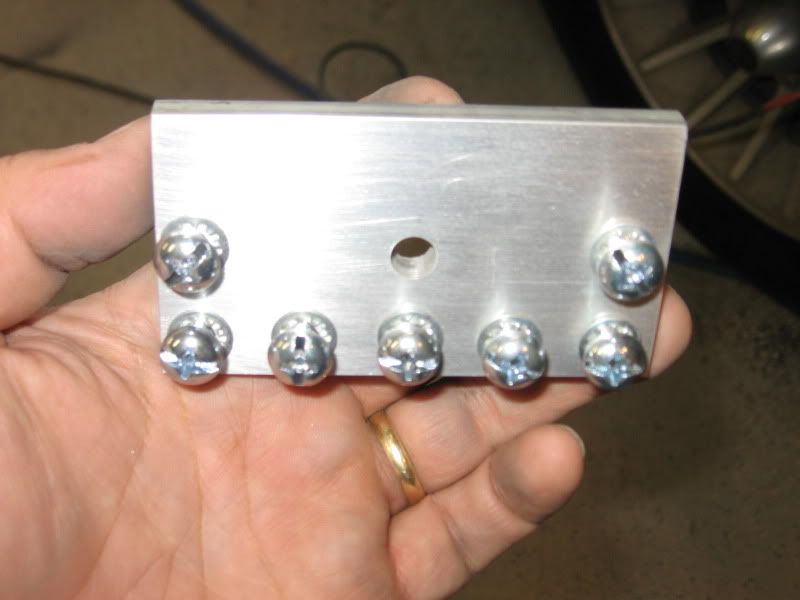 Here it is mounted. It's actually straight, but the parts along it have angles making it look crooked. Battery hides it anyway. 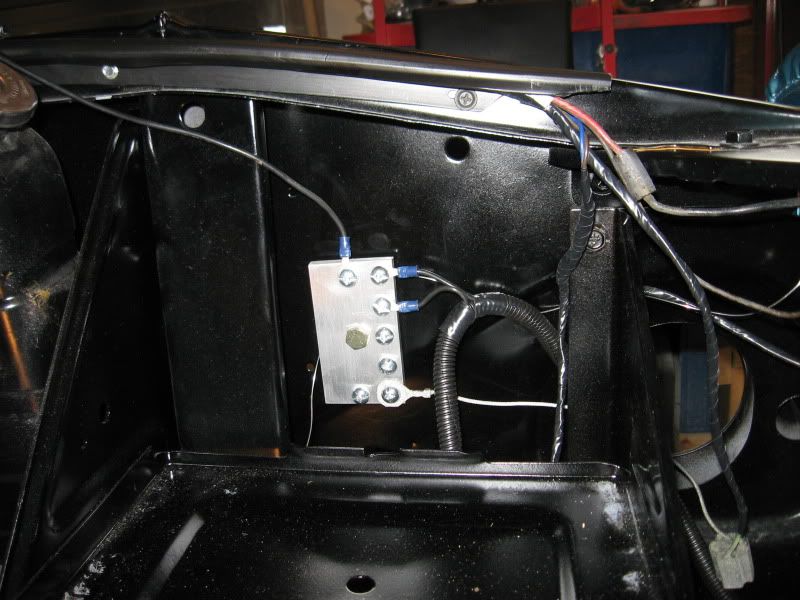 The fuse block I got because I had too many leads coming into that little one terminal thingy on the fender. This one has 6 fused terminals and fits in there just right. I didn't wire the ECO for the EFI into it because it has a separate inline fuse, but might move it later. I'll also split off the fans later when I redo the relays for them. It was about $20 at Napa. 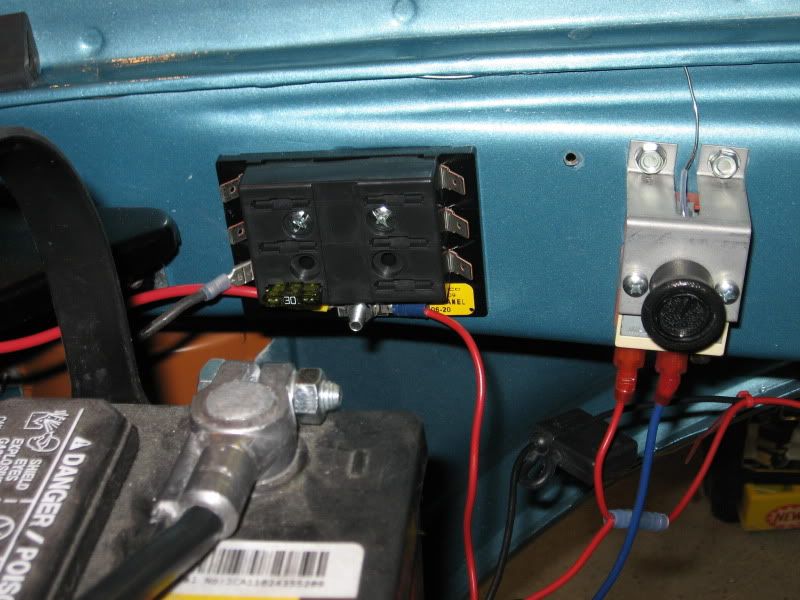 Also got the fusible link on the passenger side replaced, but don't know if the gage is working yet. Bought a new temp sending unit to install and see if I can get my temp gage to work. Will install later, the truck is cooling down for the night. Cooling down you say? That means it's been running. And running wild. Burnouts around every corner of my block. I keep adjusting the EFI leaner and it keeps running better. Even with the new locker and a swap to 3.08 gears from 3.73, it turns them over no problem, even into 2nd gear and I'm not even trying. Hope this video link works, just putting it away for the night.
__________________
If no one knows what you're doing, they can't tell you you're doing it wrong HG's Dream Car Build - Shelby Cobra Kit Build your own adjustable track bar 71 Long Fleet C/10 72 Jimmy 4x4 (Junkyard Jimmy)HG's Plow Truck '78 K35 DuallyBigass Farm Truck HG's thread of miscellaneous stuff |
|
|
|
|
09-02-2011, 08:44 PM
|
#740 |
|
VA72C10
Join Date: Mar 2008
Location: Midlothian, VA
Posts: 25,267
|
Re: Over 25 Years Later, Finally My 71 C-10 Truck Build
Nice!!! Looks and sounds good
__________________
Looking for a 67-72 swb or blazer project in or around VA.
|
|
|
|
|
09-03-2011, 01:59 AM
|
#741 |
|
6>8 Plugless........
 Join Date: Sep 2007
Location: Prairie City, Ia
Posts: 17,142
|
Re: Over 25 Years Later, Finally My 71 C-10 Truck Build
Very cool! Congrats. That has to be a great feeling to get it running and finally get it running good! Keep at it, it's coming along nicely!
__________________
Ryan 1972 Chevy Longhorn K30 Cheyenne Super, 359 Inline 6 cylinder, Auto Trans, Tilt, Diesel Tach/Vach, Buckets, Rare Rear 4-link and air ride option Build Thread 1972 GMC Sierra Grande Longhorn 4x4 1972 Chevy Cheyenne Super K20 Long Step side tilt, tach, tow hooks, AC, 350 4 speed 1972 C10 Suburban Custom Deluxe 1969 Chevy milk truck 1971 Camaro RS 5.3 BTR STG3 Cam Super T10 1940 Ford 354 Hemi 46RH Ford 9" on air ride huge project Tired of spark plugs? Check this out. |
|
|
|
|
09-04-2011, 12:02 AM
|
#742 | ||
|
GEARHEAD
Join Date: Aug 2003
Location: MN
Posts: 6,126
|
Re: Over 25 Years Later, Finally My 71 C-10 Truck Build
Quote:
Quote:
First pic is for VA72C10. 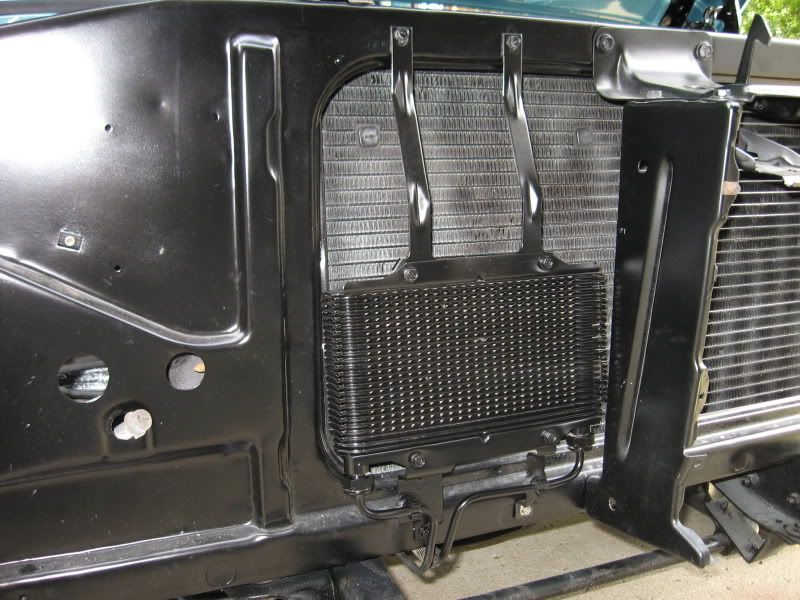 I did get the temp sending unit in, and the gage works. Bonus! I didn't have the right connector end for the sending unit so I went to the local junkyard this morning and 2 off so I have one for the Jimmy also. Soldered in a piece of wire since mine was cut about 3" from the harness plug and there it is. I put it on the passenger side of the block so the wire could be routed with the starter wiring and pretty well hidden. Kind of makes you wonder why it wasn't that way to begin with. Oh and with the temp gage I could check the electric fan operation. Test sat. 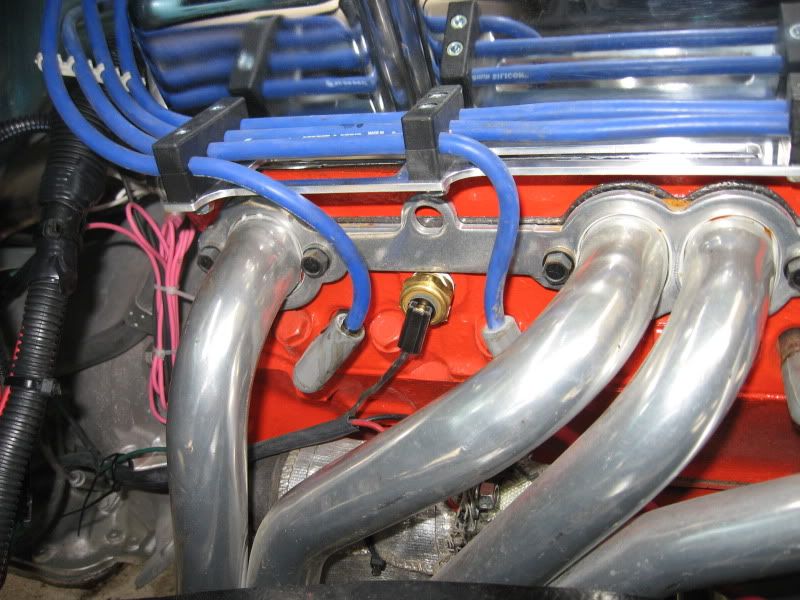 What else did I do? Let's see, finished the cowl install by adding the screws (finally found them) so now the hood seal doesn't slide around. I need to put a few shims in the front edge though so it stays even with the hood a little better. Seems like I'm almost done working under the hood, so... 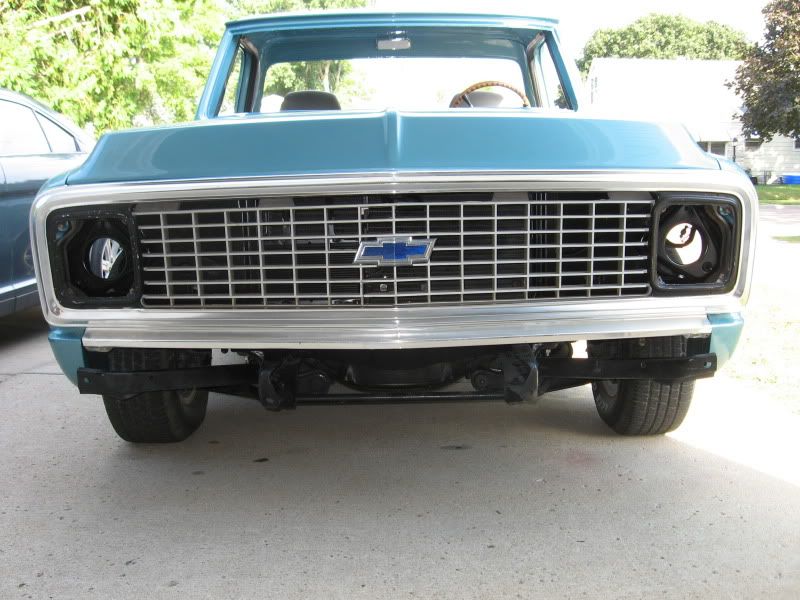 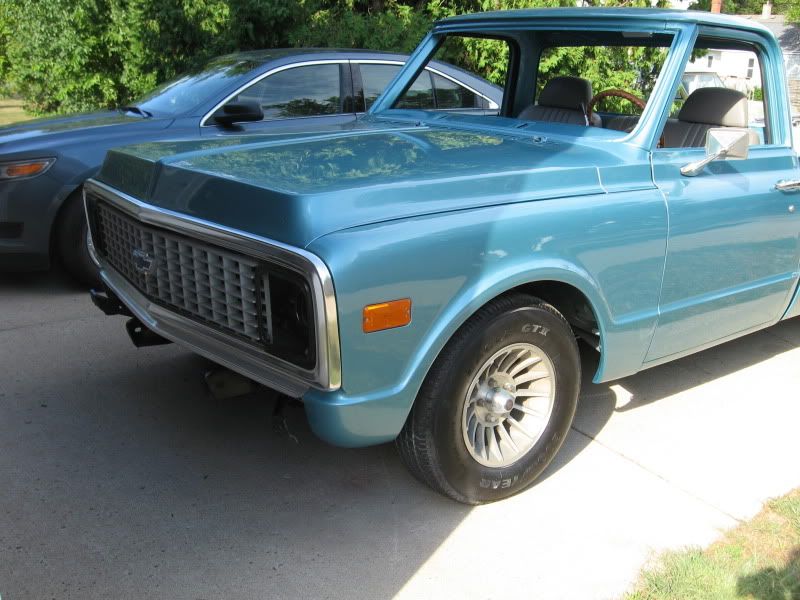 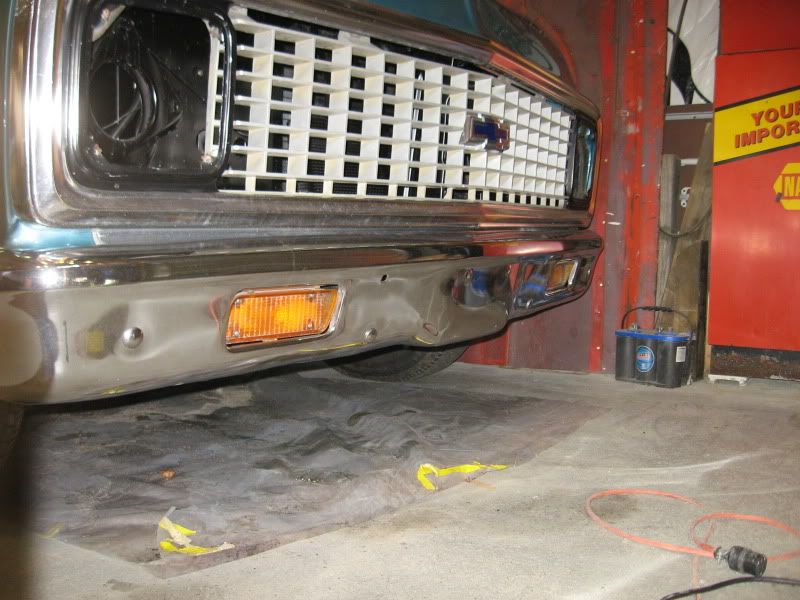 My grill is kinda crappy, considering all the work done to the rest of it. It'll have to do for now. The top edge was really scratched up and gouged, and figuring I really had nothing to lose, I took a file and sand paper to it. That anodizing or whatever is not the easiest stuff to sand though BTW, but I was able to at least smooth it out and polish it up. I could go back and just get all the anodizing off the top edge and repolish it and it would look ok. As it is now you can see the transition from chrome to polished aluminum so it sorta looks like patina'd chrome, if you can imagine that. I'll buff up the rest as much as I can, paint the headlight areas again and call it good enough for now. The wife says I have to get new stuff because the parking light lenses don't match, the grill is scratched and pitted, the inner is cracked, etc. I didn't argue but it'll have to wait until I either sell some of my blazer parts or other funding comes along. The bumper cleaned up alright, but is also scratched up some. I need to find those top of the frame bumper brackets also. Probably in the attic. Time to get some glass back in it and take a real ride in it. Punch list: Front bumper top brackets Polish other wheels door glass, felts and chanels heater box fat mat seat bolting plates adjust e-brake cable wire tie wiring on frame headlight buckets, clean and paint, adjusters? seat belts tailgate letters rearview mirror and visors door panel upper trim and panel screws (need to order) kick panel vents, paint and mount rear window and windshield wiper/washer test (will probably need new pump) horn inner fenders (need new nuts, paint bolts) gas gage reads high manual throttle Cowl shims fan and headlight relay wiring
__________________
If no one knows what you're doing, they can't tell you you're doing it wrong HG's Dream Car Build - Shelby Cobra Kit Build your own adjustable track bar 71 Long Fleet C/10 72 Jimmy 4x4 (Junkyard Jimmy)HG's Plow Truck '78 K35 DuallyBigass Farm Truck HG's thread of miscellaneous stuff Last edited by hgs_notes; 09-06-2011 at 04:44 PM. |
||
|
|
|
|
09-04-2011, 12:11 AM
|
#743 |
|
VA72C10
Join Date: Mar 2008
Location: Midlothian, VA
Posts: 25,267
|
Re: Over 25 Years Later, Finally My 71 C-10 Truck Build
Awesome! You painted the cooler!
And the rest of it looks great. When you do buy a new outer grille consider the chromed ones they now make....to me the anodized ones always look dull against a chrome bumper...and they now sell a chrome one for the same price as the aluminum...
__________________
Looking for a 67-72 swb or blazer project in or around VA.
|
|
|
|
|
09-04-2011, 12:14 AM
|
#744 |
|
GEARHEAD
Join Date: Aug 2003
Location: MN
Posts: 6,126
|
Re: Over 25 Years Later, Finally My 71 C-10 Truck Build
That's the plan man.
__________________
If no one knows what you're doing, they can't tell you you're doing it wrong HG's Dream Car Build - Shelby Cobra Kit Build your own adjustable track bar 71 Long Fleet C/10 72 Jimmy 4x4 (Junkyard Jimmy)HG's Plow Truck '78 K35 DuallyBigass Farm Truck HG's thread of miscellaneous stuff |
|
|
|
|
09-04-2011, 12:28 AM
|
#745 |
|
VA72C10
Join Date: Mar 2008
Location: Midlothian, VA
Posts: 25,267
|
Re: Over 25 Years Later, Finally My 71 C-10 Truck Build
The only issue I have with the chrome ones is they don't make them with the black around the headlight bezel area....but that's easily fixed with a little scuff and paint or some black vinyl....
__________________
Looking for a 67-72 swb or blazer project in or around VA.
|
|
|
|
|
09-04-2011, 11:33 PM
|
#746 |
|
GEARHEAD
Join Date: Aug 2003
Location: MN
Posts: 6,126
|
Re: Over 25 Years Later, Finally My 71 C-10 Truck Build
Started the day trying to figure out the mounting for my seats. Here's the dealio, they fit in the all the way forward position, but it is back against the rear window. So they can't be adjusted forward any more. This isn't really a problem for me or my wife because we don't need them forward. Just wanted to see if there was anything I could do other than mount them further forward and adjust them back. The problem with that is the little bump in the cab floor for the front mount. If I mount forward of that, then I'd have to clearance the seat mount on the driver side, blahbiddyblah. Anyway, said the heck with it and just decided to mount using the front holes and leave them that way. It's comfortable and the seats will still slide forward for access to the rear. I didn't finish that, so I'll post pics later when it's all done.
I did get the passenger door glass installed. Short sentence, lots of work. Mostly the clean up of the parts. They had over spray on them, lots of dirt, lubed everything up, etc. There are a couple threads on the board here on how to do this, but I didn't see any mention of the window seals and felts along the bottom of the window frame and when they should go in on this process. I ended up pulling the vent window back out because the seal just didn't want to fit with it in the way. Steps I took: 1. installed the regulator 2. installed the rear vertical channel, but just a loose bolt at the top rear, leave the bottom 2 out 3. drop the window in, slide the rear roller into the window channel, then slide the window to where the front roller fits into the notch in the channel 4. install the new window felt in the frame top and rear window frame 5. install the new felt in the vent window channel 6. slide the vent window in, but not all the way. Leave it up a few inches and tipped back. Tip: make sure you put some masking tape in the area where this fits in the door and at the top of the window frame. (yes I had a couple knicks in the paint) 7. cut to fit the window frame bottom seal and felt (Mine were a little long) 8. snap in the outer seal 9. Now finish sliding in the vent window, install the screws. The reason for leaving the rear channel botton loose is so the window will slide back some while you do all this. 10. Snap in the inner felt 11. install the screws for the bottom of the rear channel, tighten everything up, remove the tape and there you have it. I don't think I forgot anything, but if I did I'll update this later. I used this thread as a guide: http://67-72chevytrucks.com/vboard/s...ht=vent+window Also used my service manual for the procedure. I lubed all the rollers and the roller channels with some white lithium grease, and the regulator gears also. The rollers are available as a replacement part if you need them. 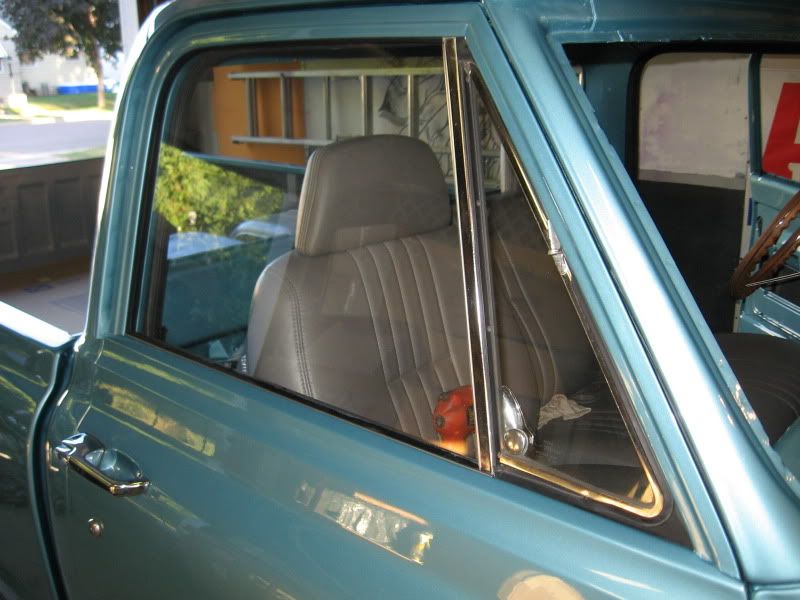
__________________
If no one knows what you're doing, they can't tell you you're doing it wrong HG's Dream Car Build - Shelby Cobra Kit Build your own adjustable track bar 71 Long Fleet C/10 72 Jimmy 4x4 (Junkyard Jimmy)HG's Plow Truck '78 K35 DuallyBigass Farm Truck HG's thread of miscellaneous stuff |
|
|
|
|
09-04-2011, 11:54 PM
|
#747 |
|
VA72C10
Join Date: Mar 2008
Location: Midlothian, VA
Posts: 25,267
|
Re: Over 25 Years Later, Finally My 71 C-10 Truck Build
Nice progress!
__________________
Looking for a 67-72 swb or blazer project in or around VA.
|
|
|
|
|
09-05-2011, 12:24 AM
|
#748 |
|
Registered User
Join Date: Mar 2010
Location: a t w a t e r cali 95301
Posts: 10,713
|
Re: Over 25 Years Later, Finally My 71 C-10 Truck Build
looks good!
|
|
|
|
|
09-06-2011, 01:14 AM
|
#749 |
|
GEARHEAD
Join Date: Aug 2003
Location: MN
Posts: 6,126
|
Re: Over 25 Years Later, Finally My 71 C-10 Truck Build
I got the glass in the driver door today. That was about it. No pic, looks like the passenger door in a mirror right? Found the brake light switch is cockeyed and needs to be adjusted, reverse switch not hooked up but I need to change it out for the correct truck switch rather than the van style it has now. This morning I was looking at my first pics in this thread and realized I didn't have the bolts in the front bumper top brackets back then either, which explains why I can't find them now. Good thing I have a parts truck to get them from.

__________________
If no one knows what you're doing, they can't tell you you're doing it wrong HG's Dream Car Build - Shelby Cobra Kit Build your own adjustable track bar 71 Long Fleet C/10 72 Jimmy 4x4 (Junkyard Jimmy)HG's Plow Truck '78 K35 DuallyBigass Farm Truck HG's thread of miscellaneous stuff |
|
|
|
|
09-06-2011, 04:44 PM
|
#750 |
|
GEARHEAD
Join Date: Aug 2003
Location: MN
Posts: 6,126
|
Re: Over 25 Years Later, Finally My 71 C-10 Truck Build
Windshield is scheduled to go in Thursday morning. I need to get the seatbelts ready and the front lights and get it ready for a cruise.
__________________
If no one knows what you're doing, they can't tell you you're doing it wrong HG's Dream Car Build - Shelby Cobra Kit Build your own adjustable track bar 71 Long Fleet C/10 72 Jimmy 4x4 (Junkyard Jimmy)HG's Plow Truck '78 K35 DuallyBigass Farm Truck HG's thread of miscellaneous stuff |
|
|
|
 |
| Bookmarks |
|
|


 Linear Mode

