
 |
|
|
#751 |
|
Registered User
 Join Date: Dec 2004
Location: Gypsum Kansas 67448
Posts: 1,681
|
Re: Junkyard Jimmy Super Low Buck Build Thread
i do like that color...might be getting some of that around here
__________________
21 2500hd duramax 58 apache HILLJOB GRAPHIX--for all your graphic needs My build thread http://67-72chevytrucks.com/vboard/s...d.php?t=542497 LS ENGINE SWAP INFORMATION THREAD http://67-72chevytrucks.com/vboard/s...d.php?t=377348 4l60 to an NP205 http://67-72chevytrucks.com/vboard/s...43#post3697343 |
|
|

|
|
|
#752 | |||
|
GEARHEAD
Join Date: Aug 2003
Location: MN
Posts: 6,125
|
Re: Junkyard Jimmy Super Low Buck Build Thread
Quote:
Quote:
Quote:
At least its cheap. If you don't like it your not out much money, just time.
__________________
If no one knows what you're doing, they can't tell you you're doing it wrong HG's Dream Car Build - Shelby Cobra Kit Build your own adjustable track bar 71  Long Fleet C/10 Long Fleet C/10 72  Jimmy 4x4 (Junkyard Jimmy) Jimmy 4x4 (Junkyard Jimmy)HG's Plow Truck '78  K35 Dually K35 DuallyBigass Farm Truck HG's thread of miscellaneous stuff |
|||
|
|

|
|
|
#753 |
|
Registered User
 Join Date: Jan 2007
Location: Columbus, Ohio
Posts: 4,346
|
Re: Junkyard Jimmy Super Low Buck Build Thread
Wow - this looks great!
Nice work Mike. |
|
|

|
|
|
#754 |
|
GEARHEAD
Join Date: Aug 2003
Location: MN
Posts: 6,125
|
Re: Junkyard Jimmy Super Low Buck Build Thread
Thank you.
Went out this morning and got the door adjusted. Its about as good as I can get it. I think the gaps are good anyway. Getting the in and out lines right is a pain. Partially because the repro rockers are not a straight line front to back on the outer edge under the door. There is a slight bow to it where the middle is out more than the ends. From what I've seen on other builds, this is common. I would like to have the top of the door in just a smidge more, but the hinge pin is against the door skin now and the only way to get it in more would be to clearance the top corner of the pin with a grinder. I'll see how everything hangs once the door is re-assembled and the door seals are in and the latch is on and adjusted. All of those things will affect the door position in the opening. Door adjustment is one of the hardest things to get right during reassembly. Heres where it's at for now... 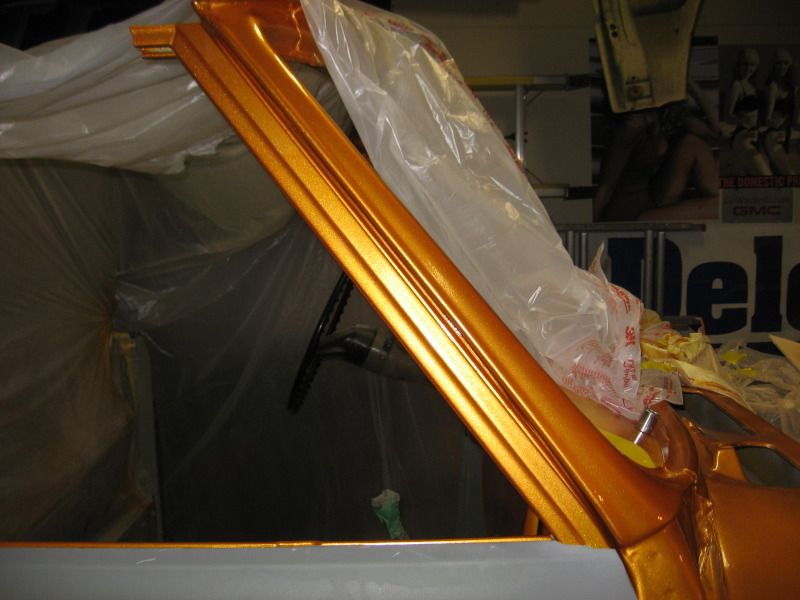  The radiator support should probably be cleaned up and painted before I mount the fenders. And I should probably fix this too before then...  I think I'll just make a patch and weld it in there. But that means I need to get a new bottle of gas for the welder. I'm just about empty. Thats it for now. 8:00, time to go to work.
__________________
If no one knows what you're doing, they can't tell you you're doing it wrong HG's Dream Car Build - Shelby Cobra Kit Build your own adjustable track bar 71  Long Fleet C/10 Long Fleet C/10 72  Jimmy 4x4 (Junkyard Jimmy) Jimmy 4x4 (Junkyard Jimmy)HG's Plow Truck '78  K35 Dually K35 DuallyBigass Farm Truck HG's thread of miscellaneous stuff |
|
|

|
|
|
#755 |
|
Registered User
Join Date: Jul 2012
Location: Mount Victory, Ohio
Posts: 101
|
Re: Junkyard Jimmy Super Low Buck Build Thread
Wow, I've been reading this thread for 5 days now whenever I get a chance. I have a few comments.
1) Awesome work. 2) You have some dedication to keep going after all these years 3) You went from junkyard project to something your wife and kids like and want to drive 4) Something for us all to strive to do. |
|
|

|
|
|
#756 |
|
GEARHEAD
Join Date: Aug 2003
Location: MN
Posts: 6,125
|
Re: Junkyard Jimmy Super Low Buck Build Thread
Yesterday I picked up all of the door seals/felts, gaskets, whatever I need for the doors. That was $166, plus I need to add the cost of the sealer I bought, it was $107 with the activator. Total spent now at $4309. I know I need more epoxy primer. Not sure yet what other parts I'll need to buy. Maybe a windshield. Probably some odds and ends I won't find until I do full assembly.
Punch list (in no particular order, * for priority items): *finish bedside body work *Finish roll bar install *finish body work on fenders *body work on hood *body work on doors *tranny o-rings and kickdown cable *change fluid in both differentials *install windshield *finish and install gauge cluster *make sure wire for gas gauge is hooked up to sender *lights, lights and more lights *tranny cooler lines *seat belts (have them) seat covers (got 'em, not installed) Al's liner inside of tub mark/drill holes for single wall top in bed rails Fab front and rear bumpers electric fan install (got it, ordered controller) heater install wiper washer pump manual throttle glove box (need to buy) hammer out dents in grill door panels, dash pad, visors, etc. (have them, need paint, cleaning, etc.) stereo (have most of it) paint, started (mayan gold metallic)
__________________
If no one knows what you're doing, they can't tell you you're doing it wrong HG's Dream Car Build - Shelby Cobra Kit Build your own adjustable track bar 71  Long Fleet C/10 Long Fleet C/10 72  Jimmy 4x4 (Junkyard Jimmy) Jimmy 4x4 (Junkyard Jimmy)HG's Plow Truck '78  K35 Dually K35 DuallyBigass Farm Truck HG's thread of miscellaneous stuff Last edited by hgs_notes; 11-21-2012 at 08:30 PM. |
|
|

|
|
|
#757 | |
|
GEARHEAD
Join Date: Aug 2003
Location: MN
Posts: 6,125
|
Re: Junkyard Jimmy Super Low Buck Build Thread
Quote:
__________________
If no one knows what you're doing, they can't tell you you're doing it wrong HG's Dream Car Build - Shelby Cobra Kit Build your own adjustable track bar 71  Long Fleet C/10 Long Fleet C/10 72  Jimmy 4x4 (Junkyard Jimmy) Jimmy 4x4 (Junkyard Jimmy)HG's Plow Truck '78  K35 Dually K35 DuallyBigass Farm Truck HG's thread of miscellaneous stuff |
|
|
|

|
|
|
#758 |
|
GEARHEAD
Join Date: Aug 2003
Location: MN
Posts: 6,125
|
Re: Junkyard Jimmy Super Low Buck Build Thread
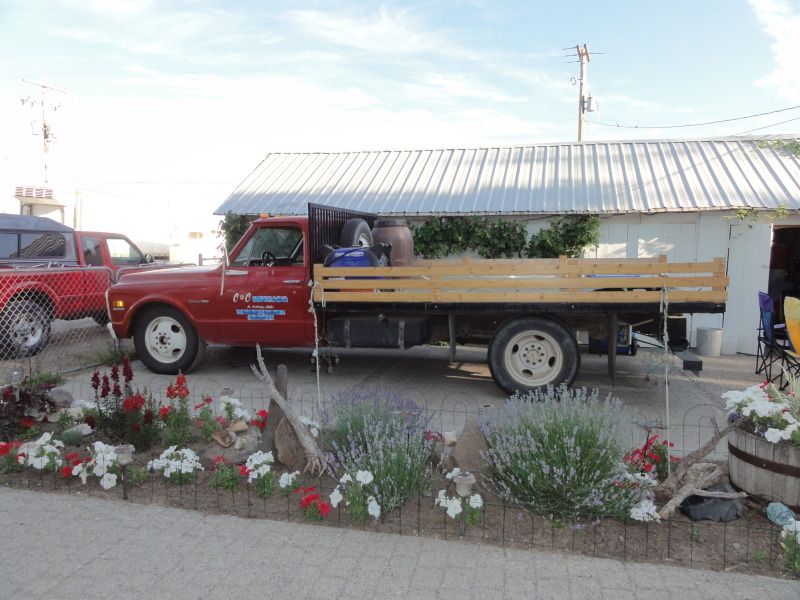
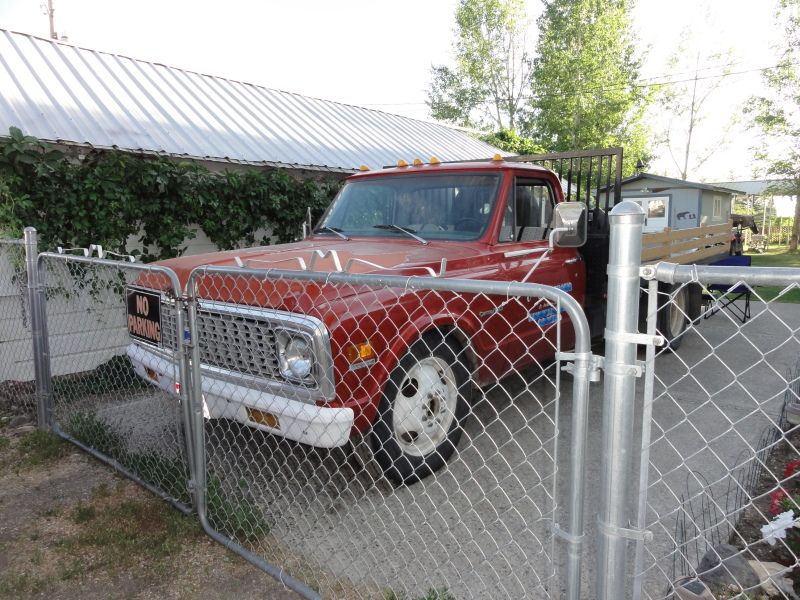
For those of you that don't follow my C-10 thread, heres pics of my future toy hauler. It's my inlaws at the moment, but I have dibs. Will probably be a couple years away, but I drove this last summer and it is an outstanding hauler. No rust, rides great, tall deck 427, auto. I'm thinking wedge bed or hydraulic tilt.
__________________
If no one knows what you're doing, they can't tell you you're doing it wrong HG's Dream Car Build - Shelby Cobra Kit Build your own adjustable track bar 71  Long Fleet C/10 Long Fleet C/10 72  Jimmy 4x4 (Junkyard Jimmy) Jimmy 4x4 (Junkyard Jimmy)HG's Plow Truck '78  K35 Dually K35 DuallyBigass Farm Truck HG's thread of miscellaneous stuff |
|
|

|
|
|
#759 |
|
GEARHEAD
Join Date: Aug 2003
Location: MN
Posts: 6,125
|
Re: Junkyard Jimmy Super Low Buck Build Thread
I didn't spend too much time out in the garage today, but managed to get a couple things done. I started making a patch panel for the rad support. I found a piece of scrap and cut a 3" x 15 1/2" section. Then had a piece of tube that was fairly close to the right radius for the corner and marked that. I bent the lip using a vise grip clamp and my vise, and a hammer. I had to pie cut the lip on that round spot in a couple places, then welded that up. A little more hammering and viola, a pretty good patch panel.
 Nice fit...  I didn't bother to start replacing it yet because my wife told me to work on some home maintenance and I'm just about out of weld gas. After I worked on the house a bit, I snuck back into the garage and cleaned up the front side of the rad support. I wiped it down with wax/grease remover and then sprayed it with some rattle can krylon primer/paint mix. It worked pretty good. I really like the spray tips on the krylon cans. They have a vertical flat spray pattern that works great. Almost like a real air spray gun. Before...  After... 
__________________
If no one knows what you're doing, they can't tell you you're doing it wrong HG's Dream Car Build - Shelby Cobra Kit Build your own adjustable track bar 71  Long Fleet C/10 Long Fleet C/10 72  Jimmy 4x4 (Junkyard Jimmy) Jimmy 4x4 (Junkyard Jimmy)HG's Plow Truck '78  K35 Dually K35 DuallyBigass Farm Truck HG's thread of miscellaneous stuff |
|
|

|
|
|
#760 |
|
GEARHEAD
Join Date: Aug 2003
Location: MN
Posts: 6,125
|
Re: Junkyard Jimmy Super Low Buck Build Thread
Not much done today, but it still counts. Every little thing is a step closer to the finish. Cleaned up and painted the driver side back of the rad support, and installed the pass door seal (minus the silicone to hold it). This is the new style one piece door seal and I liked it except for the fact that it was about 1" too short (see the top of it at the back end?).
  Before...  After... 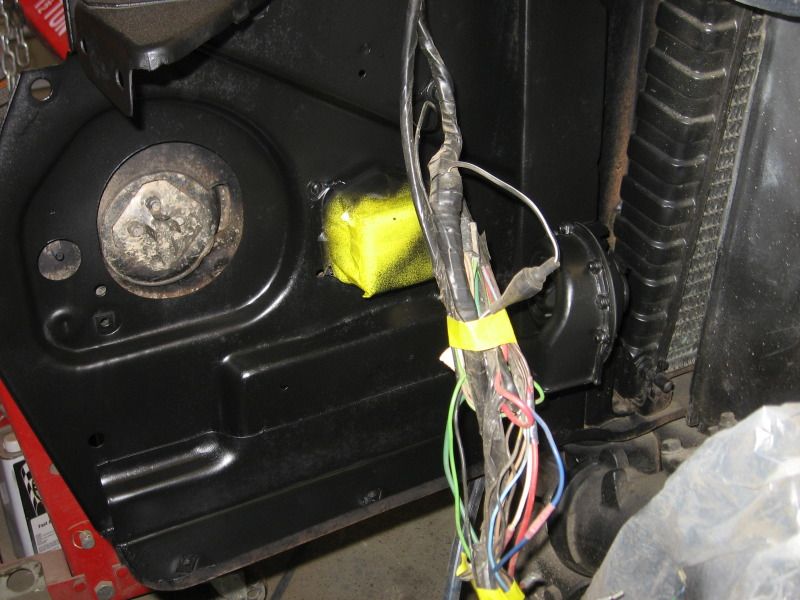
__________________
If no one knows what you're doing, they can't tell you you're doing it wrong HG's Dream Car Build - Shelby Cobra Kit Build your own adjustable track bar 71  Long Fleet C/10 Long Fleet C/10 72  Jimmy 4x4 (Junkyard Jimmy) Jimmy 4x4 (Junkyard Jimmy)HG's Plow Truck '78  K35 Dually K35 DuallyBigass Farm Truck HG's thread of miscellaneous stuff |
|
|

|
|
|
#761 |
|
Registered User
 Join Date: Nov 2009
Location: farmington nm
Posts: 178
|
Re: Junkyard Jimmy Super Low Buck Build Thread
How did u paint your core support. Prep work? Paint? Primer?
Posted via Mobile Device |
|
|

|
|
|
#762 | |
|
GEARHEAD
Join Date: Aug 2003
Location: MN
Posts: 6,125
|
Re: Junkyard Jimmy Super Low Buck Build Thread
Quote:
When I did the one on my C-10, I treated it like another body panel and used the automotive paints, primers, etc. It looks much nicer than the jimmy support, but was a lot more work and needed lots more sanding and removal from the truck. The jimmy one looks ok, not as smooth, won't be as durable, but it was sure a lot easier.
__________________
If no one knows what you're doing, they can't tell you you're doing it wrong HG's Dream Car Build - Shelby Cobra Kit Build your own adjustable track bar 71  Long Fleet C/10 Long Fleet C/10 72  Jimmy 4x4 (Junkyard Jimmy) Jimmy 4x4 (Junkyard Jimmy)HG's Plow Truck '78  K35 Dually K35 DuallyBigass Farm Truck HG's thread of miscellaneous stuff |
|
|
|

|
|
|
#763 |
|
GEARHEAD
Join Date: Aug 2003
Location: MN
Posts: 6,125
|
Re: Junkyard Jimmy Super Low Buck Build Thread
Finally got out and got something done. Its been hard lately with work and kids activities and other commitments. Anyway, I started with the core support repair. I cut the rusty part off and cleaned it up as much as I could to get clean metal to weld to, and also cleaned the paint off the patch panel I made. No real problems with anything. The patch fit good, and welded in alright.
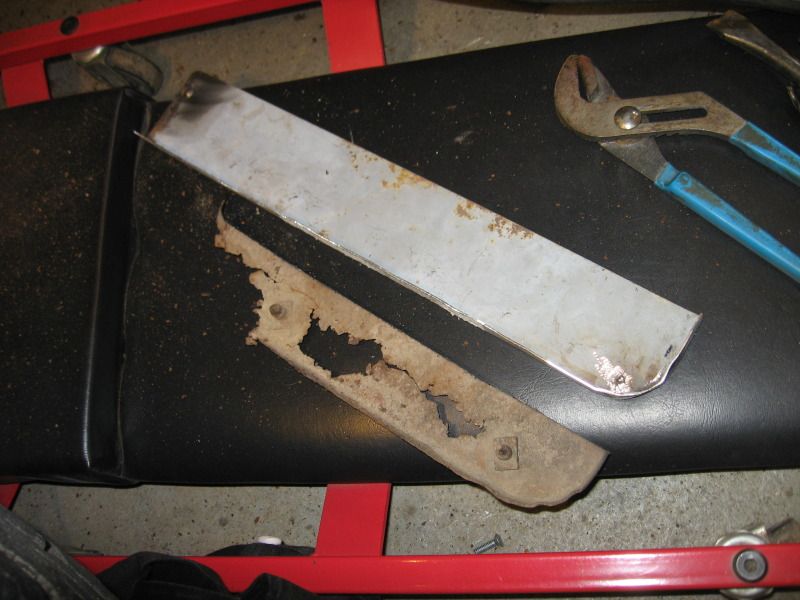 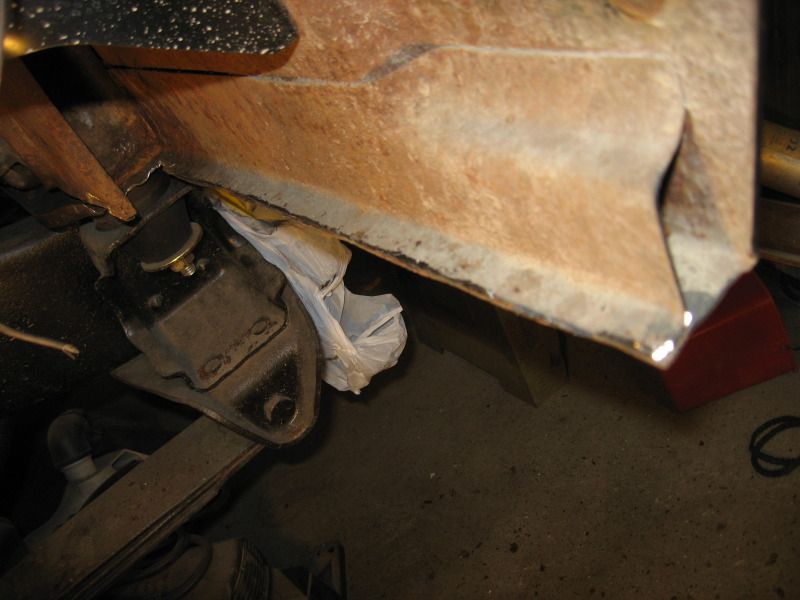 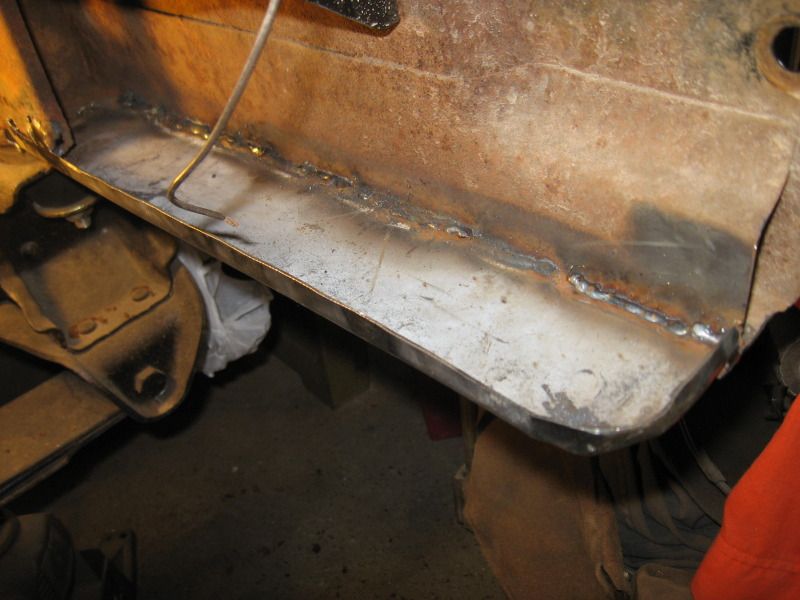 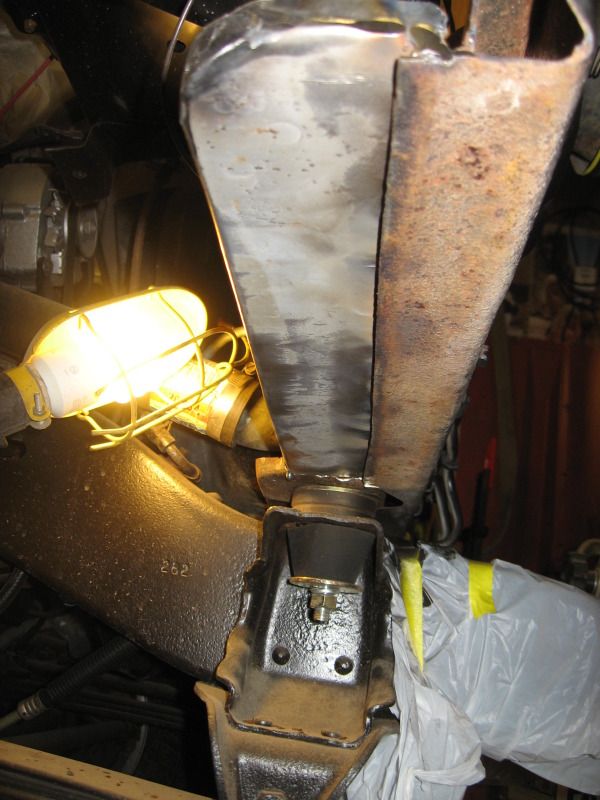 With that done I could clean up that area of the support and prep it for paint. Same procedure as the rest of it. Clean, scuff pad, wipe with wax/grease remover, spray with krylon dual primer/paint rattle can satin black. 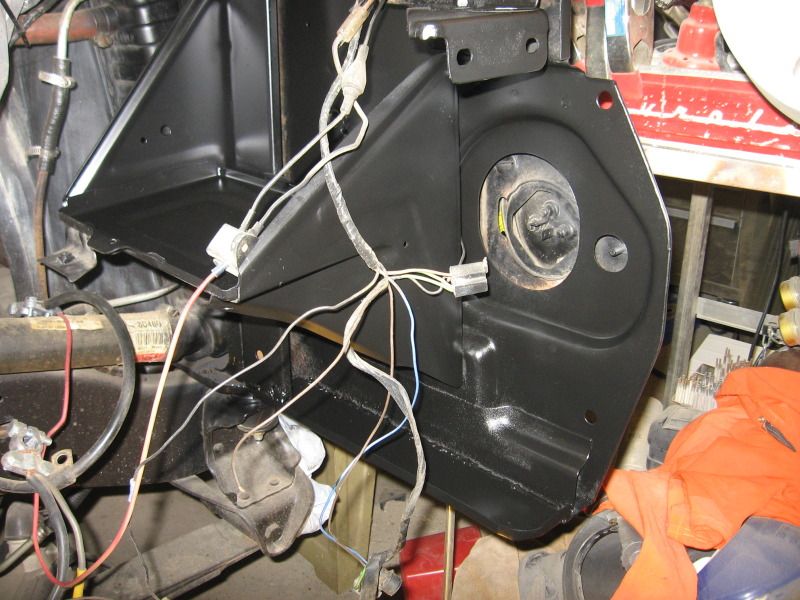 I let that dry some and got the fender on the truck. It doesn't fit as good as the green one I had mocked up before. Gaps are bad, the top rear is down tight but still sticks out too far, which means pushing the door outward more, the opposite of what I needed for the back of the door to fit. I'll figure it out eventually. 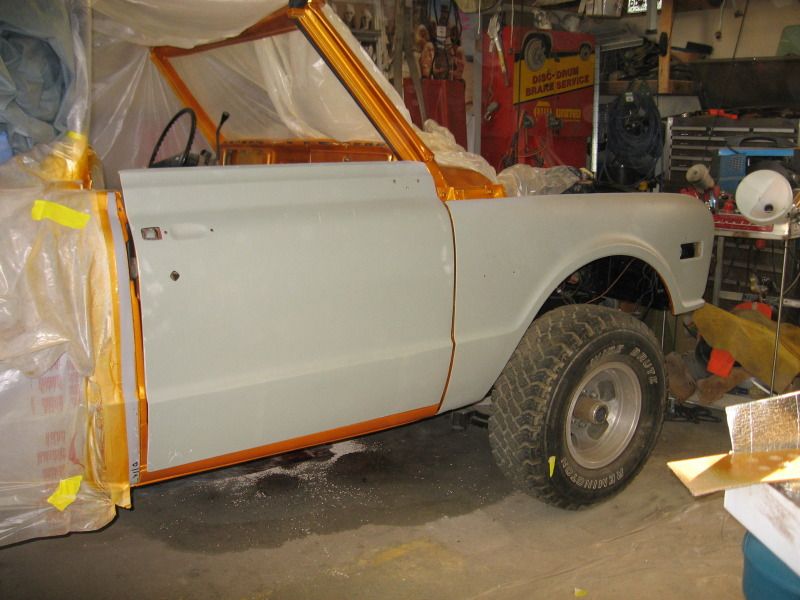 Bottom gap is wider than the top... 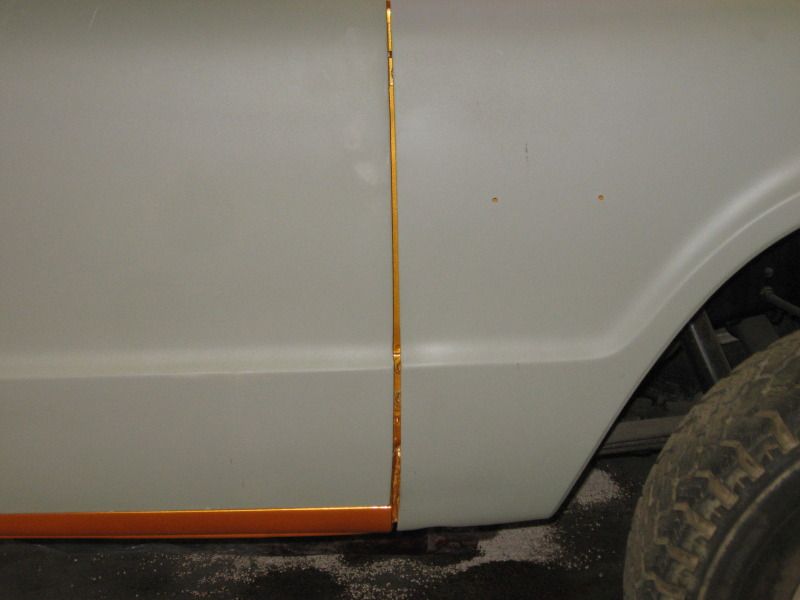 Now I could pull the plastic off the front and see if it would start. Its been awhile, but with a shot of gas down the carb, it fired right up. It worked better when I put the gas pedal back in. I forgot that I took it out before I painted the dash. It stalled when I first put it in gear, but started right back up and didn't have any problems after that. So I got to cruise it for just a few minutes to get it turned around for better access to the driver side. 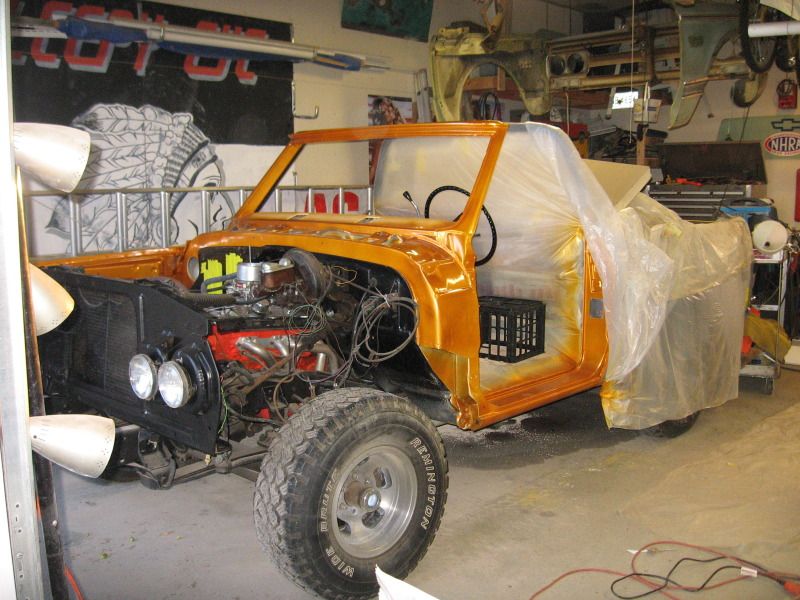 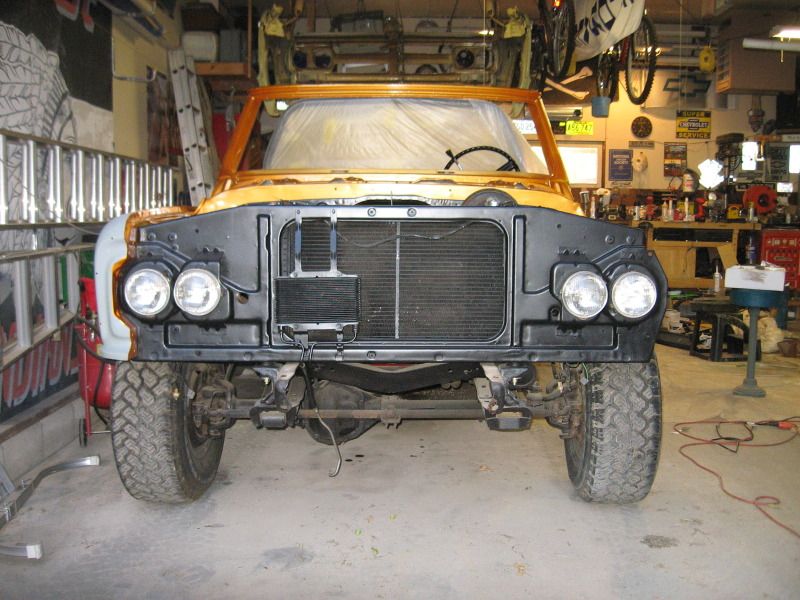 The next step is to get the driver side door fixed up. I've been trying to find a better one, but haven't had any luck yet, so for now, this is what I got to work with. Probably the 2 biggest problems is that the top hinge bolts were replaced with the wrong ones and nuts were used inside the door and the other thing is the top inside edge of the door, by the window has been pushed toward the outer skin. Its dented in and I need to figure a way to pull it out enough to make it look ok and for the felt and seal to work with the glass. For tonight I just got it stripped of parts. 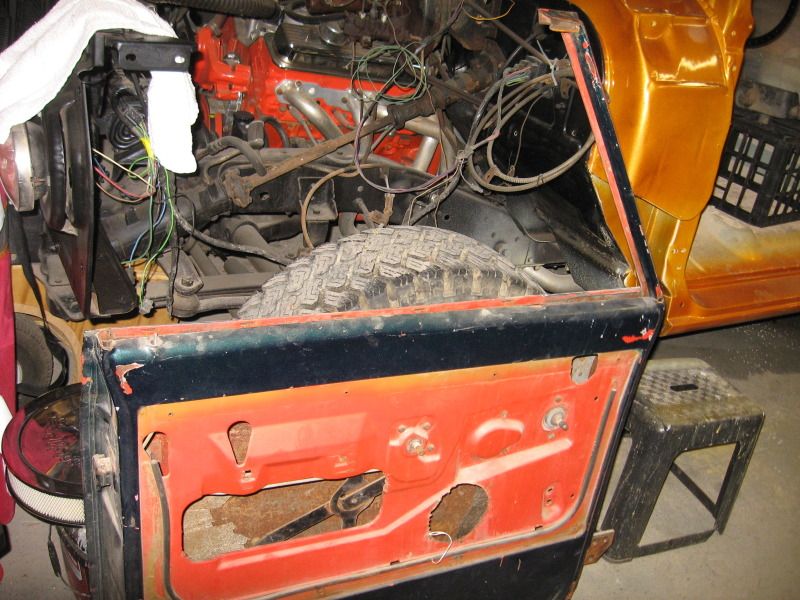 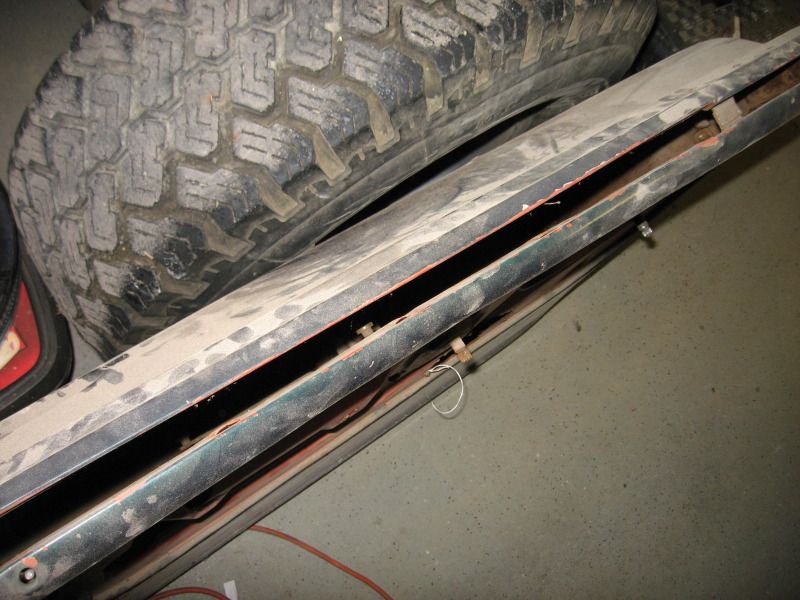 A good progress day. The jimmy and I both needed it.
__________________
If no one knows what you're doing, they can't tell you you're doing it wrong HG's Dream Car Build - Shelby Cobra Kit Build your own adjustable track bar 71  Long Fleet C/10 Long Fleet C/10 72  Jimmy 4x4 (Junkyard Jimmy) Jimmy 4x4 (Junkyard Jimmy)HG's Plow Truck '78  K35 Dually K35 DuallyBigass Farm Truck HG's thread of miscellaneous stuff |
|
|

|
|
|
#764 |
|
I miss this truck.
Join Date: Dec 2001
Location: Lexington, KY U.S.A.
Posts: 2,863
|
Re: Junkyard Jimmy Super Low Buck Build Thread
Before long it will be too cold up there to do anything but stay in your heated shop and work on your truck...
__________________
'07 GMC Acadia SLT. Sweet ride. '08 Crew Cab Z-71 short bed. Really like this truck A LOT. |
|
|

|
|
|
#765 | |
|
GEARHEAD
Join Date: Aug 2003
Location: MN
Posts: 6,125
|
Re: Junkyard Jimmy Super Low Buck Build Thread
Quote:
 I got a couple hours this afternoon to get some work done on my door. I finished pulling off the hinges and door lock. Then started looking everything over for damage. I used a tire iron to push out the top of the inner door panel and got the window opening evened out pretty good. I'll need to do a little filler work to smooth it out. 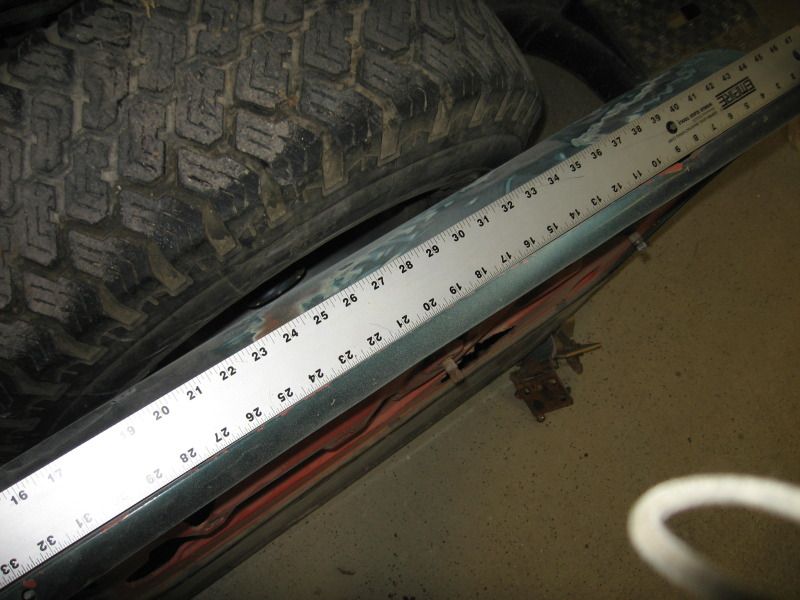 Then I found some crack on the front below the lower hinge and up high where the vent window frame attaches. 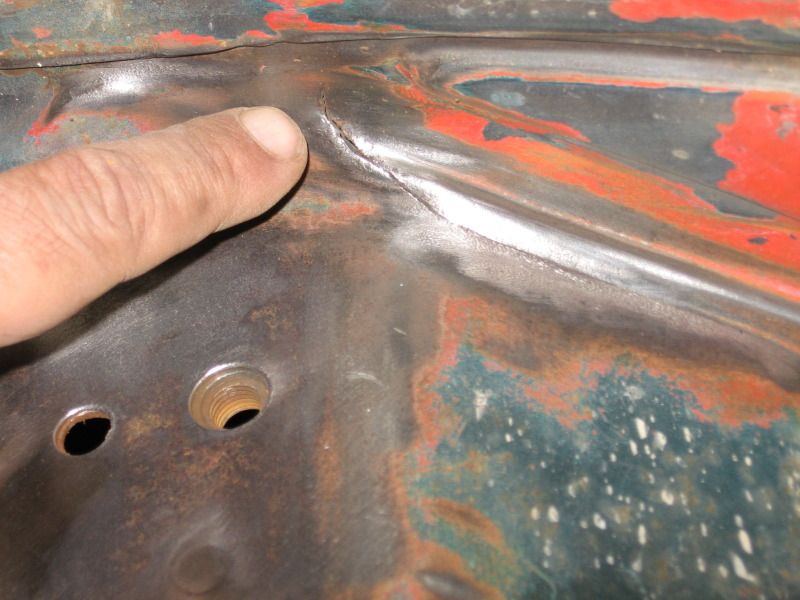 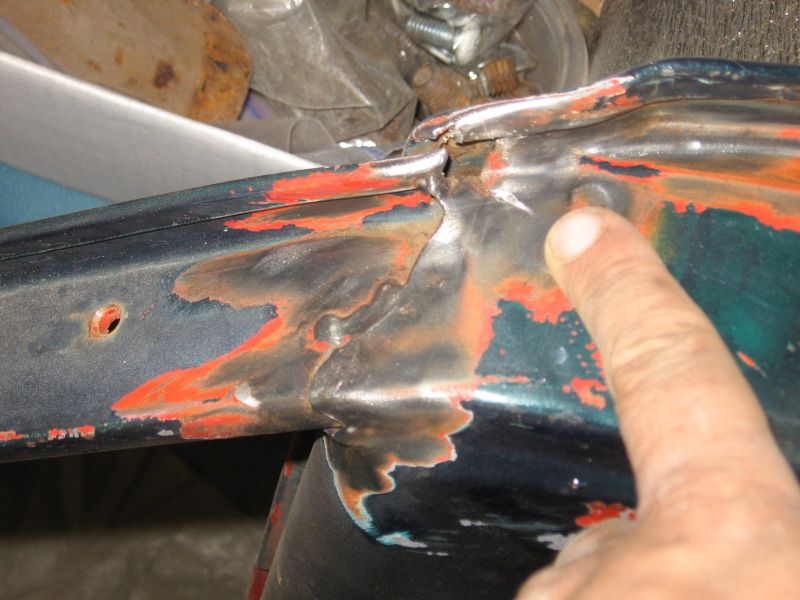 Cleaned the areas up with a wire wheel and welded them up. I also added some weld to the window frame for a little more stiffness. And added a small spot of weld on the rear side as well. There were a few holes drilled to run wires through that I filled while I was working in the area anyway. 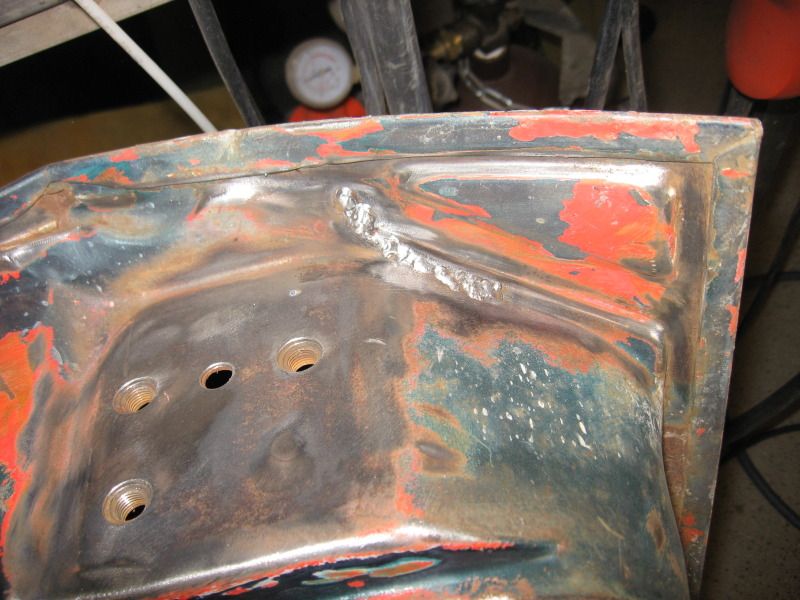 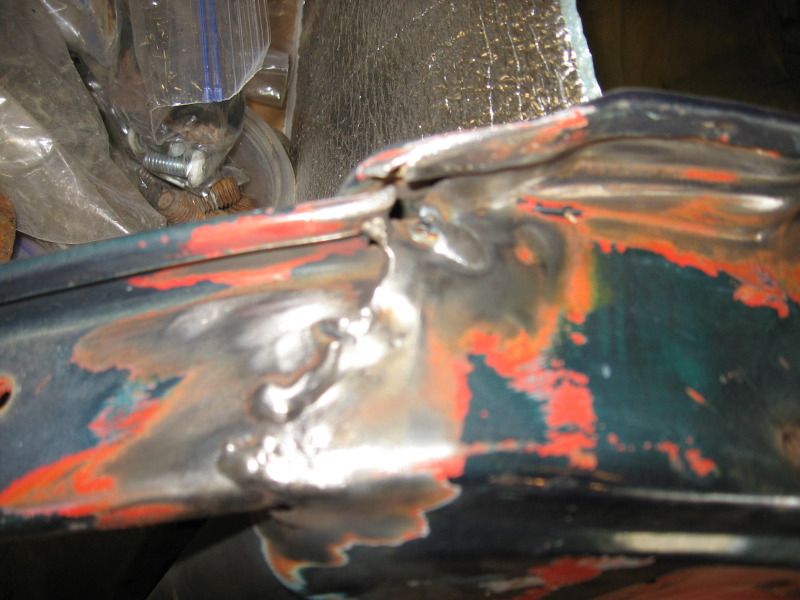 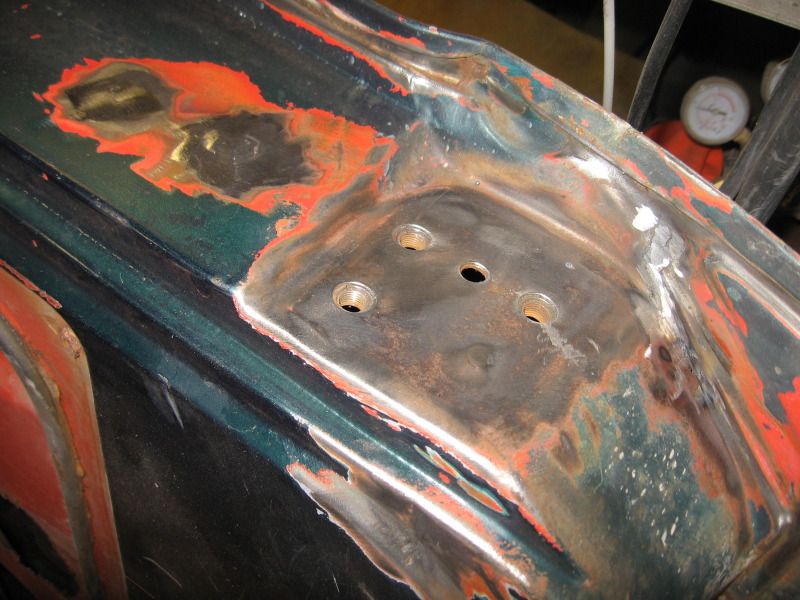 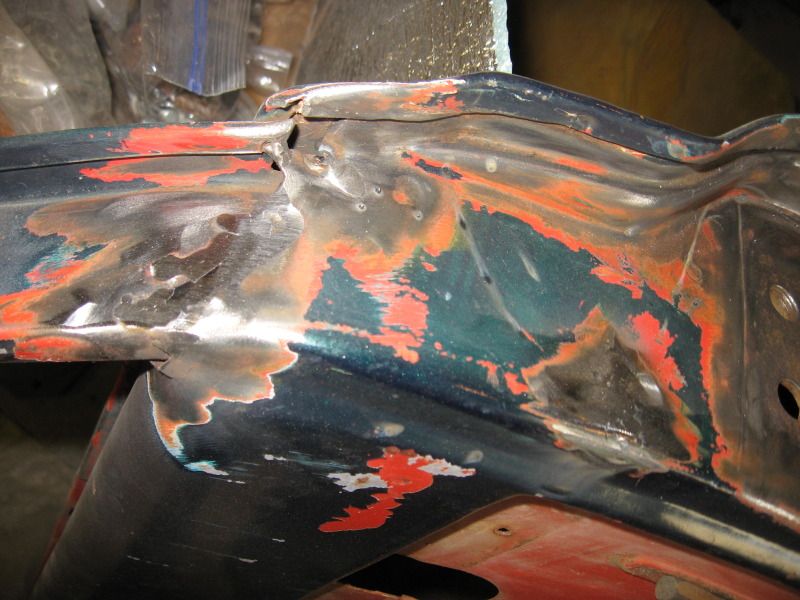 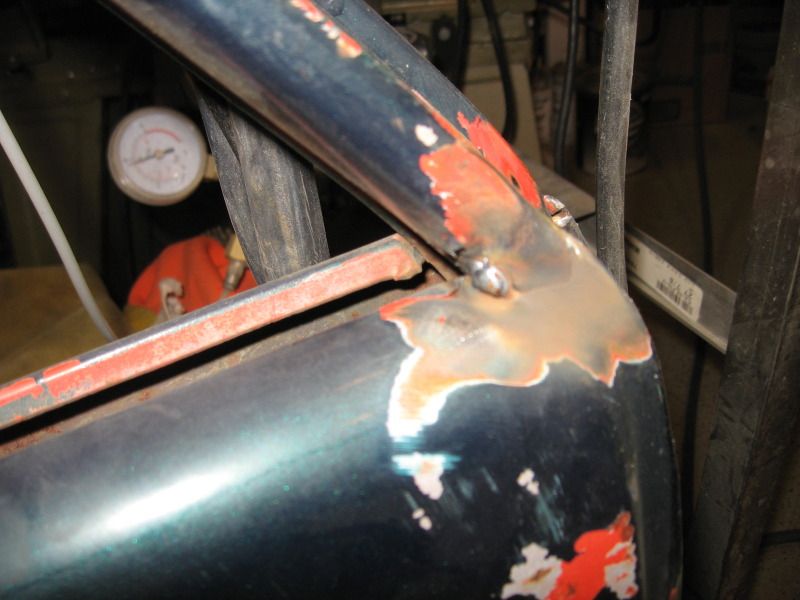 Then I started work on the rear end. There was rust in just the bottom corner. I got it cut out and will repair this weekend. 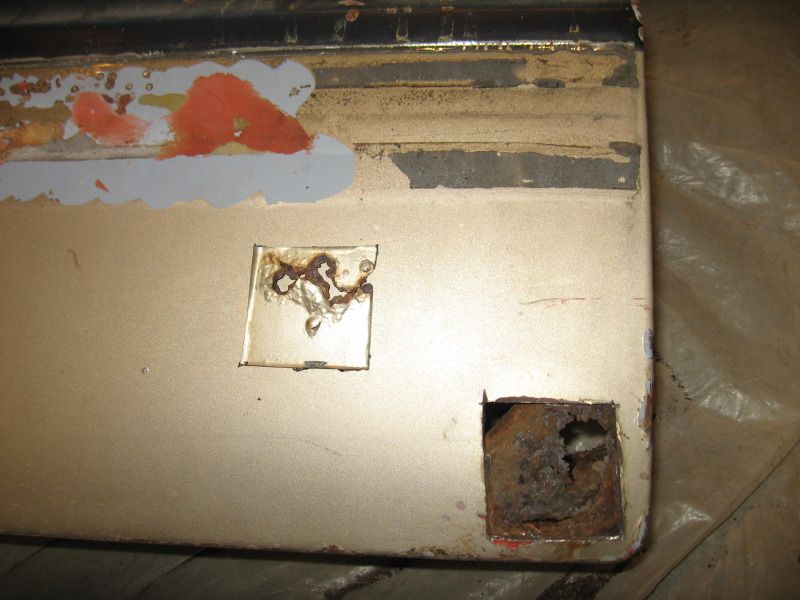 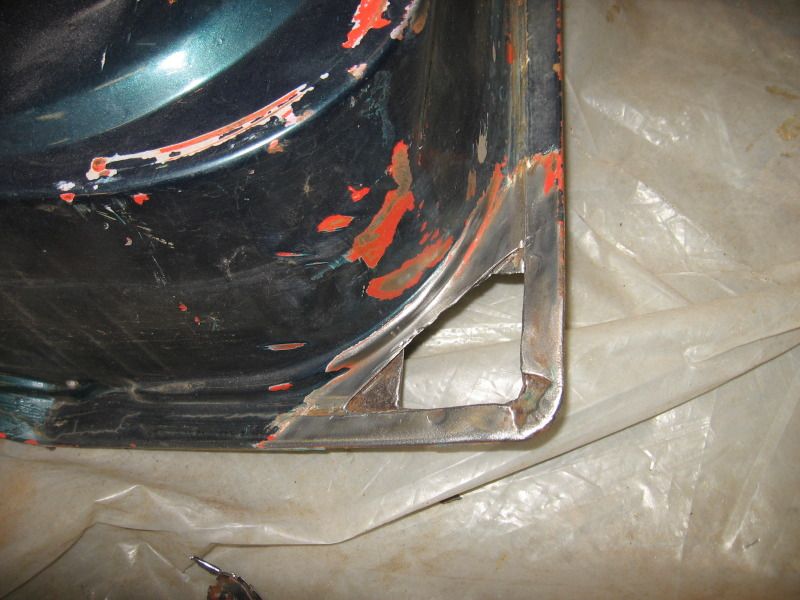 Since I was already pretty filthy I decided to start stripping some paint to see what hidden damage there was. I found a dent a couple inches from the front by the molding line. About 1/4" deep, not too bad. 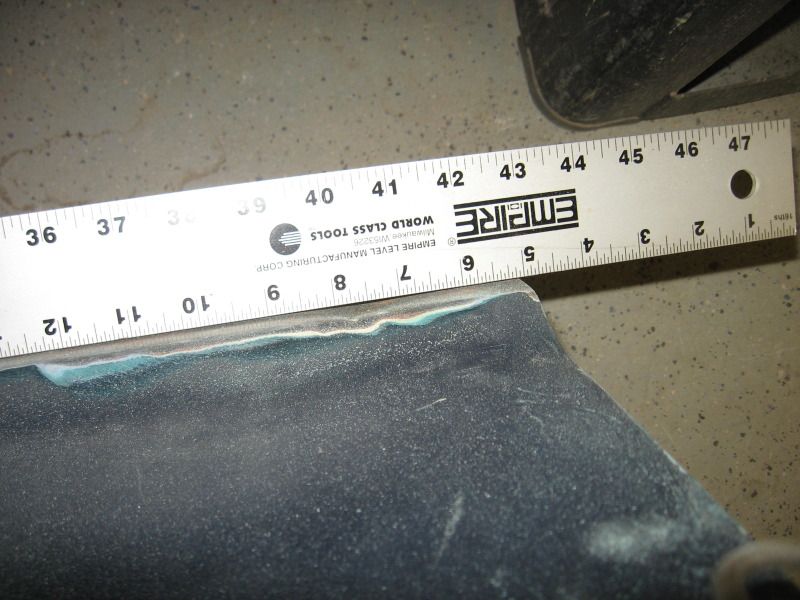 I already knew there was filler up by where the big rectangular mirrors would mount because there was a crack in the filler. But I found a pretty large area of it. I worked my way around the edges of it before I ran out of shop time. I'm going to need to borrow the stud gun again and start pounding on it. 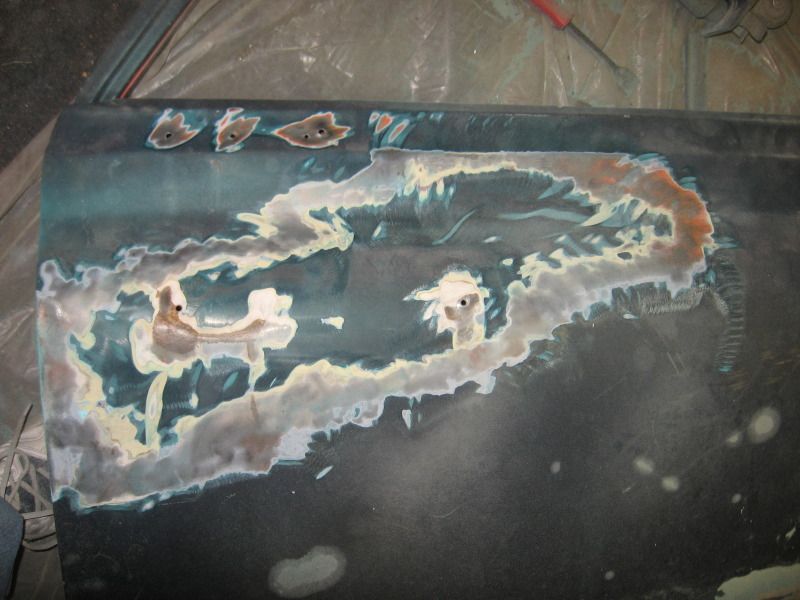
__________________
If no one knows what you're doing, they can't tell you you're doing it wrong HG's Dream Car Build - Shelby Cobra Kit Build your own adjustable track bar 71  Long Fleet C/10 Long Fleet C/10 72  Jimmy 4x4 (Junkyard Jimmy) Jimmy 4x4 (Junkyard Jimmy)HG's Plow Truck '78  K35 Dually K35 DuallyBigass Farm Truck HG's thread of miscellaneous stuff |
|
|
|

|
|
|
#766 |
|
GEARHEAD
Join Date: Aug 2003
Location: MN
Posts: 6,125
|
Re: Junkyard Jimmy Super Low Buck Build Thread
Today was another day of stripping paint, bondo, etc. There were a few more dings and holes that turned up but nothing I can't fix. Its just a little dissappointing that there is as many dents as there were under that paint.
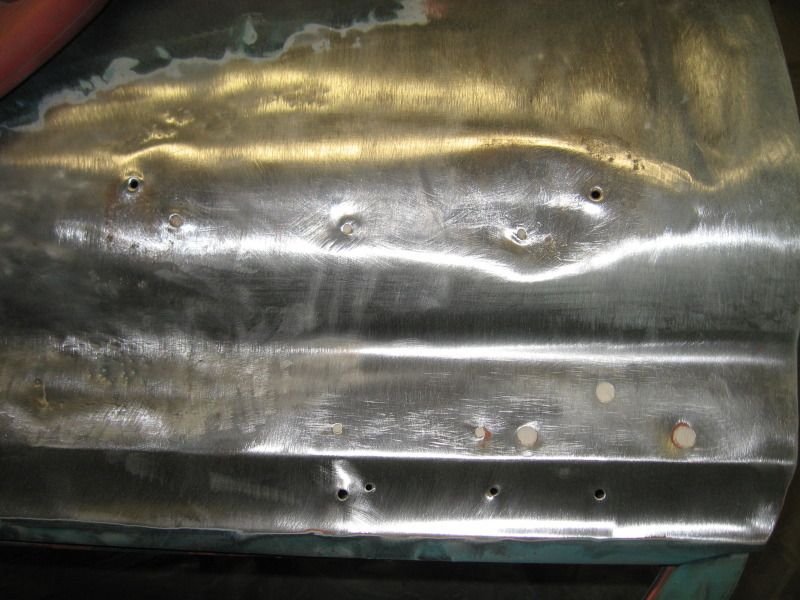 I think there were at least 4 paint layers, started as a dark orangs, but saw some red too, then a medium green and finally the dark blue, with various layers of primer and bondo. 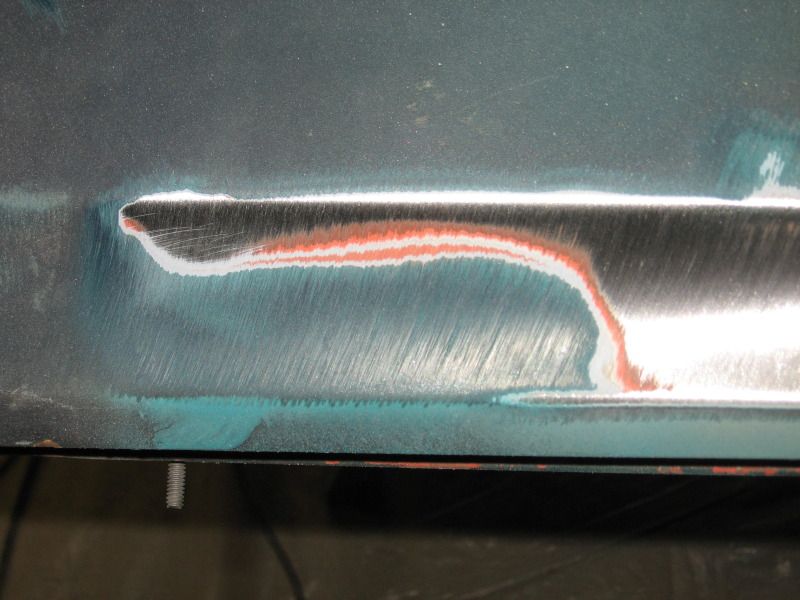 On the outer skin I found holes for just about every style of mirror you can think of. The 3 original holes are actually the ones I plan to use so I'm glad I don't have to add any. Besides those 3 holes there were 13 others, plus 2 in the window frame that I'll have to weld up. 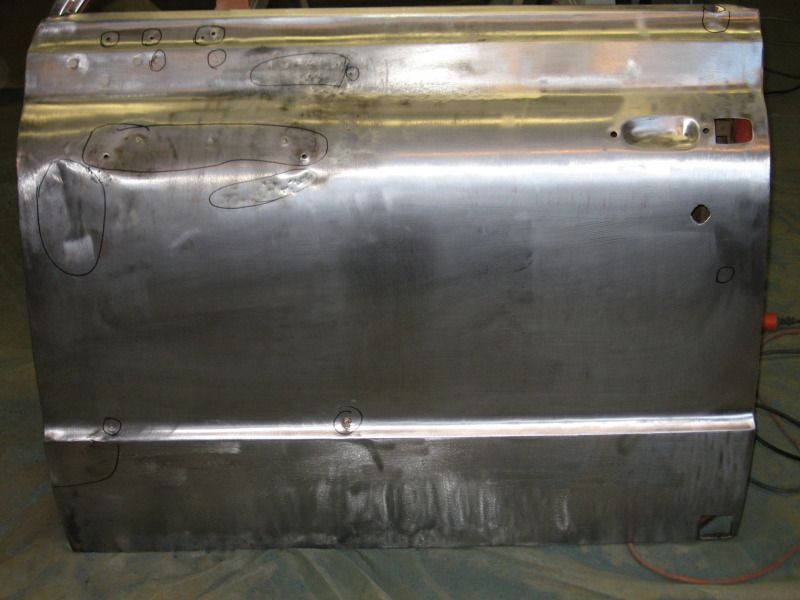 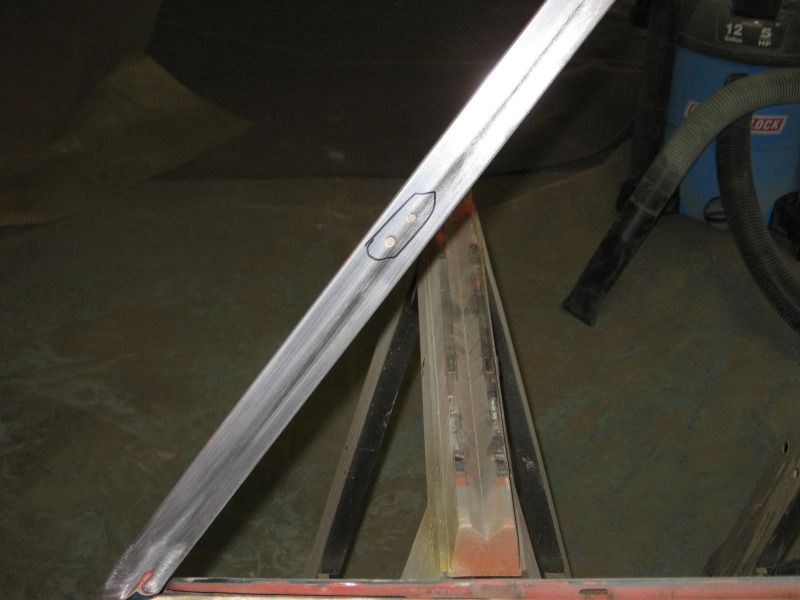 On the inner bottom I found some small rust holes and pin holes, mostly in the front part. 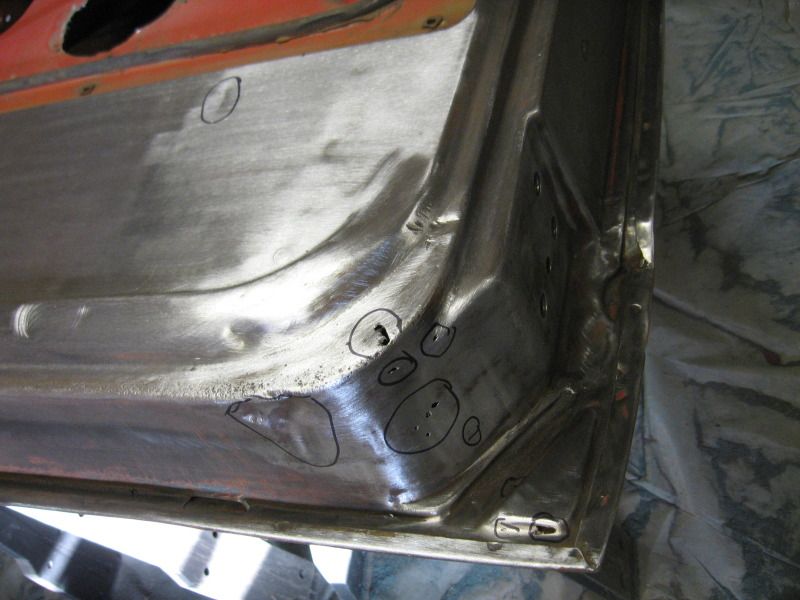 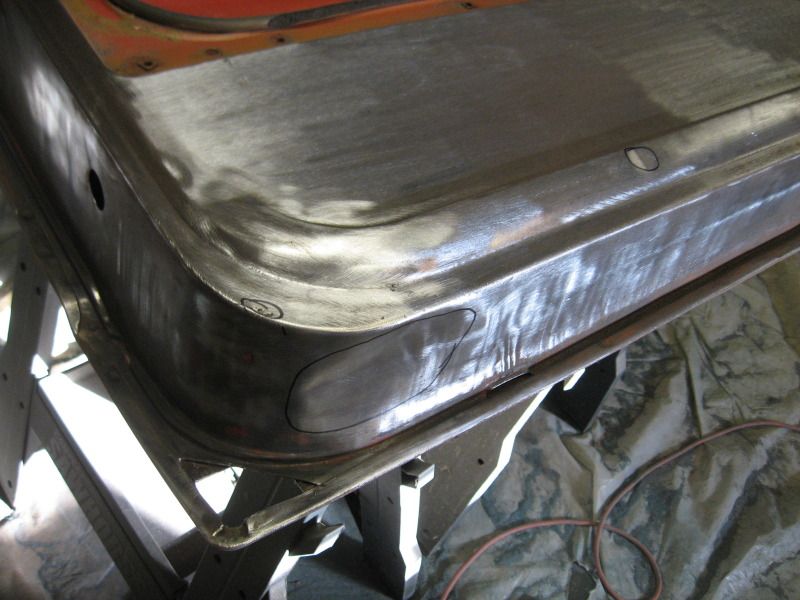 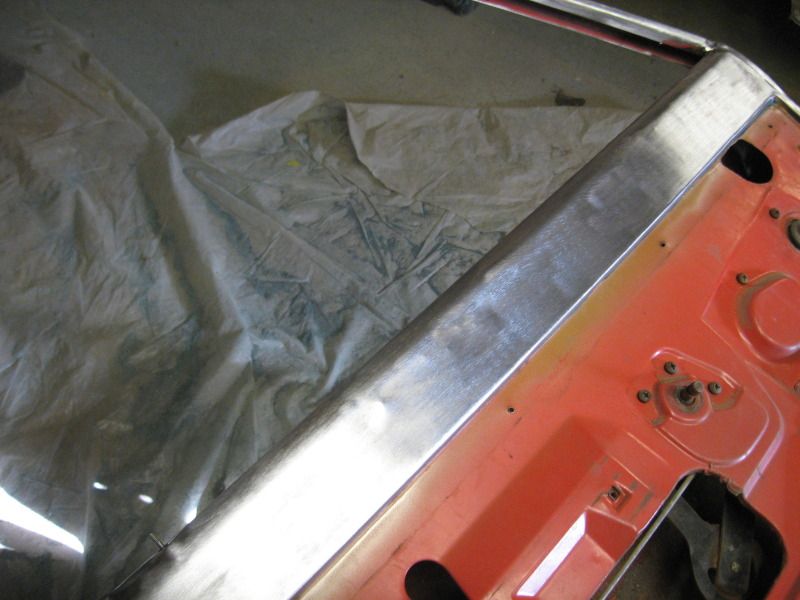 The really dirty part is over. Now I just need to start repairing, pounding, pulling, etc. and see if I can polish this turd into an acceptable door.
__________________
If no one knows what you're doing, they can't tell you you're doing it wrong HG's Dream Car Build - Shelby Cobra Kit Build your own adjustable track bar 71  Long Fleet C/10 Long Fleet C/10 72  Jimmy 4x4 (Junkyard Jimmy) Jimmy 4x4 (Junkyard Jimmy)HG's Plow Truck '78  K35 Dually K35 DuallyBigass Farm Truck HG's thread of miscellaneous stuff |
|
|

|
|
|
#767 |
|
GEARHEAD
Join Date: Aug 2003
Location: MN
Posts: 6,125
|
Re: Junkyard Jimmy Super Low Buck Build Thread
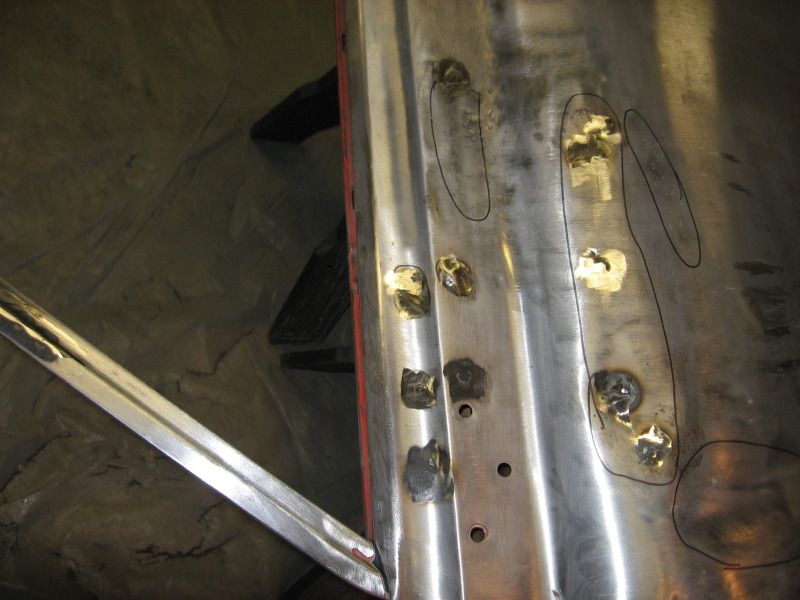
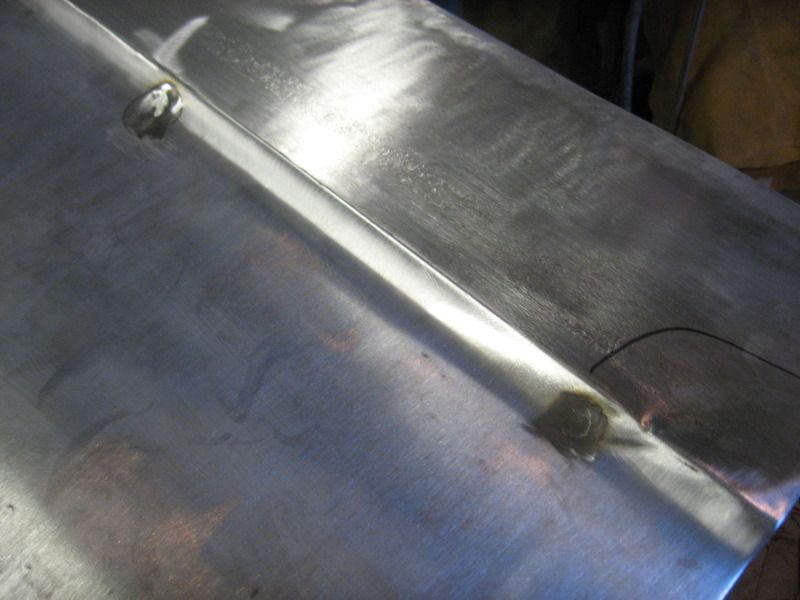
More of the same...door repairs. I welded up all the drilled holes in the outer skin and most of the holes on the inner panel. I ended up cutting the bottom front corner out of the inner panel though because welding it up just made the hole bigger. Too thin of metal there.
  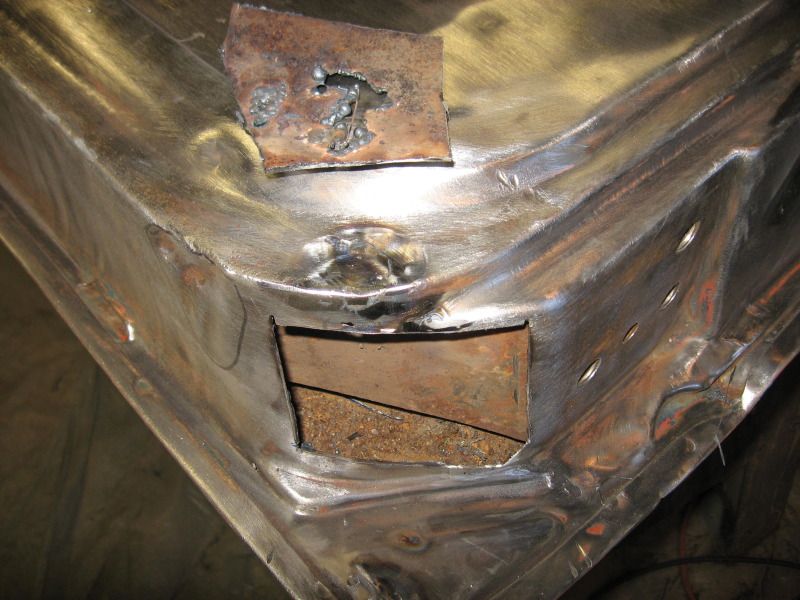 But cutting that hole actually helped me out in another way. There was just enough room to slide a crow bar under that inner brace to reach a dent and push most of it out. 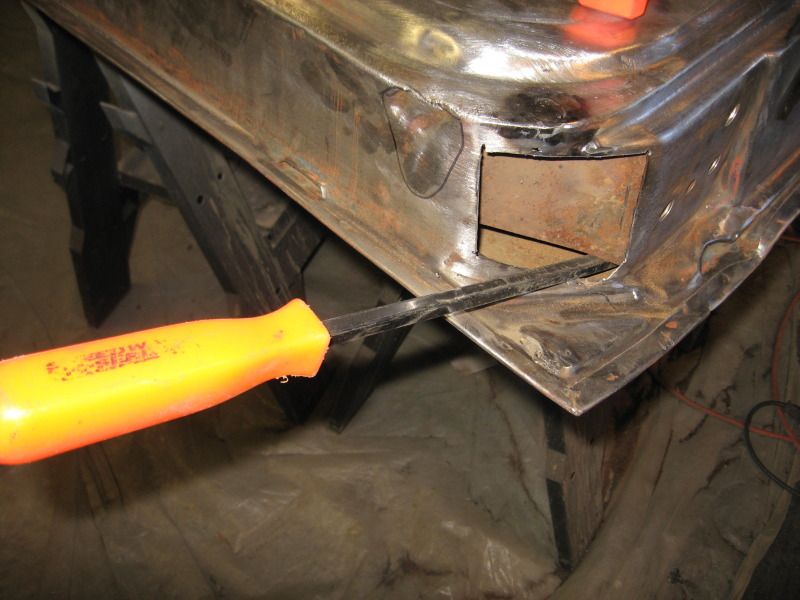 The dent in the upper part I could at least partially reach through the hole below the vent window. I'll still need to use the stud welder and dent puller to finish working that dent out. 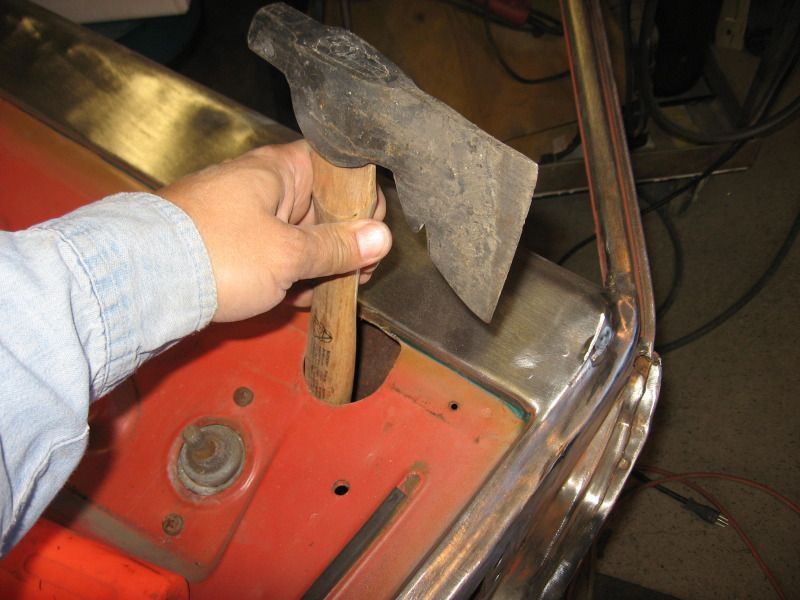 The bottom of the door had a couple dents too and I was able to get them out using the pry bar and a hammer inside the door. The upper hinge bolts had extra nuts threaded onto them inside the door. I ran a tap through them and one was kinda stripped, the other 2 didn't seem too bad. Worst case is I mount it and get it aligned using the OEM threads, then add nuts after to hold it for good. 2 out of 3 looked ok. Whats next? Stud weld and pull dents, weld in the patches, clean up the hinges and the door catches, spray some primer, a little filling and sanding, then paint and mount and alignment. Doors are a lot of work. Once they are done though the rest is much easier. I hate to set goals or dates, but outside paint by holloween? We'll see.
__________________
If no one knows what you're doing, they can't tell you you're doing it wrong HG's Dream Car Build - Shelby Cobra Kit Build your own adjustable track bar 71  Long Fleet C/10 Long Fleet C/10 72  Jimmy 4x4 (Junkyard Jimmy) Jimmy 4x4 (Junkyard Jimmy)HG's Plow Truck '78  K35 Dually K35 DuallyBigass Farm Truck HG's thread of miscellaneous stuff |
|
|

|
|
|
#768 |
|
GEARHEAD
Join Date: Aug 2003
Location: MN
Posts: 6,125
|
Re: Junkyard Jimmy Super Low Buck Build Thread
One more quick update. I bought a new air filter set up for my C-10 and was going to sell the old one, but instead decided it would look so much better than the OEM one I had on the jimmy, so here it is.
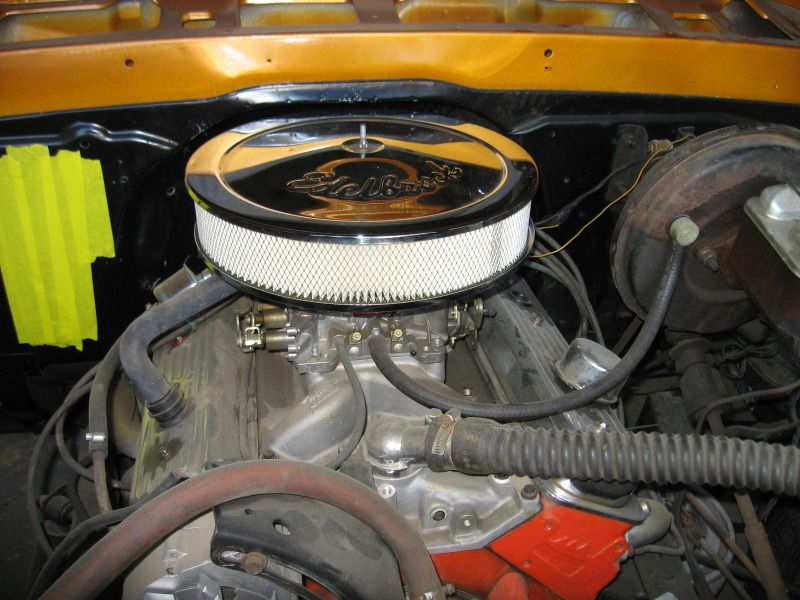
__________________
If no one knows what you're doing, they can't tell you you're doing it wrong HG's Dream Car Build - Shelby Cobra Kit Build your own adjustable track bar 71  Long Fleet C/10 Long Fleet C/10 72  Jimmy 4x4 (Junkyard Jimmy) Jimmy 4x4 (Junkyard Jimmy)HG's Plow Truck '78  K35 Dually K35 DuallyBigass Farm Truck HG's thread of miscellaneous stuff |
|
|

|
|
|
#769 |
|
GEARHEAD
Join Date: Aug 2003
Location: MN
Posts: 6,125
|
Re: Junkyard Jimmy Super Low Buck Build Thread
I went to a junkyard a couple times over the last week and found some good stuff. Some is for sale on the parts board but here are a couple things I'm keeping for myself. A working hatch handle, which I think is OEM.
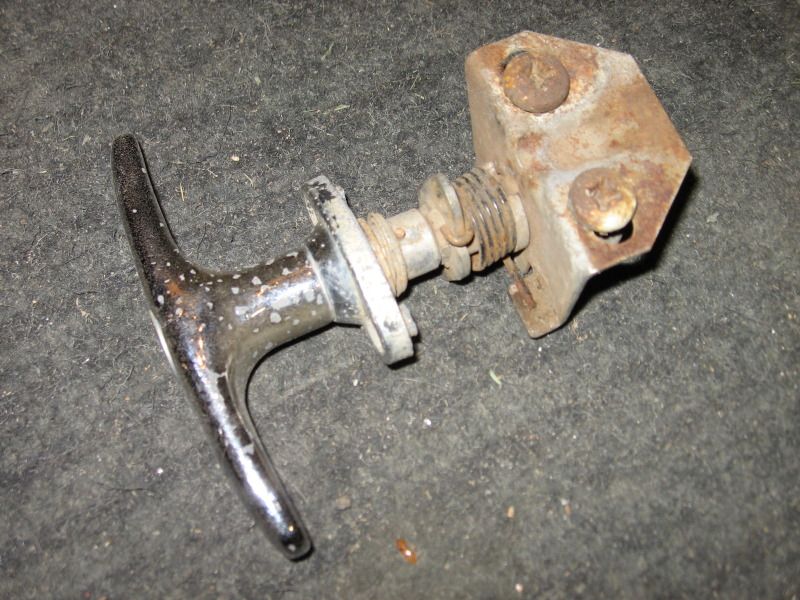 Not sure I'll use these, but it fits the theme I'm doing with a 70's vibe. Back when I was in highschool in the early to mid 80's it was normal to see these in trucks in the highschool parking lot with rifles in them. Now they would probably call the bomb squad and arrest you for terroristic threats.  They should fit in a top side window.
__________________
If no one knows what you're doing, they can't tell you you're doing it wrong HG's Dream Car Build - Shelby Cobra Kit Build your own adjustable track bar 71  Long Fleet C/10 Long Fleet C/10 72  Jimmy 4x4 (Junkyard Jimmy) Jimmy 4x4 (Junkyard Jimmy)HG's Plow Truck '78  K35 Dually K35 DuallyBigass Farm Truck HG's thread of miscellaneous stuff |
|
|

|
|
|
#770 |
|
Registered User
Join Date: Jul 2012
Location: Mount Victory, Ohio
Posts: 101
|
Re: Junkyard Jimmy Super Low Buck Build Thread
Yea I remember the good ole days. A lot of us had trucks and most had a 12 gauge or 2 in the back window. Nobody thought twice about it. Sad that's not the case anymore!
|
|
|

|
|
|
#771 |
|
VA72C10
 Join Date: Mar 2008
Location: Midlothian, VA
Posts: 25,269
|
Re: Junkyard Jimmy Super Low Buck Build Thread
Yep, looks oem to me
On the gun racks, I had classmates my senior year (95) that had shotguns and rifles on racks in their trucks and I went to a school in the "burbs" not country....times have changed.....quickly... Posted via Mobile Device
__________________
Looking for a 67-72 swb or blazer project in or around VA. 
|
|
|

|
|
|
#772 |
|
Registered User
Join Date: Jun 2007
Location: Saskatoon, Saskatchewan,:
Posts: 2,901
|
Re: Junkyard Jimmy Super Low Buck Build Thread
That cam that you speak of, it is a great little cam, tons of low end torque, it is used alot in circle track racing for this reason. I jsut wish I could get your pictures on my work ph, oh well. Soon I may have a new Iphone and look at these threads better.
__________________
James 1968 GMC "HAVOC" 1986 GMC "Frank" J.J.R.H. Design & Consulting My 68`Rebuild "HAVOC": http://67-72chevytrucks.com/vboard/s...d.php?t=316300 A 58' chev build thread: http://www.67-72chevytrucks.com/vboa...d.php?t=311238 1969 Camaro Pro Touring http://67-72chevytrucks.com/vboard/s...61#post3513361 Swiss Cheese: http://67-72chevytrucks.com/vboard/s...d.php?t=384390 Adjustable Trailing Arm How-To: http://67-72chevytrucks.com/vboard/s...d.php?t=321100 1968 Ford Farm Truck: http://67-72chevytrucks.com/vboard/s...=1#post6555587 |
|
|

|
|
|
#773 |
|
Registered User
Join Date: Jun 2007
Location: Saskatoon, Saskatchewan,:
Posts: 2,901
|
Re: Junkyard Jimmy Super Low Buck Build Thread
I am Very impressed with what you have done so far. It looks really good. How do you like that paint? I have wondered about it. Your skills are getting much better.
Posted via Mobile Device
__________________
James 1968 GMC "HAVOC" 1986 GMC "Frank" J.J.R.H. Design & Consulting My 68`Rebuild "HAVOC": http://67-72chevytrucks.com/vboard/s...d.php?t=316300 A 58' chev build thread: http://www.67-72chevytrucks.com/vboa...d.php?t=311238 1969 Camaro Pro Touring http://67-72chevytrucks.com/vboard/s...61#post3513361 Swiss Cheese: http://67-72chevytrucks.com/vboard/s...d.php?t=384390 Adjustable Trailing Arm How-To: http://67-72chevytrucks.com/vboard/s...d.php?t=321100 1968 Ford Farm Truck: http://67-72chevytrucks.com/vboard/s...=1#post6555587 |
|
|

|
|
|
#774 | |
|
GEARHEAD
Join Date: Aug 2003
Location: MN
Posts: 6,125
|
Re: Junkyard Jimmy Super Low Buck Build Thread
Quote:
I would not be a good person to ask about the paint because I have not used other paints from the normal suppliers for comparison. And because I'm still learning how to use my guns and read the indications of whats happening with my work. After the first try I was worried, it was just an abundance of problems. Second try came out much better, but after I turned the truck around I see a place where I didn't get good enough coverage. I blame it on poor lighting. I think part of the coverage problem could be the paint though. Maybe not enough solids. But it just might be the color choice and more solid colors may be better. Without any reducer it sprayed well though, not a single run. I had a couple small spots that chipped when I put the door on. Maybe I hit it harder than I realized, but it seemed to chip easier than I expected. For a basic paint job on a budget though I would definitely use it again. Its a much better option than trying to use rustoleum. Its so cheap that your not out anything but your time if you don't like it. Just scuff and reshoot.
__________________
If no one knows what you're doing, they can't tell you you're doing it wrong HG's Dream Car Build - Shelby Cobra Kit Build your own adjustable track bar 71  Long Fleet C/10 Long Fleet C/10 72  Jimmy 4x4 (Junkyard Jimmy) Jimmy 4x4 (Junkyard Jimmy)HG's Plow Truck '78  K35 Dually K35 DuallyBigass Farm Truck HG's thread of miscellaneous stuff |
|
|
|

|
|
|
#775 |
|
GEARHEAD
Join Date: Aug 2003
Location: MN
Posts: 6,125
|
Re: Junkyard Jimmy Super Low Buck Build Thread
The in-laws are on their way back to Idaho, no more kids activities to watch for a couple days, so I got back to work. This was the last warm day we have for a while so I worked in the driveway this afternoon. I borrowed the stud gun and puller from the body shop and about an hour later I had the door in pretty good shape again.
Studs installed and most of the dents pulled out...  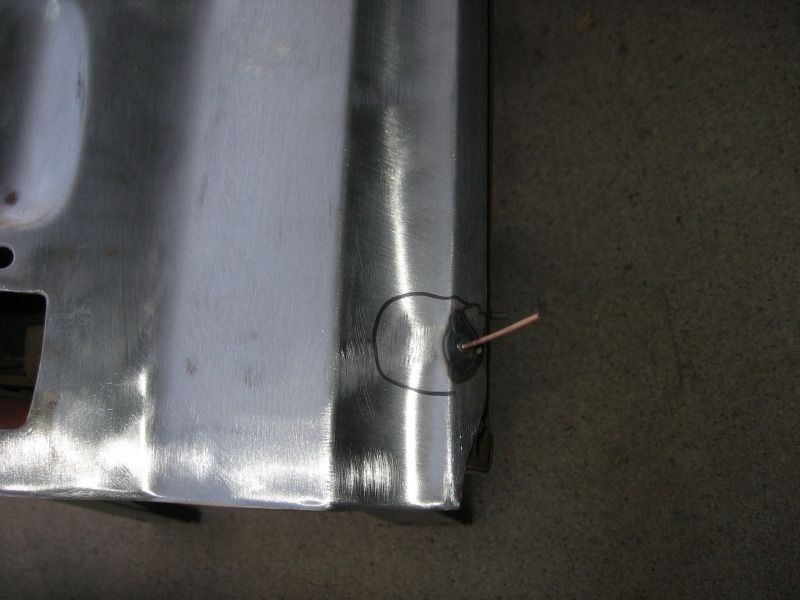  The cardboard is just a reference to show it is fairly straight now. Shouldn't have any filler much over 1/16" which isn't great, but way better than the 1/4" or more that was in this door when I started. 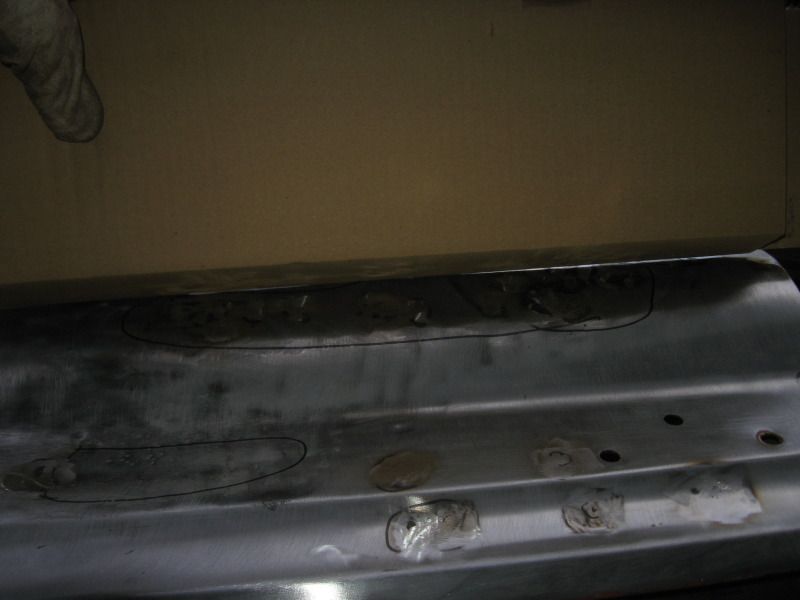  Maybe tomorrow I can get the patches welded in and start some filler work.
__________________
If no one knows what you're doing, they can't tell you you're doing it wrong HG's Dream Car Build - Shelby Cobra Kit Build your own adjustable track bar 71  Long Fleet C/10 Long Fleet C/10 72  Jimmy 4x4 (Junkyard Jimmy) Jimmy 4x4 (Junkyard Jimmy)HG's Plow Truck '78  K35 Dually K35 DuallyBigass Farm Truck HG's thread of miscellaneous stuff |
|
|

|
 |
| Bookmarks |
|
|