
 |
|
|
|
|
#1 |
|
Never Ending Projects
Join Date: Jul 2006
Location: San Diego, CA
Posts: 3,836
|
Re: The Story Of A Cummins Suburban (Lots Of Pics)
Hey mosesburb... it's me, Mike (ExpoMike on ExPo). No idea why I never saw this post before or even figured out you were on this site too.
I am really glad everything worked out in the end and still more than happy to have been part of getting you guys back home safely. It was quite a day but seeing you guys driving out of Rick's place and to your hotel, to continue your trip, was worth it all. Glad you it sounds like you got things cleaned up and no serious damage was done. Stay in touch and we'll definitely get in touch next time we ever get to Phoenix. 
__________________
. 1965 C10 Panel,  Tiki Express http://www.67-72chevytrucks.com/vboa...d.php?t=506580 SOLD Tiki Express http://www.67-72chevytrucks.com/vboa...d.php?t=506580 SOLD1968 Chevy C10, Long, Fleetside, Hot Rod Hauler http://67-72chevytrucks.com/vboard/s...d.php?t=313233 SOLD 1965 Chevy C10, Long, Fleetside, Hot Rod C10 http://67-72chevytrucks.com/vboard/s...d.php?t=415702 SOLD We were given two ears and one mouth for a reason... listen twice as much and speak half as often... |
|
|

|
|
|
#2 | |||
|
I had a V-8
Join Date: May 2003
Location: Phoenix AZ
Posts: 1,116
|
Re: The Story Of A Cummins Suburban (Lots Of Pics)
Quote:
Quote:
Quote:
I'm not sure how much of this novel you read, but it looks like it was the gasket and not the cooler that failed. I filled the cooler up with water awhile back and it is still holding all of it. Not an actual "real" test, but with the amount of coolant we had coming out of the oil pan drain plug, if it was the cooler core, it would have leaked SOMETHING by now and it hasn't. Are you going to OEX??
__________________
1972 K20 Suburban, 5.9L Cummins, Banks Power Pack, NV4500HD, NP205, H.A.D., D60/14FF ARB Link To Build: HERE. |
|||
|
|

|
|
|
#3 |
|
Never Ending Projects
Join Date: Jul 2006
Location: San Diego, CA
Posts: 3,836
|
Re: The Story Of A Cummins Suburban (Lots Of Pics)
Yeah I was reading the last couple pages. Weird as it didn't look like the gasket was bad but who knows.
We were planning on OEX but my '64 wagon ate a piston and having to deal with the cost of getting this fixed, blew any budget for that trip. We ended up cancelling our reservation. Hopefully next year!
__________________
. 1965 C10 Panel,  Tiki Express http://www.67-72chevytrucks.com/vboa...d.php?t=506580 SOLD Tiki Express http://www.67-72chevytrucks.com/vboa...d.php?t=506580 SOLD1968 Chevy C10, Long, Fleetside, Hot Rod Hauler http://67-72chevytrucks.com/vboard/s...d.php?t=313233 SOLD 1965 Chevy C10, Long, Fleetside, Hot Rod C10 http://67-72chevytrucks.com/vboard/s...d.php?t=415702 SOLD We were given two ears and one mouth for a reason... listen twice as much and speak half as often... |
|
|

|
|
|
#4 |
|
I had a V-8
Join Date: May 2003
Location: Phoenix AZ
Posts: 1,116
|
Re: The Story Of A Cummins Suburban (Lots Of Pics)
One of the things I learned last year on our trip was that the spare tire and water can/s were taking up way too much valuable interior space. I was looking at some swingout tire carrier designs and while many had some positive attributes, none seemed to be exactly what I wanted. Both Larry and Bill use double swingouts which have their benefits (light weight, easy to manufacture, loads per side are less than one single swingout), but having to unlatch two swingouts every time I needed to get in the back was not desirable. I had discussed their designs at some length with them and I think it was Bill who had run a single at one time and his biggest complaints were that the thing was heavy, hard to keep open and too long. I figured with a good pivot the heavy and keeping it open could be dealt with and I figured the length would not be such a problem. I started researching how I could do it. I contacted a couple well know pivot suppliers with my idea and they said their pivot spindles did not have the capacity I needed. They spoke from experience. They had failures with single swingouts with similar loads to what I was wanting to put on them. Hmm what to do?? I got an idea. The idea was nothing without a bumper to put it on so I started making a bumper.
I started with some 1/2" x 4" cold rolled flat stock to make the brackets. I flame cut it to the shape I needed with all the intricate notches and angles pre-figured into it. I then took a piece of 1/2" x 4" flat stock, cut it lengthwise so it was 2" wide and welded that to the main brackets. It extends forward to reach the first bolt hole in the frame. This would get me close to the 1.125" that a recovery shackle normally uses. 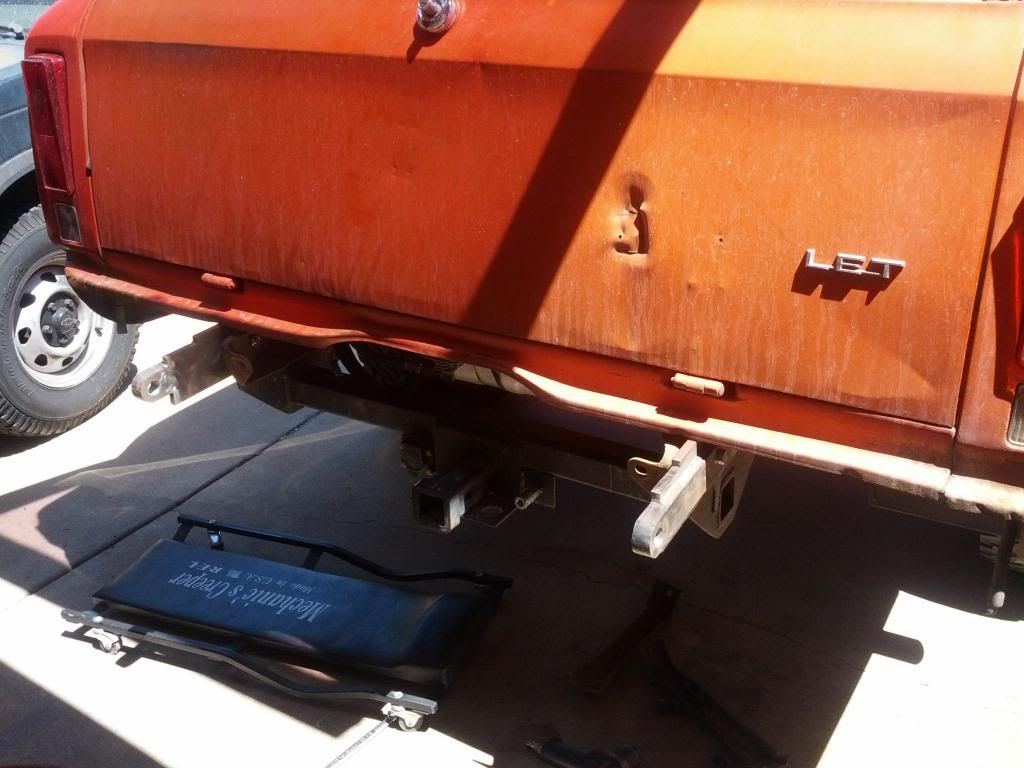 Then I took a piece of 2.5 x 2.5 angle and cut the vertical leg down to 2.25". I put a piece of 1/4" x 3" cold rolled on top of that and welded the length of it to the top of the angle, then make a mount for the pivot plate: (it's upside down in the pic) 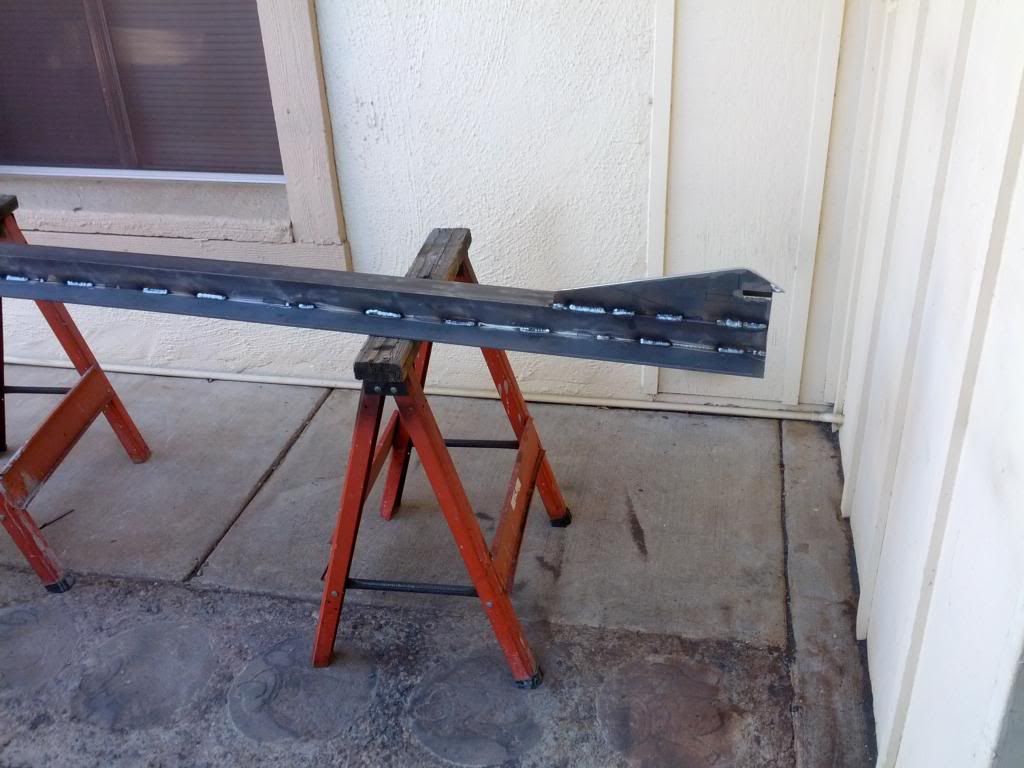 Now, for the pivot, I decided to use a splined hub assembly off of a 10 bolt front axle. I took it to Russ to have him machine off everything that it had that wasn't a swingout pivot part. He removed the mounting flange where the spindle mounts to the knuckle and the flange from the hub that mounts the rotor and ultimately the wheel leaving me a splined "cylinder". He also machined a hole in a piece of 1/2" plate to fit the OD of the spindle into. That plate fits into the bracket on the bottom (top in the pic) of the bumper: (The plate is intentionally large so I can cut it down as I figure this out) 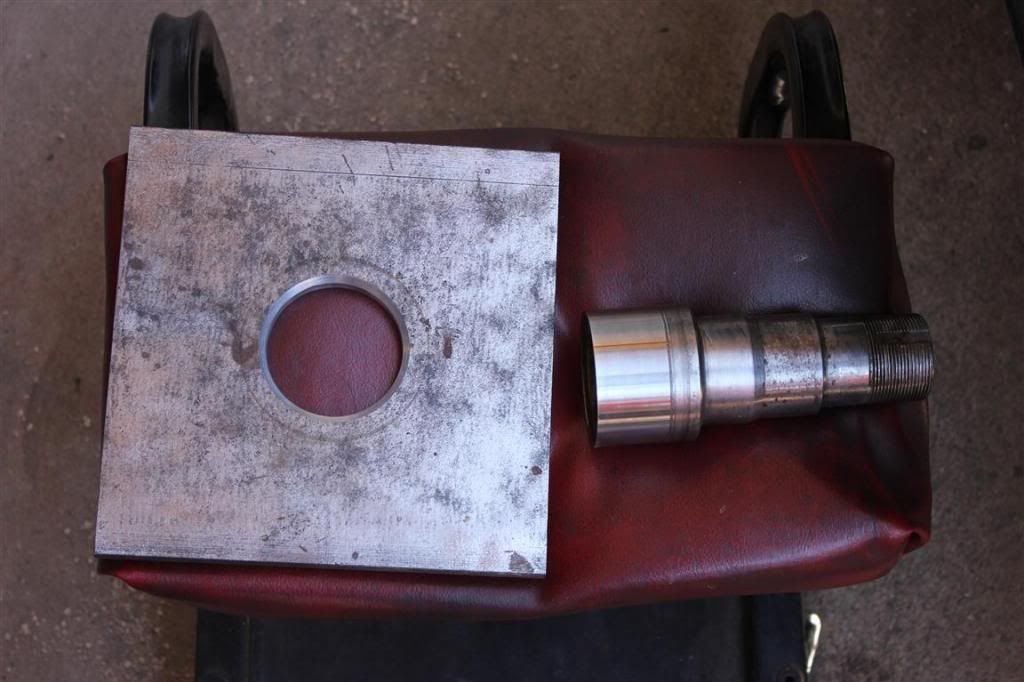 Plate tacked in with splined hub on it. Notice the second mounting bracket for the plate. It is the same as the first one, but taller to reach the upper plate of the bumper: 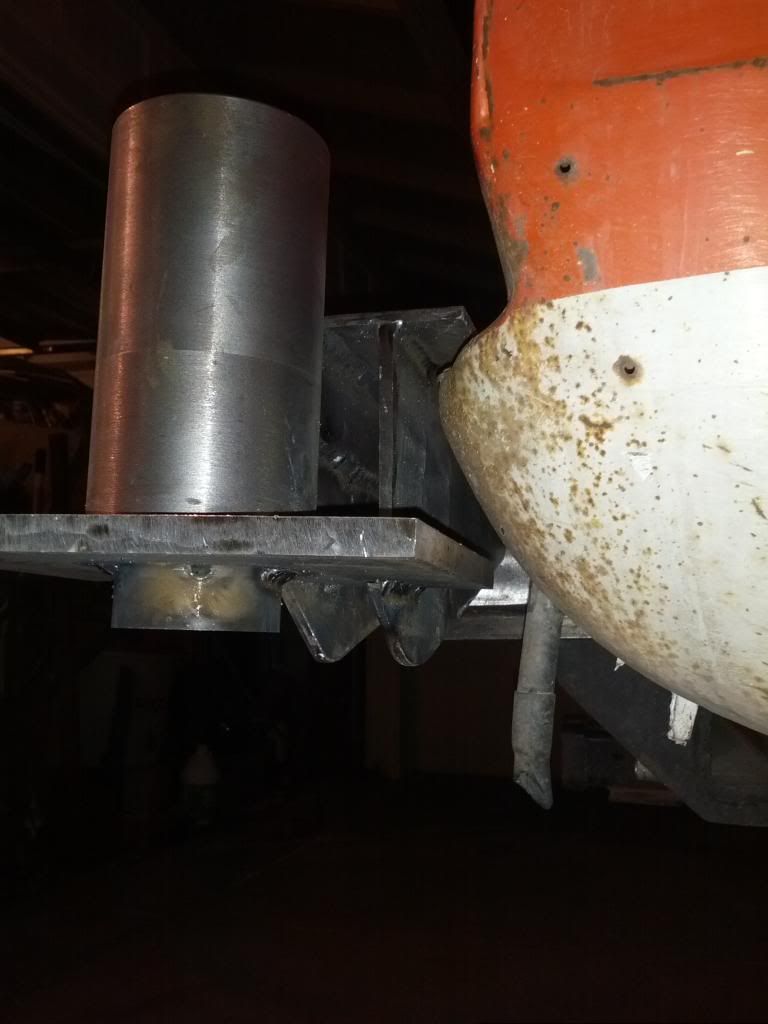 Swingout tube fitted to splined hub ready for welding: 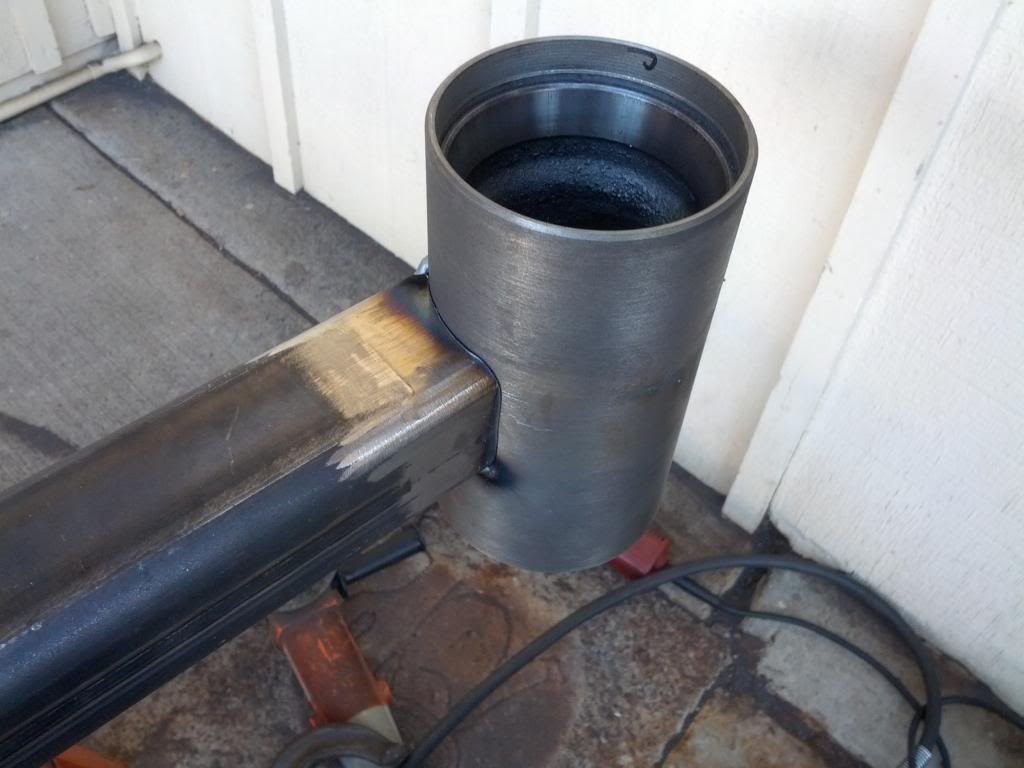 The splined hub acted like a dirty cast iron when it was machined so I got some Eutectic 680 rod to use as filler and TIG welded it to the swingout tube after preheating the hub and peening it with a needle scaler as I went. Necessary?? Not sure, but I know I don't want a failure of this connection. In along here somewhere I decided on a latch to secure the swingout tube to the fixed bumper. That is a standard cooler it is sitting on: 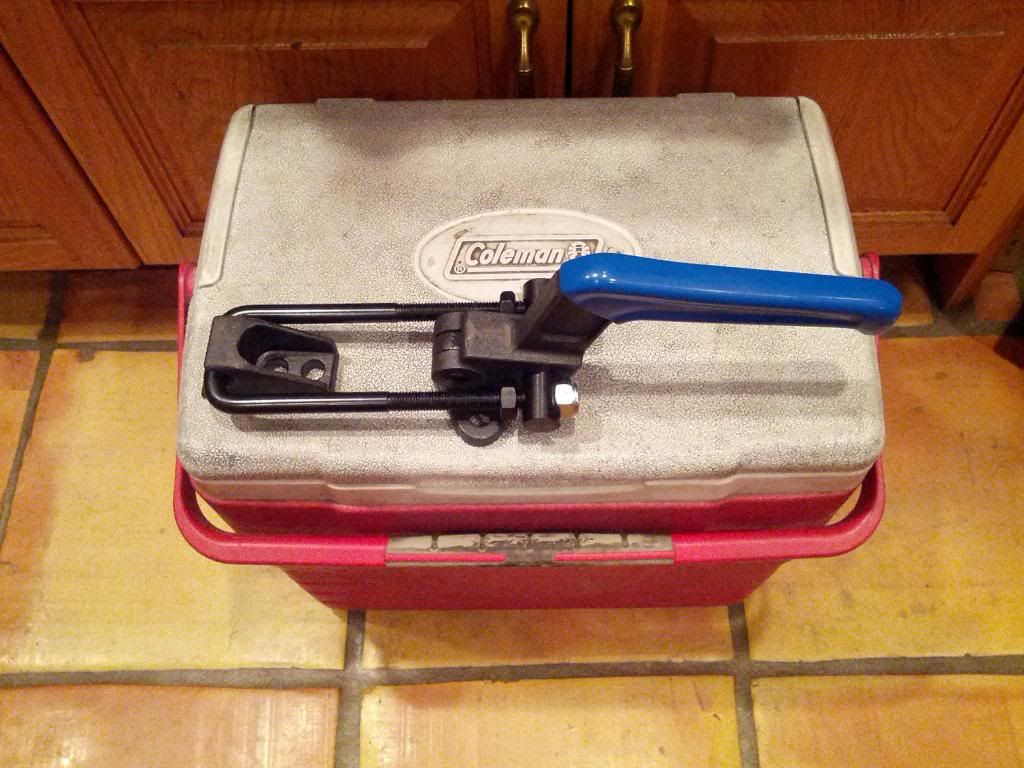 Figuring out the rear cover plate: 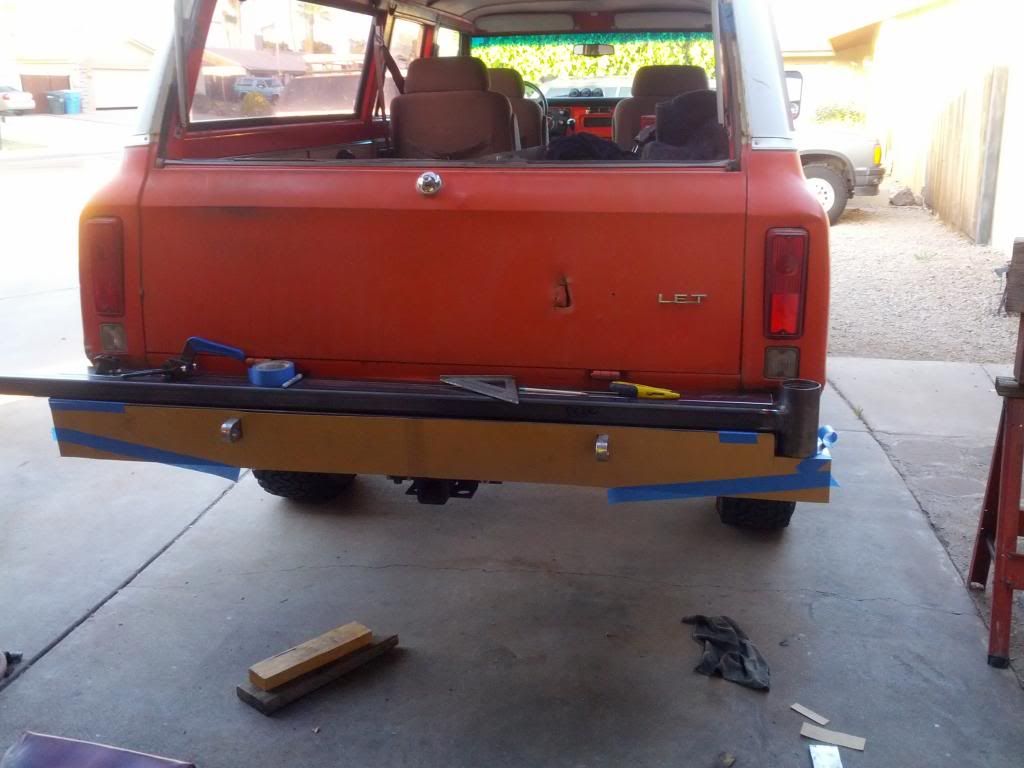 I used 1/8" cold rolled flat stock to make the filler plate out of and when I finished I added a piece of 1/8 x 1" flat stock welded at a 45* angle to enhance strength and aesthetics: 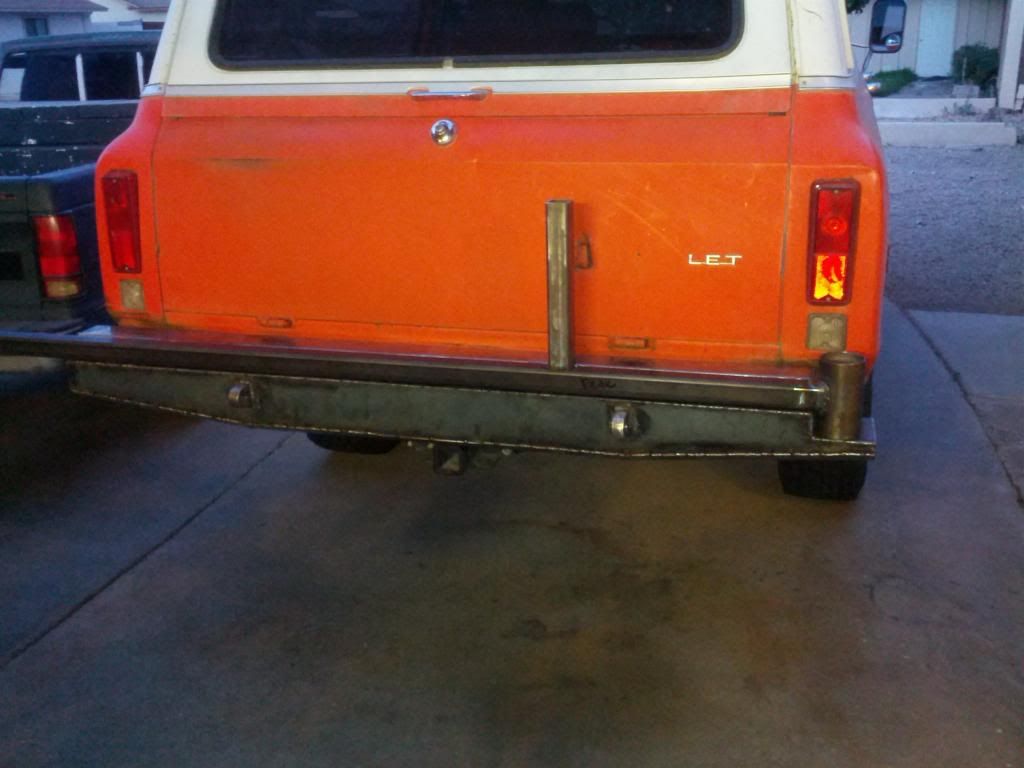 I used a standard receiver tube to mount the wheel flange on. The wheel flange is 3/8" plate. I cut the outside with the plasma cutter. I need more practice on the heavy stuff as I had a real challenge with it. 1/4" and less--no problem, but with the heavier stuff I need to figure out the settings a little better. That being the case I flame cut the square hole to fit over the receiver tube so that I would have no issues with that. 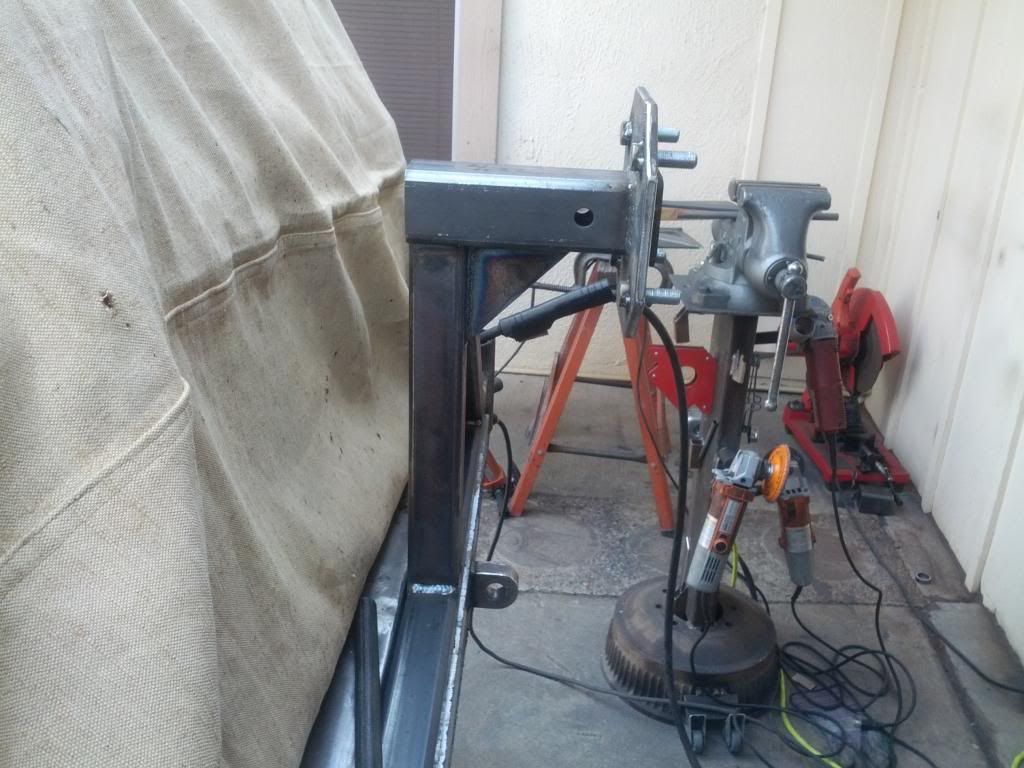 About this time I figured out that Bill and Larry had valid points about the length of a single swingout. It doesn't seem like much until you swing it out and it hits the welder in the garage. Something needs to be done here. I don't want two swingouts. Hmm. Upper hoop installed: 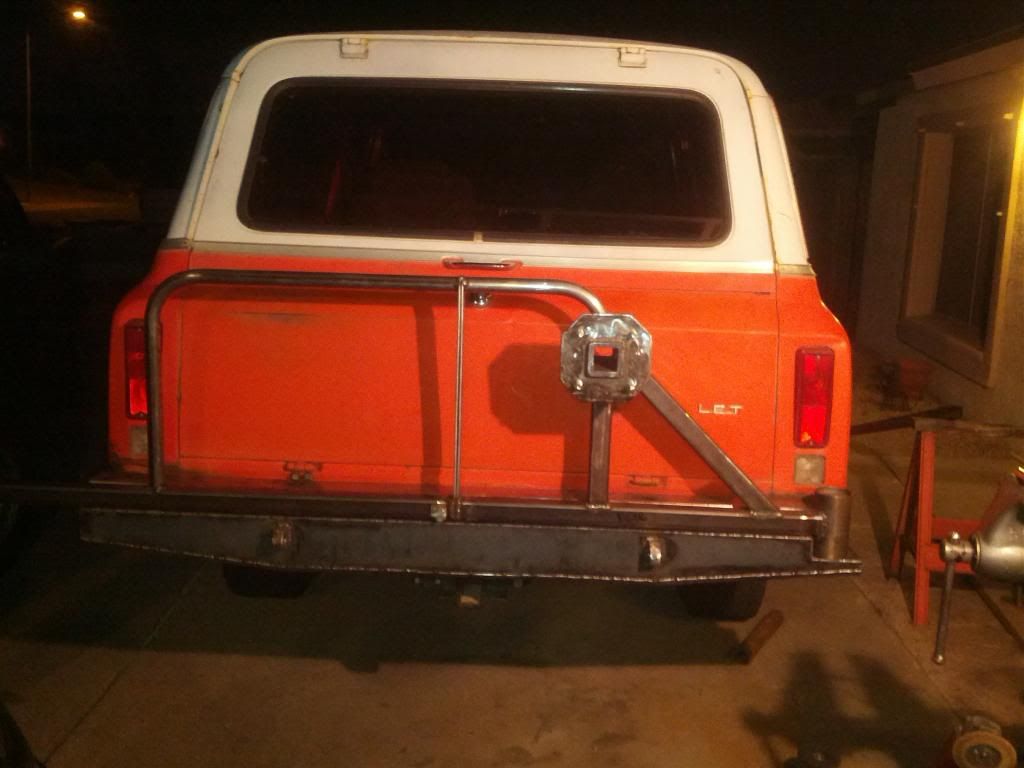 So, after quite a bit of butt scratching and endless staring at the situation I came up with a plan. I got another toggle clamp like the previous one pictured (but much smaller), made a coule hinges out of some DOM tubing and 5/8" bolt shanks for hinge pins, added it all together and came up with this: Swing it out and realize it is going to hit whatever is behind it: 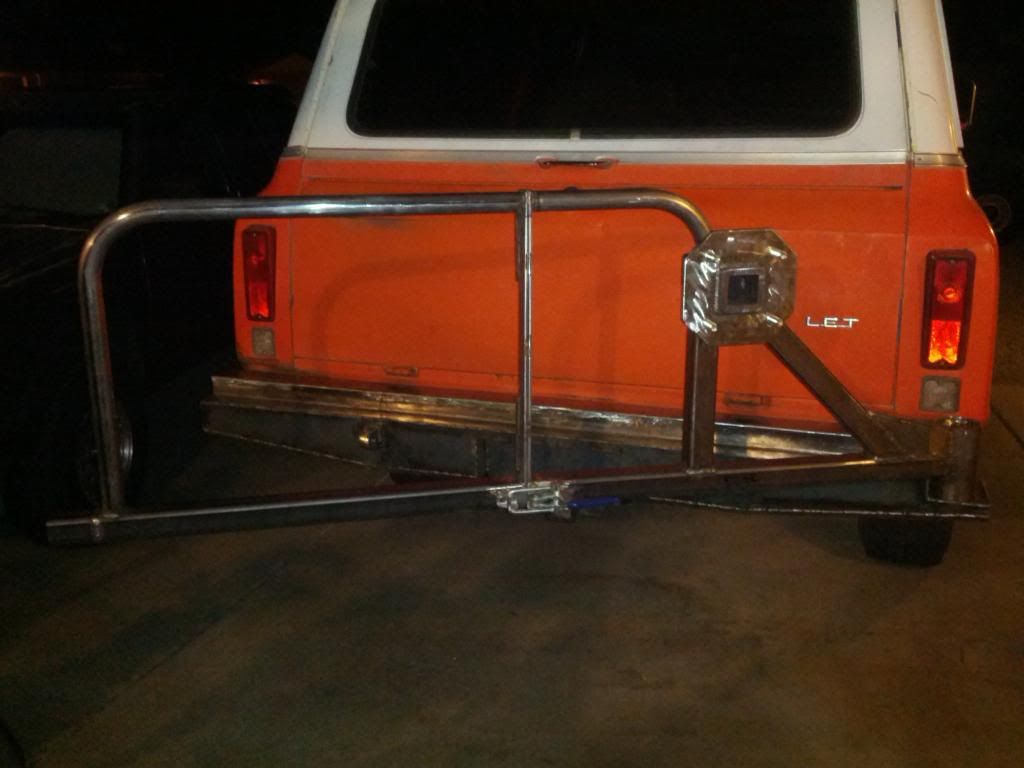 Throw the latch on the main tube and fold the tube inward: 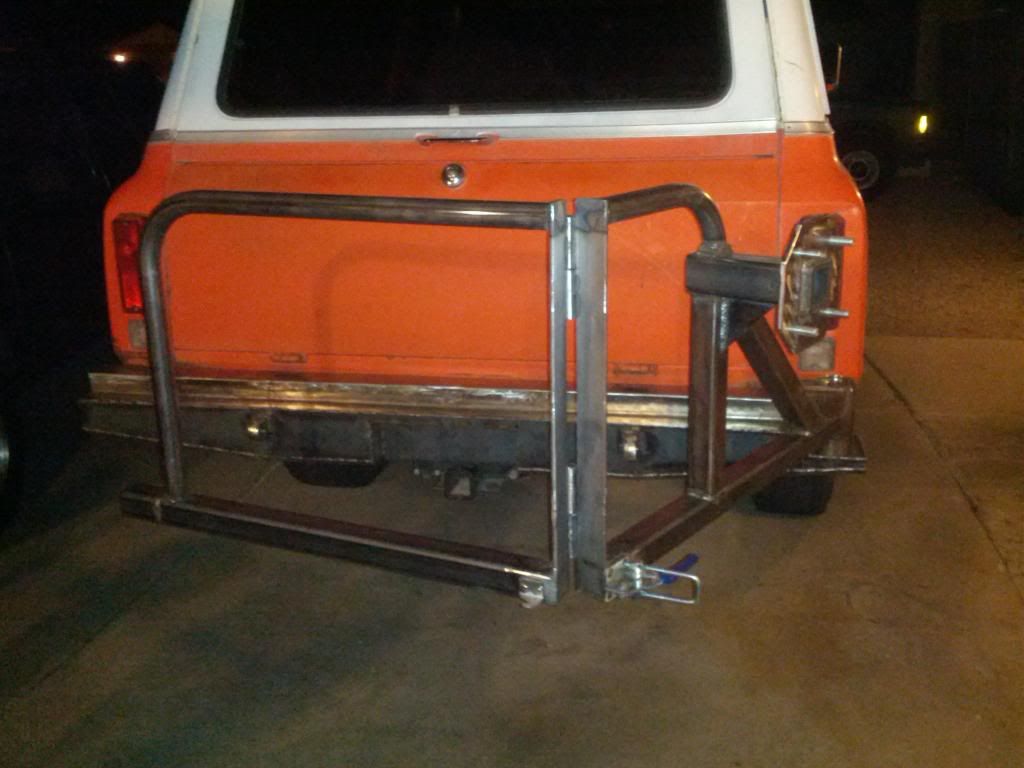 Keep going until it folds up into a nice wad over on the side of the vehicle--problem solved!! The simple functionality of a single swingout when clearance is not an issue, but the compactness of dual swingouts when space it tight: 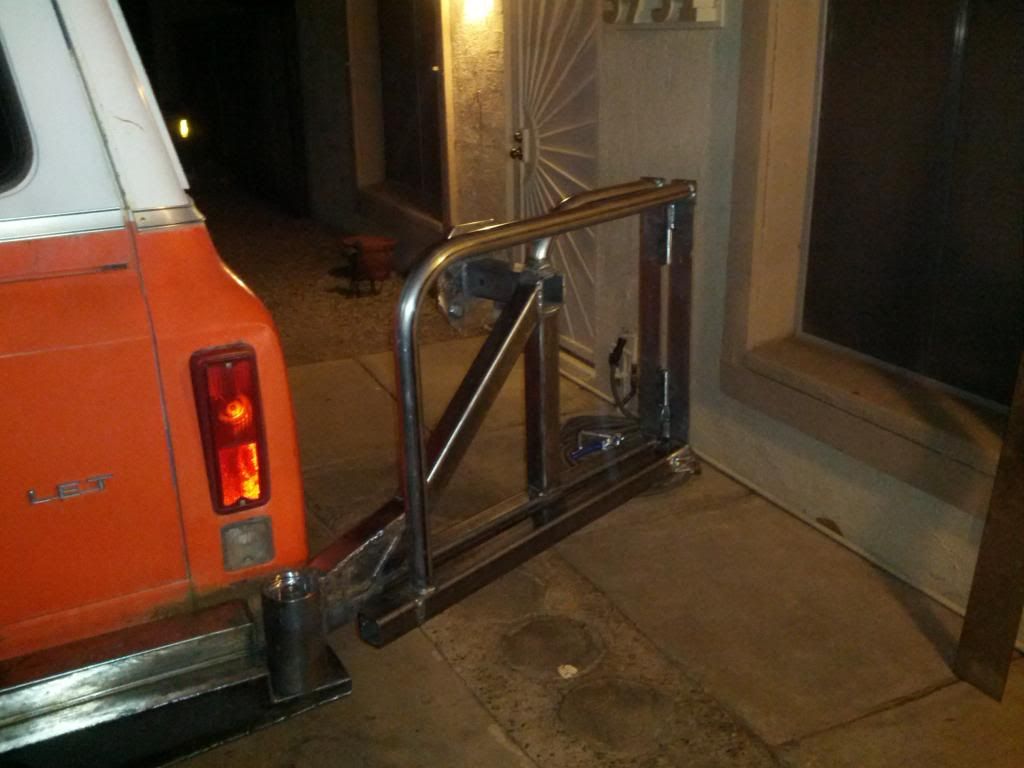 I wanted to reuse the original license plate mounting assembly from the original bumper, but of course that wouldn't fit....so, I had to make my own: 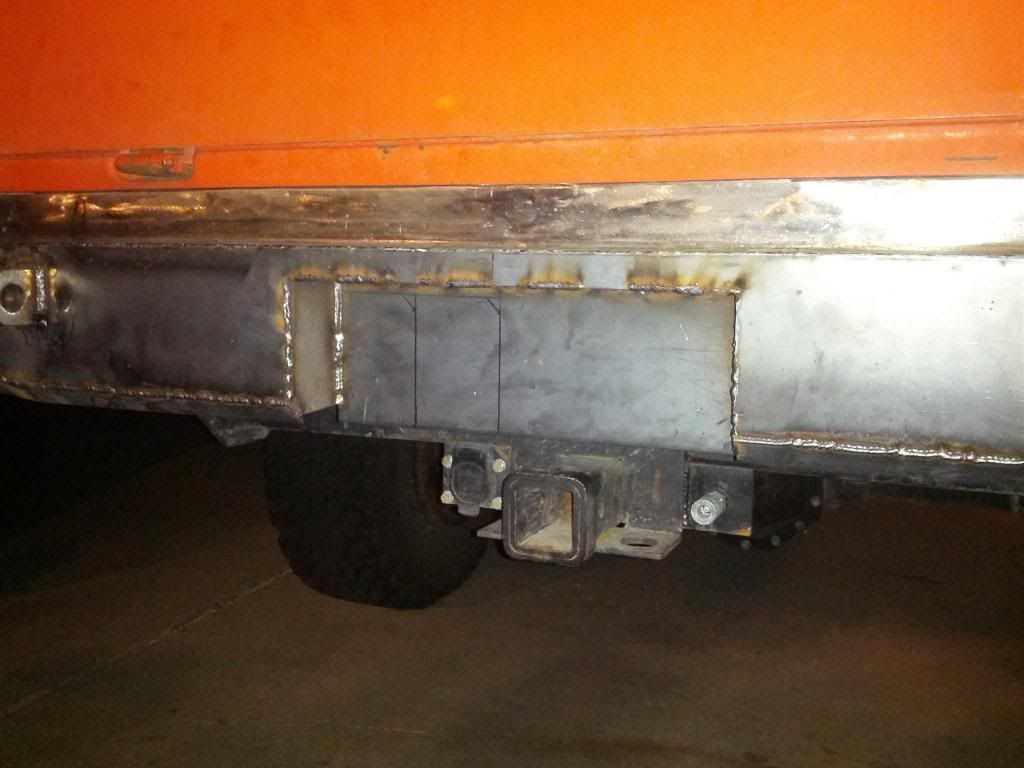 Main latch mounted. It has reinforcements behind the plate on the bottom and inside the tube on the top. 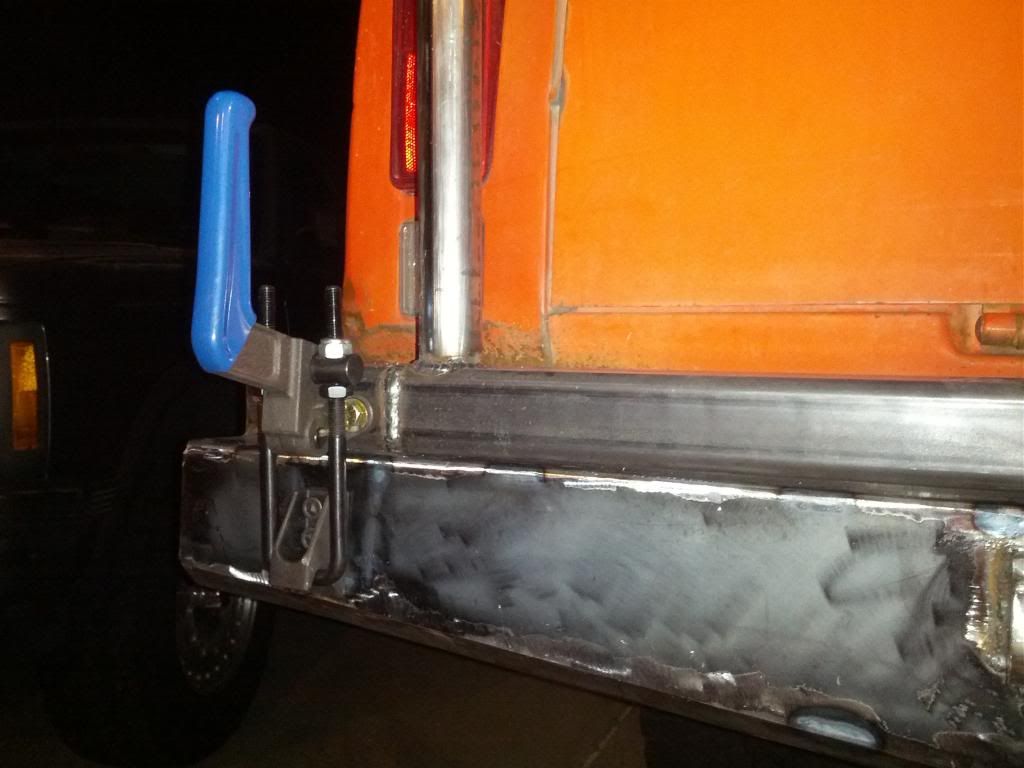 So now I have a tire mounted. What to do about the water cans and propane cylinder. I was talking with my friend Lance and he had a Sportsmobile van that had a box mounted on one of the swingouts. He loved it and it sounded like a great idea so I started searching one out. I found that they are tremendously expensive (for aluminum). Also, I was having a real difficult time finding one that was close to the dimensions that I needed. They were either a bit too small or way to big. I found one that was kind of close, but was too deep. I figured I could cut it down and weld it back together, but then I took a step back and thought about it and I was going to spend $500.00 on a box and cut it up?? Steel is cheaper, but twice the weight--not good. I started looking at the weight per square foot of material and I found that expanded steel is approximately the same weight as aluminum sheet metal. Obviously it is not as opaque, but I don't really care at this point (I'm getting close to the end of my available timeframe). Expanded metal it is. I fabbed up a framework using 2x2 x 1/8 angle for the bottom (sides taper to 1" at the back) and 1 x 1 x 1/8" angle for the rest of it, then cut the expanded metal to fit in the openings: 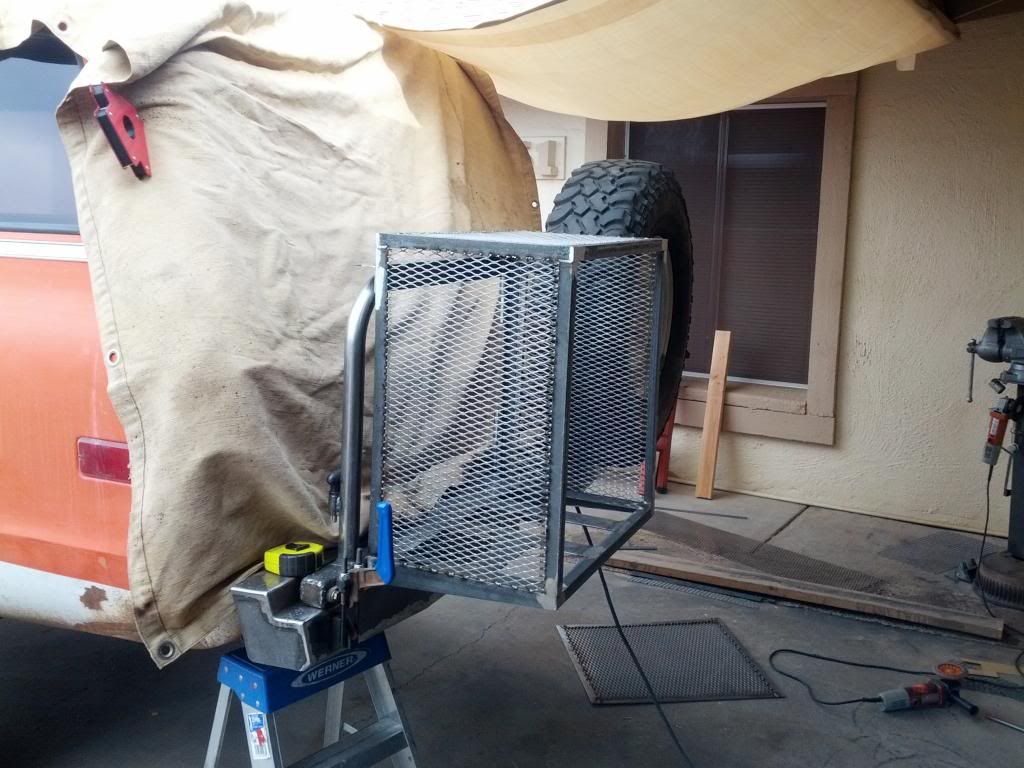 I made a jig for my plasma cutter so I could cut e-track holes at strategic points in the structure so I could use common e-track components to secure the contents easily. 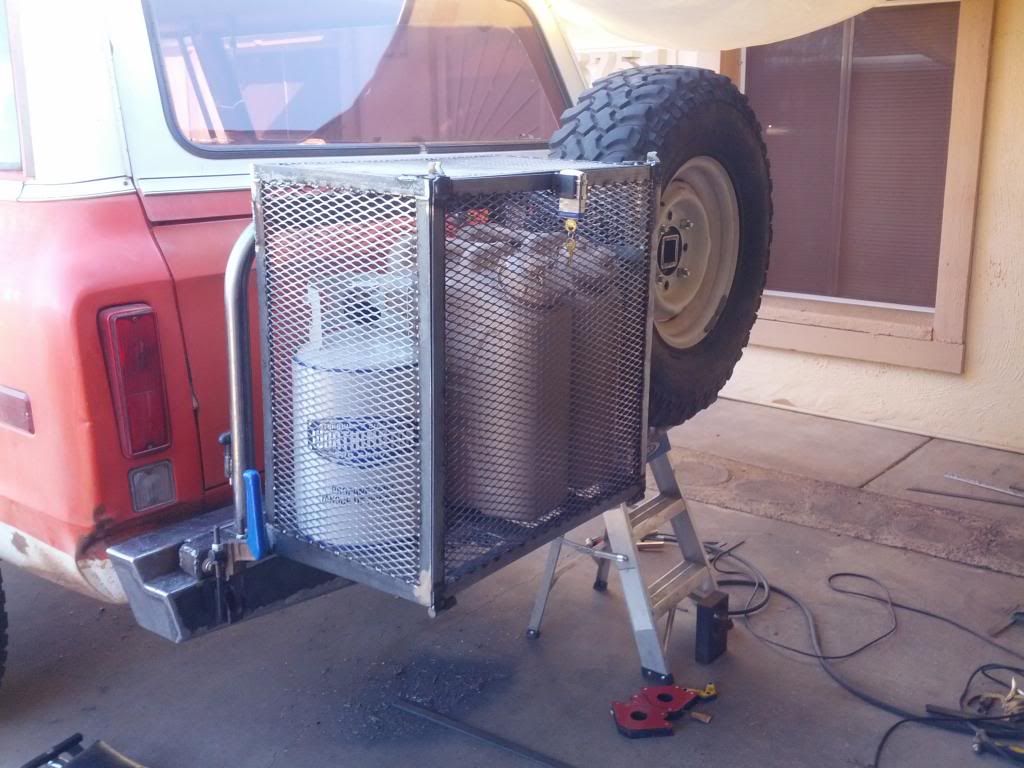 I'm not enamored with the aesthetics of the box, but it is secure and functional. I can deal with the aesthetics later. I tore it all down and had it powdercoated. I usually paint everything, but this is going to be in the line of fire for rocks and trail debris kicked up off the tires so I figured I'd give it a fighting chance of survival with some powdercoat. Reassembly. Got some work out of the boy: (Yes, he is installing a Rotopax mount) 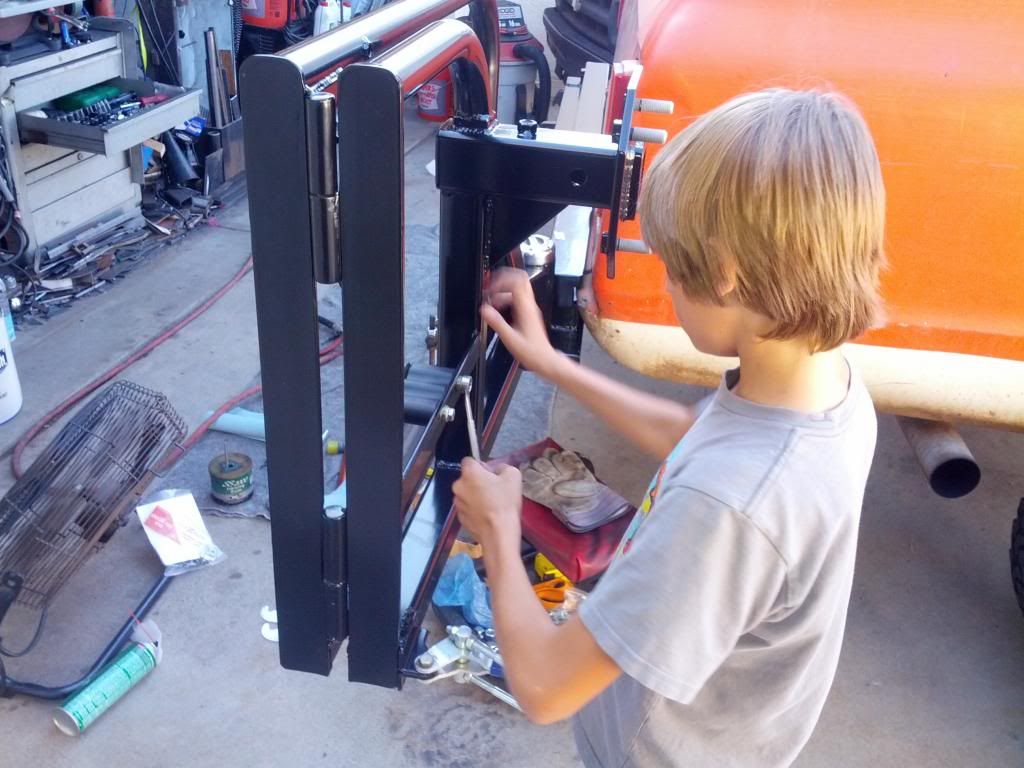 Here is the finished product: (the gas can is for when we take a Honda Generator with us. It's rare, but I don't want to add it later....) 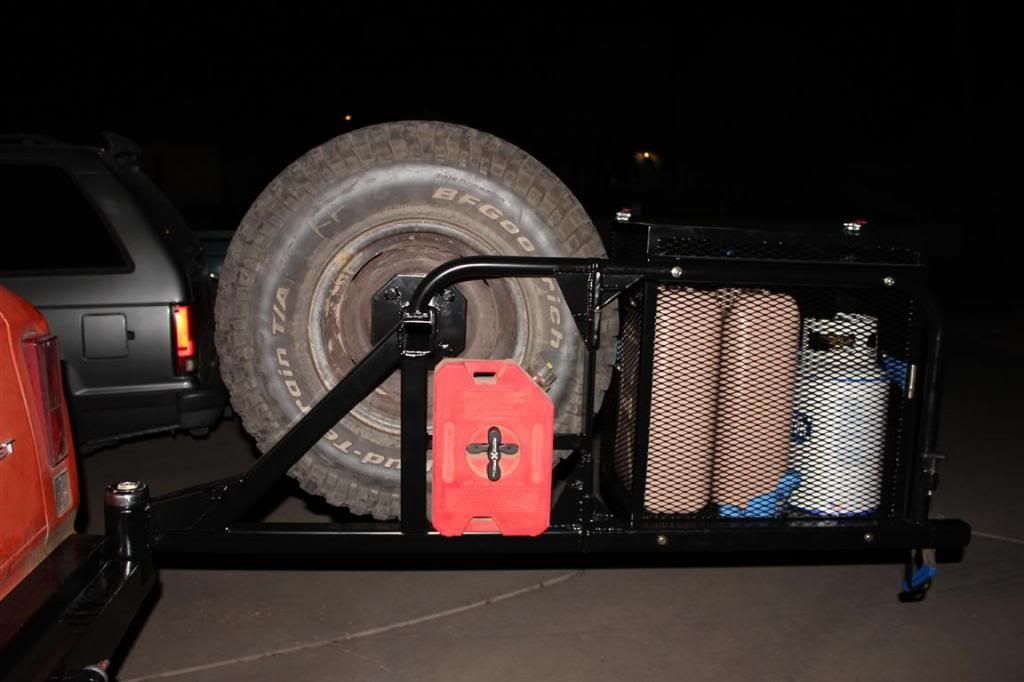 So there it is. One bumper that I would be completely and thoroughly embarrassed to admit to even 10% of the amount of time I have in fabricating it. Does it work?? Absolutely beautifully. I have not found anything I would have done differently--yet?? I am planning on doing something about the box and I have some ideas, but I have some other things that are taking precedence right now. We'll see what I come up with.
__________________
1972 K20 Suburban, 5.9L Cummins, Banks Power Pack, NV4500HD, NP205, H.A.D., D60/14FF ARB Link To Build: HERE. |
|
|

|
|
|
#5 |
|
Registered User
Join Date: Mar 2015
Location: romulus, mi
Posts: 4
|
Re: The Story Of A Cummins Suburban (Lots Of Pics)
Awesome build. I've been trying to catch up on all of it. I'm currently building a 67 k20. I'm having a problem finding the a.c. bracket that you used. Would you happen to have a part number or application to help my search? Thanks in advance
|
|
|

|
|
|
#6 |
|
Registered User
Join Date: Dec 2010
Location: Port St Lucie,FL
Posts: 203
|
Re: The Story Of A Cummins Suburban (Lots Of Pics)
That is slick !
 You need to see if you can patent that hinge idea for a production model. You need to see if you can patent that hinge idea for a production model.When are they going on sale, as everyone will want one (hint, hint).  In all honesty. really nice workmanship as usual.  
|
|
|

|
|
|
#7 |
|
Senior Member
Join Date: Apr 2004
Location: sw colorado
Posts: 2,720
|
Re: The Story Of A Cummins Suburban (Lots Of Pics)
That took what, 2-3 days?
I got to see it in person and it is a really nice piece! Ryan |
|
|

|
|
|
#8 |
|
Never Ending Projects
Join Date: Jul 2006
Location: San Diego, CA
Posts: 3,836
|
Re: The Story Of A Cummins Suburban (Lots Of Pics)
Nicely done. One of the better solutions to the age old problem of 1 long swing out or 2 short ones.
__________________
. 1965 C10 Panel,  Tiki Express http://www.67-72chevytrucks.com/vboa...d.php?t=506580 SOLD Tiki Express http://www.67-72chevytrucks.com/vboa...d.php?t=506580 SOLD1968 Chevy C10, Long, Fleetside, Hot Rod Hauler http://67-72chevytrucks.com/vboard/s...d.php?t=313233 SOLD 1965 Chevy C10, Long, Fleetside, Hot Rod C10 http://67-72chevytrucks.com/vboard/s...d.php?t=415702 SOLD We were given two ears and one mouth for a reason... listen twice as much and speak half as often... |
|
|

|
|
|
#9 | |
|
I had a V-8
Join Date: May 2003
Location: Phoenix AZ
Posts: 1,116
|
Re: The Story Of A Cummins Suburban (Lots Of Pics)
Quote:
No, four. <flipoffsmiley> So I get a text from this clown one evening. He asks how the bumper is coming along?? I said slow and painful--as usual. He says he is thinking about starting to plan out a bumper. The next day he shoots me a pic of his bumper tacked together and asks "what's my time??" I very politely called him a forking showoff and went back to slaving away on this. Wow, thanks!! You're still an ass.... Thanks Mike. Like I said, I wasn't planning on doing it this way, but I'm real glad I did. I'm also real glad I hung it off the curb side as opposed to the road side. Not sure if I planned that initially, but it sure came in handy a few times....
__________________
1972 K20 Suburban, 5.9L Cummins, Banks Power Pack, NV4500HD, NP205, H.A.D., D60/14FF ARB Link To Build: HERE. |
|
|
|

|
|
|
#10 | |
|
Registered User
Join Date: Nov 2008
Location: mitchellville, ia
Posts: 282
|
Re: The Story Of A Cummins Suburban (Lots Of Pics)
Quote:

__________________
1996 Dodge 2500 Ext Cab Long Bed P24V Cummins Turbo Diesel 5 speed 4x4
"STOCK" ASSEMBLY THREAD |
|
|
|

|
|
|
#11 |
|
GEARHEAD
Join Date: Aug 2003
Location: MN
Posts: 6,122
|
Re: The Story Of A Cummins Suburban (Lots Of Pics)
Nice. Completely over-built as usual, but well done, also as usual. I was wondering about what to use for a pivot. Might be stealing that idea. Where did you get the latch from?
__________________
If no one knows what you're doing, they can't tell you you're doing it wrong HG's Dream Car Build - Shelby Cobra Kit Build your own adjustable track bar 71  Long Fleet C/10 Long Fleet C/10 72  Jimmy 4x4 (Junkyard Jimmy) Jimmy 4x4 (Junkyard Jimmy)HG's Plow Truck '78  K35 Dually K35 DuallyBigass Farm Truck HG's thread of miscellaneous stuff |
|
|

|
|
|
#12 | ||
|
I had a V-8
Join Date: May 2003
Location: Phoenix AZ
Posts: 1,116
|
Re: The Story Of A Cummins Suburban (Lots Of Pics)
Quote:
Quote:
Ok, I just checked and it came from a place called Jergens.
__________________
1972 K20 Suburban, 5.9L Cummins, Banks Power Pack, NV4500HD, NP205, H.A.D., D60/14FF ARB Link To Build: HERE. |
||
|
|

|
|
|
#13 |
|
GEARHEAD
Join Date: Aug 2003
Location: MN
Posts: 6,122
|
Re: The Story Of A Cummins Suburban (Lots Of Pics)
__________________
If no one knows what you're doing, they can't tell you you're doing it wrong HG's Dream Car Build - Shelby Cobra Kit Build your own adjustable track bar 71  Long Fleet C/10 Long Fleet C/10 72  Jimmy 4x4 (Junkyard Jimmy) Jimmy 4x4 (Junkyard Jimmy)HG's Plow Truck '78  K35 Dually K35 DuallyBigass Farm Truck HG's thread of miscellaneous stuff |
|
|

|
|
|
#14 |
|
GEARHEAD
Join Date: Aug 2003
Location: MN
Posts: 6,122
|
Re: The Story Of A Cummins Suburban (Lots Of Pics)
Ooooh, you meant this jergens...
http://www.jergensinc.com/site/sfg_toggle_clamps
__________________
If no one knows what you're doing, they can't tell you you're doing it wrong HG's Dream Car Build - Shelby Cobra Kit Build your own adjustable track bar 71  Long Fleet C/10 Long Fleet C/10 72  Jimmy 4x4 (Junkyard Jimmy) Jimmy 4x4 (Junkyard Jimmy)HG's Plow Truck '78  K35 Dually K35 DuallyBigass Farm Truck HG's thread of miscellaneous stuff |
|
|

|
|
|
#15 | ||
|
Senior Member
Join Date: Apr 2004
Location: sw colorado
Posts: 2,720
|
Re: The Story Of A Cummins Suburban (Lots Of Pics)
Quote:
Quote:
Thanks guys.... i think 
|
||
|
|

|
|
|
#16 |
|
MOVE OVER
Join Date: Jun 2002
Location: Warrensburg, MO
Posts: 5,470
|
Re: The Story Of A Cummins Suburban (Lots Of Pics)
that looks awesome!!! you should think about building these for resell..
__________________
No matter where you are..... There you are... Buckaroo Banzi |
|
|

|
|
|
#17 |
|
6>8 Plugless........
 Join Date: Sep 2007
Location: Prairie City, Ia
Posts: 17,140
|
Re: The Story Of A Cummins Suburban (Lots Of Pics)
Your bumper and swing out turned out awesome!
__________________
Ryan 1972 Chevy Longhorn K30 Cheyenne Super, 359 Inline 6 cylinder, Auto Trans, Tilt, Diesel Tach/Vach, Buckets, Rare Rear 4-link and air ride option Build Thread 1972 GMC Sierra Grande Longhorn 4x4 1972 Chevy Cheyenne Super K20 Long Step side tilt, tach, tow hooks, AC, 350 4 speed 1972 C10 Suburban Custom Deluxe 1969 Chevy milk truck 1971 Camaro RS 5.3 BTR STG3 Cam Super T10 1940 Ford 354 Hemi 46RH Ford 9" on air ride huge project Tired of spark plugs? Check this out. |
|
|

|
|
|
#18 |
|
Ridin' Dirty
Join Date: Oct 2009
Location: Ardrossan Alberta Canada
Posts: 2,193
|
Re: The Story Of A Cummins Suburban (Lots Of Pics)
Favorite truck on the whole forum. Just keeps getting more badazz every time I creep on this thread!
__________________
1978 C3500 Crewcab (Project) 1979 C2500 Crewcab (Driver/project) 1988 R2500 Crewcab (Driver) 1988 V3500 Crewcab 1988 R2500 Crewcab (Mint, Ex Fire Dept) 1968 Chev Suburban (4x4 conversion) LINK 1970 Chev C20 Suburban (driver/cruiser)LINK 2005 Impala (Incognito vehicle) 2004 Yukon XL Denali (Kid hauler) 1947 Case tractor Facebook Page(1000's of pictures of GM cars and trucks organized into albums) YouTube Channel |
|
|

|
|
|
#19 | |
|
I had a V-8
Join Date: May 2003
Location: Phoenix AZ
Posts: 1,116
|
Re: The Story Of A Cummins Suburban (Lots Of Pics)
Quote:
Thanks Ryan!! I also saw that you nominated the Suburban for Truck Of The Month. If anyone wants to vote for it, the link is HERE. Thanks man!! That is a pretty high honor to bestow upon the truck as there are some really sweet rigs on this site!!
__________________
1972 K20 Suburban, 5.9L Cummins, Banks Power Pack, NV4500HD, NP205, H.A.D., D60/14FF ARB Link To Build: HERE. |
|
|
|

|
|
|
#20 |
|
Registered User
Join Date: Apr 2012
Location: Grants Pass, OR
Posts: 543
|
Re: The Story Of A Cummins Suburban (Lots Of Pics)
Love the bumper. I've been trying to figure out what I was going to do for my spare and you have given me lots of ideas. Mine will be a bit different since you have a tailgate and I have barn doors, but if you dont mind, I think I may steal a few ideas from you.
Have you thought of drawing up plans and selling/trading those? Until I found this board and saw your burb, I thought I was being original. I've got a '60 C30 panel that I'm putting a 5.9 Cummins into. Oh well, I guess I'll have to settle for great minds think alike, huh.  BTW, Question about the bumper, it opens 180 right? So when folded you can still get the gate down. or does it stop at or around 90? |
|
|

|
|
|
#21 | |
|
Registered User
Join Date: Apr 2012
Location: Grants Pass, OR
Posts: 543
|
Re: The Story Of A Cummins Suburban (Lots Of Pics)
Quote:
But another question. Do you have problems with it wanting to swing into the car next to you when open? Or does it not swing that freely? Or do you have some kind of stop built in to keep it in place? Sorry for all the questions. I'm no where near ready to build one for myself but when I get the ideas flowing I get excited. I've got so many plans it'll take years to get to them all. LOL |
|
|
|

|
|
|
#22 |
|
Registered User
Join Date: Dec 2010
Location: Port St Lucie,FL
Posts: 203
|
Re: The Story Of A Cummins Suburban (Lots Of Pics)
How about something like this to hold it open?
http://www.expeditionportal.com/foru...ion-quot/page7 Lower pic in #63 |
|
|

|
|
|
#23 | |
|
I had a V-8
Join Date: May 2003
Location: Phoenix AZ
Posts: 1,116
|
Re: The Story Of A Cummins Suburban (Lots Of Pics)
Quote:
__________________
1972 K20 Suburban, 5.9L Cummins, Banks Power Pack, NV4500HD, NP205, H.A.D., D60/14FF ARB Link To Build: HERE. |
|
|
|

|
|
|
#24 |
|
I had a V-8
Join Date: May 2003
Location: Phoenix AZ
Posts: 1,116
|
Re: The Story Of A Cummins Suburban (Lots Of Pics)
So after I finally get the bumper done, I have to turn it around and get after a couple things that needed attention in the front. When we went to Flagstaff for Overland Expo this year I was having a challenge keeping the truck where I wanted it to be in a lane. I'm not sure when I noticed it starting, but it had been getting worse lately. This trip was a real challenge. I had to DRIVE the truck the whole way up and back. It knew when I was looking out the side glass. If I did that, I would be greeted with the truck somewhere completely different from where I last looked at it. This is no good.
When we got home I was doing some looking around under the truck. The first thing I noticed is when the wheel is rotated radially through its freeplay, the pitman shaft would not move radially. It would move back and forth--a lot. Hmm, this can't be good. I also noticed the forward spring hanger on the left frame rail had lost a rivet head. That's not good either. the rivet head was new and I know exactly when that happened. Back to work I go here. So I pulled the steering box out and pulled the sector shaft assembly out of it. Everything looked ok until I noticed the steel bushing in the four-bolt aluminum cap hanging out about 1/8". Hmm, never seen that happen before?? How in the world?? Well, then I turned it around and quickly answered all of my own questions: 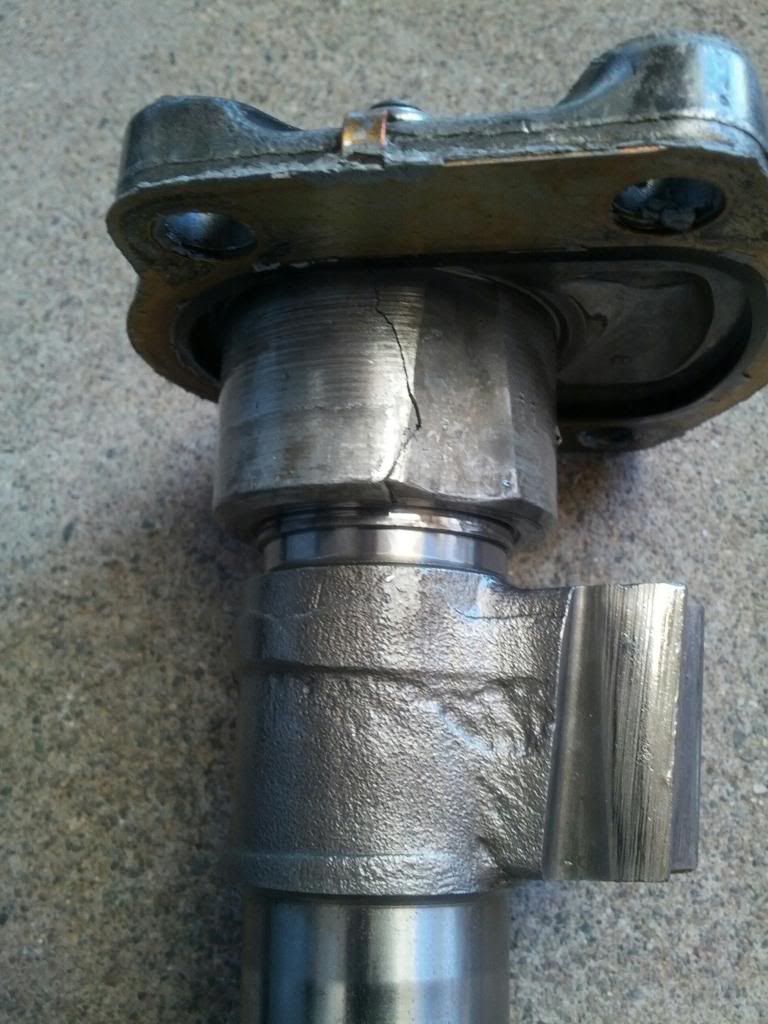 Well, that explains a lot. It also puts me in a real bind. I'm still on a tight timeframe here--real tight by this time. I always build my own steering boxes, but I'm not too sure I'm going to have time to do this. If I find a great virgin box, build it, and everything is great, then I'm golden, but if something happens, or the box has internal issues, I have no time to hunt parts or deal with odd problems. So, buy a box from the local parts house, buy a box from a national builder, buy a custom box?? I spent many years in a previous lifetime selling parts at a mom and pop parts house and I have not forgotten selling a guy two or three to get a decent one--not necessarily a good one, but one that doesn't leak or isn't too loose or, or, or... That pretty much negates that option for me. The next option is a local builder who has great product. I contacted a buddy of mine to recall the name of the guy we dealt with at this establishment and he said the guy wasn't building any more and the last couple he got were literally thrown out they were so bad. So much for an easy option for me. I did some looking and settled on a box from PSC. 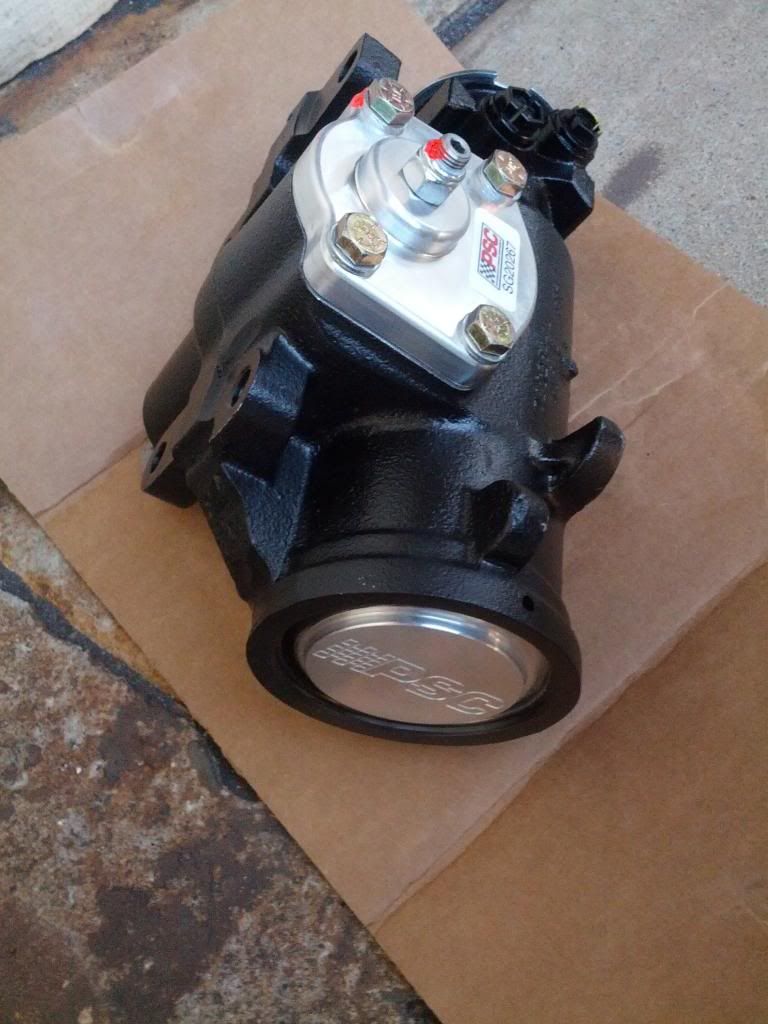 Now before everyone jumps on, I have heard all about their bad reputation AFTER I bought this one. Had I heard it before, I probably would have gone with a different vendor, but I had no time to worry about it now. They do some custom work inside the box, sleeve them if necessary, use a special torsion bar and use a billet end and top cap (which is hopefully crack-resistant). While I had the box out, I pulled the pressure fitting out of the back of the pump and enlarged the hole in the fitting a few thousandths and also removed a shim under the pressure fitting nut to hopefully get rid of the split second of no assist when slow wheeling and sawing at the wheel. Nothing that I would deal with normally, but being the system is apart, now is the time. While I was at it I decided to change out the steering stabilizer for a little stouter one. I'm not aware of any issues with the original one, but it has been on there for over 40K and I salvaged it off of the truck that originally donated its guts to this truck, so its age is unknown. I forget what brand I got, but it is shiny white and bigger in diameter: 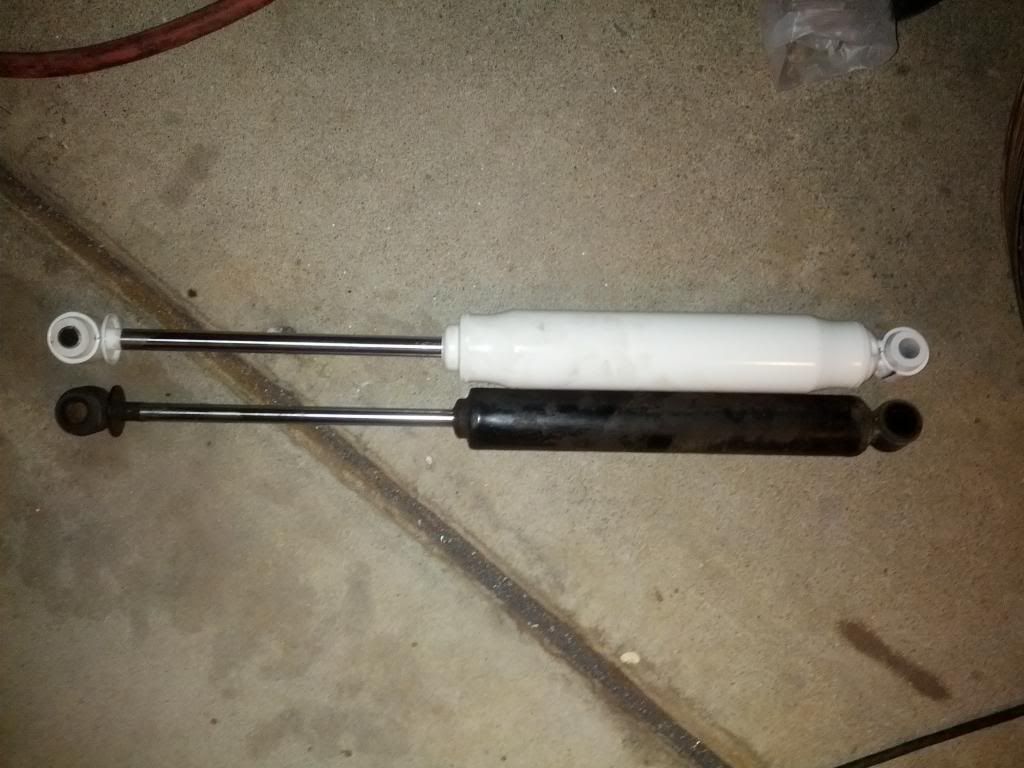 I have had a dropped pitman arm on this truck since I built it. I have had no obvious issues with the part, but with a cracked aluminum cover on the box, I figured that would be a good thing to get rid of. I researched steering blocks for the Dana 60 and found that most look like rough-cast dog crap. The one that Off Road Design sells is an exception to that finding though. It is a fully machined piece that is .250" shorter than the rest. It doesn't need a kingpin spacer like some because the cap is machined in such a way that it mimics the original cap height. They also sell an ARP stud kit to fit the block that uses tapered sleeves and steel lock nuts. From what I have seen available, this is the best piece available. So I bought it. I grabbed a stock pitman arm out of inventory here and installed it all in the truck. I ended up losing two degrees of drag link angle in the deal. 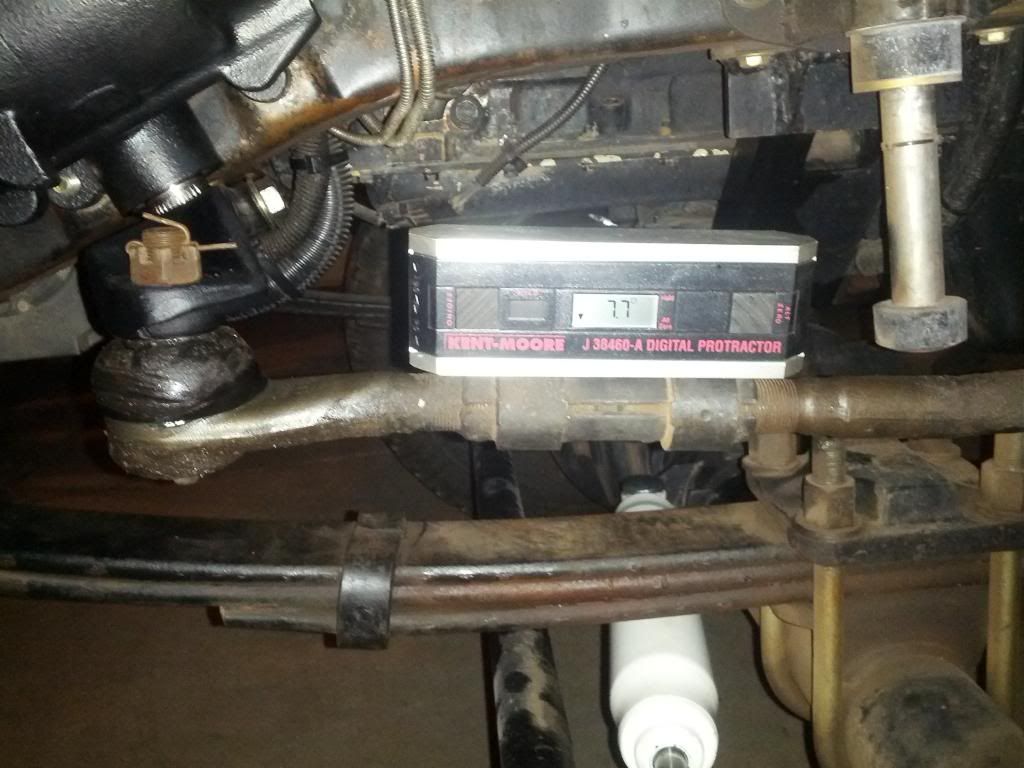 I drilled out the broken rivet and replaced it with a 7/16-20 grade 8 bolt and steel lock nut. I wanted to replace them all, but I am really running out of time at this point. I cleaned around the area where the bracket meets the frame and ran a couple beads along the joints about 3/4" long. I figured it would help the retention and also show me if anything is flexing or moving around. The last thing on my list is to flush the cooling system again. I was still running green coolant and there was some trace amounts of oil in the reservoir. I pulled the radiator and flushed it clean. I flushed the block and got it clean too. I have a fairly complex heater system now and I didn't want to flush it with the hose and leave a bunch of hose water in the system to contaminated the new high-dollar coolant and or create a mineral problem down the road. Hmm, how to flush a heater system and not leave hose water in it?? I came up with a couple ideas and even bought some parts to assemble and make a flush apparatus, but then I looked at one of my Reliance water jugs and checked the large cap that the spout threads into. It is 3/4" pipe thread without the taper. Hmm, I can make this work. I put a fair bit of Teflon tape on the threads and put it together with a ball valve and heater fitting and came up with this: 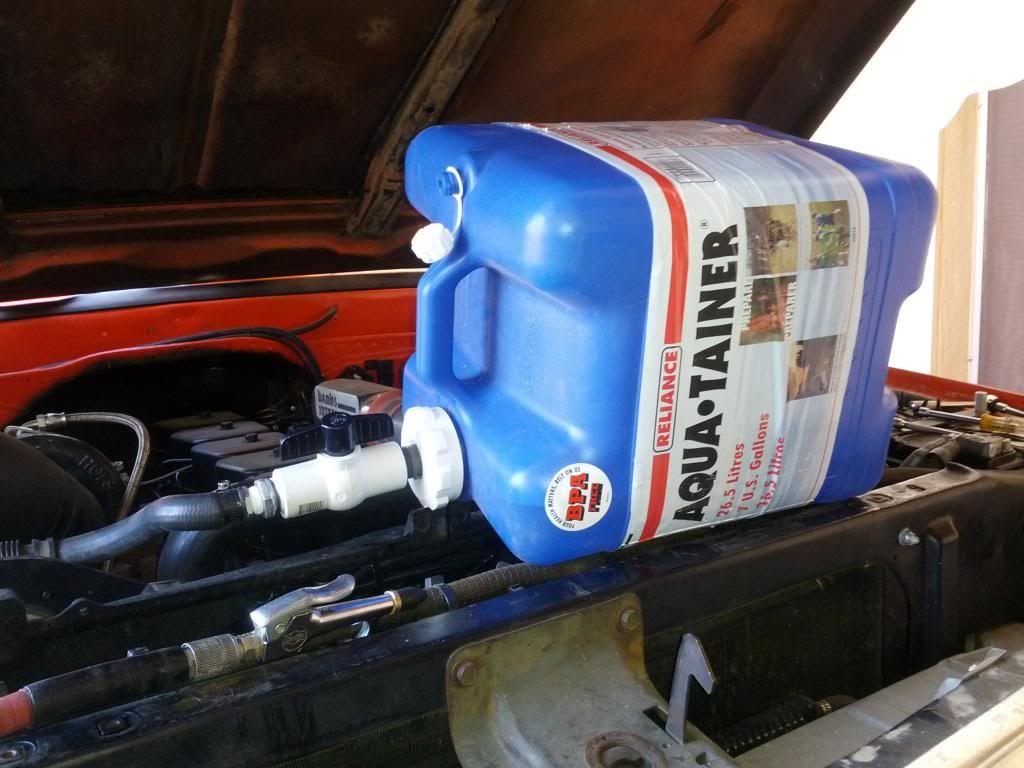 I opened the valve and it was working, but needed a little help. I put a regulator on my shop air hose and applied it to the vent hole on the container and it worked great!! When I got done all that was left in the system was some distilled water. I changed the coolant filter and installed the Rotella ELC in it and I'm ready to go--I think....
__________________
1972 K20 Suburban, 5.9L Cummins, Banks Power Pack, NV4500HD, NP205, H.A.D., D60/14FF ARB Link To Build: HERE. |
|
|

|
|
|
#25 |
|
Junk Yartist
Join Date: Jul 2009
Location: Greeley, CO
Posts: 2,203
|
Re: The Story Of A Cummins Suburban (Lots Of Pics)
more questions for the master. How do you like the 44" front springs wheeling with the cummins? Now that you have a gold plated steering gear are you sticking with push/pull steering until it needs to be replaced? (nothing against it) hold on... gotta go change a diaper....
__________________
-Jeremy YOU ONLY FAIL IF YOU STOP TRYING 70 Crew Cab Build Link 70 GMC Suburban 4X4 build thread 95 Yukon Daily Driver Rebuilding an NP205 |
|
|

|
 |
| Bookmarks |
|
|