
 |
|
|
#801 |
|
Rollin' Old Skool
Join Date: Jun 2007
Location: Hattiesburg, MS
Posts: 5,371
|
Re: Markeb01 Build Thread
Kinda looks like a black or dark gray primer on the drip rail. It's a pretty good looking ole 4x4 though, & maybe you'll run into him again sometime.
__________________
_____________________________________________ Phillip My Build threads: 1966 Chevy C-10 "Black Betty" shortbed, fleetside, BBW, 327 V8/ Powerglide (under construction) http://67-72chevytrucks.com/vboard/s...ighlight=betty 1997 Chevy Tahoe, 2dr/2wd, mild custom (Daily driver) http://67-72chevytrucks.com/vboard/s...d.php?t=601142 Pics: '66 C-10 https://flic.kr/s/aHsjHWD4h9 '97 Tahoe https://flic.kr/s/aHsjGZ7wKP '93 C-1500 https://flic.kr/s/aHskxdpdnQ '88 S-10 Blazer https://flic.kr/s/aHsjYGx4Md Previous Rides: 1993 Chevy S-10 ext. cab, 4.3L, 4/5 drop (Sold) 1993 Chevy C-1500 short/step Retro-Rod (Sold) 1988 S-10 Blazer 2dr/2wd mild custom (Sold) |
|
|

|
|
|
#802 |
|
Senior Enthusiast
Join Date: Feb 2007
Location: Spokane Valley, WA
Posts: 8,356
|
Re: Markeb01 Build Thread
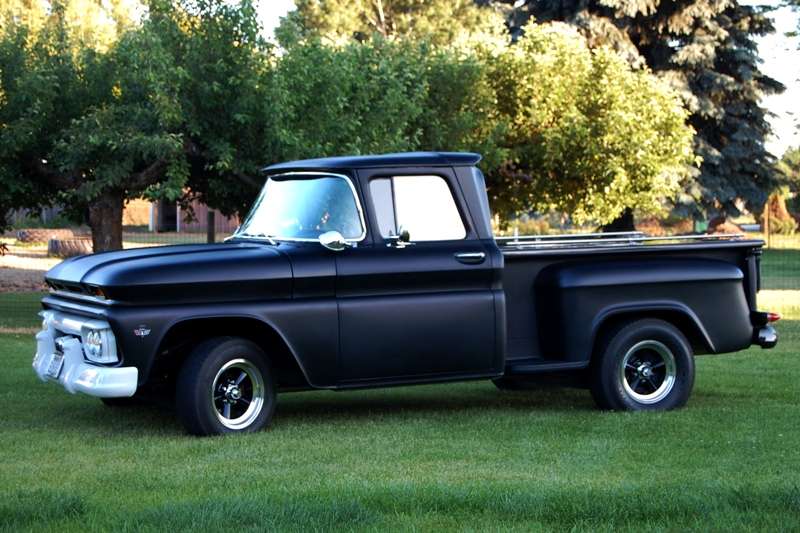
Finished painting and reassembling the doors this afternoon. The finish and color match arenít 100 percent perfect, but they came out much nicer than last time and good enough to make me happy. I like the position of the mirrors better as well. Now theyíre in line with the spotlights, and provide a much better view to the rear:
  Now I get to figure out why my high beam indicator light quit working! Itís always something.
__________________
My Build Thread: http://67-72chevytrucks.com/vboard/s...d.php?t=444502 |
|
|

|
|
|
#803 |
|
Registered User
Join Date: Apr 2012
Location: Searcy, AR
Posts: 4,203
|
Re: Markeb01 Build Thread
Amazing! That is why I enjoy checking in on u
Posted via Mobile Device
__________________
DON Proverbs 27:17  US Air Force Retarded errr Retired My '65 Stepper Build:http://67-72chevytrucks.com/vboard/s...d.php?t=533920 My '60 Rusty Patina Build:http://67-72chevytrucks.com/vboard/s...66#post7402266 My '72 http://67-72chevytrucks.com/vboard/s...59#post7204359 SOLD |
|
|

|
|
|
#804 |
|
Registered User
Join Date: Nov 2011
Location: fayetteville nc
Posts: 10,338
|
Re: Markeb01 Build Thread
Hey Mark, are the bed rails the elusive factory originals?
__________________
1963 Short bed step side SBW 427 big block and borg warner T-16 HD 3 speed manual http://67-72chevytrucks.com/vboard/s...d.php?t=519869 1963 Short bed fleetside BBW 348 1st gen big block w/Powerglide http://67-72chevytrucks.com/vboard/s...d.php?t=619024 1964 Short bed trailer |
|
|

|
|
|
#805 |
|
Senior Enthusiast
Join Date: Feb 2007
Location: Spokane Valley, WA
Posts: 8,356
|
Re: Markeb01 Build Thread
No Ė original rails are way outside my budget and almost impossible to find in usable condition. Mine are Bullet Style Mini-Tube rails made by Perrycraft. Here are some reference photos showing their orientation to the stake pockets when I had them mounted on the bed:
   These are very nicely made. The brackets are solid stainless steel and the kit comes with stainless screws. The threads are dipped in a urethane type goop that seals the holes upon installation. The tubes are heavy wall and the bullets are permanently pressed in place and both pieces are also made of polished stainless. There wonít be any rusting and peeling finish on these like the original OEM models did. They are exactly 72Ē long from tip to tip, and you can position the brackets anywhere along the length of the tube. The tube is held in position via a set screw on one side of each bracket. The rails and brackets are solid as a rock. I basically bought them for cosmetics, but they did get used frequently during the summer months when we hauled grass clipping and debris to the dumps. They remain looking as new without a mark on them. Here's where I bought mine: http://www.customautotrim.com/truck-bed-rails/ I subsequently reinstalled my Gaylord bed cover and mounted the rails on top. Now they really are for cosmetics only. The sheet metal screws were replaced with machine screws coming up from the bottom, and capped with chromed acorn nuts. I like it even better this way, having that extra bit of detail:  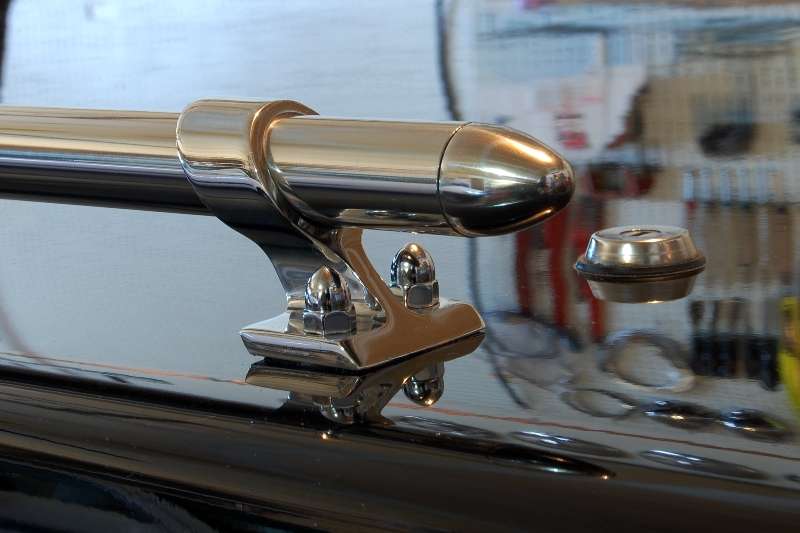 At first I was a little disappointed they weren't taller like the originals, but over time I've come to prefer the lower profile.
__________________
My Build Thread: http://67-72chevytrucks.com/vboard/s...d.php?t=444502 |
|
|

|
|
|
#806 | |
|
Senior Enthusiast
Join Date: Feb 2007
Location: Spokane Valley, WA
Posts: 8,356
|
Re: Markeb01 Build Thread
Quote:
I completed a few minor tasks today. After some debugging it was determined the 100,000 hour LED high beam indicator light simply burned out. As a generous estimate it may have provided an hour or two of illumination over the last several years. I don’t drive that much at night and the high beams are seldom needed. I guess the longevity promises are to be taken with a grain of salt. In any event I now have a new indicator light in place that works fine. Next I addressed a rattle that’s been annoying me since the new engine went in. Because I have both an electric speedometer and cruise control, the hall effect drive units connect to each other off the speedo drive of the transmission. If they aren’t tethered correctly a rattle occurs with the transmission crossmember. When the transmission went back in I just didn’t get around to securing the parts against vibration. They worked fine but were very annoying. Now they aren't! While I was under there I noticed a minor leak and realized the pan and valve cover fasteners all needed to be retorqued. So that’s done too. The only thing left on the list from the engine change is to recheck the ignition timing. That an trying to convince my wife that electric exhaust cutouts are really a better investment than a dual quad supercharged big block. So far I don’t think she’s grasping the importance of $500 cutouts! And she's just not buying the big block argument at all. 
__________________
My Build Thread: http://67-72chevytrucks.com/vboard/s...d.php?t=444502 |
|
|
|

|
|
|
#807 |
|
Senior Enthusiast
Join Date: Feb 2007
Location: Spokane Valley, WA
Posts: 8,356
|
Re: Markeb01 Build Thread
I completed my final new engine adjustment this morning. This is the first time I’ve ever owned a degreed balancer, so I had no expectation a stock timing tag wouldn’t work. Once assembled, it was immediately apparent the standard aftermarket bolt on timing tag is too big and too long and covers up all the damper markings! Watching a couple of Youtube videos I realized there are timing “pointers” on the market, mostly in the $30-$40 range.
So I did the next best thing. After removing the power steering pump (again) I pulled the tag, marked it up, and cut away everything that didn’t look like a zero pointer! Here is what was cut away with a Dremel tool: 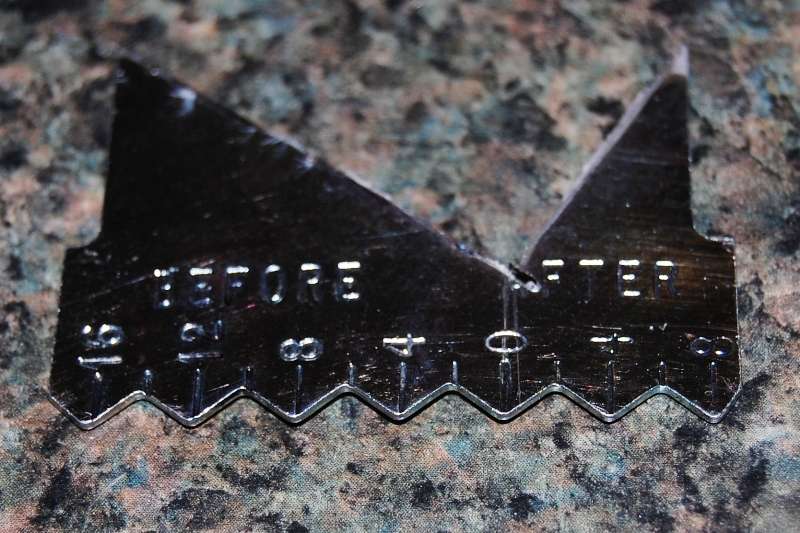 What was left got reinstalled as a zero pointer. I didn’t think to take a picture of it before mounting it back on the engine: 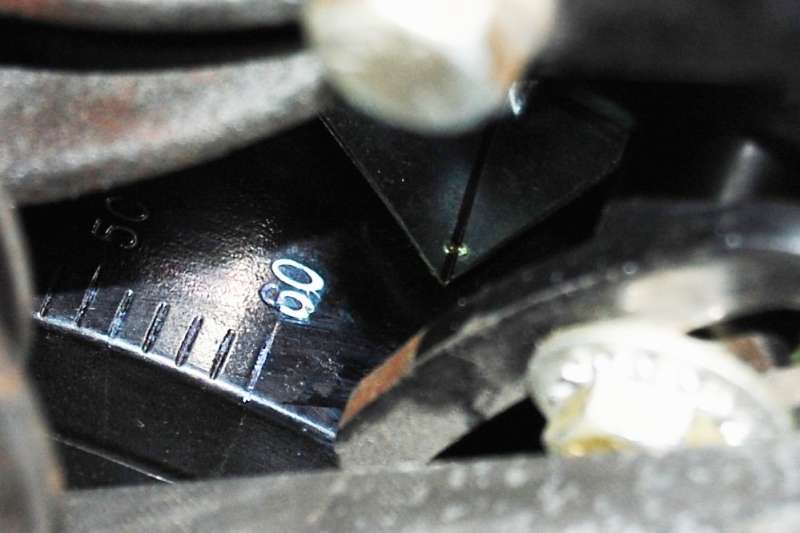 I knew I had too much advance in the engine, but I couldn’t tell how much. With the new pointer in place it was obvious I had almost 20 degrees initial and 50+ total. After spending a few minutes repositioning the distributor, the initial is now set at 10 degrees and total comes in a 34 degrees. What a difference in how it runs and sounds. A nice hour long investment in making the engine run better, and being able to repeat the settings in the future. Of course now the idle is even rougher than before, and idle vacuum dropped from 12 to 10 inches at 650 rpm. Man this is getting to be fun!! This shows nothing more important than the new Moon sticker on the heater block off: 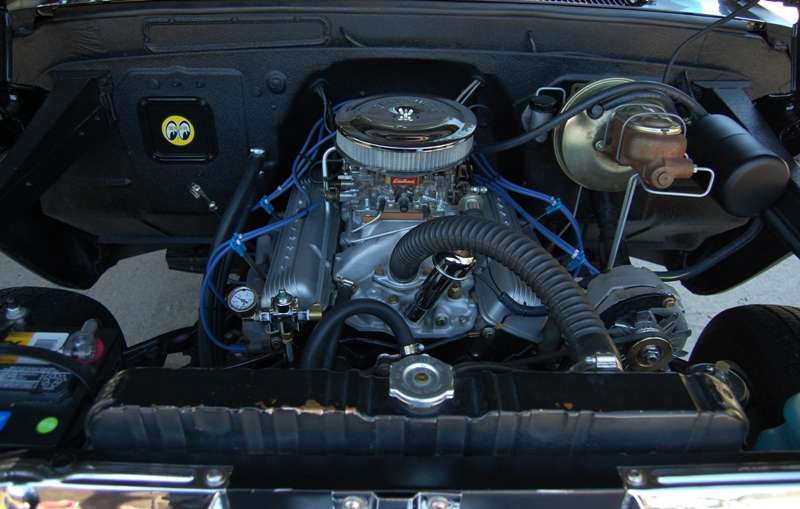 I took the truck out for some “acceleration testing” with the video camera, but today is Saturday, the day after most of the schools closed/graduated for the season. Meaning – there are cops everywhere!  Not a good time to be checking performance improvements. When I pulled up to the corning in my earliest Youtube video, two police vehicles already had somebody pulled over right at the turn! When we went out for gas last night there were at least 10 police cars cruising, parked, and hiding on the trip. So I think any new video adventures will have to wait a bit. Not a good time to be checking performance improvements. When I pulled up to the corning in my earliest Youtube video, two police vehicles already had somebody pulled over right at the turn! When we went out for gas last night there were at least 10 police cars cruising, parked, and hiding on the trip. So I think any new video adventures will have to wait a bit.
__________________
My Build Thread: http://67-72chevytrucks.com/vboard/s...d.php?t=444502 |
|
|

|
|
|
#808 |
|
Registered User
Join Date: Apr 2011
Location: .
Posts: 3,104
|
Re: Markeb01 Build Thread
 No new video but if you watch Cops we'all see you gettin' cuffed, stuffed and the truck towed. No new video but if you watch Cops we'all see you gettin' cuffed, stuffed and the truck towed. Glad the new motor is bringing enjoyment and not frustration. Top Notch as always. |
|
|

|
|
|
#809 | |
|
Rollin' Old Skool
Join Date: Jun 2007
Location: Hattiesburg, MS
Posts: 5,371
|
Re: Markeb01 Build Thread
Quote:

__________________
_____________________________________________ Phillip My Build threads: 1966 Chevy C-10 "Black Betty" shortbed, fleetside, BBW, 327 V8/ Powerglide (under construction) http://67-72chevytrucks.com/vboard/s...ighlight=betty 1997 Chevy Tahoe, 2dr/2wd, mild custom (Daily driver) http://67-72chevytrucks.com/vboard/s...d.php?t=601142 Pics: '66 C-10 https://flic.kr/s/aHsjHWD4h9 '97 Tahoe https://flic.kr/s/aHsjGZ7wKP '93 C-1500 https://flic.kr/s/aHskxdpdnQ '88 S-10 Blazer https://flic.kr/s/aHsjYGx4Md Previous Rides: 1993 Chevy S-10 ext. cab, 4.3L, 4/5 drop (Sold) 1993 Chevy C-1500 short/step Retro-Rod (Sold) 1988 S-10 Blazer 2dr/2wd mild custom (Sold) |
|
|
|

|
|
|
#810 |
|
Senior Member
 Join Date: Oct 2009
Location: Fayetteville, Arkansas
Posts: 1,923
|
Re: Markeb01 Build Thread
definitely my favorite hotrod truck on the board. extra cool mark.
|
|
|

|
|
|
#811 |
|
Senior Enthusiast
Join Date: Feb 2007
Location: Spokane Valley, WA
Posts: 8,356
|
Re: Markeb01 Build Thread
Thanks Clem. Please advise if my PM response did not come through. Regards, Mark.
__________________
My Build Thread: http://67-72chevytrucks.com/vboard/s...d.php?t=444502 |
|
|

|
|
|
#812 |
|
But Found Her 25yrs Later!
Join Date: Oct 2010
Location: Oregon City, Oregon
Posts: 10,530
|
Re: Markeb01 Build Thread
I think what ticks me off the most about you and your truck is the ridiculous attention to detail. :-p
 . Posted via Mobile Device Posted via Mobile Device
__________________
I lost my 65 - Found it 25 years later: http://67-72chevytrucks.com/vboard/s...d.php?t=426650 66 C20 Service Truck: http://67-72chevytrucks.com/vboard/s...d.php?t=428035 |
|
|

|
|
|
#813 |
|
Registered User
Join Date: Nov 2011
Location: fayetteville nc
Posts: 10,338
|
Re: Markeb01 Build Thread
thanks for the pics and info on the bed rails. i think they came out great.
Posted via Mobile Device
__________________
1963 Short bed step side SBW 427 big block and borg warner T-16 HD 3 speed manual http://67-72chevytrucks.com/vboard/s...d.php?t=519869 1963 Short bed fleetside BBW 348 1st gen big block w/Powerglide http://67-72chevytrucks.com/vboard/s...d.php?t=619024 1964 Short bed trailer |
|
|

|
|
|
#814 | ||||
|
Senior Enthusiast
Join Date: Feb 2007
Location: Spokane Valley, WA
Posts: 8,356
|
Re: Markeb01 Build Thread
Quote:
Quote:
So one morning near the end of my senior year I was late for school and failed to pull the plastic wrapped window frames out of the quarter windows. I made it the entire 5 miles to school without incident. Then as I turned the last corner toward the front of the school, there were two CHP motorcycle cops sitting next to each other. Eye contact was made and I said ďOh Sh*tĒ! I looked straight ahead and did my best to drive exactly 25 miles per hour (having no speedometer). For dramatic effect they let me make it all the way to the top of the hill about a half mile away before they flipped on their sirens and initiated the ďpursuitĒ! I had already pulled over by the time they arrived, and was standing politely next to the door. They got off their bikes and walked over menacingly but smiling, and just shook their heads. They looked inside and saw the ignition switch on the floor and nothing in the dash shell. All the door panels and rear seat were missing. They inquired into the situation, and I explained I was going to paint the car that afternoon, but was late for school and didnít have time to find another way. They kept me there for about 15 minutes, and the only criticism I received was not removing the plastic from the side windows as it impaired vision! They did look over the entire car and were impressed with the quality of the body work and the amount of detailed prep work displayed. That was it. They did tell me not to drive it again until it was put back together. I thanked them and got myself to school straight away. For the rest of the day, I must have been approached by half the kids in school wanting to know what I had done the cops needed to chase me down with their sirens! Some days it pays to be polite. Quote:
 Iím afraid itís in my blood. And speaking of detail, I was reading last night about how with my cam the vacuum advance should be hooked up to full manifold vacuum. So first thing this morning I pulled the two hard lines off the carb, and made one new piece connecting the carb to a T that now feeds both the distributor and the vacuum gauge. Iím afraid itís in my blood. And speaking of detail, I was reading last night about how with my cam the vacuum advance should be hooked up to full manifold vacuum. So first thing this morning I pulled the two hard lines off the carb, and made one new piece connecting the carb to a T that now feeds both the distributor and the vacuum gauge. Quote:
Okay so there are a couple of goofs in them, but hereís my first attempt at a couple of walk around videos. The 70-72 pedal Iím talking about is the gas pedal not the brake pedal, and itís a Moon sticker on the firewall, not a gauge! The first one is mostly inside the cab and the second is only the outside. I left out a lot of details but I figure that can get filled in later: Inside video: http://www.youtube.com/watch?v=I39qc...ature=youtu.be Outside video: http://www.youtube.com/watch?v=NMx9o...ature=youtu.be
__________________
My Build Thread: http://67-72chevytrucks.com/vboard/s...d.php?t=444502 |
||||
|
|

|
|
|
#815 |
|
Registered User
Join Date: Apr 2011
Location: .
Posts: 3,104
|
Re: Markeb01 Build Thread
Sweet vids.
Like the rear glass chrome rear window bead. Glad you got it in and it is Sharp! Seats are cool too. Well, the whole dam truck is awesome. Im sold on getting a gear drive.  Gear Drive now added to Bompensteins list cause of you. |
|
|

|
|
|
#816 |
|
Registered User
Join Date: Apr 2012
Location: Searcy, AR
Posts: 4,203
|
Re: Markeb01 Build Thread
Awesome Videos Mark!!!
One of the first builds I started watching once I found this board, and will continue to watch...  Amazing attention to detail, and the chrome rear window trim...  Overall...  Happy Father's Day!!! 
__________________
DON Proverbs 27:17  US Air Force Retarded errr Retired My '65 Stepper Build:http://67-72chevytrucks.com/vboard/s...d.php?t=533920 My '60 Rusty Patina Build:http://67-72chevytrucks.com/vboard/s...66#post7402266 My '72 http://67-72chevytrucks.com/vboard/s...59#post7204359 SOLD |
|
|

|
|
|
#817 |
|
Rollin' Old Skool
Join Date: Jun 2007
Location: Hattiesburg, MS
Posts: 5,371
|
Re: Markeb01 Build Thread
Cool vids...."Every little thing she does is magic"....just change the she to he, & it's very fitting for your build IMO...you have all these neat little doodads & tweaks that make your truck unique; and they're all so strategically placed with attention to detail that it just plain rocks!

__________________
_____________________________________________ Phillip My Build threads: 1966 Chevy C-10 "Black Betty" shortbed, fleetside, BBW, 327 V8/ Powerglide (under construction) http://67-72chevytrucks.com/vboard/s...ighlight=betty 1997 Chevy Tahoe, 2dr/2wd, mild custom (Daily driver) http://67-72chevytrucks.com/vboard/s...d.php?t=601142 Pics: '66 C-10 https://flic.kr/s/aHsjHWD4h9 '97 Tahoe https://flic.kr/s/aHsjGZ7wKP '93 C-1500 https://flic.kr/s/aHskxdpdnQ '88 S-10 Blazer https://flic.kr/s/aHsjYGx4Md Previous Rides: 1993 Chevy S-10 ext. cab, 4.3L, 4/5 drop (Sold) 1993 Chevy C-1500 short/step Retro-Rod (Sold) 1988 S-10 Blazer 2dr/2wd mild custom (Sold) |
|
|

|
|
|
#818 |
|
Senior Enthusiast
Join Date: Feb 2007
Location: Spokane Valley, WA
Posts: 8,356
|
Re: Markeb01 Build Thread
Thanks guys! Well I've gone and jumped in again. This morning I spent a while under the truck figuring out where I could install electric cutouts. Finally figured out an arrangement that will fit and work, so I ordered a pair of Doug's units from Amazon at a $50 discount over Summit or Jegs.
 They will be mounted outboard of the frame and have short tail pipes that exit in front of the rear wheels right under the edge of the steps. I'm not too worried about exhaust build up on the rear wheels as the cutouts will mostly be used at rod runs and car shows during slow speed driving. If it comes out as I envision, the modifications should also add a nice feature to the exhaust system which was beautifully crafted by my local muffler experts.
__________________
My Build Thread: http://67-72chevytrucks.com/vboard/s...d.php?t=444502 |
|
|

|
|
|
#819 |
|
Registered User
Join Date: Nov 2011
Location: fayetteville nc
Posts: 10,338
|
Re: Markeb01 Build Thread
very cool, cant wait to see the install on this. Ever thought about exhaust igniters?
__________________
1963 Short bed step side SBW 427 big block and borg warner T-16 HD 3 speed manual http://67-72chevytrucks.com/vboard/s...d.php?t=519869 1963 Short bed fleetside BBW 348 1st gen big block w/Powerglide http://67-72chevytrucks.com/vboard/s...d.php?t=619024 1964 Short bed trailer |
|
|

|
|
|
#820 | |
|
Senior Enthusiast
Join Date: Feb 2007
Location: Spokane Valley, WA
Posts: 8,356
|
Re: Markeb01 Build Thread
Quote:

__________________
My Build Thread: http://67-72chevytrucks.com/vboard/s...d.php?t=444502 |
|
|
|

|
|
|
#821 |
|
Registered User
Join Date: Nov 2011
Location: fayetteville nc
Posts: 10,338
|
Re: Markeb01 Build Thread
Yeah, that wouldn't go over to well.
__________________
1963 Short bed step side SBW 427 big block and borg warner T-16 HD 3 speed manual http://67-72chevytrucks.com/vboard/s...d.php?t=519869 1963 Short bed fleetside BBW 348 1st gen big block w/Powerglide http://67-72chevytrucks.com/vboard/s...d.php?t=619024 1964 Short bed trailer |
|
|

|
|
|
#822 |
|
Senior Enthusiast
Join Date: Feb 2007
Location: Spokane Valley, WA
Posts: 8,356
|
Re: Markeb01 Build Thread
While impatiently waiting for my cutouts to arrive, I invested a bunch of good will with my squeeze helping her lay border blocks – and – using my new engine crane again moved a 450 pound solid granite bolder to the back yard. If you want to acquire a cherry picker and your wife needs some convincing how useful these things can be, maybe this will prove helpful:
 I retrieved the rock from a pile of debris when they tore up our yard a couple of years ago to install a sewer system. Long story short – I saved the rock. Downside being I never could move it more than about 8 feet. So after finding success removing the hood and bedcover from my truck with the crane, today I got clever and used it to lift the rock. I pulled the legs to remove weight and pulled/dragged it across the lawn. After reassembly, I fabricated a harness of engine chains to contain the boulder and used the cherry picker to place it in the bed of a truck for transport. Everything worked perfectly and nobody got squashed! My wife is now thrilled with its new location. I just love this new tool. I may sell the engine stand some day, but I’ll never let the hoist go! It’s just too handy. And speaking of exhaust cutouts, I’ve also learned a valuable lesson about saving money. Specifically, I spent $50 less buying the Doug’s cutouts through Amazon.com rather than Summit or Jeg’s. The lesson? Had I spent the extra money the parts would have been here the middle of last week instead of the middle of this week (maybe). Amazon has decided to ship with Ontrac, a company with a horrible reputation and a poor delivery history. They should be mandated to change the name of the company from ONtrac to NOtrac, because they don’t provide any tracking until after the shipment has been delivered. Okay that’s my rant for the day. I’m just very anxious to get them installed, and I find sitting around waiting for no updates very frustrating.
__________________
My Build Thread: http://67-72chevytrucks.com/vboard/s...d.php?t=444502 |
|
|

|
|
|
#823 |
|
Senior Enthusiast
Join Date: Feb 2007
Location: Spokane Valley, WA
Posts: 8,356
|
Re: Markeb01 Build Thread
The owner of Discount Muffler in Spokane (corner of Sprague and Argonne) spent a little over an hour and a half this morning creating more of his exhaust art. He custom fabricated a pair conventional cutouts welded into the exhaust system, to which the Dougís electric cutouts were bolted. He also suggested I pick up a pair of copper exhaust flange gaskets as they donít leak or burn out, and are reusable. Per his suggestion I picked them up last night. He was concerned about the weight of the cutouts (about 5-6 lbs each), so he doubly reinforced the welds and also added a support brace under each side.
The results are incredible. If I wanted to go somewhere and really look old school, I could just remove the electric cutouts and cap off the sneakers. But thatís not likely to happen as the electrics are just too much fun. It took me another 5 hours to route the wires into the cab so they were nearly invisible. Of course the wife immediately wanted to go for a ride. All I can say is these things are a blast! The truck doesnít have that ďworn out muffler tractor soundĒ at all. At idle it sounds plain nasty. At speed, it reminds me of a 1960ís stock car racer, whether up or down on the pedal. Sadly none of our video today turned out well enough to post on Youtube, so Iíll try again tomorrow. And the cutouts themselves are as nice as advertised. It only takes a bit over 1 second to go from full closed to full open. And the same speed going from open to closed. Hereís how they look from under the hood: 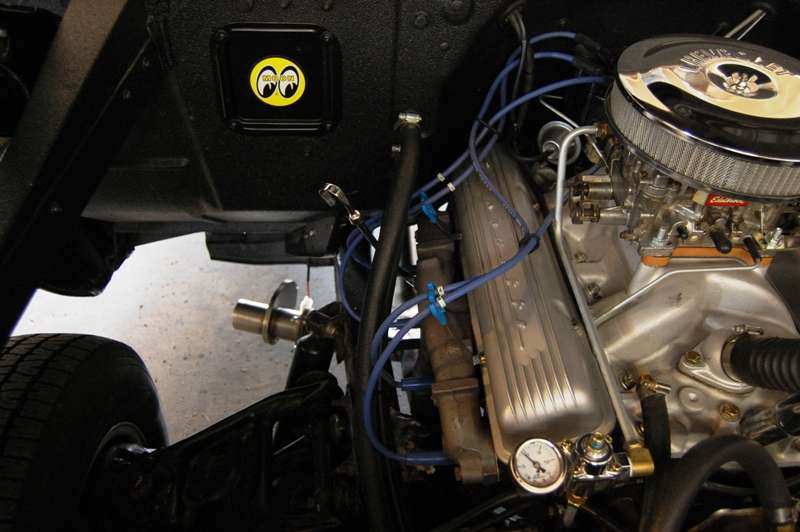 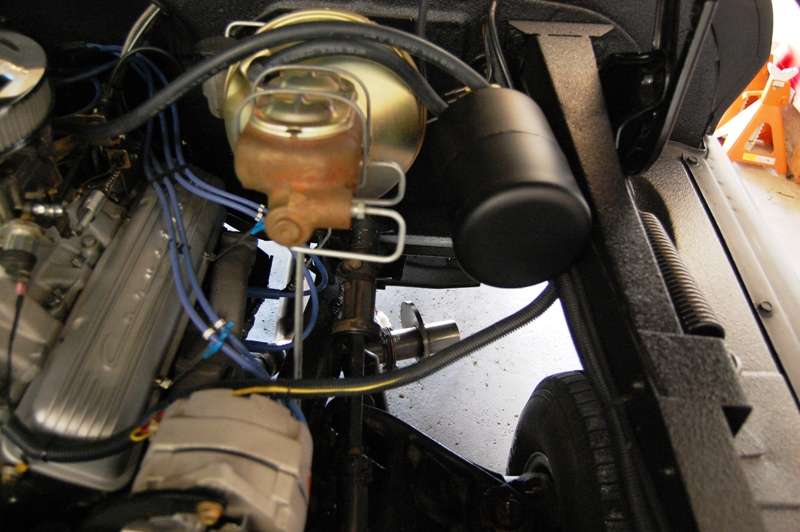 And they are reasonably well hidden. They are only visible from limited viewing angles directly to the side. There is clearance all around them, and the lowest parts are a couple of inches above the bottom of the lower control arms, so there is plenty of clearance even over speed bumps: 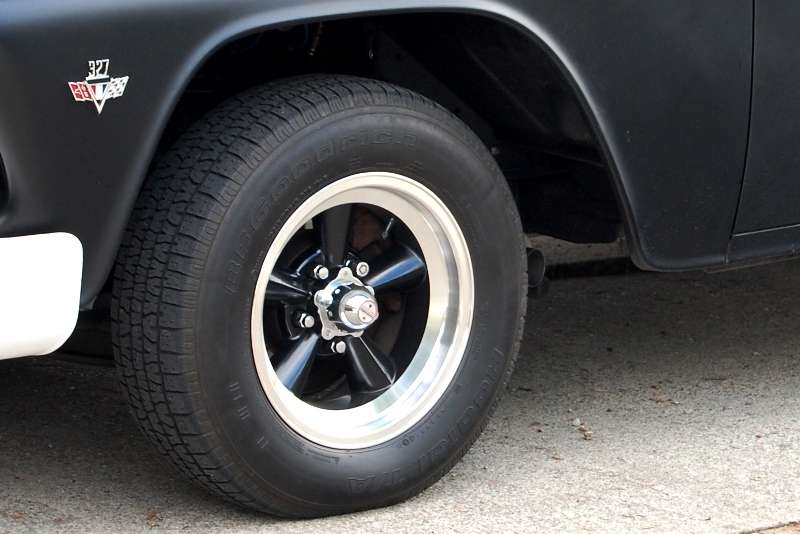 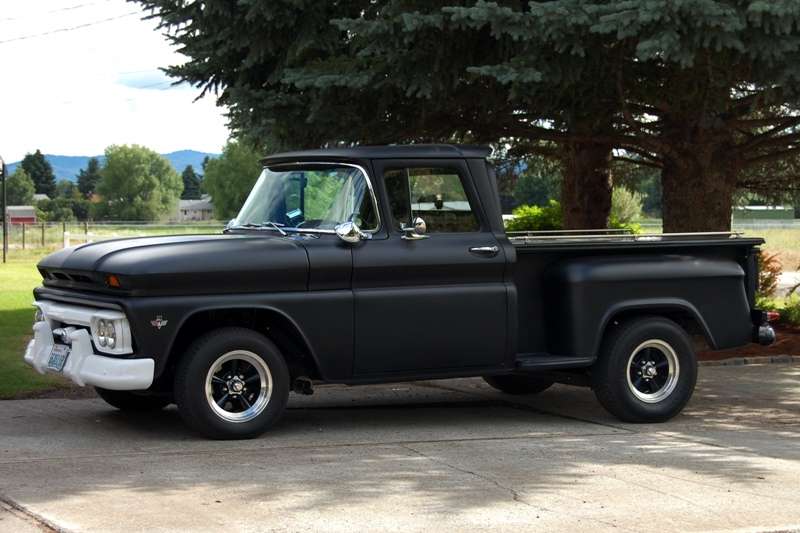 Iíll try and have some video up tomorrow.
__________________
My Build Thread: http://67-72chevytrucks.com/vboard/s...d.php?t=444502 |
|
|

|
|
|
#824 |
|
Senior Enthusiast
Join Date: Feb 2007
Location: Spokane Valley, WA
Posts: 8,356
|
Re: Markeb01 Build Thread
Iíve been experiencing some infrequent and random surging/stalling at speeds over 60 mph, almost like the engine was starving for fuel. Since everything in the fuel system is new except the filter, I figured that was the likely culprit. I have a canister style that is original to the truck:
 Itís mounted on the passenger side frame rail just below the seat. I changed it once when I installed the Rock Valley fuel tank at the rear of the frame back in 1998, so the filter served for 15 years. Iíve always been reluctant to change it for fear of dealing with a tank full of gas spewing out while the element is being replaced. I neednít have worried. With roughly ľ tank of gas in the tank, I jacked the front of the truck up as far as I could get it on the sloped driveway raising the filter above level of the gas tank. I unscrewed the filter can and only a few ounces of gas dribbled out. The filter was replaced and reinstalled in a minute or two. Next time I wonít feel the need to wait so long:  I dissected the old filter removing the ends and splitting the perforated shroud around the paper element. The folded material was stretched out flat to reveal a reasonably substantial amount of debris in the bottom of the pleats. Thankfully a 20 mile test drive on the new filter showed no signs of surging! For anyone else that may find this type of filter on your original truck, the part number for the AC filter assembly is GF-62-C. The part number for the Wix filter cartridge is 33271. I picked one up at OíReillyís for less than $4.00. Napa previously carried the same cartridge as part number 3271, but no longer list it as available.
__________________
My Build Thread: http://67-72chevytrucks.com/vboard/s...d.php?t=444502 |
|
|

|
|
|
#825 |
|
Senior Enthusiast
Join Date: Feb 2007
Location: Spokane Valley, WA
Posts: 8,356
|
Re: Markeb01 Build Thread
Also, here are the installation instructions for the Dougís electric exhaust cutouts for anyone that may have interest. To the best of my research these instructions are not available anywhere online including the Dougís website:

__________________
My Build Thread: http://67-72chevytrucks.com/vboard/s...d.php?t=444502 |
|
|

|
 |
| Bookmarks |
|
|